background image

EN-980e

10

31MY02

EN-980e

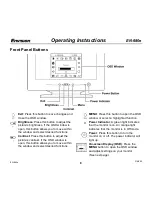
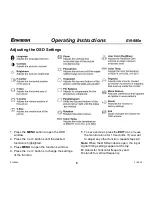
Operating Instructions

Plug & Play DDC1/2B Feature

This monitor is equipped with VESA DDC1/2B
capabilities according to the VESA DDC
STANDARD. It allows the monitor to inform the
host system of its identity and, depending on the
level of DDC used, communicate additional
information about its display capabilities. The
communication channel is defined in two levels,
DDC1 and DDC2B.

The DDC1 is a unidirectional data channel from the
display to the host that continuously transmits
EDID information. The DDC2B is a bidirectional
data channel based on the I²C protocol. The host
can request EDID information over the DDC2B.

Windows INF Driver File

Most computers will automatically configure your
monitor to work with your computer. For optimal
viewing of your monitor, download the Envision
monitor driver.

Follow these steps:
1. Go to www.ENVISIONmonitor.com

2. Click on SERVICES & SUPPORT to open the

drivers web page.

3. Follow the directions on the web page to

download and install the driver on your
computer.

Or go to www.ENVISIONmonitor.com/support/
drivers.asp to directly access the driver web page.

Summary of Contents for EN-980e

Page 1: ...EN 980e 1 31MY02 EN 980e EN 980e 19 inch Flat CRT Color Monitor User s Manual by Envision Peripherals Inc www ENVISIONmonitor com Before operating your monitor please read this manual thoroughly ...

Page 2: ...eceiving antenna 2 Increase the separation between the equipment and receiver 3 Connect the equipment into an outlet on a circuit different from that to which the receiver is connected 4 Consult the dealer or an experienced radio TV technician for help Notice 1 The changes or modifications not expressly approved by the party responsible for compliance could void the user s authority to operate the...

Page 3: ...your dealer or local power company Disconnect the power cord to stop the power supply to the monitor The monitor is equipped with a three pronged grounded plug a plug with a third grounding pin As a safety feature this plug will only fit into a grounded power outlet If your outlet does not accommodate the three wire plug have an electrician install the correct outlet or use an adapter to ground th...

Page 4: ...inet Always unplug the monitor before cleaning it Using the Right Power Cord The supplied power cord is a NEMA 5 15 style plug It is UL listed and CSA labeled for 125 volts AC If the monitor will be connected to your computer s power outlet use a minimum No 18 AWG type SJT or SVT three conductors cord with one end terminating with a male grounded plug rated 10A 250V CEE 22 The other end must termi...

Page 5: ...EN 980e 5 31MY02 EN 980e Before You Operate the Monitor Installing Removing the Base ...

Page 6: ... your monitor s power input socket 3 Plug the other end of the power cord into a grounded AC outlet or UL approved power strip Caution Make sure the power cord is the correct type that is required in your area This monitor has a universal power supply that allows operation in either 100 120V AC or 220 240V AC voltage areas no user adjustment is required If the AC outlet is not grounded with three ...

Page 7: ...t your monitor to a power supply using the power input socket on the back of your computer you must purchase a power cord with CEE 22 terminated connectors see illustration above Follow these steps 1 Connect the built in video cable into the 15 pin connector on the back of your computer and tighten the two screws 2 Connect the power cord into your monitor s power input socket 3 Plug the other end ...

Page 8: ...ust the picture s contrast If the OSD window is open this button allows you to move within the window and select desired functions MENU Press this button to open the OSD window or select a highlighted function Power Indicator A green light indicates that the monitor is on An orange light indicates that the monitor is in Off mode Power Press this button to turn the monitor on or off The power indic...

Page 9: ...ess MENU to open the function s window 4 Press the or buttons to change the settings of the function 5 To save and exit press the EXIT icon or leave the monitor alone for 10 seconds If you want to adjust any other function repeat steps 2 4 Note When the OSD window is open the input signal timing settings appear at the top H stands for horizontal frequency and V stands for vertical frequency ...

Page 10: ...splay to the host that continuously transmits EDID information The DDC2B is a bidirectional data channel based on the I C protocol The host can request EDID information over the DDC2B Windows INF Driver File Most computers will automatically configure your monitor to work with your computer For optimal viewing of your monitor download the Envision monitor driver Follow these steps 1 Go to www ENVI...

Page 11: ...y from the monitor They may be causing electrical interference Power LED is ON green or orange light is ON but there is no video or picture Press a key on the keyboard or wiggle the mouse to re activate the monitor Make sure the video cable is properly connected to the computer Inspect the video cable and make sure none of the pins are bent Make sure your computer is operating correctly by pressin...

Page 12: ...tion 1600 x 1200 pixels Plug Play VESA DDC1 2B TM Input Video Red Green Blue Analog Interface Separate Sync H V TTL H V Sync Positive Negative H Frequency 30 kHz 95 kHz V Frequency 50 Hz 160 Hz Input Video Signal Analog 0 7 Vpp 75 OHM Positive Power Source Universal AC 100 240 V 50 60 Hz Factory Preset Mode 8 User Programmable Mode 20 EPA ENERGY STAR Yes Power Consumption Maximum 130 Watts Regulat...

Page 13: ... 980e Appendix Specifications continued Optimal Viewing Mode 1280 x 1024 85 Hz Environmental Considerations Operating Temp 32 to 104 F 0 to 40 C ambient Operating Humidity 10 to 85 Signal Cable Attached Mini D sub 15 Male ...

Page 14: ...d Resolution in pixels Horizontal Frequency Vertical Frequency VGA 720 400 31 5 kHz 70 Hz 640 480 31 5 kHz 60 Hz VESA 85 640 480 43 3 kHz 85 Hz 800 600 53 7 kHz 85 Hz 1024 768 68 7 kHz 85 Hz 1280 960 85 9 kHz 85 Hz 1280 1024 91 1 kHz 85 Hz VESA 75 1600 1200 93 8 kHz 75 Hz ...

Page 15: ... Connector Pin Assignment Pin Number Description Pin Number Description 1 Red 9 NC 2 Green 10 Ground 3 Blue 11 Monitor Ground 4 Ground 12 DDC Serial Data 5 Ground 13 H Sync 6 R Ground 14 V Sync 7 G Ground 15 DDC Serial Clock 8 B Ground ...

Reviews: