6
Call 1300 369 273
www.enware.com.au
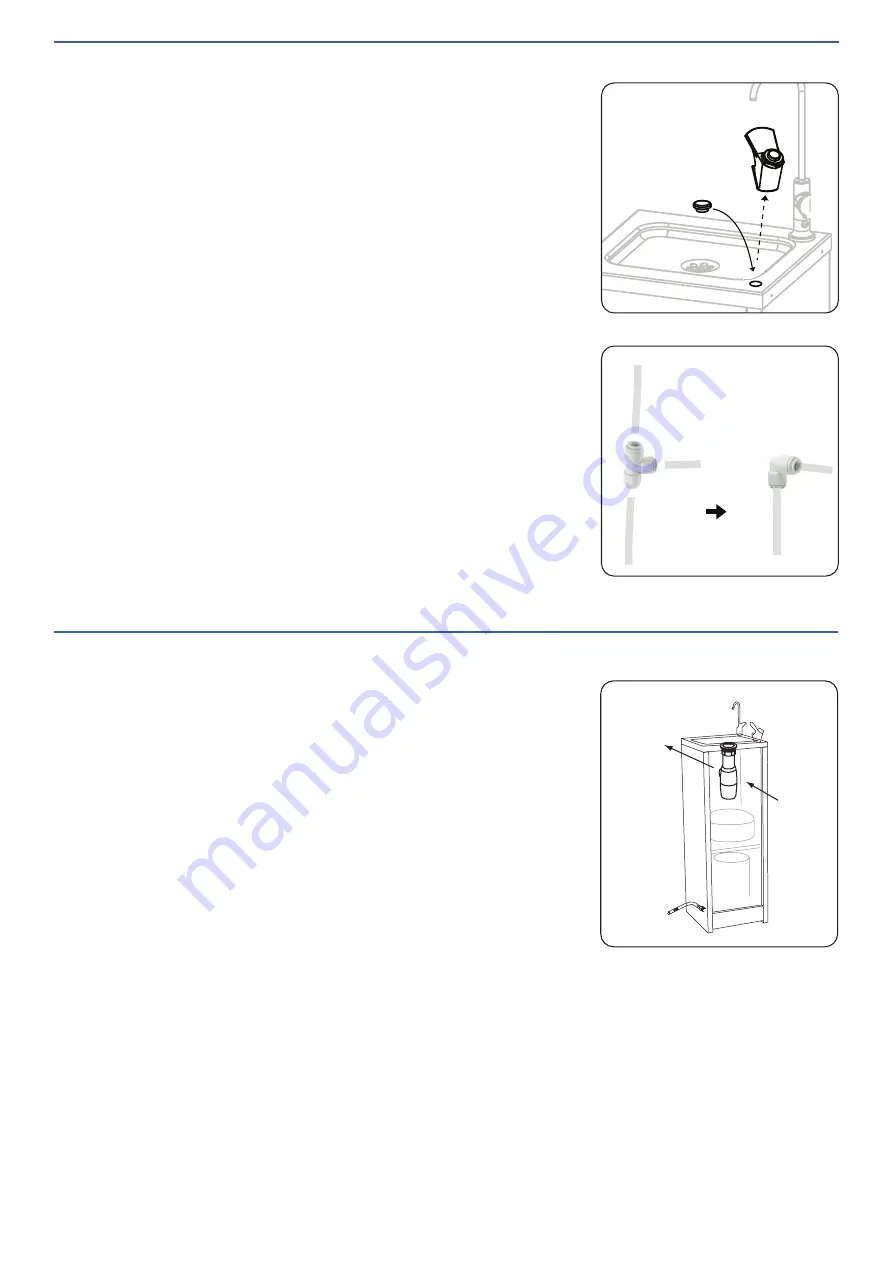
REMOVING BUBBLER (OPTIONAL)
The Water chiller is supplied with parts to allow the drinking
bubbler to be deleted or temporarily removed if not required.
1. Loosen and remove the back nut from under the bubbler.
2. Disconnect the 1/4'” tube by removing the small
compression fitting.
3. The bubbler can be removed and the rubber blanking
plug pushed into place. SEE IMAGE 4
4. Trace the 1/4” tube back to the tee-piece, then
disconnect all the tubes from the tee piece by holding the
collet at the joint in place and pulling the tube free from
the fitting. SEE IMAGE 3
5. Replace the tee-piece with elbow provided, connecting
the supply tube to the bottle filler. SEE IMAGE 5
IMAGE 4
IMAGE 5
CONNECT
TO 40MM
WASTE
BOTTLE
TRAP
WATER
INLET
IMAGE 6
WATER CHILLER INSTALLATION
1. Place water chiller in desired position and adjust levelling
feet so that the water chiller is stable and sitting level.
Note: This appliance must be placed in a horizontal
position. Ensure there is at least 50mm of gap between
the back of the unit and any wall for fan ventilation.
2. From inside of the chiller unit, connect the 40mm bottle
trap (supplied) to the waste connection located on the
underside of the top tray. Connect DN40 DWV PVC
drain pipe to the bottle trap. SEE IMAGE 6
3. (Optional) Install a carbon filter (DFS002F- sold
separately) inside the chiller unit.
Cut or disconnect the 1/4” tube that feeds the bottle filler
(&/or bubbler) and install the carbon filter in the line.
4. Install a non-return isolating valve or a stop tap (not
supplied) at the water supply as required. Flush all
foreign matter from the water supply line, then connect
water supply to the 1/2” BSP male inlet fitting located at
the rear of unit. SEE IMAGE 5


