36
ii)
Cableado del inversor monofásico
•
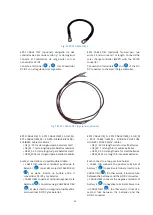
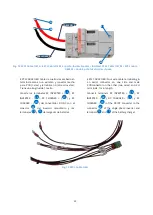
Utilizando el CABLE OEA, conectar el “BATTERY TO
IN"
y “BATTERY TO INVERTER
-"
del Convertidor DC/DC con los terminales
(MARRÓN) y
(AZUL) del inversor monofásico.
•
Utilizando el CABLE OEB, conectar el terminal “RC
INVERTER +"
y “RC INVERTER
-"
del
Convertidor DC/DC al terminal
del inversor
monofásico (solo necesario en caso de haber
adquirido el inversor TS-400)
. Y el terminal “RC
CHARGER +”
y “RC CHARGER –“
del
convertidor DC/DC a los terminales
y
del
cargador de baterías.
•
Conecte el terminal
del inversor monofásico
a la tierra de la instalación. Si dispone del
accesorio “Soporte de cargador y ondulador”,
asegúrese de que está hecha esta conexión.
iii)
Cableado del cargador de baterías
•
Utilizando el CABLE OEA conectar el “AC
C"
y el “AC CHARGER
-"
del
Convertidor DC/DC con los terminales
(ROJO) y
(NEGRO) del cargador de baterías.
•
Con el CABLE OEB conectar el “RC C"
y el “RC CHARGER
-"
del Convertidor
DC/DC con los terminales
(ROJO) y
(NEGRO) del cargador de baterías.
•
Conecte el terminal
del cargador de baterías
a la tierra de la instalación. Si dispone del
accesorio “Soporte de cargador y ondulador”,
asegúrese de que está hecha esta conexión.
NOTA
: Las baterías deben ser cargadas al 100% antes de la
primera instalación. El tiempo máximo de carga dependerá
del tamaño de las baterías, ya que ambas se cargan con una
intensidad de 8,2 A.
•
Baterías Small: t
máx
= 4,5 horas.
•
Baterías Medium: t
máx
= 8 horas.
•
Baterías Large: t
máx
= 13 horas
ii)
Connecting the AC inverter
•
Using CABLE OEA, connect “BATTERY TO
IN"
and “BATTERY TO INVERTER
-"
from the DC/DC converter to
(BROWN)
and
(BLUE) of the AC inverter.
•
Using CABLE OEB, connect the terminals “RC
IN"
and “RC INVERTER
-"
of
the DC/DC converter to terminal
of the AC
inverter (it is only required with the TS-400
model)
. Connect the terminals “RC C”
and “RC CHARGER –“
of the DC/DC
converter to the terminals
and
of the
battery charger.
•
Connect terminal
of the AC inverter to
installation ground. If you have purchased the
holding tray, make sure this connection is
made.
iii)
Connecting the battery charger
•
Using a CABLE OEA connect outputs “AC
C"
and “AC CHARGER
-"
of
the DC/DC converter with the terminals
(RED) and
(BLACK) of the battery charger.
•
Using the CABLE OEB connect “RC C"
and “RC CHARGER
-"
of the DC/DC
converter with terminals
(RED) and
(BLACK) of the battery charger.
•
Connect terminal
of the battery charger to
installation ground. If you have purchased the
tray, make sure this connection is made.
NOTE
: The batteries must be charged to 100% before the
first installation. The maximum time of charge will depend
on the size of the batteries, because both batteries are
charged with a current of 8,2 A.
•
Small batteries: t
max
= 4,5 hours.
•
Medium batteries: t
max
= 8 hours.
•
Large batteries: t
max
= 8 hours.
11
1
1
15
1
5
14
1
4
2D
2
D
2C
2
C
17
1
7
20
2
0
0
2
0
4D
4
D
4C
4
C
27
2
7
15
1
5
14
1
4
2D
D
2
D
D
2C
2
C
28
2B
2A
30
29
4B
4A
11
15
14
2D
2C
17
20
4D
4C
27
15
1
5
14
1
4
2D
D
2
D
D
2C
2
C
28
2B
2A
30
29
4B
4A
Summary of Contents for P2S Series
Page 1: ...1 Manual de instalaci n Installation guide P2S Series plug single phase P2S powered by...
Page 2: ...2 Versi n 4 6 June 2018 Epic Power Converters S L...
Page 9: ...9 Fig 3 Convertidor DC DC 5k5 5k5 DC DC Converter 0 1 2 3 4 6 10 9 7 8 5...
Page 55: ...55 Dimensiones EPCL 5K5 EPCL 5k5 dimensions...
Page 56: ...56 6 6 Dimensiones del cargador de bater as 6 6 Battery charger dimensions...
Page 58: ...58 Inversor TS 700 TS 700 Inverter...
Page 59: ...59 6 8 Dimensiones del Controlador de carga solar 6 8 Solar charge controller dimensions...
Page 61: ...61 6 9 2 Bastidor bater as Small 4x1 6 9 2 Small batteries rack 4x1...
Page 62: ...62 6 9 3 Bastidor bater as Medium 6 9 3 Medium batteries rack...

