background image

Epicenter, Inc. 

Page 8 

S

TANDARD

 1U 

I

NSTALLATION


Use the following procedure 
to install Centerpoint in the rack. 
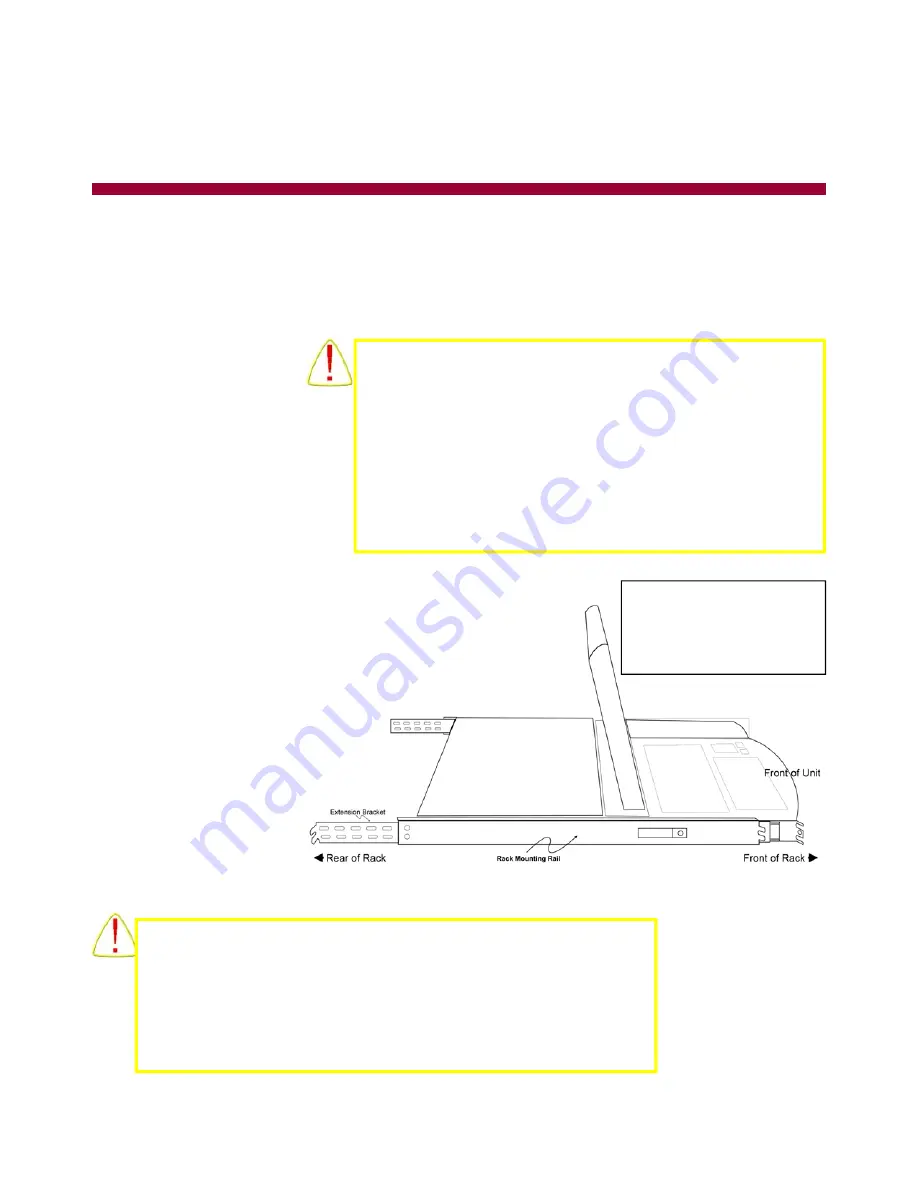
Centerpoint is shipped with the 
side-mount rails already installed 
on the unit. 
Insert a rack-mounting bracket into 
the rack at a level that will be com-
fortable for operating the keyboard, 
mouse and viewing the monitor.  
Align the screw holes at the front and back of the rack on both side rails. 
Use one screw to attach the mounting bracket to the front of the 
rack and two screws to attach the slide to the rear of the rack. 
Once the rack mounts are in place you can now place the Center-
point unit in the rack. 
Leave the upper screen panel closed as you guide the rack-mount 
slides into the rails mounted upon the 
rack.  Once the system is in place 
depress the retaining buttons and 
slide the unit completely into the 
rack.  Secure the outer slides in 
place with the included reten-
tion screws. 

R


ACK MOUNT INSTALLATION 

F

OR

 I

NSTALLATION


YOU


WILL


NEED


THE


FOLLOWING

• 

Centerpoint 16 or Centerpoint 8 Product


• 

Power cord


• 

Rails with hardware


• 

User Guide


• 

Epicenter KVM Cables for connecting video, keyboard, and mouse


Warning! 

To reduce the risk of personal injury or damage to the equip-
ment, be sure that the following items are completed BE-
FORE performing any work on the rack: 

• 

The leveling jacks are extended to the floor.


• 

The full weight of the rack rests on the leveling jacks.


• 

The stabilizing feet are attached to the rack, if it is a single-rack 
installation.


• 

The racks are coupled in multiple-rack installations.


Warning! 

Centerpoint weighs in excess of 30 pounds and can be awkward to 
handle.  Handle the product carefully and use sensible lifting proce-
dures. 
Take care to insure that the internal slide unit does not extend 
during transportation causing the unit to become unwieldy. 

Important 

When mounting the rack slides 

make sure that the end of the slides 

with the extension brackets are 
installed to the rear of the rack. 

Summary of Contents for Centercade 16

Page 1: ...Centerpoint 16 Centerpoint 8 Installation and User s Manual Epicenter Inc 211B Calle Pintoresco San Clemente CA 92672 949 366 5370...

Page 2: ...ormance or use of this material Product names mentioned herein may be trademarks and or registered trademarks of their respective companies PC AT PS 2 RS 6000 and are registered trademarks of Internat...

Page 3: ...eatures 7 Rack Mount Installation 8 Centerpoint Connections 9 On Screen Controls 10 Operation 14 TFT Setup and Controls 15 Appendices One Year Warranty 17 Factory Default Settings 18 Installing Update...

Page 4: ...As server density increases giving up valuable rack space for management consoles becomes a critical issue Centerpoint 16 and Centerpoint 8 can reduce the space requirements for your KVM switch monito...

Page 5: ...umber of accessible ports controls what will be seen on the On Screen display For example in the section on On Screen controls some of the sample screens show multiple pages to accommodate the 16 port...

Page 6: ...product on a sloping or unstable cart stand or table as the unit may fall causing serious damage to the TFT display When operating Centerpoint 16 or Centerpoint 8 with AC 208 240V power supply use a p...

Page 7: ...Epicenter Inc Page 7 PRODUCT FEATURES...

Page 8: ...e with the included reten tion screws RACK MOUNT INSTALLATION FOR INSTALLATION YOU WILL NEED THE FOLLOWING Centerpoint 16 or Centerpoint 8 Product Power cord Rails with hardware User Guide Epicenter K...

Page 9: ...s video output 1 PS 2 connector for the keyboard and 1 PS 2 connector for the mouse Connecting the Cables First power up the Centerpoint unit and optionally power down any or all computers that will b...

Page 10: ...ides access to the other functions available on the Centerpoint On Screen Display On this screen the symbols preceding the Port Name are Port is connected and is currently selected Blank Port is conne...

Page 11: ...ion of the server up to 22 characters Use F10 key to go back to the SETUP Menu NOTE The changes you make will not take perma nent effect until you leave setup using the save key Edit Port Names F1 F8...

Page 12: ...ve the new position apply to all ports or the F10 key to apply only to the selected port After pressing either F11 or F10 keys the SETUP Menu is dis played Menu Access Key Menu Access Key Determines w...

Page 13: ...the two options Input Control Input Control can be set to DUAL or LOCAL On LOCAL only the primary internal to Centerpoint keyboard and mouse are enabled On DUAL setting both the primary inputs and th...

Page 14: ...the right side of the keyboard becomes a keypad for number entry TOUCHPAD The touchpad buttons operate in a dual mode The standard buttons directly below will activate right and left mouse clicks Als...

Page 15: ...options Remember to use the TFT buttons next to the monitor screen not the keyboard buttons When you have completed your choices the on screen menu can be turned off by pressing the exit button Contro...

Page 16: ...Epicenter Inc Page 16 APPENDICES...

Page 17: ...PICENTER INC SPECIFI CALLY DISCLAIMS ANY AND ALL IMPLIED WARRANTIES INCLUDING WITHOUT LIMITATION WARRANTIES OF MERCHANTABILITY AND FITNESS FOR A PARTICULAR PURPOSE No Epicenter Inc dealer agent or emp...

Page 18: ...E Port Names F1 F8 PORT F1 SERVERNAMEHERE PORT F2 SERVERNAMEHERE PORT F3 SERVERNAMEHERE PORT F4 SERVERNAMEHERE PORT F5 SERVERNAMEHERE PORT F6 SERVERNAMEHERE PORT F7 SERVERNAMEHERE PORT F8 SERVERNAMEHE...

Page 19: ...dard serial cable male DB9 that connects between Centerpoint and the PC or laptop computer The Upgrade exe Software provided by Epicenter Technical Support on the floppy or a hard drive Leave the Cent...

Page 20: ...hance readability Avoid displaying fixed patterns on the monitor for long periods of time to avoid image persistence after image effects ERGONOMICS To realize the maximum ergonomics benefits we recomm...

Page 21: ...61000 3 3 1995 EN 55024 1998 EN 61000 4 2 1995 EN 61000 4 3 1995 EN 61000 4 4 1995 EN 61000 4 5 1995 EN 61000 4 6 1995 EN 61000 4 11 1994 Directive No 73 23 EEC Low Voltage Directive LVD as amended by...

Page 22: ...000 ft 0 to 9144 m Audible Noise Less than 60 dbA Heat Dissipation 85 Btu hr maximum Shock Operating 5 to 500 Hz 0 5 g 0 1 oct min Non operating 5 to 100 Hz 1 g 0 1 octave min 100 to 500 Hz 1 5g 0 2 o...

Page 23: ...2 connector that is marked for keyboard of the Sun PS 2 Converter box Plug the PS 2 mouse connector of the KVM cable to the PS 2 connector that was marked for mouse of the Sun PS 2 Converter box Plug...

Page 24: ...the External Video Port on the Centerpoint Using the keyboard and the touchpad of the Centerpoint to boot the Server and verify the current resolutions of the console and window modes If they are not...

Page 25: ...Epicenter Inc Page 25 Epicenter Inc 211B Calle Pintoresco San Clemente CA 92672 949 366 5370 www epicenterinc com...

Reviews: