3-Jaw Chuck Quick Start Guide
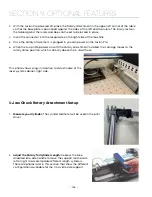
1. Lower the table far enough to accommodate the Rotary Attachment.
2. Turn off the machine.
3. Select the appropriate jaw sizes, fixture plates and / or centering devices and fixture your part in
place in the rotary.
4. Plug in the Rotary Attachment and position it in the upper left corner of the table.
5. Power up your laser.
6. Focus – Fusion Pro requires manual focus when using the 3-Jaw style rotary.
• Press the Jog Menu button on the Control Panel.
• Use the Joystick to move the carriage until the Manual Focus Gauge is above the point of focus.
• Drop the Manual Focus Gauge into the down position.
• Press the Focus Menu button on the Control Panel.
• Use the Joystick to move the table up and down to focus on your cylinder.
• Place the Manual Focus Gauge back into the up position when finished focusing.
7. Set Home Position
• Turn on the Red Dot Pointer.
• Press the Jog Menu button on the Control Panel.
• Use the Joystick to move the red pointer to the point on your cylinder where you want your Home
Position to be located.
• Click on the Centering Point icon to set the new Home Position.
8. Set up your artwork and print to the Epilog Dashboard.
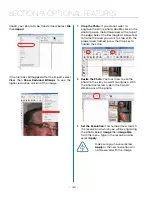
9. Use the Epilog Dashboard (Preview tab and Advanced tab) to set your laser parameters.
• Select Center-Center engraving mode in the Advanced tab.
• Select the 3-Jaw Chuck option in the Advanced tab.
• Input your cylinder diameter in the Advanced tab.
• Set your Speed, Power, and other laser parameters in the Preview tab.
• Print the job to the laser.
10. Close the top access door on your laser system.
11. From the Display panel, select your job and press the Go button to start your job.
- 146 -
SECTION 9: OPTIONAL FEATURES
Summary of Contents for Fusion Pro 32
Page 2: ......
Page 6: ......
Page 14: ...Fusion Pro 48 8 SECTION 1 SAFETY ...
Page 15: ... 9 SECTION 1 SAFETY ...
Page 18: ......
Page 28: ......
Page 60: ......
Page 98: ......
Page 108: ......
Page 132: ......
Page 162: ......
Page 184: ......
Page 202: ......
Page 214: ......
Page 216: ......
Page 242: ......

