Dual Source Option
If you have chosen the dual source option on the
Fusion Pro, you get the benefit of a CO2 and fiber
laser source both in one system. The operation of
this system is fundamentally the same as running
either the CO2 or fiber laser separately. In a typical
job when you are using only the CO2 or only the
fiber laser, you will set your laser source in the
Process Settings of the Epilog Dashboard.
Important Note about Focus:
There are two separate laser types
– CO2 and fiber – in the Dual Source
Fusion Pro system. Each laser type has
a different focus distance from the
focus lens to the work surface. This means that
the fiber laser focus point is closer to the focus
lens than the CO2 focus point by approximately
.250” (6mm).
Because there is only a single focus lens in the
dual source system, we need to accommodate
for the difference in focus distance when running
a job that incorporates both the CO2 and fiber
laser. We do this by automatically moving the
table down when the job switches from fiber to
CO2 or moving the table up when switching from
CO2 to fiber.
What does this mean for you?
Focus the system
using either the manual focus gauge or auto
focus as you normally would and the system will
automatically adjust the table to the correct
focal position. You will notice the table lower or
raise slightly when changing between processes,
but this is completely normal.
Setting Up a Dual Source Job
If you are doing a project that requires both CO2
and fiber laser sources in the same job, you must
use the Split by Color (Color Mapping) feature to
determine which parts of the job should use CO2
and which should use the fiber laser source.
In this example we are engraving a bottle opener
with a wooden handle and metal opener. We’ve
set up the file to use the color black for the CO2
wood engraving, and red for the fiber metal
etching.
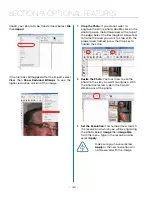
1. When your file is ready, print it to the laser. In
the Laser Dashboard, turn on Auto Focus and
set to Thickness, then select
Split by Color
.
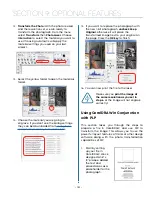
2. Click on the Black process and set the speed,
power, frequency and thickness settings. For
the Laser setting, select CO2.
3. Click on the Red process and set the speed,
power, frequency, thickness and offset for
the fiber graphic. For the Laser setting, select
Fiber.
- 147 -
SECTION 9: OPTIONAL FEATURES
Summary of Contents for Fusion Pro 32
Page 2: ......
Page 6: ......
Page 14: ...Fusion Pro 48 8 SECTION 1 SAFETY ...
Page 15: ... 9 SECTION 1 SAFETY ...
Page 18: ......
Page 28: ......
Page 60: ......
Page 98: ......
Page 108: ......
Page 132: ......
Page 162: ......
Page 184: ......
Page 202: ......
Page 214: ......
Page 216: ......
Page 242: ......


