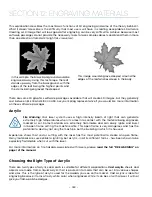
Painted Brass Engraving Techniques
• Engrave painted brass with a high speed and low power setting. It takes very little power to remove
the paint coating and too much power will melt the paint and distort the image. If your mark on
brass is turning out “fat” or has a balloon appearance to it, you are probably using too much power.
Reducing the power will bring back the nice sharp images that are normally produced with painted
brass.
• Note:
Use caution when trying to engrave brass coated pens. Many pens have a very hard epoxy
paint that is completely unacceptable for CO2 laser engraving. You should only use pens that you
have experimented with or that are specifically designed for CO2 laser engraving. Be aware that
there are many pens that can be laser engraved with a fiber laser but these pens are usually not
compatible with the CO2 laser that you are using.
• Some paints are “almost” CO2 laser engraveable. If you engrave through the paint and there is a
slight shadow remaining, try to clean the engraved area with alcohol or lacquer thinner. Depending
on the paint, there is a good chance that the shadow will disappear and an excellent engraving
result achieved.
• Use caution when trying to engrave blue painted brass. Blue paints contain very aggressive
pigments that penetrate the metal surface and it can be extremely difficult to remove all of the
blue color, but again, try alcohol or lacquer thinner to remove the shadow.
Glass
When a laser strikes glass it fractures the surface, but it will not engrave deeply or remove material.
The fracturing of the glass surface will produce a frosted appearance but can cause roughness and
chipping depending on the type of glass being engraved. While the frosted appearance is desired, the
roughness and chipping are not. Below we explain how to eliminate the roughness and produce a very
smooth frosted finish.
The composition and quality of glass varies widely and you cannot always predict the effect that you
will achieve. It is always best to experiment with an unfamiliar glass source. Generally speaking, flat
glass tends to have a very consistent hardness throughout, and the engraved areas do not tend to have
lighter and darker areas. Bottles on the other hand, tend to have soft and hard spots that will cause the
engraved area to appear lightly frosted in one area and heavily frosted in another. Engraving at medium
speed and high power will somewhat compensate for this, as will two or more engraving passes.
While the laser beam itself is very hot, the heat does not build up easily and it should not prevent you
from engraving onto full bottles of wine, champagne or other filled glass bottles. Laser engraving filled
bottles is a very popular method of creating custom presentations for special occasions. The laser will
not damage the liquid inside the bottle, and as long as you are not completely engraving away a large
section of bottle you have very little chance of breaking the bottle.
Glass Engraving Techniques
To produce a smooth frosted finish, here are some tips:
• 300 DPI:
Using a lower resolution, around 300 DPI, produces a better result on glass as you separate
the dots you are engraving.
- 183 -
SECTION 12: ENGRAVING MATERIALS
Summary of Contents for Fusion Pro 32
Page 2: ......
Page 6: ......
Page 14: ...Fusion Pro 48 8 SECTION 1 SAFETY ...
Page 15: ... 9 SECTION 1 SAFETY ...
Page 18: ......
Page 28: ......
Page 60: ......
Page 98: ......
Page 108: ......
Page 132: ......
Page 162: ......
Page 184: ......
Page 202: ......
Page 214: ......
Page 216: ......
Page 242: ......

