Í
Software Setup
There are two main ways of configuring your ePipe for use:
Option A Windows Wizard Setup (recommended).
Option B Command Line Setup using the ePipe console port.
Option A - Windows Wizard Setup
To start the Software Setup phase using the setup wizard, you need to ensure your PC is
turned on and connected to the ePipe hub or existing network. The Windows PC will need
to have TCP/IP network driver installed and operational.
To start the software setup:
•
Insert the Software & Documentation
CD-ROM into the CD drive of the PC.
•
The CD-ROM will auto-start (Figure 3). If
auto-start is disabled, from the Start Menu
of your PC select Run then Browse to your
CD drive. Select autorun.exe at the prompt
and click OK to start.
•
Select “Find ePipe / EasyServer II” from the
options and follow the instructions.
Option B - Command Line Setup
Note: Configuring the ePipe using the console will require some knowledge and familiarity
of ePipe and networking concepts in general.
To configure the ePipe from the console:
•
Connect a terminal or PC to the ePipe console port using the console cable. If
using a PC then you will need terminal emulation software. Windows users can
use HyperTerminal (in Accessories)
•
Set the terminal or emulation software at a speed of 9600 bps, 8 data bits, 1 stop
bit, no parity and software (XON/XOFF) flow control. Once you connect, then press
the Enter key several times to obtain a login prompt.
•
You are now ready to use the Command Line. See the ePipe documenation on the
CD-ROM for further instructions.
Ì
Connecting the Hardware
Place your ePipe on a flat surface in a well ventilated area not prone to extremes of
temperature or humidity.
ePipe is designed to be used in new or existing networks. If you wish to connect your
ePipe to an existing network then proceed to “Connecting ePipe to your Existing Network”.
If you are setting up a new network and/or attaching computer(s) to the internal hub in
the ePipe then proceed to “Attaching Devices to ePipe”.
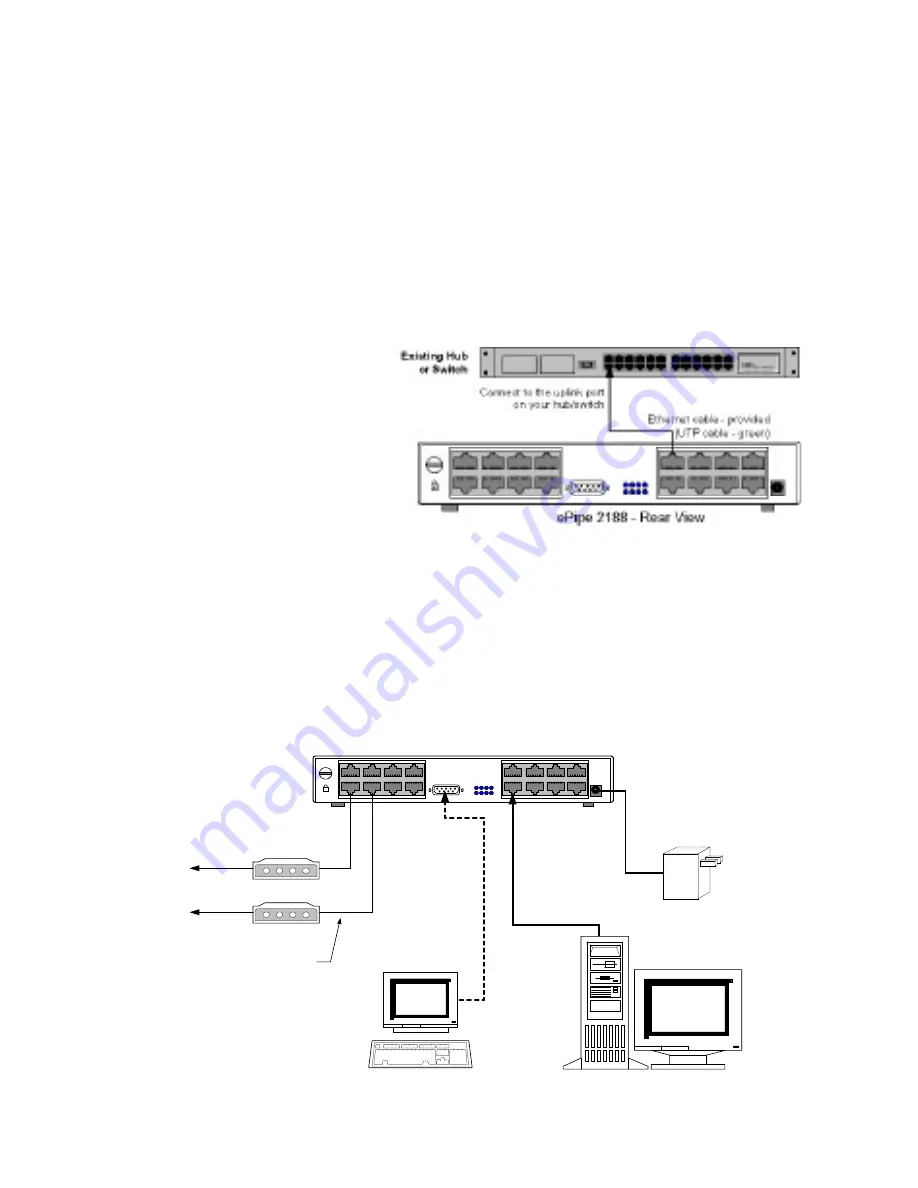
Connecting ePipe to your Existing Network
Use an Ethernet UTP cable (one
provided - green) to connect one
hub port on your ePipe to a 10
Mbps uplink (or cross-over) port on
your existing Ethernet hub or switch.
If you do not have an uplink port
then use an Ethernet cross-over
cable. Your Ethernet hub/switch
may have a button or switch that
turns a port into an uplink port. This
should be enabled when connecting
other hubs (such as in the ePipe)
to this uplink port.
Attaching Devices to ePipe
To connect ePipe to your computer(s), modems and TAs follow the steps below:
♦
Connect PC(s) or other network devices to ePipe using standard Ethernet UTP cables
(like the one provided). Connect one end of the cable to any hub port on ePipe and
the other end to the Ethernet network interface on the PC or device.
Figure 2 - Attaching Devices to ePipe
Figure 1 - Existing Network Setup
ePipe Quick Setup Guide
♦
Connect your modems and/or TAs to the RS-232 serial ports of ePipe using
appropriate serial cables. You can then power on the modems and/or TAs. Two serial
modem cables (orange) are provided with your ePipe.
♦
(Optional) Connect the supplied console cable to the DB9 console port on the
ePipe and to a DB9 serial port on your PC or terminal. This is only required
if ePipe setup is done using the console instead of the supplied software (see
Software Setup section).
♦
Connect the ePipe Power Supply Unit (PSU) to the mains power supply. Now attach
the PSU lead to the connector on the bottom right rear of the ePipe. As soon as the
ePipe Quick Setup Guide
Figure 3 - Auto Start Screen


