Pearl-2 User Guide
Set up the video output port using the Admin panel
Set up the video output port using the Admin panel
You can send a channel or a video source to the video output port using the Admin panel. You can also adjust
the video output resolution, aspect ratio, and choose to include audio. The video output port frame rate is set
automatically to the channel's configured frame rate for that video source.
When outputting a channel with audio, you can adjust the volume and choose to include the audio meter. The
audio meter is set to a fixed size of 15% of the width (or height if displayed horizontally) of the display. Audio
is not supported when sending a video input source to the output port.
Important considerations
l
If an SDI or HDMI video input source that is selected to display at the HDMI output port also appears in
a custom layout for a channel, then the channel's encoding settings are used at the HDMI output.
Changing the channel's frame rate will change the frame rate used at the output port for that video
input. If the video source appears in multiple layouts in different channels, the one with the highest
frame rate set in the encoding settings is used.
l
Default auto channels have the related HDMI (or SDI) port selected by default. As soon as you connect
your video source to the port, it appears automatically in the auto channel's custom layout. Changing
the auto channel's frame rate or deleting the auto channel will change the frame rate used at the
output port for that video input. Deleting the auto channel forces the video output port to use the
original frame rate of the video input source.
To select the video you want to appear on the output port using local console , the touch screen, or Epiphan
Live, see
Set up a channel or video source to display on the video output port using the Admin panel
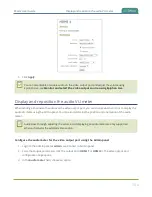
1. Login to the Admin panel as
admin
.
2. In the
Source
field, select a channel (prefixed by the word
Channel
) or a video source (prefixed by the
word
Input
).
147

