background image

page | 7

© 2015 Episode®

Wall Mount Installation

•  Remove the four feet from the bottom of the chassis, if needed.
•  Attach the included rack-mount ears to the sides of the amplifier chassis.
•  Securely mount the amplifier into a mounting box. 
•  It is always wise to leave ventilation between components even though the 

amplifier produces very little heat. 

Vertical Mounting (Walls or Enclosures)

•  The amplifier may be mounted on any surface using fasteners (not included) 

suited for the surface material.

•  The included module mounting pins may be used to secure the amplifier 

inside structured wiring enclosures.

•  The rubber feet (included) can be attached to dampen vibrations if needed.

Horizontal Placement

•  The rubber feet (included) can be used for shelf placement of the amplifier. 

Using these will prevent vibration and movement of the amplifier. Attach one 
to each corner of the unit.

!

WARNING:

 Do not stack anything on top of the amplifier.

Plenum Placement

The ECA-70VMINI-60W amplifier meets UL 2043 requirements for heat and smoke 
release. It can be installed in the plenum space, such as in the ceiling, out of sight.

!

ATTENTION: 

Although the amplifier is plenum rated, the DC power cord 

provided with the unit is not. The power supply must not be placed in the 
plenum space. Cables to and from the amplifier must also be plenum rated. 

Wire Length for DC Power

Recommended wire lengths at full power output are listed below:

•  13 AWG: up to 100ft
•  18 AWG: up to 36ft
•  22 AWG: up to 25ft

NOTE:

 Actual wire length varies by type of source and volume level. A blinking 

red LED indicates a fault. See 

Troubleshooting

 on page 10.

© 2015 Episode®

Summary of Contents for ECA-70VMINI-60W

Page 1: ...INSTALLATION MANUAL ECA 70VMINI 60W UNBALANCED IN STEREO IN STATUS R L 12VDC IN RS 232 IR SERVICE VOLUME BALANCED IN L L GND R R SPEAKER OUTPUTS S GND GND Tx Rx ECA 70VMINI 60W ...

Page 2: ...ed service personnel Servicing is required when the apparatus has been damaged in any way such as power supply cord or plug is damaged liquid has been spilled or objects have fallen into the apparatus the apparatus has been exposed to rain or moisture does not operate normally or has been dropped 15 The equipment shall be used at maximum 35 C ambient temperature 16 To reduce the risk of electrical...

Page 3: ...he amplifier via an IR input or RS 232 from a control system Multiple Inputs Select from 3 different inputs Each input may be listened to discretely selected via IR or RS 232 or summed default Compact Size and Layout The Episode Mini amplifier is designed to be tucked away for great looking and sounding installations With compact controls efficiently placed connections this amp is ready to perform...

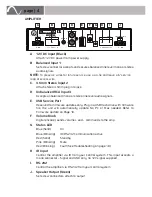
Page 4: ...e level audio signals E USB Service Port Reserved for firmware updates only Plug in a USB flash drive with firmware file the unit will automatically update No PC or Mac needed Refer to Firmware Update on Page 10 F Volume Knob Digital encoder sends volume and commands to the amp G Status LED Blue Solid On Blue Blinking IR RS 232 Communication active Red Solid Standby Pink Blinking Mute Red Blinking...

Page 5: ... Mount the unit to a wall or rack using the mounting ears B IEC Power Connector Attach included IEC cable to this port for power C Fuse Serviceable fuse D Power LED Indicates current power status Green On E 12V DC Output Connect to and to from the amplifier to the power supply ATTENTION The total 12VDC current is 2A maximum There is a maximum of 200mA available for the other two 12V outputs for ac...

Page 6: ...f the installation lacks good air flow such as solid cabinet doors or wall mounted racks it may be necessary to create ventilation to allow outside air into the space Allow a minimum of 5 of free air space above the unit Allow a minimum of 3 of free air space on either side of the unit does not apply to rack mounting Allow a minimum of 2 of depth behind unit to accommodate cables and connectors Wh...

Page 7: ...et included can be used for shelf placement of the amplifier Using these will prevent vibration and movement of the amplifier Attach one to each corner of the unit WARNING Do not stack anything on top of the amplifier Plenum Placement The ECA 70VMINI 60W amplifier meets UL 2043 requirements for heat and smoke release It can be installed in the plenum space such as in the ceiling out of sight ATTEN...

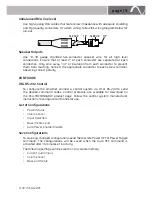
Page 8: ...t a control system to either the IR input or RS 232 input Observing proper polarity connect the speakers to the rear of the amplifier s phoenix connector Lastly connect power to an outlet with surge protection ATTENTION Do not connect more than one amplifier to the power supply Balanced Line Level Tip Sleeve s Ring Ring Tip Left Right Connect Tip to Ring to and the sleeve to ground 3 5mm stereo Us...

Page 9: ...rving correct polarity CONFIGURE IR RS 232 Control To configure the amplifier connect a control system via IR or RS 232 to send the desired command codes Control protocols are available for download on the ECA 70VMINI 60W product page Follow the control system manufacturer instructions to configure commands for use List of Configurations Power Status Volume Level Input Selection Bass Treble Level ...

Page 10: ... quickly then slowly then pause for a moment 6 LED will then blink slowly then stay ON if upgrade was successful 7 Remove USB stick and remove AC power 8 Wait for LED to go OFF and power up the unit again TROUBLESHOOTING Amplifier will not turn on Power cable to the amplifier is incorrectly connected or plugged into an outlet that does not have power Check connections and verify power on the outle...

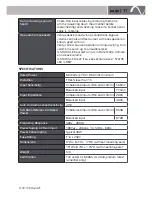
Page 11: ...If so see section above STATUS LED is RED SPECIFICATIONS Rated Power 60 Watts 70V 80 ohms minimum Distortion THD N less than 1 Input Sensitivity Unbalanced Inputs RCA and 3 5mm 550mV Balanced input 775mV Input Impedance Unbalanced Inputs RCA and 3 5mm 20KΩ Balanced input 40KΩ Auto On Audio sense Sensitivity 4mV S N Ratio Reference to Rated Power Unbalanced Inputs RCA and 3 5mm 85dB Balanced input ...

Page 12: ...o be defective in material or workmanship under normal conditions of use This warranty shall not apply to products that have been abused modified or disassembled Products to be repaired under this warranty must be returned to a designated service center with an assigned return authorization RA number Contact technical support at support episodeaudio com for an RA number CONTACTING TECHNICAL SUPPOR...

Reviews: