background image

1.  Agarre su herramienta de extracción de interruptores y alinee los dientes de agarre verticalmente (en 

el eje Y) en el centro del interruptor, como se muestra en el gráfico de ejemplo anterior.

2. Agarre el interruptor con el extractor de interruptores y aplique presión hasta que el interruptor se 

libere de la placa

3. Con una fuerza firme pero suave, separe el interruptor del teclado con un movimiento vertical.

Quitar los interruptores

1.  Compruebe que todos los pasadores metálicos del interruptor están perfectamente rectos y limpios.

2. Alinee el interruptor verticalmente para que el logotipo de Gateron esté orientado hacia el norte. Los 

pines deben alinearse con el PBC del teclado.

3. Presione el interruptor hacia abajo hasta que oiga un clic. Esto significa que los clips del interruptor se 

han unido a la placa del teclado.

4. Inspeccione el interruptor para asegurarse de que está bien conectado a su teclado, y pruébelo.

Instalar los interruptores

G U Í A   D E   U S O   R Á P I D O

ES

Nota: Si la tecla no funciona es posible que haya doblado uno de los interruptores al instalarlo. 

Saque el interruptor y repita el proceso

Las clavijas pueden dañarse de forma irreparable y necesitar ser reemplazadas si este 

proceso no se realiza correctamente. No aplique nunca una fuerza excesiva al sustituir las 

tapas de las teclas o los interruptores. Si no puede retirar o instalar las tapas de las teclas o los 

interruptores, póngase en contacto con el servicio de atención al cliente lo antes posible para 

evitar que el teclado sufra daños debido a errores de funcionamiento.

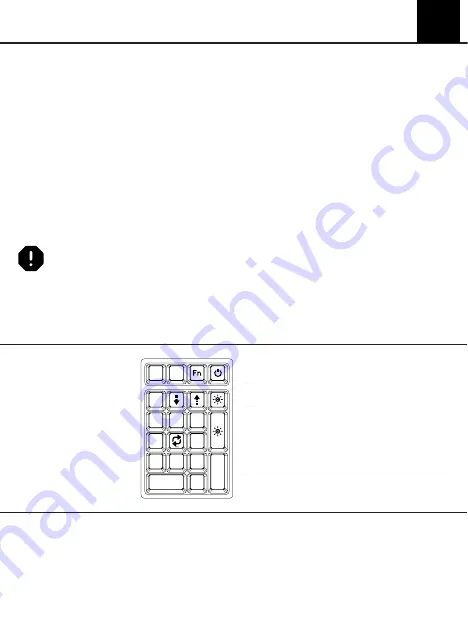
FN +

BACKSPACE

Activar/desactivar el RGB

FN + -

Brillo RGB -

FN + + 

Brillo RGB +

FN + /

Velocidad del efecto RGB -

FN + X

Velocidad del efecto RGB +

FN + 5

Cambia el efecto de luz

Confirguración

de la luz de 

fondo RGB

ASISTENCIA TÉCNICA

Para obtener asistencia técnica, envíe un correo electrónico a 

support@epomaker.com 

con su número 

de pedido y una descripción detallada de su problema.

Normalmente respondemos a las consultas en un plazo de 24 horas. Si ha adquirido su teclado a 

través de un distribuidor o no en ninguna tienda oficial de Epomaker, póngase en contacto con ellos 

directamente para cualquier ayuda adicional.

Summary of Contents for TH21

Page 1: ...pomaker com 20 Hot Swap Wired Mechanical Keyboard RoHS COMPLIANT Created by Heipi from the Noun Project Created by Loren Klein from the Noun Project Manufacturer Shenzhen Changyun Technology Co Ltd Ad...

Page 2: ...Code or type in your browser https epomaker com blogs guides diy guide how to remove and replace your mechanical keyboard switches Installing Switches Q U I C K S T A R T G U I D E EN Logo Switch Sha...

Page 3: ...U I D E EN Note If the key doesn t work its possible you may have bent one of the switches while installing it Pull the switch out and repeat the process Pins may be damaged beyond repair and need re...

Page 4: ...ponents Assembling and reassembling the product Replacing Batteries etc We will ONLY cover the item if it is bought from our official stores You do not have a warranty with us if you bought the item f...

Page 5: ...op support epomaker com 20 Hot Swap Mechanische Tastatur RoHS COMPLIANT Created by Heipi from the Noun Project Created by Loren Klein from the Noun Project Hersteller Shenzhen Changyun Technology Co...

Page 6: ...https epomaker com blogs guides diy guide how to remove and replace your mechanical keyboard switches Schakelaars installeren Q U I C K S T A R T A N L E I T U N G DE Logo Schacht van schakelaar Het g...

Page 7: ...N G DE Opmerking Als de toets niet werkt is het mogelijk dat u een van de schakelaars verbogen hebt tijdens de installatie ervan Trek de schakelaar eruit en herhaal het proces Als dit proces niet corr...

Page 8: ...zetten van het product Het vervangen van Batterijen enz Wir decken den Artikel NUR ab wenn er in unseren offiziellen Gesch ften gekauft wurde Sie haben keine Garantie bei uns wenn Sie den Artikel bei...

Page 9: ...er comm 20 Hot Swap Teclado Mec nico Al mbrico RoHS COMPLIANT Created by Heipi from the Noun Project Created by Loren Klein from the Noun Project Fabricante Shenzhen Changyun Technology Co Ltd Direcci...

Page 10: ...or https epomaker com blogs guides diy guide how to remove and replace your mechanical keyboard switches Instalar Interruptores G U A D E U S O R P I D O ES Logo Eje del interruptor La herramienta de...

Page 11: ...Nota Si la tecla no funciona es posible que haya doblado uno de los interruptores al instalarlo Saque el interruptor y repita el proceso Las clavijas pueden da arse de forma irreparable y necesitar se...

Page 12: ...je y remontaje del producto Sustituci n de bater as etc S lo cubriremos el art culo si se ha comprado en nuestras tiendas oficiales Usted no tiene una garant a con nosotros si usted compr el art culo...

Page 13: ...llez nous envoyer un e mail support epomaker Clavier m canique filaire 20 Hot Swap RoHS COMPLIANT Created by Heipi from the Noun Project Created by Loren Klein from the Noun Project FABRICANT Shenzhen...

Page 14: ...avigateur https epomaker com blogs guides diy guide how to remove and replace your mechanical keyboard switches Installation de commutateurs G U I D E D E D M A R R A G E R A P I D E FR Logo Arbre de...

Page 15: ...D E FR Remarque si la touche ne fonctionne pas il est possible que vous ayez pli l un des commutateurs lors de son installation Retirez l interrupteur et r p tez le processus Si ce processus n est pa...

Page 16: ...t le r assemblage du produit le remplacement des piles etc Nous ne couvrirons l article que s il est achet dans nos magasins officiels Vous n avez pas de garantie avec nous si vous avez achet l articl...

Page 17: ...urer Shenzhen Changyun Technology Co Ltd Address Seventh Floor Kai Daer Building No 168 Tongsha Road Xili Street Nanshan Disctrict Shenzhen Guangdong CN Email support epomaker com Web www epomaker com...

Page 18: ...QR https epomaker com blogs guides diy guide how to remove and replace your mechanical keyboard switches JA...

Page 19: ...1 3 2 3 1 2 PCB LED Gateron 3 4 JA FN BACKSPACE FN FN FN FN X FN 5 RGB support epomaker com 24 EPOMAKER...

Page 20: ...aker com discord gg 2q3Z7C2 reddit com user epomaker JA PBT RGB SMD 21 KEYS WINDOWS MAC LINUX 250G 20G USB C 88 133 5 51 mm 5V 500MAH instagram com epomakerkeyboard facebook com Epomaker tiktok com ep...

Page 21: ...Heipi from the Noun Project Created by Loren Klein from the Noun Project 168 7 support epomaker com www epomaker com EC REP APEX CE SPECIALISTS LIMITED Address UNIT 3D NORTH POINT HOUSE NORTH POINT B...

Page 22: ...https epomaker com blogs guides diy guide how to remove and replace your mechanical keyboard switches CN...

Page 23: ...1 2 3 1 2 PCB LED Gateron 3 4 CN FN BACKSPACE FN FN FN FN X FN 5 RGB support epomaker com 24 Epomaker...

Page 24: ...com 1 discord gg 2q3Z7C2 reddit com user epomaker CN PBT RGB SMD 21 WINDOWS MAC LINUX 250G 20G USB C 88 133 5 51 mm 5V 500MAH instagram com epomakerkeyboard facebook com Epomaker tiktok com epomakerke...

Reviews: