background image

Epson Perfection 3590 Photo

6/05

Epson Perfection 3590 Photo - 7

If an error occurs, the scanner stops operating and the scanner 
light flashes red. This indicates one of the following problems:

The scanner is not connected to your computer properly or 
your software is not fully installed. See the Start Here sheet 
that came with your scanner for instructions on installing 
the scanner software and connecting the scanner to your 
computer.

The scanner transportation lock is locked. Slide the lock to 
the unlock position.

After trying these solutions, turn off the scanner by unplugging 
its power cord, then plug it in to turn it back on. If the scanner 
light is still flashing:

The scanner may be malfunctioning.

The scanner lamp may need to be replaced.

The connected optional equipment may be malfunctioning.

Transporting the Scanner

Before transporting the scanner for a long distance or storing it 
for an extended period of time, you need to lock the scanner’s 
carriage to prevent damage. 

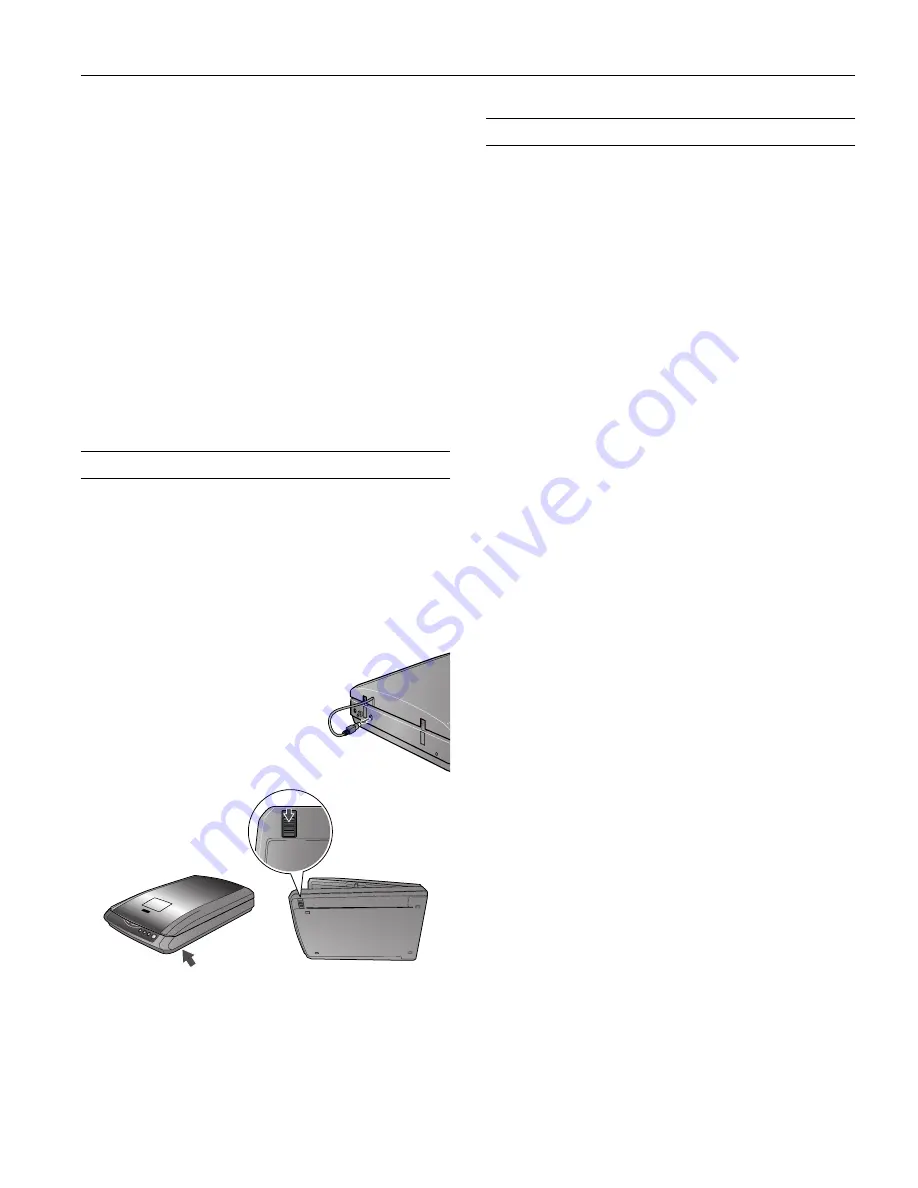
1. Plug in the scanner, connect it to your computer, and wait 

until the carriage moves to the home position (position 
nearest the buttons). While the 

]

 Start light is green, 

unplug the scanner.

2. If the cover cable is attached, 

disconnect it.

3. To lock the transportation lock, lift 

the scanner and slide the lock to the 
locked position. This secures the 
carriage.

Caution: 

Do not turn the scanner over; this may damage it.

4. Attach the protective materials and repack the scanner in its 

original box.

Related Documentation

CPD-19431

Epson Perfection 3490/3590 Photo 

Start Here 

sheet

CPD-19432

Epson Perfection 3490/3590 Photo 
Scanner Software CD-ROM

CPD-19433

Epson Perfection 3490/3590 Photo 

Notices

booklet

Epson Perfection 3490/3590 Photo 

User’s Guide

 (HTML)

Summary of Contents for 3590 - Perfection Photo

Page 1: ...dpi to 12800 dpi resolution 50 to 6400 dpi in 1 dpi increments 9600 dpi and 12800 dpi performed with zoom function Color separation RGB color filters on CCD Image data 16 bits per pixel per color internal 16 bits per pixel per color external maximum Interface USB 2 0 Hi Speed Type B connector Light source White cold cathode fluorescent lamp Dimensions Width 10 8 inches 275 mm Depth 16 5 inches 419...

Page 2: ...120 V 50 to 60 Hz 1 0 A Output DC 24 0 to 26 4 V 1 4 A Multi Photo Feeder Specifications Basic Specifications Product code B813372 Paper input Face down loading Paper output Face down ejecting Paper capacity 24 sheets maximum thickness under 0 2 inches 6 mm Paper types Photo 4 6 and 3 5 inches mini photo 2 25 3 25 inches business card post card Dimensions Width 9 1 inches 231 mm Depth 15 8 inches ...

Page 3: ...is installed inside the scanner cover 2 Place your document or photo on the document table face down on the glass Make sure the top of the document or photo is against the front edge of the scanner and centered on the arrow mark 3 An area of up to 0 2 inches 5 mm from the horizontal and the vertical sides of the scanner glass cannot be scanned If you place a document in the corner of the document ...

Page 4: ...re loading a film strip make sure it contains at least 2 photos but no more than 6 Don t load folded creased curled or sticky film into the auto film loader or it may damage the film or your scanner 4 Place the film strip in the film loader with the shiny base side facing down Your images and any wording on the film strip should appear backward on the side that faces up 5 Slowly slide the film int...

Page 5: ... top of the scanner glass so that the tab labelled D fits into the area labelled D on the document table 3 Place a 35 mm slide into the holder with its shiny base side facing down Your image should appear backwards on the side that faces up Place the top of the image toward the left side of the scanner 4 Close the scanner cover 5 When you re finished scanning you can store the slide holder in the ...

Page 6: ...nal Mode Start light Scanner status Flashing green Warming up or scanning Green Ready to scan Flashing red Make sure the transportation lock is unlocked Try restarting your computer and unplugging the scanner Wait 10 seconds then plug the scanner back in Film may be jammed in the auto film loader Disconnect the scanner from the computer wait 10 seconds and connect it to the computer again to see i...

Page 7: ...ional equipment may be malfunctioning Transporting the Scanner Before transporting the scanner for a long distance or storing it for an extended period of time you need to lock the scanner s carriage to prevent damage 1 Plug in the scanner connect it to your computer and wait until the carriage moves to the home position position nearest the buttons While the Start light is green unplug the scanne...

Reviews: