background image

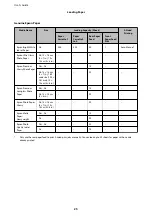
Media Name

Size

Loading Capacity (Sheets or Envelopes)

2-Sided

Printing

Paper
Cassette 1

Paper
Cassette 2
to 4

Rear Paper
Feed

Front
Paper Feed
Slot

Envelope

Envelope #10,
Envelope DL,
Envelope C6

10

Envelope  C4

1

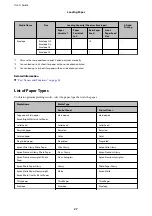
*1

Only use the rear paper feed to print 2-sided print jobs manually.

*2

You can load up to 30 sheets for paper with one side already printed.

*3

You can load up to 5 sheets for paper with one side already printed.

Related Information

&

“Part Names and Functions” on page 14

List of Paper Types

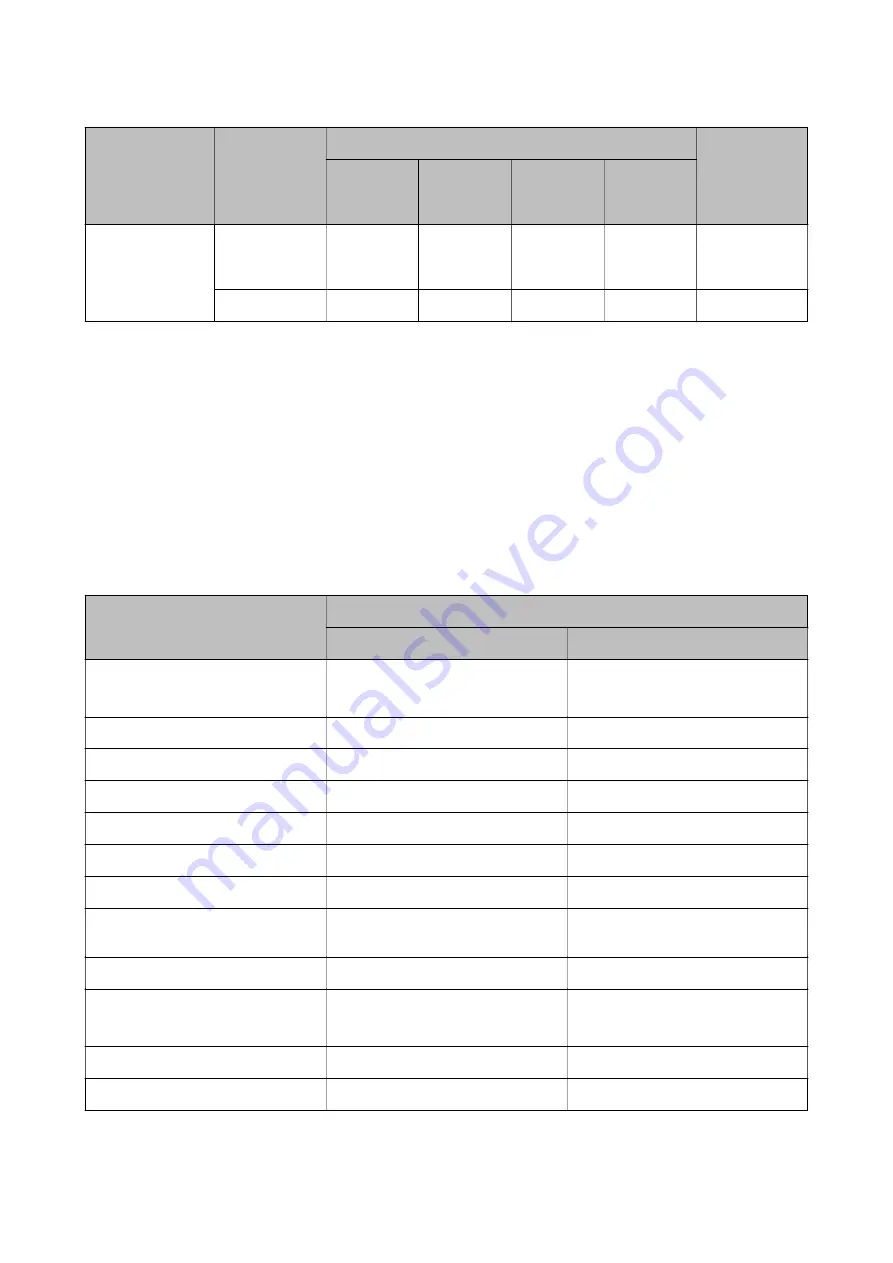
To obtain optimum printing results, select the paper type that suits the paper.

Media Name

Media Type

Control Panel

Printer Driver

Copy paper, Plain paper

Epson Bright White Ink Jet Paper

plain papers

plain papers

Letterhead

Letterhead

Letterhead

Recycled paper

Recycled

Recycled

Colored paper

Color

Color

Preprinted paper

Preprinted

Preprinted

Epson Ultra Glossy Photo Paper

Ultra Glossy

Epson Ultra Glossy

Epson Premium Glossy Photo Paper

Prem. Glossy

Epson Premium Glossy

Epson Premium Semigloss Photo
Paper

Prem. Semigloss

Epson Premium Semigloss

Epson Photo Paper Glossy

Glossy

Photo Paper Glossy

Epson Matte Paper-Heavyweight

Epson Photo Quality Ink Jet Paper

Matte

Epson Matte

Thick paper

Thick-Paper

Thick-Paper

Envelope

Envelope

Envelope

User's Guide

Loading Paper

27

Summary of Contents for 3801

Page 1: ...User s Guide NPD5017 00 EN ...

Page 2: ...urred by the purchaser or third parties as a result of accident misuse or abuse of this product or unauthorized modifications repairs or alterations to this product or excluding the U S failure to strictly comply with Seiko Epson Corporation s operating and maintenance instructions Seiko Epson Corporation and its affiliates shall not be liable for any damages or problems arising from the use of an...

Page 3: ...tered trademarks of Microsoft Corporation Apple Macintosh Mac OS OS X and Bonjour are trademarks of Apple Inc registered in the U S and other countries AirPrint is a trademark of Apple Inc Google Cloud Print is a registered trademark of Google Inc Adobe Adobe Reader Acrobat and Photoshop are trademarks of Adobe systems Incorporated which may be registered in certain jurisdictions General Notice Ot...

Page 4: ...ng the Paper Size and Paper Type for Each Paper Source 33 Printing Printing from a Computer 35 Printing Basics Windows 35 Printing Basics Mac OS X 36 Printing on 2 Sides 38 Printing Several Pages on One Sheet 40 Printing to Fit the Paper Size 41 Printing Multiple Files Together for Windows Only 43 Enlarged Printing and Making Posters for Windows Only 44 Printing on Envelopes 50 Printing Using Adva...

Page 5: ... the Rear Paper Feed B1 86 Removing Jammed Paper from the Front Paper Feed Slot B2 87 Removing Jammed Paper from the Paper Cassette C1 C2 C3 C4 88 Removing Jammed Paper from Rear Cover 1 D1 and Rear Cover 2 D2 89 Removing Jammed Paper from the Rear Cover E of the Optional Paper Cassette Unit 90 Paper Does Not Feed Correctly 91 Power and Control Panel Problems 92 Power Does Not Turn On 92 Power Doe...

Page 6: ... the Optional Cabinet 104 Optional Paper Cassette Unit Code 109 Installing the Optional Paper Cassette Units 110 Printer Sharing 114 Where to Get Help 115 Technical Support Web Site 115 Contacting Epson Support 115 User s Guide Contents 6 ...

Page 7: ...ormation on network settings and solving problems when using the printer on a network Administrator s Guide PDF manual Provides network administrators with information on management and printer settings Epson Connect Guide PDF manual Provides information on Epson Connect services This guide is available from the Epson Connect portal website https www epsonconnect com http www epsonconnect eu Europ...

Page 8: ...dows Server 2003 refer to the following operating systems Additionally Windows is used to refer to all versions Microsoft Windows 8 1 operating system Microsoft Windows 8 operating system Microsoft Windows 7 operating system Microsoft Windows Vista operating system Microsoft Windows XP operating system Microsoft Windows XP Professional x64 Edition operating system Microsoft Windows Server 2012 ope...

Page 9: ...t operate normally or exhibits a distinct change in performance Do not adjust controls that are not covered by the operating instructions Place the printer near a wall outlet where the plug can be easily unplugged Do not place or store the printer outdoors near excessive dirt or dust water heat sources or in locations subject to shocks vibrations high temperature or humidity Take care not to spill...

Page 10: ...ace objects on top of the power supply cords and do not allow the power supply cords to be stepped on or run over Be particularly careful to keep all the power supply cords straight at the ends and the points where they enter and leave the transformer If you use an extension cord with the printer make sure that the total ampere rating of the devices plugged into the extension cord does not exceed ...

Page 11: ...ould lead to accidents due to malfunction Advisories and Warnings for Using the LCD Screen The LCD screen may contain a few small bright or dark spots and because of its features it may have an uneven brightness These are normal and do not indicate that it is damaged in any way Only use a dry soft cloth for cleaning Do not use liquid or chemical cleaners The exterior cover of the LCD screen could ...

Page 12: ... and email addresses in its memory even when the power is turned off If you give the printer to someone else or dispose of it erase the memory by selecting Menu System Administration Restore Default Settings Clear All Data and Settings on the control panel User s Guide Important Instructions 12 ...

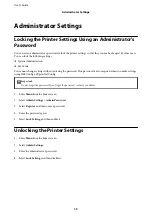
Page 13: ...o required when you make settings using Web Config or EpsonNet Config cImportant Do not forget the password If you forget the password contact your dealer 1 Enter Menu from the home screen 2 Select Admin Settings Admin Password 3 Select Register and then enter a password 4 Enter the password again 5 Select Lock Setting and then enable it Unlocking the Printer Settings 1 Enter Menu from the home sc...

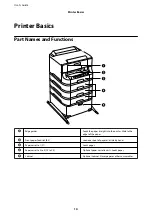
Page 14: ...ide to the edges of the paper B Front paper feed slot B2 Load one sheet of paper at a time by hand C Paper cassette 1 C1 Loads paper D Paper cassette 2 to 4 C2 to C4 Optional paper cassette units Loads paper E Cabinet Optional cabinet Stores paper or other consumables User s Guide Printer Basics 14 ...

Page 15: ...aper C Rear paper feed B1 Loads paper D Feeder guard Prevents foreign substance from entering the printer Usually keep this guard closed E Output tray Holds the ejected paper F Edge guides Feeds the paper straight into the printer Slide to the edges of the paper G Paper cassette Loads paper User s Guide Printer Basics 15 ...

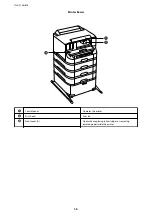
Page 16: ...A Control panel Operates the printer B Print head Fires ink C Front cover A Open when replacing ink cartridges or removing jammed paper inside the printer User s Guide Printer Basics 16 ...

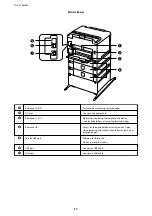
Page 17: ...box or maintenance rollers or removing jammed paper D Rear cover E Covers for the optional paper cassette units Open when replacing the maintenance rollers or removing jammed paper E Service USB port USB port for future use Do not remove the sticker F USB port Connects a USB cable G LAN port Connects a LAN cable User s Guide Printer Basics 17 ...

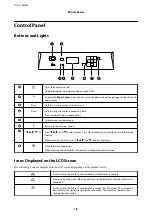
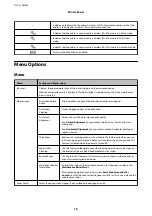
Page 18: ...lection or run the selected feature When entering characters press l u r and d to select characters H Stops the current operation When entering characters press this button to change the character type Icons Displayed on the LCD Screen The following icons are displayed on the LCD screen depending on the printer s status Turns on while the printer is connected to a wired Ethernet network Turns on w...

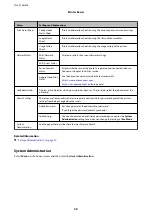
Page 19: ...prove print quality Run Vertical Alignment if your printouts look blurry or text and lines are misaligned Run Horizontal Alignment if your printouts contain horizontal banding at regular intervals Thick Paper Reduces ink smearing when printing Enable this feature only when you see ink smearing on your printouts because it may lower the printing speed This feature is disabled when the power is turn...

Page 20: ...psonconnect eu Europe only Google Cloud Print Status Confidential Job Displays a list of jobs for which a password has been set To print a job select the job and enter the password Admin Settings These menus allow an administrator to register an administrator password to protect the printer settings from being changed by other users Admin Password Set change or reset the administrator password If ...

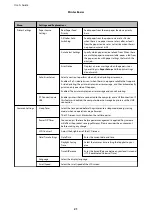
Page 21: ...n automatically prints on only one side of the paper Enabled The printer displays an error message and cancels printing PC Connection via USB Enables printers that are connected to the computer over a USB connection If this feature is disabled the computer does not recognize printers with a USB connection Common Settings Sleep Timer Select the time period before the printer enters sleep mode energ...

Page 22: ...e Could Print service or cancel using the services restore the default settings See the Epson Connect portal website for more details https www epsonconnect com http www epsonconnect eu Europe only Google Cloud Print Services Universal Print Settings These print settings are applied when you print using an external device without using the printer driver Top Offset Adjust the top or left margin of...

Page 23: ...lied Sleep Timer Select the time period before the printer enters sleep mode energy saving mode when no operations are performed The LCD screen turns black when the set time passes Power Off Timer Select the time period before the printer turns off automatically Restore Default Settings Resets the selected settings to their defaults User s Guide Printer Basics 23 ...

Page 24: ...n the printout Do not use paper that is wavy torn cut folded damp too thick too thin or paper that has stickers stuck to it Using these types of paper causes paper jams and smears on the printout Make sure you are using long grain paper If you are not sure what type of paper you are using check the paper packaging or contact the manufacturer to confirm the paper specifications Related Information ...

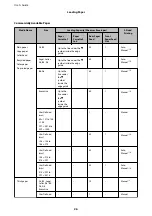
Page 25: ...n Premium Glossy Photo Paper A3 A3 10 A4 13 18 cm 5 7 in 16 9 wide size 102 181 mm 10 15 cm 4 6 in 20 Epson Premium Semigloss Photo Paper A3 A3 10 A4 10 15 cm 4 6 in 20 Epson Photo Paper Glossy A4 13 18 cm 5 7 in 10 15 cm 4 6 in 20 Epson Matte Paper Heavyweight A3 A3 10 A4 20 Epson Photo Quality Ink Jet Paper A3 A3 50 A4 70 Only use the rear paper feed to print 2 sided print jobs manually You can ...

Page 26: ...ine under the d symbol inside the edge guide 80 1 Auto Manual 1 2 B6 A6 Up to the line under the d symbol inside the edge guide 80 1 Manual 1 2 Executive Up to the line under the d symbol inside the edge guide 80 1 Manual 1 2 User Defined mm 55 127 to 105 148 297 431 8 to 329 1200 1 Manual User Defined mm 105 148 to 148 210 80 1 Manual 1 2 User Defined mm 148 210 to 215 297 80 1 Auto Manual 1 2 Us...

Page 27: ...ect the paper type that suits the paper Media Name Media Type Control Panel Printer Driver Copy paper Plain paper Epson Bright White Ink Jet Paper plain papers plain papers Letterhead Letterhead Letterhead Recycled paper Recycled Recycled Colored paper Color Color Preprinted paper Preprinted Preprinted Epson Ultra Glossy Photo Paper Ultra Glossy Epson Ultra Glossy Epson Premium Glossy Photo Paper ...

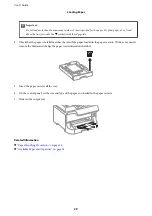
Page 28: ...same time 1 Check that the printer is not operating and then pull out the paper cassette 2 Slide the front edge guide to its maximum position and then slide the side edge guides to adjust to the paper size you want to use 3 Load paper with the printable side facing down and then slide the front edge guide to the edge of the paper User s Guide Loading Paper 28 ...

Page 29: ...size of the paper loaded in the paper cassette If it does not match remove the holder and change the paper size indicated on the label 5 Insert the paper cassette all the way 6 On the control panel set the size and type of the paper you loaded in the paper cassette 7 Slide out the output tray Related Information Paper Handling Precautions on page 24 Available Paper and Capacities on page 24 User s...

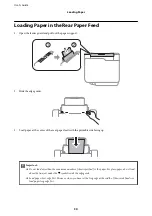
Page 30: ...th the printable side facing up cImportant Do not load more than the maximum number of sheets specified for the paper For plain paper do not load above the line just under the d symbol inside the edge guide Load paper short edge first However when you have set the long edge as the width of the user defined size load paper long edge first User s Guide Loading Paper 30 ...

Page 31: ... pre punched paper under the following conditions Automatic 2 sided printing is not available for pre punched paper Loading capacity One sheet Available size A3 B4 A4 B5 A5 Letter Legal Binding holes Do not load paper with the binding holes at the top or the bottom Adjust the print position of your file to avoid printing over the holes Related Information Paper Handling Precautions on page 24 Avai...

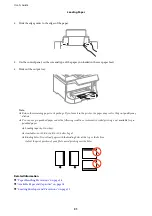
Page 32: ...some papers may not be fed correctly depending on their hardness 1 Slide out the output tray 2 Slide the edge guides to adjust to the paper size you want to use 3 Insert the paper with the printable side facing down until the printer partially pulls in the paper cImportant Load paper short edge first However when you have set the long edge as the width of the user defined size load paper long edge...

Page 33: ...s on the printout Do not use envelopes with adhesive surfaces on the flaps or window envelopes Avoid using envelopes that are too thin as they may curl during printing Related Information Available Paper and Capacities on page 24 Loading Paper in the Rear Paper Feed on page 30 Setting the Paper Size and Paper Type for Each Paper Source After loading paper set the paper size and paper type for each...

Page 34: ...3 Select the paper size and paper type you loaded Related Information List of Paper Types on page 27 User s Guide Loading Paper 34 ...

Page 35: ... and then click Help Operations may differ depending on the application See the application s help for details 1 Load paper in the printer 2 Open the file you want to print 3 Select Print or Print Setup from the File menu 4 Select your printer 5 Select Preferences or Properties to access the printer driver window 6 Make the following settings Paper Source Select the paper source in which you loade...

Page 36: ... Vivid as the Quality setting to make your printout vivid 7 Click OK to close the printer driver window 8 Click Print Related Information Available Paper and Capacities on page 24 Loading Paper in the Paper Cassette on page 28 Loading Paper in the Rear Paper Feed on page 30 Loading Paper in the Front Paper Feed Slot on page 32 List of Paper Types on page 27 Printing Basics Mac OS X Note Operations...

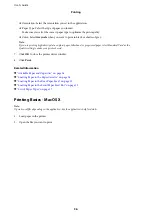
Page 37: ...y click Show Details or d to expand the print window 4 Make the following settings Printer Select your printer Paper Size Select the paper size you set in the application Orientation Select the orientation you set in the application 5 Select Print Settings from the pop up menu User s Guide Printing 37 ...

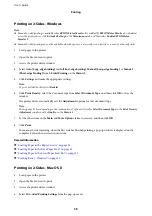
Page 38: ...e 32 List of Paper Types on page 27 Printing on 2 Sides You can use either of the following methods to print on both sides of the paper Automatic 2 sided printing Manual 2 sided printing for Windows only When the printer has finished printing the first side flip the paper over to print on the other side You can also print a booklet that can be created by folding the printout For Windows only Note ...

Page 39: ...m Select Document Type and then click OK to close the window The printer driver automatically sets the Adjustments options for that document type Note Printing may be slow depending on the combination of options selected for Select Document Type in the Print Density Adjustment window and for Quality on the Main tab 7 Set the other items on the Main and More Options tabs as necessary and then click...

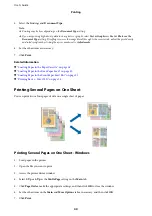
Page 40: ...Paper Cassette on page 28 Loading Paper in the Rear Paper Feed on page 30 Loading Paper in the Front Paper Feed Slot on page 32 Printing Basics Mac OS X on page 36 Printing Several Pages on One Sheet You can print two or four pages of data on a single sheet of paper Printing Several Pages on One Sheet Windows 1 Load paper in the printer 2 Open the file you want to print 3 Access the printer driver...

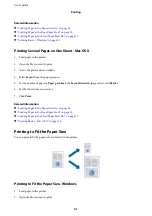
Page 41: ...pop up menu 5 Set the number of pages in Pages per Sheet the Layout Direction page order and Border 6 Set the other items as necessary 7 Click Print Related Information Loading Paper in the Paper Cassette on page 28 Loading Paper in the Rear Paper Feed on page 30 Loading Paper in the Front Paper Feed Slot on page 32 Printing Basics Mac OS X on page 36 Printing to Fit the Paper Size You can print t...

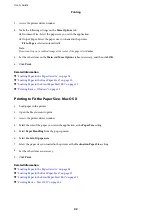
Page 42: ...ading Paper in the Front Paper Feed Slot on page 32 Printing Basics Windows on page 35 Printing to Fit the Paper Size Mac OS X 1 Load paper in the printer 2 Open the file you want to print 3 Access the printer driver window 4 Select the size of the paper you set in the application as the Paper Size setting 5 Select Paper Handling from the pop up menu 6 Select Scale to fit paper size 7 Select the p...

Page 43: ...et the Paper Source Document Size Orientation and Paper Type 6 Click OK to close the printer driver window 7 Click Print The Job Arranger Lite window is displayed and the print job is added to the Print Project 8 With the Job Arranger Lite window opened open the file that you want to combine with the current file and then repeat steps 3 to 7 Note If you close the Job Arranger Lite window the unsav...

Page 44: ...r window 4 Select 2x1 Poster 2x2 Poster 3x3 Poster or 4x4 Poster from Multi Page on the Main tab 5 Click Settings make the appropriate settings and then click OK 6 Set the other items on the Main and More Options tabs as necessary and then click OK 7 Click Print Related Information Loading Paper in the Paper Cassette on page 28 Loading Paper in the Rear Paper Feed on page 30 Loading Paper in the F...

Page 45: ... make a poster when 2x2 Poster is selected and Overlapping Alignment Marks is selected in Print Cutting Guides 1 Prepare Sheet 1 and Sheet 2 Cut off the margins of Sheet 1 along the vertical blue line through the center of the top and bottom cross marks User s Guide Printing 45 ...

Page 46: ...and align the cross marks then temporarily tape the two sheets together from the back 3 Cut the taped sheets in two along the vertical red line through the alignment markers this time the line to the left of the cross marks User s Guide Printing 46 ...

Page 47: ...rom the back 5 Repeat steps 1 to 4 to tape Sheet 3 and Sheet 4 together 6 Cut off the margins of Sheet 1 and Sheet 2 along the horizontal blue line through the center of the left and right side cross marks User s Guide Printing 47 ...

Page 48: ...7 Place the edge of Sheet 1 and Sheet 2 on top of Sheet 3 and Sheet 4 and align the cross marks and then temporarily tape them together from the back User s Guide Printing 48 ...

Page 49: ...8 Cut the taped sheets in two along the horizontal red line through the alignment markers this time the line above the cross marks 9 Tape the sheets together from the back User s Guide Printing 49 ...

Page 50: ...ter 2 Open the file you want to print 3 Access the printer driver window 4 Make the following settings on the Main tab Paper Source Select the paper source in which you loaded the envelopes Document Size Select the envelope size you set in the application Orientation Select landscape Paper Type Select Envelope User s Guide Printing 50 ...

Page 51: ... the pop up menu 6 Make the following settings Paper Source Select the paper source in which you loaded the envelopes Media Type Select Envelope 7 Click Print Related Information Loading Envelopes and Precautions on page 33 Printing Basics Mac OS X on page 36 Printing Using Advanced Features This section introduces a variety of additional layout and printing features available on the printer drive...

Page 52: ...s the color by analyzing the location of the subject Therefore if you have changed the location of the subject by reducing enlarging cropping or rotating the image the color may change unexpectedly Selecting the borderless setting also changes the location of the subject resulting in changes in color If the image is out of focus the tone may be unnatural If the color is changed or becomes unnatura...

Page 53: ...n print information such as a user name and printing date as headers or footers Click Watermark Features in the More Options tab and then select Header Footer Click Settings and select necessary items from the drop down list Setting a Password for a Print Job for Windows Only You can set a password for a print job to prevent printing until the password is entered on the printer s control panel Sel...

Page 54: ...e cancel the print job by using the printer s control panel If you cannot cancel printing from the control panel see the Network Guide Canceling Printing Printer Button Press the y button to cancel the print job in progress Canceling Printing Windows 1 Access the printer driver window 2 Select the Maintenance tab 3 Click Print Queue 4 Right click on the job you want to cancel and then select Cance...

Page 55: ...driver window 2 Click EPSON Status Monitor 3 on the Maintenance tab and then click Details Note If EPSON Status Monitor 3 is disabled click Extended Settings on the Maintenance tab and then select Enable EPSON Status Monitor 3 Related Information Windows Printer Driver on page 76 Checking the Status of the Ink Cartridges and the Maintenance Box Mac OS X 1 Start the printer driver utility Mac OS X ...

Page 56: ...tridges Handling precautions Store ink cartridges at normal room temperature and keep them away from direct sunlight Epson recommends using the ink cartridge before the date printed on the package For best results use up ink cartridge within six months of opening the package After bringing an ink cartridge inside from a cold storage site allow it to warm up at room temperature for at least three h...

Page 57: ...rinter function or performance Do not disassemble or remodel the ink cartridge otherwise you may not be able to print normally Do not drop or knock it against hard objects otherwise the ink may leak You cannot use the cartridges that came with the printer for the replacement Quoted yields may vary depending on the images that you are printing the paper type that you are using the frequency of your...

Page 58: ...ut slightly 3 Remove the ink cartridge from the printer 4 Remove the new ink cartridge from its package cImportant Do not touch the sections shown in the illustration Doing so may prevent normal operation and printing User s Guide Replacing Ink Cartridges and Other Consumables 58 ...

Page 59: ...enuine Epson maintenance box The following is the code for the genuine Epson maintenance box T6712 Maintenance Box Handling Precautions Read the following instructions before replacing the maintenance box Do not touch the green chip on the side of the maintenance box Doing so may prevent normal operation and printing Do not tilt the used maintenance box until after it is sealed in the plastic bag ...

Page 60: ...your LCD or lights on the control panel will advise you when this part needs replacing The need for replacement of the box does not mean that your printer has ceased to operate in accordance with its specifications The Epson warranty does not cover the cost of this replacement It is a user serviceable part 1 Remove the new maintenance box from its package cImportant Do not touch the green chip on ...

Page 61: ...er 1 Related Information Maintenance Box Code on page 59 Maintenance Box Handling Precautions on page 59 Maintenance Rollers Codes Epson recommends the use of genuine Epson maintenance rollers The following are the codes Maintenance rollers of paper cassette 1 S990011 Maintenance rollers of paper cassette 2 to 4 S990021 Replacing Maintenance Rollers in Paper Cassette 1 There are two places for rep...

Page 62: ...nes for paper cassette 1 If you attach the wrong rollers the printer may not feed the paper Be careful not to stain the surface of the maintenance rollers If dust collects on the surface of the maintenance rollers clean the rollers by using a soft and dry cloth 2 Turn off the printer by pressing the P button and then unplug the power cord 3 Pull out paper cassette 1 4 Turn the printer around and o...

Page 63: ...ve the cover inside the back of the printer 7 Slide out the two used maintenance rollers and remove them 8 Insert two new maintenance rollers until they click into place User s Guide Replacing Ink Cartridges and Other Consumables 63 ...

Page 64: ...nce roller for the paper cassette by rolling it up and then remove it 10 Install the new maintenance roller in the paper cassette 11 Hold down the maintenance roller firmly 12 Insert rear cover 2 close rear cover 1 and then insert the paper cassette User s Guide Replacing Ink Cartridges and Other Consumables 64 ...

Page 65: ...age cImportant The maintenance rollers for the paper cassette 1 and paper cassette 2 to 4 are different Check the direction of arrow on the center of the maintenance rollers and make sure the maintenance rollers are the ones for paper cassette 2 to 4 If you attach the wrong rollers the printer may not feed the paper Be careful not to stain the surface of the maintenance rollers If the dust collect...

Page 66: ...around and open the rear cover of the optional paper cassette unit 5 Remove the screws by a screwdriver and remove the cover on the rear of inside the printer User s Guide Replacing Ink Cartridges and Other Consumables 66 ...

Page 67: ...tenance rollers until they click into place Note Insert the maintenance rollers by rolling them so that you can insert them smoothly 8 Hold up the maintenance roller for the paper cassette by rolling it up and then remove it User s Guide Replacing Ink Cartridges and Other Consumables 67 ...

Page 68: ...mation Reset Maintenance Roller Counter and then select the paper cassette in which you replaced the maintenance rollers Related Information Maintenance Rollers Codes on page 61 Temporarily Printing with Black Ink When color ink is expended and black ink still remains you can use the following settings to continue printing for a short time using only black ink Type of paper plain papers Envelope C...

Page 69: ...ck Extended Settings on the Maintenance tab and then select Enable EPSON Status Monitor 3 The available period varies depending on the usage conditions Temporarily Printing with Black Ink Windows 1 When the following window is displayed cancel printing Note If you cannot cancel printing from the computer cancel using the printer s control panel 2 Access the printer driver window User s Guide Repla...

Page 70: ...Bonjour 1 Click the printer icon in the Dock 2 Cancel the job Mac OS X v10 8 x to Mac OS X v10 9 x Click next to the progress meter Mac OS X v10 5 8 to v10 7 x Click Delete Note If you cannot cancel printing from the computer cancel using the printer s control panel 3 Select System Preferences from the menu Printers Scanners or Print Scan Print Fax and then select the printer Click Options Supplie...

Page 71: ...r 3 Enabled Note If EPSON Status Monitor 3 is disabled access the printer driver click Extended Settings on the Maintenance tab and then select Enable EPSON Status Monitor 3 Composite black looks slightly different from pure black In addition the print speed is reduced To maintain the quality of the print head black ink is also consumed Options Description Yes Select to use a mixture of color inks...

Page 72: ...heck and head cleaning about four times wait for at least six hours without printing and then run the nozzle check again and repeat the head cleaning if necessary If the printer operates printing while waiting extend the waiting time We recommend to turn off the printer If print quality has still not improved contact Epson support To prevent the print head from drying out always turn the printer o...

Page 73: ...rinter Driver on page 76 Checking and Cleaning the Print Head Mac OS X 1 Make sure that A4 size plain paper is loaded in the printer 2 Start the printer driver utility Mac OS X v10 6 x to v10 9 x Select System Preferences from the menu Printers Scanners or Print Scan Print Fax and then select the printer Click Options Supplies Utility Open Printer Utility Mac OS X v10 5 8 Select System Preferences...

Page 74: ...al Alignment Select this if you see horizontal banding at regular intervals Note The test pattern may vary by model 5 Follow the on screen instructions to align the print head Vertical Alignment Find and enter the number for the most solid pattern in each group Horizontal Alignment Find and enter the number for the least separated and overlapping pattern Aligning the Print Head Windows 1 Make sure...

Page 75: ...ssue paper to clean the inside of the printer The print head nozzles may be clogged with lint 1 Load a sheet of paper for cleaning the printer When the printouts are smeared or scuffed load A3 size plain paper in the paper source that you want to clean When paper does not feed correctly from the rear paper feed load the cleaning sheet that came with the Epson genuine paper in the rear paper feed I...

Page 76: ...hat controls the printer according to the print commands from other applications Making settings on the printer driver provides the best printing results You can also check the status of the printer or keep it in top operating condition using the printer driver utility Note You can change the language of the printer driver Select the language you want to use from the Language setting on the Mainte...

Page 77: ... to prevent unintended changes of the settings Anti Copy Pattern Watermark Header Footer Color 2 Sided Printing Multi Page Note Log on to your computer as an administrator 1 Open the Optional Settings tab in printer properties Windows 8 1 Windows 8 Windows Server 2012 Select Desktop Settings Control Panel View devices and printers in Hardware and Sound Right click on your printer or press and hold...

Page 78: ...ems Related Information Windows Printer Driver on page 76 Mac OS X Printer Driver The printer driver is an application that controls the printer according to the print commands from other applications Making settings on the printer driver provides the best printing results You can also check the status of the printer or keep it in top operating condition using the printer driver utility Accessing ...

Page 79: ... and envelopes Prevents the ink from smearing when printing on thick paper However the print speed may be slower Skip Blank Page Avoids printing blank pages Quiet Mode Prints quietly However the print speed may be slower Permit temporary black printing Prints only with black ink temporarily High Speed Printing Prints when the print head moves in both directions The print speed is faster but the qu...

Page 80: ...nd then select the displayed icon Windows 7 Windows Vista Windows XP Click the start button and select All Programs or Programs Epson Software EPSON Software Updater Starting on Mac OS X Select Go Applications Epson Software EPSON Software Updater EpsonNet Config EpsonNet Config is an application that allows you to set the network interface addresses and protocols See the Network Guide for more de...

Page 81: ... program in Programs Windows XP Windows Server 2003 R2 Windows Server 2003 Click Add or Remove Programs 5 Select the application you want to uninstall 6 Uninstall the applications Windows 8 1 Windows 8 Windows 7 Windows Vista Windows Server 2012 Windows Server 2008 R2 Windows Server 2008 Click Uninstall Change or Uninstall Windows XP Windows Server 2003 R2 Windows Server 2003 Click Change Remove o...

Page 82: ...Epson Software select the application you want to uninstall and then drag it to the trash icon Related Information EPSON Software Updater on page 80 Installing Applications You can install the applications described in this manual by following the instructions below Note Log on to your computer as an administrator Enter the administrator password if the computer prompts you When reinstalling an ap...

Page 83: ...onnected to the internet 2 Start EPSON Software Updater and update the applications or the firmware cImportant Do not turn off the computer or the printer while updating Note If you cannot find the application you want to update in the list you cannot update using the EPSON Software Updater Check for the latest versions of the applications from your local Epson website http www epson com Related I...

Page 84: ...displayed contact Epson or an authorised Epson service provider to request repairs Maintenance rollers on XX are nearing the end of their service life The maintenance rollers need to be replaced periodically Paper is not fed correctly from the paper cassette when it is time for replacement Prepare new maintenance rollers Maintenance rollers on XX are at the end of their service life Replace the ma...

Page 85: ...er Driver on page 76 Checking Printer Status Mac OS X 1 Start the printer driver utility Mac OS X v10 6 x to v10 9 x Select System Preferences from the menu Printers Scanners or Print Scan Print Fax and then select the printer Click Options Supplies Utility Open Printer Utility Mac OS X v10 5 8 Select System Preferences from the menu Print Fax and then select the printer Click Open Print Queue Uti...

Page 86: ...med paper cImportant Do not touch the parts inside the printer Doing so may cause a malfunction 3 Close the front cover Note If any torn pieces of paper remain select Menu Maintenance Remove Paper after clearing the paper jam error This helps you to remove the remaining pieces of paper Removing Jammed Paper from the Rear Paper Feed B1 Remove the jammed paper User s Guide Solving Problems 86 ...

Page 87: ...oving Jammed Paper from the Front Paper Feed Slot B2 1 Remove the output tray and pull out the paper cassette 2 Pull the lever The cover comes off 3 Remove the jammed paper User s Guide Solving Problems 87 ...

Page 88: ... output tray Removing Jammed Paper from the Paper Cassette C1 C2 C3 C4 Note If the optional cabinet and the paper cassette units are installed do not pull out two or more paper cassettes at the same time 1 Pull out the paper cassette User s Guide Solving Problems 88 ...

Page 89: ...Insert the paper cassette Removing Jammed Paper from Rear Cover 1 D1 and Rear Cover 2 D2 1 Open rear cover 1 2 Remove the jammed paper Note If you cannot remove the paper pull rear cover 2 a little User s Guide Solving Problems 89 ...

Page 90: ...ar cover 2 4 Remove the jammed paper 5 Insert rear cover 2 6 Close rear cover 1 Removing Jammed Paper from the Rear Cover E of the Optional Paper Cassette Unit 1 Open the rear cover User s Guide Solving Problems 90 ...

Page 91: ...er does not feed after replacing the maintenance rollers the rollers may not have been replaced correctly Check if they have been replaced correctly If you have added optional paper cassette units you need to make settings in the printer driver When a no paper error occurs although paper is loaded in the rear paper feed load paper again in the center of the rear paper feed When multiple sheets of ...

Page 92: ...n page 75 Setting the Paper Size and Paper Type for Each Paper Source on page 33 Power and Control Panel Problems Power Does Not Turn On Hold down the P button for a little longer Make sure the power cord is securely plugged in Power Does Not Turn Off Hold down the P button for a little longer If you still cannot turn off the printer unplug the power cord To prevent the print head from drying out ...

Page 93: ...uality is poor due to blurry prints banding missing colors faded colors misalignment and mosaic like patterns in the prints Do not print on paper that is damp damaged or too old If the paper is curled or the envelope is puffed up flatten it When printing images or photos print using high resolution data Images on websites are often low resolution although they look good enough on the display and s...

Page 94: ...idges The use of non genuine ink cartridges may cause print quality to decline Epson recommends using the ink cartridge before the date printed on the package For best results use up ink cartridge within six months of opening the package When printing images or photos Epson recommends using genuine Epson paper rather than plain paper Print on the printable side of the genuine Epson paper Related I...

Page 95: ...velopes setting select Short Grain Paper in the Extended Settings window of the printer driver When printing high density data such as images or graphs using automatic 2 sided printing lower the print density setting and choose a longer drying time Windows Click Print Density on the printer driver s Main tab and then adjust the Increase Ink Drying Time slider Mac OS X Click the arrow next to Adjus...

Page 96: ...rn the printer to normal printing speed cancel printing and leave the printer idle for at least 30 minutes with the power on The printer does not recover if the power is off Close any unnecessary applications Lower the quality setting on the printer driver High quality printing slows down the printing speed Disable quiet mode This feature slows down the printing speed Windows Select Off as the Qui...

Page 97: ...m Preferences from the menu Printers Scanners or Print Scan Print Fax and then select the printer Click Options Supplies Options or Driver Select On as the Quiet Mode setting Forgot Your Password If you forget the administrator s password contact your dealer Related Information Contacting Epson Support on page 115 Application Is Blocked by a Firewall for Windows Only See the Network Guide for deta...

Page 98: ...o 256 g m2 25 to 68 lb Envelope Envelope 10 DL C6 75 to 90 g m2 20 to 24 lb Envelope C4 80 to 100 g m2 21 to 26 lb Printable Area Print quality may decline in the shaded areas due to the printer s mechanism Single sheets A 3 0 mm 0 12 in B 46 0 mm 1 81 in C 51 0 mm 2 01 in Envelopes A 3 0 mm 0 12 in B 5 0 mm 0 20 in C 18 0 mm 0 71 in D 46 0 mm 1 81 in Interface Specifications For Computer Hi Speed...

Page 99: ...rds with support for WPA WPA2 Personal Ethernet Specifications Standards IEEE802 3i 10BASE T IEEE802 3u 100BASE TX IEEE802 3ab 1000BASE T 1 IEEE802 3az Energy Efficient Ethernet 2 Communication Mode Auto 10Mbps Full duplex 10Mbps Half duplex 100Mbps Full duplex 100Mbps Half duplex Connector RJ 45 1 To prevent risk of radio interference we recommend using a Category 5e or higher Shielded Twisted Pa...

Page 100: ...nits and an optional cabinet Dimensions Storage Width 615 mm 24 2 in Depth 794 mm 31 3 in Height 1045 mm 41 1 in Printing Width 615 mm 24 2 in Depth 907 mm 35 7 in Height 1230 mm 48 4 in Weight Approx 78 4 kg 172 8 lb Without the ink cartridges and the power cord Electrical Specifications Rated Power Supply Voltage 100 to 240 V Rated Frequency Range 50 to 60 Hz Rated Current 1 0 to 0 5 A Power Con...

Page 101: ...roximately three hours at 25 C 77 F You can store for one month at 40 C 104 F System Requirements Windows 8 1 32 bit 64 bit Windows 8 32 bit 64 bit Windows 7 32 bit 64 bit Windows Vista 32 bit 64 bit Windows XP Professional x64 Edition Windows XP 32 bit Windows Server 2012 Windows Server 2008 R2 Windows Server 2008 Windows Server 2003 R2 Windows Server 2003 Mac OS X v10 9 x Mac OS X v10 8 x Mac OS...

Page 102: ...thuania Poland Romania and Slovakia Epson cannot accept responsibility for any failure to satisfy the protection requirements resulting from a non recommended modification of the products Restrictions on Copying Observe the following restrictions to ensure the responsible and legal use of the printer Copying of the following items is prohibited by law Bank bills coins government issued marketable ...

Page 103: ...r transporting When lifting the printer place your hands in the positions shown below If you lift the printer holding other positions the printer may fall or you may trap your fingers when placing the printer When carrying the printer do not tilt it more than 10 degrees otherwise the printer may fall When installing the printer on the optional cabinet lock the casters before starting installation ...

Page 104: ...e ink may leak during transporting 1 Turn off the printer by pressing the P button and then unplug the power cord 2 Disconnect any connected cables 3 Remove all of the paper from the printer 4 Store the paper support and the output tray 5 Uninstall the optional cabinet or paper cassette units 6 Repack the printer in its box using the protective materials Remove the protective materials before you ...

Page 105: ...njured When lifting the printer place your hands in the positions shown below If you lift the printer holding other positions the printer may fall or you may trap your fingers when placing the printer 1 Turn off the printer by pressing the P button and then unplug the power cord 2 Disconnect any connected cables Note If optional paper cassette units have been installed uninstall them as well 3 Rem...

Page 106: ...5 Place the cabinet on a flat surface and lock the casters at the front 6 Secure the stands with the attachments and screws User s Guide Appendix 106 ...

Page 107: ...7 Remove the output tray and pull out the paper cassette User s Guide Appendix 107 ...

Page 108: ...t gently onto the cabinet aligning the corners and then secure them with the screws Note Use a screwdriver to tighten the screws when securing the printer Depending on the configuration some screws may be left over after assembly User s Guide Appendix 108 ...

Page 109: ...d plug in the printer Note When uninstalling the cabinet turn off the printer unplug the power cord disconnect any cables and then perform the installation procedure in reverse Related Information Optional Cabinet Code on page 104 Optional Paper Cassette Unit Code The following is the code for the optional paper cassette unit 500 Sheet Optional Cassette Unit User s Guide Appendix 109 ...

Page 110: ...you lift the printer holding other positions the printer may fall or you may trap your fingers when placing the printer cImportant If you are using the optional cabinet install it under the bottom of the paper cassette unit in advance 1 Turn off the printer by pressing the P button and then unplug the power cord 2 Disconnect any connected cables Note If other optional paper cassette units have bee...

Page 111: ...ssette unit where you want to set up the printer 6 Remove the output tray and pull out the paper cassette 7 Stack all optional paper cassette units on top of each other and then secure them with the screws User s Guide Appendix 111 ...

Page 112: ... corners and then secure them with the screws using a screw driver Note Depending on the configuration some screws may be left over after assembly 9 Secure the optional paper cassette unit and the printer at the back with the attachments and screws User s Guide Appendix 112 ...

Page 113: ...r cables and then plug in the printer 14 Turn on the printer by pressing the P button 15 Press the button and check that the optional cassette unit that you installed is displayed on the Paper Setup screen Note When uninstalling the optional paper cassette unit turn off the printer unplug the power cord disconnect any cables and then perform the installation procedure in reverse Proceed with the p...

Page 114: ...ab Windows Vista Windows Server 2008 Click the start button and then select Control Panel Printers in Hardware and Sound Right click on your printer select Property and then click Optional Settings Windows XP Windows Server 2003 R2 Windows Server 2003 Click the start button and select Control Panel Printers and Other Hardware Printers and Faxes Right click on your printer select Property and then ...

Page 115: ...ted below contact the dealer where you purchased your product Epson support will be able to help you much more quickly if you give them the following information Product serial number The serial number label is usually on the back of the product Product model Product software version Click About Version Info or a similar button in the product software Brand and model of your computer Your computer...

Reviews: