background image

62

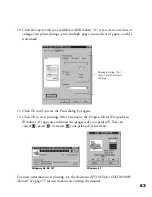
8. Check the following settings:

Make sure the Media Type is set to 

Plain paper

. (If you load a different type 

of paper, select the corresponding Media Type for it, as described on page 76. 
For instructions on loading special paper, see page 73.)

Make sure Ink is set to 

Color

 if you want to print in color.

Set the Mode option to 

Automatic

. This is the easiest way to get good 

printing results for all kinds of documents, on all types of paper.

Move the Quality/Speed slider to the 

Quality

 setting. This selects high quality 

printing for your media. (The slider is not available for some media types. You 
can use a higher resolution on some papers on the Advanced [More Settings in 
Windows 3.1] dialog box; see page 70 for instructions.)

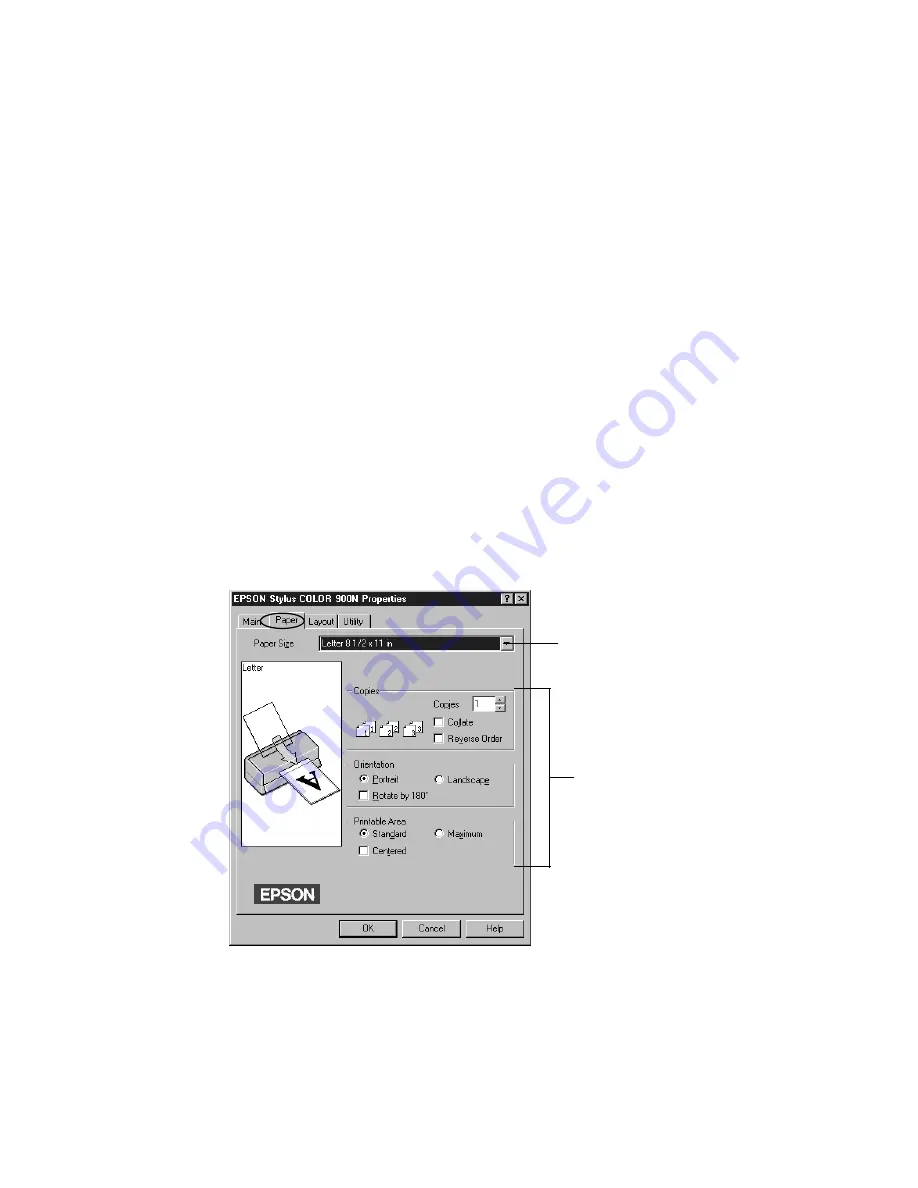
9. Click the 

Paper

 tab at the top of the dialog box if you need to change the paper 

size, number of copies, or page orientation.

Paper Size setting

Copies, Orientation, and 
Printable Area settings. 
Rotate by 180° is not 
available with Windows 3.1

basicprn.fm  Page 62  Friday, February 19, 1999  4:01 PM

Summary of Contents for 900N

Page 1: ...Epson America Inc Stylus COLOR 900N User s Guide ...

Page 2: ...t or excluding the U S failure to strictly comply with SEIKO EPSON CORPORATION s operating and maintenance instructions SEIKO EPSON CORPORATION shall not be liable for any damages or problems arising from the use of any options or any consumable products other than those designated as Original EPSON Products or EPSON Approved Products by SEIKO EPSON CORPORATION Trademarks EPSON and EPSON Stylus ar...

Page 3: ...tenna Increase the separation between the equipment and receiver Connect the equipment into an outlet on a circuit different from that to which the receiver is connected Consult the dealer or an experienced radio TV technician for help WARNING The connection of a non shielded equipment interface cable to this equipment will invalidate the FCC Certification of this device and may cause interference...

Page 4: ...y Instructions 9 SETTING UP YOUR PRINTER 11 Unpack the Printer 11 Attach the Paper Support 12 Install the Ink Cartridges 13 Load Paper 16 Connect the Printer to Your Network 17 Printing a Status Sheet 17 CONFIGURING THE PRINTER FOR THE NETWORK 19 Install the Network Software 21 Installing EPSON Net 2 21 Installing Status Monitor 2 23 Configuring for NetWare 26 Using NwAdmin to Set Up Your Printer ...

Page 5: ...NIC MANUAL 55 Installing the Manual 55 Installing Acrobat Reader 56 Opening Your Electronic Manual 56 Navigating an Electronic Manual 57 BASIC PRINTING 59 Printing with Windows 60 Printing with a Macintosh 64 Using Custom Project Types 67 Using the Advanced Dialog Box 70 Using Special Papers 73 EPSON Photo Paper 73 Envelopes 75 Selecting the Correct Media Type 76 MAINTAINING YOUR PRINTER 77 Cleani...

Page 6: ...he Printer or Installing Its Software 92 Problems Getting Good Print Quality 93 Uninstalling Printer Software 97 Uninstalling Your Printer Driver 97 Uninstalling EPSON Status Monitor 2 99 Uninstalling EPSON Net 2 100 Where To Get Help 100 INSTALLING SOFTWARE FROM DISKETTES 103 Creating the Software Diskettes 103 Using the Disk Creation Utility 103 Copying Macintosh Files 106 Ordering Printer Softw...

Page 7: ...iv Installing the Printer Driver in Windows 110 Installing the Printer Driver in Macintosh 111 INDEX 113 ...

Page 8: ...even on plain paper Smallest ink droplets available 3 picoliters for finest detail and smoothest gradations EPSON s unique variable micro droplet technology for superior image quality Integrated Ethernet card for complete network connectivity Flexible resource sharing for multiple types of networks and operating systems Four color printing for photo quality color and sharp black text on plain pape...

Page 9: ...o install and use your electronic EPSON Stylus COLOR 900N Manual Basic Printing covers the basics of printing with Windows or Macintosh Maintaining Your Printer gives instructions for replacing ink cartridges cleaning and aligning the print heads and cleaning and transporting the printer Problem Solving provides solutions for problems you may have For solutions to network problems see Chapter 12 i...

Page 10: ...llow these guidelines Warnings must be followed carefully to avoid bodily injury Cautions must be observed to avoid damage to your equipment Notes contain important information about your printer Tips contain additional hints for better printing ...

Page 11: ... or Windows NT 4 0 At least 16MB of RAM 32MB recommended for Windows 95 or 98 or 64MB for Windows NT 4 0 At least 50MB of free hard disk space 100MB recommended VGA Super VGA or better display adapter and monitor Double speed 2x CD ROM drive quad 4x or faster recommended for installing the printer software Ethernet network connection A twisted pair 10BaseT or 100BaseTX cable to connect the printer...

Page 12: ... 475 575 588 630 5210 or later Power Macintosh series iMac series System 7 5 1 or later 7 6 or later recommended or iMac with System 8 1 or later At least 16MB of available RAM 32MB recommended At least 50MB of free hard disk space 100MB recommended RGB display or better Double speed 2x CD ROM drive quad 4x or faster recommended for installing the printer software Network connection to Ethernet A ...

Page 13: ...gy efficient personal computers monitors printers fax machines and copiers in an effort to reduce air pollution caused by power generation Year 2000 Ready Your EPSON printer is Year 2000 Ready However be sure the other parts of your network and computer systems are also ready for the year 2000 Printer Parts ink cartridge clamps thickness lever control panel sheet feeder left edge guide output tray...

Page 14: ...ter for protocols including Novell NetWare TCP IP and AppleTalk EPSON Status Monitor 2 for Windows allows you to monitor your printer over the network and use TCP IP for printing in Windows 98 Windows 95 peer to peer networks Your printer driver for Windows and Macintosh runs your printer and lets you control how your documents look The EPSON Driver Disk Creation utility lets you create diskettes ...

Page 15: ...r source indicated on the printer s label Connect all equipment to properly grounded power outlets Avoid using outlets on the same circuit as photocopiers or air control systems that regularly switch on and off Place the printer near a wall outlet where the plug can be easily unplugged Placez l imprimante près d une prise de contacte où la fiche peut être débranchée facilement Do not let the power...

Page 16: ...dges or try to refill them This could result in damage to the print head Once you install an ink cartridge do not open the clamp or remove the cartridge except to replace it with a new one The cartridge may become unusable otherwise Install the ink cartridge immediately after you remove it from its foil package Leaving the cartridge unpacked for a long time before use may result in reduced print q...

Page 17: ...10 ...

Page 18: ...the printer to your network Unpack the Printer Remove any packing material from the printer as described on the unpacking sheet in the printer box Then make sure you have these items You ll also need a network cable to connect your printer this Start Here book Administrator s Manual EPSON Photo Paper Pack printer software CD ROM black ink cartridge color ink cartridge printer paper support ...

Page 19: ...ear an available grounded outlet but avoid areas With high temperature or humidity In direct sunlight or dusty conditions Near sources of heat or electromagnetic interference such as loudspeakers or cordless telephone base units Also be sure to check safety requirements and follow all the safety instructions in the Introduction ...

Page 20: ...which can erase memory or even damage the power supply 2 Unwrap the ink cartridges Then remove only the yellow part of the tape seal on the top as shown Don t pull off the blue portion or remove the clear seal underneath the cartridge To ensure the print heads charge correctly install the ink cartridges that came with your printer You must remove the yellow tape from the top of the cartridge or yo...

Page 21: ...he printer The P power light flashes and the B and A ink out lights come on The black ink cartridge holder moves slightly left to the loading position Always use the P power button to turn the printer on or off Never use the external switch on a power strip 5 Lift up the black ink cartridge clamp ...

Page 22: ... 8 Repeat steps 5 and 6 to install the color ink cartridge 9 Press the R cleaning button to begin charging the ink delivery system and then close the printer cover Charging takes about 2 minutes The P power light flashes and the printer makes various sounds until it s finished Don t turn off the printer or interrupt this charging process or it will start over using more ink than necessary Charging...

Page 23: ...dge guide right until it is a little wider than your paper 2 Load a stack of plain paper with the printable side up and place it against the right edge guide Then slide the left edge guide to the paper s left edge Don t load paper higher than the arrow on the guide ...

Page 24: ...he status sheet button Continue pressing the status sheet button for five seconds Printing a Status Sheet To print a status sheet press the status sheet button and hold it for about three seconds This sheet gives you important information including the serial number and MAC address hardware address of the card Keep the status sheet so you can use it when you configure the Ethernet card status shee...

Page 25: ...18 ...

Page 26: ...e Ethernet card page 39 4 Printer driver on each workstation page 49 NetBEUI TCP IP must also be installed 1 EPSON Net 2 page 21 2 EPSON Status Monitor 2 page 23 3 IP address for the Ethernet card page 39 4 NetBEUI settings on the Ethernet card home page page 46 5 Printer driver on each workstation page 49 Novell NetWare 1 EPSON Net 2 page 21 and page 33 2 EPSON Status Monitor 2 page 23 3 Setup us...

Page 27: ... TCP IP must also be installed 1 EPSON Net 2 page 21 2 EPSON Status Monitor 2 page 23 3 IP address for the Ethernet card page 39 4 NetBEUI settings on the Ethernet card home page page 46 5 Printer driver on each workstation page 49 Novell NetWare 1 EPSON Net 2 page 21 and page 33 2 EPSON Status Monitor 2 page 23 3 Setup using NwAdmin page 26 or PCONSOLE Administrator s Manual Chapter 4 4 Printer d...

Page 28: ...re Before you start turn off all other active applications including virus protection programs If you need to create diskettes to install the software see page 103 Then follow the configuration instructions starting on page 26 For TCP IP networks if you want to use the arp command to set the card s IP address instead of installing EPSON Net 2 see page 42 Installing EPSON Net 2 If you have the foll...

Page 29: ...en you are finished you can install Status Monitor 2 to monitor information about your printer including ink levels and printer errors See page 23 for instructions Status Monitor 2 can create extra network traffic so if you don t want to install it you can skip to configuring the Ethernet card with EPSON Net 2 See page 26 for NetWare and page 39 for TCP IP and NetBEUI If you have any Windows 98 or...

Page 30: ...rk Status Monitor 2 lets you monitor information from the server or from any of the workstations where you install it It gives you ink levels in the printer and notifies you if the printer has any problems It does create network traffic however so you may want to limit the number of users who monitor the printer Status Monitor 2 also includes the EPSON TCP IP printing protocol which allows Windows...

Page 31: ...A screen appears asking where you want to install Status Monitor 2 4 Click Next to accept the default directory or choose a different directory and click Next 5 If you are using Windows 98 or Windows 95 and you have TCP IP installed you see a screen asking you if you want to enable EPSON TCP IP printing Select Yes if you want to print with TCP IP and then click Next TCP IP Printing Yes_______ No__...

Page 32: ... 11 From the EPSON Installation Program screen highlight Install Status Monitor 2 for EPSON Stylus COLOR 900N and click the right arrow button 12 Click Next then follow steps 5 through 8 using the same settings you used in those steps 13 Check the current settings and click Next Select Yes and click Finish to restart your computer 14 After you restart your computer right click the green background...

Page 33: ...ee page 4 2 in your Administrator s Manual for details Using NwAdmin to Set Up Your Printer You must first use NwAdmin to define your printer define a print server and set up a queue If the client does not correspond to NDS set up the printer print server and queue in the bindery context When printing using bindery correspondence clients make the object related to the print server right under the ...

Page 34: ... the administrator tool NwAdmin 3 Create a printer Click the directory context icon or bindery context and select Object Create and then Printer Type the printer name and click Create 4 Create a print server Click the directory context icon or bindery context and select Object Create and then Print Server Type the print server name and click Create ...

Page 35: ...xt and select Object then Create and then Print Queue Type the print queue name and select the print queue volume Then click Create The objects you have just created are added to the NDS tree or bindery 6 Double click the Printer Object icon on the NetWare Administrator screen ...

Page 36: ...signments and then click Add 8 From the print queue list select the queue you want to assign and click OK 9 For Print Server mode go to step 11 For Remote Printer mode click Configuration select Other Unknown for the Printer type box and click OK ...

Page 37: ...rint server object icon on the NetWare Administrator screen 11 The Print Server dialog box appears Click Assignments and then click Add 12 From the printer object list select the printer object you want to assign and click OK ...

Page 38: ...go to step 14 For Remote Printer mode go back to the screen in step 11 and click the Printer Number button to set up the printer number from 0 to 254 14 Double click the print queue object icon on the NetWare Administrator screen ...

Page 39: ...x appears Click Assignments Check that the print server and the printer are assigned to the queue You now need to use EPSON Net 2 to configure the card For Print Server mode see the section below For Remote Printer mode go to page 36 ...

Page 40: ...n off background monitoring following step 14 on page 25 If you have connected more than one printer with the same type of Ethernet card to the network you can distinguish the cards by their MAC addresses Press and hold the card s status sheet button for three seconds to print a status sheet with the MAC address of the card If the IP address is set to the default IP address the printer model might...

Page 41: ...thernet II or SNAP Mode Select Print Server NDS Select Enable or Disable NDS Tree name If you are using NDS mode type the same name as you used in NwAdmin up to 31 characters NDS Context NDS context is the Object rank in the Directory tree Type the container object up to 255 characters from the Object to the Root Do not type the at the top ...

Page 42: ...word Type any new password up to 19 characters The characters you enter appear as Print server name Type any new name up to 47 characters The default name consists of the printer name and the last six digits of the Ethernet card s serial number Polling interval Set the polling time from 5 to 90 seconds 5 Click OK to save your changes If the message Configuration is successfully done appears on you...

Page 43: ... turned on it may interfere with EPSON Net 2 Close Status Monitor 2 if it is running and turn off background monitoring following step 14 on page 25 If you have connected more than one printer with the same type of Ethernet card to the network you can distinguish the cards by their MAC addresses Press and hold the card s status sheet button for three seconds to print a status sheet with the MAC ad...

Page 44: ...appears 3 Highlight your printer and click Configuration 4 Click the NetWare Basic tab and make the following settings Frame type Select one of the following Auto Ethernet 802 2 Ethernet 802 3 Ethernet II Ethernet SNAP Mode Select Remote Printer ...

Page 45: ...Type the container object up to 255 characters from the Object to the Root Do not type the at the top See your NetWare manual for the available characters and number of characters you can use 5 Click the Remote Printer tab and make the following settings Primary print server Select the print server name you have created Printer port number Type the same port number you assigned to the print server...

Page 46: ...address You can use EPSON Net 2 or the arp command to do this as described in the sections below Windows 98 and Windows 95 do not come with the TCP IP printing protocol so in addition to TCP IP you need to install the EPSON TCP IP printing protocol included with Status Monitor 2 See page 23 for instructions See your Windows documentation or Help system to set up TCP IP If the Status Monitor 2 util...

Page 47: ...t 2 then click EPSON Net 2 3 Click the printer where you want to set the IP address and then click the Configuration button If you have connected more than one printer with the same type of Ethernet card to the network you can distinguish the cards by their MAC addresses Press and hold the card s status sheet button for three seconds to print a status sheet with the MAC address of the card click h...

Page 48: ...m documentation for the settings 6 Assign the IP address the Subnet mask and the Default gateway If you use DHCP to acquire an IP address you can t assign these items they are assigned by the server If you will use the card s internal home page assign an IP address manually The default IP address is 11 22 33 44 If you plan to use the card s internal home page change the default IP address If a ser...

Page 49: ...he IP address for the computer and the IP address you will assign to the printer s Ethernet card Follow these steps to assign the IP address 1 Click Start point to Settings click Control Panel and double click the Network icon 2 In Windows 98 or Windows 95 highlight TCP IP and click Properties then click the Gateway tab In Windows NT click the Protocols tab Highlight TCP IP Protocol and click Prop...

Page 50: ...ess For example ping 192 1 1 6 You see a message similar to the following Reply from 192 1 1 6 bytes 32 time 10ms TTL 30 Reply from 192 1 1 6 bytes 32 time 10ms TTL 30 Reply from 192 1 1 6 bytes 32 time 10ms TTL 30 Reply from 192 1 1 6 bytes 32 time 10ms TTL 30 This shows that the Ethernet card is correctly set up for TCP IP If you receive 4 lines that say Request Timed Out the card is not set up ...

Page 51: ...ge 49 Add a printer port see page 51 See page 46 if you need to enable NetBEUI on the Ethernet card Configuring for AppleTalk To use your printer on an AppleTalk network you need to configure the Ethernet card for AppleTalk Follow these steps to configure your card using EPSON Net 2 1 Open the EPSON Net 2 utility You see a window like the following ...

Page 52: ... the printer name and the last six digits of the Ethernet card s serial number Entity Type You do not have to set this option Zone Name Select the network zone in which you want the printer to appear If the zone has not been set appears Network Number Set Select the network number setting In most cases you should select Auto Network Number for Manual Mode The default number is 65535 If you have se...

Page 53: ...scape Navigator 3 0 or later EPSON Net 2 for Windows and the Ethernet card home page can t be open at the same time If you have not assigned an IP address to the Ethernet card or if you use the default setting including when you select DHCP to acquire an IP address you can t configure the Ethernet card for NetBEUI using the Ethernet card home page Then follow these steps to access the Ethernet car...

Page 54: ...ique name for the network For the workgroup name type the domain name or the workgroup name used in the Windows network 4 Type the NetBIOS name up to 15 characters the workgroup name up to 15 characters and the device name up to 8 characters There are some restrictions on the characters you can use For details see your browser or operating system documentation 5 Click SUBMIT to update the settings...

Page 55: ...48 6 If the message Configuration change is complete appears on your screen the update is complete Enable the changes by pressing RESET or turning your printer off and on ...

Page 56: ...rmation about your printer Status Monitor 2 does create traffic so you might want to limit the number of users who monitor the printer To install Status Monitor 2 see the instructions on page 23 If you are using only Windows 98 and or Windows 95 on a TCP IP network you must install EPSON Status Monitor 2 on each workstation If your workstation does not have a CD ROM drive you can create diskettes ...

Page 57: ...een click Start Run and type D EPSETUP where D is the drive letter of your CD ROM Then click OK 2 Highlight Install Printer Driver and click the right arrow button 3 Click OK to install the printer driver Your printer is automatically set to your local port LPT1 You need to change it to follow the network path to your printer by adding a port See the section below ...

Page 58: ...t up on Then click OK In Windows NT 4 0 click LPR Port then type the printer s IP address and the name you want to assign Click OK Close and OK again Installing in Windows 3 1x 1 Make sure Windows Program Manager is running and exit any open application programs 2 Insert the printer software CD ROM 3 Open the File menu and select Run 4 Type D EPSETUP where D is the drive letter of your CD ROM and ...

Page 59: ...k path to your printer 4 Click Connect and then click Close Installing on a Macintosh 1 Turn on your printer and your Macintosh and turn off any virus protection programs you may have 2 Insert the printer software CD ROM 3 Double click the Installer icon 4 Follow the instructions on the screen and restart your computer To use the printer or configure the printer s Ethernet card you need to select ...

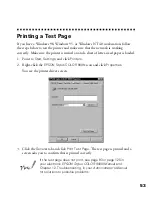
Page 60: ...o Start Settings and click Printers 2 Right click the EPSON Stylus COLOR 900N icon and click Properties You see the printer driver screen 3 Click the General tab and click Print Test Page The test page is printed and a screen asks you to confirm that it printed correctly If the test page does not print see page 93 or page 128 in your electronic EPSON Stylus COLOR 900N Manual and Chapter 12 Trouble...

Page 61: ...54 ...

Page 62: ...CD ROM into your CD ROM drive Then use Windows Explorer or My Computer to copy the file 900Ndoc pdf to a directory on your hard disk Windows 3 1 Insert the printer software CD ROM into your CD ROM drive Then use Windows File Manager to locate the file 900Ndoc pdf and copy it to a directory on your hard disk Macintosh Insert the printer software CD ROM in your CD ROM drive Then drag and drop the MA...

Page 63: ...installation creates an Adobe Acrobat program group in Program Manager Macintosh Insert the printer software CD ROM in your CD ROM drive Double click the Reader 3 01 Installer icon and follow the instructions on the screen to install Acrobat Reader Opening Your Electronic Manual Follow the instructions below for your operating system to open your electronic EPSON Stylus COLOR 900N Manual Windows 9...

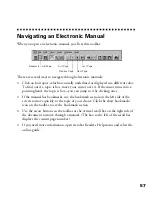
Page 64: ... it by clicking once If the manual has bookmarks use the bookmark section on the left side of the screen to move quickly to the topic of your choice Click the show bookmarks icon on the toolbar to see the bookmark section Use the arrow buttons in the toolbar or the vertical scroll bar on the right side of the document to move through a manual The box to the left of the scroll bar displays the curr...

Page 65: ...58 ...

Page 66: ... Follow the step by step instructions for your operating system in these sections Printing with Windows on page 60 Printing with a Macintosh on page 64 For instructions on using special papers such as EPSON Photo Paper or envelopes see page 73 For instructions on customizing your settings to fine tune your printouts see Using Custom Project Types on page 67 and Using the Advanced Dialog Box on pag...

Page 67: ...e paper feeds into the printer first 3 Open a Windows application program and select a document to print 4 Open the File menu and click Print You see the Print dialog box for your application the Print dialog box for your application may look slightly different 5 Make sure EPSON Stylus COLOR 900N is selected slide paper against the right edge guide load paper only up to this arrow If you see a Pro...

Page 68: ...ndows 3 1 you won t see a Properties button just click Setup Printer or Options until you see the window in step 7 7 Now you see the printer settings dialog box If necessary click the Main tab to display the settings shown below Quality Speed slider MediaType setting Automatic mode setting Ink setting Quality Speed slider Media Type setting Automatic mode setting Ink setting Windows 95 98 or NT Wi...

Page 69: ...results for all kinds of documents on all types of paper Move the Quality Speed slider to the Quality setting This selects high quality printing for your media The slider is not available for some media types You can use a higher resolution on some papers on the Advanced More Settings in Windows 3 1 dialog box see page 70 for instructions 9 Click the Paper tab at the top of the dialog box if you n...

Page 70: ...x again 12 Click OK to start printing After a moment the Progress Meter Despooler in Windows 3 1 appears and shows the progress of your print job You can cancel pause or restart your print job as necessary For more information on printing see the electronic EPSON Stylus COLOR 900N Manual See page 55 for instructions on viewing the manual Reduce Enlarge Print Layout and Watermark settings Windows 9...

Page 71: ...w on the guide If you are using letterhead or preprinted paper be sure the top of the paper feeds into the printer first 3 Open a Macintosh application program and select a document to print 4 Open the File menu and choose Page Setup Document Setup in some applications You see a Page Setup dialog box like this 5 Choose your paper size page orientation and printable area settings Then click OK slid...

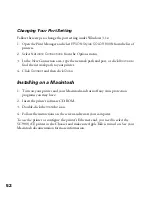
Page 72: ... Make sure Ink is set to Color if you want to print in color Set the Mode option to Automatic This is the easiest way to get good printing results for all kinds of documents on all types of paper Move the Quality Speed slider to the Quality setting This selects high quality printing for your media The slider is not available for some media types You can use a higher resolution on some papers on th...

Page 73: ...of paper or add a watermark 9 Click the Background Printing icon if you want to prioritize or schedule your print job for printing 10 Click the Preview icon then click the Preview button that appears if you want to preview how your layout and other settings will look The Print button changes to the Preview button ...

Page 74: ...tware includes custom project types with preset options for printing specific types of documents or images such as photographs graphics text and drafts These custom project types let you quickly select the best settings for your particular type of document and paper Some project types may not be available depending on your operating system and the Media Type and Ink settings you choose You can als...

Page 75: ...e you want to print on If you re not sure which setting to choose see Selecting the Correct Media Type on page 76 4 Choose Color or Black ink 5 Click Custom in Windows 3 1 click Advanced and then click Custom Settings You see the list of project types Windows 95 98 NT Click Custom then click here to see a list of project types Windows 3 1 Click Advanced then click here to see a list of project typ...

Page 76: ...ive documents like presentations with charts and graphs Economy For printing rough drafts of text on plain paper Saves ink ICM Image Color Matching Windows 95 and Windows 98 only For printing documents created in an ICM compatible application sRGB Standard Red Green Blue not available with Windows 3 1 recommended only with Windows 98 For printing documents created in an sRGB compatible application...

Page 77: ...ings dialog box as described in Printing with Windows on page 60 or Printing with a Macintosh on page 64 2 Click Custom and then click the Advanced button In Windows 3 1 click Advanced then click the More Settings button You see the Advanced dialog box called More Settings in Windows 3 1 Windows 95 98 NT Some of these options are automatically set or disabled by other settings you choose Windows 3...

Page 78: ... Choose one of the following Halftoning options No Halftoning Select when printing black text only Error Diffusion For printing photographic images Blends each color dot with the dots around it Fine Dithering For printing graphs or other images that require precise solid areas of bright colors 6 Choose any of the following print options MicroWeave This option is automatically selected or disabled ...

Page 79: ...ments created in an ICM compatible application sRGB Standard Red Green Blue not available with Windows 3 1 recommended only with Windows 98 For printing documents created in an sRGB compatible application using sRGB colors such as those designed for the World Wide Web See your Windows 98 online help for details ColorSync Macintosh only Automatically adjusts printout colors to closely match the col...

Page 80: ...ocessing EPSON 4 6 inch Photo Paper is micro perforated around the edges so you can trim your printouts and bleed the photo extend it to the edge of the paper on all sides Photo Paper is also available in A4 8 3 11 7 inches and Panoramic 8 27 23 4 inches sizes Keep the following in mind when using EPSON Photo Paper Always load the paper with the whiter glossier side facing up Load up to 20 sheets ...

Page 81: ...de against the left edge of the paper 3 When you create the image in your application software size it to 4 25 6 25 inches You can also use your printer software s Reduce Enlarge settings as described in your EPSON Stylus COLOR 900N Manual 4 Choose Photo Paper as the Media Type setting 5 Choose Photo Paper 4 6 in as the Paper Size setting and Maximum as the Printable Area setting 6 After you print...

Page 82: ...tter results if you press each envelope flat before loading it or try loading one envelope at a time Select Plain paper as the Media Type and choose the correct envelope size as the Paper Size setting in the printer software Set the thickness lever to the position when you print on envelopes or other thick media as shown here Make sure you return the lever to the 0 position before you print on reg...

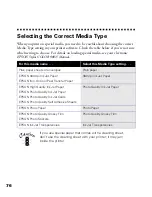
Page 83: ...e the cleaning sheet with your printer it may jam inside the printer For this media name Select this Media Type setting Plain paper sheets or envelopes Plain paper EPSON 360 dpi Ink Jet Paper EPSON Iron On Cool Peel Transfer Paper 360 dpi Ink Jet Paper EPSON High Quality Ink Jet Paper EPSON Photo Quality Ink Jet Paper EPSON Photo Quality Ink Jet Cards EPSON Photo Quality Self Adhesive Sheets Photo...

Page 84: ...t or dots are missing from the image you may need to clean the print head This unclogs the nozzles so they can deliver ink properly Cleaning the print head uses ink so clean it only if print quality declines You can clean the print head in either of the following ways Using the Head Cleaning utility in your printer software when the printer is connected to a local port not over a network as descri...

Page 85: ...e noise and the P power light flashes Never turn off the printer while the P power light is flashing unless the printer hasn t moved or made noise for more than 5 minutes 6 When the P power light stops flashing run a nozzle check to test the results and reset the cleaning cycle Make sure paper is loaded in the printer and click Print nozzle check pattern Windows or Confirmation Macintosh Then clic...

Page 86: ...ozzle check Go to step 4 If you re using DOS open an application and print a document containing black and color data Then go to step 8 4 Start an application open a document and access the printer settings dialog box as described in Printing with Windows on page 60 or Printing with a Macintosh on page 64 5 Click the Utility tab Windows or the Utility icon Macintosh You see the Utility menu 6 Make...

Page 87: ...a good time to make sure you have a new cartridge When the light stays on the cartridge is empty and you need to replace it You cannot print if either ink cartridge is empty You can also check your ink levels using the EPSON status monitor not available for Windows 3 1 See your electronic EPSON Stylus COLOR 900N Manual for details Use these EPSON ink cartridges within six months of installing them...

Page 88: ...d on page 77 Follow these steps to replace ink cartridges 1 Remove the new ink cartridge from its packaging 2 Remove only the yellow part of the tape seal on top as shown to the right Don t pull off the blue portion or try to remove the clear seal underneath the cartridge You must remove the yellow tape from the top of the cartridge or you will permanently damage it Do not remove the clear seal fr...

Page 89: ...r the new ink cartridge into its holder with the label facing up and toward the back of the printer 8 Press down the ink cartridge clamp until it locks in place 9 If you need to replace the other ink cartridge repeat steps 4 through 8 before continuing with step 10 10 Press the R cleaning button and close the printer cover The printer moves the print head and begins charging the ink delivery syste...

Page 90: ...llow tape from the top of the cartridge or you will permanently damage it Do not remove the clear seal from the bottom of the cartridge ink will leak 3 Make sure the printer is turned on and not printing then open the printer cover 4 Press the E load eject button and hold it down for three seconds until the print head moves to the left to the black ink cartridge replacement position and the Ppower...

Page 91: ...e 10 Press the E load eject button The print head moves to the color ink cartridge replacement position If you need to replace the color ink cartridge repeat steps 6 through 9 Then continue with step 11 11 Press the E load eject button again and close the printer cover The printer moves the print head and begins charging the ink delivery system The P power light flashes and the printer makes vario...

Page 92: ...t least 8 27 inches 210 mm wide This prevents ink from spraying inside the printer and smudging your printouts For the best results load EPSON ink jet paper in the printer whenever you check the print head alignment 2 Access the printer settings dialog box as described on page 61 Windows or page 65 Macintosh 3 Click the Utility tab Windows or the Utility icon Macintosh You see the Utility menu 4 C...

Page 93: ...xterior of the printer with a soft damp cloth 4 Clean ink out of the printer s interior with a soft damp cloth Don t touch the gears inside the printer Never use alcohol or thinner for cleaning they can damage the printer components and case Don t use a hard or abrasive brush Don t get water on the printer components and don t spray lubricants or oils inside the printer Don t use any cleaning shee...

Page 94: ...l outlet Then disconnect the network cable from the printer 3 Remove any paper from the printer and remove the paper support 4 Open the printer cover Secure the ink cartridge holder to the printer with tape as shown then close the printer cover 5 Push in the output tray extensions and close the tray 6 Repack the printer and attachments in the original box using the protective materials that came w...

Page 95: ...88 ...

Page 96: ...ubleshooting section of your electronic EPSON Stylus COLOR 900N Manual If none of the suggested solutions solve your problem contact your EPSON dealer or see Where To Get Help on page 100 Diagnosing Printer Problems You can diagnose some problems by checking the printer s control panel lights as described below It may also be helpful to try running a printer check see page 91 for instructions Chec...

Page 97: ... replacement cartridge B or A are on When an ink out light comes on you need to replace the ink cartridge See page 80 for instructions P and S flash and B and A are on When the P power and S paper out lights flash and the B black and A color ink out lights come on jammed paper may be blocking movement of the print head Turn off the printer wait a few seconds and turn it back on If no paper ejects ...

Page 98: ... Ppower button Continue holding down the E load eject button until the Ppower light starts to flash then release it The printer prints one page showing its ROM version number ink counter and a nozzle check pattern Only the nozzle check pattern is shown below 5 To end the check turn off the printer after it prints the check page Then reconnect the interface cable and turn on your printer and comput...

Page 99: ...r while it is charging it will begin charging again the next time you turn on the printer and use more ink than necessary Make sure the ink cartridge clamps are locked down completely and that no packing material remains in the printer If your printer makes noise when you turn it on or after it has been sitting for a while Your printer is performing routine maintenance If you re having problems in...

Page 100: ...ndows Make sure you installed both parts of Status Monitor 2 If you didn t uninstall your printer driver and Status Monitor 2 as described on page 97 Then see page 23 to install Status Monitor 2 After that re install your printer driver following the instructions on page 49 Once you ve installed Status Monitor 2 make sure background monitoring is turned on See your electronic EPSON Stylus COLOR 90...

Page 101: ...place it see page 83 Try using Automatic mode See page 62 Windows or page 65 Macintosh for instructions Make sure the paper thickness lever is in the 0 position as shown to the right Set the thickness lever to the position when you print on thicker paper or envelopes If you see vertical banding Make sure the print head nozzles are not clogged To clean the print head see page 77 Run the Print Head ...

Page 102: ... with special media or try loading your media one sheet at a time Make sure your paper or media meets the specifications listed in your electronic EPSON Stylus COLOR 900N Manual Run the Print Head Alignment utility See page 85 for instructions Check the paper thickness lever position If it s in the position your printer is set for thicker paper or envelopes and your image may smear For most papers...

Page 103: ...ure the print head nozzles are not clogged To clean the print head see page 77 Make sure the ink cartridges aren t low on ink or too old If either ink out light is flashing replace the ink cartridge see page 80 If your ink cartridge is more than six months old you may need to replace it see page 83 Try using Automatic mode See page 62 Windows or page 65 Macintosh for instructions Your printed colo...

Page 104: ...select your printer in the Macintosh Chooser see page 52 If your printout is grainy Try using a higher quality paper Make sure you set the Quality Speed slider to the Quality setting in your printer software see page 62 Windows or page 65 Macintosh for instructions Run the Print Head Alignment utility See page 85 for instructions You may need to increase the image resolution or print it in a small...

Page 105: ...nter driver with the Add Remove Programs utility See your Windows documentation to remove printer drivers from your system 1 Click Start point to Settings and then click Control Panel 2 Double click Add Remove Programs 3 Select EPSON Printer Software in the program list 4 Click the Add Remove button Follow the instructions on the screen to uninstall your software To reinstall your software see pag...

Page 106: ...le it as described in Changing the Status Monitor 2 Setup on page 103 in your electronic EPSON Stylus COLOR 900N Manual If you try to uninstall EPSON Status Monitor 2 when using IntranetWare Client for NT in Windows NT 4 0 and an error message appears and the uninstall process terminates delete the following files from the directory where EPSON Status Monitor 2 is installed and then delete EPSON S...

Page 107: ...d and drag it to your Trash icon Where To Get Help EPSON provides technical assistance through automated telephone services and electronic support services 24 hours a day as listed in the following tables Automated telephone services Service Access EPSON SoundAdviceSM For pre recorded answers to commonly asked questions about EPSON products 24 hours a day seven days a week call 800 922 8911 EPSON ...

Page 108: ...epsonsupplies com U S sales only In Canada please call 800 873 7766 for dealer referral If you need help using another manufacturer s software with an EPSON product see the documentation for that software for technical support information Electronic support services Service Access World Wide Web From the Internet you can reach EPSON s Home Page at http www epson com EPSON Internet FTP Site If you ...

Page 109: ...102 ...

Page 110: ...M drive using the disk creation utility on the printer software CD ROM as described below For a Macintosh you can copy the files on a computer that has a CD ROM drive See page 106 Order software diskettes from EPSON See page 106 Once you have your diskettes follow the steps starting on page 107 to install the software Creating the Software Diskettes Using the Disk Creation Utility If you want to m...

Page 111: ... not appear go to My Computer and double click the Epson CD ROM icon to start the EPSON Installation program 2 Highlight Create Printer Driver Utility diskettes and click the right arrow button 3 Select which program you want and click OK You see a screen like the following The screen lists the number of diskettes you need and lets you change the floppy drive letter if necessary ...

Page 112: ...onitor 2 network part disk 1 of 2 etc If you are making Status Monitor 2 diskettes make sure you label the diskettes for both parts carefully so you do not mix up the network diskettes and the EPSON Stylus COLOR 900N diskettes 6 If you have to create more than one disk insert the next disk and click Copy Repeat this step for a third disk if necessary 7 When the diskettes have finished copying clic...

Page 113: ... you re ready to install your software see page 107 Download EPSON Web Page Point your browser to http www epson com connects and select File Downloads FTP EPSON Internet FTP Site Log on to ftp epson com with the user name anonymous and your e mail address as the password Epson America Forum on CompuServe Click on Services Go then type EPSONFOR in the dialog box If you need downloading instruction...

Page 114: ...Net 2 If you have the following network configurations you should install EPSON Net 2 Windows 98 Windows 95 or Windows NT 4 0 with TCP IP or NetWare Macintosh with AppleTalk EtherTalk Installing EPSON Net 2 in Windows Follow these steps 1 Insert the EPSON Net 2 diskette in your drive 2 Click Start then click Run 3 Type A WINDOWS INSTALL and click OK If your diskette drive is not A substitute the c...

Page 115: ...tall the network part and the EPSON Stylus COLOR 900N part of EPSON Status Monitor 2 These two parts work together to allow you to see your printer s status information over the network You may not see all the steps here depending on your computer s configuration If you are using Windows 98 or Windows 95 make sure you have TCP IP installed on your system before installing Status Monitor 2 so you c...

Page 116: ...___ 8 Select Monitor to monitor EPSON network printers that do not have drivers installed in your computer Select Do not monitor if network traffic is a problem Then click Next Printers Monitor_______ Do not monitor_______ 9 If you re using NetWare set the number of hops 0 to 15 and click Next Number of hops _______ If you have dial up routers in a NetWare environment they may automatically dial u...

Page 117: ...ot using EPSON Net 2 you do not have to turn off background monitoring You should limit the number of systems that monitor the printer however to prevent network traffic problems Installing the Printer Driver in Windows Follow these steps to install your printer driver 1 Insert diskette 1 in your drive 2 In Windows 98 Windows 95 or Windows NT 4 0 click Start then click Run In Windows 3 1x select R...

Page 118: ...d turn off any virus protection programs you may have 2 Insert the diskette in your drive and double click the diskette icon that appears 3 Double click the Installer icon 4 Follow the instructions on the screen and restart your computer To use the printer you need to select the SC 900 AT printer in the Chooser and make sure AppleTalk is on ...

Page 119: ...112 ...

Page 120: ...ent mode 72 Color management settings 72 ColorSync setting 69 72 Custom project types 67 to 69 D Despooler Windows 3 1 63 Device name 47 DHCP 41 Diffusion error 71 Digital Camera Correction setting 72 Digital Camera setting 69 Diskettes installing software 107 to 111 making 103 to 105 ordering 106 Dithering 71 Documentation how to use 55 to 57 Driver installing from diskettes 110 uninstalling 97 t...

Page 121: ...ion troubleshooting 92 IP address 41 Iron On Cool Peel Transfer Paper 76 L Layout tab Windows 63 Lever thickness 75 94 95 M MAC address 17 Macintosh background printing 66 Chooser 93 preview 66 system requirements 5 using diskettes 106 to 111 Manual how to use 2 55 to 57 Media Type setting 68 71 74 76 MicroWeave setting 71 Mirror images 71 Moving printer 87 N NetBIOS name 47 Nozzle check pattern 8...

Page 122: ... quality S Safety instructions 8 to 9 Service 100 to 101 Sharpness setting 72 Smears 75 94 95 Software installation troubleshooting 92 Special effects 70 to 72 Special papers 73 to 76 sRGB Standard Red Green Blue setting 69 72 Status Monitor 2 installing from CD ROM 23 to 26 installing from diskettes 108 uninstalling 99 Status sheet 17 Subnet mask 41 Support 100 to 101 System requirements Macintos...

Page 123: ...116 Windows Progress Meter 63 system requirements 4 using diskettes 103 to 110 Workgroup name 47 World Wide Web 101 Y Year 2000 6 ...

Page 124: ...with brilliant results Perfect for letters charts clip art and color drafts Photo Quality Glossy Film Durable bright white film sheets with the highest gloss finish Perfect for printing professional quality high resolution photographs of all your digital images Photo Paper and Panoramic Photo Paper Photo lab quality heavier weight glossy paper available in a variety of sizes Perfect for color phot...

Page 125: ...igh Quality Ink Jet Paper Letter S041111 A4 8 3 x 11 7 inches S041117 EPSON Photo Quality Ink Jet Paper Letter S041062 A4 8 3 x 11 7 inches S041061 Legal S041067 EPSON Photo Quality Ink Jet Cards A6 4 1 x 5 8 inches S041054 8 x 10 inches S041122 EPSON Photo Paper 4 x 6 inches S041134 Letter S041141 A4 8 3 x 11 7 inches S041140 Panoramic 8 3 x 23 inches S041145 EPSON Photo Stickers Kit CD ROM paper...

Reviews: