background image

49

R4CC310
short.bk

Rev. E

INK.FM

A5 size

1/29/04

R

Proof Sign-off:
K.Yoda CRE Nakano
M.Otsuka
editorname

English

c

Caution:

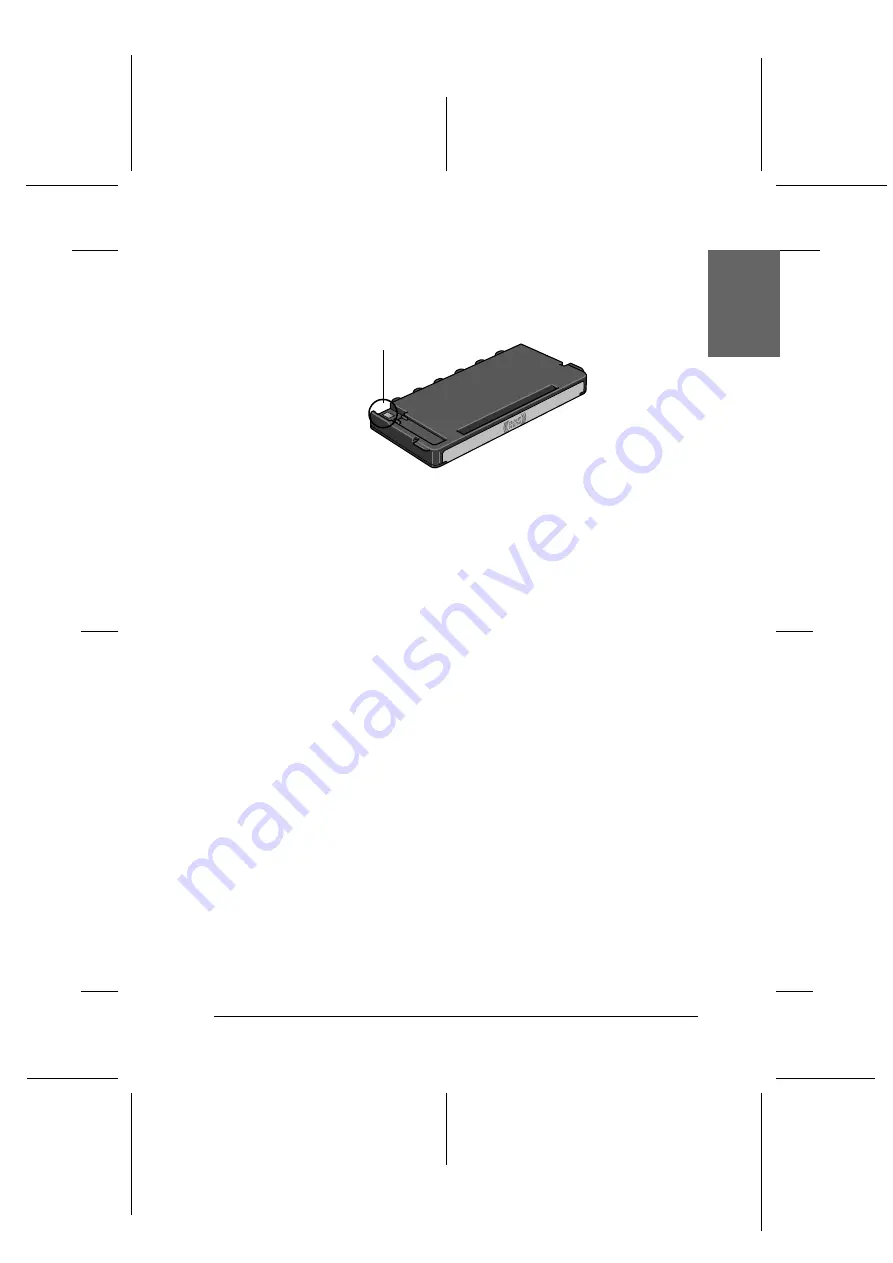
Do not touch the green IC chip on the bottom of the 
cartridge. This can damage the photo cartridge.

If you remove the photo cartridge for later use, be sure to 
protect the ink supply ports from dirt and dust; store it 
in the same environment as the printer. Note that there 
is a valve in the ink supply ports, making covers or plugs 
unnecessary, but care is needed to prevent the ink from 
staining items that the cartridge touches. Do not touch 
the ink supply ports or surrounding area.

Be sure to always install a photo cartridge into the 
printer immediately following the removal of the current 
photo cartridge. If a photo cartridge is not installed 
promptly, the print head may dry out, rendering it 
unable to print.

Do not touch this part.

Summary of Contents for A251B

Page 1: ...ce cables other than those designated as Epson Approved Products by Seiko Epson Corporation EPSON is a registered trademark and PictureMate is a trademark of Seiko Epson Corporation Copyright 2001 Seiko Epson Corporation All rights reserved PRINT Image Matching is a trademark of Seiko Epson Corporation The PRINT Image Matching logo is a trademark of Seiko Epson Corporation Copyright 2002 Seiko Eps...

Page 2: ...Print Software Setup This guide contained on the CD ROM provides information on installing EPSON PhotoQuicker EPSON PhotoStarter EPSON CardMonitor EPSON PRINT Image Framer Tool PIF DESIGNER It also contains uninstalling and system requirements Reference Guide The Reference Guide contained on the CD ROM provides detailed information about printing with a computer maintenance and problem solving War...

Page 3: ...t Printing Basics 14 Introduction 14 Paper Handling Instructions 14 Loading Paper 15 Loading Memory Cards 17 Summary of Panel Setting 20 Basic Printing 22 Ejecting Memory Cards 27 Various Setting 28 More Options Settings 28 Exif Print and PRINT Image Matching 33 Printing with DPOF files 35 Printing with a Frame 36 Print Directly from a Digital Camera 38 Backup 41 Printing with an External Device 4...

Page 4: ...ror Warning Display 58 Print Quality Problems 61 Printout Problems Not Related to Print Quality 63 Paper Does Not Feed Correctly 64 Printer Does Not Print 66 Printing Problem when Using Bluetooth Photo Print Adapter 67 Canceling Printing 67 Contacting Customer Support 68 Technical Support Web Site 68 Regional Customer Services 68 Option and Consumable Products 72 Option and Consumable Products 72 ...

Page 5: ...in all directions If you place the printer by the wall leave more than 10 cm between the back of the printer and the wall The printer will not operate properly if it is tilted at an angle When storing or transporting the printer do not tilt it stand it on its side or turn it upside down Otherwise ink may leak from the cartridge Leave enough space in front of the printer for the paper to be fully e...

Page 6: ... careful to keep all power supply cords straight at the ends and the points where they enter and leave the AC adapter Use only the AC adapter model A251B E that comes with this product Use of another cord may result in fire or electrical shock or injury The AC adapter is designed for use with the printer with which it was included Do not attempt to use it with other electronic devices unless speci...

Page 7: ...isassemble modify or attempt to repair the AC adapter power cord printer and option by yourself except as specifically explained in the printer s guides Unplug the printer and the AC adapter and refer servicing to qualified service personnel under the following conditions The power cord or plug is damaged liquid has entered the printer or the AC adapter the printer or the AC adapter has been dropp...

Page 8: ...may damage the printer Always turn the printer off using the P On button Do not unplug the printer or turn off the power to the outlet until the power light goes out Before transporting the printer make sure that the photo cartridge is in place Leave the photo cartridge installed Removing the cartridge can dehydrate the print head and may prevent the printer from printing When using a memory card ...

Page 9: ...ugh flushing see a doctor immediately When using the optional Bluetooth Photo Print Adapter Refer to the Bluetooth Photo Print Adapter s documentation for the safety instructions When handling photo cartridges Observe the following when handling photo cartridges Do not shake photo cartridge after removing it from the bag this can cause leakage Do not remove or tear the label on the cartridge this ...

Page 10: ...s inserted some ink is consumed because the printer automatically performs a reliability check Store each photo cartridge so that the bottom of its packaging faces down ENERGY STAR Compliance As an ENERGY STAR Partner Epson has determined that this product meets the ENERGY STAR guidelines for energy efficiency The International ENERGY STAR Office Equipment Program is a voluntary partnership with t...

Page 11: ...s and Control Panel Functions Printer Parts Memory card slot enlarged figure paper support edge guides paper feeder carrying handle memory card slot cover output tray control panel Memory Stick Memory Stick PRO SD MultiMediaCard memory card slot SmartMedia xD Picture Card memory card slot CompactFlash Type II memory card slot ...

Page 12: ...FM A5 size 1 29 04 L Proof Sign off K Yoda CRE Nakano M Otsuka editorname Control Panel cartridge compartment cover computer USB connector externaldevice USB connector AC inlet photo cartridge cartridge lock lever 8 1 7 10 2 9 5 4 6 3 ...

Page 13: ...er settings when you press and hold this button for three seconds or more 5 Print button Starts printing with the settings on the LCD panel selected via the buttons on the control panel 6 Power light On when the printer is turned on and ready Flashes during printing 7 OK button Opens the setting menu and selects the item to be set on the LCD panel 8 Up u Down d arrow buttons Move the cursor on the...

Page 14: ... a memory card Before you start you will need paper and a memory card containing suitable digital photo data Note Before printing large jobs print a single sheet to confirm quality Disconnecting the USB cable is recommended when printing directly from a memory card Paper Handling Instructions When storing printouts Do not touch the printed side or stack your printouts until the ink is dry To avoid...

Page 15: ...ackage and store it away from extreme temperatures high humidity and bright lights When displaying printouts When displaying your printouts indoors EPSON recommends placing your printouts in glass frames to preserve the colors in your image Avoid displaying your printouts outdoors or in a place exposed to direct sunlight to prevent fading Note For best results allow your prints to dry thoroughly f...

Page 16: ... tap paper on a flat surface to even the edges 4 Load the paper with the printable side up so it is against the right edge guide and slide it into the paper feeder Then slide the left edge guide against the left edge of the paper Make sure that the paper stack is loaded under the tabs inside the edge guides You can load paper up to 20 sheets Note Make sure that the paper stack is flush with or low...

Page 17: ...sed with this printer are shown below cCaution The methods for using memory cards vary according to card type Be sure to refer to the documentation packaged with your memory card for details Note For the latest information on memory cards available for your printer contact your dealer or regional Epson sales office Loadable storage media CompactFlash MagicGate Memory Stick Memory Stick Up to 128 M...

Page 18: ...formation Technology Industries Association JEITA 2 Supports Exif Version 2 1 2 2 Note File names containing double byte characters are not valid when printing directly from a memory card Inserting memory cards 1 Turn the printer on and open the memory card slot cover Digital camera DCF version 1 0 compliant 1 File format JPEGformatimagefiles 2 takenwithaDCF version 1 0 compliant digital camera Im...

Page 19: ...rycardisinsertedcorrectly the memorycard light comes on When you insert a memory card the Print Wizard appears on the panel The wizard guides you through the steps for printing If you do not want to use the wizard turn the Print Wizard Off on the More Options menu CompactFlash Microdrive Memory Stick Memory Stick Duo SD Card MultiMediaCard miniSD card SmartMedia xD Picture Card ...

Page 20: ...er it may cause the printer to malfunction Before loading the Memory Stick Duo and miniSD Card attach the adapter provided with it Summary of Panel Setting 1 Select Photo On this menu you can select how to print data stored on a memory card All Print all photographs on the memory cards One Photo Print a single selected photograph from the memory card Several Print selected photographs from the mem...

Page 21: ...to a size slightly larger than the paper size the portion of the image that extends beyond the edges of the paper will not be printed Print quality may decline in the top and bottom areas of the printout or the area may be smeared when printing Before printing large jobs print a single sheet to confirm quality Borderless Prints without margins Portrait layout Border Prints with 3 mm margins on all...

Page 22: ... Print Wizard Printing an index You can print one or more copies of an index of all or the specified photographs on a loaded memory card An index can be helpful in selecting which photos you want to print 1 Make sure Select Photo is highlighted then press the OK button to open the menu Color Effects Print Confirmation Print Zoom Template Maintenance Zoom Memory Card Overwrite Auto Correction Selec...

Page 23: ...phs then press the OK button Note YoucanprintanindexofselectedphotographsbyselectingSeveral for Select Photo setting and choose the photo numbers 3 Makesurethat1each is indicated as the Copies setting 4 Press the u or d button to select Layout then press the OK button 5 Press the u or d button to select 20 then press OK button 6 Press the Print button to print the index ...

Page 24: ...mal print quality 1 From the index find the number of the photo that you want to print The number is printed under the photo 2 Press the u or d button to select Select Photo then press the OK button 3 Press the u or d to select One Photo then press the OK button 4 Presstheuordbutton to specify the photo number that you have selected from the Index then press the OK button Index photo number ...

Page 25: ...hat Borderless is indicated as the Layout setting 7 Press the Print button and follow the message displayed on the panel Print all photographs on the memory card 1 Select All as the Select Photo 2 Select Copies press the OK button to open the Copies counter select the number of copies you want to print then press the OK button 3 Make any Layout and More Options settings as needed 4 Press the Print...

Page 26: ...press OK button 4 Repeat steps 2 through 3 to register other photos Note To reset the number of copies select the photo and press the OK button The number of copies resets to 0 and the check box is cleared 5 When you have finished selecting photos presstheBack button Then press the d button to select Copies and press the OK button to confirm your selections 6 Make any Layout and More Options setti...

Page 27: ...t the number you want to print then press the OK button 4 Make any Layout and More Options settings as needed 5 Press the Print button and follow the message displayed on the panel Ejecting Memory Cards Make sure that the memory card light is not flashing Open the memory card slot cover then pull the card out to eject the memory card cCaution The handling method varies depending on the storage med...

Page 28: ... of zoom result as a template of the selected image to carry out printing The printer prints in a specified number which is displayed in the template By specifying a number in that printed template list by the panel the printer prints in the selected zoom This function is not available when All or DPOF is selected for Select Photo setting Color No filter is applied to the printouts Black White Pho...

Page 29: ...pper Right Center Right and Lower Right You can select either 1 2 or 1 5 times magnification Note When the photo is zoomed the image may become blurry depending on the resolution of the original photo Auto Correction This printer is able to correct the color of printouts automatically There are two kinds of correction available By default the setting is Enhance For printing with PRINT Image Matchi...

Page 30: ... setting is to print the date information contained in your photo data The default setting is None The following examples show the format options for setting the date Fix Images imported from the memory card are automatically enhanced Printing requires more time but images are enhanced to ensure higher picture quality If the photo data contains PRINT Image Matching commands or Exif Print informati...

Page 31: ...d in the memory card Print Wizard The Print Wizard is a set of questions that first appear when you insert a memory card to the printer This wizard guides you to the successful and easy settings and printing The default setting is On Selecting Off transits directly to the initial menu Print Confirmation This option sets whether or not a message confirming your settings will be displayed after you ...

Page 32: ...See Cleaning the Print Head on page 53 Nozzle Check If you find the printouts faint or dots are missing you can identify the problem by printing a nozzle check pattern See Checking the Print Head Nozzles on page 51 Align Print Head If you notice a misalignment of vertical lines or horizontal banding solve the problem by selecting this option See Aligning the Print Head on page 54 LCD Contrast The ...

Page 33: ...al standard for digital cameras and PRINT Image Matching allow you to print fine quality photographs using in combination a digital camera and printer that support these features Effectiveness Exif Print When taking photographs using an Exif Print compatible digital camera information about camera settings and scene conditions when the photograph was taken is embedded in the photo data Such inform...

Page 34: ... color space color balance shadow point contrast and brightness settings among other attributes A printer equipped with PRINT Image Matching is able to interpret these commands and faithfully reproduce the characteristics of the image captured by the digital camera Note See the relevant device instruction manual for details concerning the use of devices loaded with the PRINT Image Matching functio...

Page 35: ...upports DPOF For the details about DPOF settings see your digital camera s documentation This section explains how to make print settings without using the Print Wizard 1 Load paper and a memory card which contains DPOF data Select Photo turns into DPOF as soon as you load the memory card To exit DPOF mode select the other settings as the Select Photo 2 Make Layout settings The copies menu shows t...

Page 36: ...PRINT Image Framer data into the printer s card slot If you have saved or deleted data on the memory card via your computer and have not ejected the memory card from the printer since eject and reinsert the memory card before printing Note BesuretoproperlysavethePRINTImageFramerdatawhichnamed EPUDL AUTOLOAD USD to the memory card using the EPSON PRINT Image Framer Tool otherwise AUTOLOAD will not ...

Page 37: ...he desired PRINT Image Framer data from the Layout menu The PRINTImageFramer data fileis displayed PRINT Image Framer data is located at the bottom of the Layout menu 4 Specify the photos that you want to print and the number of copies of each using the Select Photo and Copies menus 5 Press the Print button to start printing ...

Page 38: ...necessary to perform the following operations on the digital camera before connecting it to the printer For more details on the operation of the digital camera refer to its manual Select the photo you want to print Select the paper type and paper size you want to use Select the appropriate layout setting Select any other printing settings Settings will be different depending on the make of your di...

Page 39: ...Connecting the digital camera to the printer Note Do not print from the computer or from a memory card inserted in the printer s memory card slot before or while a digital camera is connected to the printer Do not backup before or while a digital camera is connected to the printer Make sure that the no error has occurred before a digital camera is connected to the printer Your printer has two USB ...

Page 40: ...era has been connected appears for one second on the LCD panel when the connection is established Printing Print from the digital camera For more details on printing from the digital camera refer to its manual Note When printing is finished disconnect the USB cable from the printer if you will be inserting a memory card into the printer s memory card slot Canceling printing Press the Cancel button...

Page 41: ...e printing from the computer to the printer Do not connect the external storage device while the computer is accessing the memory card in the printer The message Cannot recognize loaded media is displayed on the LCD panel if the storage media is not formatted for DOS or Windows Follow the instructions on the LCD panel to format the storage media You can backup up to 512 times to one storage medium...

Page 42: ... 50 times in a 700 MB CD R cCaution Do not remove the storage media from the external storage device or disconnect the cable from the printer while backing up Printing with an External Device Connecting an external device cCaution Not all of the devices that can be connected with USB cable are supported Contact your regional customer support for details Do not connect USB devices other than an ext...

Page 43: ... or less A USB hub cannot be used Even if the printer is connected to a computer the computer cannot recognize the external storage device Insert the USB cable to the external device USB connector and insert the other connector into the external storage device Printing from an external device 1 Insert a media that contains photo data into the external storage device 2 If a memory card has been ins...

Page 44: ...the memory card Select the folder in which the photo data you want to print out is registered using the Folder Selection menu if data in the external storage device has been backed up using the backup function of the printer The Folder Selection menu is displayed when data in the external storage device is recognized and pressing the Back button 3 Set the individual items using the same procedure ...

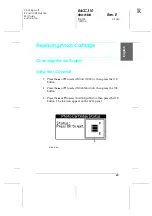
Page 45: ...lacing Photo Cartridge Checking the Ink Supply Using the LCD panel 1 Press the u or d to select More Options then press the OK button 2 Press the u or d to select Maintenance then press the OK button 3 Press the u or d to select Cartridge Status then press the OK button The ink icon appear on the LCD panel ink icon ...

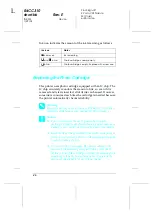
Page 46: ... drink from or otherwise handle the cartridges cCaution Epson recommends the use of genuine Epson photo cartridges Products not manufactured by Epson may cause damage to your printer not covered by Epson s warranties Leave the old cartridge installed in the printer until you have obtained a replacement otherwise ink remaining in the print head nozzles may dry out Do not refill photo cartridges The...

Page 47: ...printer is turned on and during ink charging when the photo cartridge is installed in the printer For more information about photo cartridges See When handling photo cartridges on page 9 1 Make sure that the printer is on but not printing Note Check the ink status See Checking the Ink Supply on page 45 2 Check that the message Ink out is displayed on the LCD panel This message is not displayed if ...

Page 48: ... the printer and dispose of it properly Note Do not take the used cartridge apart or try to refill it Do not shake the used photo cartridge otherwise it may leak The photo cartridge must be replaced when any one of the colors is depleted The rate that a specific color of ink is consumed depends on the images printed 5 For best results shake the new photo cartridge four or five times before opening...

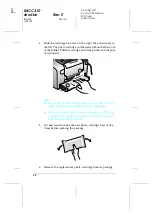
Page 49: ...t store it in the same environment as the printer Note that there is a valve in the ink supply ports making covers or plugs unnecessary but care is needed to prevent the ink from staining items that the cartridge touches Do not touch the ink supply ports or surrounding area Be sure to always install a photo cartridge into the printer immediately following the removal of the current photo cartridge...

Page 50: ...CRE Nakano M Otsuka editorname 7 Place the cartridge properly into the cartridge holder then push in the cartridge until it clicks into place 8 Slide the cartridge lock lever all the way to the right then up slightly so that it catches 9 Close the cartridge compartment cover ...

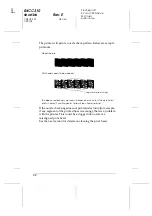
Page 51: ... Follow the steps below to check the print head nozzles using the control panel buttons 1 Make sure that the printer is turned on and no warnings or errors are displayed on the LCD panel 2 Make sure that paper is loaded in the paper feeder 3 Press the u or d button to select More Options then press OK 4 Press the u or d button to select Maintenance then press OK button 5 Press the d button to posi...

Page 52: ...ned The above sample may be shown in black and white but the actual test prints in color Cyan Magenta Yellow Black Red and Blue If the nozzle check page does not print satisfactorily for example if any segment of the printed lines is missing there is a problem with the printer This could be a clogged ink nozzle or a misaligned print head See the next section for details on cleaning the print head ...

Page 53: ...nfirm that the print head needs to be cleaned This saves ink You cannot clean the print head if the message ink out is displayed or the ink icon flashes to show ink low on the LCD panel Follow the steps below to clean the print head using the control panel buttons 1 Make sure that the printer is turned on and no warnings or errors are displayed on the LCD panel 2 Make sure that paper is loaded in ...

Page 54: ...e replaced See Replacing the Photo Cartridge on page 46 to replace the photo cartridge before it is empty If print quality remains a problem after replacing the photo cartridge contact your dealer To maintain print quality we recommend printing a few pages at least once every month Aligning the Print Head If you notice a misalignment of vertical lines or horizontal banding you may be able to solve...

Page 55: ...ess OK button 5 Press d button to position the cursor at Align Print Head and press the OK button 6 Follow the instructions displayed on the LCD panel 7 From the alignment pattern in set 1 on the printed test sheet choose the vertical line that is aligned best Press the u or d button to select the corresponding line number and press the OK button 8 Repeat step 7 for the alignment patterns in sets ...

Page 56: ...e paper feeder is dirty wipe itwithasoft cleanclothdampenedwithmilddetergent Keep the output tray closed to prevent water from getting inside 5 If the inside of the printer accidentally gets soiled with ink wipe it off with a damp cloth cCaution Never use alcohol or thinner to clean the printer as these chemicals can damage the components as well as the case Be careful not to get water on the prin...

Page 57: ...it up vertically or turn it upside down Otherwise ink may leak from the cartridge Leave the photo cartridge installed Removing the cartridge can dehydrate the printer head and may prevent the printer from printing 1 Turn off the printer and then unplug the printer 2 Disconnect the interface cable from the printer 3 Remove the paper from the paper feeder 4 Attach the protective materials to both si...

Page 58: ...lacement Replace the photo cartridge shown with a new one The internal pad that absorbs ink during head cleaning has become saturated T557 The genuine EPSON photo cartridge listed above is recommended for replacement Replace the photo cartridge shown with a new one The ink absorbing pad inside the photo cartridge is saturated The photo cartridge must be replaced before cleaning Replace the photo c...

Page 59: ...d for replacement Reinstall the cartridge shown Service required Parts inside your printer are at the end of their service life See your printer s documentation for details Contact your dealer The inserted card cannot be used with this printer Use a compatible and formatted memory card Bluetooth Photo Print Adapter error Disconnect the Adapter from the printer then reconnect it Disconnect the Adap...

Page 60: ...onitor will lead you step by step through the cartridge replacement procedure If an error message indicating that parts inside your printer are near the end of their service life appears contact your dealer for replacement Error Display Solution Ink low You are running low on ink Obtain a replacement photo cartridge No data in Memory card No images were found on the card Please check the card Chec...

Page 61: ...e Aligning the Print Head on page 54 Use up photo cartridge within six months after opening its package Use the genuine Epson photo cartridge Check the LCD panel If the ink icon is flashing or a message is displayed replace the photo cartridge See Replacing the Photo Cartridge on page 46 Vertical misalignment or banding Make sure that the printable side of the paper is face up in the paper feeder ...

Page 62: ...place with new photo cartridge See Replacing the Photo Cartridge on page 46 Blurry or smeared printout Use only paper recommended by Epson See Consumable products on page 72 Use a genuine Epson photo cartridge Make sure that the printer is on a flat stable surface that extends beyond the printer base in all directions The printer will not operate properly if it is tilted Make sure that your paper ...

Page 63: ...on page 53 Run the Print Head Alignment utility See Aligning the Print Head on page 54 Printout Problems Not Related to Print Quality Blank pages print Run the Head Cleaning utility to clear any clogged nozzles See Cleaning the Print Head on page 53 Printout has smears If the paper is curled toward the printable side flatten it or curl it slightly in the opposite direction Load and eject dry paper...

Page 64: ...aper stack fits under the tabs inside the edge guide Paper is not jammed inside the printer If it is remove the jammed paper See The paper jams on page 64 The photo cartridge is not empty If it is replace the cartridge See Replacing the Photo Cartridge on page 46 Special loading instructions that came with your paper have been followed Load the paper again See Loading Paper in the online Reference...

Page 65: ...paper is not loaded above the triangular load limit mark on the left edge guide The number of sheets in the paper stack does not exceed 20 The left edge guide is adjusted to fit your paper The printer is on a flat stable surface that extends beyond the printer base in all directions The printer will not operate properly if it is tilted Paper improperly loaded If you have loaded the paper too far i...

Page 66: ...s and is not controlled by a wall switch or timer LCD panel displays a warning or error message If the LCD panel displays a warning or error message follow the instructions See Error Warning Display on page 58 for the explanation of warnings and error messages LCD panel came on and then went out The printer s voltage may not match the outlet rating Turn off the printer and unplug it immediately Th...

Page 67: ...nterwiththeBluetooth Photo Print Adapter see the following See Using the Bluetooth Photo Printer Adapter on page 74 Canceling Printing If you encounter problems while printing you may need to cancel printing To stop printing in progress press Cancel button The printer will cancel all print jobs and stop printing and eject any pages whichisprinting Dependingontheprinter sstatus printingmay not stop...

Page 68: ...tomer Services If your Epson product is not operating properly and you cannot solve the problem using the troubleshooting information in your product documentation contact customer support services for assistance If customer support for your area is not listed below contact the dealer where you purchased your product Customer support will be able to help you much more quickly if you give them the ...

Page 69: ...mer Support see the Online Reference Guide included in the software CD ROM For users in the United Kingdom and the Republic of Ireland For users in the Middle East For users in Scandinavia URL http www epson co uk Telephone UK 08701 637 766 The Republic of Ireland 01 679 9016 URL http www epson com E mail epson_support compubase co ae Telephone 971 4 352 4488 Fax 971 4 351 6617 URL http www epson ...

Page 70: ...34 E minute Ouvert du lundi au samedi de 9h00 à 20h00 sans interruption http www epson fr support selfhelp french htm pour accéder à l AIDE EN LIGNE http www epson fr support services index shtml pour accéder aux SERVICES du support technique For user in Germany EPSON Service Center c o Exel Hünxe GmbH Werner Heisenberg Strase 2 46569 Hünxe URL www epson co za Telephone 011 444 5223 or 0800 600 57...

Page 71: ...Vizzi 93 95 20092 Cinisello Balsamo MI Tel 02 660 321 Fax 02 612 36 22 Assistenza e Servizio Clienti TECHNICAL HELPDESK 02 268 300 58 http www epson it For users in Spain For users in Portugal URL http www epson es E mail soporte epson es Telephone 902 40 41 42 Fax 93 582 15 16 URL http www epson pt E mail apoio_clientes epson pt Telephone 707 222 000 Fax 21 303 54 90 ...

Page 72: ...for the last digit of the product number which varies by location See Using the Bluetooth Photo Printer Adapter on page 74 Consumable products The following photo cartridge and Epson special media are available for your printer PictureMate PicturePack PictureMate Photo Cartridge and 100 sheets of PictureMate Photo Paper T5570 PictureMate Photo Cartridge T557G EPSON Premium Glossy Photo Paper 10 15...

Page 73: ...K Yoda CRE Nakano M Otsuka editorname English Note PictureMate also gives excellent results using EPSON Premium Glossy Photo Paper Please check your local EPSON customer support website where to buy or visit your local dealer See Contacting Customer Support on page 68 ...

Page 74: ...wireless technology without cables when connected to the printer Note While this product complies with the Bluetooth Specification it is not guaranteed to work with all devices enabled with Bluetooth wireless technology The communication range of this product is approximately 10 meters however this may vary depending on conditions including obstacles between devices signal quality magnetic fields ...

Page 75: ...bject Push Profile OPP Connecting and Disconnecting the Bluetooth Photo Print Adapter Connecting 1 Insert the Adapter connector into the external device USB connector as shown below cCaution Do not connect this product while the printer is operating Doing so may cause the printer to malfunction 2 The Adapter s light comes on for one second If the LED does not turn on disconnect the Adapter from th...

Page 76: ...ution Do not remove this product while communicating with another device Do not disconnect this product while the printer is operating Doing so may cause the printer to malfunction Do not remove this product by pulling on its upper section Doing so may damage the product Bluetooth Settings Use the LCD panel on the printer to make settings for Bluetooth wireless communication See Making settings on...

Page 77: ...printer once in Public mode After your device has discovered the printer in Public mode once it will subsequently be able to communicate with and print from it in Private mode Bonding This mode requires that the four digit Passkey be entered into a device before it can communicate with and print from the printer BT Encryption On Off Default Off Select On to encrypt communication Encryption require...

Page 78: ...ee Connecting and Disconnecting the Bluetooth Photo Print Adapter on page 75 cCaution Be sure that the printer is not operating before connecting this product Otherwise the printer may malfunction 2 Press the u or d button to highlight More Options and then press the OK button 3 Use the d or u buttons and the OK button to make the desired settings See Outline of settings on page 77 ...

Page 79: ...ed into a Bluetooth wireless capable device before it can communicate with and print from the printer The default Passkey is 0000 To change the Passkey follow the instructions below A Passkey of 1234 is used as an example 1 Press the u or d button to highlight More Options then press the OK button 2 Press the u or d button to highlight BT Passkey then press the OK button 3 Press the u or d button ...

Page 80: ...rinting Print settings are made using both the printer s LCD panel and the device sending the print job Refer to the following table to determine where to make each setting Note The settings available may vary among Bluetooth wireless capable devices For more information refer to your device s documentation Print Setting Setting Location Select Photo Bluetooth Wireless capable device Copies Printe...

Page 81: ... CRE Nakano M Otsuka editorname English For more information about printing from Bluetooth wireless capable digital still cameras digital video cameras PDAs mobile PCs and other Bluetooth wireless capable device refer to the documentation for both the device and the printer ...

Page 82: ...inter Dimensions Storage Width 256 mm 10 0 inches Depth 146 mm 5 7 inches Height 147 mm 5 8 inches Printing Width 256 mm 10 0 inches Depth 304 mm 11 9 inches Height 162 mm 6 4 inches Printable area Border printing 3 mm margin for all sides of paper Borderless printing 0 mm margin Paper tray capacity 20 sheets Weight 2 5 kg 5 5 lb without photo cartridge ...

Page 83: ...nput voltage range 90 to 132 V 198 to 264 V Rated frequency range 50 to 60 Hz Input frequency range 49 5 to 60 5 Hz Rated current 0 3 A Max 0 5 A 0 15 A Max 0 3 A Power consumption Approx 13 0 W Digital camera image Approx 4 0 W in Sleep mode Approx 13 5 W Digital camera image Approx 4 5 W in Sleep mode Temperature Operation 10 to 35 C 50 to 95 F Storage 20 to 60 C 4 to 140 F Transit 20 to 60 C 4 ...

Page 84: ...Specification 1 4 SmartMedia card slot Compatible with SmartMedia Standard 2000 Memory Stick MemoryStick PRO card slot Compatible with Memory Stick Standard version 1 3 Compatible with Memory Stick Standard Memory Stick PRO Format Specifications version 1 0 SD MMC card slot Compatible with SD Memory Card Specifications PART1 Physical Layer Specification Version 1 0 Compatible with MultiMediaCard S...

Page 85: ...ntact your regional customer support for details Color Black Cyan Magenta Yellow Red and Blue Cartridge life Within 6 months of opening the package at 25 C 77 F Temperature Storage 20 to 40 C 4 to 104 F 1 month at 40 C 104 F Transit 30 to 60 C 22 to 140 F 120 hours at 60 C 140 F Freezing 11 C 12 2 F Connectivity Universal Serial Bus Specifications Revision 1 1 Bit rate 12 Mbps Full speed device Co...

Page 86: ... model Australian model EMC FCC Part 15 Subpart B Class B CSA C108 8 Class B EMC Directive 89 336 EEC EN 55022 Class B EN 55024 EMC AS NZS 3548 Class B Safety UL 60950 CSA No 60950 EMC FCC Part 15 Subpart B Class B CSA C108 8 Class B Low Voltage Directive 73 23 EEC EN 60950 EMC Directive 89 336 EEC EN 55022 Class B EN 55024 EN 61000 3 2 EN 61000 3 3 Safety AS NZS 3260 or AS NZS 60950 EMC AS NZS 35...

Reviews: