background image

Using Memory

Your computer can use up to 8MB of memory. This section

describes how the memory in your computer works. Also be

sure to see your operating system manual for complete

information on memory management.

A computer’s memory is divided into three types:

conventional, reserved, and extended. The following diagram

shows the relationships between these types of memory and

their addresses.

All memory in a computer is managed using addresses—

numbers that describe the location of each byte of data. Each

memory chip must have its own set of unique addresses so that

the operating system knows where to store and find data.

Conventional memory is memory that MS-DOS recognizes and

manages directly. The size of conventional memory is limited

to 640KB and has addresses in the range 0 to 640KB.

Reserved memory is memory in the range 640KB to 1MB. The

system enhances its performance by using 128KB of this

memory as shadow RAM, and the remaining memory is

available.

3-22

Using Your Computer

Summary of Contents for ActionNote

Page 1: ......

Page 2: ...circuit different from that to which the receiver is connected Consult an experienced radio TV technician for help WARNING The connection of a non shielded equipment interface cable to this equipment will invalidate the FCC Certification of this device and may cause interference levels that exceed the limits established by the FCC for this equipment It is the responsibility of the user to obtain a...

Page 3: ... transmitted in any form or by any means electronic mechanical photocopying recording or otherwise without the prior written permission of Epson America Inc No patent liability is assumed with respect to the use of information contained herein Nor is any liability assumed for damages resulting from the use of the information contained herein Further this publication and features described herein a...

Page 4: ...and over current protection for this computer the building installation must be protected by a 16 Amp circuit breaker Beim Anschluß des Computer an die Netzversorgung muß sichergestellt werden daß die Gebäudeinstallation mit einem 16 A Überstromschutzschalter abgesichert ist Connect all equipment to properly grounded earthed power outlets If you are unable to insert the plug into an outlet contact...

Page 5: ...plug is damaged B If liquid has entered the computer C If the computer does not operate normally when the operating instructions are followed Adjust only those controls that are covered by the operating instructions Improper adjustment of other controls may result in damage and often requires extensive work by a qualified technician to restore the computer to normal operation D If the computer has...

Page 6: ...ordinateur en Allemagne on doit observer les normes securitaires qui suivent Afin d assurer une protection adequate à l ordinateur contre les court circuits et le survoltage l installation de l édifice doit comprendre un disjoncteur de 16 amp On doit brancher tout l équipement dans une sortie reliée à la masse Lorsqu il est impossible d insérer la fiche dans la prise on doit retenir les services d...

Page 7: ... ommagés B Lorsqu un liquide s est infiltré dans l ordinateur C Lorsque l ordinateur refuse de fonctionner normalement même en suivant les instructions N ajuster que les commandes qui sont énumérées dans les instructions de fonctionnement Tout ajustement inadéquat de tout autre contrôle peut provoquer un dommage et souvent nécessiter des reparations élaborées par un technicien qualifié afin de rem...

Page 8: ... 1 10 Turning On the Computer 1 11 Chapter 2 Running SETUP Starting the SETUP Program 2 2 Setting the Date and Time 2 5 Setting the Diskette Drive or Printer 2 5 Setting the Trackball 2 5 Setting the Self Test Halt On Error Level 2 6 Setting the Shadow RAM 2 6 Setting the Password Security Options 2 7 Changing or Deleting a Password 2 8 Setting the Hard Disk Drive s 2 9 Defining Your Own Drive Typ...

Page 9: ...g the Embedded Numeric Keypad 3 7 Stopping a Command or Program 3 8 Resetting the Computer 3 9 Turning Off the Computer 3 10 Changing the CPU Speed 3 11 Adjusting the LCD Screen 3 12 Using the Trackball 3 13 Using Diskettes 3 14 Inserting and Removing Diskettes 3 14 Write protecting Diskettes 3 15 Making Backup Copies 3 16 Using a Single Diskette Drive System 3 16 Using a Hard Disk 3 17 Backing Up...

Page 10: ...ettings 5 7 Using the EXT KB Port 5 7 Connecting an External Keyboard or Keypad 5 8 Connecting a Mouse or Other Pointing Device 5 9 Installing a Memory Module or a Numeric Coprocessor 5 11 Removing the Access Cover 5 11 Installing a Memory Module 5 12 Installing a Numeric Coprocessor 5 16 Replacing the Access Cover 5 17 Chapter 6 Using the VGA Utilities Lotus 1 2 3 Version 2 x 6 3 Microsoft Window...

Page 11: ...Problems A 10 Hard Disk Problems A 11 Software Problems A 12 Printer Problems A 13 PC Card Problems A 13 Mouse or Pointing Device Problems A 14 External Keyboard Problems A 15 Memory Module Problems A 15 Numeric Coprocessor Problems A 16 CMOS Battery Problems A 16 Appendix B Specifications Main Unit B 1 Controllers B 2 Interfaces B 2 Input Devices B 3 Mass Storage B 3 Monochrome VGA LCD B 3 Power ...

Page 12: ...0 x 480 and emulates VGA color with 64 shades of gray Removable hard disk drive Built in trackball PCMCIA version 2 0 Type II expansion PC card slot Parallel port for an external 3 5 inch 1 44MB diskette drive or a parallel printer Serial port for a serial device Video port for an external color or monochrome VGA monitor Port for a PS 2 compatible pointing device or external keyboard Rechargeable ...

Page 13: ...on Reseller or Service Center Customer relations Epson technical information library fax service also available directly by calling 310 782 4214 Product literature with technical specifications on current and new products When you call for technical assistance be ready to identify your system and its configuration and provide any error messages to the support staff See Appendix A for more informat...

Page 14: ... find the sections you need Chapter 1 provides steps for setting up your computer Chapter 2 describes how to run the SETUP program run this program the first time you start your system This is also necessary if you want to set a password or if you change the configuration of your computer Chapter 3 covers basic information about using the computer Chapter 4 explains how to power your computer usin...

Page 15: ...the key marked and press the letter or hold down the key marked and press the key c DOS Text as it appears on the screen DISKCOPY A B Text that you type exactly as shown path filename VIDEO Words printed in lowercase italics represent optional parameter names here you would type the actual path and filename such as WORK CONTACT Names of hardware elements 4 introduction ...

Page 16: ...Opening the screen Identifying the computer parts Connecting the AC adapter Connecting an external diskette drive Turning on the computer Note For instructions on installing or connecting additional equipment such as a memory module a monitor or a printer see Chapter 5 Setting Up the Computer 1 1 ...

Page 17: ...w these steps to open the LCD screen 1 Place the computer on a level surface 2 Turn the computer so its front is facing you 3 Slide the release latch on the cover to the right and lift up the screen 1 2 Setting Up the Computer ...

Page 18: ...omputer Front View The main components on the front and right side are shown here LCD screen Your computer has a backlit monochrome LCD that supports VGA resolutions up to 640 x 480 dpi x 64 shades of gray Release latch Slide this latch to the right to release the top cover and open the LCD screen Setting Up the Computer 1 3 ...

Page 19: ...g device to move around the screen select items or choose commands in application programs that support a pointing device Power switch This switch turns the computer on and off Hard disk drive Your computer comes with a removable hard disk drive Slide the drive to the right to remove it See Chapter 3 for instructions Access cover Remove this cover to install a numeric coprocessor or additional mem...

Page 20: ...the computer is in Suspend mode Hard disk drive Indicates the computer is accessing the hard disk drive PC card slot Indicates a PC card is inserted in the PC card slot Num Lock Indicates that Num Lock is set on the keyboard This activates the embedded numeric keypad on the keyboard Caps Lock Indicates that Caps Lock is set on the keyboard Scroll Lock Indicates that Scroll Lock is set on the keybo...

Page 21: ... Insert PCMCIA version 2 0 Type I or II PC cards here See Chapter 3 for instructions Battery The rechargeable NiCad battery powers your computer when the AC adapter is not connected To remove the battery slide this edge toward the back of the computer For a full description see Chapter 4 1 6 Setting Up the Computer ...

Page 22: ...optional devices PRINTER parallel port You can connect a parallel device such as a printer to this port When used along with the EXT KB port this port also supports an external diskette drive See page 1 10 or Chapter 5 for instructions COM 1 serial port This port supports a serial RS 232C device See Chapter 5 for more information VIDEO external VGA port You can connect a VGA monochrome or color mo...

Page 23: ...r make sure you have the correct power cable for the electrical socket See the power cable specifications in Appendix B for details Caution Use only the AC adapter model number AP 006 supplied with the computer You may need to connect the AC adapter to charge the battery before you use it the first tune Follow these steps 1 Connect the AC adapter plug to the DC input port on the back of the comput...

Page 24: ... outlet The indicator lights on the AC adapter tell you the adapter is working properly Indicates the adapter is connected to an outlet Flashes when the battery is recharging remains steady when the battery is fully charged Note For complete instructions on using the AC adapter see chapter 4 Setting Up the Computer 1 9 ...

Page 25: ...low these steps 1 Make sure the computer power is off Caution Make sure the computer is turned off before connecting or disconnecting the external diskette drive otherwise you could damage the drive 2 Open the port cover on the back of the computer by pulling down on the notch at the top 3 Align the diskette drive cable connector with the parallel port and external keyboard port Push it firmly int...

Page 26: ...y not be charged so make sure the AC adapter is connected when you turn it on for the first time Before you turn on the computer first connect and turn on any external devices you will be using such as a printer monitor or pointing device See Chapter 5 for information about installing optional devices Then slide the power switch on the right side of the computer to turn it on Setting Up the Comput...

Page 27: ...ntinue the startup process Because your computer was set up at the factory the configuration listing should be accurate but you will want to run SETUP to enter the correct time and date Additionally if you have changed the computer s setup so that this information does not match your configuration be sure to run SETUP Depending on your configuration your computer may come with MSDOS and Microsoft ...

Page 28: ...ing optional devices however you need to update the SETUP settings The SETUP program is stored in the computer s ROM BIOS read only memory basic input output system so you can access it any time you turn on or reset the computer SETUP lets you verify or change the following settings Current date and time Diskette drive or printer connection Self test error level Halt on Shadow RAM Password feature...

Page 29: ... bottom of the screen Press F1 to continue or Delete to run SETUP If this happens press to run SETUP and correct the setting Starting the SETUP Program To start SETUP make sure there is no diskette in the diskette drive then turn on your computer If your computer is already on turn it off wait 20 seconds and then turn it on again After the self test you see the following prompt at the bottom of th...

Page 30: ...All but diskette No errors Shadow System Video video BIOS System BIOS Disabled security Disabled System access Setup access Boot Sequence A C C A Virus Warning Enabled Disabled Default Speed High Low Drive C None Type 1 85MB Type 2 120MB Type 49 MB Note If you are having trouble seeing your cursor position press to change the screen colors Your cursor changes to a solid highlight bar over the opti...

Page 31: ...difiable option Changes the current setting for numeric parameters increases or decreases the current numeric value Cancels the exit menu and returns to the current screen Displaysthe next page Displays me previous page Setting the Date and Time The real time clock in your computer continuously tracks the date and time even when the computer is turned off The first time you run SETUP you ll want t...

Page 32: ...ing the Diskette Drive or Printer Your system may have come with one external diskette drive and you may want to connect a printer to the computer The Parallel option lets you select one of the following 1 44MB 3 5 inch Ext printer If you want to connect the Epson external diskette drive select 1 44MB 3 5 inch For a printer select Ext printer Setting the Trackball This option enables or disables t...

Page 33: ...ut diskette You want your system to stop booting If it encounters any error except a diskette drive error during the self test No errors You don t want your system to stop booting even if it encounters errors during the self test l Default setting Setting the Shadow RAM Your computer can access RAM random access memory faster than ROM read only memory The Shadow option allows your system to copy t...

Page 34: ...r disable an optional password to control who can access your system The following table lists the available options Security options I Select If I Disable I You do not want to set a password Setup Access You want to set a password to use the SETUP program System Access You want to set a password to use the system computer Including the SETUP program Default setting If you select Setup Access you ...

Page 35: ...ssword Again you ll see an asterisk for each letter you type If the password you type the second time doesn t match the first password you entered you see the Enter Password prompt again 5 As you exit the SETUP program make sure you press to save the new settings If you set the System Access password when the system reboots you will see the password prompt Changing or Deleting a Password If you wa...

Page 36: ...isk drive installed so you should only change this setting if you purchase an additional Epson ActionNote drive with a different capacity Caution Use only the appropriate removable hard disk drives designed for your ActionNote computer Inserting an incompatible drive could damage your system Drive C options are as follows None Type 1 85MB Type 2 120MB Type 49 userdefined When you install another E...

Page 37: ...ers or press or to scroll through the available options Drive type options Heading Description CYLS The number of cylinders on the drive HEADS The number of read write heads in the drive SECTORS The number of sectors on the drive PRECOMP LANDZONE The precompensation cylinder The landing zone the area on which the computer parks the heads Press after typing each number Check your drive documentatio...

Page 38: ...ation programs conforming to the Lotus Intel Microsoft Expanded Memory Specification LIM EMS Your computer is compatible with version 4 0 of the LIM EMS The memory portion of the SETUP program s STATUS page displays the total memory available as well as the amount of memory contained in each of the following Basememory Extended memory Expanded memory Reserved memory between 640 KB and 1MB Other me...

Page 39: ... the computer loads the operating system from drive C If it doesn t find the operating system on drive C it checks the diskette in drive A This setting allows the computer to load the operating system a little faster Setting the Virus Warning Your computer contains a built in virus warning function to protect your data should a software virus come in contact with your system If the virus warning o...

Page 40: ...ing feature Setting the Default Speed Your computer s processor can operate at two speeds High 33 MHz or Low 8 MHz The processor is factory set to High speed where it can access memory faster If you want the computer to always start at Low speed change this option to Low Use High speed for everything you do unless you have an application program that requires a slower speed Some applications like ...

Page 41: ...for the specified period of time the hard disk drive goes into Suspend mode System timeout Enables or disables a timeout period for the system if enabled and the system is not accessed for the specified period of time the computer goes into Suspend mode Highlight the option you want to change and press the or key repeatedly to see what timeout periods are available then press to make your selectio...

Page 42: ...eboots 3 If you have just run SETUP for the first time see Post SETUP Procedures below Note You may see an error message and a prompt to run SETUP when your computer is rebooting if it detects a problem in your SETUP configuration If so follow the instructions on the screen to run SETUP and correct the problem You may also see an error message if you have not installed your operating system on the...

Page 43: ... been configured you now need to install the operating system on your computer See your operating system manual for instructions After you have installed your operating system you can install any software you plan to use See your application program manual for instructions 2 16 Running SETUP ...

Page 44: ...cluding Taking care of the computer Using the password Using the keyboard Stopping a command or program Resetting the computer Turning off the computer Adjusting the LCD screen Using the trackball Using diskettes Using the hard disk Using PC cards Using memory Using Your Computer 3 1 ...

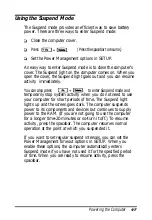
Page 45: ...e battery pack installed to maintain a full battery charge Occasionally clean the exterior of the computer with a soft damp cloth Occasionally clean the LCD screen using glass cleaner on a soft cloth do not apply the cleaner directly to the screen Using the Password Function You can select password security for the entire system or only the SETUP program This allows you to safeguard all your data ...

Page 46: ...rd Type the correct password and press To protect your password the screen does not display the characters you type If you do not type the correct password the system beeps and repeats the password prompt Try typing the password again The computer allows you three tries to enter it correctly After the third incorrect attempt the system locks up and you see the following message Password check fail...

Page 47: ... the and keys Using the embedded numeric keypad is described later in this section Note The keyboard on the ActionNote is available with different layouts for different languages Special keytop sets are available in some countries Additionally you can use MS DOS to reassign the layout of your keyboard to duplicate that of another country See your MS DOS manual for more information This section des...

Page 48: ...programs These special keys are described below Special key functions Purpose Produces uppercase characters or the top symbols on the keys when used with the main character keys Produces lowercase characters when the Caps Lock function is on Controls functions on the embedded numeric keypad as well as other special functions Works with other keys to perform special control functions Works with oth...

Page 49: ...nates the current operation when used with Turns the insert function on and off Deletes the character marked by the cursor The and keys work as toggles press them once to turn on the function and again to turn it off When the function is on the corresponding light above the keyboard is lit Using F11 and F12 The and keys perform special functions within application programs You activate these keys ...

Page 50: ...nction Enters Suspend mode Toggles normal and reverse video Toggles between LCD CRT and simultaneous display Toggles LCD backlight on and off Using the Embedded Numeric Keypad The embedded numeric keypad allows you to enter numeric characters from the keyboard when the Num Lock function is on The numeric keypad is shown below Using Your Computer 3 7 ...

Page 51: ...You may sometimes need to stop a command or program while it is running Many programs provide a command you can use to cancel or even undo an operation If you have entered an MS DOS command that you want to stop try one of the following commands Hold down and press Hold down and press These methods may also work in your application program If not you may need to reset the computer as described bel...

Page 52: ...system must be either on the hard disk or on a diskette in drive A If you are using MS DOS hold down and and press The screen goes blank for a moment and then the computer reloads MS DOS Caution Resetting the computer erases any data in memory you have not saved so do not use the reset function unless necessary Also some programs classify and store new data only when you exit them properly so do n...

Page 53: ...ng Make sure the hard disk drive and the diskette drive lights are off then turn off the computer by sliding the power switch on the right side of the computer Caution Always make sure the computer is off when you connect or disconnect equipment such as a printer or diskette drive 3 10 Using Your Computer ...

Page 54: ... the default setting in SETUP whenever you turn on or reset the computer it starts up in Hi h speed To change the speed temporarily first press to turn Num Lock and its indicator light on Then to change to Low speed press When you want to change back to Hi h speed make sure Num Lock is on and press Note You must press or on the embedded numeric keypad If you want your computer to always start at L...

Page 55: ...he two switches next to the screen Adjust these switches to produce the best display for your viewing angle Slide the brightness switch down to increase the background brightness or up to darken it Slide the contrast switch down to lighten the contrast between the background and foreground or up to darken it 3 12 Using Your Computer ...

Page 56: ...trackball with your thumb and place your index finger on the right button The cursor moves in response to the direction of the ball up down left or right You can press the right button and hold it down while you move the trackball to drag objects around the screen Like the mouse you can doubleclick the right button press it twice quickly to make menu selections or block text The lower button is so...

Page 57: ...llowing types of diskettes 720KB double sided doubledensity usually labelled 2DD 1 44MB double sided highdensity labelled 2HD Inserting and Removing Diskettes To insert a diskette hold it with the label facing up and the metal shutter leading into the diskette drive Slide it into the drive until it clicks into place release button 3 14 Using Your Computer ...

Page 58: ... its data from being altered When a diskette is write protected you can read it and copy data from it but you cannot store new data on it or delete any files it contains If you try to change data stored on a write protected diskette you will see an error message To write protect a diskette turn it over so you are looking at the underside Slide the switch in the lower right comer toward the outer e...

Page 59: ...gle Diskette Drive System MS DOS expects a computer to have at least two diskette drives A and B and displays prompts and messages accordingly Your ActionNote supports one 3 5 inch external diskette drive this is drive A MS DOS uses the one drive as two by displaying alternate prompts for the source and target diskettes For example if you need to make a copy of a diskette you can insert the disket...

Page 60: ...om damage and to avoid losing data Never turn off or reset the computer when the hard disk drive light is on This light indicates that the computer is copying data to or from the hard disk After turning the power off wait 20 seconds before moving the computer This allows the disks in the drive to stop spinning and the hard disk read write heads to lock in place so you do not damage the drive Never...

Page 61: ...er This is useful for sharing the computer among several people keeping data confidential or managing very large programs To remove the hard disk drive slide it to the left as far as it will go You ll feel it ease away from the case Then pull the drive straight out of the computer 3 18 Using Your Computer ...

Page 62: ... computer is running on the battery remember that it uses more battery power You can reduce the power consumption however with the following conservation measures Define a timeout period for the hard disk through the SETUP program See Chapter 2 for instructions Close the cover or press to place the computer in Suspend mode when you are not using it but you want to leave it turned on Open the cover...

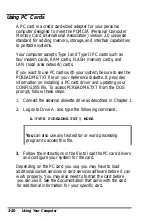
Page 63: ...g a PC card driver and updating your CONFIG SYS file To access PCREADME TXT from the DOS prompt follow these steps 1 Connect the external diskette drive as described in Chapter 1 2 Log onto Drive A and type the following command A TYPE PCREADME TXT MORE You can also use any text editor or word processing program to access this file 3 Follow the instructions in the file to load the PC card drivers ...

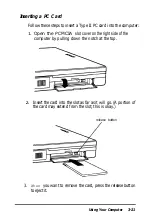
Page 64: ...lot cover on the right side of the computer by pulling down the notch at the top 2 Insert the card into the slot as far as it will go A portion of the card may extend from the slot this is okay release button 3 When you want to remove the card press the release button to eject it Using Your Computer 3 21 ...

Page 65: ...ll memory in a computer is managed using addresses numbers that describe the location of each byte of data Each memory chip must have its own set of unique addresses so that the operating system knows where to store and find data Conventional memory is memory that MS DOS recognizes and manages directly The size of conventional memory is limited to 640KB and has addresses in the range 0 to 640KB Re...

Page 66: ...DOS Windows and other compatible programs it is best to use one of the memory managers such as HIMEM SYS that came with your software because these memory managers have been tested and proven reliable Most MS DOS commands and application programs cannot use extended memory directly They need to use expanded memory which uses a portion of reserved memory as a window to access RAM beyond 1MB This ty...

Page 67: ...henever you have access to an electrical outlet When the AC adapter is connected it supplies power to the computer and recharges the battery The AC adapter is ideally suited for travel to foreign countries It is designed to operate in 100 240 VAC ranges with a frequency of 50 60 Hz All you need is an appropriate plug for the electrical socket see Appendix B for specifications See Chapter 1 for ins...

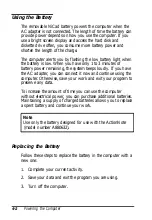
Page 68: ...eeps loudly If you have the AC adapter you can connect it now and continue using the computer Otherwise save your work and exit your program to preserve any data To increase the amount of time you can use the computer without electrical power you can purchase additional batteries Maintaining a supply of charged batteries allows you to replace a spent battery and continue your work Note Use only th...

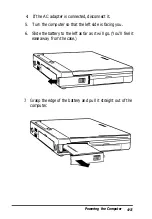
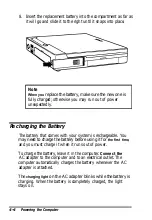
Page 69: ... 5 Turn the computer so that the left side is facing you 6 Slide the battery to the left as far as it will go You ll feel it ease away from the case 7 Grasp the edge of the battery and pull it straight out of the computer Powering the Computer 4 3 ...

Page 70: ...your system is rechargeable You may need to charge the battery before using it for the first time and you must charge it when it runs out of power To charge the battery leave it in the computer Connect the AC adapter to the computer and to an electrical outlet The computer automatically charges the battery whenever the AC adapter is attached The charging light on the AC adapter blinks while the ba...

Page 71: ...ntly start to recharge the battery before it runs out completely it starts to remember this discharge level When you use it again it may stop supplying power at that level To reduce the memory effect and extend the life of your battery you should let it discharge completely whenever possible before recharging it If you use the computer every day you should completely discharge the battery at least...

Page 72: ...rk If you don t have your AC adapter with you follow these steps 1 Complete your current activity as quickly as possible 2 Save your data 3 Exit the program you are using 4 Turn off the computer 5 If you have a spare charged battery you can install it now See Replacing the Battery on page 4 2 Caution Make sure you turn off the computer before replacing a battery Removing the battery when the compu...

Page 73: ...t need to use your computer for short periods of time The Suspend light lights up and the screen goes dark The computer suspends power to its components and devices but continues to supply power to the RAM If you are not going to use the computer for a longer time 20 minutes or so turn it off To resume activity press the spacebar The computer resumes normal operation at the point at which you susp...

Page 74: ...ncludes Power Management options that enable you to conserve battery power These options allow you to set timeout periods for your system and or hard disk drive so you don t waste power For instructions on running SETUP see chapter 2 4 8 Powering the Computer ...

Page 75: ...er Serialdevice External keyboard keypad mouse or other pointing device Expansion memory modules Numeric coprocessor Make sure the computer is turned off before you install or connect any of these devices This is a safety precaution and is also necessary for the computer to recognize that you connected a new device Connecting Optional Devices 5 1 ...

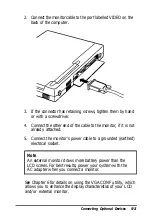
Page 76: ...s on the far right next to the battery Connecting an External Monitor The VIDEO port on your computer allows you to connect an external color or monochrome VGA monitor When a monitor is connected you can display text and graphics on both the LCD screen and the monitor Follow these steps to connect a monitor 1 Make sure both the computer and the monitor are turned off 5 2 Connecting Optional Device...

Page 77: ... not already attached 5 Connect the monitor s power cable to a grounded earthed electrical socket Note An external monitor draws more battery power than the LCD screen For best results power your system with the AC adapter when you connect a monitor See Chapter 6 for details on using the VGACONF utility which allows you to enhance the display characteristics of your LCD and or external monitor Con...

Page 78: ... using an external diskette drive you ll have to disconnect it before you can connect a printer to this port You cannot use both devices at the same time Follow these steps to connect a parallel printer 1 Place the printer in a convenient location near your computer 2 Make sure both the computer and printer are turned off 3 Disconnect the external diskette drive if connected 4 Connect the printer ...

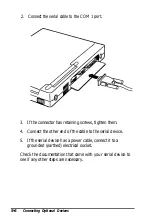
Page 79: ...the printer s power cable to a grounded earthed electrical socket Now run SETUP as described in Chapter 2 to set the Parallel option to Ext printer Connecting a Serial Device You can use the COM 1 port to connect serial devices such as a serial printer or plotter You could also connect a modem or mouse Follow these steps to connect a serial device 1 Make sure both the computer and the serial devic...

Page 80: ...hten them 4 Connect the other end of the cable to the serial device 5 If the serial device has a power cable connect it to a grounded earthed electrical socket Check the documentation that came with your serial device to see if any other steps are necessary 5 6 Connecting Optional Devices ...

Page 81: ...al port you can use the MS DOS MODE command to redirect the output You can even tell the computer to redirect printer and serial port settings automatically if you place the appropriate MODE commands in your AUTOEXEC BAT file See your MS DOS manual for instructions Using the EXT KB Port You can use the EXT KB port to connect a variety of PS 2 compatible pointing devices including an external keybo...

Page 82: ... PS 2 device Connecting an External Keyboard or Keypad If you are typing text or entering numbers for extended periods of time you may want to connect an optional external keyboard or keypad You connect either of these devices directly to the EXT KB port on the computer as shown below 5 8 Connecting Optional Devices ...

Page 83: ...e back of the drive connector cable as shown below Connecting a Mouse or Other Pointing Device You can connect a PS 2 type mouse or other pointing device to your computer using the special adapter included with your system Follow these steps 1 Connect the adapter to the EXT KB port Connecting Optional Devices 5 9 ...

Page 84: ... is connected to the computer connect the adapter to the 6 pin port on the back of the drive s connector cable as shown below 2 Connect the pointing device plug to the lower connector on the adapter 5 10 Connecting Optional Devices ...

Page 85: ...tation supplied with the device for instructions Installing a Memory Module or a Numeric Coprocessor The sections below describe how to add a memory module to your computer and install a numeric coprocessor To access the sockets for these options you need to remove the access cover on the bottom of the computer Removing the Access Cover To remove the access cover follow these steps 1 Make sure the...

Page 86: ...ur computer comes with 2MB of memory soldered directly onto the system board You can increase your memory up to a maximum of 8MB by installing a 2MB or 6MB memory module Note If your system came with a 2MB memory module already installed and you want to increase the memory to 8MB you need to remove the 2MB module and replace it with a 6MB module 5 12 Connecting Optional Devices ...

Page 87: ...mory module 1 Remove the access cover as described on page 5 11 2 If there is no memory module installed go to step 4 If a memory module is installed as shown below and you need to remove it go to step 3 Connecting Optional Devices 5 13 ...

Page 88: ...ter as shown below Then lift the memory module out of the computer and store it safely in case you need to use it again 4 Lower the new memory module straight down into the computer with the chip side up Align its connector with the socket on the system board 5 14 Connecting Optional Devices ...

Page 89: ...le and try again 6 Replace the access cover as described on page 5 17 After you reassemble your computer you need to run the SETUP program to make sure it recognizes the new amount of memory As soon as you turn on the computer it will prompt you to run SETUP because of the memory mismatch See Chapter 2 for instructions If you later remove or change the memory module be sure to run the SETUP progra...

Page 90: ...are using certain application software The coprocessor chip can be easily damaged and is expensive to replace so if you don t feel confident about installing it yourself ask your Authorized Epson Servicer for assistance To install the coprocessor follow these steps 1 Remove the access cover as described on page 5 11 2 Place the coprocessor onto the socket so that the round indentation indicating p...

Page 91: ...resent Replacing the Access Cover After installing a memory module or numeric coprocessor you must replace the access cover Follow these steps 1 Turn the computer upside down with the front facing you 2 Replace the access cover as shown below Gently press down on it until you feet it snap into place 3 Turn the computer right side up 4 Connect any external devices you are using Connecting Optional ...

Page 92: ...ypes of monitors the VGA drivers identify your display adapter and monitor for the software These drivers are files your software uses to communicate with your display adapter and monitor A utility is a program that supports the processes of a computer The utilities on your VGA diskette allow you to change the system s default graphic configuration and enhance your system operation by setting vari...

Page 93: ... Windows version 3 0 WordPerfect version 5 1 supported Supported resolutions colors 100 x 60 text 640 x 480 16 800 x 600 16 800 x 600 16 Note These drivers and utilities are designed for systems running MS DOS If you are using another operating system see the documentation that came with it for information about the VGA drivers you can use If you are displaying data simultaneously on both the LCD ...

Page 94: ...s driver from the Reference diskette to this directory At the command prompt type the following and press COPY A LOTUS L100X60 DRV Type INSTALL and press to run the Lotus installation program From the main menu select Advanced options and press Then select Add new drivers to libraryand press When the program finishes adding drivers to the library select Modify current driver set and press Select T...

Page 95: ...ou named your driver 100X60 SET you would type the following and press 123 100X60 Microsoft Windows Version 3 0 The Microsoft Windows driver supports a resolution of 800 x 600 with 16 colors Note Even though this driver specific to Windows 3 0 you can use it with Windows version 3 1 Check with the Epson Connection for the availability the Windows 3 1 driver To install the driver follow these steps...

Page 96: ...press 8 Remove the Reference diskette from drive A 9 Complete the Windows Setup WordPerfect Version 5 1 The WordPerfect driver supports high resolution text and graphics WordPerfect allows text and graphics drivers to be set up separately so be sure to install both of these drivers Follows these steps 1 Insert the Reference diskette into the external diskette drive 2 Log onto the WordPerfect direc...

Page 97: ...xit Your selection is saved and used for displaying text and the print preview and graphics functions of WordPerfect Using the VGACONF Utility Program The Reference diskette includes one utility program VGACONF which is located in the UTILS directory This utility allows you to change your system s default graphic configuration Note You may want to copy this program to a directory on your hard disk...

Page 98: ...tatus option displays the current VGACONF settings For example Display Status Reverse video is set to enable text and disable graphics Bold font is disabled Contrast enhancement is Expanded mode is enabled set to automap Vertical position is set to center unexpanded mode Display type is set to panel 16 bit ram access is enabled Font load is inhibited Full height cursor is disabled RGB weighting is...

Page 99: ...the desired setting and press to return to the SELECT OPTION menu Some options are designed for a specific display mode CRT SimulSCAN or panel CRT mode refers to a VGA monitor connected to the VIDEO port SimulSCAN refers to both the LCD screen and a VGA monitor panel refers to the LCD screen on your computer The following table shows the display modes available for each option 6 8 Using the VGA Ut...

Page 100: ... SimulSCAN panel Cursor Panel Rgb Panel Standby Timer Standby Timer allows you to set a timeout period for the LCD display panel if the Display option is set to PANEL When you select Standby Timer your see this menu Select Timer to set a timeout period or select Normal to disable standby mode When you select Timer you see these prompts Standby Time minutes Time out on K eyboard activity or M emory...

Page 101: ...tility is exactly the same as Suspend mode You can reactivate the system at any time by pressing the spacebar Quit Select Quit to exit the VGACONF program and return to the operating system prompt Using VGACONF from the Command fine To quickly change one or more VGA configuration settings you can initiate VGACONF from the command line with option parameters At the command prompt enter the VGACONF ...

Page 102: ... BKFRGND EXPAND Disable text and enable graphics reverse video Enable bold mode Disable bold mode Disable Automap Enable Automap Enable background enhancement Enable foreground enhancement Enable background and foregound enhancement Enable expand mode NOEXPAND Disable expand mode I CENTER Center the display on the screen TOP Align the display on the top of the screen BOTTOM PANEL Align the display...

Page 103: ...ing 5 2 9 W295 Select RGB weighting 2 9 5 W592 W925 Select RGB weighting 5 9 2 Select RGB weighting 9 2 5 W952 Select RGB weighting 9 5 2 You can abbreviate any of the VGACONF options by typing only the first three characters of the option name The following examples show how to enter the VGACONF command with the options parameters VGACONF SIMUL VGACONF SIM VGACONF PANEL NOATTREMUL NOBOLD NOEXPAND...

Page 104: ... t start Battery problems AC adapter problems The LCD screen is blank The external monitor screen is blank The computer locks up Password problems Diskette problems External diskette drive problems Hard disk problems Software problems Printer problems PC card problems Mouse or pointing device problems External keyboard problems Memory module problems Troubleshooting A 1 ...

Page 105: ...ion numbers of any software programs you are using You can find the serial number on the underside of the computer If you are able to use your computer follow these steps to obtain information about your configuration as well as the version numbers of your system BIOS and MS DOS 1 Turn on your computer or press to restart it 2 As the computer performs its power on diagnostics it displays the versi...

Page 106: ...nitialization The error message remains on the screen and the computer locks up If this happens contact your Authorized Epson Servicer as soon as possible to report this information and the error message The Computer Won t Start If your computer does not start when you press the power button try the following 1 Check the power light If it is on the computer is on and you should follow the steps un...

Page 107: ...ge the one in the computer If you have the AC adapter with you connect it to the computer to begin recharging the battery The battery light on the AC adapter blinks to indicate it is charging You can continue using the computer while the battery is being recharged 4 If you replace the battery and the computer does not work properly the new battery may not be fully charged Use the AC adapter to rec...

Page 108: ...y diskette from the diskette drive and turn off the computer Disconnect the AC adapter and then reconnect it Then turn the computer back on If the power light is still off go to step 2 2 Check the connections make sure the AC adapter cable is securely connected to the computer and that the power cable is properly connected to both the AC adapter and an electrical outlet 3 If the connections are go...

Page 109: ...cebar to see if this restores the display See Chapter 2 for information about the Power Management options 3 The computer may just be in Suspend mode Press the spacebar to resume activity 4 If you have connected an external monitor to your computer and you are using it you should not have any problem displayin information on both screens at the same time Press to toggle between simultaneous displa...

Page 110: ...e Chapter 6 for details 4 Remove any diskette from the external diskette drive and turn off the computer and the monitor Check that the monitor s power cable is securely connected to the monitor and to an electrical outlet Be sure the monitor cable is properly connected to both the monitor and the computer Then turn both power switches back on 5 If the monitor still does not work turn off both the...

Page 111: ...ivity operation Try pressing by cancelling the current or 4 If the computer remains locked up after you ve waited a reasonable amount of time reset it by pressing 5 If resetting does not work you probably need to turn off the computer wait five seconds and turn it back on Password Problems If you set a password using the SETUP program you must enter it at the times you selected in SETUP either whe...

Page 112: ...rnal Diskette Drive Problems on the following page 3 Are you using the right type of diskette for your drive The external 3 5 inch drive can read either 720KB or 1 44MB diskettes 4 Is the diskette write protected If you want to copy to a diskette it must not be write protected If the write protect switch is set first make sure the diskette does not contain files you do not want to change or lose T...

Page 113: ...e check the following 1 Is the external diskette drive connected properly Remove any diskette from the drive and turn off the computer Make sure the connector is inserted firmly into the EXT KB and PRINTER port and that the retaining screws are tightened to secure the connection See Chapter 1 for instructions 2 Are you using the Epson external diskette drive Other drives may not work with your sys...

Page 114: ... problem with the hard disk Contact your Authorized Epson Servicer if this occurs If you have set a timeout for the hard disk in the SETUP program and it has timed out the hard disk drive requires about 15 seconds to come back up to speed when you access it again Make sure you have formatted the hard disk correctly for the operating system you are using See the instructions in your operating syste...

Page 115: ...speed some must run at the slower speed Check your software manual to see if this is the case and change the CPU speed if necessary See Changing the CPU Speed in Chapter 3 for instructions 3 If you have entered an MS DOS command that you want to stop there are special key commands you can use to tell MS DOS to stop what it is doing These methods may also work in your application programs Hold down...

Page 116: ...ding paper check the printer manual for the correct DIP switch settings If you are using MS DOS refer to your printer documentation to see whether you need to use the MODE command described in the MS DOS manual to match the serial settings PC Card Problems If you inserted a PC card in the PC card slot and you cannot access data on the card follow these steps to solve the problem 1 Make sure the ca...

Page 117: ...rer or call the Epson Connection for assistance Mouse or Pointing Device Problems If you installed a mouse or other PS 2 compatible pointing device and it doesn t work properly try these solutions 1 2 3 4 Is the mouse or pointing device connected properly Make sure you connected it to the adapter as described in chapter 5 Did you install any necessary drivers and load them into your computer s mem...

Page 118: ...whom you purchased it or call the Epson Connection for assistance Memory Module Problems If you have added extra memory to your system and that memory is not operating properly check the following 1 See if the SETUP program is displaying the correct amount of memory See Chapter 2 for instructions 2 Did you insert the memory module correctly See Installing a Memory Module in Chapter 5 3 Have you de...

Page 119: ...Epson Connection if you cannot solve the problem CMOS Battery Problems The Dallas clock chip in your computer preserves the contents of CMOS RAM even when the power is off This battery should last more than a year before you need to replace it When this battery s life is exhausted you see a message similar to the following CMOS battery has failed Contact your Authorized Epson Servicer to install a...

Page 120: ... 8MB using a memory module the first 640KB is conventional memory and 128KB is used for shadow RAM the rest can be used as extended or expanded memory 128KB on a single one time programmable ROM includes system BIOS VGA BIOS and the SETUP program 256KB 80ns video memory on main system board 256KB x 4 frame buffer Shadowing of system and VGA BIOS 128KB at E0000 to FFFFF Real time clock calendar and...

Page 121: ...ith 64 gray scales and external monitor with resolutions up to 800 x 600 x 16 colors simultaneous LCD and CRT operation PCMCIA Databook DB86082 PCMCIA version 2 0 controller Type II connector supports Type I and Type II memory and I O cards Speaker Built in ISA compatible speaker controller internal Interfaces External VGA 15 pin D sub female connector for external analog VGA or SVGA monitor Paral...

Page 122: ... numeric keypad and and keys inverted T cursor control key layout Mass Storage Hard disk drive One removable 2 inch internal hard disk drive Diskette drive Optional external 3 5 inch diskette drive supports 1 44MB and 720KB diskette formats Monochrome VGA LCD 640x480 dots x 64 shades of gray 0 23 nun high contrast two film paper white backlit by one cooled cathode fluorescent tube CCFT continuous ...

Page 123: ...able internal AE size NiCad battery pack 9 cell 9 6 volt 1 7AH 16 3W minimum 2 hours battery life typical Caution Use only the ActionNote AC adapter model number AP 006 and battery model number A880632 Physical Dimensions Height 38 mm 1 5 in Width 252 mm 10 0 in Depth 190 mm 7 6 in Weight with 1 75 kg 3 85 lb battery and hard disk drive installed B 4 Specifications ...

Page 124: ...on condensing Non operating 5 to 95 non condensing 35dB 1 meter Altitude Operating 61 to 3048 m 200 to 10 000 feet Non operating 261 to 9 090 m 200 to 30 000 feet Caution When travelling by airplane bring your computer into the passenger compartment as carry on luggage to prevent it from being stored in an unpressurized storage area Specifications B 5 ...

Page 125: ...V 10A Australia 24OV 10A North America 24OV 15A Reference standards CEE 7 7 IEC 83 IEC 127 HD 21 BS 1362 BS 1363A IEC 83 IEC 127 HD 21 EN 60 320 1 ASTA mark ASC112 IEC 127 HD 21 ANSI C73 20 NEMA 6 15 P IEC 83 UL 198 6 Power cord UL CSA Listed Type SJT no 18 3AWG or no 16 3AWG or HAR 3OOV 10A or 13A Power cord I HAR 1 OOmm2 300V 10A HAR 1 OOmm2 3OOV 10A UL CSA Listed Type SJT No 18 3AWG 3OOV 10A HA...

Page 126: ... wall outlet into the proper DC voltage to power your computer The AC adapter also charges the battery pack while it is in the computer Address A number or name that identifies the location of each piece of information in the computer s memory ASCII American Standard Code for Information Interchange A standard system for encoding text characters such as letters numbers and symbols An ASCII charact...

Page 127: ...ename MS DOS executes each command in the file in sequence See also AUTOEXEC BAT file Baud rate A measure of data transmission speed Usually equivalent to bits per second BIOS Basic Input Output System Routines in ROM that handle the basic input output functions of the operating system For example the SETUP program is contained in the computer s ROM BIOS Chip A hardware component of your system fo...

Page 128: ...ile to customize your system by installing device drivers setting limits for files and buffers and specifying MS DOS commands to be run during startup Configuration The particular arrangement of the hardware components installed in or attached to your computer For example your configuration might include a hard disk a printer and a PC modem card Control code A command generated by holding down and...

Page 129: ...t which the CPU can execute commands Your system can run at 33 MHz High or 8 MHz Low In Suspend mode the CPU automatically runs at 1 MHZ Also called clock speed execution speed or operating speed Cursor The highlighted marker that shows your position on the screen and moves as you enter and delete data Default A value or setting that takes effect when you turn on or reset the computer Also the res...

Page 130: ...e or a hard disk See also Diskette and Hard disk Diskette A flat piece of flexible plastic coated with magnetic material and used to store data Also called a floppy disk Diskette drive The physical device that enables the computer to read from and write to a diskette Your system supports a 3 5 inch external diskette drive Double density A type of diskette format A 3 5 inch doubledensity diskette h...

Page 131: ...keyboard to access alternate key functions for the embedded numeric keypad the and keys and the Suspend mode Format To prepare a new disk or erase an old one so that it can store information Formatting a disk divides it into tracks and sectors and creates addressable locations on it Frame buffer The portion of the computer s display memory that holds the contents of a single Screen image The VGA c...

Page 132: ... transmit data between equipment or programs KB Kilobyte A unit used to measure storage space in a computer s memory or on a disk One kilobyte equals 1 024 bytes LCD Liquid Crystal Display A thin backlit panel containing thousands of pixels that can be turned on and off individually by electric currents Used as the main display on most portable computers LIM EMS 4 0 Lot us Intel Microsoft Expanded...

Page 133: ...r 1024KB Memory The area where the computer stores data Memory contents may be permanent ROM or temporary RAM See also ROM and RAM Memory module An optional card that adds 2MB or 6MB of extended memory to your computer Memory resident program A program that remains in RAM so you can access it while another program is running MHz Megahertz A unit used to measure the oscillation frequency of a compu...

Page 134: ...oprocessor See Coprocessor Numeric keypad The embedded numeric activate by pressing the keypad in the keyboard which you can key Operating speed See CPU speed Operating system A collection of programs for example MS DOS that control the operation of a computer The operating system determines how programs run on the computer and supervises all input and output See also MS DOS Parallel A way of orga...

Page 135: ...ory is BUSINESS CONTRACT TXT PC card These credit card sized products provide a universal expansion capability across PC platforms PC cards can emulate a storage device such as a hard disk provide a fax modem or serve as a LAN adapter Your system includes a PCMCIA Version 2 0 PC card slot which accepts Type I or Type II cards up to 5 mm thick See also PCMCIA PCMCIA Personal Computer Memory Card In...

Page 136: ...u work All data stored in RAM is temporarily maintained while the computer is in Suspend mode but erased when you turn off the computer You must save any data you want to keep on a diskette or hard disk See also ROM Read To copy data from one area to another For example when you open a text file stored on disk the computer reads the data from the disk and displays it on the screen Read write head ...

Page 137: ...sk The root directory is designated by a backslash All other directories are subdirectories of the root directory or of other subdirectories RS 232C A standard serial interface Your computer has a connector that lets you attach an RS 232C compatible device to your computer serial A way of organizing communications between two pieces of computer equipment in which the signals that make up each char...

Page 138: ... operating system on a diskette as it formats it See also Parameter System disk A disk containing one of the operating systems used by your computer Timeout period An amount of time you can specify using the SETUP program or VGACONF utility if the hard disk or system is not accessed for the specified amount of time the computer enters Suspend mode Utility program A type of program designed to allo...

Page 139: ...Write To record data on a disk Write protect To prevent a diskette from being overwritten When a diskette is write protected you cannot erase change or record over its contents 14 Glossary ...

Page 140: ...sal 4 5 extra 4 5 light 1 5 4 2 4 6 A 4 part number 4 2 B 4 problems A 4 5 Battery continued recharging 4 4 5 removing 4 2 4 replacing 4 2 4 specifications B 4 using 4 2 6 Battery power saving 2 14 3 19 4 7 8 6 9 10 Baud rate serial port 5 7 BIOS 2 1 A 2 B 1 BIOS version number A 2 Break key 3 6 Brightness control 3 12 switch 1 4 3 12 Built in VGA adapter 6 1 2 C Caps Lock key 3 5 Caps Lock light ...

Page 141: ...nce diskette 3 16 CPU specifications B 1 speed changing 3 11 Ctrl key commands 3 8 11 Cursor control 3 5 Cyrix coprocessor 5 16 B 1 D Dallas clock chip A 16 B 1 DC input port 1 6 8 Delete key 1 12 3 3 Device drivers 3 20 5 11 6 1 12 Diagnostics power on 1 12 Dimensions physical B 4 Diskette drive external connecting 1 10 11 controller B 2 enabling 2 5 problems 2 6 A 10 11 SETUP 2 5 using 3 14 15 D...

Page 142: ...problems A 14 SETUP 2 5 External VGA controller B 2 port 1 6 7 using 5 2 3 6 1 2 Extra Care Road Service Intro 2 F F1 F12 keys 3 6 Features computer Intro 1 Fn key commands 3 6 7 G Graphic configuration 6 6 H Hard disk drive backing up 3 17 configuring 2 9 10 conserving power 3 19 controller B 2 light 1 5 location 1 4 problems A 11 removing 3 17 19 replacing 3 17 19 Suspend mode 3 19 timeout 2 14 ...

Page 143: ...ed 3 22 23 managers 3 23 problems A 15 specifications B 1 system 3 22 23 5 11 using 2 11 3 22 23 Memory module adding 5 11 15 installing 5 12 15 problems A 15 Microprocessor Intro 1 B 1 Microsoft Windows 1 12 6 2 6 4 5 Monitor external connecting 5 2 3 controller B 3 problems A 7 VGA drivers 6 2 6 VGACONF utility 6 6 12 Mouse external adapter 1 7 5 7 5 9 11 connecting 5 7 5 9 11 controller B 3 dis...

Page 144: ... 20 removing 3 21 slot for 1 6 3 21 PC cards continued socket services 3 20 specifications B 2 types of 3 20 using 3 20 21 PC card slot light 1 5 PCMCIA Intro 1 3 20 B 2 PCREADME TXT file 3 20 PgDn key 3 5 PgUp key 3 5 Physical dimensions B 4 Plugs AC B 6 Pointing device adapter 1 7 5 7 5 9 11 connecting 5 7 5 9 11 controller B 3 disabling 2 5 enabling 2 5 problems A 14 Ports 1 6 7 Power cable 1 8...

Page 145: ...ting 5 5 7 controller B 2 location 1 6 7 settings 5 7 Serial printer 5 5 Setting up computer 1 1 12 SETUP program booting sequence 2 12 date and time 2 4 5 default speed 2 13 external diskette drive 1 11 2 5 hard disk drive type 2 9 10 options 2 3 25 parallel printer 2 5 password security 2 7 9 pointing device 2 5 power management options 2 14 printer 2 5 running 2 2 saving settings 2 15 self test...

Page 146: ...mputer 3 10 Turning on computer 1 11 12 Typing password 3 3 U Unix 1 12 utilities 6 1 18 V VGA adapter built in 1 6 7 5 2 3 6 1 2 BIOS B 1 controller B 2 display characteristics 6 1 external port 1 6 7 monitor 5 2 3 6 1 2 6 6 12 resolutions Intro 1 1 3 6 1 2 B 3 VGA drivers applications 6 2 6 installing 6 2 6 Reference diskette 6 1 using 6 1 6 VGA utilities using 6 1 12 VGACONF utility command lin...

Page 147: ... Epson Hong Kong Ltd 25 F Harbour Centre 25 Harbour Road Wanchai Hong Kong Phone 831 4600 Fax 572 5792 Telex 65542 EPSCO I IX Epson Australia Pty Ltd 17 Rodborough Road Frenchs Forest N S W 2086 Australia Phone 2 452 0666 Fax 2 451 0251 Telex 71 75052 Epson Electronics Trading Ltd Taiwan Branch 10F No 287 Nanking E Road Sec 3 Taipei Taiwan R O C Phone 886 2 717 m Free phone 886 080 211172 Fax 886 ...

Reviews: