background image

140

Installing Options

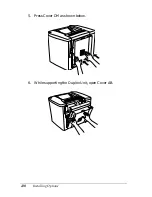
5. Press Cover DM as shown below.

6. While supporting the Duplex Unit, open Cover AB.

Summary of Contents for AcuLaser C900

Page 1: ...information on assembling the printer and installing the printer software Reference Guide this manual Providesyouwithdetailedinformationontheprinter sfunctions optional products maintenance troubleshooting and technical specifications ...

Page 2: ...2 ...

Page 3: ...s a result of accident misuse or abuse of this product or unauthorized modifications repairs or alterations to this product or excluding the U S failure to strictly comply with SEIKO EPSON CORPORATION s operating and maintenance instructions SEIKO EPSON CORPORATION shall not be liable against any damages or problems arising from the use of any options or any consumable products other than those de...

Page 4: ...4 ...

Page 5: ...le Products 19 Options 19 Consumable products 20 About Your Printer 21 Pre defined color settings in printer driver 21 Duplex printing 21 Resolution Improvement Technology RITech 22 Chapter 2 Paper Handling Available Paper 23 EPSON special media 23 General paper 25 Paper that should not be used 25 Paper Sources 27 MP tray 27 500 Sheet Paper Cassette Unit 28 Selecting a paper source 28 Output Tray ...

Page 6: ...printouts 49 Modifying the print layout 51 Using a watermark 53 Printing with the Duplex Unit 56 Making Extended Settings 58 Monitoring Your Printer by Using EPSON Status Monitor 3 60 Accessing EPSON Status Monitor 3 61 Getting printer status details 62 Setting Monitoring Preferences 64 Status Alert window 66 Setting Monitored Printers 66 Setting for the USB Connection 67 Canceling Printing 69 Uni...

Page 7: ... Printing 101 Uninstalling the Printer Software 101 Chapter 5 Setting Up Your Printer on a Network For Windows 103 Sharing the printer 103 Setting up your printer as a shared printer 104 Using an additional driver 106 Note for Windows XP Users 114 Setting for the clients 117 Installing the printer driver from the CD ROM 125 For Macintosh 126 About the shared printer 126 Setting up your printer as ...

Page 8: ... 172 Transporting the Printer 174 Chapter 9 Troubleshooting Ready and Error Lights 179 Printing a Status Sheet 181 Clearing Jammed Paper 182 Precautions for clearing jammed paper 182 Jam Cover AB 183 Jam MP tray or cassette 191 Jam Cover DM 197 Operational Problems 199 The Ready light does not turn on 199 The Ready light is on but nothing prints 199 Printout Problems 201 Printout is garbled 201 Th...

Page 9: ...n the printed image 210 Completely blank pages are output 210 The printed image is light or faint 212 The non printed side of the page is dirty 212 Paper Handling Problems 212 Paper does not feed properly 212 Appendix A Technical Specifications Available Paper 215 Available paper types 216 Specifications 217 Printable area 220 Printer 221 General 221 Environmental 223 Mechanical 223 Electrical 223...

Page 10: ...2 and FX modes 253 I239X mode 254 Printing font samples 254 Adding More Fonts 255 Selecting Fonts 255 Downloading Fonts 255 EPSON Font Manager Windows Only 256 Installing EPSON Font Manager 256 Contacting Customer Support 259 For users in Latin America 260 For users in Australia 260 For users in Singapore 262 For users in Thailand 262 For users in Indonesia 263 For users in Hong Kong 264 For users...

Page 11: ...ur equipment Notes contain important information and useful tips on the operation of your printer Safety Precautions Be sure to follow these precautions carefully to ensure safe efficient operation Because the printer weighs approximately 30 kg 66 1 lb one person should not lift or carry it Two people should carry the printer lifting it by the correct positions as shown below ...

Page 12: ...ching the components inside the printer unless instructed to do so in this guide Neverforcetheprinter scomponentsintoplace Althoughthe printer is designed to be sturdy rough handling can damage it When handling developer cartridges or photoconductor units always place them on a clean smooth surface Do not attempt to modify developer cartridges or take them apart They cannot be refilled Do not touc...

Page 13: ... to keep the unit out of the printer for long periods cover it with an opaque cloth Be sure not to scratch the surface of the photoconductor unit s drum When you remove the photoconductor unit from the printer always place the unit on a clean smooth surface Avoid touching the drum since oil from your skin can permanently damage its surface and affect print quality To get the best print quality do ...

Page 14: ...d by the operating instructions Improper adjustment of other controls may result in damage that requires repair by a qualified service representative ENERGY STAR Compliance As an International ENERGY STAR Partner EPSON has determined that this product meets the InternationalENERGYSTAR Programguidelines for energy efficiency The International ENERGY STAR Office Equipment Program is a voluntary part...

Page 15: ...Safety Information 15 For at least 180 seconds after turning on the printer Wait until the Ready green light comes on and is not flashing While the Ready light is flashing While printing ...

Page 16: ...16 Safety Information ...

Page 17: ...Product Information 17 1 1 1 1 1 1 1 1 1 1 1 1 Chapter 1 Product Information Printer Parts face down tray front cover Cover AB ...

Page 18: ...rmation parallel interface connector Type B Interface card slot cover power switch USB interface connector AC inlet MPtray Multi Purpose tray photoconductor unit waste toner collector developer cartridge transfer unit ...

Page 19: ...to your printer s capabilities by installing any of the following options The 500 Sheet Paper Cassette Unit C12C813911 holds one paper cassette It increases paper feeding capacity up to 500 sheets of paper The Duplex Unit C12C813921 provides for automatic printing on both sides of the paper An optional memory module expands your printer s memory allowing you to print complex and graphics intensive...

Page 20: ...s is monitored by the printer The printer lets you know when replacements are needed The EPSON special media listed below provide you with best quality printouts Developer Cartridge Black Developer Cartridge Yellow Developer Cartridge Magenta Developer Cartridge Cyan Photoconductor Unit Waste Toner Collector Transfer Unit S050100 S050097 S050098 S050099 S051083 S050101 S053009 EPSON Color Laser Pa...

Page 21: ...uality output The main features are described below Pre defined color settings in printer driver The printer driver offers many pre defined settings for color printing allowing you to optimize print quality for various types of color documents For Windows see Using the predefined settings on page 44 For Macintosh see Using the predefined settings on page 77 Duplex printing EPSON provides optional ...

Page 22: ...esolution Improvement Technology RITech Resolution Improvement Technology RITech is an original EPSON printer technology that improves the appearance of printed lines text and graphics RITech is also applied to color printing ...

Page 23: ...aper in a dry environment EPSON special media EPSON provides special media that are created especially for this printer EPSON Color Laser Paper This media is designed specifically for this printer You can load this media from the MP tray and the optional 500 Sheet Paper Cassette Unit S041215 A4 S041218 Letter EPSON Color Laser Transparencies This media is designed specifically for this printer You...

Page 24: ...Laser Coated Paper is designed specifically for this printer This media is thicker than EPSON Color Laser Paper and producesglossierandhigherqualityprinting ToprintonEPSON Color Laser Coated Paper choose Coated or Coated Back as the Paper Type setting This setting is optimized for printing on coated paper but paper can only be fed from the MP tray S041383 A4 Note Duplex printing using the optional...

Page 25: ...uarantee the quality of any type of media Always test samples of media stock before purchasinglarge quantities or printing large jobs You may use paper with preprinted letterheads provided that the paper and ink are both compatible with laser printers Paper that should not be used You cannot use the following paper in this printer It may cause printer damage paper jams and poor print quality Paper...

Page 26: ...uses high temperature sensitive ink around 180 C Labels that peel easily or labels that do not cover the backing sheet completely Coated paper or special surface colored paper other than EPSON Color Laser Coated Paper Paper that has binder holes or is perforated Paper that has glue staples paper clips or tape on it Paper that attracts static electricity Moist or damp paper Paper of uneven thicknes...

Page 27: ... Laser Paper A4 A5 B5 Letter LT Half Letter HLT Executive EXE Government Letter GLT Custom size paper 92 210 mm minimum 216 297 mm maximum Up to 200 sheets Total thickness 23 mm maximum Envelopes Monarch MON C10 DL C6 C5 IB5 Up to 10 envelopes Labels A4 Letter LT Up to 50 sheets Thick paper A4 A5 B5 LT GLT HLT EXE Up to 50 sheets EPSON Color Laser Transparencies A4 Letter LT Up to 50 sheets EPSON ...

Page 28: ...urce list Then click OK For Macintosh access the printer driver open the Basic Settings dialog box and select the paper source that you want to use from the Paper Source list Then click OK Auto selection If you want the printer to select the paper source containing the appropriate size of paper automatically select Auto Selection in the printer driver The printer will search for a paper source con...

Page 29: ... Note If you make paper size settings or paper source settings in your application these settings may override the printer driver settings If you select an envelope for the Paper Size setting it can be fed only from the MP tray regardless of the Paper Source setting Output Tray The face down tray is located on the top of the printer Your printouts will be stacked facing down Raise the paper suppor...

Page 30: ...r envelopes see also Printing on Special Media on page 34 MP tray The MP tray is the most flexible paper source accommodating various paper sizes and media types It is also the paper source for feeding paper manually See MP tray on page 27 for details Follow these steps to load paper into the MP tray 1 Remove the MP tray cover and open the MP tray flap Paper type All types of paper that are suppor...

Page 31: ...then slide the paper guide to the widest position 3 Load a stack of the desired media on the center of the tray with the printable surface facing up Then slide the right paper guide against the right side of the stack to obtain a snug fit The left paper guide also slides toward the center ...

Page 32: ...rint on the back side of previously printed paper use the MP tray The optional Duplex Unit cannot be used for this purpose Be sure that you do not add paper while printing Optional Lower Cassette Note To use the optional 500 Sheet Paper Cassette Unit select it in the printer driver s Optional Settings menu after installing it on the printer Follow these steps to load paper into the optional lower ...

Page 33: ...own on the metal plate in the cassette until it clicks into place 3 Fan a stack of paper and then tap the edge of the stack against a hard surface until all sheets are even Note If your printouts are curled or do not stack properly when using plain paper try turning the stack over and reloading it ...

Page 34: ...n all the way Printing on Special Media You can print on special paper stock such as EPSON Color Laser Paper EPSON Color Laser Transparencies EPSON Color Laser Coated Paper thick paper envelopes and labels Note Sincethequalityofanyparticularbrandortypeof mediamaybechanged by the manufacturer at any time EPSON cannot guarantee the quality of any type of media Always test samples of media stock befo...

Page 35: ...ng paper sources For optimal printing on this media choose Coated or Coated Back as the Paper Type setting Note When printing on the back side of previously printed paper select Coated Back EPSON Color Laser Transparencies EPSON recommends the use of EPSON Color Laser Transparencies for presentations or other applications Note Duplex printing is not enabled with transparencies Paper Source Capacit...

Page 36: ...ces The EPSON logo appears on the printable side When loading transparencies in the MP tray insert the short edge first and with the printable surface facing up cCaution Sheets that have just been printed on may be hot Envelopes The print quality of envelopes may be irregular because different parts of an envelope have different thicknesses Print one or two envelopes to check the print quality Pap...

Page 37: ...a trial print run before you print on a lot of envelopes The following table shows important settings you have to make when using envelopes When using a paper size listed above Paper Type Settings is set automatically Please note the following tips for handling this media Load envelopes with the flap closed and facing forward as shown below Do not use an envelope that has glue or tape on it Note L...

Page 38: ... you may need to feed some labels one sheet at a time or load them manually The following table shows important settings you have to make when using labels Note You should only use labels designed for laser printers or plain paper copiers Height Width 92 mm 148 mm Paper Source Paper Size Paper Type Settings Capacity MP tray A4 LT Thick up to 50 sheets Min 92 mm Min 148 mm Min 92 mm Min 148 mm ...

Page 39: ...er Thick paper The following table shows important settings you have to make when using thick paper Loading a custom paper size You can load non standard size paper into the MP tray as long as it meets the following size and weight requirements Paper Source Paper Size Paper Type Settings Capacity MP tray A4 A5 B5 LT GLT HLT EXE Thick up to 50 sheets Plain paper 92 210 mm to 216 297 mm 3 6 8 3 in t...

Page 40: ... Paper Width Paper Length and Unit settings to match your custom paper Then click OK and your custom paper size will be saved For Macintosh access the printer driver click Custom Size in the Paper Setting dialog box Then click New and adjust the Paper Width Paper Length and Margin settings to match your custom paper Then enter the setting s name and click OK to save your custom paper size ...

Page 41: ... information Note To ensure proper operation a computer name must be entered in your computer s settings Make sure there are no invalid characters in the name If your printer is shared or on a network make sure the name is uniquetoyourcomputer Forinformationonsettingthecomputername see the documentation for your operating system Accessing the Printer Driver You can access the printer driver direct...

Page 42: ...ties in Windows Me 98 95 Printing Preferences in Windows XP 2000 or Document Defaults in Windows NT 4 0 Making Changes to Printer Settings Making the print quality setting You can change the print quality of printouts through settings in the printer driver With the printer driver you can make the print settings by choosing from a list of predefined settings or customizing the settings Choosing the...

Page 43: ...g you select Color and resolution are the only settings you have to make You can change other settings such as paper size or orientation in most applications Note Online help provides more information on printer driver settings 1 Click the Basic Settings tab 2 Click the Automatic button Then choose desired printing resolution from Fast 300 dpi or Fine 600 dpi with the slider bar 3 Click OK to acce...

Page 44: ...fined settings The predefined settings are provided to help you optimize print settings for a particular kind of printout such as presentation documents or images taken by a video or digital camera Follow these steps to use the predefined settings 1 Select the Advanced button on the Basic Settings menu You will find the predefined settings in the list on the right of the Automatic button 1 2 ...

Page 45: ...utomatic Standard Suitable for regular printing especially photos Text Graph Suitable for printing documents that include text and graphs such as presentation documents Graphic CAD Suitable for printing graphics and charts Photo Suitable for printing photos PhotoEnhance4 Suitable for printing video captures images taken with a digital camera or scanned images EPSON PhotoEnhance4 automatically adju...

Page 46: ...itable for printing high quality printing documents Advanced Text Graph Suitable for printing high quality presentation documents that include text and graphs Advanced Graphic CAD Suitable for printing high quality graphs charts and photos Advanced Photo Suitable for printing high quality scanned photos and digitally captured images Customizing print settings If you need to change detailed setting...

Page 47: ...en is a Windows Me 98 and 95 screen 2 Choose Color or Black as the Color setting 3 Choose desired printing resolution from 300 dpi or 600 dpi with the Resolution slider bar then make other settings For details on each settings see online help 4 Click OK to apply your settings and return to the Basic Settings menu Click Cancel to return to the Basic Settings menu without applying your settings ...

Page 48: ...e for your custom settings To delete a custom setting click the Advanced button and click Save Settings in the Basic Settings menu select the setting in the Custom Settings dialog box and then click Delete You cannot delete predefined settings If you change any setting in the More Settings dialog box when one of your custom settings is selected in the Advanced Settings list on the Basic Settings m...

Page 49: ...ve your document enlarged or reduced during printing To automatically resize pages to fit the output paper 1 Click the Layout menu 2 Select the Zoom Options check box 3 Select the desired paper size from the Output Paper drop down list The page will be printed to fit on the paper you have selected ...

Page 50: ... to print reduced page image with centering for Location setting 5 Click OK to accept the settings To resize pages by a specified percentage 1 Click the Layout menu 2 Select the Zoom Options check box 3 Select the Zoom To check box 4 Specify the magnification percentage in the box then click OK The percentage can be set between 50 and 200 in 1 increments ...

Page 51: ... layout Your printer can print either two or four pages onto a single page and specifies the printing order automatically resizing each page to fit the specified paper size You can also choose to print documents surrounded by a frame 1 Click the Layout menu 2 Select the Print Layout check box and click Print Layout Settings The Print Layout Settings dialog box appears 1 2 ...

Page 52: ... each sheet Select the Print the Frame check box when you want to print the pages surrounded by a frame Note The Page Order choices depend on the number of pages selected above and the paper orientation Portrait or Landscape selected on the Basic Settings menu 5 Click OK to close the Print Layout Settings dialog box 6 Click OK on the Layout menu to accept the settings ...

Page 53: ... from a list of predefined watermarks or you can make an original watermark with text or a bitmap The Watermark dialog box also allows you to make a variety of detailed watermark settings For example you can select the size intensity and position of your watermark 1 Click the Special menu 2 Select the Watermark check box 3 Click Watermark Settings The Watermark dialog box appears ...

Page 54: ...st the horizontal or vertical Offset position 7 Select the color from the Color drop down list 8 Adjust theimage intensityofthewatermark withtheIntensity slider bar 9 Adjust the size of the watermark with the Size slider bar 10 Select Front to print the watermark in the foreground of the document orBack toprintthewatermarkinthebackground of the document for the Position setting 11 Click OK to acce...

Page 55: ...the Watermark check box 3 Click Watermark Settings The Watermark dialog box appears 4 Click New Delete The User Defined Watermarks dialog box appears 5 Select Text or BMP and type a name for the new watermark in the Name box 6 If you select Text type the watermark text in the Text box If you select BMP click Browse select the BMP file you want to use then click OK ...

Page 56: ...g with the Duplex Unit Duplex printing with the optional Duplex Unit prints on both sides of the paper When printing for binding the binding edge can be specified as required to produce the desired page order As an ENERGY STAR partner EPSON recommends the use of the double sided printing function Refer to ENERGY STAR Compliance for more information on the ENERGY STAR program 1 Click the Layout tab...

Page 57: ... Printer Software with Windows 57 3 3 3 3 3 3 3 3 3 3 3 3 2 Select the Duplex check box 3 Select the Left Top or Right button as a Binding Position 4 Click Duplex Settings to open the Duplex Settings dialog box ...

Page 58: ...ng as a booklet click the Binding Method check box and make appropriate settings For details about each setting see online help 8 Click OK to close the Duplex Settings dialog box 9 Click OK on the Layout menu to accept the settings Making Extended Settings You can make various settings in the Extended Settings dialog box for example Avoid Page Error To open the dialog box click Extended Settings o...

Page 59: ...is feature enables you to not print blank pages Ignore the selected paper size check box When you select this check box theprinterprintsonloadedpaper regardless of size High Speed Graphics Output check box Select this check box to optimize the printing speed of graphics composed of line drawings such as overlaid circles and squares Clear this check box if graphics do not print correctly Avoid Page...

Page 60: ...rthePrintingStatus check box Monitor the printing status Uses the spooling method provided by the operation system check box Select this check box to enable the Spool function for Windows XP 2000 NT 4 0 OK button Click this button to save your settings and to exit the dialog box or printer driver The settings are effective until you make new settings and click OK again Cancel button Click this but...

Page 61: ...ile contains the latest information on the EPSON Status Monitor 3 Note for Windows XP users The EPSON Status Monitor 3 utility is not available when printing from a Remote Desktop connection Accessing EPSON Status Monitor 3 Here is the way to access EPSON Status Monitor 3 Open the printer software click the Utility tab then click the EPSON Status Monitor 3 button ...

Page 62: ... dialog box Note The screen shot may vary depending on your printer 1 Icon Message The icon and message show the printer status 2 Printer image The image at the upper left shows the printer status graphically 3 Text box The text box next to the printer image displays the current status of the printer When a problem occurs the most probable solution is displayed 1 2 3 4 9 8 6 7 10 5 ...

Page 63: ...er is low 7 Waste toner collector Blinks when the waste toner collector is not installed correctly or is near full 8 Photoconductor Unit Life Indicates the remaining functional life of the photoconductor unit 9 Paper Displays the paper size and the approximate amount of paper remaining in the paper source Informationfortheoptionalcassetteis displayed only if this option is installed 10 How to butt...

Page 64: ...the Utility tab of the printer driver The Monitoring Preferences dialog box appears The following settings and buttons appear in the dialog box 1 Select Notification Use the check boxes in this area to select the types of error that you wish to be notified about 2 Event Displays the events where notification screens appear 3 8 9 10 2 1 5 4 6 7 ...

Page 65: ...ing Preferences to open the Monitoring Preferences dialog box and EPSON AL C1900 Advanced to open the EPSON Status Monitor 3 dialog box 6 Allow monitoring of shared printers check box To monitor a shared printer select this check box You need to make this setting on the server 7 Allow multiple users to monitor printers check box For Windows XP Users Only If the Monitored Printers settings are not ...

Page 66: ...w will also appear according to the selected notification in the Monitoring Preferences dialog box If you wish to see information about printer consumables click Consumables Once this button is clicked the Status Alert window will not disappear even after a problem is cleared To close the window you need to click Close Setting Monitored Printers You can use Monitored Printers utility to change the...

Page 67: ...e that comes with your printer complies with Microsoft Plug and Play PnP USB specifications Note Only PC systems equipped with a USB connector and running Windows Me 98 XP and 2000 support the USB interface 1 Click Start point to Settings then click Printers 2 Right click the EPSON AL C1900 Advanced icon and click Properties on the menu that appears 3 Click the Details tab In Windows 2000 click th...

Page 68: ...ppropriateUSBportfromthePrinttothefollowing port drop down list In Windows Me or 98 select EPUSB1 EPSON AL C1900 Advanced In Windows XP 2000 select USB001 in the list on the Ports menu Note This screen is a Windows 98 screen 5 Click OK to save this setting ...

Page 69: ...the instructions below to cancel the printing Double clicktheprintericononthetaskbar thenclickPurge Print Documents from the Printer menu After the last page is output the Ready green light on the printer turns on The current job is canceled Uninstalling the Printer Software When you wish to reinstall or upgrade the printer driver be sure to uninstall the current printer software beforehand 1 Clos...

Page 70: ...ndows 3 Double click the Add Remove Programs icon 4 Select EPSON Printer Software and click Add Remove When using the Windows XP 2000 computer select EPSON Printer Software on the Change or Remove Programs menu then click Change Remove 1 2 ...

Page 71: ... OK Note Youcanuninstallonly the utilityfor MonitoredPrinters ofEPSON Status Monitor 3 When that utility is uninstalled you cannot change the setting of Monitored Printers from the EPSON Status Monitor 3 utility of other printers Select the EPSON Status Monitor 3 Monitored Printers check box and click OK 6 Follow the on screen instructions 1 2 3 ...

Page 72: ...er to Windows 98 Me with a USB interface cable Follow these steps to uninstall the USB device driver Note Uninstall the printer driver before uninstalling the USB device driver When the USB device driver is uninstalled you cannot access the other EPSON printers connected with USB interface cable 1 Follow steps 1 through 3 of Uninstalling the Printer Software on page 69 ...

Page 73: ... Printer Devices appears only when the printer is connected to Windows Me 98 with a USB interface cable IftheUSBdevicedriverisnotinstalledcorrectly EPSONUSB Printer Devices may not appear Follow these steps to run the Epusbun exe file in the CD ROM that comes with your printer 1 Insert the CD ROM in the CD ROM drive of your computer 1 2 ...

Page 74: ...ng the Printer Software with Windows 3 Follow the on screen instructions 2 Access the CD ROM by using the software such as Windows Explorer 3 Double click the Win9x folder 4 Double click the Epusbun exe icon ...

Page 75: ...by using EPSON Status Monitor 3 on page 94 for more information Accessing the Printer Driver To control your printer and change its settings use the printer driver The printer driver allows you to easily make all the print settings including paper source paper size and orientation Note The printer driver s online help provides details on printer driver settings To access the printer driver and ope...

Page 76: ...tomatic setting You can change the print quality of printouts to favor speed or detail There are two levels of print output 300 dpi and 600 dpi 600 dpi provides high quality precise printing but requires more memory and slows the printing speed When theAutomaticbuttonisselectedon the BasicSettingsdialog box the printer driver takes care of all detailed settings according to the color setting you s...

Page 77: ...he RITech function see the Online Help If printing is unsuccessful or a memory related error message appears selecting a lower resolution may allow printing to proceed Using the predefined settings The predefined settings are provided to help you optimize print settings for a particular kind of printout such as presentation documents or images taken by a video or digital camera Follow these steps ...

Page 78: ...rint When you choose a predefined setting other settings such as Printing Mode Resolution Screen and Color Management are set automatically Changes are shown in the current settings list on the left of the Basic Settings dialog box This printer driver provides the following predefined settings Automatic Standard Suitable for regular printing especially photos Text Graph Suitable for printing docum...

Page 79: ...ors on your screen Automatic High Quality Suitable for regular printing that gives priority to high quality printing Advanced Text Graph Suitable for printing high quality presentation documents that include text and graphs Advanced Graphic CAD Suitable for printing high quality graphs charts and photos Advanced Photo Suitable for printing high quality scanned photos and digitally captured images ...

Page 80: ...ing 3 ChoosedesiredprintingresolutionfromFast 300dpi orFine 600dpi thenmakeothersettings Fordetailsoneachsetting click the button 4 Click OK to apply your settings and return to the Basic Settings tab ClickCancel to return to theBasic Settings dialog box without applying your settings Saving your settings To save your custom settings select the Advanced radio button and click Save Settings on the ...

Page 81: ... when one of your custom settings is selected in the Advanced Settings list on the Basic Settings dialog box the setting selected in the list changes to User Settings The custom setting that was previously selected is not affected by this change To return to your custom setting simply reselect it from the current settings list Resizing printouts The Fit to Page function in the Layout dialog box al...

Page 82: ...ve selected 4 Click OK to accept the settings Modifying the print layout You can print either two or four pages onto a single page and to specify the printing order automatically resizing each page to fit the specified paper size by using Layout printing You can also choose to print documents surrounded by a frame 1 Click the Layout icon on the Basic Settings dialog box The Layout dialog box appea...

Page 83: ...Using the Printer Software with Macintosh 83 4 4 4 4 4 4 4 4 4 4 4 4 2 Select the Print Layout check box then click Print Layout Settings The Print Layout Settings dialog box appears 1 2 ...

Page 84: ...ich the pages are printed on each sheet Note Page Order choices depend on Pages selected above and Orientation 5 Click OK to close the Print Layout Setting dialog box 6 Select the Print the Frame check box on the Layout dialog box when you want to print the pages surrounded by a frame 7 Click OK on the Layout dialog box to accept the settings ...

Page 85: ... box also allows you to make a variety of detailed watermark settings For example you can select the size intensity and position of your watermark 1 Click the Layout icon on the Basic Settings dialog box The Layout dialog box appears 2 Select the Watermark Settings check box and a watermark from the Watermark drop down list 3 Select the location on the page where you want to print the watermark by...

Page 86: ...e by mouse check box and rotate the text watermark with the pointer on the preview window 6 Click OK to accept the settings Making a new watermark You can make a new text or bitmap watermark with the following procedures To make a text watermark 1 Click the Layout icon on the Basic Settings dialog box The Layout dialog box appears 2 Select the Watermark Settings check box and click New Delete The ...

Page 87: ...are with Macintosh 87 4 4 4 4 4 4 4 4 4 4 4 4 3 Click Add Text on the Custom Watermark dialog box 4 Type the watermark text in the Text box and select the Font and Style and then click OK on the Text Watermark dialog box 1 2 ...

Page 88: ...aved text watermark select it from the List box and click Delete After removing it be sure to click Save to close the dialog box 6 Select the saved custom watermark from the Watermark drop down list on the Layout dialog box Then click OK To make a bitmap watermark Beforemakingacustomwatermark youshouldprepareabitmap PICT file 1 Click the Layout icon on the Basic Settings dialog box The Layout dial...

Page 89: ...Using the Printer Software with Macintosh 89 4 4 4 4 4 4 4 4 4 4 4 4 2 Select the Watermark Settings check box and click New Delete 3 Click Add PICT on the Custom watermark dialog box 1 2 ...

Page 90: ...e name in the Name box and click Save Note To remove the saved watermark select it from the List box and click Delete After removing it be sure to click Save to close the dialog box 6 Select the saved custom watermark from the Watermark drop down list on the Layout dialog box Then click OK 1 2 2 1 ...

Page 91: ...Compliance for more information on the ENERGY STAR program To use Printing for Binding the optional Duplex Unit must be installed and enabled in the printer driver To enable the Duplex Unit select the AL C1900 icon and close Chooser However the Duplex Unit is enabled automatically when this unit is installed and the printer is connected with the computer correctly 1 Click the Layout icon on the Ba...

Page 92: ...Start Page 7 Click OK to close the Duplex Settings dialog box 8 Click OK on the Layout dialog box to accept the settings Making Extended Settings You canmake various settings in theExtended Setting dialog box for example Page Protect To open the dialog box click the Extended Setting icon on the Basic Settings dialog box Offset Makes fine adjustments to the printing position of data on a page ...

Page 93: ... on the back of a page when printing with the optional Duplex Unit Automatically change to monochrome mode check box Select this check box to have the printer driver analyze the printing data and automatically switch to monochrome mode if the printing data is black and white Ignore the selected paper size check box When you select this check box the printer prints on loaded paper regardless of siz...

Page 94: ...such as documents with a large number of complex fonts or graphics Doing so may slow down printing somewhat Adjust line thickness check box Adjusts the width of the lines printed Default button Returns to initials settings Select button Selects spool file saving folder Cancel button Click this button to exit the dialog box or printer driver without saving your settings OK button Click this button ...

Page 95: ... selected in the Chooser so that necessary information can be received from the selected printer driver when the EPSON Status Monitor 3 starts If the printer port is not correct an error will occur If you change the printer driver in the Chooser while the spool file is printing in the background output to the printer may be disrupted Printer and consumable products status information appears in th...

Page 96: ...ls You can monitor printer status and get information on consumable products using the EPSON Status Monitor 3 dialog box Note The screen shot may vary depending on your printer 1 Printer image The image at the upper left shows the printer status graphically 2 3 6 9 8 1 7 4 5 ...

Page 97: ...Toner Indicates the amount of remaining toner The toner icon flashes if toner is low 6 Waste toner collector life Blinks when the waste toner collector is not installed correctly or is near full 7 Photoconductor Unit Life Indicates the remaining functional life of the photoconductor unit 8 Paper Displays the paper size and the approximate amount of paper remaining in the paper source Information f...

Page 98: ...r Setup from the File menu The Monitor Setup dialog box appears The following settings and buttons appear in the dialog box 1 Error Notification Selection Select thetypesoferrorthatyou wish to be notified about 2 Default button Restores default settings 3 Cancel button Cancels any changes 4 OK button Saves new changes 1 2 3 4 ...

Page 99: ...es dialog box If you wish to see information about printer consumables click Show Details If you click this button the Status Alert Window will not disappear even after the problem is cleared To close the window you need to click Close Setting for the USB connection Note If you are connecting the USB cable to your Macintosh through a USB hub besuretoconnectusingthefirsthubinthechain TheUSBinterfac...

Page 100: ...USB port your printer is connected to 2 Select Background Printing to turn background printing on or off Note Background printing must be turned on for the EPSON Status Monitor 3 to manage print jobs When background printing is on you can use your Macintosh while it is preparing a document for printing 3 Close the Chooser 2 1 ...

Page 101: ...ng If this appears follow instructions in the message During background printing open EPSON Status Monitor 3 from the Application menu Then stop printing from EPSON Status Monitor 3 or delete the file that is in Sleep mode After the last page is output the Ready green light on the printer turns on Uninstalling the Printer Software When you wish to reinstall or upgrade the printer driver be sure to...

Page 102: ...4 Double click the Installer icon 5 Click Continue When the software license agreement screen appears read the statement and then click Accept 6 Select Uninstall from the menu at the upper left and click Uninstall Follow the on screen instructions ...

Page 103: ...computers are the clients which need permission to share the printer with the printer server The clients share the printer via the printer server According to the versions of Windows OS and your access rights on the network perform the appropriate settings of the printer server and clients Setting the printer server For Windows Me 98 95 see Setting up your printer as a shared printer on page 104 F...

Page 104: ... make sure that the IPX SPX compatible Protocol or the TCP IP Protocol is installed The printer server and clients should be set on the same network system and they should be under the same network management beforehand The on screen displays on the following pages may differ depending on the version of Windows OS Setting up your printer as a shared printer When the printer server s OS is Windows ...

Page 105: ...e prompt to restart the computer appears restart the computer and continue with the settings See For users restarting the computer on page 105 For users restarting the computer 1 Double click the Printers icon on the control panel 2 Right click your printer icon and click Sharing in the menu that appears 3 Select Shared As type the name in the Share Name box and click OK Type a Comment and Passwor...

Page 106: ...n page 117 With Windows XP 2000 on page 119 With Windows NT 4 0 on page 123 Using an additional driver When the printer server s OS is Windows 2000 XP or Windows NT 4 0 you can install the additional drivers in the server The additional drivers are for client computers that have different OS from the server Follow these steps to set a Windows XP 2000 or Windows NT 4 0 as a printer server and insta...

Page 107: ...inters and Faxes For Windows XP Home edition users point to Control panel first then click Printers and Faxes 2 Right click your printer icon and click Sharing in the menu that appears For Windows XP if the following menu appears click either Network Setup Wizard or If you understand the security risks but want to share printers without running the wizard click here In either case follow the on sc...

Page 108: ...108 Setting Up Your Printer on a Network 3 For a Windows 2000 or NT 4 0 printer server select Shared for Windows 2000 or Shared as for Windows NT 4 0 then type the name in the Share Name box ...

Page 109: ...hare this printer then type the name in the Share name box Note Do not use spaces or hyphens for the share name or an error may occur 4 Select the additional drivers Note If the computers of the server and clients use the same OS you do not have to install the additional drivers Just click OK after step 3 ...

Page 110: ...t Windows 95 to install the additional driver for the Windows Me 98 95 clients Then click OK Note You do not have to select Windows NT 4 0x86 because that driver has been already installed Do not select additional drivers other than Windows 95 The other additional drivers are not available On the Windows XP 2000 printer server 1 2 ...

Page 111: ...Setting Up Your Printer on a Network 111 5 5 5 5 5 5 5 5 5 5 5 5 Click Additional Drivers ...

Page 112: ... drivers other than Intel Windows 95 or 98 and Me and Intel Windows NT 4 0 or 2000 The other additional drivers are not available 5 When a prompt appears insert the CD ROM that comes with your printer in your CD ROM drive then click OK For Windows Me 98 95 clients Select Intel Windows 95 or 98 and Me For Windows NT 4 0 clients SelectIntel Windows NT 4 0 or 2000 For Windows XP 2000 clients Intel Wi...

Page 113: ... 2000 Digital Signature is not found may appear Click Yes for Windows 2000 or Continue Anyway for Windows XP and continue installing 7 When installing in Windows XP 2000 click Close When installing in Windows NT 4 0 the property window closes automatically Note Confirm the following items when sharing the printer Be sure to set the EPSON Status Monitor 3 so that the shared printer can be monitored...

Page 114: ...ared printer When printing from a client via a server runningWindowsXP thereisapossibilitythatEPSONStatus Monitor3willindicateacommunicationerrororthatprinting will not be possible In these cases restart the server Shared printer If printing is not possible from a client via a server running Windows XP confirm that the server is set up as outlined below For Windows XP Professional Users 1 Click St...

Page 115: ...box 8 Click Find Now then select Everyone from the Name RDN list then click OK 9 Click OK to close the Select Users or Groups dialog box 10 Select Everyone from the Group or user names list Next select Allow for both Read and Write in the Permissions for Everyone list 11 Click OK For Windows XP Home Edition Users 1 Click Start then click Control Panel then click Printers and Other Hardware then cl...

Page 116: ...d settings all users Documents 5 Click OK If the Monitored Printers settings are not available on a computer set up for multiple users make sure that the Allow multiple users to monitor printers check box is selected in the Monitoring Preferences dialog box ...

Page 117: ...g the server Microsoft workgroup If you cannot access the shared printer due to the network system ask the administrator of the network for assistance This section describes how to install the printer driver by accessing the shared printer from the Printers folder You can also access the shared printer from Network Neighborhood or My Network on the Windows desktop The client cannot use the additio...

Page 118: ... the computer or server that is connected to the shared printer To make sure of the name of the shared printer ask the administrator of the network 6 Click Next Note If the printer driver is installed in the client beforehand you need to select the new printer driver or the current printer driver When the prompt to select the printer driver appears select the printer driver according to the messag...

Page 119: ...you have Power Users or more powerful access rights even if you are not the Administrator If the printer server s OS is Windows NT 4 0 confirm the following items In a Windows NT 4 0 printer server the additional driver for Windows XP 2000 clients is the Windows NT 4 0 x86 driver which is installed beforehand as the printer driver for Windows NT 4 0 When installing the printer driver in the Window...

Page 120: ...rs and Faxes For Windows XP Home edition users point to Control panel first then click Printers and Faxes 2 ForWindow2000 double clicktheAdd Printericon thenclick Next For Windows XP click the Add a printer in the Printer Tasks menu 3 Select Network printer for Windows 2000 or A network printer or a printer attached to another computer for Windows XP then click Next ...

Page 121: ...e the name of the shared printer then click Next Note You can also type the name of the computer that is locally connected to the shared printer the shared printer s name in Network path or queue name otherwise click Next to browse for a printer For Windows XP select Browse for a printer ...

Page 122: ...driver or the current printer driver When the prompt to select the printer driver appears select the printer driver according to the message If the local printer driver for Windows XP 2000 is installed beforehand you can select the printer driver for Windows XP 2000 as the current printer driver instead of the alternative driver in the Windows NT 4 0 server If the additional driver for Windows XP ...

Page 123: ... settings then click Finish With Windows NT 4 0 Follow these steps to set Windows NT 4 0 clients You can install the printer driver of the shared printer if you have Power Users or more powerful access rights even if you are not the Administrator 1 Click Start point to Settings and click Printers 2 Double click the Add Printer icon 3 Select Network printer server then click Next ...

Page 124: ...the shared printer may be changed by the computer or server that is connected to the shared printer To make sure of the name of the shared printer ask the administrator of the network If the printer driver is installed in the client beforehand you need to select the new printer driver or the current printer driver When the prompt to select the printer driver appears select the printer driver accor...

Page 125: ... as follows The additional drivers are not installed in the Windows XP 2000 NT 4 0 printer server The printer server s OS is the Windows Me 98 95 and the client s OS is the Windows XP 2000 NT 4 0 The on screen displays on the following pages may differ depending on the version of Windows OS Note When installing in Windows XP 2000 NT 4 0 clients you must access Windows XP 2000 NT 4 0 with the Admin...

Page 126: ...r Click Yes for Windows 2000 or Continue Anyway for Windows XP and continue installing The folder name differs depending on the OS being used 3 Select the name of the printer then click OK Then follow the on screen instructions For Macintosh About the shared printer This section describes how to share the printer on an AppleTalk network Client s OS Folder Name Windows Me 98 95 Language WIN9X Windo...

Page 127: ...The clients share the printer via the printer server Note Printer sharing function can be used in Mac OS 8 1 to 9 X Setting up your printer as a shared printer Follow these steps to share a printer connected directly to your computer with other computers on an AppleTalk network 1 Turn on the printer 2 Select Chooser from the Apple menu and click the AL C1900 Advanced icon Then select USB port in t...

Page 128: ...e shared printer Follow these steps to access your printer from another computer on the network 1 Turn on your printer 2 On each computer from which you want to access the printer select Chooser from the Apple menu Then click the AL C900 Advanced AT icon and select the name of the shared printer in the Select a printer port box on the right You can only select from the printers connected to your c...

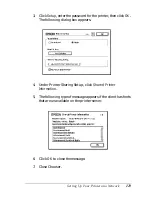
Page 129: ...password for the printer then click OK The following dialog box appears 4 Under Printer Sharing Set up click Shared Printer Information 5 The following type of message appears if the client has fonts that are unavailable on the printer server 6 Click OK to close the message 7 Close Chooser ...

Page 130: ...130 Setting Up Your Printer on a Network ...

Page 131: ...th the 500 Sheet Paper Cassette Unit Note Load paper with the printable surface facing up Handling precautions Always pay attention to the following handling precautions before installing the option Paper Type Paper Size Capacity Plain paper A4 Up to 500 sheets in the cassette Total thickness 57 mm maximum for the cassette EPSON Color Laser Paper A4 Up to 500 sheets in the cassette ...

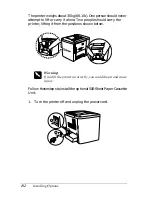
Page 132: ...ft or carry it alone Two people should carry the printer lifting it from the positions shown below wWarning If you lift the printer incorrectly you could drop it and cause injury Follow these steps to install the optional 500 Sheet Paper Cassette Unit 1 Turn the printer off and unplug the power cord ...

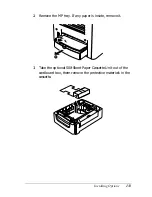
Page 133: ...tions 133 6 6 6 6 6 6 6 6 6 6 6 6 2 Remove the MP tray If any paper is inside remove it 3 Take the optional 500 Sheet Paper Cassette Unit out of the cardboard box them remove the protective materials in the cassette ...

Page 134: ... Paper Cassette Unit 5 Place the printer onto the 500 Sheet Paper Cassette Unit Align each of the printer s corners with those of the unit then lower the printer until it rests securely on the unit Note The printer should be carried by at least two people ...

Page 135: ...Installing Options 135 6 6 6 6 6 6 6 6 6 6 6 6 6 Pull out the cassette of the unit 7 Open the front cover 8 Remove the waste toner collector ...

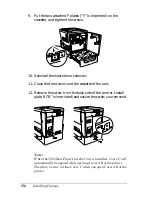
Page 136: ...front cover and the cassette of the unit 12 Remove the screw from the back side of the printer Install plate B B is imprinted and secure the screw you removed Note When the 500 Sheet Paper Cassette Unit is installed Cover C will automatically be opened when opening Cover AB of the printer Therefore be sure to close Cover C when you open Cover AB of the printer ...

Page 137: ...tall the MP tray and paper if necessary Removing the 500 Sheet Paper Cassette Unit Perform the installation procedure in reverse Duplex Unit Follow these steps to install the optional Duplex Unit The illustration below shows all the items packed together with the Duplex Unit ...

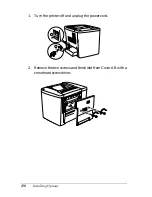
Page 138: ...138 Installing Options 1 Turn the printer off and unplug the power cord 2 Remove the two screws and the shield from Cover AB with a cross head screwdriver ...

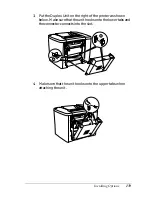
Page 139: ... 6 6 6 6 3 Put the Duplex Unit on the right of the printer as shown below Make sure that the unit hooks onto the lower tabs and the connector connects into the slot 4 Make sure that the unit hooks onto the upper tabs when attaching the unit ...

Page 140: ...140 Installing Options 5 Press Cover DM as shown below 6 While supporting the Duplex Unit open Cover AB ...

Page 141: ...Installing Options 141 6 6 6 6 6 6 6 6 6 6 6 6 7 Check that the two tabs on the unit are correctly hooked onto Cover AB 8 While supporting the Duplex Unit open Cover DM ...

Page 142: ...142 Installing Options 9 Secure the Duplex Unit to Cover AB with the two screws provided Tighten the screws with either a screwdriver or a coin 10 Close Cover DM ...

Page 143: ... 6 6 6 6 6 6 6 6 6 6 6 6 11 Open Cover AB to which the Duplex Unit is attached 12 Connect the spring on the Duplex Unit to the printer 13 Close Cover AB Removing the Duplex Unit Perform the installation procedure in reverse ...

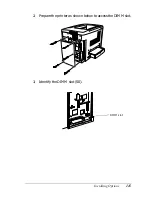
Page 144: ...asing make sure that the DIMM you choose is compatible with EPSON products For more details contact your dealer or EPSON sales company Follow these steps to install an optional memory module wWarning Be careful when working inside the printer as some components are sharp and may cause injury cCaution Before you install a memory module be sure to discharge any static electricity by touching a groun...

Page 145: ...Installing Options 145 6 6 6 6 6 6 6 6 6 6 6 6 2 Prepare the printer as shown below to access the DIMM slot 3 Identify the DIMM slot S0 DIMM slot ...

Page 146: ...nto the slot Be sure to insert the DIMM facing the correct way You should not remove any modules from the circuit board Otherwise the printer will not work 5 Return the printer to its original state as shown below 6 Plug the printer s power cord into an electrical outlet 7 Turn on the printer ...

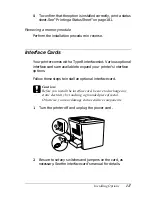
Page 147: ...lot Various optional interface cards are available to expand your printer s interface options Follow these steps to install an optional interface card cCaution Before you install the interface card be sure to discharge any static electricity by touching a grounded piece of metal Otherwise you may damage static sensitive components 1 Turn the printer off and unplug the power cord 2 Be sure to set a...

Page 148: ...emove the screws and the cover as shown below wWarning Removing other screws and covers will expose high voltage areas Note Keep the slot cover in a safe place You will need to reattach it if you remove the interface card later ...

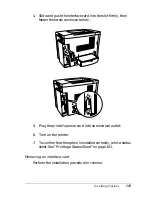
Page 149: ...y then fasten the screw as shown below 5 Plug the printer s power cord into an electrical outlet 6 Turn on the printer 7 To confirm that the option is installed correctly print a status sheet See Printing a Status Sheet on page 181 Removing an interface card Perform the installation procedure in reverse ...

Page 150: ...150 Installing Options ...

Page 151: ...s the front cover of the printer when you are replacing consumables Do not install used consumable products into the printer Although approximately 50 sheets can be printed after the notice message appears be prepared to the waste toner collector wWarning Do not dispose of used consumable products in fire as they may explode and cause injury Dispose of them according to local regulations cCaution ...

Page 152: ...inting and displays messages in the window of the EPSON Status Monitor 3 utility When this happens the printer cannot resume printing until you replace the depleted consumable products Developer Cartridge According to the message on the window of the EPSON Status Monitor 3 utility replace the correct developer cartridge from the list below Note If you want to replace developer cartridges before it...

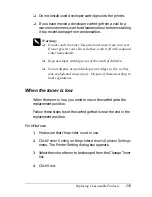
Page 153: ...veloper cartridges out of the reach of children Do not dispose of used developer cartridges in fire as they may explode and cause injury Dispose of them according to local regulations When the toner is low When the toner is low you need to move the cartridge to the replacement position Follow these steps to set the cartridge that is near the end in the replacement position For Windows 1 Make sure ...

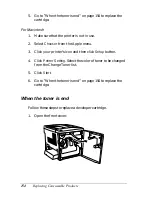
Page 154: ... Select Chooser from the Apple menu 3 Click your printer s icon and then click Setup button 4 Click Printer Setting Select the color of toner to be changed from the Change Toner list 5 Click Start 6 Go to When the toner is end on page 154 to replace the cartridge When the toner is end Follow these steps to replace a developer cartridge 1 Open the front cover ...

Page 155: ...the developer cartridge that appears in the cartridge installment position The color displayed indicates the developer cartridge that needs to be replaced 3 Put two fingers into the holes in front of the installed developer cartridge 4 Pull the developer cartridge out of the slot ...

Page 156: ...156 Replacing Consumable Products 5 Take the new developer cartridge out of its package 6 Gently shake the developer cartridge as shown below ...

Page 157: ... new developer cartridge Then put the cover on the removed developer cartridge that you removed from the slot in step 4 8 Insert the new developer cartridge all the way until it stops 9 Close the front cover If another cartridge needs to be replaced wait for about 30 seconds and return to step 1 ...

Page 158: ...ing the drum since oil from your skin may permanently damage its surface and affect print quality To get the best print quality do not store the photoconductor unit in an area subject to direct sunlight dust salty air or corrosive gases such as ammonia Avoid locations subject to extreme or rapid changes in temperature or humidity wWarning Do not dispose of the used photoconductor unit in fire as i...

Page 159: ...Replacing Consumable Products 159 7 7 7 7 7 7 7 7 7 7 7 7 1 Open the front cover 2 Tilt the waste toner collector and pull it out ...

Page 160: ... to the unlocked position Then pull the green knob on the photoconductor unit with your finger to remove the photoconductor unit 4 Take the new photoconductor unit out of its package 5 Insert the new photoconductor unit by aligning it with the guide rails ...

Page 161: ...ellow tag Then return the lever to the locked position 7 Put the removed waste toner collector back into the printer as shown below 8 Close the front cover Waste Toner Collector Prepare a new waste toner collector for replacement when you get a message informing you to do so ...

Page 162: ...e toner found in the waste toner collector wWarning Keep the waste toner collector out of the reach of children Do not dispose of used waste toner collector in fire as it may explode and cause injury Dispose of it according to local regulations Replacing the waste toner collector Follow these steps to replace the waste toner collector 1 Open the front cover ...

Page 163: ...aste toner collector and pull it out 3 Remove the two caps on the removed waste toner collector to close the two open holes with them as shown below Note You need to close the holes to prevent spilling the toner inside the collector 4 Prepare the new waste toner collector ...

Page 164: ...ent when you get a message informing you to do so Handling precautions Note the following handling precautions before replacing the transfer unit Do not touch the surface of the transfer unit Doing so may impair print quality wWarning Keep the transfer unit out of the reach of children Replacing the transfer unit Follow these steps to replace the transfer unit ...

Page 165: ...umable Products 165 7 7 7 7 7 7 7 7 7 7 7 7 1 Open the front cover and Cover AB Note You must open Cover AB to avoid the friction of the transfer unit 2 Take out the waste toner collector and the photoconductor unit ...

Page 166: ...ove the two screws on the transfer unit Note You can use a screwdriver or a coin to remove the screws 4 Take out the transfer unit by pulling the knob holding the handle and pulling the unit up 5 Take the new transfer unit out of its package ...

Page 167: ...w transfer unit by aligning it with the arrow marks on the transfer unit and the printer Note Tilt the transfer unit forward to install correctly 7 Tighten the two screws of the transfer unit you removed in step 3 Note Tighten the screws tightly with a screwdriver or a coin ...

Page 168: ...168 Replacing Consumable Products 8 Reinstall the photoconductor unit 9 Remove the protective material as shown below 10 Reinstall the waste toner collector ...

Page 169: ...Replacing Consumable Products 169 7 7 7 7 7 7 7 7 7 7 7 7 11 Close the front cover and Cover AB ...

Page 170: ...170 Replacing Consumable Products ...

Page 171: ... the printer and clean it with a soft clean cloth moistened with a mild detergent cCaution Never use alcohol or paint thinner to clean the printer cover these chemicals can damage the components and the case Be careful not to get water onto the printer mechanism or any electrical components Cleaning the pickup roller If the paper jam occurs frequently wipe the paper path roller with a clean dampen...

Page 172: ...path roller as shown below 3 With a clean dampened cloth wipe the pickup roller 4 Close Cover AB Cleaning the print head filter If the glass on the print head filter is dirty with toner wipe it with a clean cloth A vertical white line may appears in the printout Follow the steps below 1 Open the front cover ...

Page 173: ...handle of the print head filter with your fingers and gently pull it straight out of the slot Note Be careful not to spill toner that has accumulated on the print head filter 4 With a clean cloth wipe the glass surface of print head filter 5 Hold the print head filter by the handle and gently insert it all the way into the slot ...

Page 174: ...front cover Transporting the Printer For long distances If you need to transport your printer for long distances carefully repack it using the original box and packing materials Follow these steps to repack your printer 1 Turn off the printer 2 Unplug the power cord from the electrical outlet ...

Page 175: ...ttach the protective materials onto the printer then repack the printer in its original box For short distances Alwayspayattentiontothefollowinghandlingprecautionswhen you need to move the printer for a short distance If you are moving the printer on its own two people should lift and carry the printer Moving the printer Follow these steps to move the printer for a short distance 1 Turn off the pr...

Page 176: ... always keep it horizontal Moving the printer together with an optional lower cassette installed Follow these steps to move the printer together with the optional 500 Sheet Paper Cassette Unit 1 Turn off the printer and remove the following items Power cord Interface cable 2 Lift the printer together with the optional unit cCaution Do not move the printer on angled or uneven surfaces ...

Page 177: ...nce Use the following illustration as a guide for the amount of space required around the printer to ensure smooth operation Dimensions shown in the illustrations below are in millimeters To install and use any of the following options you will need the indicated amount of additional space The 500 Sheet Paper Cassette Unit adds 120 mm 4 7 in to the bottom and 40 mm 1 6 in to the right side of the ...

Page 178: ...e base units of cordless telephones Avoid using an electrical outlet that is controlled by wall switches or automatic timers Accidental disruption of power can erase valuable information in your computer s and printer s memory cCaution Leaveadequateroomaroundtheprintertoallowforsufficient ventilation Avoid locations that are subject to direct sunlight excessive heat moisture or dust Avoid using ou...

Page 179: ... flashing indicates the status of your printer as described below The Status Alert window in the EPSON Status Monitor 3 utility indicateswhattypeoferrorhasoccurredandoffersyouapossible solution Look through this section to find the kind of problem you have then try the recommended solutions in the order they are presented until your problem is solved ON Flashing Flashing slowly OFF Lights Printer ...

Page 180: ... moment A consumable product is almost used up Check the alert message on the EPSON Status Monitor 3 utility and replace the consumable with a new one There is an error that can be easily recovered Check the alert message on the EPSON Status Monitor 3 utility for a solution The cover of the printer is open the printer is out of paper or paper is jammed in the printer When printing with the Duplex ...

Page 181: ...about the printer the current settings Follow the steps below to print a status sheet For Windows users 1 Click Start point to Settings and click Printers A protocol error has occurred Try turning off the printer and then turning it back on If this does not clear the error contact your dealer or a qualified service person Flashing alternately An error has occurred Try turning off the printer and t...

Page 182: ...nd the EPSON Printer Setup dialog box appears 2 Click Print Status and the Status Sheet dialog box appears 3 Click Status Sheet and the printer starts printing a status sheet 4 Click OK to close the dialog box Clearing Jammed Paper If paper becomes jammed in the printer the EPSON Status Monitor 3 utility provide alert messages Precautions for clearing jammed paper Be sure to observe the following ...

Page 183: ...in a place not mentioned in this chapter contact your dealer cCaution Unlessspecificallyinstructedinthisguide becarefulnottotouch the fuser which is marked CAUTION Hot Surface Avoid Contact or the surrounding areas If the printer has been in use the fuser and the surrounding areas may be very hot Jam Cover AB Follow these steps to clear paper jams from Cover AB 1 Open Cover AB ...

Page 184: ...med paper gently with both hands Be careful not to tear the jammed paper Note Always try to remove jammed paper with both hands to avoid tearing it If paper is torn be sure to remove all torn pieces 3 Close Cover AB If the indicator lights still indicate a paper jam error follow the steps below ...

Page 185: ... 9 9 9 9 9 1 Open Cover AB 2 Open the cover above the paper path roller until it stops as shown below Remove any jammed paper gently with both hands Be careful not to tear the jammed paper z 3 Close the cover that you opened in step 2 ...

Page 186: ... the levers up to release the paper path as shown below 5 If you turn the dial towards you the jammed paper comes out from the face down tray If you turn the dial towards the printer the jammed paper comes out from Cover AB side ...

Page 187: ... 9 9 9 9 6 Pull the levers down to close the paper path as shown below 7 Close Cover AB Note If you installed the 500 Sheet Paper Cassette Unit close Cover C If the indicator lights still indicate a paper jam error follow the steps below ...

Page 188: ...188 Troubleshooting 1 Open Cover AB 2 Pull the levers up to release the paper path as shown below 3 Open the cover of the fuser unit as shown below You can open it narrowly ...

Page 189: ...roubleshooting 189 9 9 9 9 9 9 9 9 9 9 9 9 Note Be careful not to touch the red rollers in the fuser unit because they may be hot 4 Remove any jammed paper by hand Be careful not to tear the jammed paper ...

Page 190: ...190 Troubleshooting 5 Close the cover of the fuser unit 6 Pull the levers down to close the paper path as shown below 7 Close Cover AB ...

Page 191: ...is cleared completely and Cover C is closed the jammed page s print data is automatically reprinted Note If you cannot find any jammed paper in Cover AB check Cover DM of the optional Duplex Unit or Cover C of the 500 Sheet Paper Cassette Unit Jam MP tray or cassette Follow the steps to clear paper jams in the MP tray 1 Open Cover AB ...

Page 192: ...n below Remove any jammed paper gently with both hands Be careful not to tear the jammed paper Note Always try to remove jammed paper with both hands to avoid tearing it If paper is torn be sure to remove all torn pieces 3 Remove the MP tray cover and open the MP tray flap ...

Page 193: ...Troubleshooting 193 9 9 9 9 9 9 9 9 9 9 9 9 4 Gently pull out any sheets that have fed part way into the printer 5 Remove paper stacked on the MP tray Check if any paper is jammed inside the MP tray ...

Page 194: ...194 Troubleshooting 6 Fan a stack of paper and set the paper back into the MP tray 7 Close the MP tray flap and set the MP tray cover 8 Close Cover AB ...

Page 195: ...9 9 9 Follow these steps to clear paper jams in the optional 500 Sheet Paper Cassette Unit 1 Open Cover C of the optional 500 Sheet Paper Cassette Unit 2 Gently remove the jammed paper with both hands Be careful not to tear the jammed paper ...

Page 196: ...196 Troubleshooting 3 Pull out the paper cassette and discard any crumpled paper 4 Close the paper cassette ...

Page 197: ...he paper jam is cleared completely and Cover C of the 500 Sheet Paper Cassette Unit is closed the jammed page s print data is automatically reprinted Jam Cover DM Follow these steps to clear paper jams in the Duplex Unit s cover 1 Open the Cover DM of the Duplex Unit ...

Page 198: ... paper inside Cover DM Be careful not to tear the paper Note If paper is torn be sure to remove all torn pieces 3 Close Cover DM When the paper jam is cleared completely and Cover DM is closed the jammed page s print data is automatically reprinted ...

Page 199: ...ay be controlled by an outside switch or an automatic timer Make sure that the switch is turned on orpluganotherelectricaldeviceintothe outlet to check whether the outlet is operating properly Cause What to do Your computer may not be properly connected to the printer Perform the procedure described in ConnectingthePrintertoaComputer in the Setup Sheet The interface cable may not be plugged in sec...

Page 200: ...th If you are using the USB interface use a Revision 1 1 cable Your application software is not properly set up for your printer Make sure that the printer is selected in your application software Your computer system s memory is too small to handle the volume of data in your document Try reducing the image resolution of your document in the application software or install more memory in your comp...

Page 201: ...ble If you are using the parallel interface make sure that the cable is a double shielded twisted pair interface cable no more than six feet in length If you are using the USB interface use a Revision 1 1 cable Note If a status sheet does not print correctly your printer may be damaged Contact your dealer or a qualified service representative Cause What to do The page length and margins are set in...

Page 202: ...202 Troubleshooting You may need more memory Graphics require large amounts of memory Install an appropriate memory module See Memory Module on page 144 ...

Page 203: ...mp coated paper may produce a rough printed surface Use coated paper that is newly unwrapped Always store coated paper in a dry environment Cause What to do Black is selected as the Color setting in the printer driver Change this setting to Color The color setting in the application you are using is not appropriate for color printing Make sure that the settings in your application are appropriate ...

Page 204: ...ttingto 1 5in theMore Settings dialog box in the printer driver then print again If you still do not get the printouts you expect adjust the color using the slide bar for each color For details see Customizing print settings on page 46 for Windows or see Customizing print settings on page 79 for Macintosh ...

Page 205: ...Macintosh canimprovecolormatching between different devices For details see Using the predefined settings on page 44 for Windows and Using the predefined settings on page 77 for Macintosh For Macintosh the System Profile setting is not in use To apply ColorSync properly your input device and the application must support ColorSync and a System Profile must be used for your monitor PhotoEnhance4 may...

Page 206: ...per for your printer If the surface of your paper is too rough printed characters may appear distorted or broken EPSON special paper or smooth high quality copier paper is recommended for best results See Available Paper on page 23 for information on choosing paper ...

Page 207: ...ter on page 172 Cause What to do Duplex printing on damp coated or thick paper may produce printouts with white dots where the toner density is high on the back of the paper Do not select Thick Back or Coated Back as the Paper Type setting in the printer driver Choose Thick or Coated instead Do not store coated paper in a humid or damp environment Be sure to use paper that is newly unwrapped Cause...

Page 208: ... be moist or damp Do not store paper in a humid or damp environment Be sure to use paper that is newly unwrapped There may be no toner left in the toner cartridge If the message in the EPSON Status Monitor 3 utility indicates that the amount of toner is low see Developer Cartridge on page 152 There may be a problem with the photoconductor unit Replace the photoconductor unit See Photoconductor Uni...

Page 209: ...r for your printer EPSON special paper or smooth high quality copier paper is recommended for best results See Available Paper on page 23 for information on choosing paper There may be a problem with the photoconductor unit Replace the photoconductor unit See Photoconductor Unit on page 158 ...

Page 210: ...ppear distorted or broken EPSON special paper or smooth high quality copier paper is recommended for best results See Available Paper on page 23 for information on choosing paper Cause What to do The printer may have loaded more than one sheet at a time Remove the paper stack and fan it Tap it on a flat surface to even the edges Then reload the paper There may be no toner left in the toner cartrid...

Page 211: ... 9 9 9 9 Theproblemmaybewithyour application or interface cable Print out a status sheet See Printing a Status Sheet on page 181 If a blank page is ejected the problem may be with the printer Turn off the printer and contact your dealer ...

Page 212: ...ay be on Turn off the Toner Save mode using the printer driver There may be a problem with the photoconductor unit Replace the photoconductor unit See Photoconductor Unit on page 158 Cause What to do Toner may have spilled onto the paper feed path Clean internal printer components by printing three pages with only one character per page Cause What to do The paper source setting may not be correct ...

Page 213: ...r MP tray Make sure that you have not tried to load too many sheets of paper For the maximum paper capacity for each paper source see Paper Sources on page 27 If paper does not feed from the optional 500 Sheet Paper CassetteUnit theunitmaynot be installed properly For instructions on installing the unit see 500 Sheet Paper Cassette Unit on page 131 ...

Page 214: ...214 Troubleshooting ...

Page 215: ...ifications Available Paper Since the quality of any particular brand or type of paper may be changed by the manufacturer at any time EPSON cannot guarantee the quality of any type of paper Always test samples of paper stock before purchasing large quantities orprinting large jobs ...

Page 216: ... is acceptable Envelopes No paste and no tape No plastic window unless specifically designed for laser printers Labels The backing sheet should be covered completely with no gaps between labels Thick paper Weight 91 to 163 g m2 Laser printer paper EPSON Color Laser Paper Transparencies EPSON Color Laser Transparencies Coated paper EPSON Color Laser Coated Paper Colored paper Non coated Paper with ...

Page 217: ...0 10 5 in Executive 7 25 10 5 in Custom 92 to 216 mm 210 to 297 mm Paper that is shorter than 210 mm is printed as thick paper Paper Sources MP tray for all sizes Optional 500 Sheet Paper Cassette Unit for A4 Optional Duplex Unit for A4 Letter Size Monarch 3 7 8 7 1 2 in Commercial 10 4 1 8 9 1 2 in DL 110 220 mm C6 114 162 mm C5 162 229 mm International B5 176 250 mm 7 9 8 in Paper Source MP tray...

Page 218: ...218 Technical Specifications Size A4 210 297mm Letter 8 5 11 in Paper Source MP tray only ...

Page 219: ...A4 210 297 mm A5 148 210 mm B5 182 257 mm Letter 8 5 11 in Half Letter 5 5 8 5 in Government Letter 8 5 10 5 in Executive 7 25 10 5 in Paper Source MP tray only Size A4 210 297 mm Letter 8 5 11 in Paper Sources MP tray for all sizes Optional 500 Sheet Paper Cassette Unit for A4 Optional Duplex Unit for A4 Letter Size A4 210 297 mm Letter 8 5 11 in Paper Source MP tray only Size A4 210 297 mm ...

Page 220: ...220 Technical Specifications Printable area 5 mm minimum margin on all sides Paper Source MP tray only when Coated or Coated Back is selected as the Paper Type setting in the printer driver ...

Page 221: ...inting speed varies by paper source or other conditions Color printing 25 seconds or less Black only printing 14 seconds or less Warm up time About 180 seconds at normal temperature Paper feed Automatic or manual feed Paper feed alignment Center alignment for all sizes Input paper supply MP tray Up to 200 sheets of plain paper and EPSON Color Laser Paper Up to 10 envelopes Up to 50 sheets of label...

Page 222: ...222 Technical Specifications Paper output For all paper types and size Paper output capacity Up to 200 sheets A4 or letter size plain paper RAM 16 MB expandable up to 144MB ...

Page 223: ...00 meters 8 200 feet maximum Dimensions and weight Height 406 mm 16 0 in Width 429 mm 16 9 in Depth 521 mm 20 5 in Weight Approx 29 kg about 63 9 lb excluding options Durability 5 years or 200 000 pages whichever comes first under the condition of A4 or letter size plain paper 110 V 120 V Model Model L431B 220 to 240 V Model Model L431B Voltage 110 V 120 V 10 220 V 240 V 10 Rated frequency 50 Hz 6...

Page 224: ... A Less than 7A Power consumption During printing Average Color 243Wh B W 351Wh 352Wh MAX Color 1100W or less B W 1100W or less During standby mode Average 111Wh 100Wh Sleep mode Less than 11Wh Less than 8Wh Safety UL 60950 CSA C22 2 No 60950 EMC FCC Part 15 Subpart B Class B CSA C108 8 Class B Low Voltage Directive 73 23 EEC EMC Directive 89 336 EEC EN 60950 EN 55022 Class B EN 55024 EN 61000 3 2...

Page 225: ...y Act of 1968 This means that the printer does not produce hazardous laser radiation CDRH regulations The Center for Devices and Radiological Health CDRH of the U S Food and Drug Administration implemented regulations for laser products on August 2 1976 Compliance is mandatory for products marketed in the United States The label shown below indicates compliance with the CDRH regulations and must b...

Page 226: ...interface connector your computer must support ECP mode The procedure of the mode setting on the parallel interface may differ depending on your computer Refer to your computer s manual to adjust the mode setting on the parallel interface USB interface USB 1 1 Note Only computers equipped with a USB connector and running Mac OS 8 1 to 9 X or Windows Me 98 XP or 2000 support the USB interface ...

Page 227: ...SON Color Laser Coated Paper This media can be fed from this paper source only when Normal is selected as the Paper Type setting in the printer driver Power supply 5 Vdc and 24V supplied by the printer Dimensions and weight Height 178 mm 7 0 in Width 380 mm 15 0 in Depth 485 mm 19 1 in Weight 5 3 kg 11 7 lb including paper cassette Paper size A4 Letter Paper weight 60 to 90 g m 16 to 24 lb Paper f...

Page 228: ...n Width 96 mm 3 8 in Depth 340 mm 13 4 in Weight 2 0 kg 4 4 lb DRAM type Synchronous Dynamic RAM Dual In line memory module SDRAM DIMM Memory size 16MB 32MB 64 MB or 128MB Storage temperature 0 to 35 C 32 to 95 F Storage humidity 30 to 85 RH Lifeoffactory installed cartridges Up to 1 500 A4 size pages each at 5 print ratio Life of replacement cartridges Up to 4 500 A4 size pages each at 5 print ra...

Page 229: ... printer or by frequently printing on envelopes labels thick paper transparencies or paper that is smaller than the print data s page size The actual number of pages you can print with a transfer unit varies depending on the type of printing Storage temperature 0 to 35 C 32 to 95 F Storage humidity 30 to 85 RH Life 45 000 pages of black and white continuos printing 11 250 pages of color continuous...

Page 230: ...mber of pages you can print before replacing the waste toner collector varies depending on the type of printing Storage temperature 0 to 35 C 32 to 95 F Storage humidity 30 to 85 RH Life 6 250 images of color printing 25 000 images of black and white printing under the conditions of A4 size paper at 5 print ratio ...

Page 231: ...o the bar code characters themselves However EPSON BarCode Fonts are designed to add such codes automatically allowingyoutoeasilyprintbar codesthatconform to a variety of bar code standards EPSON BarCode Fonts support the following types of bar codes Bar code Standard EPSON BarCode OCR B Check Digit Comments EAN EPSON EAN 8 Yes Yes Creates EAN abbreviated version bar codes EPSON EAN 13 Yes Yes Cre...

Page 232: ...s Code128 bar codes Interleaved 2 of 5 ITF EPSON ITF No No Printing of OCR B and check digits can be specified with the font name EPSON ITF CD No Yes EPSON ITF CD Num Yes Yes EPSON ITF Num Yes No Codabar EPSON Codabar No No Printing of OCR B and check digits can be specified with the font name EPSON Codabar CD No Yes EPSON Codabar CD Num Yes Yes EPSON Codabar Num Yes No Bar code Standard EPSON Bar...

Page 233: ... Installing EPSON BarCode Font Follow these steps to install EPSON BarCode Font 1 Make sure that the printer is off and that Windows is running on your computer 2 Insert the CD ROM that comes with your printer into your CD ROM drive Computer IBM PC series or IBM compatible with an i386SX or higher CPU Operating system Microsoft Windows Me 98 95 Windows XP 2000 NT 4 0 Hard disk 15 to 30 KB free spa...

Page 234: ... on screen instructions 7 When installation is complete click OK EPSON BarCord Font is now installed on your computer Printing with EPSON BarCode Fonts Follow these steps to create and print bar codes using EPSON BarCode Fonts The application featured in these instructions is Microsoft WordPad The actual procedure may differ slightly when printing from other applications ...

Page 235: ...rking with Fonts 235 B B B B B B B B B B B B 1 Open a document inyour applicationand enter the characters you want to convert into a bar code 2 Select the characters then select Font from the Format menu ...

Page 236: ...Font you want to use then set the font size and click OK Note In Windows XP 2000 and NT 4 0 you cannot use font sizes larger than 96 points when printing bar codes 4 The characters you selected appear as bar code characters similar to those shown below ...

Page 237: ...o me Printer Driver Host Based Color Printer Driver Color not available Black not available Black Print Quality 600 dpi 600 dpi 600 dpi 600 dpi Toner Save Not selected Not selected Not selected Not selected Zoom Options Not selected Not selected Not selected Not selected Graphicmode in the Extended Settings dialog box accessed through the Optional Settings tab High Quality Printer not available no...

Page 238: ...ers only specify rotation angles of 90 180 and 270 Turn off all automatic character and word spacing settings in your application Do not use features in your application that enlarge or reduce the size of characters in only the vertical or horizontal direction Turn off your application s auto correct features for spelling grammar spacing etc To more easily distinguish bar codes from other text in ...

Page 239: ...d before printing large quantities BarCode Font specifications This section contains details on the character input specifications for each EPSON BarCode Font EPSON EAN 8 EAN 8 is an eight digit abbreviated version of the EAN bar code standard Because the check digit is added automatically only 7 characters can be input The following codes are inserted automatically and need not be input by hand L...

Page 240: ...characters can be input The following codes are inserted automatically and need not be input by hand Left Right margin Left Right guard bar Center bar Check digit EPSON EAN 8 Character type Numbers 0 to 9 Number of characters Up to 12 characters Font size 60 pt to 150 pt up to 96 pt in Windows XP 2000 NT Recommended sizes are 60 pt 75 pt standard 112 5 pt and 150 pt ...

Page 241: ...codesaresupported Supplementarycodes are not supported The following codes are inserted automatically and need not be input by hand Left Right margin Left Right guard bar Center bar Check digit OCR B EPSON EAN 13 Character type Numbers 0 to 9 Number of characters Up to 11 characters Font size 60 pt to 150 pt up to 96 pt in Windows XP 2000 NT Recommended sizes are 60 pt 75 pt standard 112 5 pt and ...

Page 242: ... Specification Manual The following codes are inserted automatically and need not be input by hand Left Right margin Left Right guard bar Check digit OCR B The numeral 0 EPSON UPC A Character type Numbers 0 to 9 Number of characters Up to 6 characters Font size 60 pt to 150 pt up to 96 pt in Windows XP 2000 NT Recommended sizes are 60 pt 75 pt standard 112 5 pt and 150 pt ...

Page 243: ...this reason it is important to keep at least one space between the bar code and the surrounding text to prevent overlapping Spaces in Code39 bar codes should be input as _ underbars When printing two or more bar codes on one line separate the bar codes with a tab or select a font other than a BarCode Font and input the space If a space is input while a Code39 font is selected the bar code will not...

Page 244: ...e code set of a line of characters is changed in the middle of the line a conversion code is automatically inserted Font size When OCR B is not used 26 pt or more up to 96 pt in Windows XP 2000 NT Recommended sizes are 26 pt 52 pt 78 pt and 104 pt When OCR B is used 36 pt or more up to 96 pt in Windows XP 2000 NT Recommended sizes are 36 pt 72 pt 108 pt and 144 pt EPSON Code39 EPSON Code39 CD EPSO...

Page 245: ...plications that automatically delete spaces from the ends of lines or change multiple spaces into tabs When printing two or more bar codes on one line separate the bar codes with a tab or select a font other than a BarCode Font and input the space If a space is input while Code128 is selected the bar code will not be correct The following codes are inserted automatically and need not be input by h...

Page 246: ...ally adjusted to 15 or more of its total length in conformance to the Interleaved 2 of 5 standard For this reason it is important to keep at least one space between the bar code and the surrounding text to prevent overlapping Interleaved 2 of 5 treats every two characters as one set When there are an odd number of characters EPSON ITF fonts automatically add a zero to the beginning of the characte...

Page 247: ...art Stop character Check digit The numeral 0 added to the beginning of character strings as needed Font size When OCR B is not used 26 pt or more up to 96 pt in Windows XP 2000 NT Recommended sizes are 26 pt 52 pt 78 pt and 104 pt When OCR B is used 36 pt or more up to 96 pt in Windows XP 2000 NT Recommended sizes are 36 pt 72 pt 108 pt and 144 pt ...

Page 248: ...l length in conformance to the Codabar standard For this reason it is important to keep at least one space between the bar code and the surrounding text to prevent overlapping When either a Start or a Stop character is input Codabar fonts automatically insert the complementary character If neither a Start nor a Stop character is input these characters are automatically input as the letter A EPSON ...

Page 249: ...nt sample Character type Numbers 0 to 9 Symbols Number of characters No limit Font size When OCR B is not used 26 pt or more up to 96 pt in Windows XP 2000 NT Recommended sizes are 26 pt 52 pt 78 pt and 104 pt When OCR B is used 36 pt or more up to 96 pt in Windows XP 2000 NT Recommended sizes are 36 pt 72 pt 108 pt and 144 pt EPSON Codabar EPSON Codabar CD EPSON Codabar Num EPSON Codabar CD Num ...

Page 250: ...250 Working with Fonts ...

Page 251: ...HP Equivalent Courier SWC Medium Bold Italic Bold Italic Courier Dutch 801 SWC Medium Bold Italic Bold Italic CG Times Zapf Humanist 601 SWC Medium Bold Italic Bold Italic CG Omega Ribbon 131 SWC Coronet Clarendon Condensed SWC Clarendon Condensed Swiss 742 SWC Medium Bold Italic Bold Italic Univers Swiss 742 Condensed SWC Medium Bold Italic Bold Italic Univers Condensed Incised 901 SWC Medium Bol...

Page 252: ... Italic Bold Italic ITC Bookman Century Schoolbook SWA Medium Bold Italic Bold Italic New Century Schoolbook Dutch 801 SWA Medium Bold Italic Bold Italic Times ITC Zapf Chancery SWA Italic ITC Zapf Chancery Medium Italic Symbol Set SWM Symbol Symbol Set SWA SymbolPS More WingBats SWM Wingdings ITC Zapf Dingbats SWA ITC Zapf Dingbats Letter Gothic SWC Medium Bold Italic Letter Gothic Courier SWA Me...

Page 253: ... read before printing large quantities ESC P 2 and FX modes Available only in ESC P2 mode Note Depending on the print density or on the quality or color of the paper OCR A and OCR B fonts may not be readable Print a sample and make sure the fonts can be read before printing large quantities Font Name Family Courier SWC Medium Bold EPSON Prestige EPSON Roman EPSON Sans serif Swiss 721 SWM Medium Bo...

Page 254: ...amplesofthefontsavailableineachmodebyusing the control panel s Information Menu Follow these steps to print font samples 1 Make sure that paper is loaded 2 Make sure the LCD panel displays Ready or Standby then press the Enter button 3 Press the d Down button to select the font sample for the appropriate mode Font Name Family Courier SWC Medium Bold EPSON Prestige EPSON Gothic EPSON Orator EPSON S...

Page 255: ...re sending unformatted text to the printer directly from DOS or if you are using a simple software package that does not include font selection you can select fonts using the printer s control panel menus when in the LJ4 ESC P 2 FX or I239X emulation mode Downloading Fonts Fonts that reside on your computer s hard disk can be downloaded or transferred to the printer so they can be printed Download...

Page 256: ...ter or having fonts downloaded only when you need to print a particular font EPSON Font Manager Windows Only EPSON Font Manager provides you with 131 software fonts Installing EPSON Font Manager Follow these steps to install EPSON Font Manager 1 Make sure that the printer is off and that Windows is running on your computer 2 Insert the CD ROM that comes with your printer into your CD ROM drive ...

Page 257: ...ON Font Manager Alternatively you can install it by selecting Install EPSON Font Manager and then clicking the arrow at the top right 4 Follow the on screen instructions 5 When installation is complete click OK EPSON Font Manager is now installed on your computer ...

Page 258: ...258 ...

Page 259: ... dealer where you purchased your product Customer support will be able to help you much more quickly if you give them the following information Product serial number The serial number label is usually on the back of the product Product model Product software version Click About Version Info or similar button in the product software Brand and model of your computer Your computer operating system na...

Page 260: ...tion to your product documentation we provide the following sources for obtaining information Service Access World Wide Web From the Internet you can reach EPSON s Latin American web site at http www latin epson com In Brazil you can reach Epson at http www epson com br Country Telephone number Argentina 11 4346 0300 Brazil 55 11 7296 6100 Chile 02 236 6717 Colombia 01 523 5000 Costa Rica 6 296 62...

Page 261: ... e mail EPSON Faxback Service EPSON Faxback service will fax you the latest specifications for most EPSON products offered in Australia Phone 02 9903 9075 andthe system will guide you through a numberof choices before faxing the information to your fax machine EPSON Helpdesk EPSON Helpdesk is provided as a final backup to make sure our clients have access to advise Operators on the Helpdesk can ai...

Page 262: ...ide Web http www epson com sg Information on product specifications drivers for download Frequently Asked Questions FAQ Sales Enquiries and Technical Support via e mail are available Epson HelpDesk Phone 65 6586 3111 Our HelpDesk team can help you with the following over the phone Sales enquiries and product information Product usage questions or problem Enquiries on repair service and warranty Fo...

Page 263: ...es on repair service and warranty For users in Indonesia Contacts for information support and services are World Wide Web http www epson co id Information on product specifications drivers for download Frequently Asked Questions FAQ Sales Enquiries questions through e mail Epson Hotline Sales enquiries and product information Technical support Phone 62 21 572 4350 Fax 62 21 572 4357 ...

Page 264: ...vide users with the following information Product information Answers to Frequently Asked Questions FAQs Jakarta Wisma Bisnis Indonesia 3rd floor Jl Letjen S Parman Kav 12 Slipi Jakarta Phone Fax 62 21 5357159 Bandung Lippo Center 8th floor Jl Gatot Subroto No 2 Bandung Phone Fax 62 22 7303766 Surabaya Gedung Koko Perdana 3rd floor Jl Jend Basuki RakhmatNo 105 107 Surabaya Phone Fax 62 31 5458562 ...

Page 265: ... drivers You can log on to the following number for the BBS service Technical Support Hotline You can also contact our technical staff at the following telephone and fax numbers For users in Malaysia Contacts for information support and services are World Wide Web http www epson com my Information on product specifications drivers for download Frequently Asked Questions FAQ Sales Enquiries questio...

Page 266: ...age and technical support Techline For users in India Contacts for information support and services are World Wide Web http www epson co in Information on product specifications drivers for download Frequently Asked Questions FAQ Products Enquiry and Technical Query are available Phone 603 56288288 Fax 603 56212088 Phone 603 56288222 Phone 603 56288333 ...

Page 267: ...abad Cochin Mumbai Pune Delhi and Kolkata Phone 5321 266 70 Fax 5581799 5321095 Mumbai Phone 8261516 17 Fax 8257287 Delhi Phone 6447201 06 Fax 6447205 Chennai Phone 8203940 41 Fax 8272463 Kolkata Phone 2871355 56 Fax 2871357 Hyderabad Phone 6329335 36 Cochin Phone 361638 362677 Fax 352940 Pune Phone 4335460 ext 214 Fax 4330881 Ahmedabad Phone 6407176 77 ...

Page 268: ...tp www epson com ph Information on product specifications drivers for download Frequently Asked Questions FAQ and E mail Enquiries are available Epson Helpdesk Phone 63 2 813 6567 Our Hotline team can help you with the following over the phone Sales enquiries and product information Product usage questions or problems Enquiries on repair service and warranty Phone 63 2 813 6567 Fax 63 2 813 6545 E...

Page 269: ...mation from the computer to the printer dpi dots per inch The number of dots per inch is a measure of printer resolution The higher the number of dots the higher the resolution driver See printer driver drum The part of the printer mechanism where the image is formed and transferred to paper FF Form Feed A control code to break the page fixed width font A font whose characters are allotted the sam...

Page 270: ...of the printer s electronic system that is used to store information Some information is fixed and is used to control how the printer operates Information that is sent to the printer from the computer is stored in memory temporarily See also RAM orientation Refers to the direction in which characters are printed on a page This direction is either portrait where the length of the page is longer tha...

Page 271: ...h of the character Thus the uppercase M takes up more horizontal space than the lowercase l RAM Random Access Memory The portion of the printer s memory used as a buffer and for storing user defined characters All data stored in RAM is lost when the printer is turned off reset To refresh the printer s memory and erase the current print jobs resolution A measure of the fineness and clarity of image...

Page 272: ...272 Glossary ...
Page 273: ...ns 227 E Envelopes driver settings 37 loading 37 specifications 217 the use of 36 EPSON BarCode Fonts about 231 formatting 238 inputting 238 installing 233 printing 234 specifications 239 system requirements 233 EPSON Color Laser Coated Paper specifications 219 EPSON Color Laser Paper specifications 219 EPSON Color Laser Transparencies specifications 219 EPSON special media EPSON Color Laser Coate...

Page 274: ...6 M Memory modules installing 144 removing 147 specifications 144 228 O Options 500 Sheet Paper Cassette Unit 131 Duplex Unit 137 Output tray face down tray 29 P Paper EPSON special media 23 printable area 220 prohibited 25 specifications 217 supported media types 216 Paper jams Cover AB 183 Cover DM 197 MP tray or cassette 191 precautions when clearing jams 182 Paper sources for EPSON Color Laser...

Page 275: ...ut Macintosh 82 print layout Windows 51 print quality Macintosh 76 print quality Windows 42 resizing printouts Macintosh 81 resizing printouts Windows 49 saving customized settings Macintosh 80 saving customized settings Windows 48 watermark Macintosh 85 watermark Windows 53 Q Quality Macintosh 76 Quality Windows 42 R Ready light 179 Removing 500 Sheet Paper Cassette Unit 137 Duplex Unit 143 inter...

Page 276: ...ling printer software Macintosh 101 printer software Windows 69 USB device driver 72 USB connection setting Macintosh 99 settings Windows 67 W Waste toner collector handling precautions 162 replacing 162 specifications 230 ...

Reviews: