background image

Appendix A

Technical Specifications

Paper

Since the quality of any particular brand or type of paper may be changed by the manufacturer at any
time, Epson cannot guarantee the quality of any type of paper. Always test samples of paper stock
before purchasing large quantities or printing large jobs.

Available paper types

Paper type

Description

Plain paper

Weight: 64 to 90 g/m2 (Recycled paper is acceptable.

*

)

Envelopes

No paste and no tape. No plastic window. (unless specifically designed for
laser printers.)

Labels

The backing sheet should be covered completely, with no gaps between
labels.

Epson Color Laser Transparencies

Transparencies for color laser printers or copiers.

Thick paper

Weight: 91 to 157 g/m2

Extra thick paper

Weight: 158 to 216 g/m2

Colored paper

Non coated

Paper with letterhead

Paper and ink of letterheads must be compatible with laser printers.

*

Use recycled paper only under normal temperature and humidity conditions. Poor quality paper may reduce print quality,
or cause paper jams and other problems.

Paper that should not be used

You cannot use the following paper in this printer. It may cause printer damage, paper jams, and poor
print quality:

Media meant for other black-and-white laser printers, color laser printers, color copiers,
black-and-white copiers, or ink jet printers

Epson AcuLaser M7000 Series     User's Guide

Technical Specifications     

181

Summary of Contents for AcuLaser M7000 Series

Page 1: ...User s Guide NPD4502 00 EN ...

Page 2: ...created by Gretag Macbeth ProfileMaker Gretag Macbeth is the registered trademark of Gretag Macbeth Holding AG Logo ProfileMaker is a trademark of LOGO GmbH IBM and PS 2 are registered trademarks of International Business Machines Corporation Microsoft Windows and Windows Vista are registered trademarks of Microsoft Corporation Apple Macintosh Mac Mac OS AppleTalk and Bonjour are registered tradem...

Page 3: ...ft Corporation in the United States and other countries Marigold is trademark of Arthur Baker and may be registered in some jurisdictions Antique Olive is a registered trademark of Marcel Olive and may be registered in certain jurisdictions Carta and Tekton are registered trademarks of Adobe Systems Incorporated Marigold and Oxford are trademarks of AlphaOmega Typography Coronet is a registered tr...

Page 4: ...indows Vista Home Premium x64 Edition Windows Vista Home Basic x64 Edition Windows Vista Enterprise x64 Edition and Windows Vista Business x64 Edition Windows XP refers to Windows XP Home Edition and Windows XP Professional Windows XP x64 refers to Windows XP Professional x64 Edition Windows Server 2008 refers to Windows Server 2008 Standard Edition and Windows Server 2008 Enterprise Edition Windo...

Page 5: ...18 Chapter 1 Getting to Know Your Printer Printer Parts 20 Front view 20 Rear view 21 Inside the printer 22 Control panel 22 Options and Consumable Products 23 Options 23 Consumable products 24 Where to Find Information 24 Printer Features 25 Power saving performance 25 Print Job Arranger 25 Sort function 25 Chapter 2 Printing Tasks Loading Paper into Your Printer 26 MP tray 26 Lower paper cassett...

Page 6: ...anced Layout 44 Duplex printing with the Duplex Unit 44 Modifying the print layout 45 Resizing printouts 46 Printing watermarks 47 Printing headers and footers 49 Printing with an overlay 50 Printing the copy protected document 52 Printing Multiple Print Jobs at Once 53 Printing Web Pages to Fit Your Paper Size 54 Using the Reserve Job Function 54 Sending the print job 55 Chapter 3 Using the Contr...

Page 7: ... and Error Messages 84 Printing and Deleting Reserve Job Data 93 Using the Quick Print Job Menu 93 Using the Confidential Job Menu 94 Printing a Configuration Status Sheet 95 Canceling Printing 96 Using the Pause Cancel button 96 Using the Reset menu 96 Interrupting Printing 97 Chapter 4 Installing Options Optional Paper Cassette Unit 98 Handling precautions 98 Installing the optional paper casset...

Page 8: ...eshooting Clearing Jammed Paper 125 Precautions for clearing jammed paper 125 Paper Jam MP A MP tray or Cover A 126 Paper Jam MP B A MP Tray Cover B or A 131 Paper Jam MP C1A Paper Jam MPC2 A Paper Jam MPC3A MP Tray All paper cassettes and Cover A 138 Paper Jam DM Duplex Unit s cover 146 Printing a Configuration Status Sheet 147 Operational Problems 147 The Ready light does not turn on 147 The pri...

Page 9: ...current task 156 Insufficient memory to print all copies 157 Paper Handling Problems 157 Paper does not feed properly 157 Problems Using Options 158 The message Invalid AUX I F Card appears on the LCD panel 158 Paper does not feed from the optional paper cassette 158 An installed option cannot be used 158 The optional product is not available 159 Correcting USB Problems 159 USB connections 159 Win...

Page 10: ...stScript Printer Driver 173 System requirements 173 Using the PostScript printer driver with Windows 174 Using the PostScript printer driver with Macintosh 177 Using the PCL6 printer driver 180 Appendix A Technical Specifications Paper 181 Available paper types 181 Paper that should not be used 181 Printable area 182 Printer 183 General 183 Environmental 184 Mechanical 184 Electrical 185 Standard ...

Page 11: ...lp for Users in Europe 189 Help for Users in Singapore 189 Help for Users in Thailand 190 Help for Users in Vietnam 190 Help for Users in Indonesia 191 Help for Users in Hong Kong 192 Help for Users in Malaysia 193 Help for Users in India 193 Help for Users in the Philippines 194 Index Epson AcuLaser M7000 Series User s Guide Contents 11 ...

Page 12: ...nt Safety Instructions Setting up the printer Becausetheprinterweighsapproximately 22 kg 48 5 lb with consumable productsinstalled one person should not lift or carry it Two people should carry the printer lifting it by the correct positions as shown below When moving the printer always keep it horizontal If you are unable to insert the AC plug into the electrical outlet contact an electrician Eps...

Page 13: ...liquid has been spilled into it C If it has been exposed to rain or water D Ifitdoesnotoperatenormallywhentheoperatinginstructionsarefollowed Adjustonlythosecontrolsthat arecoveredbytheoperatinginstructionssinceimproperadjustmentofothercontrolsmayresultindamage and will often require extensive work by a qualified technician to restore the product to normal operation E If it has been dropped or the...

Page 14: ...he printer stand produced specifically for this product Using options produced for other products may cause the product to fall over and injure someone Finding the place for the printer When relocating the printer always choose a location that has adequate space for easy operation and maintenance Use the following illustration as a guide for the amount of space required around the printer to ensur...

Page 15: ...unstable surface Slots and openings in the cabinet and the back or bottom are provided for ventilation Do not block or cover them Do not put the printer on a bed sofa rug or other similar surface or in a built in installation unless proper ventilation is provided Keep the entire computer and printer system away from potential sources of interference such as loudspeakers or the base units of cordle...

Page 16: ...ontrols may result in damage and may require repair by a qualified service representative Do not turn off the printer After turning on the printer wait until Ready appears on the LCD panel While the Ready light is flashing While the Data light is on or flashing While printing Avoid touching the components inside the printer unless instructed to do so in this guide Follow all warnings and instructi...

Page 17: ...getthebestprintquality donotstoretheimagingcartridgeinanareasubjecttodirectsunlight dust salty air or corrosive gases such as ammonia Avoid locations subject to extreme or rapid changes in temperature or humidity When removing the imaging cartridge do not expose it to sunlight at all and avoid exposing it to room light for more than five minutes The imaging cartridge contains a light sensitive dru...

Page 18: ...visiblelaserbeaminsidetheprinterheadunit The printer head unit is NOT A SERVICE ITEM therefore the printer head unit should not be opened under any circumstances An additional laser warning label is affixed to the inside of the printer Ozone safety Ozone emission Ozone gas is generated by laser printers as a by product of the printing process Ozone is produced only when the printer is printing Ozo...

Page 19: ...ilation Long continuous printing together with any of the above Printer location The printer should be located so that the exhaust gases and heat generated are Not blown directly into the user s face Vented directly out of the building whenever possible Epson AcuLaser M7000 Series User s Guide Safety Instructions 19 ...

Page 20: ... Your Printer Printer Parts Front view a face down tray b control panel c right side cover d standard lower paper cassette e power switch f paper support Epson AcuLaser M7000 Series User s Guide Getting to Know Your Printer 20 ...

Page 21: ...hernet interface connector f Type B interface card slot cover g USB interface connector When the printer is in the deep sleep mode or the power off mode the Ethernet interface connector s LED does not light Epson AcuLaser M7000 Series User s Guide Getting to Know Your Printer 21 ...

Page 22: ...Inside the printer a imaging cartridge b cover A c MP tray d tray paper size switch Control panel Epson AcuLaser M7000 Series User s Guide Getting to Know Your Printer 22 ...

Page 23: ... is flashing pressing this button clears the error and switches the printer to ready status f Error light Orange On or flashes when an error has occurred g h i j k Right button Down button Left button OK button Up button Use these buttons to access the control panel menus where you can make printer settings and check the status of consumable products For instructions on how to use these buttons se...

Page 24: ...ed service representative Parallel Interface Card C12C824521 This option enables parallel interface connection Insert the parallel interface card to the Type B interface card slot Consumable products The life of the following consumable products is monitored by the printer The printer lets you know when replacements are needed Product name Product code Imaging Cartridge 1221 Return Imaging Cartrid...

Page 25: ...all the printer software Printer Features Power saving performance The printer has an advanced power saving feature that helps you reduce electricity consumption In the power off mode the printer consumes about 0 2 W by disabling almost all operations For a detailed explanation see Energy Saver Menu on page 82 Print Job Arranger This function allows printing settings for several documents created ...

Page 26: ...he paper types and sizes see Paper on page 181 c Caution Do not let the paper s edge slide across your skin because the edge of the paper may cut you MP tray The MP tray Multi purpose tray is the paper source that is available for various types of paper such as labels envelopes thick paper and transparencies Note To load envelopes see Envelopes on page 36 1 Open the MP tray Epson AcuLaser M7000 Se...

Page 27: ...uides to accommodate the paper you are loading Note When the loading paper size is bigger than B4 open the extension tray on the MP tray to accommodate the paper Epson AcuLaser M7000 Series User s Guide Printing Tasks 27 ...

Page 28: ...e desired paper with the printable surface facing up Then slide the paper guides to get a snug fit Note Make sure that you do not load paper beyond the limit mark Epson AcuLaser M7000 Series User s Guide Printing Tasks 28 ...

Page 29: ... details see Tray Menu on page 60 If the tray paper size switch is set to set the MP Tray Size setting on the control panel to match the size of the loaded paper For details see Tray Menu on page 60 Lower paper cassette This cassette gives you a second paper source in addition to the MP tray 1 Pull out the paper cassette Epson AcuLaser M7000 Series User s Guide Printing Tasks 29 ...

Page 30: ...aper guides to accommodate the paper you are loading Note When loading paper that is A3 B4 A4 portrait or larger extend the paper cassette If you do not need to extend the paper cassette go to step 8 Epson AcuLaser M7000 Series User s Guide Printing Tasks 30 ...

Page 31: ...4 Slide the unlock levers outward 5 Pull out the paper tray to extend the paper cassette and align the arrow marks according to the paper size Epson AcuLaser M7000 Series User s Guide Printing Tasks 31 ...

Page 32: ...6 Slide the unlock levers back to their lock positions 7 Pinch the knobs and slide the paper guide to accommodate the paper you are loading Epson AcuLaser M7000 Series User s Guide Printing Tasks 32 ...

Page 33: ...r cassette with the printable surface facing up Note Make sure that you do not load paper beyond the limit mark 9 Insert the paper size label into the front of the paper cassette 10 Replace the tray cover Epson AcuLaser M7000 Series User s Guide Printing Tasks 33 ...

Page 34: ...aper both in portrait and landscape orientation in the printer Set the printer as follows when you load A4 size paper Paper source Orientation of paper in paper source Printer driver Output Settings Control panel Tray Menu MP Tray Size Cassette1 2 3 Size MP tray Portrait Eject Vertically A4 Portrait Landscape Eject Horizontally A4 Landscape Lower cassette Portrait Unnecessary Unnecessary Landscape...

Page 35: ...kpaper andtransparencies Theinstructions below describe loading special media in the MP tray as an example When loading special media you should make paper settings You can also make these settings on the Tray Menu in the control panel See Tray Menu on page 60 Note Since the quality of any particular brand or type of media may be changed by the manufacturer at any time Epsoncannotguaranteethequali...

Page 36: ...ure labelsmight be wrinkled Make a trial print run before you print on a lot of labels Duplex printing is not available for labels Press a sheet of paper on top of each sheet of labels If the paper sticks do not use those labels in your printer Envelopes Available envelopes Envelopes that have no glue or no tape c Caution Do not use window envelopes The plastic on most window envelopes will melt E...

Page 37: ...the printing procedure envelopes might be wrinkled Make a trial print run before you print on a lot of envelopes Duplex printing is not available for envelopes Thick paper MP tray Printer driver settings Paper Size A4 A3 A5 A6 B4 B5 LT HLT LGL GLT GLG B EXE F4 Paper Source MP Tray Paper Type Thick for 91 to 157 g m2 paper Epson AcuLaser M7000 Series User s Guide Printing Tasks 37 ...

Page 38: ...r than 106 g m2 cannot be used for duplex printing Extra thick paper MP tray Printer driver settings Paper Size A4 A3 A5 A6 B4 B5 LT HLT LGL GLT GLG B EXE F4 Paper Source MP Tray Paper Type Extra Thick for 158 to 216 g m2 paper Transparencies MP tray Printer driver settings Paper Size A4 Paper Source MP Tray Paper Type Transparency Note Duplex printing is not available for transparencies Epson Acu...

Page 39: ...tandardsize paper For Windows access the printer driver then select UserDefinedSize from the Paper Size list on the Basic Settings tab In the User Defined Paper Size dialog box adjust the Paper Width Paper Length and Unit settings to match your custom paper Then click OK and your custom paper size will be saved The saved paper sizes can only be used with the printer driver you saved them to Even i...

Page 40: ...Setting the Print Quality You can change the print quality of printouts through settings in the printer driver In the Automatic setting you can select a print mode according to your printing purpose The printer driver makes optimal settings depending on the print mode you have selected In the Advanced setting you have more setting options Note The printer driver s online help provides details on p...

Page 41: ...s users 1 Click the Basic Settings tab 2 Click Automatic then choose desired printing quality 3 Click OK Using the Advanced setting For Windows users 1 Click the Basic Settings tab Epson AcuLaser M7000 Series User s Guide Printing Tasks 41 ...

Page 42: ...e Setting Information dialog box that appears by pressing the Setting Info button on the Optional Settings tab Customizing print settings If you need to change detailed settings make the settings manually For Windows users 1 Click the Basic Settings tab 2 Select Advanced then click More Settings 3 Make appropriate settings For details about each setting see online help 4 Click OK Saving your setti...

Page 43: ...e Name box then click Save Your settings will appear in the drop down list which appears when Advance is selected on the Basic Settings tab Note To delete a custom setting follow the step 1 and 2 select the setting in the Custom Settings dialog box then click Delete You can create new settings in the More Settings dialog box When you create new settings Custom Settings is displayed in the list on ...

Page 44: ...be printed in thicker lines as visible 1 Click the Basic Settings tab 2 Select Advanced then click More Settings to open the More Settings dialog box 3 Select the Dot Correction check box then click OK The default setting for the Dot Correction is on Setting the Advanced Layout Duplex printing with the Duplex Unit This function allows you to print on both sides of the paper automatically by instal...

Page 45: ...te the installed option information manually For details see Making Optional Settings on page 165 3 If you want to make detailed settings click Duplex Settings to open the Duplex Settings dialog box 4 Make appropriate settings For details about each setting see online help 5 Click OK Modifying the print layout This function allows you to print multiple pages on single sheets of paper For Windows u...

Page 46: ...s click More Settings The Print Layout Settings dialog box appears 4 Make appropriate settings For details about each setting see online help 5 Click OK Resizing printouts This function allows you to enlarge or reduce your document For Windows users 1 Click the Advanced Layout tab Epson AcuLaser M7000 Series User s Guide Printing Tasks 46 ...

Page 47: ... select the output paper size 4 Select Upper Left to print reduced page image at upper left corner of the paper or Center to print reduced page image with centering for Location setting Note This setting is not available when you select Zoom To check box 5 Click OK Printing watermarks This function allows you to print a text based or image based watermark on your document For Windows users 1 Click...

Page 48: ...aking a new watermark For Windows users 1 Click the Advanced Layout tab 2 Click Add New Watermark 3 Select Text or BMP and type a name for the new watermark in the Name box 4 If you select Text type the watermark text in the Text box If you select BMP select the BMP file you want to use then click Open 5 Click OK Note You can register up to 10 original watermarks Epson AcuLaser M7000 Series User s...

Page 49: ...ple printer names are set for a printer driver the settings can be available only for the printer name in which you saved the settings When sharing the printer on a network you cannot create a user defined watermark at the client Printing headers and footers This function allows you to print user name computer name date time or collate number at the top or bottom of each page in a document For Win...

Page 50: ...iginal document Note This function is for Windows only Theoverlayfunctionisavailable only when HighQuality Printer isselectedfor thePrintingMode in the Extended Settings dialog box from the Optional Settings tab Creating an overlay 1 Click the Advanced Layout tab 2 Select the Form Overlay check box 3 Select Create Overlay Data then click More Settings The Create Form dialog box appears Epson AcuLa...

Page 51: ...rmdatafromthePaperSourcedrop downlistontheBasicSettingstab For registering form data in the Paper Source see step 6 in Creating an overlay on page 50 If overlay form data is not registered in the Paper Source or if you want to make detailed settings follow the steps below 1 Click the Advanced Layout tab 2 Select the Form Overlay check box 3 Select the Overlay Print check box then click More Settin...

Page 52: ...ent as a copy protected document When you try to copy a copy protected document COPY is printed several times on the document Note Epson will not guarantee to secure from information leakage and any other damage by using this function nor hidden letters appear in all cases Screen tone may be too dark hidden letters may not be printed on the entire print or hidden letters may not appear when photoc...

Page 53: ...s function allows you to print several documents created by different applications at once arranging settings such as the printing order duplex and the print layout 1 Click the Basic Settings tab 2 Select the Print Job Arranger check box 3 Click OK The Print Job Arranger screen appears when a print job is executed Make appropriate settings For details see the Print Job Arranger help Epson AcuLaser...

Page 54: ... and to print them later directly fromtheprinter scontrolpanel Youcanpreventtheprinteddocumentfrombeinglookedatbyother people by applying a password to the print job This function uses the following types of printer memory Printer s Storage Description RAM Disk AnadditionalmemorymustbeinstalledonyourprinterinordertousetheReserveJob function To enable the RAM disk you have to set the RAM Disk setti...

Page 55: ...l Job 3 Enter a user name and job name in the corresponding text boxes If you selected Confidential Job enter a four digit number in the password text box to set the password Note If you want to create a thumbnail of the first page of a job select the Createathumbnail check box Thumbnails can be accessed by entering http followed by the internal print server s IP address in a Web browser 4 Click O...

Page 56: ...ow to access the control panel menus 1 Press the r Right button to access the control panel menus 2 Use the u Up and d Down buttons to scroll through the menus 3 Press the r Right button to view the items in a menu Depending on the menu the LCD panel displays an item and the current setting separated YYYY ZZZZ or only an item YYYY 4 UsetheuUpanddDownbuttonstoscrollthroughtheitems orpressthelLeftbu...

Page 57: ...ng the OK button while the LCD panel displays Ready Note The maximum number of menus you can register as bookmarks is 3 1 Display the menu to register For details see How to access the control panel menus on page 56 2 Press the OK button for more than two seconds The Add Bookmark menu appears Note Some menus cannot be bookmarked If you tried to register them Bookmark Failed is displayed 3 Press th...

Page 58: ...tus Sheet 2 AUX Status Sheet 3 USB ExtI FStatusSht 4 PS3 Status Sheet PS3 Font List PCL Font Sample ESCP2 Font Sample FX Font Sample I239X Font Sample Toner E F to E F Total Pages 0 to 99999999 1 Available only when the jobs are stored by using the Quick Print Job feature 2 Available only when the Network I F setting in Network Menu is set to On 3 Available only when an optional interface card is ...

Page 59: ... status of the network AUX Status Sheet Prints a sheet showing the working status of the optional interface USB ExtI FStatusSht Prints a sheet showing the working status of the USB interface PS3 Status Sheet Prints a sheet showing information about the PS3 mode such as the PS3 version PS3 Font List PCL Font Sample ESCP2 Font Sample FX Font Sample I239X Font Sample Prints a sample of the fonts avai...

Page 60: ... Labels Thick ExtraThk Envelope Special Cassette1 Size A4 Portrait A4 Landscape A3 A5 B4 B5 LT LGL CTM Cassette2 Size Cassette3 Size A4 Portrait A4 Landscape A3 A5 B4 B5 LT LGL CTM Cassette1 Type Cassette2 Type Cassette3 Type Plain Preprinted Letterhead Recycled Color Thick Special Detect Cassette1 Size Detect Cassette2 Size Detect Cassette3 Size On Off MP Tray AutoSel On Off Cassette1 AutoSel Cas...

Page 61: ...Detect Cassette3 Size Detects the paper size loaded in the standard and optional paper cassettes MP Tray AutoSel Cassette1 AutoSel Cassette2 AutoSel Cassette3 AutoSel SpecifieswhetherthetraycanbeselectedforprintingwhenPaperSourceisselectedforAutoSelection in the printer driver Emulation Menu Note You can specify different emulations for each interfaces Item Settings default in bold Parallel Auto E...

Page 62: ...oner Save Off On Density 1 to 3 to 5 Dot Correction Off On Top Offset 150 0 0 0 150 0mm in 0 5 increments LeftOffset 150 0 0 0 150 0mm in 0 5 increments T Offset B 3 150 0 0 0 150 0mm in 0 5 increments L Offset B 3 150 0 0 0 150 0mm in 0 5 increments 1 The minimum and maximum of custom paper sizes vary depending on the tray MP Tray Minimum 75 0 98 4 mm maximum 297 0 508 0 mm Lower paper cassette M...

Page 63: ...eds from the paper source containing paper that matches your Paper Size setting Orientation Specifies whether the page is printed in portrait or landscape orientation Resolution Specifies the printing resolution RITech Turning RITech on produces smoother and crisper lines text and graphics Toner Save Whenthissettingisselected theprintersavestonerbysubstituting agrayshadefortheblackinsideof charact...

Page 64: ...wise you may damage the printer T Offset B Adjusts the vertical printing position on the back of the paper when printing on both sides Use this if the printout on the back is not where you expected L Offset B Adjuststhehorizontalprintingpositiononthebackofthepaperwhenprintingonbothsides Usethis if the printout on the back is not where you expected Setup Menu Item Settings default in bold Language ...

Page 65: ...r 3 Available only for ESCP2 FX or I239X mode 4 Not available in PS3 and PCL 5 After this item is changed the setting value takes effect after a warm boot or after the power is turned on again Language Specifies the language displayed on the LCD panel and that printed on the status sheet Time Out Specifies the length of the time in seconds before a time out when interfaces are being switched autom...

Page 66: ... Start Page Specifies whether duplex printing starts from the front or back of the page Skip Blank Page Enables you to skip blank pages when printing Auto Eject Page SpecifieswhetherornottoejectpaperwhenthelimitspecifiedintheTime Outsettingisreached The default is Off which means paper is not ejected when the time out limit is reached Size Ignore If you want to ignore a paper size error select On ...

Page 67: ...ed You will need to increase your printer s memory if memory errors continue to occur Note Changing the Page Protect setting reconfigures the printer s memory which causes any downloaded fonts to be deleted A4 LT Auto Switching When A4 or Letter size paper is selected for printing and there is no paper of that size loaded the printout is output in another size Toner Alert Specifieswhetherornotto s...

Page 68: ...sages that show errors except for these that occur from consumable products or mandatory replacement parts Clear All Warnings Clears all warning messages that appear on the LCD panel Reset Stops printing and clears the current job received from the active interface You may want to reset the printer when there is a problem with the print job itself and the printer cannot print successfully Reset Al...

Page 69: ...the correct password to access this data For instructions on using this menu see Using the Confidential Job Menu on page 94 Clock Menu Item Settings default in bold Local Time Diff 13 59 0 00 13 59 Time Setting 2000 01 01 00 00 to 2099 12 31 23 59 Date Format DD MM YY MM DD YY YY MM DD Local Time Diff Specifies the current date and time by entering the time difference from Greenwich Mean time Time...

Page 70: ...lected thepulsewidthisabout1μs WhenNormalisselected thepulse width is about 10 μs Bi D Allows you to specify the bidirectional communication mode When you select Off bidirectional communication is disabled Buffer Size Determines the amount of memory to be used for receiving data and printing data If Maximum is selected more memory is allocated for receiving data If Minimum is selected more memory ...

Page 71: ...ower is turned on again 2 Available only when USB I F is set to On 3 AvailableonlywhenaUSBexternaldevicewith D4 supportisconnected Thecontentsof thesettings dependontheUSB external device settings 4 If the Get IPAddress setting is set to Auto this setting cannot be changed 5 WhentheGet IPAddresssettingischangedfromPanelorPINGtoAuto thepanelsettingvaluesaresaved ThenAutois changed back to Panel or ...

Page 72: ...PCL Menu These settings are available in the PCL mode Item Settings default in bold FontSource Resident Download 1 Font Number 0 65535 depending on your settings Pitch 2 0 44 10 00 99 99cpi in 0 01cpi increment Height 2 4 00 12 00 999 75pt in 0 25pt increment SymSet IBM US Roman 8 Roman 9 ECM94 1 8859 2 ISO 8859 9 ISO 8859 10ISO 8859 15ISO PcBlt775 IBM DN PcMultiling PcE Europe PcTk437 PcEur858 Pc...

Page 73: ...ht Specifies the default font height if the font is scalable and proportional You can select from 4 00 to 999 75 points in 0 25 point increments This item may not appear depending on the FontSource or Font Number settings SymSet Selects the default symbol set If the font you selected in FontSourceand Font Number is not available in the new SymSet setting the FontSource and the Font Number settings...

Page 74: ... A3 A5 A6 B4 B5 LT HLT LGL GLT GLG B EXE F4 MON C10 DL C5 C6 IB5 Error Sheet When you select On the printer prints out an error sheet when an error occurs in the PS3 mode or when the PDF file you tried to print is not a supported version Image Protect When On is selected the print quality is not reduced even with insufficient memory In that case Memory Overflow is displayed and the printing is sto...

Page 75: ...ge that is printed ESCP2 Menu Item Settings default in bold Font Courier Prestige Roman Sans serif Roman T Orator S Sans H Script OCR A OCR B Pitch 10 12 15cpi Prop Condensed Off On T Margin 0 40 0 50 1 50inch in 0 05 inch increments Text 1 66 117Lines CGTable PcUSA Italic PcMultilin PcPortugue PcCanFrenc PcNordic PcTurkish2 PcIcelandic PcE Europe BpBRASCII BpAbicomp Roman 8 PcEur858 ISO Latin1 88...

Page 76: ...med to be 1 pica 1 6 inch If you change the Orientation Page Size or T Margin settings the page length setting automatically returns to the default for each paper size CG Table Use the character generator CG table option to select the graphics character table or the italics table The graphics table contains graphic characters for printing lines corners shaded areas international characters Greek c...

Page 77: ...image density is low If you select BarCode the printer converts bit images to bar codes by automatically filling in any verticalgapsbetweendots Thisproducesunbrokenverticallinesthatcanbereadbyabarcodereader This mode will reduce the size of the image being printed and may also cause some distortion when printing bit image graphics ZeroChar Specifies whether the printer prints a slashed or unslashe...

Page 78: ...he closer the printable line is to the top Text Sets the page length in lines For this option a line is assumed to be 1 pica 1 6 inch If you change the Orientation Page Size or T Margin settings the page length setting automatically returns to the default for each paper size CGTable Use the character generator CG table option to select the graphics character table or the italics table The graphics...

Page 79: ...ext lines overlap Bit Image Theprinterisabletoemulatethegraphicsdensitiessetwiththeprintercommands IfyouselectDark the bit image density is high and if you select Light the bit image density is low If you select BarCode the printer converts bit images to bar codes by automatically filling in any verticalgapsbetweendots Thisproducesunbrokenverticallinesthatcanbereadbyabarcodereader This mode will r...

Page 80: ... character tables Character tables contain the characters and symbols used by different languages The printer prints text based on the selected character table T Margin Sets the distance from the top of the page to the baseline of the first printable line The distance is measured in inches The smaller the value the closer the printable line is to the top Text Sets the page length in lines For this...

Page 81: ...age Theprinterisabletoemulatethegraphicsdensitiessetwiththeprintercommands IfyouselectDark the bit image density is high and if you select Light the bit image density is low If you select BarCode the printer converts bit images to bar codes by automatically filling in any verticalgapsbetweendots Thisproducesunbrokenverticallinesthatcanbereadbyabarcodereader This mode will reduce the size of the im...

Page 82: ... the restriction range When Interface is selected the password is required to change the settings in the USB and Network menus When Config is selected the password is required to enter Quick Print Job or Confidential Job or to change the settings in all menus When All is selected the password is required to enter Quick Print Job or Confidential Job or to change the settings and to perform the item...

Page 83: ...switches to the deep sleep mode only when the Apple Talk WSD IPv6 and IPSec settings in the Network Setting and RAM Disk in the Setup Menu are set to Off To recover from the deep sleep mode press the Wake Up Sleep button The printer recovers automatically when it receives a print job Power Off Timer Power Off mode When this setting is set to On the printer switches into the power off mode at the t...

Page 84: ...u MP Tray Size System Information To register the menus in bookmark see How to register menus as bookmarks on page 57 for details Status and Error Messages This section contains a list of error messages shown on the LCD panel a brief description of each message and suggestions for correcting the problem Note that not every message shown on the LCD panel indicates a problem When the mark is display...

Page 85: ...sure the appropriate paper size and printer driver are used Can t Print Duplex The printer has encountered problems during duplex printing Make sure you are using an appropriate type and size of paper for the duplex printing The problem could also be a result of incorrectsettingsforthepapersourceyouareusing PressingtheStart Stopbuttonwillprinttherest of the print job on only one side of the paper ...

Page 86: ...ils about clearing paper jams see Clearing Jammed Paper on page 125 Close Cover wwww The specified cover wwww does not close securely Open the cover once and then close Collate Disabled Printing by specifying the number of copies is no longer possible due to a lack of memory RAM If this error occurs print only one copy at a time To clear this error select Clear Warning from the control panel s Res...

Page 87: ... printer is ejecting paper due to a user request This message appears when pressing the Start Stopbuttononcetomaketheprinteroffline thenholdingdowntheStart Stopbuttonformorethan 2 seconds in order not to receive form feed command Fuser Needed Soon This message indicates that the fuser unit is near the end of its service life You can continue to print until the Replace Fuser message appears To clea...

Page 88: ...le Turn off the printer and contact your dealer Manual Feed ssss The manual feed mode is specified for the current print job Make sure the paper size indicated by ssss is loaded then press the Start Stop button Memory Overflow The printer has insufficient memory to execute the current task Press the Start Stop button on the control panel to resume printing or cancel the print job To cancel the pri...

Page 89: ...ional RAM Error The optional memory module may be corrupted or incorrect Replace it with a new one Paper Out tttt sssss There is no paper in the specified paper source tttt Load paper of the size sssss into the paper source Paper Set tttt sssss Thepaperloadedinthespecifiedpapersource tttt doesnotmatchtherequiredpapersize sssss Replace the loaded paper with the correct size paper and press the Star...

Page 90: ...eady The printer is ready to receive data and print ReplaceFeedRollerMP ReplaceFeedRollerC1 ReplaceFeedRollerC2 ReplaceFeedRoller C3 The feed roller MP C1 C2 or C3 has reached the end of its service life and needs to be replaced If this error occurs consult your dealer Replace Fuser The fuser has reached the end of its service life and needs to be replaced If this error occurs consult your dealer ...

Page 91: ...nus see How to access the control panel menus on page 56 Reset The printer s current interface has been reset and the buffer has been cleared However other interfaces are still active and retain their settings and data Reset All All printer s interface has been reset and the buffer has been cleared The printer reboots automatically Reset to Save Acontrolpanelmenusettingwaschangedwhiletheprinterwas...

Page 92: ...life Prepare a new imaging cartridge Transfer Unit Needed Soon Thismessageindicatesthatthetransferunitisneartheendofitsservicelife Youcancontinuetoprint until the Replace Tranasfer Unit message appears Turn Paper MP Tray Turn Paper Cassette1 Turn Paper Cassette2 Turn Paper Cassette3 The direction of the paper loaded in the MP Tray or the specified paper cassette does not match the required paper d...

Page 93: ...edusingthecontrolpanel sQuick Print JobMenu JobssavedusingtheConfidentialJoboptioncanbeprintedfromtheConfidentialJobMenu Follow the instructions in this section Note The RAM Disk setting on the control panel must be set to Normal or Maximum to use the Reserve Job function We recommend installing optional memory to use this function For instructions about increasing your printer s memory see Instal...

Page 94: ... Press the d Down button repeatedly until ConfidentialJobMenu appears on the LCD panel then press the r Right button 3 Use the d Down or u Up button to scroll to the appropriate user name then press the r Right button 4 Enter your four digit password To enter the password press the d Down or u Up button to select the character and press the r Right button to determine the character After all chara...

Page 95: ... information about the installed options is correct If the options are installed correctly they appear under Hardware Configuration Ifthe options arenot listed try reinstalling them Note If the configuration status sheet does not list your installed options correctly make sure that they are securely connected to the printer If you are unable to get the printer to print a correct configuration stat...

Page 96: ...Up button to select Cancel Job then press the OK button Printing is canceled Note Select Cancel All Jobs on step 3 to cancel all print jobs in the printer s memory The operation is canceled and printing restarts one minute after the printer is not operated After canceling jobs is completed the printer recovers from pause Using the Reset menu Selecting Reset from the control panel s Reset Menu stop...

Page 97: ...t print job Follow the steps below to use this function 1 Press the W Pause Cancel button to stop the current print job 2 Press the d Down or u Up button to select the job that you want to print then press the OK button 3 Press the d Down or u Up button to select Interrupt Printing then press the OK button Note The operation is canceled and the printing restarts one minute after the printer is not...

Page 98: ...n to the following handling precautions before installing the option The printer weighs about 20 kg 44 lb One person should never attempt to lift or carry it alone Two people should carry the printer lifting it from the positions shown below w Warning If you lift the printer incorrectly you could drop it and cause injury Installing the optional paper cassette unit 1 Turn the printer off and unplug...

Page 99: ...e unit out from its carton and place it where you intend to set up the printer Note The instructions below describe installing two optional paper cassette units as an example 3 Confirm the bundled items a optional paper cassette unit b fittings 4 Pull out the optional paper cassette Epson AcuLaser M7000 Series User s Guide Installing Options 99 ...

Page 100: ...5 Place the optional paper cassette units in advance Epson AcuLaser M7000 Series User s Guide Installing Options 100 ...

Page 101: ...tte units with the four fittings Install two of the four fittings inside on both sides of the optional paper cassette unit and the other two fittings outside on both sides Epson AcuLaser M7000 Series User s Guide Installing Options 101 ...

Page 102: ...ndard lower paper cassette 8 Be sure to lift the printer by the correct positions as shown below c Caution When moving the printer always keep it horizontal Epson AcuLaser M7000 Series User s Guide Installing Options 102 ...

Page 103: ... of the optional paper cassette units Then lower the printer until it rests securely on the optional paper cassette units Note The printer should be carried by at least two people holding the printer with their hands in the indicated positions Epson AcuLaser M7000 Series User s Guide Installing Options 103 ...

Page 104: ...10 Open the MP tray 11 Pull out the MP tray from the printer Epson AcuLaser M7000 Series User s Guide Installing Options 104 ...

Page 105: ... the printer to the optional paper cassette unit with the four fittings Install two of the four fittings on both sides of the inside of the printer Epson AcuLaser M7000 Series User s Guide Installing Options 105 ...

Page 106: ... cassettes 16 Insert all paper cassettes 17 Reconnect the interface cable and power cord and then turn the printer on To confirm that the option is installed correctly print a configuration status sheet See Printing a Configuration Status Sheet on page 147 Epson AcuLaser M7000 Series User s Guide Installing Options 106 ...

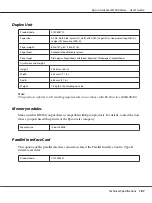
Page 107: ... the Duplex Unit see Duplex Unit on page 187 Installing the Duplex Unit 1 Turn the printer off and unplug the power cord and interface cable c Caution Make sure to unplug the power cord from the printer to prevent getting an electrical shock 2 Remove the upper and lower option covers and the duplex unit connector cover Epson AcuLaser M7000 Series User s Guide Installing Options 107 ...

Page 108: ...lace to prevent from losing it 3 Install the Duplex Unit as shown below Make sure that the hooks on the Duplex Unit hook onto the printer s tabs and the duplex connector goes into the slot 4 Secure the Duplex Unit with the two screws Epson AcuLaser M7000 Series User s Guide Installing Options 108 ...

Page 109: ... the printer off and unplug the power cord and interface cable 2 Loosen the two screws on the Duplex Unit 3 Press the unlock button to unlock the hooks then remove the Duplex Unit from the printer 4 Attach the duplex unit connector cover that was removed when installing the Duplex Unit 5 Attach the upper and lower option covers that were removed when installing the Duplex Unit Epson AcuLaser M7000...

Page 110: ... careful when working inside the printer as some components are sharp and may cause injury c Caution Before you install a memory module be sure to discharge any static electricity by touching a grounded piece of metal Otherwise you may damage static sensitive components 1 Turn the printer off and unplug the power cord and interface cable 2 Remove the right side cover by loosening the screw on the ...

Page 111: ...xpansionmemorymoduleintotheslottomatchthenotchonthememorymodulewith that of the slot Note Make sure to push both edges of the memory module until the button on the left side pops out Epson AcuLaser M7000 Series User s Guide Installing Options 111 ...

Page 112: ...terwillnot work 5 Reattach the right side cover to the printer as shown below 6 Tighten the screw on the back of the printer w Warning Tighten the screw firmly to prevent the printer s right side cover from the falling off when moving the printer 7 Reconnect the interface cable and power cord and turn the printer on Epson AcuLaser M7000 Series User s Guide Installing Options 112 ...

Page 113: ...nts Perform the installation procedure in reverse When removing a memory module from its slot press the clip and pull out the memory module Interface Card Your printer comes with an empty type B interface slot Various optional interface cards are available to expand your printer s interface options Installing an interface card c Caution Before you install the interface card be sure to discharge an...

Page 114: ...e You will need to reattach it if you remove the interface card later 3 Slide and push the interface card into the slot firmly then fasten the screw as shown below 4 Reconnect the interface cable and power cord and turn the printer on To confirm that the option is installed correctly print a configuration status sheet See Printing a Configuration Status Sheet on page 147 Epson AcuLaser M7000 Serie...

Page 115: ...interface card be sure to discharge any static electricity by touching a grounded piece of metal Otherwise you may damage static sensitive components Perform the installation procedure in reverse Epson AcuLaser M7000 Series User s Guide Installing Options 115 ...

Page 116: ...ter cover of the printer when you are replacing consumables Do not install used consumable products into the printer For details about the handling precautions see Handling the consumables on page 17 Replacement Messages If a consumable product reaches the end of its service life the printer displays the following message on the LCD panel or the window of EPSON Status Monitor LCD Panel Message Des...

Page 117: ...3 Reinstall the imaging cartridge If the printout is still faded replace the imaging cartridge Epson AcuLaser M7000 Series User s Guide Replacing Consumable Products 117 ...

Page 118: ...printer and clean it with a soft clean cloth moistened with a mild detergent c Caution Never use alcohol or paint thinner to clean the printer cover These chemicals can damage the components and the case Be careful not to get water onto the printer mechanism or any electrical components Epson AcuLaser M7000 Series User s Guide Cleaning and Transporting the Printer 118 ...

Page 119: ...Cleaning the pickup roller MP tray 1 Open the MP tray 2 Pull out the MP tray from the printer Epson AcuLaser M7000 Series User s Guide Cleaning and Transporting the Printer 119 ...

Page 120: ...y wipe the rubber parts of the pickup rollers with a well wrung wet cloth pickup roller 4 Insert the MP tray into the printer Epson AcuLaser M7000 Series User s Guide Cleaning and Transporting the Printer 120 ...

Page 121: ...5 Close the MP Tray Lower paper cassette 1 Pull out the lower paper cassette 2 Remove the tray cover Epson AcuLaser M7000 Series User s Guide Cleaning and Transporting the Printer 121 ...

Page 122: ... rubber parts of the pickup roller with a well wrung wet cloth pickup roller 4 Replace the tray cover 5 Insert the lower paper cassette Epson AcuLaser M7000 Series User s Guide Cleaning and Transporting the Printer 122 ...

Page 123: ... 1 Turn off the printer and remove the following items Power cord Interface cables Loaded paper Installed options Imaging cartridge 2 Attach the protective materials onto the printer then repack the printer in its original box c Caution When moving the printer always keep it horizontal For short distances Before you move the printer prepare the location where you are going to place it See the foll...

Page 124: ...ter and remove the following items Power cord Interface cables Loaded paper Installed options 2 Be sure to lift the printer by the correct positions as shown below c Caution When moving the printer always keep it horizontal Epson AcuLaser M7000 Series User s Guide Cleaning and Transporting the Printer 124 ...

Page 125: ... C3 A MP Tray All paper cassettes and Cover A on page 138 Clear paper jam and then reload DM For instructions on clearing this type of paper jam see Paper Jam DM Duplex Unit s cover on page 146 Precautions for clearing jammed paper Be sure to observe the following points when you clear jammed paper Do not remove jammed paper by force Torn paper can be difficult to remove and might cause other pape...

Page 126: ...hot If you must touch one of these areas wait 40 minutes to allow the heat to subside before doing so Do not insert your hand deep into the fuser unit as some components are sharp and may cause injury Paper Jam MP A MP tray or Cover A 1 Open the MP tray 2 If there is any jammed paper remove it gently with both hands Be careful not to tear the jammed paper Epson AcuLaser M7000 Series User s Guide T...

Page 127: ...Note Pull out the MP tray from the printer and then make sure that there is no jammed paper at the back of the MP tray 3 Open cover A Epson AcuLaser M7000 Series User s Guide Troubleshooting 127 ...

Page 128: ...rtridge and pull it out Note Place the cartridge on a clean flat surface 5 If there is any jammed paper remove it gently with both hands Be careful not to tear the jammed paper Epson AcuLaser M7000 Series User s Guide Troubleshooting 128 ...

Page 129: ...medpapercannotberemovedeasily turntherollertotaketensionoffthepaper thenpull it straight out Turn the roller that is indicated in the illustration below Epson AcuLaser M7000 Series User s Guide Troubleshooting 129 ...

Page 130: ...6 Reinstall the imaging cartridge 7 Close cover A Epson AcuLaser M7000 Series User s Guide Troubleshooting 130 ...

Page 131: ...MP B A MP Tray Cover B or A 1 Open the MP tray 2 If there is any jammed paper remove it gently with both hands Be careful not to tear the jammed paper Epson AcuLaser M7000 Series User s Guide Troubleshooting 131 ...

Page 132: ...Note Pull out the MP tray from the printer and then make sure that there is no jammed paper at the back of the MP tray 3 Open cover B Epson AcuLaser M7000 Series User s Guide Troubleshooting 132 ...

Page 133: ...plex Unit s cover before opening cover B 4 Open the paper holder by pulling down the lever with a black star on it w Warning Be careful not to touch the rollers in the fuser unit they may be very hot Epson AcuLaser M7000 Series User s Guide Troubleshooting 133 ...

Page 134: ...thepaperholder Becarefulnottotear the jammed paper 6 Close the paper holder and close cover B Note When the optional Duplex Unit is installed close the Duplex Unit s cover after closing cover B Epson AcuLaser M7000 Series User s Guide Troubleshooting 134 ...

Page 135: ...7 Open cover A 8 Hold the handle of the imaging cartridge and pull it out Note Place the cartridge on a clean flat surface Epson AcuLaser M7000 Series User s Guide Troubleshooting 135 ...

Page 136: ...Be careful not to tear the jammed paper Note Whenjammedpapercannotberemovedeasily turntherollertotaketensionoffthepaper thenpull it straight out Turn the roller that is indicated in the illustration below Epson AcuLaser M7000 Series User s Guide Troubleshooting 136 ...

Page 137: ...10 Reinstall the imaging cartridge 11 Close cover A Epson AcuLaser M7000 Series User s Guide Troubleshooting 137 ...

Page 138: ...ibes about standard lower paper cassette C1 as an example Use the same procedure for optional paper cassette C2 and C3 1 Open the MP tray 2 If there is any jammed paper remove it gently with both hands Be careful not to tear the jammed paper Epson AcuLaser M7000 Series User s Guide Troubleshooting 138 ...

Page 139: ...ke sure that there is no jammed paper at the back of the MP tray 3 Pull out the paper cassette from the printer 4 Remove the tray cover and discard any crumpled paper Then reattach the tray cover Epson AcuLaser M7000 Series User s Guide Troubleshooting 139 ...

Page 140: ...5 Gently remove the jammed paper with both hands Be careful not to tear the jammed paper 6 Open cover A Epson AcuLaser M7000 Series User s Guide Troubleshooting 140 ...

Page 141: ...rtridge and pull it out Note Place the cartridge on a clean flat surface 8 If there is any jammed paper remove it gently with both hands Be careful not to tear the jammed paper Epson AcuLaser M7000 Series User s Guide Troubleshooting 141 ...

Page 142: ...annotberemovedeasily turntherollertotaketensionoffthepaper thenpull it straight out Turn the roller that is indicated in the illustration below 9 Open the MP tray Epson AcuLaser M7000 Series User s Guide Troubleshooting 142 ...

Page 143: ...y from the printer 11 If there is any jammed paper remove it gently with both hands Be careful not to tear the jammed paper 12 Insert the MP tray into the printer Epson AcuLaser M7000 Series User s Guide Troubleshooting 143 ...

Page 144: ...13 Close the MP tray 14 Reinsert the paper cassette Epson AcuLaser M7000 Series User s Guide Troubleshooting 144 ...

Page 145: ...15 Reinstall the imaging cartridge 16 Close cover A Epson AcuLaser M7000 Series User s Guide Troubleshooting 145 ...

Page 146: ...cover 1 Press the unlock button to unlock the hooks Then open the Duplex Unit s cover 2 Gently remove the jammed paper inside the cover Be careful not to tear the paper Epson AcuLaser M7000 Series User s Guide Troubleshooting 146 ...

Page 147: ...er driver for Windows see Printing a configuration status sheet on page 165 Operational Problems The Ready light does not turn on Cause What to do The power cord may not be properly plugged into the electrical outlet Turn off the printer check the power cord connections between the printer and theelectrical outlet then turn the printer back on The electrical outlet may be controlled by an outside ...

Page 148: ...art Stop button once to switch the printer to ready status Make sure that the Ready light turns on Some error may have occurred Check the LCD panel to see if an error message appears Theprinterisinthepoweroffmode theWakeUp Sleep button blinks Press the Wake Up Sleep button to return the printer to ready status To not enter the power off mode set Power Off Timer to Off in Energy Saver Menu on the c...

Page 149: ...een updating information for the consumables is too long Press the Get Information Now button on the Consumable Info Settingsdialogbox Youcanalsochangetheintervalforupdating information about the consumables on the Consumable Info Settings dialog box Cannot install software or drivers Cause What to do You are not accessing the operating system with the administrator privilege Access the operating ...

Page 150: ...dditional driver for Windows XP x64 and Server 2003 x64 can beusedon Windows XP Service Pack 2 Windows 2003 Service Pack 1 or later Printout Problems The font cannot be printed Cause What to do For Windows users you may use the printer fonts substituted for specified TrueType fonts In the printer driver choose the Print TrueType fonts as bitmap check box in the Extended Settings dialog box The sel...

Page 151: ... sure that you are using the correct page length and margin settings in your application The paper size setting may be incorrect Make sure the correct paper size is set in the Tray Menu on the control panel The MP Tray Size setting may be incorrect When loading paper for which the size is not specified with Auto setting specifythecorrectpapersizebythetraypapersizeswitch or on the MP Tray Size sett...

Page 152: ...ur printer If the surface of your paper is too rough printed characters may appear distorted or broken Smooth high quality copier paper is recommended for best results See Available paper types on page 181 for information on choosing paper The paper path inside the printer may be dusty Clean internal printer components by printing three pages with only one character per page The Density setting ma...

Page 153: ...er may be moist or damp Do not store paper in a humid or damp environment Be sure to use paper that is newly unwrapped The imaging cartridge may be near the end of its service life If the message on the LCD panel or in EPSON Status Monitor indicates that the imaging cartridge is near the end of its service life try the following procedure Remove the imaging cartridge gently rock it back and forth ...

Page 154: ...htertheprintout Do not store paper in a humid or damp environment You may not be using the correct type of paper for your printer If the surface of your paper is too rough printed characters may appear distorted or broken Smooth high quality copier paper is recommended for best results See Available paper types on page 181 for information on choosing paper Completely blank pages are output Cause W...

Page 155: ... your paper in a humid or damp environment The Toner Save mode may be on Turn off the Toner Save mode using the printer driver or the printer s control panel menus For Windows users on the Basic Settings tab in the printer driver click Advanced and select the More Settings button Then deselect the Toner Save check box The imaging cartridge may be near the end of its service life If the message on ...

Page 156: ...int quality temporarily in the printer driver If RAM Disk is set to Maximum or Normal on the control panel you canincreasetheavailablememoryspacebychangingthissetting to Off Memory Problems Insufficient memory for current task Cause What to do The printer has insufficient memory for current task Reduce the contents of print jobs or increase the available memory on your printer You can increase the...

Page 157: ...ication There may be no paper in the paper source Load paper into the selected paper source Thesizeofloadedpaperdiffersfromthecontrolpanelor printer driver settings Make sure that the correct paper size and paper source are set in the control panel or printer driver Too many sheets may be loaded in the MP tray or paper cassettes Make sure that you have not tried to load too many sheets of paper Fo...

Page 158: ...it on page 98 for instructions on installing an optional paper cassette unit The paper source setting may not be correct Make sure you have selected the proper paper source in your application There may be no paper in the paper cassette Load paper into the selected paper source Too many sheets may be loaded in the paper cassette Make sure that you have not tried to load too many sheets of paper Fo...

Page 159: ... you should connect the printer directly to the computer s USB port If you must use multiple USB hubs we recommend that you connect the printer to the first tier hub Windows operating system Yourcomputermusthaveoneoftheoperatingsystemssupportedbythisprinterpre installed orbea model upgraded from Windows XP Vista Server 2003 or Server 2008 to an operating system supported by this printer You must n...

Page 160: ...re has been installed correctly Note For Windows Vista Vista x64 XP XP x64 Server 2003 or Server 2003 x64 if the software installation dialog box appears during the installation process click Continue Anyway If you click STOP Installation you will have to install the printer software again Status and Error Messages You can see the printer s status and error messages on the LCD panel For more infor...

Page 161: ...e you are using to PS3 SettheemulationmodethroughtheSelecTypeEmulation Menu on the printer See Emulation Menu on page 61 The printer does not print Cause What to do An incorrect printer driver is selected Make sure that the PostScript printer driver that you are using to print is selected TheEmulation Menu in the printer s Control Panel is set to a mode other than Auto or PS3 for the interface tha...

Page 162: ...rface that you are using then try reinstalling the printer fonts again The edges of texts and or images are not smooth Cause What to do The Print Quality is set to Fast Change the Print Quality setting to Fine The printer does not have sufficient memory Increase the printer memory The printer does not print normally via the USB interface Cause What to do For Windows users only The Data Format sett...

Page 163: ...og box is set to Yes Make sure that both the Send CTRL D Before Each Job and Send CTRL D After Each Job settings are set to No For Windows users only The print data is too large ClickAdvancedonthePostScriptsheetoftheprinter sProperties then change the Data Format setting from ASCII data default to TBCP Tagged binary communications protocol WhentheBinarysettingissettoOn TBCPisnotavailable Usethe Bi...

Page 164: ...ly from any application programs and from your Windows operating system The printer settings made from any Windows applications override the setting made from the operating system From the application Click Print Print Setup or Page Setup from the File menu As necessary click Setup Options Properties or a combination of these buttons Windows 7 users Click the start button select Devices and Printe...

Page 165: ...er driver can update the installed option information automatically if Update the Printer Option Info Automatically is selected 1 Access the printer driver 2 Click the Optional Settings tab then select Update the Printer Option Info Automatically Displaying consumable product information The remaining service life of the consumable products is displayed on the Basic Settings tab Note This function...

Page 166: ...1 Make sure that the printer is off and that Windows is running on your computer 2 Insert the Software Disc in the CD DVD drive Note IftheEpsonInstallNaviscreendoesnotappearautomatically click Start thenclickComputer for Windows 7 Vista or Server 2008 or click the MyComputer icon on the desktop for Windows XP or Server 2003 Right click the CD ROM icon click Open in the menu that appears then doubl...

Page 167: ...e dialog box also appears by clicking the OrderOnline button on the Basic Settings tab in the printer driver About You can obtain information about EPSON Status Monitor such as product versions or interface versions Simple Status You can check printer status errors and warnings Detailed Status You can monitor detailed printer status When a problem occurs the most probable solution is displayed See...

Page 168: ...e computer You can also access any of the menus by clicking the appropriate tab on each information window Note for Windows XP users EPSON Status Monitor is not available when printing from a Remote Desktop connection Detailed Status Replacement Parts Information a Paper Displaysthepapersize the papertypeandtheapproximateamountof paperremainingin the paper source Epson AcuLaser M7000 Series User s...

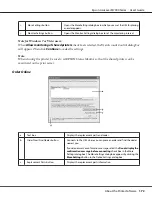
Page 169: ...nformation a Job Name Displays the user s print job names Other user s print jobs are displayed as b Status Waiting Indicates the print job is waiting to be printed Spooling Indicates the print job is being spooled on your computer Deleting Indicates the print job is being deleted Printing Indicates the print job is printed currently Completed Indicates the print job have finished Canceled Indicat...

Page 170: ...r 2008 x64 Server 2003 or Server 2003 x64 LPR connection with Windows Vista Vista x64 XP or XP x64 clients When using the shared Windows Vista Vista x64 Server 2008 Server 2008 x64 Server 2003 or Server 2003 x64 Standard TCP IP connection with Windows Vista Vista x64 XP or XP x64 When using the shared Windows Vista Vista x64 Server 2008 Server 2008 x64 Server 2003 or Server 2003 x64 EpsonNet Print...

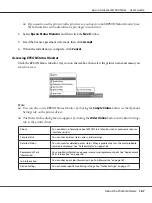
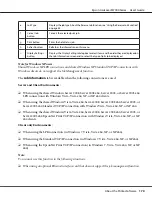
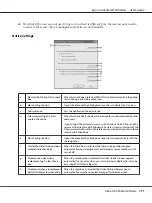
Page 171: ... itcommunicateswiththe OScommunicationfunction Thereforeyoucanmonitortheprinterwithout selecting this check box e More Settings button Opens the More Settings dialog box to set how to communicate with the shared printer f DisplaytheOrderOnlinewindow automatically check box When this check box is selected the Order Online window appears automatically when a replacement part becomes low or reaches e...

Page 172: ...s Monitor so that the shared printer can be monitored on the print server Order Online a Text box Displays the replacement parts and codes b Order Now Find Dealer button Connects to the URL where you can place an order and find the dealer nearest you Ifyoudonotwantaconfirmationmessage selecttheDonotdisplaythe confirmation message before connecting check box in the More Settingsdialogbox TheMoreSet...

Page 173: ...re that you want to uninstall and then click the item below Uninstall Change for Windows 7 Vista Server 2008 Change Remove for Windows XP Server 2003 Note You can uninstall EPSON Network Utility by selecting EPSON Status Monitor from the menu If you monitor more than one printer on the network using EPSON Status Monitor and if you uninstall EPSON Network Utility you cannot display any printer stat...

Page 174: ...ta Using the PostScript printer driver with Windows ToprintinthePostScriptmode youwillhavetoinstalltheprinterdriver Seetheappropriatesections below for installation instructions according to the interface that you are using to print Installing the PostScript printer driver for the USB interface or the parallel interface c Caution Never use EPSON Status Monitor and PostScript 3 driver at the same t...

Page 175: ...r Wizard appears Then click Next 5 Select Local printer then click Next Note Do not select the Automatically detect and install my Plug and Play printer check box 6 If the printer is connected to a USB interface select USB then click Next or if the printer is connected to a parallel interface select LPT1 then click Next 7 ClickHaveDiskandspecifythefollowingpathfortheSoftwareDisc IfyourCD DVDdrivei...

Page 176: ...d appears Then click Next 4 Select Local printer then click Next Note Do not select the Automatically detect and install my Plug and Play printer check box 5 Select the CreateanewportcheckboxandselectStandardTCP IPPortfromthedrop down list Click Next 6 Click Next 7 Specify the IP address and port name then click Next 8 Click Finish 9 ClickHaveDiskintheAddPrinterWizardandspecifythefollowingpathfort...

Page 177: ... PrinterSetupUtility for Mac OS X 10 4 is not open 1 Insert the printer Software Disc into your CD DVD drive 2 Double click the CD ROM icon 3 Double click Adobe PS then double click PS Installer 4 TheInstallEPSONPostScriptSoftwarescreenappears clickContinue thenfollowtheon screen instructions 5 Easy Install is displayed on the screen Click Install Note For Mac OS X 10 4 if the Authenticate window ...

Page 178: ...w appears 2 Click Add in the Printer List window 3 Select the protocol or the interface that you are using from the pop up list Note for AppleTalk users Make sure to select AppleTalk Do not select EPSONAppleTalk because it cannot be used with the PostScript 3 printer driver Note for IP Printing users Make sure to select IPPrinting Do not select EPSONTCP IP because it cannot be used with the PostSc...

Page 179: ...r driver on page 177 5 Click Add Note for IP Printing users USB or Bonjour users Select your printer from the Printer list then select Show Info from the Printers menu The Printer Info dialog box appears Select Installable Options from the pop up list then make the necessary settings 6 Confirmthatyourprinter snameisaddedtothePrinterList ThenquitPrint Fax forMacOSX 10 5 or later or Printer Setup Ut...

Page 180: ...ac OS X 10 4 Using the PCL6 printer driver To print in the PCL mode you will have to install the printer driver Consult the customer support in your region regarding how to get the printer driver and system requirements such as the versions of supported operating systems Epson AcuLaser M7000 Series User s Guide About the Printer Software 180 ...

Page 181: ...tween labels Epson Color Laser Transparencies Transparencies for color laser printers or copiers Thick paper Weight 91 to 157 g m2 Extra thick paper Weight 158 to 216 g m2 Colored paper Non coated Paper with letterhead Paper and ink of letterheads must be compatible with laser printers Userecycledpaperonlyundernormaltemperatureandhumidityconditions Poorqualitypapermayreduceprintquality or cause pa...

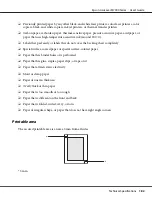
Page 182: ...ial surface coated paper or special surface colored paper Paper that has binder holes or is perforated Paper that has glue staples paper clips or tape on it Paper that attracts static electricity Moist or damp paper Paper of uneven thickness Overly thick or thin paper Paper that is too smooth or too rough Paper that is different on the front and back Paper that is folded curled wavy or torn Paper ...

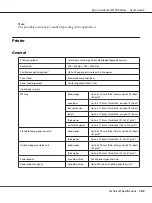
Page 183: ...o a 17 5 mm thick stack or up to 75 sheets labels Up to a 17 5 mm thick stack or up to 75 sheets thick paper Up to a 17 5 mm thick stack 91 to 157 g m2 extra thick paper Up to a 17 5 mm thick stack 158 to 216 g m2 Standard lower paper cassette plain paper Up to a 27 6 mm thick stack or up to 230 sheets 80 g m2 thick paper Up to a 27 6 mm thick stack 91 to 157 g m2 Optional paper cassette unit plai...

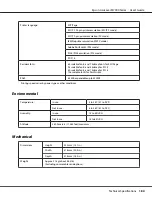
Page 184: ...itmap for PCL6 136 scalable fonts for PostScript3 RAM 64 MB expandable up to 320 MB Printing speed varies by paper type or other conditions Environmental Temperature In use 5 to 35 C 41 to 95 F Not in use 5 to 35 C 41 to 95 F Humidity In use 15 to 85 RH Not in use 15 to 85 RH Altitude 3 500 meters 11 483 feet maximum Mechanical Dimensions Height 333 mm 13 1 in Width 518 mm 20 4 in Depth 415 mm 16 ...

Page 185: ... Values represent power consumption while all operations are completely suspended Power consumption varies depending on operating conditions and whether a type B interface card is installed or a USB memory is inserted Standard and approvals European model Low Voltage Directive 2006 95 EC EN 60950 1 EN 60825 1 EMC Directive 2004 108 EC EN 55022 Class B EN 55024 EN 61000 3 2 EN 61000 3 3 Interfaces ...

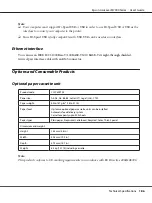
Page 186: ...assette unit Product code C12C802702 Paper size A3 A4 A5 B4 B5 Letter LT Legal LGL CTM Paper weight 60 to 157 g m2 16 to 41 lb Paper feed Up to two optional paper cassette units can be installed Automatic feed delivery system Cassette capacity up to 500 sheets Paper types Plain paper Preprinted Letterhead Recycled Color Thick Special Dimensions and weight Height 143 mm 5 6 in Width 505 mm 19 9 in ...

Page 187: ...8 5 mm 2 7 in Weight 1 8 kg 4 0 lb including cassette Note This product conforms to CE marking requirements in accordance with EC Directive 2004 108 EC Memory modules Make sure that DIMM you purchase is compatible with Epson products For details contact the store where you purchased this printer or the Epson sales company Memory size 128 or 256 MB Parallel Interface Card This option enables parall...

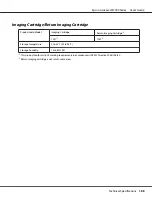
Page 188: ... 2 1221 1 1222 1 Storage temperature 0 to 35 C 32 to 95 F Storage humidity 15 to 80 RH 1 This product conforms to CE marking requirements in accordance with EMC Directive 2004 108 EC 2 Return imaging cartridge is not sold in some areas Epson AcuLaser M7000 Series User s Guide Technical Specifications 188 ...

Page 189: ...ollowing information Product serial number The serial number label is usually on the back of the product Product model Product software version Click About Version Info or similar button in the product software Brand and model of your computer Your computer operating system name and version Names and versions of the software applications you normally use with your product Help for Users in Europe ...

Page 190: ... information support and services are World Wide Web http www epson co th Information on product specifications drivers for download Frequently Asked Questions FAQ and e mail are available Epson Hotline Phone 66 2685 9899 Our Hotline team can help you with the following over the phone Sales enquiries and product information Product usage questions or problems Enquiries on repair service and warran...

Page 191: ...nical support Phone 62 21 572 4350 Fax 62 21 572 4357 Epson Service Center Jakarta Mangga Dua Mall 3rd floor No 3A B Jl Arteri Mangga Dua Jakarta Phone Fax 62 21 62301104 Bandung Lippo Center 8th floor Jl Gatot Subroto No 2 Bandung Phone Fax 62 22 7303766 Surabaya Hitech Mall lt IIB No 12 Jl Kusuma Bangsa 116 118 Surabaya Phone 62 31 5355035 Fax 62 31 5477837 Yogyakarta Hotel Natour Garuda Jl Mali...

Page 192: ...me Page Epson Hong Kong has established a local home page in both Chinese and English on the Internet to provide users with the following information Product information Answers to Frequently Asked Questions FAQs Latest versions of Epson product drivers Users can access our World Wide Web home page at http www epson com hk Technical Support Hotline You can also contact our technical staff at the f...

Page 193: ...8388 399 Epson Helpdesk Sales enquiries and product information Infoline Phone 603 56288222 Enquiries on repair services warranty product usage and technical support Techline Phone 603 56288333 Help for Users in India Contacts for information support and services are World Wide Web http www epson co in Information on product specifications drivers for download and products enquiry are available Ep...

Page 194: ...9 26407176 77 079 26407347 Helpline For Service Product info or to order a cartridge 18004250011 9AM 9PM This is a Toll free number For Service CDMA Mobile Users 3900 1600 9AM 6PM Prefix local STD code Help for Users in the Philippines Toobtaintechnicalsupportaswellasotheraftersalesservices usersarewelcometocontacttheEpson Philippines Corporation at the telephone and fax numbers and e mail address...

Page 195: ...ons FAQ and E mail Enquiries are available Toll Free No 1800 1069 EPSON 37766 Our Hotline team can help you with the following over the phone Sales enquiries and product information Product usage questions or problems Enquiries on repair service and warranty Epson AcuLaser M7000 Series User s Guide Where To Get Help 195 ...

Page 196: ...network 72 panel settings 56 parallel 69 password config 81 PCL 72 printing 62 PS3 74 quick print job 69 93 reserve job data 93 reset 68 setup 64 system information 60 tray 60 USB 71 D Duplex printing 44 Duplex Unit how to install 107 how to remove 109 specifications 187 E Emulation menu 61 Energy Saver menu 82 EPSON Status Monitor Accessing EPSON Status Monitor Windows 167 Installing EPSON Status...

Page 197: ...stall 113 how to remove 115 Interfaces ethernet 186 USB 185 Interrupting printing 97 M Maintenance printer 118 Printer pickup roller 119 Memory module how to install 110 how to remove 113 specifications 187 MP tray Specifications 26 Supported paper 26 N Network menu 72 O Optional paper cassette unit how to install 98 how to remove 107 specifications 186 Options specifications duplex unit 187 speci...

Page 198: ... the printer driver Windows 164 Uninstalling the Printer software Windows 173 Printer driver settings Creating an overlay Windows 50 Dot Correction 44 Duplex printing 44 Making a new watermark 48 Making Extended settings Windows 165 Making Optional settings Windows 165 print layout 45 Print Text In Black 44 Printing the copy protected document 52 Printing with an overlay 51 Re Print Job 55 Reserve...

Page 199: ...l problems 147 options 158 paper handling problems 157 PostScript 3 mode 160 print quality problems 152 printout problems 150 USB problems 159 U Unavailable paper 181 USB 185 USB menu 71 W Watermark how to make 48 how to use 47 Epson AcuLaser M7000 Series User s Guide Index 199 ...

Reviews: