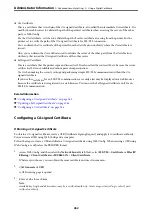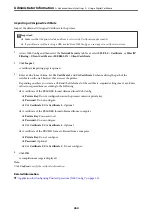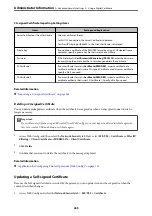
background image

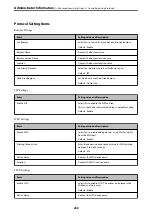
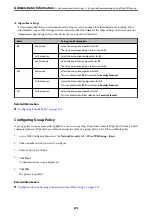
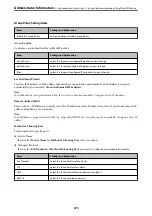
Protocol Setting Items

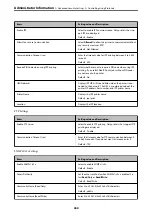
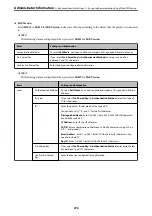
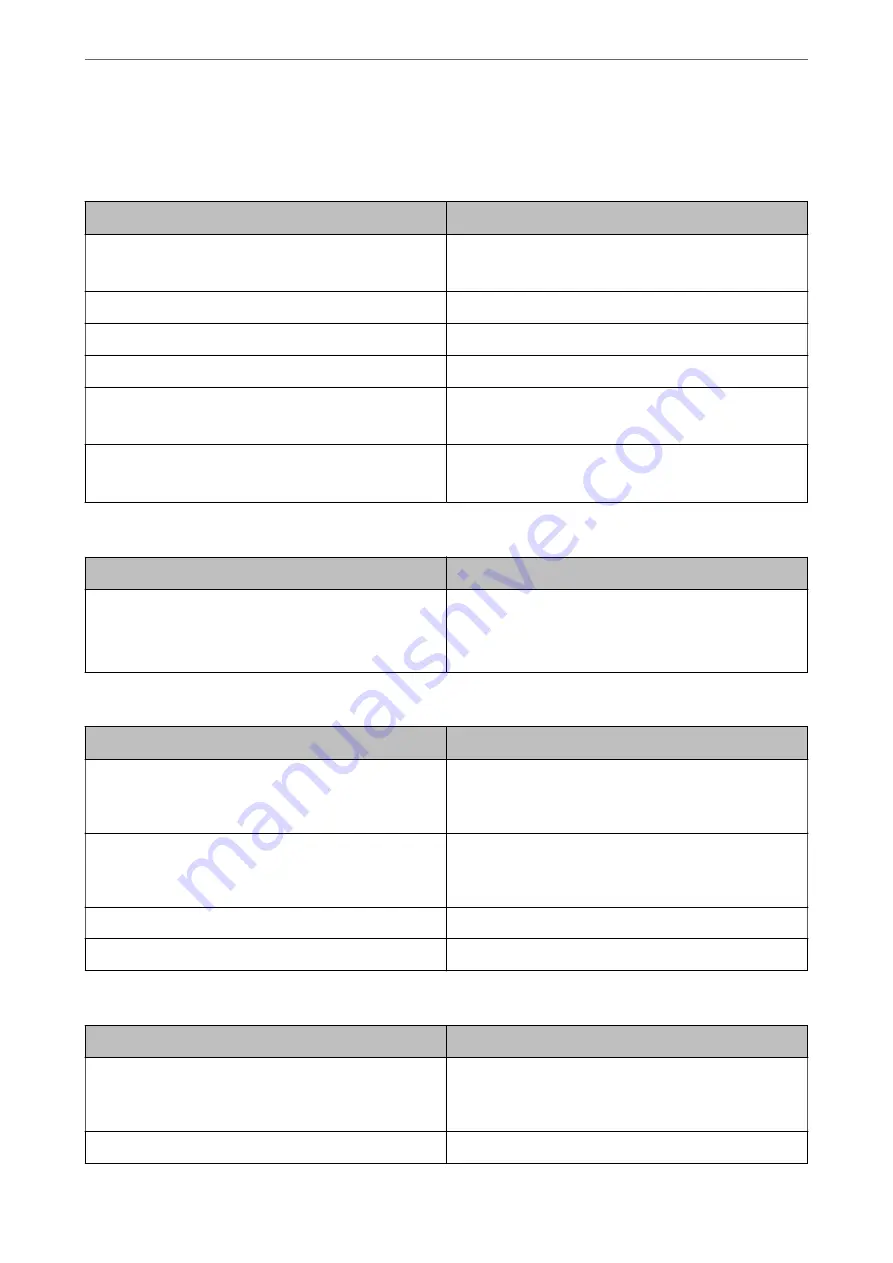
Bonjour Settings

Items

Setting value and Description

Use Bonjour

Select this to search for or use devices through Bonjour.

Default : Enable

Bonjour Name

Displays the Bonjour name.

Bonjour Service Name

Displays the Bonjour service name.

Location

Displays the Bonjour location name.

Top Priority Protocol

Select the top priority protocol for Bonjour print.

Default : IPP

Wide-Area Bonjour

Set whether to use Wide-Area Bonjour.

Default : Do Not Use

SLP Settings

Items

Setting value and Description

Enable SLP

Select this to enable the SLP function.

This is used such as network searching in EpsonNet Config.

Default : Enable

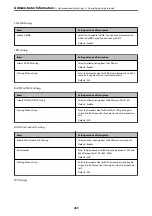
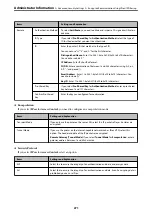
WSD Settings

Items

Setting value and Description

Enable WSD

Select this to enable adding devices using WSD, and print
from the WSD port.

Default : Enable

Printing Timeout (sec)

Enter the communication timeout value for WSD printing
between 3 to 3,600 seconds.

Default : 300

Device Name

Displays the WSD device name.

Location

Displays the WSD location name.

LLTD Settings

Items

Setting value and Description

Enable LLTD

Select this to enable LLTD. The printer is displayed in the
Windows network map.

Default : Enable

Device Name

Displays the LLTD device name.

Administrator Information

>

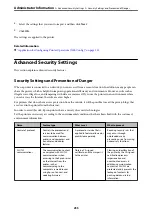
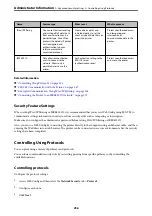
Advanced Security Settings

>

Controlling Using Protocols

258

Summary of Contents for AL-M7150DN

Page 1: ...User s Guide Printing Maintaining the Printer Solving Problems NPD6595 02 EN ...

Page 2: ...ting Printing Documents 36 Printing from a Computer Windows 36 Printing a Document Using the PostScript Printer Driver Windows 62 Printing from a Computer Mac OS 67 Printing from the PostScript Printer Driver on Mac OS 80 Printing Documents from Smart Devices iOS 84 Printing Documents from Smart Devices Android 85 Printing on Envelopes 86 Printing on Envelopes from a Computer Windows 86 Printing o...

Page 3: ...n Status from the Control Panel 138 Printing a Network Connection Report 138 Printing a Network Status Sheet 142 Checking the Network of the Computer Windows only 142 Using Optional Items List of Optional Items 145 Precautions when Installing Optional Items 147 Checking the Installed Optional Items 147 Printer Stand 148 Installing the Printer Stand to the Paper Cassette Unit 148 Moving the Printer...

Page 4: ...on the Network Epson Device Admin 223 Connecting the Printer to the Network 223 Before Making Network Connection 223 Connecting to the Network from the Control Panel 225 Settings to Use the Printer 227 Using the Print Functions 227 Setting Up AirPrint 235 Configuring a Mail Server 235 Making Basic Operation Settings for the Printer 238 Problems when Making Settings 241 Managing the Printer 243 Int...

Page 5: ...Guide to This Manual Introduction to the Manuals 6 Searching for Information 6 Printing Only the Pages You Need 7 About This Manual 7 Trademarks 9 Copyright 10 ...

Page 6: ...upport website at http support epson net Digital manual To view the Web manual visit the following website enter the product name and then go to Support http epson sn Searching for Information The PDF manual allows you to search for information you are looking for by keyword or jump directly to specific sections using the bookmarks This section explains how to use a PDF manual that has been opened...

Page 7: ...the end page Example 20 25 To specify pages that are not in series divide the pages with commas Example 5 10 15 About This Manual This section explains the meaning of marks and symbols notes on descriptions and operating system reference information used in this manual Marks and Symbols Warning Instructions that must be followed carefully to avoid serious bodily injury Caution Instructions that mu...

Page 8: ...r 2019 Windows Server 2016 Windows Server 2012 R2 Windows Server 2012 Windows Server 2008 R2 Windows Server 2008 Windows Server 2003 R2 and Windows Server 2003 refer to the following operating systems Additionally Windows is used to refer to all versions Microsoft Windows 10 operating system Microsoft Windows 8 1 operating system Microsoft Windows 8 operating system Microsoft Windows 7 operating s...

Page 9: ...ertain jurisdictions ITC Avant Garde Gothic ITC Bookman Lubalin Graph Mona Lisa ITC Symbol Zapf Chancery and Zapf Dingbats are trademarks of International Typeface Corporation registered in the U S Patent and Trademark Office and may be registered in certain other jurisdictions Clarendon Eurostile and New Century Schoolbook are trademarks of Linotype GmbH registered in the U S Patent and Trademark...

Page 10: ...ormation as applied to other products Neither Seiko Epson Corporation nor its affiliates shall be liable to the purchaser of this product or third parties for damages losses costs or expenses incurred by the purchaser or third parties as a result of accident misuse or abuse of this product or unauthorized modifications repairs or alterations to this product or excluding the U S failure to strictly...

Page 11: ...Important Instructions Important Safety Instructions 12 Safety Information 18 Protecting Your Personal Information 19 ...

Page 12: ...hat comes with this product Use of another cord may result in fire or electric shock This product s power cord is for use with this product only Use with other equipment may result in fire or electric shock If damage occurs to the plug replace the cord set or consult a qualified electrician If there are fuses in the plug make sure you replace them with fuses of the correct size and rating Use a gr...

Page 13: ...r requirements are indicated on a label attached to the printer If you are not sure of the power supply specifications in your area contact your local power company or consult your dealer If you use an extension cord make sure that the total of the ampere ratings on the products plugged into the extension cord does not exceed the extension cord ampere rating When connecting this product to a compu...

Page 14: ...ject to direct sunlight excessive heat moisture oil vapor or dust Avoid locations that are subject to the air coming directly from an air conditioner Do not place the printer on an unstable surface Slots and openings in the cabinet and the back or bottom are provided for ventilation Do not block or cover them Do not put the printer on a bed sofa rug or other similar surface or in a built in instal...

Page 15: ...surrounding areas may be very hot If you must touch one of these areas wait 40 minutes to allow the heat to subside before doing so Do not touch the Sharp edges Be careful of the sharp edges Do not touch the sharp edges It may hurt your fingers etc Be careful not to touch the fuser unit which is marked with a caution label or the surrounding areas If the printer has been in use the fuser unit and ...

Page 16: ...h these edges Be careful not to touch the fuser unit cover which is marked with a caution label or the surrounding areas If the printer has been in use the fuser unit cover and the surrounding areas may be very hot If you must touch one of these areas turn off the printer and wait for at least 40 minutes to allow the heat to disperse before doing so Important Instructions Important Safety Instruct...

Page 17: ...Do not leave jammed paper inside the printer This can cause the printer to overheat Never spill liquid of any kind on the printer Adjust only those controls that are covered by the operating instructions Improper adjustment of other controls may result in damage and may require repair by a qualified service representative Do not turn off the printer After turning on the printer wait until the home...

Page 18: ...cause a fire or explosion if they come into contact with a spark do not use a vacuum cleaner Wait at least one hour before using a toner cartridge after moving it from a cool to a warm environment to prevent damage from condensation To get the best print quality do not store the toner cartridge in an area subject to direct sunlight dust salty air or corrosive gases such as ammonia Avoid locations ...

Page 19: ...ns Use of multiple laser printers in a confined area Operation in conditions of extremely low humidity Poor room ventilation Long continuous printing together with any of the above Printer Location The printer should be located so that the exhaust gases and heat generated are Not blown directly into the user s face Vented directly out of the building whenever possible Protecting Your Personal Info...

Page 20: ...Part Names and Functions Front 21 Inside 22 Rear 23 ...

Page 21: ... C2 C3 C4 C5 Optional paper cassette units Loads paper Cassette 5 is only available for theAL M8250DN AL M8150DN F Printer stand Optional printer stand The stand has casters allowing you to easily move the printer G Paper tray MP Loads all paper types supported by the printer H Paper support Supports loaded paper I Output tray Holds the ejected paper Optional item See the Related Information below...

Page 22: ...r Pull toward you to replace the toner cartridge C Toner cartridge Contains the toner for printing A Printer cover A Open when replacing toner cartridge B Front cover F Open when pulling out the development unit to remove jammed paper Part Names and Functions Inside 22 ...

Page 23: ...hen replacing the waste toner collector B Waste toner collector Collects toner wasted during printing Rear A Vent Releases heat from the inside of the printer There are also vents on the lateral sides of the printer Do not cover the vents when placing the printer Part Names and Functions Rear 23 ...

Page 24: ...erface slot Insert an optional interface card Only for theAL M8250DN AL M8150DN B USB port Connects a USB cable to connect with a computer C Service USB port USB port for future use Do not remove the cap D LAN port Connects a LAN cable E AC inlet Connects the power cord Part Names and Functions Rear 24 ...

Page 25: ...Guide to the Control Panel Control Panel 26 Home Screen Configuration 27 Menu Screen Configuration 28 Entering Characters 28 Viewing Animations 29 ...

Page 26: ...per size and paper type settings for each paper source D Returns to the previous screen E Flashes or turns on when an error occurs F Flashes when the printer is processing data It turns on when there are queued jobs G Applies to a variety of functions depending on the situation H Move the focus using the l u r d buttons to select the items and then press the OK button to confirm your selection or ...

Page 27: ...ions or the solutions to problems E Enters the printer into sleep mode When the icon is grayed out the printer cannot enter sleep mode F Displays each menu Print From Internal Memory Allows you to temporarily save jobs sent from the printer driver to the printer s memory before printing You can print a password protected job and test prints when printing multiple copies Settings Allows you to make...

Page 28: ...buttons are displayed Entering Characters You can enter characters and symbols by using on screen keyboard when you make network settings and so on A Indicates the character count B Moves the cursor to the input position C Switches between upper case and lower case Guide to the Control Panel Entering Characters 28 ...

Page 29: ...ght when the cursor is at the start of the line and there are no characters to the left Viewing Animations You can view animations of operating instructions such as loading paper or removing jammed paper on the LCD screen Select Displays the help screen Select How To and select the items that you want to view Select How To at the bottom of the operation screen Displays the context sensitive animat...

Page 30: ...Loading Paper Paper Handling Precautions 31 Paper Size and Type Settings 32 Loading Paper 32 Paper Eject Setting 33 ...

Page 31: ...nvironment and printing method wrinkles may be noticeable We recommend performing a test print If you cannot feed envelopes correctly try reducing the number of envelopes and you may be able to feed them correctly If you cannot feed envelopes correctly even if the leading edge of the envelope is firmly inserted into the paper tray make sure the leading edge of the envelope is not curled down If it...

Page 32: ...er from the loaded paper select the item to change If the settings match the loaded paper close the screen Note You can also display the paper size and paper type settings screen by pressing the button on the control panel You cannot select the paper size if the paper size setting dial is not set to Loading Paper You can load paper by referring to the animations displayed on the printer s LCD scre...

Page 33: ...s When printing on paper other than standard paper be sure to specify the paper size in User Defined Size Windows Manage Custom Size Mac OS in the printer driver If you continue to print with a different paper size selected the fuser inside the printer may be damaged Note If the paper runs out during printing a buzzer will sound You can adjust the volume to High Medium Low or Off If Mute is set on...

Page 34: ... in Portrait or Landscape Alternately 1 Load A4 size paper horizontally in one of the paper sources and vertically in the other 2 If paper is loaded in the paper tray set the paper size orientation on the control panel Setting items Paper Size Setting values A4 A4 3 Select Collated in the printer driver and set the paper source to Auto Select Windows Main Paper Source Mac OS Print Settings Paper S...

Page 35: ...Printing Printing Documents 36 Printing on Envelopes 86 Printing Web Pages 87 Printing Using a Cloud Service 88 ...

Page 36: ...inting Using Easy Settings Note Operations may differ depending on the application See the application s help for details 1 Load paper in the printer Loading Paper on page 32 2 Open the file you want to print 3 Select Print or Print Setup from the File menu 4 Select your printer 5 Select Preferences or Properties to access the printer driver window Printing Printing Documents Printing from a Compu...

Page 37: ...nformation Available Paper and Capacities on page 176 Menu Options for the Printer Driver on page 37 Menu Options for the Printer Driver Open the print window in an application select the printer and then access the printer driver window Note Menus vary depending on the option you selected Main Tab Printing Presets Add Remove Presets You can add or remove your own presets for frequently used print...

Page 38: ...o reduce or enlarge the size of a document Fit to Page Automatically reduce or enlarge the document to fit to the paper size selected in Output Paper Zoom to Prints with a specific percentage Center Prints images in the center of the paper Paper Type Select the type of paper on which you print If you select Unspecified printing is performed from the paper source for which the paper type is set to ...

Page 39: ...per sizes which are supported to be fed in both portrait and landscape orientations If you select the face up as the output tray install the optional face up tray More Options Tab Printing Presets Add Remove Presets You can add or remove your own presets for frequently used print settings Select the preset you want to use from the list Show Settings Hide Settings Displays a list of items currently...

Page 40: ...rmarks Header Footer You can print information such as a user name and printing date in headers or footers Form Overlay Allows you to print a standard form or letterhead onto original documents Rotate 180 Rotates pages 180 degrees before printing Select this item when printing on paper such as envelopes that are loaded in fixed direction in the printer Maintenance Tab Print Status Sheets Print a s...

Page 41: ...ose the printer driver and then open it again Software Update Starts EPSON Software Updater to check for the latest version of applications on the Internet Technical Support If the manual is installed on your computer the manual is displayed If it is not installed you can connect to the Epson Web site to check the manual and available technical support Adding Printing Presets for Easy Printing If ...

Page 42: ...e paper Note If you do not use paper that is suitable for 2 sided printing the print quality may decline and paper jams may occur Paper for Automatic 2 Sided Printing on page 178 This needs to be installed if you want to check the printing status with EPSON Status Monitor You can download it from the Epson website http www epson com 1 On the printer driver s Main tab select 2 Sided Printing 2 Clic...

Page 43: ...download it from the Epson website http www epson com 1 On the printer driver s Main tab select the type of long edge binding you want to use from 2 Sided Printing 2 Click Settings select Booklet and then select Center Binding or Side Binding Center Binding Use this method when printing a small number of pages that can be stacked and easily folded in half Side Binding Use this method when printing...

Page 44: ...ver s Main tab select 2 Up 4 Up 6 Up 8 Up 9 Up or 16 Up as the Multi Page setting 2 Click Layout Order make the appropriate settings and then click OK 3 Set the other items on the Main and More Options tabs as necessary and then click OK Main Tab on page 37 More Options Tab on page 39 4 Click Print Related Information Loading Paper on page 32 Printing Using Easy Settings on page 36 Printing Printi...

Page 45: ...ut Paper Select the paper size you loaded in the printer Fit to Page is automatically selected Note Click Center to print the reduced image in the middle of the paper 2 Set the other items on the Main and More Options tabs as necessary and then click OK Main Tab on page 37 More Options Tab on page 39 3 Click Print Related Information Loading Paper on page 32 Printing Using Easy Settings on page 36...

Page 46: ...from the Output Paper setting 3 Select Zoom to and then enter a percentage If you have selected Same as Document Size as the Output Paper select Reduce Enlarge Document first 4 Set the other items on the Main and More Options tabs as necessary and then click OK Main Tab on page 37 More Options Tab on page 39 5 Click Print Related Information Loading Paper on page 32 Printing Using Easy Settings on...

Page 47: ...priate settings and then click OK Note Print Cutting Guides allows you to print a cutting guide 4 Set the other items on the Main and More Options tabs as necessary and then click OK Main Tab on page 37 More Options Tab on page 39 5 Click Print Related Information Loading Paper on page 32 Printing Using Easy Settings on page 36 Making Posters Using Overlapping Alignment Marks Here is an example of...

Page 48: ...s explanation they are shown as blue and red lines 1 Prepare Sheet 1 and Sheet 2 Cut off the margins of Sheet 1 along the vertical blue line through the center of the top and bottom cross marks Printing Printing Documents Printing from a Computer Windows 48 ...

Page 49: ...marks then temporarily tape the two sheets together from the back 3 Cut the taped sheets in two along the vertical red line through the alignment markers this time the line to the left of the cross marks Printing Printing Documents Printing from a Computer Windows 49 ...

Page 50: ...t steps 1 to 4 to tape Sheet 3 and Sheet 4 together 6 Cut off the margins of Sheet 1 and Sheet 2 along the horizontal blue line through the center of the left and right side cross marks Printing Printing Documents Printing from a Computer Windows 50 ...

Page 51: ...e the edge of Sheet 1 and Sheet 2 on top of Sheet 3 and Sheet 4 and align the cross marks and then temporarily tape them together from the back Printing Printing Documents Printing from a Computer Windows 51 ...

Page 52: ...heets in two along the horizontal red line through the alignment markers this time the line above the cross marks 9 Tape the sheets together from the back Printing Printing Documents Printing from a Computer Windows 52 ...

Page 53: ...der and Footer You can print information such as a user name and printing date in headers or footers 1 On the printer driver s More Options tab click Watermark Features and then select the Header Footer checkbox Printing Printing Documents Printing from a Computer Windows 53 ...

Page 54: ...nting an Anti Copy Pattern You can print an anti copy pattern on your printouts When printing the letters themselves are not printed and the entire print is screen toned lightly The hidden letters appear when photocopied to easily distinguish the original from the copies Anti Copy Pattern is available under the following conditions Quality Fine Note You can also add your own anti copy pattern 1 On...

Page 55: ... and then enter a password 2 Set the other items on the Main and More Options tabs as necessary and then click OK Main Tab on page 37 More Options Tab on page 39 3 Click Print 4 To print the job select Print From Internal Memory on the home screen of the printer s control panel Select the job you want to print and then enter the password Related Information Loading Paper on page 32 Printing Using ...

Page 56: ...bs as necessary and then click OK Main Tab on page 37 More Options Tab on page 39 4 Click Print Only one copy is printed and the print job is stored in the printer s memory The stored job is deleted when the printer is turned off 5 To print the job select Print From Internal Memory on the home screen of the printer s control panel 6 Select the job you want to print Select the User from the list an...

Page 57: ... Set the other items on the Main and More Options tabs as necessary and then click OK Main Tab on page 37 More Options Tab on page 39 4 Click Print 5 To print the job select Print From Internal Memory on the home screen of the printer s control panel 6 Select the job you want to print Select the User from the list and then select the job If you are asked to enter a password enter the one you set o...

Page 58: ...n the Job Arranger Lite window you can edit the page layout 5 Click Print from the File menu to start printing Note If you close the Job Arranger Lite window before adding all the print data to the Print Project the print job you are currently working on is canceled Click Save from the File menu to save the current job The extension of the saved files is ecl To open a Print Project click Job Arran...

Page 59: ...Information Loading Paper on page 32 Printing Using Easy Settings on page 36 Making Thick Lines Thinner When Printing If lines are too thick you can make them thinner when printing 1 On the printer driver s More Options tab click Image Options in the Tone Correction setting 2 Select None from Emphasize Thin Lines and then click OK 3 Set the other items on the Main and More Options tabs as necessar...

Page 60: ...aper on page 32 Printing Using Easy Settings on page 36 Printing Clear Bar Codes You can print a bar code clearly and make it easy to scan Only enable this feature if the bar code you printed cannot be scanned 1 On the printer driver s Maintenance tab click Extended Settings and then select Barcode mode 2 Set the other items on the Main and More Options tabs as necessary and then click OK Main Tab...

Page 61: ...rm data box select Overlay or Underlay in the Layering list then click OK 4 Click OK 5 Click Print to print the document with the form data Related Information Loading Paper on page 32 Printing Using Easy Settings on page 36 Creating an Overlay Note You first need to install EPSON FormOverlayUTL utility to create overlay or underlay data You can download the latest applications from the Epson webs...

Page 62: ...m data Note To change the settings of the overlay form data you created after doing steps 1 and 2 and the settings in the Basic Settings tab Form Overlay Create Overlay Data click the Edit Form Printing a Document Using the PostScript Printer Driver Windows A PostScript Printer Driver is a driver that outputs printing commands to a printer using a PostScript Page Description Language 1 Open the fi...

Page 63: ... for details 7 Click Print Related Information Available Paper and Capacities on page 176 Loading Paper on page 32 Paper Quality Tab on page 64 Layout Tab on page 65 Using an Optional Device with a PostScript Printer Driver You need to make settings in the PostScript printer driver to use optional devices Printing Printing Documents Printing a Document Using the PostScript Printer Driver Windows 6...

Page 64: ... Settings tab select the optional device in the Installable Options setting Windows XP Windows Server 2003 R2 Windows Server 2003 Click the start button and select Control Panel Printers and Other Hardware Printers and Faxes Right click on your printer and select Properties On the Device Settings tab select the optional device in the Installable Options setting Menu Options for the PostScript Prin...

Page 65: ...ges on one sheet or when creating a booklet Extended Settings Tab Job Settings If the printer usage has been restricted by the administrator printing is available after you register your account on the printer driver Contact the administrator for your user account Save Access Control settings Allows you to enter a user name and password User Name Enter a user name Password Enter a password Reserve...

Page 66: ...ential Job password User Name Enter a user name Job Name Enter a job name Advanced Options Paper Output Select the paper size and number of copies Paper Size Select the paper size on which you want to print Copy Count Set the number of copies you want to print Graphic Set the following menu items Print Quality Select the pint quality you want to use for printing Scaling Allows you to reduce or enl...

Page 67: ...r than the outline to save toner Use this feature when you are not concerned about gradation and print quality such as when checking the layout Density Set the strength of the density Output Direction Set the paper output direction according to the direction of the paper loaded in the paper feeder Rotate by 180º Rotates the data 180 degrees before printing Printing from a Computer Mac OS Printing ...

Page 68: ...ks 10 9 OS X Mountain Lion 10 8 the Epson printer driver has not been installed correctly Enable it from the following menu Select System Preferences from the Apple menu Printers Scanners or Print Scan Print Fax remove the printer and then add the printer again See the following to add a printer Adding the Printer for Mac OS Only on page 100 macOS Mojave 10 14 cannot access Print Settings in appli...

Page 69: ...ect the printer and then access the printer driver window Note Menus vary depending on the option you selected Menu Options for Layout Pages per Sheet Select the number of pages to be printed on one sheet Layout Direction Specify the order in which the pages will be printed Border Prints a border around the pages Reverse page orientation Rotates pages 180 degrees before printing Select this item w...

Page 70: ...s Paper Source Select the paper source from which the paper is fed Select Auto Select to automatically select the paper source selected in the print settings on the printer Media Type Select the type of paper on which you print If you select Unspecified printing is performed from the paper source for which the paper type is set to the following in the printer s settings Plain Letterhead Recycled C...

Page 71: ...r Options You can set the gamma and adjust brightness and contrast Menu Options for Anti Copy Pattern Settings You can print the documents to have hidden letters that appear when photocopied in order to distinguish the original from the copies Menu Options for Watermark Settings You can select a watermark such as the date or label a document as Confidential edit the layout and font and print Menu ...

Page 72: ...reset name you want to delete from the list and then delete it 4 Click Print The next time you want to print using the same settings select the registered preset name from the Presets Related Information Loading Paper on page 32 Printing Using Easy Settings on page 67 Printing on 2 Sides You can print on both sides of the paper Note If you do not use paper that is suitable for 2 sided printing the...

Page 73: ...t quality may decline and paper jams may occur Paper for Automatic 2 Sided Printing on page 178 1 Select Print Settings from the pop up menu 2 Select Booklet in 2 sided Printing 3 Set binding edge and click d to set booklet binding Center Binding Use this method when printing a small number of pages that can be stacked and easily folded in half Side Binding Use this method when printing one sheet ...

Page 74: ... of data on a single sheet of paper 1 Select Layout from the pop up menu 2 Set the number of pages in Pages per Sheet the Layout Direction page order and Border Menu Options for Layout on page 69 3 Set the other items as necessary 4 Click Print Related Information Loading Paper on page 32 Printing Using Easy Settings on page 67 Printing Printing Documents Printing from a Computer Mac OS 74 ...

Page 75: ... Paper Size setting 2 Select Paper Handling from the pop up menu 3 Select Scale to fit paper size 4 Select the paper size you loaded in the printer as the Destination Paper Size setting 5 Set the other items as necessary 6 Click Print Related Information Loading Paper on page 32 Printing Using Easy Settings on page 67 Printing Printing Documents Printing from a Computer Mac OS 75 ...

Page 76: ...Size enter percentage in Scale and then click OK Note Select the paper size you set in the application as the Paper Size setting 4 Set the other items as necessary 5 Click Print Related Information Loading Paper on page 32 Printing Using Easy Settings on page 67 Printing with a Header and Footer You can print information such as a user name and printing date in headers or footers 1 Select Header F...

Page 77: ...iginal from the copies Anti Copy Pattern is available under the following conditions Paper Type Plain Letterhead Recycled Color Preprinted Semi thick Thick paper1 Thick paper2 Thick paper3 Thin Paper Transparency Labels Postcard Envelope or Special Quality Fine Note You can also print your own anti copy pattern 1 Select Anti Copy Pattern Settings from the pop up menu and then select the type of an...

Page 78: ...nt the job select Print From Internal Memory on the home screen of the printer s control panel Select the job you want to print and then enter the password Related Information Loading Paper on page 32 Printing Using Easy Settings on page 67 Adjusting the Print Tone You can adjust the tone used in the print job These adjustments are not applied to the original data 1 Select Color Options from the p...

Page 79: ...u 2 Select Off from Emphasize Thin Lines 3 Set the other items as necessary 4 Click Print Related Information Loading Paper on page 32 Printing Using Easy Settings on page 67 Printing to Emphasize Thin Lines You can thicken thin lines that are too thin to print 1 Select Extension Settings from the pop up menu 2 Enable Emphasize Thin Lines 3 Set the other items as necessary 4 Click Print Printing P...

Page 80: ...ge 1 Open the file you want to print Load paper in the printer if it has not already been loaded 2 Select Print or Print Setup from the File menu If necessary click Show Details or d to expand the print window 3 Select your printer 4 Select Print Features from the pop up menu 5 Change the settings as necessary See the menu options for the printer driver for details 6 Click Print Printing Printing ...

Page 81: ...r and then access the printer driver window Note Menus vary depending on the option you selected Menu Options for Layout Pages per Sheet Select the number of pages to be printed on one sheet Layout Direction Specify the order in which the pages will be printed Border Prints a border around the pages Two Sided Allows you to perform 2 sided printing Reverse page orientation Rotates pages 180 degrees...

Page 82: ...ng the size of the document Menu Options for Paper Feed Select the paper source from which the paper is fed All Pages From Selecting Auto Select selects the paper source that matches the Paper Setting on the printer automatically First Page From Remaining From You can also select the paper source for page Menu Options for Cover Page Print Cover Page Select whether or not to print a cover page When...

Page 83: ...Tech You can use the Epson original contour correction RIT feature to print jagged lines such as oblique lines and curves smoothly This is more effective when printing large characters Density Set the strength of the density Output Output Tray Select which output tray to use for printouts If you select the face up tray as the output tray install the optional face up tray Output Direction Set the p...

Page 84: ...he home screen 5 Tap the location of the document you want to print 6 Select the document and then tap Next 7 Tap Print Printing Documents Using AirPrint AirPrint enables instant wireless printing from iPhone iPad iPod touch and Mac without the need to install drivers or download software Note If you disabled paper configuration messages on your printer control panel you cannot use AirPrint See th...

Page 85: ...rint on page 184 2 Connect your smart device to the same wireless network as your printer 3 Start Epson iPrint 4 Tap Print Documents on the home screen 5 Tap the location of the document you want to print 6 Select the document and then tap Next 7 Tap Print Printing Documents Using Epson Print Enabler You can wirelessly print your documents emails photos and web pages right from your Android phone ...

Page 86: ... printer 3 Connect your Android device to the same wireless network that your printer is using 4 Print from your device to your printer Note For more details access the Mopria Web site at https mopria org Related Information Loading Paper on page 32 Printing on Envelopes Printing on Envelopes from a Computer Windows 1 Load envelopes in the printer Loading Envelopes on page 33 2 Open the file you w...

Page 87: ...ting Web Pages Printing Web Pages from Smart Devices When the wireless router is connected to the same network as the printer you can operate the printer via the wireless router from your smart device Note Operations may differ depending on the device 1 If Epson iPrint is not installed install it Installing Epson iPrint on page 184 2 Connect your smart device to the same wireless network as your p...

Page 88: ...chments from remote locations such as your home or office printer Epson iPrint This Application is for iOS and Android and allows you to print or scan from a smartphone or tablet You can print documents images and web sites by sending them directly to a printer on the same network Remote Print Driver This is a shared driver supported by Remote Print Driver When printing using a printer in a remote...

Page 89: ... Web Service Settings Epson Connect Services Unregister to print the registration sheet 3 Follow the instructions on the registration sheet to register the printer Printing Printing Using a Cloud Service Registering to Epson Connect Service from the Control Panel 89 ...

Page 90: ...eaning the Paper Path when There are Paper Feeding Problems 91 Cleaning Inside the Printer 92 Cleaning the Printer 96 Installing or Uninstalling Applications Separately 96 Moving and Transporting the Printer 104 Checking the Printer Status Status Sheet Print 106 ...

Page 91: ...r except when instructed to do so in the printer s documentation Otherwise it may result in fire or electric shock Do not use any kind of combustible gases such as air dusters or dust sprays inside or around this product the printer Otherwise it may result in fire or explosion cImportant Do not use volatile chemicals such as benzine thinner or alcohol to clean the printer Otherwise the chemicals m...

Page 92: ...to close the animation screen Cleaning Inside the Printer The printer needs only minimal cleaning to keep it in good condition Caution Do not touch inside the printer except when instructed to do so in the printer s documentation Otherwise it may result in fire or electric shock Do not use any kind of combustible gases such as air dusters or dust sprays inside or around this product the printer Ot...

Page 93: ...t Do not use volatile chemicals such as benzine thinner or alcohol to clean the printer Otherwise the chemicals may damage the printer s components and the case Do not get the printer wet Do not clean the printer with a hard brash or a hard cloth Otherwise the printer may be damaged 1 Turn the printer off and unplug the power cord 2 Open the printer cover A then the front cover F Maintaining the P...

Page 94: ...y up to draw out the developer unit 4 Gently wipe the metallic roller inside with a soft and dry cloth to remove the grime and paper particles cImportant Do not touch the transfer roller which is black to avoid damaging it Maintaining the Printer Cleaning Inside the Printer 94 ...

Page 95: ...lose the front cover F then the printer cover A 7 Open the waste toner collector cover E and wipe the vent holes with a soft dry cloth to remove dust and dirt 8 Close the waste toner collector cover E Maintaining the Printer Cleaning Inside the Printer 95 ...

Page 96: ...chemicals may damage the printer s components and the case Do not get the printer wet Do not clean the printer with a hard brash or a hard cloth Otherwise the printer may be damaged Installing or Uninstalling Applications Separately Connect your computer to the network and install the latest version of applications from the website Log in to your computer as an administrator Enter the administrato...

Page 97: ...tion of the printer Note You can download the latest applications from the Epson website http www epson com If you use Windows Server operating systems you cannot use Epson Software Updater Download the latest applications from the Epson website Related Information Application for Updating Software and Firmware Epson Software Updater on page 185 Uninstalling Applications on page 100 Checking if a ...

Page 98: ...s folder and then click Run as administrator Server Properties Windows XP Windows Server 2003 R2 Windows Server 2003 From the File menu select Server Properties Click the Driver tab If your printer name is displayed in the list a genuine Epson printer driver is installed on your computer Related Information Installing the Applications Separately on page 96 Checking if a genuine Epson printer drive...

Page 99: ... from one of the following options Use the software disc supplied with the printer Insert the software disc into the computer access the following folder path and then run SETUP64 EXE or SETUP EXE Driver PostScript WINX64 or WINX86 SETUP SETUP64 EXE or SETUP EXE Download from the website Access your printer page from the following website download the PostScript printer driver and then run the exe...

Page 100: ...hen select the active connection method to confirm the printer s IP address Adding the Printer for Mac OS Only 1 Select System Preferences from the Apple menu Printers Scanners or Print Scan Print Fax 2 Click and then select Add Other Printer or Scanner 3 Select your printer and then select your printer from the Use 4 Click Add Note If your printer is not listed check that it is correctly connecte...

Page 101: ...y print jobs Delete or wait to be printed the jobs before uninstalling 6 Uninstall the applications Windows 10 Windows 8 1 Windows 8 Windows 7 Windows Vista Windows Server 2019 Windows Server 2016 Windows Server 2012 R2 Windows Server 2012 Windows Server 2008 R2 Windows Server 2008 Click Uninstall Change or Uninstall Windows XP Windows Server 2003 R2 Windows Server 2003 Click Change Remove or Remo...

Page 102: ...he printer and the computer are connected and the computer is connected to the internet 2 Start EPSON Software Updater and update the applications or the firmware cImportant Do not turn off the computer or the printer until the update is complete otherwise the printer may malfunction Note If you cannot find the application you want to update in the list you cannot update using the EPSON Software U...

Page 103: ...dating Firmware Using Web Config When the printer can connect to the Internet you can update the firmware from Web Config 1 Access Web Config and select the Device Management tab Firmware Update 2 Click Start and then follow the on screen instructions The firmware confirmation starts and the firmware information is displayed if the updated firmware exists Note You can also update the firmware usin...

Page 104: ... when placing the printer Do not touch the projections on the bottom of the printer that are for connecting an optional paper cassette When carrying the printer do not tilt it more than 10 degrees otherwise the printer may fall When you put the printer on a stand with casters make sure you lock the casters Otherwise the stand may move unexpectedly and cause an injury Transporting the Printer for S...

Page 105: ...nstalling the Face up Tray on page 157 Transporting the Printer When you need to transport the printer follow the steps below to pack it The printer should be packed in the same status as when it was purchased to prevent it from being subjected to vibrations or shocks 1 Turn off the printer by pressing the P button and then unplug the power cord 2 Remove all of the paper from the printer 3 Disconn...

Page 106: ...an check the settings and the status of the printer 1 Select Settings on the home screen To select an item use the u d l r buttons and then press the OK button 2 Select Printer Status Print Print Status Sheet Configuration Status Sheet 3 Check the message and then print the status sheet Maintaining the Printer Checking the Printer Status Status Sheet Print 106 ...

Page 107: ...Solving Problems Cannot Print 108 Paper Gets Jammed 123 A Message is Displayed on the LCD Screen 125 It is Time to Replace Consumables 126 Print Quality is Poor 128 Cannot Solve Problem 133 ...

Page 108: ...s Sheet Print on page 106 Is any paper jammed in the printer Solutions If paper is jammed in the printer it cannot start printing Remove the jammed paper from the printer Paper Gets Jammed on page 123 Has print data been sent correctly Solutions Make sure there is no print data standing by from a previous job Check the printer driver to make sure the printer is not offline The printer is pending o...

Page 109: ...XXXX is installed If a genuine Epson printer driver is not installed the available functions are limited We recommend using a genuine Epson printer driver If you are printing a large data size image the computer may run out of memory Print the image at a lower resolution or a smaller size If you are printing a large data size image the data may not be processed depending on the CPU or memory of th...

Page 110: ...tiple printer icons see the following to select the correct printer Example USB connection EPSON XXXX Series Network connection EPSON XXXX Series network If you install the printer driver multiple times copies of the printer driver may be created If copies such as EPSON XXXX Series copy 1 are created right click the copied driver icon and then click Remove Device The printer port is not set correc...

Page 111: ...er driver is not installed the available functions are limited We recommend using a genuine Epson printer driver If you are printing a large data size image the computer may run out of memory Print the image at a lower resolution or a smaller size If you are printing a large data size image the data may not be processed depending on the CPU or memory of the computer Try the following solutions Ins...

Page 112: ...The Printing Language setting needs to be changed Solutions Set the Printing Language setting to Auto or PS on the control panel Cannot Print Even Though a Connection has been Established iOS The following causes can be considered Paper Setup Auto Display is disabled Solutions Enable Paper Setup Auto Display in the following menu Settings General Settings Printer Settings Paper Source Settings Pap...

Page 113: ...a Network Connection The following issues could be causing the problem Note Even if your printer is only using a wired connection check the Wi Fi environment if your computer or smart device is connected to the network by Wi Fi The IP address is incorrectly assigned Solutions If the IP address assigned to the printer is 169 254 XXX XXX and the subnet mask is 255 255 0 0 the IP address may not be a...

Page 114: ...ar apart Solutions After moving the computer or the smart device closer to the wireless router turn off the wireless router and then turn it back on A privacy separator on the wireless router is available Solutions Most wireless routers have a separator function that blocks communication between devices within the same SSID If you cannot communicate between the printer and the computer or smart de...

Page 115: ... provided with the computer for details 3 Connect the computer and the printer with an Ethernet cable directly 4 On the printer print a network connection report Printing a Network Connection Report on page 138 5 Check the printer s IP address on the network connection report 6 On the computer access Web Config Launch a Web browser and then enter the printer s IP address Running Web Config on a We...

Page 116: ...cassette and optional paper cassette correctly Make sure that the edge guide is in the correct position After inserting the paper cassette select Settings Printer Status Print Print Status Sheet Configuration Status Sheet to print the configuration status sheet and then make sure that the paper cassette and paper size are recognized correctly The paper settings on the printer are incorrect Solutio...

Page 117: ...ed incorrectly Solutions Load paper in the correct direction and slide the edge guide against the edge of the paper Loading Paper on page 32 Too many sheets are loaded in the printer Solutions Do not load more than the maximum number of sheets specified for the paper Available Paper and Capacities on page 176 Paper cassette is not inserted correctly Solutions Insert the standard paper cassette and...

Page 118: ...n paper dust adheres to the roller Solutions Clean the roller Cleaning the Paper Path when There are Paper Feeding Problems on page 91 Several Sheets of Paper are Fed at a Time The following causes can be considered Unsupported paper is being used Solutions Use paper supported by this printer Available Paper and Capacities on page 176 Unavailable Paper Types on page 178 Paper handling is inappropr...

Page 119: ...ion After inserting the paper cassette select Settings Printer Status Print Print Status Sheet Configuration Status Sheet to print the configuration status sheet and then make sure that the paper cassette and paper size are recognized correctly The paper settings on the printer are incorrect Solutions Make sure the paper size and paper type settings match the actual paper size and paper type loade...

Page 120: ...wer Does Not Turn On The following causes can be considered The power cord is not plugged in properly to the electrical outlet Solutions Make sure the power cord is securely plugged in The P button was not pressed for long enough Solutions Hold down the P button for longer than five seconds Power Does Not Turn Off The P button was not pressed for long enough Solutions Hold down the P button for a ...

Page 121: ...paper set the paper type setting to Plain paper The printer is cooling the fuser unit Solutions When continuously printing on narrow paper the printer needs to cool the fuser unit to prevent it from overheating which may slow down printing Wait until printing is complete The print data size is too large Solutions If you are printing a large data size image the data may not be processed depending o...

Page 122: ...on the control panel to return the LCD screen to its former state The Root Certificate Needs to be Updated The root certificate has expired Solutions Run Web Config and then update the root certificate Cannot Cancel Printing from a Computer Running Mac OS X v10 6 8 There is a problem with your AirPrint setup Solutions Run Web Config and then select Port9100 as the Top Priority Protocol setting in ...

Page 123: ...the printing status on the Notice Settings screen Redirect printing is performed using the remote desktop feature Windows XP Windows Vista Solutions A communication error is displayed but printing finishes normally Paper Gets Jammed Check the error displayed on the control panel and follow the instructions to remove the jammed paper including any torn pieces The LCD screen displays an animation th...

Page 124: ...hands to prevent the paper from tearing Removing the paper with too much force may tear the paper making it difficult to remove which may cause another paper jam If the paper does tear remove all of the paper including any torn pieces If you cannot remove the torn paper or cannot remove paper that is jammed in a part of the printer not explained in this manual contact Epson support Preventing Pape...

Page 125: ...eck that the printer driver is installed on the computer and that the port settings for the printer are correct Make sure the printer port is selected correctly in Property Port from the Printer menu as follows Select USBXXX for a USB connection or EpsonNet Print Port for a network connection Check that the printer driver is installed on the computer and that the USB port settings for the printer ...

Page 126: ...Epson website for further instructions It is Time to Replace Consumables Precautions when Handling Consumables Always observe the following handling precautions when replacing consumables or maintenance parts Warning Be sure to read the handling precautions linked below as well as the following precautions Handling the Consumable Products and Maintenance Parts on page 18 Caution When replacing con...

Page 127: ...placing the waste toner collector Do not reuse the toner in the waste toner collector Be careful not to spill any toner Although the toner is harmless to humans if toner gets on your skin or clothes wash it off with soap and water immediately If toner is spilled inside the printer wipe it clean Replacing Toner Cartridges and the Waste Toner Collector When a message is displayed prompting you to re...

Page 128: ...oner save feature saves toner while printing so the print quality is lower than for normal printing This is useful for printing when you are not concerned about the print quality such as a test print Turn off the toner save mode using the printer driver or the printer s control panel menus Control panel Select Settings General Settings Printer Settings PDL Print Configuration Common Settings and t...

Page 129: ...lated information below for details Printer Adjust Menu on page 201 Non genuine consumables are used Solutions This product is designed to provide the best print quality when using genuine toner Other products not manufactured by Epson may cause damage or reduce print quality that is not covered by Epson s warranties and under certain circumstances may cause erratic printer behavior Epson recommen...

Page 130: ...hanged on the printer Solutions Select Settings General Settings System Administration Printer Adjust Menu and then change the Charging Roller Voltage setting Drum Refresh with paper needs to be performed Solutions Select Settings General Settings System Administration Printer Adjust Menu and then select Drum Refresh with paper The Position Size or Margins of the Printout Are Incorrect The followi...

Page 131: ...Incorrect or Garbled The following causes can be considered There is a problem with the usage environment Solutions If you can perform test printing or status printing correctly there may be a problem in the usage environment Check the following points The printer is connected correctly with the correct cable The computers specifications support the printer s system requirements You are using the ...

Page 132: ... driver and application Windows Solutions If you make collated settings in the printer driver and the application from which you are printing you may not be able to perform collated printing correctly When you have made collated settings in the application do not make settings in the printer driver Last Page is Printed on Opposite Side in 2 sided Printing The One side 2 sides conversion setting is...

Page 133: ...eated in an application that allows you to change the data format such as Adobe Photoshop make sure that the settings in the application match the settings in the printer driver EPS files made in binary format may not be printed correctly Set the format to ASCII when making EPS files in an application For Windows the printer cannot print binary data when it is connected to the computer using a USB...

Page 134: ...Adding or Replacing the Computer or Devices Connecting to a Printer that has been Connected to the Network 135 Re setting the Network Connection 136 Checking the Network Connection Status 137 ...

Page 135: ...ollowing website and then enter the product name Go to Setup and then start setting up https epson sn Setting up using the software disc only for the models that come with a software disc and users with Windows computers with disc drives Insert the software disc into the computer and then follow the on screen instructions Selecting the Printer Follow the on screen instructions until the following ...

Page 136: ...r Connecting to the Computer We recommend using the installer to connect the printer to a computer You can run the installer using one of the following methods Setting up from the website Access the following website and then enter the product name Go to Setup and then start setting up https epson sn Setting up using the software disc only for the models that come with a software disc and users wi...

Page 137: ...ting up from the website Access the following website and then enter the product name Go to Setup and then start setting up http epson sn Setting up using the software disc only for the models that come with a software disc and users with Windows computers with disc drives Insert the software disc into the computer and then follow the on screen instructions Selecting Change the Connection Methods ...

Page 138: ...network menus you want to check 1 Select Settings on the home screen 2 Select General Settings Network Settings Network Status 3 To check the information select the menus that you want to check Wired LAN Status Displays the network information for Ethernet Print Status Sheet Prints a network status sheet The information for Ethernet is printed on two or more pages Printing a Network Connection Rep...

Page 139: ...twork Connection Report on page 139 Messages and Solutions on the Network Connection Report Check the messages and error codes on the network connection report and then follow the solutions a Error code b Messages on the Network Environment Related Information E 1 on page 140 E 8 on page 140 E 9 on page 140 E 10 on page 140 Adding or Replacing the Computer or Devices Checking the Network Connectio...

Page 140: ...l Related Information Network Settings on page 191 E 9 Solutions Check the following Devices are turned on You can access the Internet and other computers or network devices on the same network from the devices you want to connect to the printer If still does not connect your printer and network devices after confirming the above turn off the router Wait for about 10 seconds and then turn it on Th...

Page 141: ...art on the network connection report Related Information Network Settings on page 191 E 12 Solutions Check the following Other devices on the network are turned on The network addresses IP address subnet mask and default gateway are correct if you are entering them manually The network addresses for other devices subnet mask and default gateway are the same The IP address does not conflict with ot...

Page 142: ...ler You can run it from the following website http epson sn Setup Related Information Network Settings on page 191 Making Settings for Connecting to the Computer on page 137 Printing a Network Status Sheet You can check the detailed network information by printing it 1 Select Settings on the home screen To select an item use the u d l r buttons and then press the OK button 2 Select Printer Status ...

Page 143: ...re multiple DHCP servers on the same network you can find out the actual address assigned to the computer the referred DNS server etc Format ipconfig all Examples pathping command You can confirm the list of routers passing through the destination host and the routing of communication Format pathping xxx xxx xxx xxx Examples pathping 192 0 2 222 Adding or Replacing the Computer or Devices Checking...

Page 144: ...cautions when Installing Optional Items 147 Checking the Installed Optional Items 147 Printer Stand 148 Paper Cassette Unit 152 Face up Tray 157 HDD AL M8250DN AL M8150DN Only 158 Ethernet Board 10 100 1000 Base T Ethernet AL M8250DN AL M8150DN Only 166 ...

Page 145: ... load up to 500 sheets of plain paper 80 g m2 You can install up to 4 paper cassette units for the AL M8250DN AL M8150DN and 3 paper cassette units for the AL M7150DN Paper Cassette Unit on page 152 B Printer Stand C12C932091 With casters Printer Stand on page 148 Using Optional Items List of Optional Items 145 ...

Page 146: ...10 100 1000 Base T Ethernet AL M8250DN AL M8150DN Only on page 166 B HDD C12C934441 You can install an HDD Use the designated HDD model number C12C934441 Operation cannot be guaranteed if other HDDs are connected Only available for the AL M8250DN AL M8150DN HDD AL M8250DN AL M8150DN Only on page 158 C Face Up Tray C12C817071 Hold up to 250 sheets of plain paper 80 g m2 Face up Tray on page 157 Usi...

Page 147: ...vy it should always be carried by two or more people when unpacking and transporting When you inserting cables and optional items make sure you insert them in the correct direction and by following the correct steps according to the manual Otherwise there is a risk of fire or injury cImportant Turn off the printer by pressing the P button and then unplug the power cord Do not unplug the power code...

Page 148: ... example We recommend using the printer stand if you install the paper cassette units You can install up to 4 paper cassette units for the AL M8250DN AL M8150DN and 3 paper cassette units for the AL M7150DN 1 Place the printer stand on a flat surface and lock the front casters Keep the casters locked to prevent the printer from moving Using Optional Items Printer Stand Installing the Printer Stand...

Page 149: ...2 Install two guide pins on the printer stand 3 Pull out the upper paper cassette Using Optional Items Printer Stand Installing the Printer Stand to the Paper Cassette Unit 149 ...

Page 150: ...n the bottom with the guide pins Install the printer after you have installed all of the paper cassette units on the printer stand 5 Reinsert the paper cassette into the paper cassette unit Using Optional Items Printer Stand Installing the Printer Stand to the Paper Cassette Unit 150 ...

Page 151: ...Moving the Printer While the Printer Stand is Attached Unlock the stopper for the casters Avoid steps when moving the printer to prevent it from being subjected to shocks Related Information Moving and Transporting the Printer on page 104 Printer Stand Specifications Dimensions Width 512 mm 20 2 in Depth 518 mm 20 4 in Height 109 mm 4 3 in Weight Approx 5 1 kg 11 3 lb Including the 20 mm protrudin...

Page 152: ...low If you lift the printer holding other positions the printer may fall or you may trap your fingers when placing the printer Do not touch the projections on the bottom of the printer that are for connecting an optional paper cassette cImportant If you are using the printer stand install it onto the lowest paper cassette unit in advance When installing the printer stand make sure you lock the cas...

Page 153: ...1 Unlock the fixture on the back as shown below Using Optional Items Paper Cassette Unit Installing the Paper Cassette Units to the Printer 153 ...

Page 154: ...ssette unit Align each of the holes with the guide pins of the paper cassette unit and then lower the paper cassette unit or the printer until it resets securely on the unit Using Optional Items Paper Cassette Unit Installing the Paper Cassette Units to the Printer 154 ...

Page 155: ...nal items are installed correctly Related Information Installing the Printer Stand to the Paper Cassette Unit on page 148 Checking the Installed Optional Items on page 147 Setting the Paper Cassette Unit in the Printer Driver To use the installed paper cassette unit the printer driver needs to acquire the necessary information Using Optional Items Paper Cassette Unit Setting the Paper Cassette Uni...

Page 156: ...indows Server 2003 Click the start button and select Control Panel Printers and Other Hardware Printers and Faxes 2 Right click on your printer or press and hold it select Printer properties or Property and then click the Optional Settings tab 3 Select Acquire from Printer and then click Get Optional Paper Sources information is displayed in Current Printer Information 4 Click OK Setting the Paper...

Page 157: ...Dimensions Width 490 mm 19 3 in Depth 410 mm 16 2 in Height 121 mm 4 8in Weight Approx 5 kg 11 1 lb Without the protruding pins Face up Tray Installing the Face up Tray Install the face up tray on the back of the printer Note Holds up to 250 sheets plain paper 80 g m2 Make sure you open the face up tray when you use the printer If you use both the printer stand and the face up tray you can install...

Page 158: ...ll the HDD Caution Make sure you turn off the power unplug the power cord and check that all wiring has been disconnected The cord may be damaged resulting in electric shock or fire cImportant Install the designated HDD model number C12C934441 Operation cannot be guaranteed if other HDDs are installed Electrostatic discharge can damage printer parts Make sure you discharge static electricity from ...

Page 159: ...n the back of the printer 4 Pull out the additional interface slot Pull the black parts of the slot straight out and avoid tilting 5 See the following to identify where to place the HDD Using Optional Items HDD AL M8250DN AL M8150DN Only Installing the HDD 159 ...

Page 160: ...irm the bundled items Note Cable sets A and B are not used 7 Connect the two cables to the HDD Make sure you connect the cables in the correct direction as shown below Using Optional Items HDD AL M8250DN AL M8150DN Only Installing the HDD 160 ...

Page 161: ...8 Connect the two cables to the circuit board Using Optional Items HDD AL M8250DN AL M8150DN Only Installing the HDD 161 ...

Page 162: ... HDD as shown below 9 Place the HDD by aligning each of the holes with the screw holes on the printer and then secure the HDD in place with four screws Using Optional Items HDD AL M8250DN AL M8150DN Only Installing the HDD 162 ...

Page 163: ...e deleted If you remove the HDD to perform repairs or transport the printer data could be lost Make sure you select Option HDD invalid and then remove the HDD in the reverse order to the installation procedure Related Information Checking the Installed Optional Items on page 147 Setting the HDD in the Printer Driver The process is the same as for the paper cassette unit Related Information Setting...

Page 164: ...ting High Speed Erases all data with a dedicated erase command Overwrite Erases all data with a dedicated erase command and overwrites other data in all areas to erase all data Triple Overwrite Erases all data with a dedicated erase command and overwrites other data in all areas three times to erase all data Making Settings for Sequential Deletion Note You can also make settings from the device s ...

Page 165: ...7 Settings Menu List When the HDD is Installed When the HDD is installed the menu below is displayed on the printer s control panel Settings General Settings System Administration HDD Erase Settings Make settings for processing data stored in the internal hard disc Jobs for printing are temporarily saved to the hard disc in order to handle the data for authenticated printing and the large amount o...

Page 166: ...rmation Printing Printing from a computer Epson Connect Printing Using a Cloud Service on page 88 EPSON Software Updater Application for Updating Software and Firmware Epson Software Updater on page 185 Updating firmware Application for Updating Software and Firmware Epson Software Updater on page 185 Network settings Setting an IP address 1 1 Assigning the IP Address When Using an Additional Netw...

Page 167: ...he standard or the additional network to send to recipients for each destination Installing an Ethernet Board Caution Make sure you turn off the power unplug the power cord and check that all wiring has been disconnected The cord may be damaged resulting in electric shock or fire cImportant Electrostatic discharge can damage printer parts Make sure you discharge static electricity from your body b...

Page 168: ...nal interface slot for the ethernet board Insert the ethernet board firmly into the slot cImportant Do not remove the cover of the ethernet board Do not touch the terminals of the ethernet board 5 Secure the ethernet board with the two screws 6 Connect the removed power cord and USB cable Using Optional Items Ethernet Board 10 100 1000 Base T Ethernet AL M8250DN AL M8150DN Only Inst 168 ...

Page 169: ...rm the MAC address on the label stuck to the Ethernet board We recommend that you change the initial password as soon as possible to prevent unauthorized access If you reset the additional network to the default settings the initial password will be restored Related Information Menu Options for Network Settings When Using an Additional Network on page 173 Configuring the Administrator Password for...

Page 170: ...enter the administrator password for the additional network 6 Select Manual for Obtain IP Address When you set the IP address automatically by using the DHCP function of router select Auto In that case the IP Address Subnet Mask and Default Gateway on step 7 to 8 are also set automatically so go to step 9 7 Enter the IP address Focus moves to the forward segment or the back segment separated by a ...

Page 171: ...ces The proxy server is only available on the standard network 1 Select Settings on the home screen When making settings after IP address setting the Advanced screen is displayed Go to step 3 2 Select General Settings Network Settings Standard Advanced 3 Select Proxy Server 4 Select Use for Proxy Server Settings 5 Enter the address for the proxy server by IPv4 or FQDN format Confirm the value refl...

Page 172: ...s You can register up to five destinations and set the notification settings for each destination To use this function you need to set up the mail server before setting up notifications Set up the email server on the network standard or additional to which you want to send the email Related Information Configuring a Mail Server on page 235 Configuring Email Notification When Using an Additional Ne...

Page 173: ...ng the Paper Source where paper is not set Related Information Application for Configuring Printer Operations Web Config on page 221 Configuring a Mail Server on page 235 Items for Email Notification on page 253 Solving Problems when Using an Additional Network Cannot Print from a Computer The standard or additional network settings are incorrect You need to set up the standard network and the add...

Page 174: ... Address Link Speed Duplex Redirect HTTP to HTTPS Disable IPsec IP Filtering Disable IEEE802 1X You need to enter the administrator password for the additional network Restore Default Settings Reset the settings for the additional network to their defaults You need to enter the administrator password for the additional network Network Transmission Route This menu is unavailable LDAP Server This me...

Page 175: ...roduct Information Paper Information 176 Consumable Products Information 179 Software Information 179 Settings Menu List 186 Product Specifications 195 Font Specifications 204 Regulatory Information 219 ...

Page 176: ...uously print up to 2600 sheets for AL M8250DN and AL M8150DN or up to 2100 sheets for AL M7150DN The output tray capacity for plain paper is as follows up to 550 sheets for face down tray standard output tray up to 250 sheets for face up tray optional output tray Select the size of the paper that is loaded on the paper size setting dial on the paper cassette If the paper size is not on the dial se...

Page 177: ...300 sheets 3 The loading capacity for paper longer than B4 364 mm is 50 sheets Thick paper 120 to 220g m2 Select Thick paper1 for thick paper 120 to 135g m2 Thick paper2 for thick paper 135 to 170g m2 or Thick paper3 for thick paper 170 to 220g m2 as the paper type setting Size Loading Capacity Thickness Paper Cassette 1 Paper Cassette 2 to 5 Paper Tray A3 A4 A5 A6 B5 B4 Half Letter Executive 8 10...

Page 178: ...ia meant for other color laser printers black and white laser printers color copiers black and white copiers or ink jet printers Previously printed paper by any other color laser printers black and white laser printers color copiers black and white copiers ink jet printers or thermal transfer printers Paper that has already been printed on with special ink Very thin paper 59g m or less or very thi...

Page 179: ...roducts Code A waste toner collector is supplied with the toner cartridge Replace the waste toner collector when replacing the toner cartridge For AL M8250DN and AL M8150DN Product name Part number Remark STANDARD CAPACITY TONER CARTRIDGE BLACK 10141 Storage temperature 0 to 35 C 32 to 95 F Storage humidity 15 to 80 RH HIGH CAPACITY TONER CARTRIDGE BLACK 10142 Support only for AL M8250DN For AL M7...

Page 180: ...12 R2 Windows Server 2012 Select Desktop Settings Control Panel View devices and printers in Hardware and Sound Right click on your printer or press and hold it and then select Printing preferences Windows 7 Windows Server 2008 R2 Click the start button and select Control Panel View devices and printers in Hardware and Sound Right click on your printer and select Printing preferences Windows Vista...

Page 181: ...Making settings on the printer driver provides the best printing results You can check the status of the printer using the printer driver utility Accessing the printer driver from applications Click Page Setup or Print on the File menu of your application If necessary click Show Details or d to expand the print window Note Depending on the application being used Page Setup may not be displayed in ...

Page 182: ...ing on the application See the application s help for details Accessing the printer driver from the control panel To make settings that apply to all of the applications access from the control panel Windows 10 Windows Server 2019 Windows Server 2016 Click on the start button and then select Windows System Control Panel View devices and printers in Hardware and Sound Right click on your printer or ...

Page 183: ...m the computer and print properly This is suitable for printing from PostScript compliant applications used for DTP Accessing the printer driver from applications Click Page Setup or Print on the File menu of your application If necessary click Show Details or d to expand the print window Note Depending on the application being used Page Setup may not be displayed in the File menu and the operatio...

Page 184: ...reen If the printer s IP address is changed by DHCP the printer is still detected You can use a printer located on a different network segment You can print using one of the various protocols IPv6 address is not supported Application for Printing Easily from a Smart Device Epson iPrint Epson iPrint is an application that allows you to print photos documents and web pages from a smart device such a...

Page 185: ...lation such as installing the printer driver installing EPSON Status Monitor and creating a printer port This software allows the administrator to create unique software packages and distribute them among groups For more information visit your regional Epson website http www epson com Software for Updating Application for Updating Software and Firmware Epson Software Updater Epson Software Updater...

Page 186: ... General Settings Select the menus on the control panel as described below Settings General Settings Basic Settings Select the menus on the control panel as described below Settings General Settings Basic Settings You cannot change settings that have been locked by your administrator LCD Brightness Adjust the brightness of the LCD screen Sound Adjust the volume Mute Select On to mute sounds such a...

Page 187: ...he time difference between your local time and UTC Coordinated Universal Time Language Select the language used on the LCD screen Operation Time Out Select On to return to the initial screen when no operations have been performed for the specified time Keyboard Change the layout of the keyboard on the LCD screen Related Information Entering Characters on page 28 Printer Settings Select the menus o...

Page 188: ... frequently on irregularly sized paper Output Tray Select which output tray to use to catch paper when it is ejected after printing If you select Face Up Tray as the output tray install the optional face up tray Printing Language Select the printing language for the USB interface or the network interface Universal Print Settings These print settings are applied when you print by an external device...

Page 189: ...Printing Select On to perform 2 sided printing Convert to Simplex In the duplex printing mode specifies whether to print the last page of a job in one side printing mode Select Off to print the final page on the appropriate side Odd Page 1 page jobs or the last page of a job with an odd number of pages are printed in one side printing mode 1 Page 1 page jobs are printed in one side printing mode O...

Page 190: ...er of lines for the selected paper size and orientation This also causes a line spacing VMI change and the new VMI value is stored in the printer This means that later changes in the page size or orientation settings cause changes in the Form value based on the stored VMI CR Function Select the line feed command when printing with a driver from a specific operating system LF Function Select the li...

Page 191: ...nter receives a print job from a PostScript printer driver or PCL printer driver If the job ending is not clearly defined from a PostScript printer driver or PCL printer driver it can cause endless USB communication When this occurs the printer ends communication after the specified time has elapsed Enter 0 zero if you do not want to end communication Printer Swapping If you select On the USB devi...

Page 192: ...following settings Suspend Resume Unregister For details see the following web site https www epsonconnect com http www epsonconnect eu Europe only System Administration By using this menu you can maintain the product as a system administrator It also allows you to restrict product features for individual users to suite your work or office style Select the menus on the control panel as described b...

Page 193: ...tomer Research Select Approve to provide product usage information such as the number of prints to Seiko Epson Corporation Printer Adjust Menu You can make special settings for the printer Restore Default Settings Reset the settings in the following menus to their defaults Network Settings All Except Network Settings All Settings Firmware Update You can get firmware information such as your curren...

Page 194: ...s Language Select the language used on the LCD screen Printer Status Print Select the menus on the control panel as described below Settings Printer Status Print Print Status Sheet Configuration Status Sheet Print information sheets showing the current printer status and settings Supply Status Sheet Print information sheets showing the status of consumables Usage History Sheet Print information sh...

Page 195: ...e Epson Open Platform Product Specifications Printing Features Printing Method Laser beam scanning and dry electrophotographic process Resolution 600 600 dpi 1200 1200dpi Continuous Printing Speed on A4 Size Paper 1 AL M8250DN 45 PPM AL M8150DN 40 PPM AL M7150DN 35 PPM Time for Printing A4 Size Paper AL M8250DN From ready mode in monochrome 6 3 s From sleep mode in monochrome 23 s AL M8150DN From ...

Page 196: ...5 scalable fonts for PCL5 80 scalable fonts for PCL6 80 scalable fonts for PostScript3 compatible with PostScript Level 3 Bitmap Fonts 7 bitmap fonts for ESC Page 5 bitmap for PCL5 1 bitmap for PCL6 Memory RAM 2GB Supported Protocols TCP IPv4 TCP IPv6 LPD IPP PORT9100 WSD SNMP HTTP DHCP BOOTP APIPA PING DDNS mDNS SNTP SLP WSD LLTD Printable Area 2 The assured printable area is an area 4 mm from al...

Page 197: ...5357 When the Sender Client is the Client Computer Use Destination Server Protocol Port Number File Sending When FTP printing is used from the printer Printer FTP TCP 20 21 Discover the printer from an application such as EpsonNet Config printer driver Printer ENPC UDP 3289 Collect and set up the MIB information from an application such as EpsonNet Config printer driver Printer SNMP UDP 161 Forwar...

Page 198: ...unctions and IPv4 IPv6 Functions Supported Remarks Network Printing EpsonNet Print Windows IPv4 Standard TCP IP Windows IPv4 IPv6 WSD Printing Windows IPv4 IPv6 Windows Vista or later BonjourPrinting Mac OS IPv4 IPv6 IPPPrinting Windows Mac OS IPv4 IPv6 PictBridgePrinting Wi Fi IPv4 Digital camera Epson Connect Email Print Remote Print IPv4 AirPrint iOS Mac OS IPv4 IPv6 iOS 5 or later Mac OS X v10...

Page 199: ...pt used on this printer is compatible with PostScript Level 3 Dimensions Dimensions 1 Width 490 mm 19 3 in Depth 2 410 mm 16 2 in Height 335 mm 13 2 in Weight 3 Approx 21 kg 46 3 lb 1 With the paper tray closed and without any protruding sections 2 420 mm including the paper size setting dial 3 With consumable products Electrical Specifications AL M8250DN Power Supply Rating AC 110 V Rated Frequen...

Page 200: ... Current 12 8 A Power Consumption without USB Connection Printing in monochrome Approx 575 W Ready mode Fuser Temperature Keep 1 Approx 55 W Ready mode Fuser Temperature Don t Keep 2 Approx 6 3 W Sleep mode 3 Approx 4 0 W Power off Approx 3 4 W Maximum Power Consumption Approx 1280 W 1 When Quick Sleep is set to Off and Fuser Temperature Keep is selected 2 When Quick Sleep is set to On the printer...

Page 201: ...s 10 or later 32 bit 64 bit Windows XP SP3 32 bit Windows XP Professional x64 Edition SP2 Windows Server 2003 SP2 or later Mac OS Mac OS X v10 6 8 or later Note Mac OS may not support some applications and features The UNIX File System UFS for Mac OS is not supported Printer Adjust Menu You can make special settings on the printer s control panel Normally you do not need to change the settings The...

Page 202: ...ided printing and for the back of duplex printing 3 5 to 3 5 mm 0 0 mm default Feed Offset Back Adjusts the start position for printing in the vertical direction You need to adjust Feed Reg2 from Each Tray Offset before making this adjustment The start position shifts down as the value increases This setting is available for the front of duplex printing 3 5 to 3 5 mm 0 0 mm default Scan Offset Bac...

Page 203: ...nt density by correcting for the voltage of the charging roller The printout becomes lighter as the value increases 1 dense to 5 light 3 default Drum Refresh Refreshes the drum This may help to reduce smears on the print outs Note that before refreshing the drum make sure no paper is loaded in the paper tray Drum Refresh with paper This may help to reduce smears on the print outs Select this menu ...

Page 204: ...kers when printing Normal default Noise Level Adjusts the image gradation Image gradation gets better as the value increases but image granularity gets worse 0 to 7 3 default Print Pattern Prints a halftone or full pattern that allows you to check for unevenness in the density or pitch on the printout Screen 25 Prints the pattern in a 25 density halftone Screen 50 Prints the pattern in a 50 densit...

Page 205: ...edium Extra Bold Albertus NimbusSansNo2 Medium Bold Italic Bold Italic Arial Nimbus Roman No9 Medium Bold Italic Bold Italic Times New Roman Nimbus Sans Medium Bold Oblique Bold Oblique Helvetica Nimbus Sans Narrow Medium Bold Oblique Bold Oblique Helvetica Narrow Palladio Roman Bold Italic Bold Italic Palatino URW Gothic Book Demi Book Oblique Demi Oblique ITC Avant Garde URW Bookman Light Demi L...

Page 206: ... Halbfett Garamond 3 Mauritius Marigold 3 Algiers Medium Extra Bold Albertus 3 NimbusSansNo2 Medium Bold Italic Bold Italic Arial 3 Nimbus Roman No9 Medium Bold Italic Bold Italic Times New 3 Nimbus Sans Medium Bold Oblique Bold Oblique Helvetica 3 Nimbus Sans Narrow Medium Bold Oblique Bold Oblique Helvetica Narrow 3 Palladio Roman Bold Italic Bold Italic Palatino 3 URW Gothic Book Demi Book Obli...

Page 207: ...may not be readable Print a sample and make sure the fonts can be read before printing large quantities List of Symbol Sets Your printer can access a variety of symbol sets Many of these symbol sets differ only in the international characters specific to each language When you are considering which font to use you should also consider which symbol set to combine with the font Note Since most softw...

Page 208: ...1 0N Swedis2 0S ANSI ASCII 0U UK 1E French2 1F German 1G Legal 1U 8859 2 ISO 2N Spanish 2S ISO 8859 4 Latin 4 4N Roman 9 4U PsMath 5M 8859 9 ISO 5N WiTurkish 5T MsPublishin 6J VeMath 6M 8859 10ISO 6N DeskTop 7J Math 8 8M Roman 8 8U WiE Europe 9E Pc1004 9J 8859 15ISO 9N PcTk437 9T Windows 9U Product Information Font Specifications List of Symbol Sets 208 ...

Page 209: ... PcEur858 13U VeUS 14J PiFont 15U PcE Europe 17U Unicode 3 0 18N WiBALT 19L WiAnsi 19U PcBlt775 26U Pc866Cyr 3R Greek8 8G WinGrk 9G WinCyr 9R Pc851Grk 10G ISOCyr 10N Pc8Grk 12G ISOGrk 12N Pc866Ukr 14R Hebrew7 0H 8859 8 ISO 7H Hebrew8 8H Pc862Heb 15H PC 862 Hebrew 15Q Arabic8 8V HPWARA 9V Product Information Font Specifications List of Symbol Sets 209 ...

Page 210: ...such as Start bar Stop bar and OCR B in addition to the bar code characters themselves However Epson BarCode Fonts are designed to add such codes automatically allowing you to easily print bar codes that conform to a variety of bar code standards Printing with Epson BarCode Fonts Follow the steps below to create and print bar codes using Epson BarCode Fonts The application featured in these instru...

Page 211: ...to convert into a bar code 2 Select the characters then select the Epson BarCode font you want to use and the font size Note You cannot use font sizes larger than 96 points when printing bar codes Product Information Font Specifications Epson BarCode Fonts Windows Only 211 ...

Page 212: ...ion that enlarge or reduce the size of characters in only the vertical or horizontal direction Turn off your application s auto correct features for spelling grammar spacing etc To more easily distinguish bar codes from other text in your document set your application to show text symbols such as paragraph marks tabs etc Because special characters such as Start bar and Stop bar are added when an E...

Page 213: ...lowing codes are inserted automatically and need not be input by hand Left Right margin Left Right guard bar Center bar Check digit OCR B Print sample EPSON EAN 8 EPSON EAN 13 EAN 13is the standard 13 digit EAN bar code Because the check digit is added automatically only 12 characters can be input Character type Numbers 0 to 9 Number of characters 12 characters Font size 60 pt to 96 pt Recommended...

Page 214: ... to 96 pt Recommended sizes are 60 pt and 75 pt standard The following codes are inserted automatically and need not be input by hand Left Right margin Left Right guard bar Center bar Check digit OCR B Print sample EPSON UPC A EPSON UPC E UPC E is the UPC A zero suppression deletes extra zeros bar code specified by the American Universal Product Code UPC Symbol Specification Manual Character type ...

Page 215: ...nt overlapping Spaces in Code39 bar codes should be input as _ underbars When printing two or more bar codes on one line separate the bar codes with a tab or select a font other than a BarCode Font and input the space If a space is input while a Code39 font is selected the bar code will not be correct Character type Alphanumeric characters A to Z 0 to 9 Symbols space Number of characters No limit ...

Page 216: ...or select a font other than a BarCode Font and input the space If a space is input while a Code128 font is selected the bar code will not be correct Character type All ASCII characters 95 in total Number of characters No limit Font size 26 pt to 96 pt Recommended sizes are 26 pt 52 pt and 78 pt The following codes are inserted automatically and need not be input by hand Left Right quiet zone Start...

Page 217: ...le and disable the automatic insertion of check digits and OCR B The height of the bar code is automatically adjusted to 15 or more of its total length in conformance to the Codabar standard For this reason it is important to keep at least one space between the bar code and the surrounding text to prevent overlapping When either a Start or a Stop character is input Codabar fonts automatically inse...

Page 218: ...codes containing spaces may not be correctly printed from applications that automatically delete spaces from the ends of lines or change multiple spaces into tabs When printing two or more bar codes on one line separate the bar codes with a tab or select a font other than a BarCode Font and input the space If a space is input while a GS1 128 EAN128 font is selected the bar code will not be correct...

Page 219: ...and other official postal items bearing valid postage Government issued revenue stamps and securities issued according to legal procedure Exercise caution when copying the following items Private marketable securities stock certificates negotiable notes checks etc monthly passes concession tickets etc Passports driver s licenses warrants of fitness road passes food stamps tickets etc Note Copying ...

Page 220: ...rmation Software Information for Administrators 221 Connecting the Printer to the Network 223 Settings to Use the Printer 227 Managing the Printer 243 Advanced Security Settings 255 Epson Remote Services Information 288 ...

Page 221: ...not forget the user name and the password If you forget them you will need to contact Epson service support Running Web Config on a Web Browser 1 Check the printer s IP address Select the network icon on the printer s home screen and then select the active connection method to confirm the printer s IP address To select an item use the u d l r buttons and then press the OK button Note You can also ...

Page 222: ...Properties 3 Select the Web Service tab and click the URL Since the printer uses a self signed certificate when accessing HTTPS a warning is displayed on the browser when you start Web Config this does not indicate a problem and can be safely ignored Running Web Config on Mac OS 1 Select System Preferences from the Apple menu Printers Scanners or Print Scan Print Fax and then select the printer 2 ...

Page 223: ...the device on the network The following functions are available Monitor or manage up to 2 000 printers over the segment Make a detailed report such as for the consumable or product status Update the firmware of the product Introduce the device to the network Apply the unified settings to multiple devices You can download Epson Device Admin from Epson support website For more information see the do...

Page 224: ...nformation Port number to release Check the port number used by the printer and computer then release the port that is blocked by a firewall if necessary See the following for the port number used by the printer Using Port for the Printer on page 197 IP Address Assignment These are the following types of IP address assignment Static IP address Assign the predetermined IP address to the printer hos...

Page 225: ...ection function When you use those functions make the DNS server settings When you assign the printer s IP address by using the DHCP function of the DHCP server or router it is automatically set The proxy server is placed at the gateway between the network and the Internet and it communicates to the computer printer and Internet opposite server on behalf of each of them The opposite server communi...

Page 226: ...ct the DNS server settings from Manual or Auto If you cannot obtain the DNS server address automatically select Manual and enter the DNS server address Then enter the secondary DNS server address directly If you select Auto go to step 9 8 Enter the IP address for the secondary DNS server Confirm the value reflected on the previous screen 9 Select Start Setup Setting the Proxy Server Set up the pro...

Page 227: ...rint it Settings to Use the Printer Using the Print Functions Enable to use the print function through the network To use the printer on the network you need to set the port for network connection on the computer as well as the printer s network connection Printer Connection Types The following two methods are available for the printer s network connection Peer to peer connection direct printing S...

Page 228: ...e client computers By accessing the Windows server and linking the printer the printer driver is installed on the client computer and can be used Features Manage the printer and the printer driver in batch Depending on the server spec it may take time to start the print job because all print jobs go through the print server You cannot print when the Windows server is turned off Print Settings for ...

Page 229: ...r and then select The printer that I want isn t listed 3 Add a local printer Select Add a local printer or network printer with manual settings and then click Next 4 Select Create a new port select Standard TCP IP Port as the Port Type and then click Next 5 Enter the printer s IP address or printer name in Host Name or IP Address or Printer Name or IP Address and then click Next Example Printer na...

Page 230: ...en using the printer under the server client connection printer sharing using the Windows server make the sharing settings hereafter Checking the Port Configuration Windows Check if the correct port is set for the print queue 1 Open the devices and printers screen Desktop Settings Control Panel Hardware and Sound or Hardware Devices and Printers 2 Open the printer properties screen Right click the...

Page 231: ...nters on the print server 2 Right click the printer icon that you want to share with the clients and then click Printer Properties Sharing tab 3 Click Additional Drivers For Windows Server 2012 click Change Sharing Options and then configure the settings 4 Select versions of Windows for clients and then click OK 5 Select the information file for the printer driver inf and then install the driver U...

Page 232: ...he range you can enter here depends on the paper source which is indicated on the side of Height When you select mm in Unit you can enter up to one decimal place When you select inch in Unit you can enter up to two decimal places Paper Type Select the paper type you want to set from the pull down menu 3 Check the settings and then click OK Setting the Interface Set the timeout of the print jobs or...

Page 233: ...print from external devices without using the printer driver Some items are not displayed depending on the printing language of your printer 1 Access Web Config and select the Print tab Universal Print Settings 2 Set each item 3 Check the settings and then click OK Basic Items Explanation Top Offset 30 0 30 0mm Sets the vertical position of the paper on which printing starts Left Offset 30 0 30 0m...

Page 234: ...lanation Font Source Select whether to use the font installed on the printer or download it Font Number Specify the font number you want to use Pitch 0 44 99 99cpi If the font to use is scalable and fixed pitch font specify the font size in pitch Height 4 00 999 75pt If the font to use is scalable and proportional font specify the font size in points Symbol Set Select the symbol set of the font yo...

Page 235: ... Bonjour Set whether or not to use Wide Area Bonjour If you use it the printers must be registered on the DNS server to be able to search the printer over the segment Require PIN Code when using IPP printing Select whether or not to require a PIN code when using IPP printing If you select Yes IPP print jobs without PIN codes are not saved in the printer Enable AirPrint IPP Bonjour AirPrint are ena...

Page 236: ...server When you select POP before SMTP enter the authenticated account for the POP3 server Sender s Email Address Enter the sender s email address such as the email address of the system administrator This is used when authenticating so enter a valid email address that is registered to the mail server Enter between 0 and 255 characters in ASCII 0x20 0x7E except for A period cannot be the first cha...

Page 237: ...message appears when The printer is not connected to a network SMTP server is down Network connection is disconnected while communicating Received incomplete data POP3 server communication error Check the following Network Settings This message appears when The printer is not connected to a network POP3 server is down Network connection is disconnected while communicating Received incomplete data ...

Page 238: ...tificate has expired The connection is untrusted Check the following CA Certificate This message appears when the printer does not have a root certificate corresponding to the server or a CA Certificate has not been imported The connection is not secured This message appears when the obtained certificate is damaged SMTP server authentication failed Change Authentication Method to SMTP AUTH This me...

Page 239: ...ecify On or Off 3 Click OK Power Saving Settings You can set up the time to shift to the power saving mode or to turn the power off when the printer s control panel is not operated for a certain period of time Set the time depending on your usage environment Setting the Sleep Timer You can set up the time to switch to power saving mode when inactivity occurs 1 Access Web Config and select the Devi...

Page 240: ...me periods You can select the following Power Saving Mode options On Enters sleep mode according to the Sleep Timer settings Quick Enters sleep mode immediately when inactivity occurs For example if you want the printer to sleep on Monday as shown in the following figure make settings as shown in the Sleep Schedule screenshot below During this time period it enters sleep mode immediately During th...

Page 241: ...ented by synchronizing with the time server 1 Access Web Config and select the Device Management tab Date and Time Time Server 2 Select Use for Use Time Server 3 Enter the time server address for Time Server Address You can use IPv4 IPv6 or FQDN format Enter 252 characters or less If you do not specify this leave it blank 4 Enter Update Interval min You can set up to 10 080 minutes by the minute 5...

Page 242: ...ed browser 80bit AES256 AES128 3DES 112bit AES256 AES128 3DES 128bit AES256 AES128 192bit AES256 256bit AES256 CA signed Certificate is expired If there is a problem with the expiration date of the certificate The certificate has expired is displayed when connecting to Web Config with SSL TLS communication https If the message appears before its expiration date make sure that the printer s date is...

Page 243: ...etwork settings and so on Also reduce a wide range of security risks such as leakage of information for the network environment or security policy Setup for access control If you log on with a user account registered in advance you are allowed to use the printer Protects from illegal access by any system other than the authentication system when using it Register any user account You can register ...

Page 244: ...Register 4 Enter the new password 5 Enter the password again Note You can change or delete the administrator password when you select Change or Restore Default Settings on the Admin Password screen and enter the administrator password Configuring the Administrator Password from a Computer You can set the administrator password using Web Config 1 Access Web Config and select the Product Security ta...

Page 245: ...t the password is required Enabling the Lock Setting from a Computer 1 Access Web Config and click the Administrator Login 2 Enter the user name and password and then click OK 3 Select the Device Management tab Control Panel 4 On the Panel Lock select ON 5 Click OK 6 Select Settings General Settings Network Settings on the printer s control panel and then check that the password is required Relate...

Page 246: ...rd General Settings menu Panel Lock Printer Settings Paper Source Settings Output Tray Printing Language Universal Print Settings PDL Print Configuration Auto Error Solver PC Connection via USB USB I F Timeout Setting Printer Swapping General Settings menu Panel Lock Network Settings Administrator Information Managing the Printer Administrator Settings 246 ...

Page 247: ... TCP IP Proxy Server IPv6 Address Link Speed Duplex Redirect HTTP to HTTPS Disable IPsec IP Filtering Disable IEEE802 1X General Settings menu Panel Lock Web Service Settings Epson Connect Services General Settings menu Panel Lock System Administration Administrator Information Managing the Printer Administrator Settings 247 ...

Page 248: ...e menu of Settings Printer Status Print Network 2 This item is displayed when the optional hard disk unit is installed Related Information HDD AL M8250DN AL M8150DN Only on page 158 Logging on to the Printer as an Administrator If the administrator password is set to the printer you need to log on as an administrator to operate the locked menu items on Web Config Enter the password to operate the ...

Page 249: ...r settings see the driver s help or manual Creating the User Account Create the user account for access control 1 Access Web Config and select the Product Security tab Access Control Settings User Settings 2 Click Add for the number you want to register cImportant When using the printer with the authentication system of Epson or other companies register the user name of the restriction setting in ...

Page 250: ...tion Application for Configuring Printer Operations Web Config on page 221 Deleting the User Account Delete the account registered to access control 1 Access Web Config and select the Product Security tab Access Control Settings User Settings 2 Click Edit for the number you want to delete 3 Click Delete cImportant When clicking Delete the user account will be deleted without a confirmation message...

Page 251: ...face 2 Select Disable on the functions you want to set Select Enable when you want to cancel controlling PC Connection via USB You can restrict the usage of the USB connection from the computer If you want to restrict it select Disable 3 Click OK 4 Check that the disabled port cannot be used PC Connection via USB If the driver was installed on the computer Connect the printer to the computer using...

Page 252: ...ving Email Notifications When Events Occur About Email Notifications This is the notification function that when events such as printing stop and printer error occur send the email to the specified address You can register up to five destinations and set the notification settings for each destination To use this function you need to set up the mail server before setting up notifications Related In...

Page 253: ...page 235 Items for Email Notification Items Settings and Explanation Replacing toner cartridge is required Notification displayed when the toner is expended Toner low Notification displayed when the toner is nearly expended Administrator password changed Notification displayed when administrator password has been changed Paper out Notification displayed when the paper out error has occurred in the...

Page 254: ...d the password to import the file Leave this blank if you do not want to encrypt the file 4 Click Export cImportant If you want to export the printer s network settings such as the device name and IPv6 address select Enable to select the individual settings of device and select more items Only use the selected values for the replacement printer Related Information Application for Configuring Print...

Page 255: ...y according to the environmental conditions that have been built with the customer s environment information Name Feature type What to set What to prevent Control of protocol Controls the protocols and services to be used for communication between printers and computers and it enables and disables features A protocol or service that is applied to features allowed or prohibited separately Reducing ...

Page 256: ...Connecting the Printer to an IEEE802 1X Network on page 279 Security Feature Settings When setting IPsec IP filtering or IEEE802 1X it is recommended that you access Web Config using SSL TLS to communicate settings information in order to reduce security risks such as tampering or interception Make sure you configure the administrator password before setting IPsec IP filtering or IEEE802 1X Also y...

Page 257: ...e DNS LPR Settings You can specify whether or not to allow LPR printing When this is enabled you can print from the LPR port RAW Port9100 Settings You can specify whether or not to allow printing from the RAW port Port 9100 When this is enabled you can print from the RAW port Port 9100 RAW Custom Port Settings You can specify whether or not to allow printing from the RAW port custom port When this...

Page 258: ... to enable the SLP function This is used such as network searching in EpsonNet Config Default Enable WSD Settings Items Setting value and Description Enable WSD Select this to enable adding devices using WSD and print from the WSD port Default Enable Printing Timeout sec Enter the communication timeout value for WSD printing between 3 to 3 600 seconds Default 300 Device Name Displays the WSD devic...

Page 259: ...ct to allow printing from the RAW port Port 9100 Default Enable Printing Timeout sec Enter the timeout value for RAW Port 9100 printing be tween 0 to 3 600 seconds If you do not want to timeout en ter 0 Default 300 RAW Custom Port Settings Items Setting value and Description Allow RAW Custom Port Printing Select to allow printing from the RAW port custom port Default Enable Port Number Enter the p...

Page 260: ...ddress Port number and IPP printer name Printer Name Displays the IPP printer name Default ipp print Location Displays the IPP location FTP Settings Items Setting value and Description Enable FTP Server Select to enable FTP printing Only printers that support FTP printing are displayed Default Disable Communication Timeout sec Enter the timeout value for FTP communication between 0 to 3 600 second...

Page 261: ...onfirm Password Enter the password you configured for confirmation Context Name Enter within 32 characters or less in Unicode UTF 8 If you do not specify this leave it blank The number of characters that can be entered varies depending on the language Default EPSON Related Information Controlling protocols on page 256 Protocols you can Enable or Disable on page 257 Using a Digital Certificate Abou...

Page 262: ...for an SSL TLS communication a security alert may be displayed on a web browser because the certificate is not registered on a web browser You can use the Self signed Certificate only for an SSL TLS communication Related Information Configuring a CA signed Certificate on page 262 Updating a Self signed Certificate on page 265 Configuring a CA Certificate on page 266 Configuring a CA signed Certifi...

Page 263: ... Explanation Key Length Select a key length for a CSR Common Name You can enter between 1 and 128 characters If this is an IP address it should be a static IP address You can enter 1 to 5 IPv4 addresses IPv6 addresses host names FQDNs by separating them with commas The first element is stored to the common name and other elements are stored to the alias field of the certificate subject Example Pri...

Page 264: ...he file format of the certificate required settings may vary Enter values to required items according to the following A certificate of the PEM DER format obtained from Web Config Private Key Do not configure because the printer contains a private key Password Do not configure CA Certificate 1 CA Certificate 2 Optional A certificate of the PEM DER format obtained from a computer Private Key You ne...

Page 265: ...ues CA Certificate 1 Specify a file if you need Related Information Importing a CA signed Certificate on page 264 Deleting a CA signed Certificate You can delete an imported certificate when the certificate has expired or when an encrypted connection is no longer necessary cImportant If you obtain a certificate using a CSR created from Web Config you cannot import a deleted certificate again In th...

Page 266: ...elf signed Certificate and click Confirm Related Information Application for Configuring Printer Operations Web Config on page 221 Configuring a CA Certificate When you set the CA Certificate you can validate the path to the CA certificate of the server that the printer accesses This can prevent impersonation You can obtain the CA Certificate from the Certification Authority where the CA signed Ce...

Page 267: ...Sockets Layer Transport Layer Security communication to the printer you can encrypt the communication path between computers Do this if you want to prevent remote and unauthorized access Configuring Basic SSL TLS Settings If the printer supports the HTTPS server feature you can use an SSL TLS communication to encrypt communications You can configure and manage the printer using Web Config while en...

Page 268: ...g a Self signed Certificate on page 265 Encrypted Communication Using IPsec IP Filtering About IPsec IP Filtering You can filter traffic based on IP addresses services and port by using IPsec IP Filtering function By combining of the filtering you can configure the printer to accept or block specified clients and specified data Additionally you can improve security level by using an IPsec Note Com...

Page 269: ...can enable or disable an IPsec IP Filtering feature Access Control Configure a control method for traffic of IP packets Items Settings and Explanation Permit Access Select this to permit configured IP packets to pass through Refuse Access Select this to refuse configured IP packets to pass through IPsec Select this to permit configured IPsec packets to pass through Administrator Information Advanc...

Page 270: ... obtain and import a CA signed certificate in advance ID Type If you select Pre Shared Key for Authentication Method select the type of ID for the printer ID Enter the printer s ID that matches the type of ID You cannot use and for the first character Distinguished Name Enter 1 to 255 1 byte ASCII 0x20 to 0x7E characters You need to include IP Address Enter IPv4 or IPv6 format FQDN Enter a combina...

Page 271: ...n 1 and 127 characters Confirm Pre Shared Key Enter the key you configured for confirmation Encapsulation If you select IPsec for Access Control you need to configure an encapsulation mode Items Settings and Explanation Transport Mode If you only use the printer on the same LAN select this IP packets of layer 4 or later are encrypted Tunnel Mode If you use the printer on the Internet capable netwo...

Page 272: ...hentication algorithm for ESP This is available when ESP is selected for Security Protocol AH Authentication Select the encryption algorithm for AH This is available when AH is selected for Security Protocol Related Information Configuring Default Policy on page 268 Configuring Group Policy A group policy is one or more rules applied to a user or user group The printer controls IP packets that mat...

Page 273: ... static IPv6 address Remote Address Host Enter a device s IP address to control access The IP address must be 43 characters or less If you do not enter an IP address all addresses are controlled Note If an IP address is assigned automatically e g assigned by DHCP the connection may be unavailable Configure a static IP address Method of Choosing Port Select a method to specify ports Service Name If...

Page 274: ...e maximum Example 25 80 143 5220 If you do not enter a port number all ports are controlled IKE Version Select IKEv1 or IKEv2 for IKE Version Select one of them according to the device that the printer is connected to IKEv1 The following items are displayed when you select IKEv1 for IKE Version Items Settings and Explanation Authentication Method If you select IPsec for Access Control select an op...

Page 275: ...e key you configured for confirmation Remote Authentication Method If you select IPsec for Access Control select an option Used certificate is common with a default policy ID Type If you select Pre Shared Key for Authentication Method select the type of ID for the device that you want to authenticate ID Enter the printer s ID that matches to the type of ID You cannot use and for the first characte...

Page 276: ...ings and select an item other than Any for the other settings the device may not communicate depending on the other device that you want to authenticate Items Settings and Explanation IKE Encryption Select the encryption algorithm for IKE The items vary depending on the version of IKE Authentication Select the authentication algorithm for IKE Key Exchange Select the key exchange algorithm for IKE ...

Page 277: ...min and the printer driver SNMP UDP 161 Any port Acquiring and configuring of MIB from applications such as Epson Device Admin and the printer driver LPR TCP 515 Any port Forwarding LPR data RAW Port9100 TCP 9100 Any port Forwarding RAW data IPP IPPS TCP 631 Any port Forwarding data of IPP IPPS printing WSD TCP Any port 5357 Controlling WSD WS Discovery UDP 3702 Any port Searching for a printer fr...

Page 278: ...f Choosing Port Service Name Service Name Check the box of ENPC SNMP HTTP Local HTTPS Local and RAW Port9100 Note To avoid receiving HTTP Local and HTTPS Local clear their checkboxes in Group Policy When doing so disable IPsec IP filtering from the printer s control panel temporarily to change the printer settings Receiving access from a specified IP address only This example allows a specified IP...

Page 279: ...fig on page 221 Configuring a CA signed Certificate on page 262 Configuring a CA Certificate on page 266 Connecting the Printer to an IEEE802 1X Network Configuring an IEEE802 1X Network When you set IEEE802 1X to the printer you can use it on the network connected to a RADIUS server a LAN switch with authentication function or an access point 1 Access Web Config and then select the Network Securi...

Page 280: ...ation regardless of the authentication method Import the certificate in CA Certificate Anonymous Name If you select PEAP TLS EAP TTLS or PEAP MSCHAPv2 for EAP Type you can configure an anonymous name instead of a user ID for a phase 1 of a PEAP authentication Enter 0 to 128 1 byte ASCII 0x20 to 0x7E characters Encryption Strength You can select one of the followings High AES256 3DES Middle AES256 ...

Page 281: ... printer s user ID and or certificate protocol is incorrect Server ID Error Authentication has failed since the server ID of the server certificate and the server s ID do not match Server Certificate Error Authentication has failed since there are the following errors in the server certificate The server certificate is out of date The chain of the server certificate is incorrect CA Certificate Err...

Page 282: ...ant to disable Disable IPsec IP Filtering Disable IEEE802 1X 4 Select Proceed on the confirmation screen Problems Using Network Security Features Forgot a Pre shared Key Re configure a pre shared key To change the key access Web Config and select the Network Security tab IPsec IP Filtering Basic Default Policy or Group Policy When you change the pre shared key configure the pre shared key for comp...

Page 283: ...t be used IPsec communication cannot be performed Disable IPsec using the printer s control panel If the DHCP is out of date rebooting or the IPv6 address is out of date or has not been obtained then the IP address registered for the printer s Web Config Network Security tab IPsec IP Filtering Basic Group Policy Local Address Printer may not be found Use a static IP address The IP address of the c...

Page 284: ...ec IP Filtering on page 268 Cannot Access the Printer after Configuring IEEE802 1X The settings of IEEE802 1X are incorrect Disable IEEE802 1X from the printer s control panel Connect the printer and a computer and then configure IEEE802 1X again Related Information Configuring an IEEE802 1X Network on page 279 Problems on Using a Digital Certificate Cannot Import a CA signed Certificate CA signed...

Page 285: ...n the common name If a comma is entered the Common Name is divided at that point If only a space is entered before or after a comma an error occurs Related Information Updating a Self signed Certificate on page 265 Cannot Create a CSR The Common Name has not been entered The Common Name must be entered Unsupported characters have been entered to Common Name Organization Organizational Unit Localit...

Page 286: ...ate and time using Web Config EpsonNet Config or the printer s control panel Invalid password Cause The password set for CA certificate and entered password do not match What to do Enter the correct password Invalid file Cause You are not importing a certificate file in X509 format What to do Make sure that you are selecting the correct certificate sent by a trusted certificate authority Cause The...

Page 287: ...e private key file If the certificate is the PKCS 12 format and it is obtained from a CSR using a computer create a file that contains the private key Cause You have re imported the PEM DER certificate obtained from a CSR using Web Config What to do If the certificate is the PEM DER format and it is obtained from a CSR using Web Config you can only import it once Setup failed Cause Cannot finish t...

Page 288: ... a service that periodically collects printer information over the Internet This can be used to predict when consumables and replacement parts need to be replaced or replenished and to quickly resolve any errors or problems Contact your sales representative for more information about Epson Remote Services Administrator Information Epson Remote Services Information 288 ...

Page 289: ...Where to Get Help Technical Support Web Site 290 Contacting Epson Support 290 ...

Page 290: ...tact the dealer where you purchased your product Epson support will be able to help you much more quickly if you give them the following information Product serial number The serial number label is on the front of the printer and can be viewed when you open the paper tray Product model Product software version Click About Version Info or a similar button in the product software Brand and model of ...

Page 291: ...ed Questions FAQ Sales Enquiries and Technical Support via e mail are available Epson HelpDesk Toll Free 800 120 5564 Our HelpDesk team can help you with the following over the phone Sales enquiries and product information Product usage questions or problem troubleshooting Enquiries on repair service and warranty Help for Users in Thailand Contacts for information support and services are World Wi...

Page 292: ...5 ess epson indonesia co id ess support epson indonesia co id SERPONG Epson Sales and Service Serpong Ruko Melati Mas Square Blok A2 No 17 Serpong Banten 082120090084 082120090085 esstag epson indonesia co id esstag support epson indonesia co id SEMARANG Epson Sales and Service Semarang Komplek Ruko Metro Plaza Block C20 Jl MT Haryono No 970 Semarang JAWA TENGAH 024 8313807 024 8417935 esssmg epso...

Page 293: ...ARINDA Epson Service Center Samarinda Jl KH Wahid Hasyim M Yamin Kelurahan Sempaja Selatan Kecamatan Samarinda UTARA SAMARINDA KALTIM 0541 7272 904 escsmd epson indonesia co id escsmd support epson indonesia co id SURABAYA Epson Sales Service Surabaya barat Jl Haji Abdul Wahab Saimin Ruko Villa Bukit Mas RM 11 Kec Dukuh Pakis Surabaya 60225 031 5120994 sby technical epson indonesia co id sby admin...

Page 294: ...i No 45C SERANG BANTEN 0254 7912503 srg admin epson indonesia co id srg technical epson indonesia co id PALU EPSON SALES AND SERVICE Palu Jl Juanda No 58 Palu Sulteng 0451 4012 881 plw admin epson indonesia co id plw technical epson indonesia co id BANJARMASI N EPSON SERVICE CENTER BANJARMASIN Jl Gatot Soebroto NO 153 BANJARMASIN KALSEL 70235 0511 6744135 TEKNISI 3266321 ADMIN bdj admin epson indo...

Page 295: ...hk Epson Hong Kong has established a local home page in both Chinese and English on the Internet to provide users with the following information Product information Answers to Frequently Asked Questions FAQs Latest versions of Epson product drivers Technical Support Hotline You can also contact our technical staff at the following telephone and fax numbers Phone 852 2827 8911 Fax 852 2827 4383 Hel...

Page 296: ...r download Frequently Asked Questions FAQ and E mail Enquiries are available Epson Philippines Customer Care Toll Free PLDT 1 800 1069 37766 Toll Free Digital 1 800 3 0037766 Metro Manila 632 8441 9030 Web Site https www epson com ph contact E mail customercare epc epson com ph Accessible 9am to 6pm Monday through Saturday Except public holidays Our Customer Care team can help you with the followi...

Reviews: