53
Note:
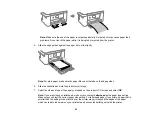
Make sure the end of the paper is cut perpendicularly. A slanted cut may cause paper feed
problems. Do not touch the paper while it is being fed or ejected from the printer.
5.
Slide the edge guides against the paper, but not too tightly.
Note:
For plain paper, make sure the paper fits under the tabs on the edge guides.
6.
Slide the cassette back into the product until it stops.
7.
Select the size and type of the paper you loaded on the product LCD screen and select
OK
.
Note:
If you are printing on letterhead, make sure you select
Letterhead
as the paper type setting.
Make sure you select the correct paper size setting. For letterhead paper, if you print on paper that is
smaller than the setting in the printer driver, the printer may print beyond the edges of the paper
which can lead to ink smears on your printouts and excess ink building up inside the printer.
Summary of Contents for C11CK61201
Page 1: ...XP 5200 User s Guide ...
Page 2: ......
Page 14: ...14 Product Parts Inside 1 Document cover 2 Scanner glass 3 Control panel 4 Front cover ...
Page 124: ...124 You see an Epson Scan 2 window like this ...
Page 126: ...126 You see an Epson Scan 2 window like this ...
Page 140: ...140 You see a screen like this 2 Click the Save Settings tab ...
Page 145: ...145 You see this window ...


