background image

64

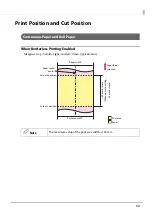
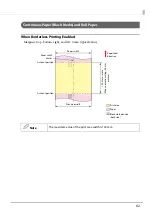
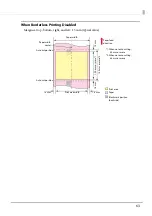
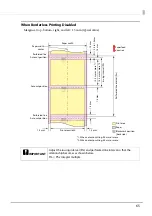
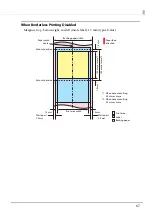
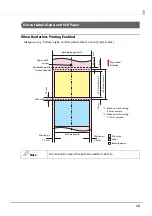
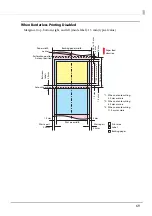
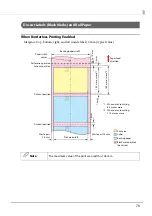
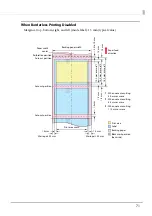
Continuous Paper (Black Marks) and Fanfold Paper

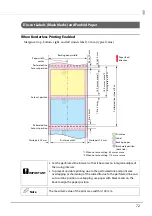
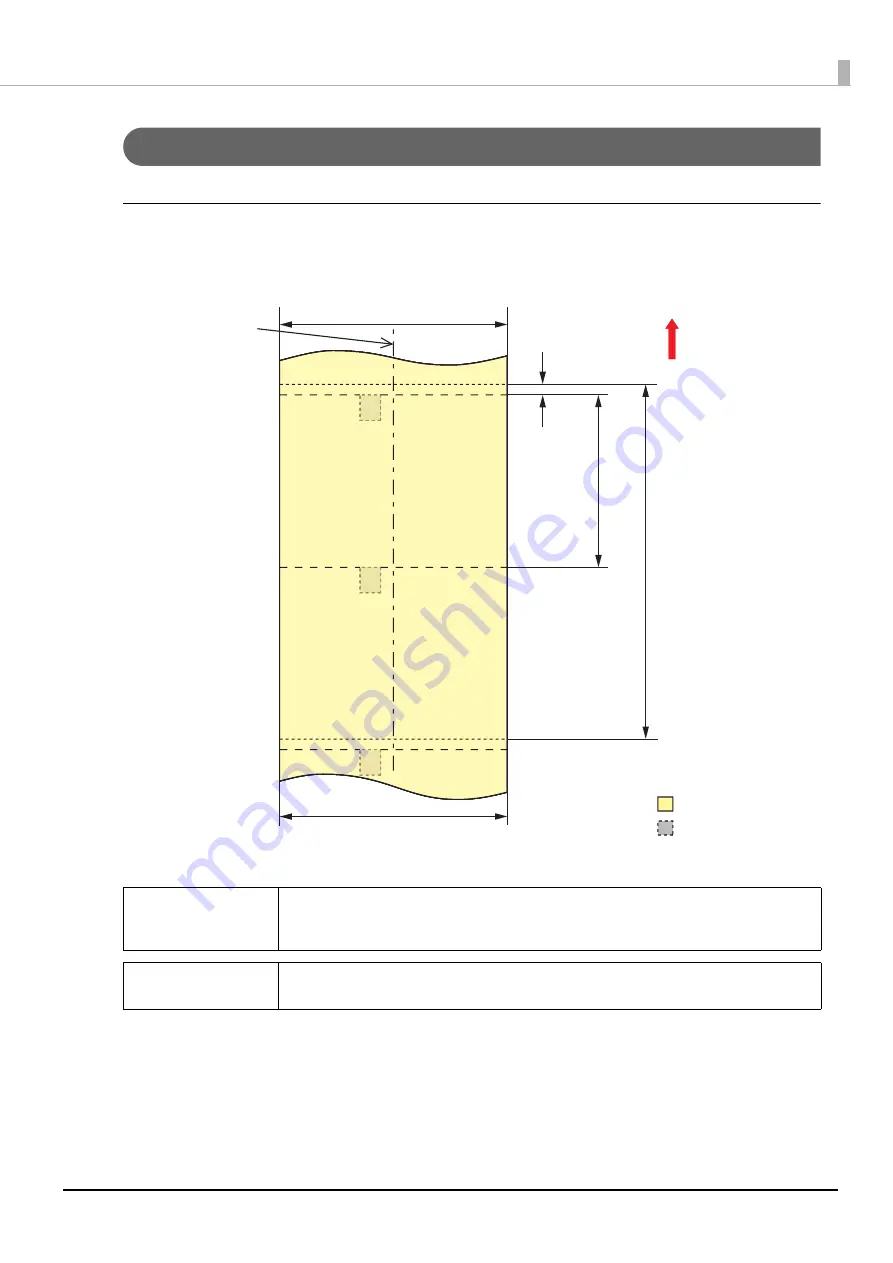
When Borderless Printing Enabled

Margins at top, bottom, right, and left: 0 mm (typical value)

c

 IMPORTANT

Set the perforated line interval so that it becomes an integral multiple of the 
issuing interval.

Q

 Note

The maximum value of the print area width is 104 mm.

Paper width

0

.5 to 1.0

 mm

Issuing in

ter

v

al 

(Ph)

Auto cut position

Auto cut position

Paper feed 
direction

Print area

Print area width

P

e

rf

o

ra

te

d

 li

n

e

 in

te

rv

a

l (

P

m

)

Perforated line

Auto cut position

Perforated line

Paper width

center

Black mark position
(back side)

15.0 

mm or mor

e

(W

hen not auto cutting

, 8.0 

mm or mor

e

)

Summary of Contents for C31CD54011

Page 1: ...eloper s Guide M00107502 Rev C Before use Functions and Operating Procedures of the Printer How to Use the Printer Driver Application Development Information Media Design Printer Management Appendix Series ...

Page 2: ...l Start Here Describes precautions on handling the product Be sure to read the precautions before use in order to ensure safe and proper use and to prevent personal injury to you and other persons and damage to property This also gives instructions for unpacking and installing the product Manual viewable with PC User s Guide Describes details about the functions and operating procedures of the pro...

Page 3: ...g this symbol can lead to injury and property damage cIMPORTANT Indicates information with which you must comply when using the product Mishandling due to ignoring this information may cause the product to fail or malfunction QNOTE Indicates supplementary explanations and information you should know U Indicates a reference page containing related information ...

Page 4: ...w to Check the Product Version You can check the version of the product firmware being used by performing self test printing Check the first line of the self test print results For the procedure for the self test printing see the User s Guide How to Check the Printer Driver Version You can check the version in the printer driver screen Firmware version Printer driver version ...

Page 5: ...e screens in this manual and the screens actually displayed in Windows may differ depending on the product used and operating system Unless otherwise specified the screens in this manual are those when using TM C3500 in Windows 7 ...

Page 6: ...ings that cannot be Exported to a BSF File 39 Exported Settings 40 Importing Settings 41 Application Development Information 42 Epson Inkjet Label Printer SDK 42 Media Design 43 Types of Media that can be Used 43 Paper that cannot be Used 44 Paper Loading Detection 45 Detection Methods 45 Paper Limitations 46 Paper Specifications 48 Continuous Paper 48 Continuous Paper Black Marks 49 Full page Lab...

Page 7: ...up Multiple Printers 91 Efficiently Setting up the Printer Driver 92 Creating an Installation Package 92 Client Computer Procedures 92 Efficient System Management 93 Printer Monitoring 93 Changing Printer Settings 95 Changing Printer Driver Settings 96 Automatically Changing a Printer Driver USB Port 97 Appendix 101 Notes 101 Trademarks 101 ...

Page 8: ...the power button You can turn the printer power on and off by inserting a ballpoint pen or similar item with a thin tip into the hole of the power switch cover Attach the power switch cover by following the procedures below 1 Pierce the middle of the power switch cover with a thin tipped hard object to open the hole 2 Peel off the backing of the double sided tape of the power switch cover 3 Affix ...

Page 9: ...urn the power off but rather resets the printer Disable the power button by following the procedures below 1 Check that the printer is powered off 2 Open the ink cartridge cover and remove the dip switch cover CAUTION Turn the printer off before removing the dip switch cover Removing the cover while the power is on may cause the printer to fail due to a short circuit ...

Page 10: ...p tip to operate the dip switches The dip switches are numbered in order from the left Up is the ON state and down is the OFF state Turn on dip switch 1 4 Attach the dip switch cover and close the ink cartridge cover 1 2 3 4 5 6 7 8 ...

Page 11: ...tings Advanced Settings Notification Settings Beep Notification Setting at an Error LED Notification Setting at Ink Low Notification Setting at a Media Size Error Panel Button Settings Panel Button Settings Operating Time Settings Platen Vacuum Operation Pause Time Set tings Data Standby Time Settings Printer Adjustment Paper Feed Adjustment Cut Position Adjustment Print Start Position Adjustment ...

Page 12: ...ppears 3 Select Settings Save and Restore The Settings Save and Restore screen appears 4 If set values can be acquired from this printer the values acquired from the current settings will be displayed 5 Click Save Settings The Save as screen appears 6 Specify a file name and saving location and then click Save The successful operation message is displayed to indicate that settings have been saved ...

Page 13: ... 3 Select Settings Save and Restore The Settings Save and Restore screen appears 4 Click Restore Settings The Open screen appears 5 Select the settings file you want to restore and click Open A confirmation screen appears 6 Click OK File restoration starts 7 A message is displayed when restoration is completed Click OK The successful operation message is displayed to indicate that settings have be...

Page 14: ...nt barcodes 2 dimensional symbols with a high level of readability that is suitable for the resolution of this printer The settings flow is as follows Barcodes 2 Dimensional Symbol Settings Set the type and size of barcodes 2 dimensional symbols in the font for barcodes 2 dimensional symbols of the printer driver Font Replacement You can replace the printer driver fonts to replace the font for bar...

Page 15: ...printer driver 2 Click Barcodes 2 Dimensional Symbols Settings on the Driver Utilities tab The Barcode and 2D Symbol Settings screen appears 3 From Type select the barcode 2 dimensional symbol you want to specify Setting items change depending on the type 4 Set the displayed items Right click an item and then click Help to display an explanation of the setting item QNOTE Setting point displays a p...

Page 16: ...y and check the printing size of the barcodes 2 dimen sional symbols 6 Input a character string into Test print and then click Print After printing barcodes 2 dimensional symbols use a scanner to check that they can be read ...

Page 17: ...nto Font name and then click Add on the lower left 8 Check that the font for barcodes 2 dimensional symbols has been added to the Font list and then click OK Close the Barcode and 2D Symbol Set tings screen Setting of the barcodes 2 dimensional symbols is now completed ...

Page 18: ...o read the barcode with a barcode reader if printed straddling the feeding position U Checking the Feeding Position on page 35 For this reason it is recommended to use fence barcodes or set the Print Quality to Quality Mode2 8 1 0 1 0 5 4 3 2 1 1 2 0 0 8 1 0 1 0 5 4 3 2 1 1 2 0 0 Paper feed direction Fence barcode Ladder barcode ...

Page 19: ...n 1 Font settings of barcodes 2 dimensional symbols Media type Print quality Adjust Bar Width 2 Upper line Minimum module dot Lower line Minimum element ratio ANSI grade D or higher ANSI grade C or higher ANSI grade B or higher Plain paper Speed Fence Yes 4 dot 2 5 Ladder 6 dot 2 5 Synthetic paper Matte paper Glossy Speed Fence Yes 3 dot 2 7 4 dot 2 5 Ladder 6 dot 2 5 Quality Mode1 Fence 3 dot 2 7...

Page 20: ... as follows For wristbands and Code 128 Five dot module and ANSI grade D For wristbands and Codabar Four dot module minimum element ratio of 2 5 and ANSI grade C Wristbands Speed Fence Yes 3 dot 2 7 4 dot 2 5 Ladder 6 dot 2 5 3 3 Quality Mode1 Fence 3 dot 2 7 4 dot 2 5 Ladder 6 dot 2 5 3 3 QNOTE If an odd number value is set for the Module changing the Media Type and Print Quality causes the resol...

Page 21: ...r to Checking the Feeding Position on page 35 2 Recommended value when using PDF417 General settings Straddling paper feeding 1 Font settings of barcodes 2 dimensional sym bols Media type Print quality Module height 2 Minimum module dot ANSI grade D or higher ANSI grade C or higher ANSI grade B or higher Plain paper Speed No 3 6 dot Yes 6 dot Synthetic paper Matte paper Glossy Speed No 4 dot Yes 4...

Page 22: ...ode only General settings Straddling paper feeding 1 Font settings of barcodes 2 dimensional symbols Media type Print quality Minimum cell size unit 360 dpi ANSI grade D or higher ANSI grade C or higher ANSI grade B or higher Plain paper Speed No 6 dot Yes 8 dot Synthetic paper Matte paper Glossy Speed No 5 dot 6 dot 2 Yes 6 dot 7 dot Quality Mode1 No 5 dot 6 dot 2 Yes 6 dot 7 dot Quality Mode2 6 ...

Page 23: ...indows True Type font Replace fonts by following the procedures below 1 Display the printer driver 2 Select the Driver Utilities tab and then click Font Replacement The Font Replacement screen appears 3 From the True Type Font Name click the True Type font you want to replace The selected font is displayed in the Replacement True Type Font cIMPORTANT For True Type fonts replacing barcode fonts sel...

Page 24: ...24 4 From the Replacement Target Font select the previously set barcodes 2 dimensional symbols font 5 Click OK to close the Font Replacement screen Font replacement is now completed ...

Page 25: ...atically added For seven digits Digits two to seven are data digits and the check digit is automatically added For eight digits Digits two to seven are data digits and the eighth digit is processed as the check digit but the barcode font is not verified If the composite is checked the eighth digit is ignored and the check digit is automatically added For 11 digits The check digit is automatically ...

Page 26: ... of the start and stop codes are not specified they are automatically added ITF Specify a character string with a maximum of 256 digits If odd digit data is specified 0 zero is automatically added at the beginning of the string Codabar Specify a character string with a maximum of 256 digits If a start code is not specified A is automatically added as the start code If a stop code is not specified ...

Page 27: ... character for the HRI control characters 00h to 1Fh and 7Fh Control characters HRI char acters Control characters HRI char acters Control characters HRI char acters ASCII Hexa decimal number ASCII Hexa decimal number ASCII Hexa decimal number NULL 00 U VT 0B K SYN 16 V SOH 01 A FF 0C L ETB 17 W STX 02 B CR 0D M CAN 18 X ETX 03 C SO 0E N EM 19 Y EOT 04 D SI 0F O SUB 1A Z ENQ 05 E DLE 10 P ESC 1B A...

Page 28: ... print barcodes by only inputting data for a desired symbol Manually specify the code set if not checked If code set C is specified consider the two created digits as ASCII decimal numbers and specify the corresponding ASCII character s Example 37 Specify as 65 Specify as A 979899 Specify as abc An error occurs if the data immediately following is not as indicated below Special HRI characters are ...

Page 29: ...git is Indicate special characters with a combination of followed immediately by a single character An error occurs if the data immediately following is not as indicated below GS1 128M Specify a character string of 38 to 66 digits The delimiter of the application identifier is separated by parenthesis Although printed as HRI characters they are not encoded A start code CODE A CODE B or CODE C and ...

Page 30: ...taBar truncated GS1 DataBar Limited Leading application identifier 01 is not included in the character string When printing HRI characters leading application identifier 01 is printed as 01 before the packing identification code Do not add a check digit to the bar code data When printing HRI characters the check digit is printed after the product code Specify 0 or 1 as the first digit if using GS1...

Page 31: ...ication identifier 10 or 21 because FNC1 is not necessary If the application identifier is 01 the 14th digit of the data section is made the check digit If the check digit is not correct an error occurs Different than the case of GS1 128 in that the check digit is not automatically calculated and added due to is skipped An error occurs if the data immediately following the character string is not ...

Page 32: ...ed Different than the case of GS1 128 in that the check digit is not automatically calculated and added due to If is specified is ignored and the following data is shifted by one digit each Specify special characters according to the following formats PDF417 Automatic calculation is performed if the number of digits and rows is 0 zero If anything other than 0 zero is specified specify so that the ...

Page 33: ...aracter string Do not add a check digit to the character string GS1 DataBar Expanded Stacked It is a multi row symbol version of GS1 DataBar Expanded Data specification procedures are the same as that for GS1 DataBar Expanded AztecCode Both full range and compact modes are supported DataMatrix Both square and rectangular shapes of version ECC200 are supported Control characters Hexadecimal number ...

Page 34: ...onal symbols and print True Type Font Use Font Replacement to specify the selected True Type font Point Separately specify the point for each font for barcodes 2 dimensional symbols Check the specified points of the fonts for barcodes 2 dimensional symbols U Barcodes 2 Dimensional Symbol Settings on page 15 ...

Page 35: ...g the feeding position It is not necessary to check the feeding position or adjust it if Quality Mode2 is specified for the Print Quality because the feeding position does not affect the reading accuracy of barcodes 2 dimensional symbols You can use Print Preview of the General tab to check an image of the print results before printing The feeding position is not displayed if Quality Mode2 is spec...

Page 36: ...ation Right click an item and then click Help to display an explanation of the setting item 1 List This is a list of your favorites The initial settings are those specified when the printer driver is installed The first setting at the top of the list is the default setting when the printer driver is started Click Up Down to switch the order of the list 1 2 3 4 ...

Page 37: ...s tab The Save Delete Favorite Setting screen appears The contents of the General and Options tabs are displayed under Current Settings 3 Input the settings name into Name and then click Add The Save Delete Favorite Setting screen closes 2 Item The favorites setting items 3 Current Settings Set value when you click Save As Favorite Setting 4 Registered Settings Favorite set value selected from the...

Page 38: ...38 4 The added settings name is Favorite Setting of the General or Options tab Registering favorites is now completed ...

Page 39: ...mbols Font replacement Driver operation settings Epson log file settings Fatal error notification settings Monitoring function settings Settings that cannot be Exported to a BSF File Items set for this printer by using PrinterSetting Printer driver port settings printer IP address and computer port QNOTE If the printer driver of another computer is specified by using a BSF file the file cannot be ...

Page 40: ...egistered only the initial settings when the printer driver was installed are registered 3 Click Import Export Settings on the Driver Utilities tab The Import Export Settings screen appears 4 Click Export Settings The Save As screen appears 5 Name and save the BSF file When the file has been saved Processing Completed is displayed 6 Click OK Exporting of settings is now complete ...

Page 41: ...ab The Import Export Settings screen appears 3 Click Import Settings The Overwrite confirmation screen appears 4 Click OK The Open screen appears 5 Select the file to be imported Processing Completed is displayed 6 Click OK Importing of settings is now complete QNOTE You can import settings from a BSF file to overwrite printer driver settings and save them ...

Page 42: ... Driver Interface The Epson Driver Printer Interface EPDI provides the Application Pro gramming Interface API for Epson printer drivers Use the EPDI to directly control the printer driver settings from your own developed applications EpsonNet SDK The EpsonNet SDK provides the API used for acquiring the status of Epson inkjet label printers Use the EpsonNet SDK to acquire the status of network prin...

Page 43: ...l page labels Die cut labels with black marks Die cut labels with gaps Plain paper Matte paper Synthetic paper Glossy No Continuous paper Continuous paper with black marks Plain paper Matte paper Wristbands Fanfold paper Yes Die cut labels with black marks Plain paper Matte paper No Continuous paper with black marks cIMPORTANT Depending on the shape of die cut labels the labels may peel off their ...

Page 44: ... be Used Do not load paper like the following Such paper will cause paper jams and print stains Thermal paper Paper joined together or lengthened by tape etc Paper joined to the core by tape etc Paper of A size B size etc ...

Page 45: ...ctance rate must be 70 or higher In order to accurately detect black marks use paper having black marks printed at the positions indicated for each black mark of the paper specifications Gap Detection Transmission type sensors are positioned along the paper path to detect paper loading from differences in the light transmission rates between the backing paper and labels The light transmission rate...

Page 46: ... of Paper Do not use paper preprinted in the following area if using paper preprinted on the back because it negatively affects detection Excluding black marks Paper width center 13 mm Preprinting prohibited area Paper feed direction Back side 8 5 mm ...

Page 47: ... Do not use make holes in the following areas if it is necessary to use paper with holes such as wristbands because it negatively affects detection Paper width center Holes prohibited areas Paper feed direction Print side 8 5 mm 6 0 mm ...

Page 48: ...nuous Paper Paper type Plain paper matte paper Form Roll paper Paper width 30 to 108 mm Paper thickness 0 084 to 0 124 mm Roll paper core Outer diameter 44 1 mm or more Outer diameter Max 101 6 mm Winding direction Printing surface must be facing outside cIMPORTANT Paper with holes or cutouts cannot be used ...

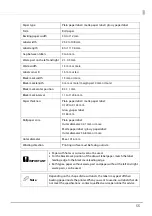
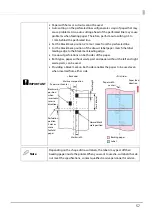
Page 49: ... 1 mm Black mark interval 8 to 1117 6 mm Paper thickness 0 084 to 0 124 mm Roll paper core Outer diameter 44 1 mm or more Outer diameter Max 101 6 mm Winding direction Printing surface must be facing outside cIMPORTANT Paper with holes or cutouts cannot be used Mark width Mark center position Mark length Mark interval Paper width center Perforation position 0 5 mm or more Fanfold paper Back side P...

Page 50: ... cut Number of folds 500 or less cIMPORTANT Paper with holes or cutouts cannot be used When fanfold paper is used the black marks must be at least 0 5 mm away from the perforated lines Set the auto cut position of fanfold paper to a position 0 5 to 1 mm away behind the perforated line Use uncut perforations on both sides of the paper Make sure the position of the black marks is kept the same in re...

Page 51: ... paper label 0 184 mm Roll paper core Plain paper label matte paper label synthetic paper label Outer diameter 44 1 mm or more Glossy paper label Outer diameter 56 8 mm or more Outer diameter Max 101 6 mm Winding direction Printing surface must be facing outside cIMPORTANT Paper with holes or cutouts cannot be used To prevent adhesive from adhering to the roll paper supply unit use label paper fro...

Page 52: ...er R 1 5 mm or less Paper thickness Plain paper label matte paper label synthetic paper label 0 129 to 0 195 mm Glossy paper label 0 184 mm Roll paper core Plain paper label synthetic paper label Outer diameter 44 1 mm or more Matte paper label glossy paper label Outer diameter 56 8 mm or more Outer diameter Max 101 6 mm Winding direction Printing surface must be facing outside Label width Backing...

Page 53: ...d will be difficult even if there are perforated lines so do not use perforated lines QNote Depending on the shape of die cut labels the labels may peel off their backing paper inside the printer When you want to use die cut labels that do not meet the specifications contact qualified service personnel for advice ...

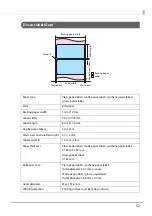
Page 54: ...ht waste parts Waste part Waste part Waste width Waste width Label length Gap between labels Corner R Backing paper width Label part Label width Backing paper Label Waste part Mark width Mark center position Mark length Mark interval Paper width center Perforation position 2 mm or more Fanfold paper Back side Print side Paper width center Paper feed direction Backing paper Label ...

Page 55: ...y paper label 0 184 mm Roll paper core Plain paper label Outer diameter 44 1 mm or more Matte paper label glossy paper label Outer diameter 56 8 mm or more Outer diameter Max 101 6 mm Winding direction Printing surface must be facing outside cIMPORTANT Paper with holes or cutouts cannot be used For the black mark position of the die cut label paper match the label leading edge to the black mark le...

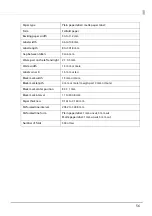
Page 56: ...5 mm Waste width 1 5 mm or more Label corner R 1 5 mm or less Black mark width 13 mm or more Black mark length 4 mm or more margin part 4 mm or more Black mark center position 8 5 1 mm Black mark interval 11 to 304 8 mm Paper thickness 0 161 to 0 164 mm Perforated line interval 203 2 to 304 8 mm Perforated line form Plain paper label 1 mm uncut 5 mm cut Matte paper label 1 mm uncut 5 mm cut Number...

Page 57: ...the paper Both types paper without waste part and paper without the left and right waste parts can be used Providing a black mark on both sides enables the paper to be used even when inserted from either side QNote Depending on the shape of die cut labels the labels may peel off their backing paper inside the printer When you want to use die cut labels that do not meet the specifications contact q...

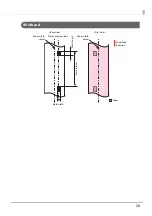
Page 58: ...58 Wristband Mark width Mark center position Mark length Mark interval Paper width center Back side Print side Paper feed direction Paper width center Paper ...

Page 59: ...er position 8 5 1 mm Black mark interval WB S series 184 1 mm WB M series 292 1 mm WB L series 292 1 mm Paper thickness 0 225 mm Roll paper core Outer diameter 56 8 mm or more Outer diameter Max 101 6 mm Winding direction Printing surface must be facing outside Holes and cutouts Hole diameter 2 5 mm or more cIMPORTANT When printing a barcode check that the barcode can be read in actual operation i...

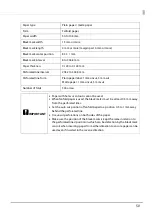
Page 60: ...nabled Margins at top bottom right and left 0 mm typical value QNote The maximum value of the print area width is 104 mm Paper width 15 0 mm or more When not auto cutting 8 0 mm or more Auto cut position Auto cut position Paper feed direction Print area Print area width Paper width center Paper ...

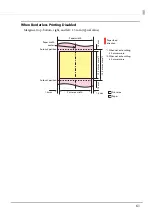
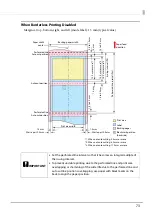
Page 61: ...mm typical value Paper width 1 5 mm 12 0 mm or more 1 15 0 mm or more 2 1 5 mm 1 5 mm 1 5 mm Auto cut position Auto cut position Paper feed direction Print area Print area width Paper width center Paper 1 When not auto cutting 5 0 mm or more 2 When not auto cutting 8 0 mm or more ...

Page 62: ...tom right and left 0 mm typical value QNote The maximum value of the print area width is 104 mm Paper width 15 0 mm or more When not auto cutting 8 0 mm or more Auto cut position Auto cut position Paper feed direction Print area Print area width Paper width center Paper Black mark position back side ...

Page 63: ...e Paper width 1 5 mm 12 0 mm or more 1 15 0 mm or more 2 1 5 mm 1 5 mm 1 5 mm Auto cut position Auto cut position Paper feed direction Print area Print area width Paper width center Paper Black mark position back side 1 When not auto cutting 5 0 mm or more 2 When not auto cutting 8 0 mm or more ...

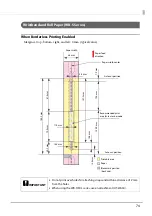
Page 64: ...tegral multiple of the issuing interval QNote The maximum value of the print area width is 104 mm Paper width 0 5 to 1 0 mm Issuing interval Ph Auto cut position Auto cut position Paper feed direction Print area Print area width Perforated line interval Pm Perforated line Auto cut position Perforated line Paper width center Black mark position back side 15 0 mm or more When not auto cutting 8 0 mm...

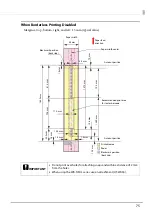
Page 65: ...l multiple Paper width 0 5 to 1 0 mm 12 0 mm or more 1 Issuing interval Ph 1 5 mm Auto cut position Auto cut position Paper feed direction Print area Print area width 1 5 mm 1 5 mm 1 5 mm 1 5 mm Perforated line interval Pm Perforated line Auto cut position Perforated line Paper width center 1 5 mm Paper Black mark position back side 1 When not auto cutting 5 0 mm or more 2 When not auto cutting 8 ...

Page 66: ...bel 0 mm typical value QNote The maximum value of the print area width is 104 mm Backing paper width 15 0 mm or more When not auto cutting 8 0 mm or more Auto cut position Paper feed direction Print area Print area width 2 0 mm 2 0 mm Label Paper width center Backing paper Waste part Waste part Paper width center ...

Page 67: ...g paper width 1 5 mm 12 0 mm or more 1 15 0 mm or more 2 1 5 mm 1 5 mm Auto cut position Auto cut position Paper feed direction Print area Print area width 1 5 mm Label Paper width center Backing paper Waste part 2 0 mm Waste part 2 0 mm 1 When not auto cutting 5 0 mm or more 2 When not auto cutting 8 0 mm or more ...

Page 68: ...nt area width is 104 mm Backing paper width 0 5 to 1 0 mm 15 0 mm or more 1 1 5 mm Waste part Auto cut position Auto cut position Paper feed direction Print area Print area width 2 0 mm 2 0 mm Waste part Label 1 5 mm 3 0 mm Paper width center Backing paper 18 0 mm or more 2 Perforation position 1 When not auto cutting 8 0 mm or more 2 When not auto cutting 11 0 mm or more ...

Page 69: ...1 5 mm 1 5 mm Auto cut position Auto cut position Paper feed direction Print area Print area width 2 0 mm 2 0 mm 1 5 mm Label 1 5 mm 1 5 mm 3 0 mm Paper width center Backing paper 18 0 mm or more 3 Perforation position Waste part Waste part Between labels 1 5 mm 1 When not auto cutting 5 0 mm or more 2 When not auto cutting 8 0 mm or more 3 When not auto cutting 11 0 mm or more ...

Page 70: ... mm Backing paper width 0 5 to 1 0 mm 15 0 mm or more 1 18 0 mm or more 2 1 5 mm Auto cut position Paper feed direction Print area Print area width Label 1 5 mm Paper width center Waste part 2 0 mm 1 5 mm Auto cut position Backing paper Waste part 2 0 mm Auto cut position Perforation position Black mark position back side 1 When not auto cutting 8 0 mm or more 2 When not auto cutting 11 0 mm or mo...

Page 71: ...osition Paper feed direction Print area Print area width 1 5 mm Label 1 5 mm 1 5 mm Paper width center Waste part 2 0 mm 1 5 mm Auto cut position Backing paper 1 5 mm Waste part 2 0 mm 12 0 mm or more 1 Auto cut position Perforation position Black mark position back side 1 5 mm 1 When not auto cutting 5 0 mm or more 2 When not auto cutting 8 0 mm or more 3 When not auto cutting 11 0 mm or more ...

Page 72: ...sitions overlapping use paper with black marks on the back to align the paper position QNote The maximum value of the print area width is 104 mm Backing paper width 15 0 mm or more 1 Auto cut position Auto cut position Paper feed direction Print area Print area width Label 1 5 to 3 0 mm 0 5 to 1 0 mm 1 5 to 3 0 mm Perforated line interval Pm Perforated line Auto cut position Perforated line Paper ...

Page 73: ...black marks on the back to align the paper position 1 5 mm 15 0 mm or more 2 1 5 mm Auto cut position Auto cut position Paper feed direction Print area Print area width Label 1 5 to 3 0 mm 0 5 to 1 0 mm 1 5 to 3 0 mm Perforated line interval Pm Perforated line Auto cut position Perforated line Paper width center 1 5 to 3 0 mm Backing paper 1 5 mm Waste part 2 0 mm 1 5 mm Waste part 2 0 mm 12 0 mm ...

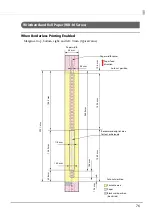
Page 74: ...within a distance of 2 mm from the holes When using the WB S M L series use an attachment OT WA34 Paper width Auto cut position Paper feed direction Printable area Paper Auto cut position Paper width center 5 5 mm 184 2 mm 11 0 mm 14 6 mm 81 5 mm 157 2 mm 105 9 mm Recommended print area for text or barcode 72 5 mm 15 0 mm 12 4 mm 30 2 mm 70 4 mm 7 9 mm Black mark position back side 36 mm ...

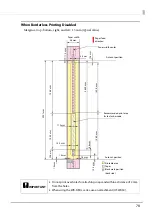
Page 75: ...using the WB S M L series use an attachment OT WA34 Paper width 1 5 mm Auto cut position Paper feed direction Paper 1 5 mm 1 5 mm Printable area Paper width center 5 5 mm 184 2 mm 11 0 mm 14 6 mm 81 5 mm 157 2 mm 105 9 mm Recommended print area for text or barcode 72 5 mm 15 0 mm 12 4 mm 1 5 mm 30 2 mm 70 4 mm 7 9 mm Black mark position back side Black mark position back side Auto cut position 36 ...

Page 76: ...mm typical value Paper width Auto cut position Paper feed direction Printable area Paper Paper width center 5 5 mm 11 0 mm Recommended print area for text or barcode 30 6 mm 292 1 mm 156 5 mm 105 0 mm 15 0 mm 265 0 mm 14 6 mm 12 5 mm 138 9 mm 142 4 mm Auto cut position 10 8 mm 36 mm Black mark position back side ...

Page 77: ...77 cIMPORTANT Do not print over holes for attaching snaps and within a distance of 2 mm from the holes When using the WB S M L series use an attachment OT WA34 ...

Page 78: ...e holes When using the WB S M L series use an attachment OT WA34 Paper width 1 5 mm Auto cut position Paper feed direction Printable area 1 5 mm Paper Paper width center 5 5 mm 11 0 mm 1 5 mm Recommended print area for text or barcode 1 5 mm 30 6 mm 292 1 mm 156 5 mm 105 0 mm 15 0 mm 265 0 mm 14 6 mm 12 5 mm 138 9 mm 142 4 mm Auto cut position 10 8 mm 36 mm Black mark position back side ...

Page 79: ...typical value Paper width Auto cut position Paper feed direction Printable area Paper Auto cut position Paper width center 5 5 mm 183 0 mm 15 0 mm 71 0 mm 265 0 mm 158 4 mm 122 9 mm Recommended print area for text or barcode 38 1 mm 292 1 mm 28 0 mm 24 0 mm 14 6 mm 12 5 mm 10 8 mm 36 mm Black mark position back side ...

Page 80: ...80 cIMPORTANT Do not print over holes for attaching snaps and within a distance of 2 mm from the holes When using the WB S M L series use an attachment OT WA34 ...

Page 81: ...m Auto cut position Paper feed direction Printable area 2 0 mm Paper Auto cut position Paper width center 5 5 mm 183 0 mm 15 0 mm 1 5 mm 71 0 mm 265 0 mm 158 4 mm 122 9 mm Recommended print area for text or barcode 38 1 mm 292 1 mm 28 0 mm 24 0 mm 14 6 mm 12 5 mm 1 5 mm 10 8 mm 36 mm Black mark position back side ...

Page 82: ...82 cIMPORTANT Do not print over holes for attaching snaps and within a distance of 2 mm from the holes When using the WB S M L series use an attachment OT WA34 ...

Page 83: ...ect the leading edge of a page fixed quantity feeding is performed after the paper is loaded As a result it may not be possible to print the first sheet of labels This section describes the paper loading methods and paper handling in order to prevent this problem and print from the first labels Loading Paper When loading paper check that the leading edge of roll paper is between the auto cut posit...

Page 84: ...o that it is located at less than 172 5 mm from the leading edge of the paper Die cut labels black marks and gaps and die cut labels gaps with transparent backing paper Set the leading edge of the first label so that it is located at 172 5 to 200 mm from the leading edge of the paper Do not set the label or black mark so that it is located at less than 172 5 mm from the leading edge of the paper T...

Page 85: ...k mark so that it is located at less than 25 mm from the leading edge of the paper Die cut labels black marks Set the leading edge of the first label so that it is located at 25 mm or more from the leading edge of the paper Do not set the label or black mark so that it is located at less than 25 mm from the leading edge of the paper This area must only consist of backing paper Black mark width lea...

Page 86: ... definition you want to use and then click Edit 4 Check that No Auto Cut Feed to Peel Off Position is not selected in Settings for Paper Handling After Print Printer Settings Use PrinterSetting to enable notification settings at a Media Size Error Settings Specify the printer settings by following the procedures below 1 Display the printer driver 2 Select the Printer Utilities tab and then click P...

Page 87: ...ocated less than 107 5 mm from the end edge of the paper This area must only consist of backing paper Affix two black marks behind the final ticket or label printed QNOTE If new print data is sent to this printer after print processing including auto cut of the final ticket or label has completed normally a Media Size Error will occur and the printer will stop with the print data retained Max 11 m...

Page 88: ...the label so that it is located less than 150 mm from the end edge of the paper This area must only consist of backing paper Affix two black marks behind the final ticket or label printed QNOTE A No Paper Error occurs after printing of the last ticket or label is com pleted and the printer stops QNOTE If new print data is sent to this printer after print processing including auto cut of the final ...

Page 89: ...ter settings can be started from the driver EpsonNet Config Software for changing the network settings of the product USB Printer Class Device Replace ment Service Software that provides assistance for replacing the product in the event that the printer fails The printer driver USB port is automatically changed when connecting a new printer with a client computer that is permanently in use EPSON D...

Page 90: ...river EpsonNet Config Required if setting up network printers Specify the printer settings by following the procedures below 1 Connect this printer to the administrator s computer and turn on the power 2 Start PrinterSetting of the printer driver and specify the settings of the media source and media detection method 3 If using as a network printer start EpsonNet Config and specify network set tin...

Page 91: ...ng a network computer 2 Register the settings file and network settings in the Printer Deployment of the EPSON Deployment Tool For registration procedures refer to the user s manual included with the EPSON Deployment Tool 3 Connect the printer and select Settings from the EPSON Deployment Tool list and then click Start Setup Printer and network settings are completed automatically Setting up of th...

Page 92: ...ures below 1 Prepare a BSF file of the printer driver and the printer s IP address if using a network printer in the administrator s computer 2 From Driver Deployment of the EPSON Deployment Tool select the TM C3500 printer driver and start the EpsonNet SetupManager 3 Select the BSF file set the IP address if using a network printer and create the printer driver installation package For creation p...

Page 93: ... and printers connected to the client computer The following software is required EPSON Monitoring Tool Printer Registration Start the EPSON Monitoring Tool to display the network printers Register the local printers connected to the client computer by following the procedures below 1 Start the EPSON Monitoring Tool 2 Select Tool Add Device to List The Add Device to List screen appears 3 Select PC...

Page 94: ...ON Monitoring Tool screen The registration of local printers connected to the client computer is now complete Checking Printer Status Double click the printer displayed in the list of the EPSON Monitoring Tool to display the EPSON Status screen You can check printer status and amount of remaining ink Client computer port name IP address Printer status Amount of remaining ink ...

Page 95: ...w 1 Prepare a PrinterSetting settings file 2 Register local printers connected to the client computer in the EPSON Monitoring Tool For registration procedures refer to Printer Monitoring on page 93 3 From the EPSON Monitoring Tool screen select the printer for which you want to change the settings Register the PrinterSetting settings file and change settings according to the instructions displayed...

Page 96: ... package by following the procedures below 1 Prepare a printer driver settings file BSF file in the administrator s com puter 2 Create a settings change package by using Driver Deployment of the EPSON Deployment Tool For creation procedures refer to the user s manual of the EPSON Deployment Tool Creation of a settings change package is now complete Client Computer Procedures Perform client compute...

Page 97: ...anging of the driver USB port when a printer is changed The client computer user does not have to change the settings Installing Install the USB Printer Class Device Replacement Service by following the procedures below 1 Unzip the USBRepSv file and extract to a folder of your choice 2 Double click SETUPxx exe of the USBRepSv UsbRepSv_xx_xxxx folder Installation of the USB Printer Class Device Rep...

Page 98: ...Uninstall a program Windows 8 1 or Windows 8 Select Control Panel from the Settings sidebar of the desktop Click Uninstall a program Windows 7 Click Control Panel in the Start menu Click Uninstall a program Windows Vista Click Control Panel in the Start menu Click Uninstall a program Windows XP Professional Click Control Panel in the Start menu and then click Add or Remove Programs Windows XP Home...

Page 99: ...a check mark next to the USB Replacement Service and click OK Click OK to start the uninstall process The Uninstall Complete screen is displayed 6 Click OK Uninstallation of the USB Printer Class Device Replacement Service is now complete ...

Page 100: ... be displayed for the previous printer that was replaced Or the check mark might not be displayed at all In such cases you can correct the check mark by performing the following procedure Return to the desktop screen and open the View devices and printers screen again Right click the printer driver and select Set as Default Printer Log off the user s account and restart the operating system ...

Page 101: ...y purchaser or third parties as a result of accident misuse or abuse of this product or unauthorized modifications repairs or alterations to this product or excluding the U S failure to strictly comply with Seiko Epson Corporation s operating and maintenance instructions 6 Seiko Epson Corporation shall not be liable for any damages or problems arising from the use of any options or any consumable ...

Reviews: