background image

EPSON Stylus Pro 5500

6 -


EPSON Stylus Pro 5500

2/01

Installing Ink Cartridges for the 
First Time

Always use new ink cartridges. Reinstalling partially empty ink 
cartridges prevents the ink counter from accurately indicating 
the amount of ink remaining. 

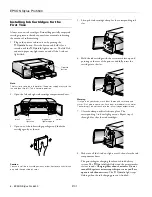
1. Plug in the printer and turn it on by pressing the


P

Operate

 button. Press the button and hold it for a 

second until the


 P

Operate

 light comes on. The 

Ink Out


and main paper tray light come on and all the 


ink out 

lights flash.

Note

:

The first time you plug in the printer, the power supply may cycle the 
fan and then turn off. This is normal operation.

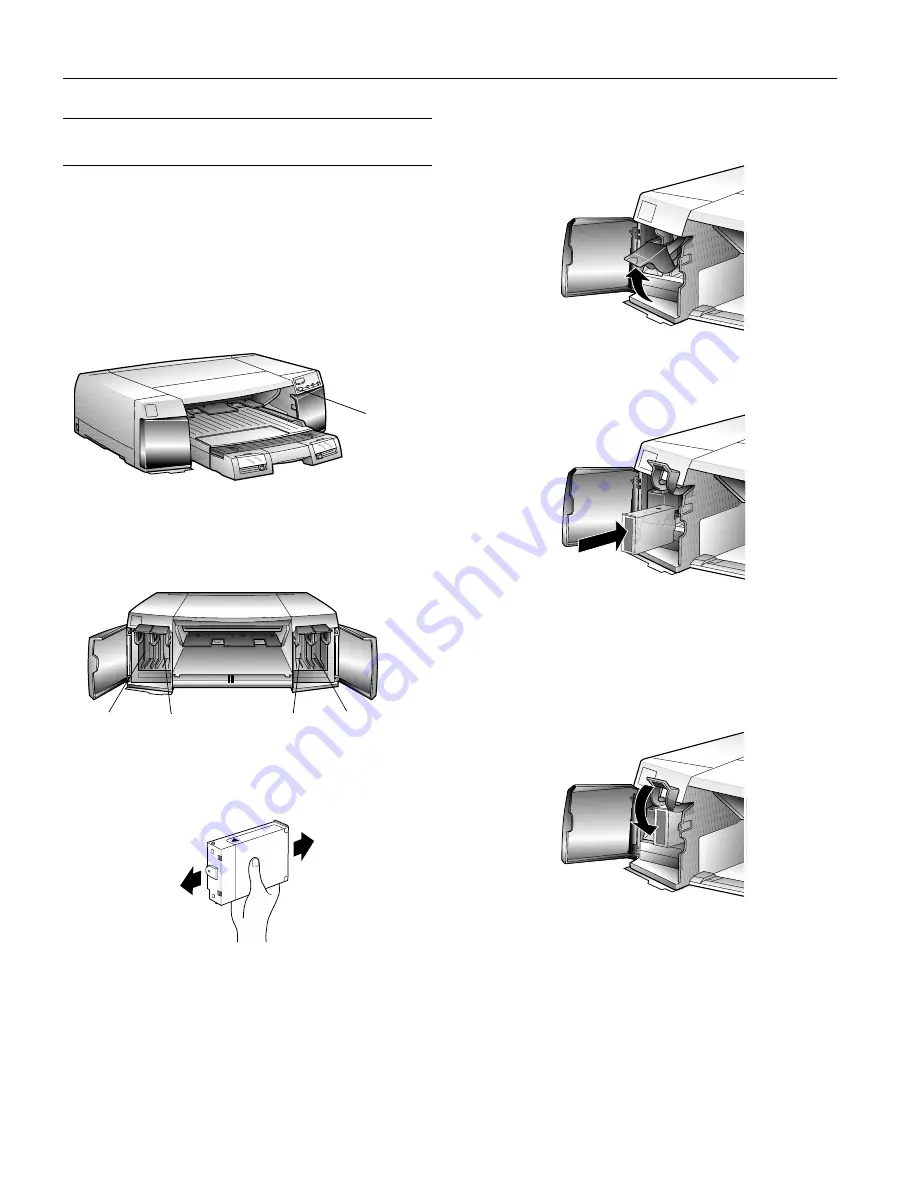
2. Open the left and right ink cartridge compartment doors.

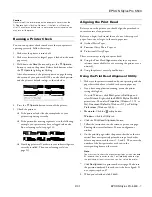
3. Open one of the ink cartridge packages and shake the 

cartridge gently, as shown.

4.

Caution

:

You can install the ink cartridges in any order; however, each slot can 
only hold the specified ink color.

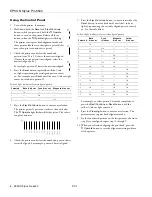
5. Lift up the ink cartridge clamp for the corresponding ink 

slot.

6. Hold the ink cartridge with the arrow mark face-up and 

pointing to the rear of the printer, and fully insert the 
cartridge into the slot. 

Warning

:

If ink gets on your hands, wash them thoroughly with soap and 
water. If ink gets in your eyes, flush them immediately with water. 
To avoid injury, do not reach into the ink cartridge compartments.

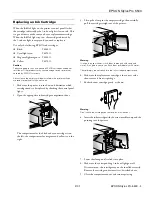
7. Close the clamp until it clicks into place. The 

corresponding 


ink out light goes out. Repeat steps 3 

through 6 for the other ink cartridges.

8. Make sure all the 


ink out lights are off, then close the ink 

compartment doors.

The printer begins charging the advanced ink delivery 
system. The


 P

Operate

 light flashes and the printer makes 

various sounds. 

Charging takes about 6 minutes. Do not 

turn off the printer or interrupt this process or you’ll use 
up more ink than necessary.

 The


 P


Operate

 light stops 

flashing when the ink charging process is finished.

Operate 
button

 yellow

magenta/
light magenta

cyan/
light cyan

black

Summary of Contents for Color Proofer 5500

Page 1: ...y C813621 EPSON Type B IEEE 1394 FireWire Interface Card C823722 EPSON Type B 10 100 BaseT Ethernet Interface Card C823632A EFI Fiery Spark Professional RIP software TBD One year Service Plan EPP55B1 Two year Service Plan EPP55B2 Media name Size Part number Archival Matte Paper Letter 8 5 11 inches A3 297 420 mm Super A3 B 13 19 inches S041341 S041343 S041339 Premium Glossy Photo Paper Letter 8 5 ...

Page 2: ...inch increments Paper feed speed 79 milliseconds per 1 6 inch line 152 mm per second in continuous feeding Specification 120V Model 220 240V Model Input voltage range 99 to 132V 198 to 264V Rated frequency range 50 to 60 Hz Input frequency range 49 5 to 60 5 Hz Rated current 1 0A Power consumption Approx 26W ISO IEC 10561 Letter Pattern 10W or less in standby mode Size Paper types Thickness Weight...

Page 3: ...tored in shipping container without condensation Safety standards UL 1950 CSA C22 2 950 EMC FCC part 15 subpart B class B CSA C108 8 class B Compatibility mode Forward channel Data format 8 bit parallel IEEE 1284 compatibility mode Synchronization STROBE pulse Handshake timing BUSY and ACKNLG signals Signal level TTL compatible Connector 57 30360 Amphenol connector or equivalent Reverse channel Tr...

Page 4: ...is installed correctly Paper Out light flashing and all paper tray lights flashing Paper jam Turn off the printer and remove the jammed paper Paper path cover is open Close the paper path cover Ink Out light flashing and one or more H ink out lights flashing Corresponding ink cartridge nearly empty Obtain a replacement ink cartridge Ink Out light on and one or more H ink out lights on Correspondin...

Page 5: ...k on Run a nozzle check and if necessary clean the print head Ink Out Paper Out and Paper Size Type lights flashing but the paper tray and H ink out lights are off Maintenance will be required soon Turn off the printer and contact EPSON Paper Out and POperate lights flashing Ink Out and Paper Size Type light on all paper tray lights flash and H ink out lights are on Maintenance required now Turn o...

Page 6: ...cified ink color 5 Lift up the ink cartridge clamp for the corresponding ink slot 6 Hold the ink cartridge with the arrow mark face up and pointing to the rear of the printer and fully insert the cartridge into the slot Warning If ink gets on your hands wash them thoroughly with soap and water If ink gets in your eyes flush them immediately with water To avoid injury do not reach into the ink cart...

Page 7: ...ze or larger in the main paper tray Archival Matte Paper Premium Glossy Photo Paper or Professional Glossy Paper There are two ways to align the print head Using the Print Head Alignment utility in your printer software not available if you re accessing the printer over a network Using the printer s control panel buttons Using the Print Head Alignment Utility 1 Make sure the printer is turned on b...

Page 8: ...a couple of minutes 6 Check the printout and select the numbered pattern that is correctly aligned For example pattern 8 here is aligned 7 Press the Eject Continue button to move forward or the Reset button to move backward until the H ink out light s representing the correctly aligned pattern come s on See the table below For example to select pattern 8 from the sample above press the Eject Conti...

Page 9: ... by checking the control panel lights 2 Open the appropriate ink cartridge compartment door The compartment for the black and cyan cartridges is on the left the compartment for magenta and yellow is on the right 3 Lift up the clamp for the empty cartridge then carefully pull the cartridge straight out of the printer Warning If ink gets on your hands wash them thoroughly with soap and water If ink ...

Page 10: ... paper you re using If the print settings don t match the lever settings you ll get an error message and your job won t print Note You can disable verification by setting the levers to Other However the purpose of paper size and media type verification is to help you avoid printing errors and you should take advantage of this help whenever possible Paper Tray Loading Capacities and Guidelines The ...

Page 11: ...y when you load paper You should also use the media type and paper size cards to identify the substrate loaded in each tray This helps all users to be aware of what s in the printer at a glance and also prevents anyone from inadvertently changing the lever positions The table to the right identifies the media type settings for EPSON media and similar papers Note For any substrates not on this list...

Page 12: ...elect Properties Windows 95 98 or 2000 Document Defaults Windows NT or Printing Preferences Windows 2000 3 Macintosh Click the utility button Windows Click the Utility tab 4 On the Utility menu click the Head Cleaning button 5 Follow the instructions on the screen to clean the print head Cleaning takes about 90 seconds during which the printer makes some noise and the POperate light flashes Cautio...

Page 13: ...n t turn off the printer by unplugging it or turning off a power strip This will not properly lock the print head in the home position causing ink to leak out and damage the printer 4 Turn off the printer and make sure the print head is in the home far right position If it s not turn the printer back on wait until the print head stops moving and is in the home position then turn off the printer Af...

Reviews: