Installing the software
(Windows only)
1
Insert the Epson RC+ 7.0 DVD into a DVD drive on the
computer you will use to program the robot.
Note:
You can download manuals for your product from the
Epson website. Visit
www.epsonrobots.com/product-manuals
and search for your product. If you need to download the
Epson RC+ 7.0 software, send an email request to
applications@robots.epson.com to receive a download link.
2
Follow the on-screen instructions to install the software.
3
Double-click the
EPSON RC+ 7.0 icon on your desktop to
start the Epson RC+ 7.0 software.
See the online Epson RC+ 7.0 User’s Guide for details on
installing and using the Epson RC+ 7.0 software.
Any problems?
When testing the Vision Guide environment, there is no
live feed showing from the camera (screen is dark).
• Make sure the lens cap is removed from the lens.
• Try adjusting the iris on the lens.
• Make sure the
Virtual setting has not been selected in the
camera settings. In the Epson RC+ 7.0 software, open the
Setup menu and click System Configuration. Expand Vision
in the menu tree then expand
Cameras. Click on Camera 1. If
the
Virtual setting is selected, deselect the box, then continue
from step 12 of “Test the system.”
• Remove the lens and point the camera at a light source. If the
screen shows a bright image, there may be an issue with the
lens. If the screen remains dark after removing the lens, contact
Epson.
• Reset the system from the software. In the Epson RC+ 7.0
software, open the
Setup menu and click System
Configuration. Expand Vision in the menu tree and click
Cameras. Click Reset, then click Yes. If the screen remains
dark, contact Epson.
I get a connection or communication error message.
• Make sure your cable connections are correct and secure.
• Check the camera configuration settings in the software.
• Reset the system from the software. In the Epson RC+ 7.0
software, open the
Setup menu and click System
Configuration. Expand Vision in the menu tree and click
Cameras. Click Reset, then click Yes. If the error messages
persist, contact Epson.
Where to get help
For technical support, do one of the following:
• Visit
www.epsonrobots.com/customer-service anytime.
• Call 1-866-ROBOTS1 (U.S. only, toll-free) or 1-562-290-5900
(U.S. and elsewhere, toll or long distance charges may apply),
6
am
to 4:30
pm
, Pacific Time, Monday through Friday.
Training
To help you get the most from your Epson product, Epson offers
programming, maintenance, and robotics vision guide classes.
Visit
www.epsonrobots.com/training for more information.
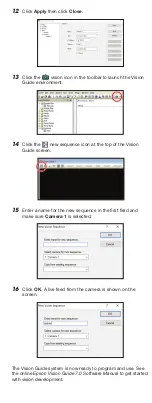
12
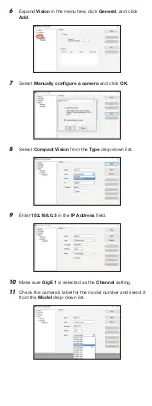
Click
Apply then click Close.
13
Click the
vision icon in the toolbar to launch the Vision
Guide environment.
14
Click the
new sequence icon at the top of the Vision
Guide screen.
15
Enter a name for the new sequence in the first field and
make sure
Camera 1 is selected.
16
Click
OK. A live feed from the camera is shown on the
screen.
The Vision Guide system is now ready to program and use. See
the online Epson Vision Guide 7.0 Software Manual to get started
with vision development.
EPSON is a registered trademark and EPSON Exceed Your Vision is a registered logomark of
Seiko Epson Corporation.
Windows is a registered trademark of Microsoft Corporation in the United States and/or other
countries.
General Notice: Other product names used herein are for identification purposes only and may
be trademarks of their respective owners. Epson disclaims any and all rights in those marks.
This information is subject to change without notice.
© 2019 Epson America, Inc., 3/19
Printed in U.S.A.
CPD-57173

