Projector Parts and Functions
20
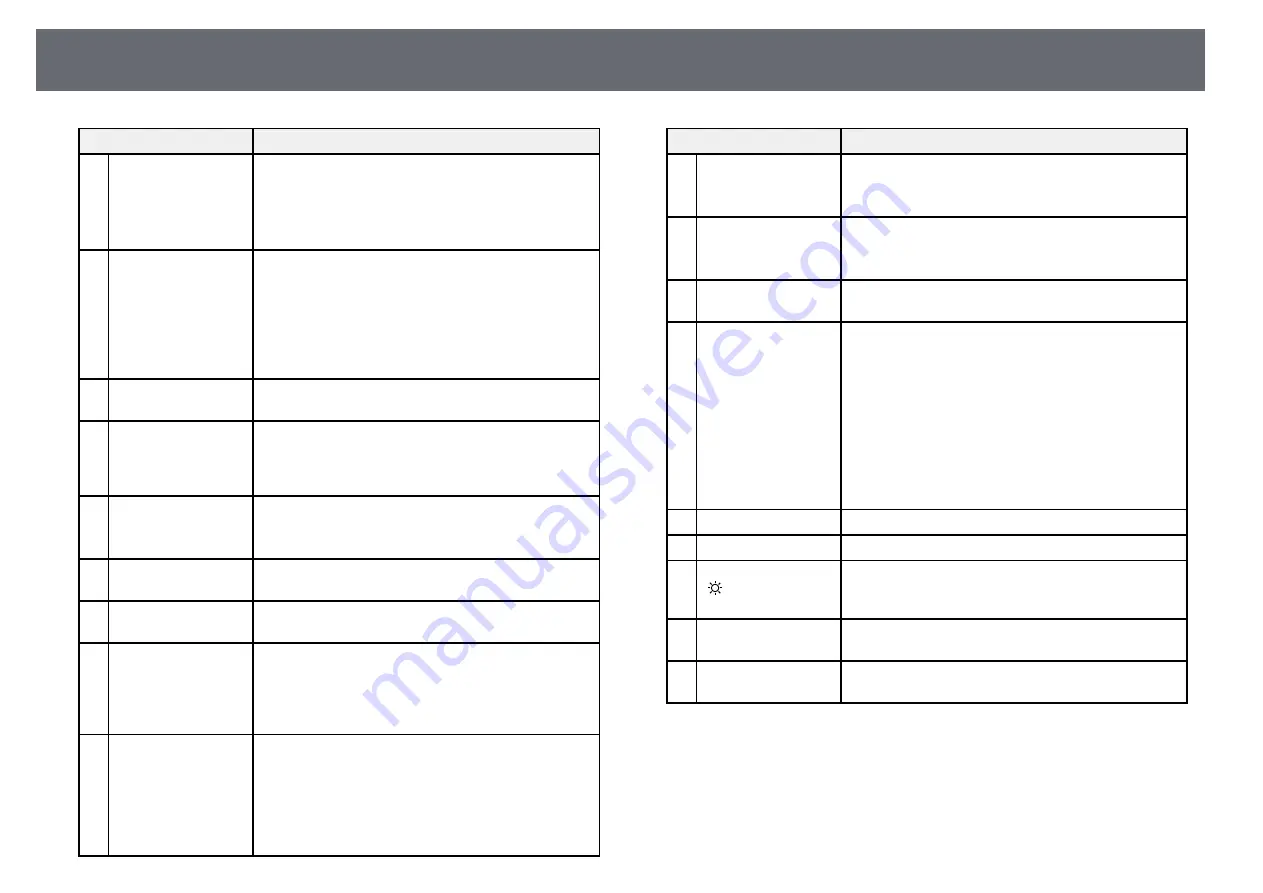
Name
Function
R
Numeric buttons
Enters numbers in the projector's menu while holding
down the [Num] button.
In Content Playback mode, enter numbers while
holding down the [Num] button to play back your
favorite playlists.
S
[ID] button
Press this button and press a number button within 5
seconds to select the ID for the projector you want to
operate using the remote control. (Enter a one-digit or
two-digit number.)
If you do not know the projector's ID, press this button
during projection to temporarily display the projector's
ID and the remote control's ID on the screen.
T
[ID] switch
Enables (On) or disables (Off) ID settings for the
remote control.
U
Remote port
Use to connect the optional remote control cable set
and inputs signals from the remote control. When the
remote control cable is connected, the remote receiver
on the projector is disabled.
V
[Home] button
Displays and closes the Home screen.
Hold down this button for more than 5 seconds to lock
or unlock the remote control buttons.
W
[Num] button
Hold down this button to enter numbers using the
numeric buttons.
X
[Geometry] button
Displays the
Geometry Correction
screen allowing you
to correct keystone distortion of the projected image.
Y
[Memory] button
Displays the
Memory
screen where you can save
customized settings and load saved settings. A memory
name that has already been used is indicated by a blue
mark. Saving over a previously saved memory
overwrites the settings with your current settings.
Z
[E-Zoom] +/–
buttons
Resizes the projected image without changing the
projection size.
This feature is unavailable if the
Scale
setting in the
projector's menu.
s
Signal
>
Scale
s
Extended
>
Multi-Projection
>
Scale
Name
Function
a
[Default] button
Returns the selected setting to its default value.
Hold down this button for more than 3 seconds to start
the lens calibration process.
b
[Esc] button
Stops the current function.
Moves back to the previous menu level while
displaying the projector's menu.
c
[Focus] button
Displays the screen where you can adjust the focus and
distortion in the projected image.
d
[Split] button
Projects two images from different image sources
simultaneously by splitting the projected screen.
While using the split screen feature, other projector
features may not be available and some settings may be
automatically applied to all images.
You cannot perform split screen projection when the
Content Playback
setting is set to
On
in the projector's
Settings
menu.
Some input source combinations are not supported for
split screen projection.
e
[Color Mode] button Changes the color mode.
f
[Search] button
Switches to the next input source.
g
Illumination button
[ ]
Illuminates the buttons on the remote control for
approximately 15 seconds. This is useful when using
the remote control in the dark.
h
Indicator
A light is emitted when outputting remote control
signals.
i
Remote control light
emitting area
Outputs remote control signals.
g
g
Related Links
• "Installing Batteries in the Remote Control"


