Useful Functions
43
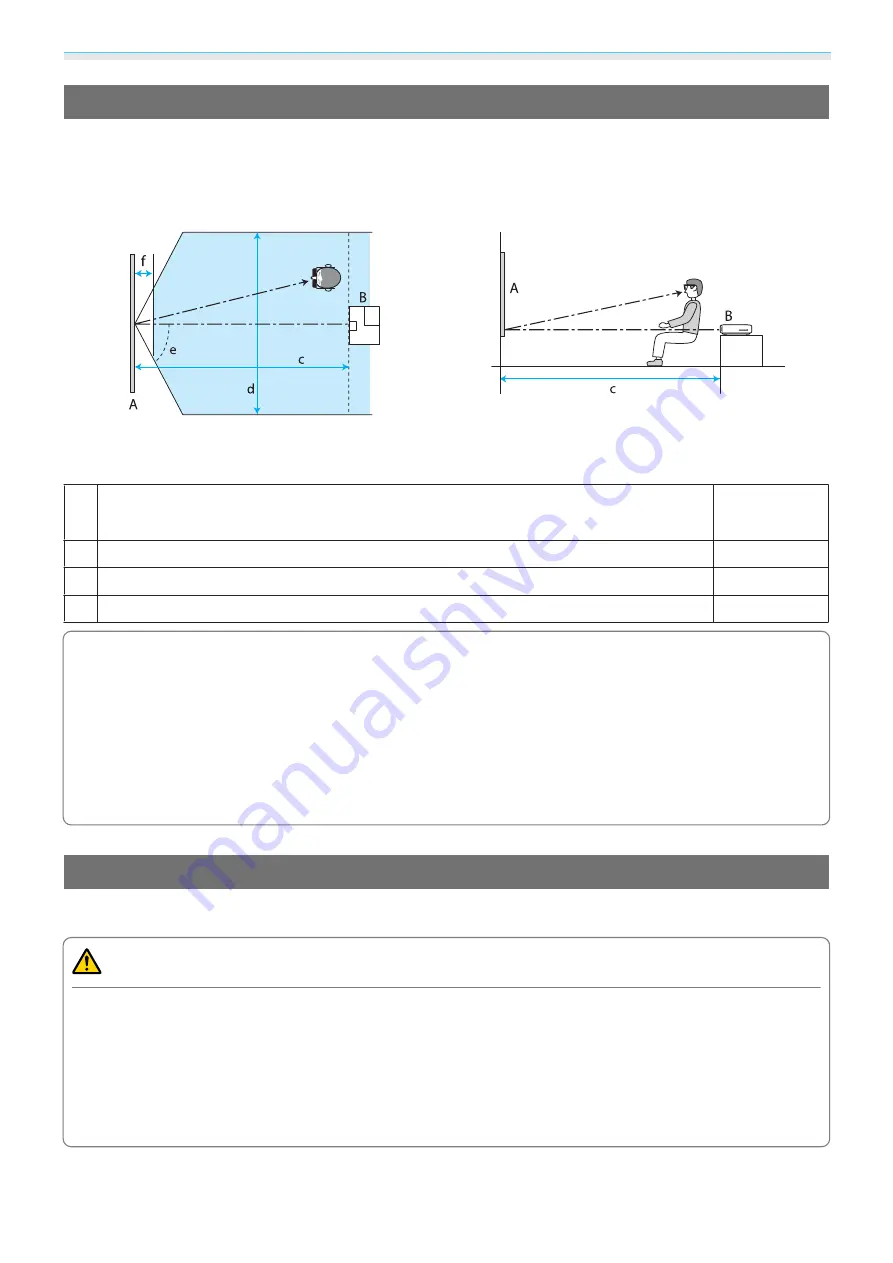
Viewing Area for 3D Images
The projector is equipped with an internal 3D emitter that synchronizes with your 3D Glasses to view 3D
images. This allows you to view 3D images within the range shown in the figure below.
Use the optional External 3D IR emitter if you cannot view the 3D image normally or if you are in a particularly
spacious room.
s
A
Screen
B
Projector
c
Distance from the projector to the screen
Viewing distance when using the projector's built-in 3D emitter
5 m
d
Viewing width
4 m
e
Viewing angle
60°
f
Distance from the screen (viewing is not possible)
0.3 m
c
•
If there are AV devices such as Blu-ray Disc players near the screen, signals from the projector's 3D
emitter may effect operations for the AV devices. Please setup the AV device further away from the
screen.
•
Do not stick anything that will block the signal onto the front of the 3D Glasses.
•
Connect the optional External 3D IR emitter to the External 3D IR port on the rear of the projector with
a LAN cable, and install it at the base of the screen, near the center.
•
The viewing range for the optional External 3D IR emitter is 10 m.
•
The 3D Glasses for this projector utilize 3D Active Shutter Eyewear Technology developed by the
Panasonic Corporation and X6D Ltd.
Warnings Regarding Viewing 3D Images
Note the following important points when viewing 3D images.
Warning
•
Do not disassemble or remodel the 3D Glasses.
This could cause a fire to occur or the images to appear abnormal when viewing, causing you to feel unwell.
•
Do not install the lithium coin batteries with their polarities (plus and minus) inversed.
If the batteries are inversed by mistake, they could explode or leak, causing a fire, injury, or damage the
surroundings. Follow the instructions to install the batteries correctly.
•
Do not leave the batteries or the supplied nose pad within reach of children.
They could be accidentally swallowed. If anything is accidentally swallowed, contact a doctor immediately.
Summary of Contents for EH-TW5900
Page 1: ...User s Guide ...
Page 25: ...Basic Operations 24 f Reattach the lens cover ...


