background image

Displaying  live  images  and  images  on  an  SD  card

a

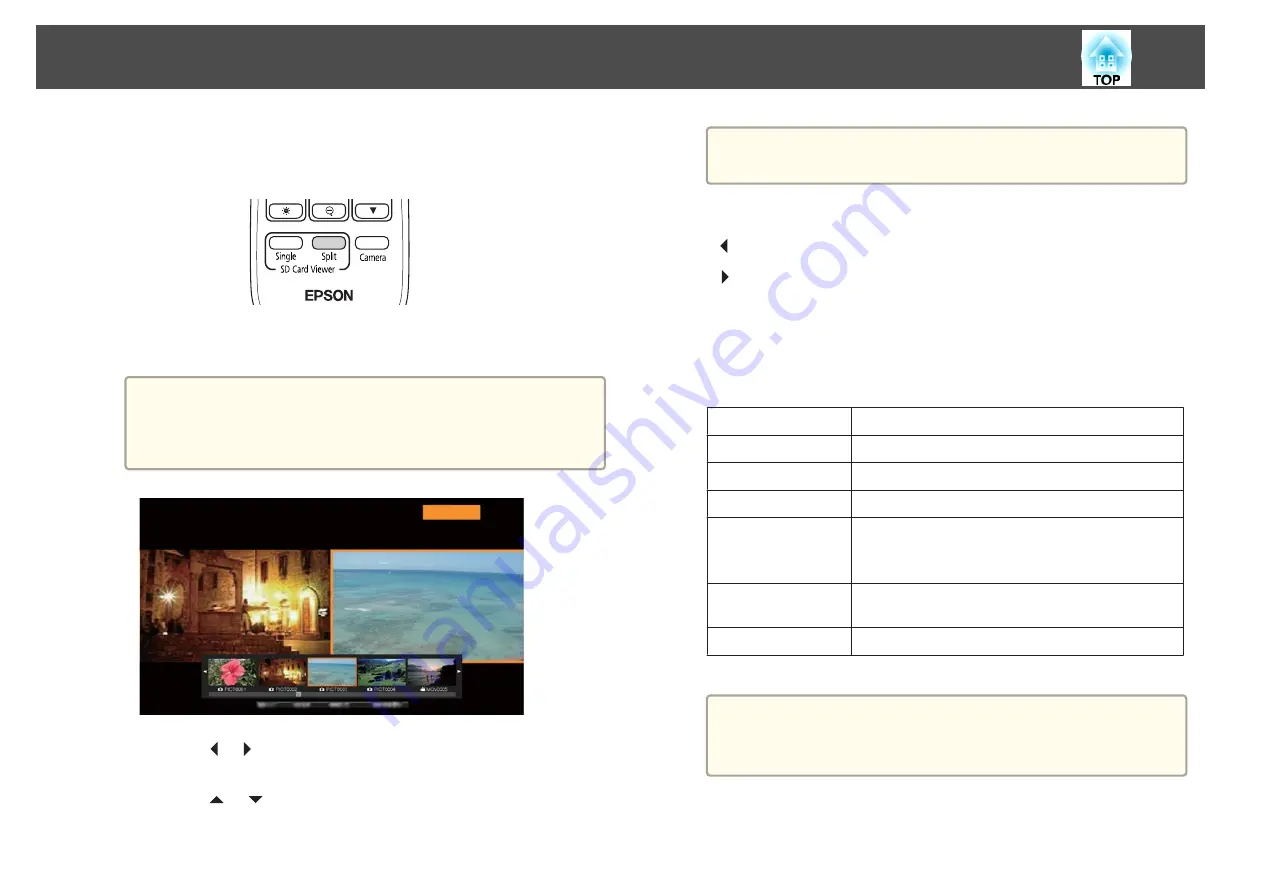
Press  the  [Split]  button  on  the  remote  control.

A  live  image  and  an  image  on  the  SD  card  are  displayed  side-by-side
on  the  screen.

a

You  can  start  the  split  screen  projection  using  the  [Enter]
button  on  the  document  camera  or  the  remote  control.  Press
the  [Enter]  button  while  projecting  a  live  image,  and  then  select

Split  Screen

 from  the  

SD  Card

 menu.

b

Press  the  [

]   [

]  buttons  to  select  the  thumbnail  for  the  image

you  want  to  display.

Press  the  [

]   [

]  buttons  to  change  the  thumbnails  page.

a

When  projecting  a  live  image  from  the  document  camera,  you
cannot  display  a  movie  from  the  SD  card.

c

Press  the  [Enter]  button  to  hide  the  thumbnails.

[ ]  button:  Displays  the  previous  file.

[ ]  button:  Displays  the  next  file.

[Esc]  button:  Displays  the  thumbnails  again.

d

Press  the  [Menu]  button  to  access  the  following  functions.

Some  functions  are  not  available  depending  on  the  image  being
projected.

Rotate  to  Right

Rotates  the  image  90  degrees  to  the  right.

Rotate  to  Left

Rotates  the  image  90  degrees  to  the  left.

Single  Screen

Changes  to  a  single  image  display.

Flip

Switches  the  images  on  the  left  and  right.

Camera/SD
Mode
SD/SD  Mode

Changes  the  combination  of  displayed  images.

Live  Image  and  Image  on  SD  card

Two  Files  on  SD  Card

Return  to  Camera

The  slideshow  is  closed  and  a  live  image  is
displayed.

Thumbnail

*

Displays  thumbnails.

*

 This  is  not  displayed  while  thumbnails  are  displayed.

a

You  can  use  the  following  adjustment  functions  for  live  images.

Brightness  adjustment,  Focus  adjustment  (automatic  and
manual),  Freeze,  Zoom  (Pan/Tilt)

e

End  the  slideshow  by  pressing  the  [Camera]  button  on  the  remote
control.

Displaying a Slideshow (SD Card Viewer Function)

35

Summary of Contents for ELPDC21

Page 1: ...Document Camera User s Guide ...

Page 2: ... symbol indicates information that if ignored could possibly result in personal injury or physical damage due to incorrect handling Symbols for General Information Attention Indicates information that if ignored could cause the product to malfunction or cause damage a Indicates additional information and points which may be useful to know regarding a topic s Indicates a page where detailed informa...

Page 3: ... be exposed to rain water or excessive humidity Fire or electric shock may result Do not use or store the document camera where it may be exposed to smoke steam corrosive gases or excessive dust Fire or electric shock may result Caution Do not set up the document camera near high voltage electrical wires or sources of magnetic fields This may interfere with correct operation Operate in the proper ...

Page 4: ... in fire or electric shock If the AC adapter power cord or document camera is damaged turn the power off unplug the AC adapter from the electrical outlet and contact your local dealer or Epson for help Do not touch the device the AC adapter or the plug with wet hands Otherwise you may receive an electric shock Do not use a power cord that is damaged This may result in fire or electric shock Take t...

Page 5: ...aution Do not place the document camera in an unstable location such as on a shaky table or slanted surface The document camera may drop or tip over causing personal injury If you use a table cart or stand make sure it is stable and will not fall over When using the mounting points under the document camera to secure it to a table cart or stand fasten the two bolts securely but do not overtighten ...

Page 6: ...sing the damaged device may cause fire or electric shock Never allow objects of any kind to enter any openings in the document camera Do not leave objects especially flammable objects near the document camera Doing so may result in fire or electric shock Caution Unplug the AC adapter from the outlet before cleaning to prevent electric shock Usage Precautions Caution Do not look into the lens when ...

Page 7: ...ous if swallowed Prepare two replacement manganese or alkaline AA batteries Do not install batteries of different types or mix new and old batteries Insert batteries so that the polarities and are correct Not doing so may cause leakage overheating or explosion Be sure to replace both batteries with new ones of the same type Not doing so may cause leakage overheating or explosion Remove the batteri...

Page 8: ... Camera 22 Plugging In and Turning On 23 Projecting 24 Switching the Projected Image 25 Outputting Images and Sound 26 Freezing an Image 26 Projecting Small Objects 26 Displaying Whiteboard Images 26 Projecting Through a Microscope 27 Turning Off 29 Displaying Saved Images as a Slideshow Saving Images 31 Recording Movies 32 Displaying a Slideshow SD Card Viewer Function 33 Dividing the Screen and ...

Page 9: ...roblems 49 SD Card Problems 49 Problems Connecting a Laptop 50 Epson Projector Contact List 51 EUROPE 51 AFRICA 53 MIDDLE EAST 53 NORTH CENTRAL AMERICA CARIBBEAN ISLANDS 54 SOUTH AMERICA 54 ASIA AND OCEANIA 54 Notices Specifications 57 General Specifications 57 Symbols Indicating the Device Meets the IEC60950 1 A2 Safety Standards 59 General Notice 61 Copyrights and Trademarks 62 Responsible Use o...

Page 10: ... You can use this document camera to capture and project pages from books or other documents and even three dimensional objects You can also use the software supplied to operate the document camera from a computer ...

Page 11: ... Remote control with 2 AA batteries Power cord and adapter Computer cable USB cable EPSON Document Camera Software CD ROM Document CD ROM Quick Start Guide Microscope adapter Included Items 11 ...

Page 12: ... Microsaver security system manufactured by Kensington F Interface s Interface p 14 Name Function G Security cable installation point Lets you attach a commercially available security cable to lock the document camera in place Camera Head Name Function A Microphone Captures sound when you record a video B Lamp switch Changes the LED lamp status in three steps bright dim and off C LED lamp Provides...

Page 13: ...g images from the document camera buttons Adjusts the focus of the image if pressed while projecting images from the document camera E Enter button When the menu is displayed pressing this button confirms the current item Displays the SDCard menu and images on the SD card if pressed while projecting live images s Displaying a Slideshow SD Card Viewer Function p 33 F Esc button Stops the current fu...

Page 14: ...mera to your computer with the USB cable supplied By using the software supplied you can operate the document camera from a computer Base Name Function A Mounting points You can attach the document camera to a table cart or stand with commercially available M4 bolts You can thread them to a maximum depth of 9 mm 0 35 inch Attention Fasten the bolts securely but do not overtighten them Do not use a...

Page 15: ...ment camera operation Name Function D t power button Turns the document camera on or off You cannot operate a projector with this button E Auto Focus button Focuses the image automatically The document camera cannot focus on objects that are approximately 10 cm 4 inches or less from the surface of the camera lens F Rotate Image button Lets you turn an image upside down G Menu button Opens and clos...

Page 16: ...he projection size N Focus button Adjusts the focus of the image manually O Esc button Stops the current function When the menu is displayed pressing this button moves to the previous menu level P Record button Starts and stops video recording Q Capture button Captures still images R Freeze button Freezesliveimages Pressthebuttonagaintoresume projection S Source button Switches the output image to...

Page 17: ...Connecting Follow the instructions in this section to set up the document camera ...

Page 18: ...amera to a projector using an HDMI cable commercially available Images live or on an SD card from the document camera are output from the projector Only audio from the SD card is output a When image devices that support the HDMI CEC standard are connected to the document camera operations for the document camera and the image device can be linked together Set HDMI Link on the document camera s Fun...

Page 19: ...puter directly to the projector Images on the computer connected to the document camera are only output from the Display Out port You can switch the projected image between or using the Source button on the document camera or the remote control Projects images from a computer Projects images live or on an SD card from the document camera Connecting the Document Camera Directly to a Projector 19 ...

Page 20: ...computer to the projector The cable used to create the connection differs depending on the computer and projector you are using See the documentation provided with the computer and projector you are using a You cannot project images by directly connecting the document camera to a projector with a USB cable Connect the document camera to a USB 2 0 port of a computer If you connect it to a USB 3 0 p...

Page 21: ...Projecting ...

Page 22: ...and b Rotate the camera arm as shown c Position the camera head above the projection area Attention Do not try to press the arm flat or fold it backwards Otherwise the document camera may be damaged The camera arm can only rotate within the range shown below Positioning the Document Camera 22 ...

Page 23: ...on the document camera or remote control The power indicator flashes blue When startup is complete the power indicator and the camera indicator are lit blue Startup takes approximately 15 seconds c Turn on your projector d Select the appropriate source on the projector depending on the port to which you connected Live images from the document camera are projected from the projector Plugging In and...

Page 24: ...p switch to illuminate the document a If necessary you can adjust the brightness of the image using the or on the document camera or remote control c Press the Focus button on the document camera or the Auto Focus button on the remote control The focus is adjusted automatically a To sharpen hard to focus objects use the buttons on the document camera or the Focus buttons on the remote control d To...

Page 25: ...On When using the digital zoom you can scroll Pan Tilt the enlarged image by pressing the and buttons Image quality declines when using the digital zoom function Switching the Projected Image When a computer is connected to the document camera you can switch the image projected from the projector using the Source button on the document camera or the remote control Projects images from a computer P...

Page 26: ... card a When a computer is connected to the USB B port the SD card viewer is unavailable Freezing an Image Press and release the Freeze button on the document camera or the remote control to freeze the image After freezing the image you can remove your document while leaving its image displayed on the screen Place your next document under the camera lens and press the Freeze button again your pres...

Page 27: ...ecting Through a Microscope Projected image To display objects as seen through a microscope use the included microscope adapter a Before installing the document camera make the following settings Focus the microscope and adjust the zoom Press the Menu button and then select Image Microscope On Images may not be displayed correctly depending on the optical properties of your microscope a Attach the...

Page 28: ...e piece in the center of the microscope adapter tighten the three screws on the microscope adapter to secure it in place c Adjust the height and angle of the camera head and then attach it to the microscope adapter Projecting 28 ...

Page 29: ...mera or remote control The following message is displayed on the projected image b Press the t power button again The projected image disappears and the power indicator turns off c Disconnect the power cord and any other connected cables and then fold down the camera arm Turning Off 29 ...

Page 30: ... FAT16 SD cards up to 2 G and FAT32 SDHC cards up to 32 GB are supported EX FAT SDXC cards are not supported SD cards with a security function cannot be used Attention In the following situations data on the SD card may be lost or corrupted If the card is subjected to static electricity or electronic noise If the card is not handled correctly If a malfunction occurs or during repairs If damage occ...

Page 31: ... Background Color p 41 a Insert an SD card into the SD card slot on the document camera b Project the image you want to save c Press the Capture button to capture the image The number of photos available is displayed at the top right of the screen next to and captured images are saved to the following folder on the SD card d Repeat steps 2 and 3 for any additional images you want to save a If ther...

Page 32: ...ou want to save c Press the Record button to start recording The recording indicator is lit blue while recording a While recording the elapsed time is displayed at the top right of the screen This is not displayed on the saved image If there is no space on the SD card the message No free space on the SD Card is displayed and the movie is not saved Do not remove the SD card while recording The foll...

Page 33: ... captured by the document camera as a slideshow To display files they must be saved to the specified folder See the following for more details s SD Card Problems p 49 a Press the Single button on the remote control The final file and thumbnail on the SD card are displayed a You can start a slideshow using the Enter button on the document camera or the remote control Press the Enter button while pr...

Page 34: ...n to Camera The slideshow is closed and a live image is displayed Thumbnail 2 Displays thumbnails 1 This is not available while a movie is being displayed 2 This is not displayed while thumbnails are displayed Attention If the images on the SD card are rotated when displayed by the document camera the original image can be saved as the rotated image Backup data on the SD card to other media as oft...

Page 35: ...ile Esc button Displays the thumbnails again d Press the Menu button to access the following functions Some functions are not available depending on the image being projected Rotate to Right Rotates the image 90 degrees to the right Rotate to Left Rotates the image 90 degrees to the left Single Screen Changes to a single image display Flip Switches the images on the left and right Camera SD Mode S...

Page 36: ...mage and then select Split Screen from the SD Card menu b Press the Menu button on the document camera or the remote control and then select SD SD Mode Two files on the SD card are displayed side by side on the screen You can change the file surrounded by the orange frame c Press the buttons to select the thumbnail for the file you want to display Press the buttons to change the thumbnails page d ...

Page 37: ...trol a You can also close the slideshow by pressing the Esc button when thumbnails are displayed Available combinations for the Split Screen function Left Source Right Source Live Image SD Card Image SD Card Image Live Image SD Card Image SD Card Image Left Source Right Source SD Card Movie SD Card Image a Movies cannot be displayed on the right hand side of the screen Displaying a Slideshow SD Ca...

Page 38: ...Image Adjustments and Effects The document camera provides a full range of image adjustments and effects including freeze image black and white and the ability to change the display for color images ...

Page 39: ...reen Menu Table p 40 The following menu is displayed Use the buttons to navigate the menu and adjust the settings Press Enter to select a setting When you are done adjusting the settings press the Menu or Esc button to close the menu and save your settings a The menu cannot be displayed when connecting to a computer using a USB cable Using the On screen Menu 39 ...

Page 40: ... for projecting black and white text Display Suitable for projecting images from a tablet display and so on Digital Zoom Adjusts the digital zoom settings On Enables digital zoom operations after performing the optical zoom Off Disables digital zoom operations Color B W Negative Select the display method for color images Color Displays the image in color Black White Displays the image in black and...

Page 41: ...u settings to the default values Default setting at time of purchase Function Menu Setup Item Explanation Select Output Resolution Sets the output resolution when connecting a computer cable to the Display Out port Auto Sets automatically according to the resolution of the image device XGA 1024x768 WXGA 1280x800 WXGA 1360x768 SXGA 1280x1024 Full HD 1920x1080 HDMI Output Sets the output resolution ...

Page 42: ...the default setting is Off Sleep Mode Operation settings when the document camera is inactive On The power automatically turns off if the document camera is inactive for a certain amount of time Off The power remains on even if the document camera is inactive for a certain amount of time Sleep Mode Timer Sets the time from when the document camera is last operated until the power automatically tur...

Page 43: ... usage ratio of the SD card Recordable Images Displays the number of images that can be stored on the SD card Total Memory Displays the total capacity of the SD card Info Menu Setup Item Explanation Output HDMI Displays the set content for HDMI Output s Function Menu p 41 Output RGB Displays the output resolution for the image signal Version Displays the firmware version for the document camera Se...

Page 44: ...Using the Computer Software The included software lets you operate the document camera from a computer The software also lets you capture live images and record them as movies ...

Page 45: ...64 bit Home Basic 32 bit Windows 8 Windows 8 32 64 bit Windows 8 Pro 32 64 bit Windows 8 Enterprise 32 64 bit Windows 8 1 Windows 8 1 32 64 bit Windows 8 1 Pro 32 64 bit Windows 8 1 Enterprise 32 64 bit CPU Intel Core2 Duo 1 2 GHz or faster Recommended Intel Core i3 or faster Amount of Mem ory 1 GB or more Recommended 2 GB or more Hard Disk Space 100 MB or more Display Resolutions no lower than XG...

Page 46: ...con in the EPSON window d Select Drawing on the Camera screen on the installer screen to start installation Uninstalling Windows Vista Windows 7 a Click Start and then Control Panel b Click Uninstall a program c Select Easy Interactive Tools Ver X XX and then click Uninstall Windows 8 Windows 8 1 a Select Search on the Charms and then search for Easy Interactive Tools Ver X XX b Right click press ...

Page 47: ...ctions on the screen to install all the software Uninstalling Windows Vista Windows 7 a Click Start Control Panel b Click Uninstall a program c Select TWAIN Driver for Epson Document Camera Ver X XX and then click Uninstall Windows 8 Windows 8 1 a Select Search from the Charm bar and then search for TWAIN Driver for Epson Document Camera Ver X XX b Right click and hold on TWAIN Driver for Epson Do...

Page 48: ...Solving Problems ...

Page 49: ...ality Problems The image is fuzzy or out of focus If the surroundings are dark and the contrast in the projected image is low the document camera s auto focus function may not work correctly Press the buttons on the document camera or the Focus buttons on the remote control and then adjust the contrast manually Make sure the camera head is at least 10 cm 4 inches away from the object you are viewi...

Page 50: ...es from your computer the actual time they were created is not displayed Problems Connecting a Laptop If images are not displayed from a PC laptop you need to set up the laptop to display on an external monitor If images are not displayed from a Mac laptop you need to set up the laptop for mirrored display See your laptop manual for details Windows Hold down the laptop s Fn key and press the key l...

Page 51: ...ttp www epson be BOSNIA AND HERZEGOVINA NET d o o Computer Engineering http www net com ba BULGARIA Epson Service Center Bulgaria http www kolbis com CROATIA MR servis d o o http www mrservis hr CYPRUS Mechatronic Ltd http www mechatronic com cy CZECH REPUBLIC Epson Europe B V Branch Office Czech Republic http www epson cz DENMARK Epson Denmark http www epson dk ESTONIA Epson Service Center Estoni...

Page 52: ...A Epson Service Center Lithuania http www epson lt LUXEMBURG Epson Europe B V Branch office Belgium http www epson be MACEDONIA Digit Computer Engineering http www digit com mk NETHERLANDS Epson Europe B V Benelux sales office http www epson nl NORWAY Epson Norway http www epson no POLAND Epson EUROPE B V Branch Office Poland http www epson pl PORTUGAL Epson Ibérica S A U Branch Office Portugal ht...

Page 53: ...ecpro com tr UK Epson UK Ltd http www epson co uk Indication of the manufacturer and the importer in accordance with requirements of EU directive Manufacturer SEIKO EPSON CORPORATION Address 3 5 Owa 3 chome Suwa shi Nagano ken 392 8502 Japan Telephone 81 266 52 3131 http www epson com Importer EPSON EUROPE B V Address AtlasArena AsiaBuilding Hoogoorddreef5 1101BAAmsterdamZuidoost The Netherlands T...

Page 54: ...a Inc http www epson com SOUTH AMERICA ARGENTINA Epson Argentina S R L http www epson com ar BRAZIL Epson do Brasil http www epson com br CHILE Epson Chile S A http www epson cl COLOMBIA Epson Colombia Ltd http www epson com co PERU Epson Peru S A http www epson com pe VENEZUELA Epson Venezuela S A http www epson com ve ASIA AND OCEANIA AUSTRALIA Epson Australia Pty Ltd http www epson com au CHINA...

Page 55: ... www epson jp KOREA Epson Korea Co Ltd http www epson co kr MALAYSIA Epson Malaysia Sdn Bhd http www epson com my NEW ZEALAND Epson New Zealand http www epson co nz PHILIPPINES Epson Philippines Co http www epson com ph SINGAPORE Epson Singapore Pte Ltd http www epson com sg TAIWAN Epson Taiwan Technology Trading Ltd http www epson com tw THAILAND Epson Thailand Co Ltd http www epson co th Epson P...

Page 56: ...Notices ...

Page 57: ...tment Automatic manual Zoom adjustment 12x optical zoom at infinity 10x digital zoom Frame rate Up to 30 fps Internal microphone 1 monaural input Power supply AC adapter 100to 240 VAC 10 50 60 Hz Main unit 12 VDC Power consumption Operating 13 W Standby 0 2 W Operating temperature 5 to 35C without condensation Storage temperature 10 to 60C without condensation Operating humidity 20 to 80 RH withou...

Page 58: ... 720p 1080p Connector port USB B port 2 1 USB connector TypeB Output VGA SVGA XGA SXGA WXGA 720p 1080p SD card slot 1 SD SDHC card compatible 1 HDMI CEC is supported however the operation of all compatible devices is not guaranteed 2 USB 2 0 is supported however the operation of all USB compatible devices is not guaranteed This product is also designed for IT power distribution system with phase t...

Page 59: ...ved standards Meaning I IEC60417 No 5001B Battery general On battery powered equipment To identify a device for instance a cover for the battery compartment or the connector terminals J IEC60417 No 5002 Positioning of cell To identify the battery holder itself and to identify the positioning of the cell s inside the battery holder K IEC60417 No 5019 Protective earth Toidentifyanyterminalwhichisint...

Page 60: ...indicate that the marked item don t place anything on projector T ISO3864 IEC60825 1 Caution laser radiation To indicate the equipment has a laser radiation part U ISO 3864 Disassembly prohibition To indicate a risk of injury such as electric shock if the equipment is disassembled V Indicates that you should not look into the lens while the LED is on Symbols Indicating the Device Meets the IEC6095...

Page 61: ...gainst harmful interference in a residential installation This equipment generates uses and can radiate radio frequency energy and if not installed and used in accordance with the instructions may cause harmful interference to radio communications However there is no guarantee that interference will not occur in a particular installation If this equipment does cause interference to radio and telev...

Page 62: ...ginal Epson Products or Epson Approved Products by Seiko Epson Corporation The contents of this guide may be changed or updated without further notice Illustrations in this guide and the actual projector may differ Responsible Use of Copyrighted Materials Epson encourages each user to be responsible and respectful of the copyright laws when using any Epson product While some countries laws permit ...

Reviews: