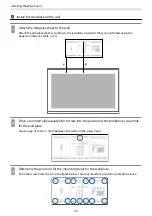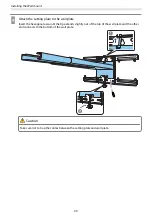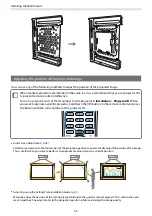
Installing the Wall mount
40
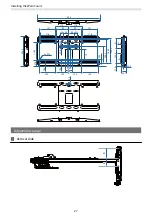
a
b
c1
d1
c2
d2
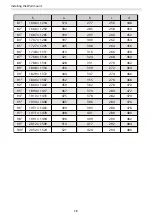
80"
1903 × 713
291 - 481
194 - 384
413
605
235
427
81"
1926 × 722
297 - 490
200 - 393
417
609
237
429
82"
1950 × 731
304 - 500
207 - 403
421
613
238
430
83"
1974 × 740
311 - 509
214 - 412
425
617
240
432
84"
1998 × 749
318 - 518
221 - 421
429
621
242
434
85"
2022 × 758
325 - 527
228 - 430
433
625
244
436
86"
2045 × 767
331 - 536
234 - 439
437
629
245
437
87"
2069 × 776
338 - 545
241 - 448
441
633
247
439
88"
2093 × 785
345 - 555
248 - 458
445
637
249
441
89"
2117 × 794
352 - 564
255 - 467
449
641
251
443
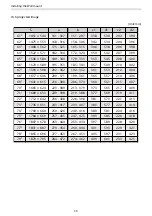
90"
2140 × 803
359
262
453
645
252
444
91"
2164 × 812
365
268
457
649
254
446
92"
2188 × 821
372
275
461
653
256
448
93"
2212 × 829
379
282
465
657
258
450
94"
2236 × 838
386
289
469
661
260
452
95"
2259 × 847
393
296
473
665
261
453
96"
2283 × 856
400
303
477
669
263
455
97"
2307 × 865
406
309
481
673
265
457
98"
2331 × 874
413
316
485
677
267
459
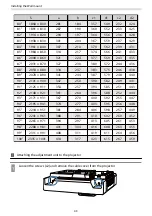
99"
2354 × 883
420
323
489
681
268
460
S
Summary of Contents for ELPHD02
Page 1: ...Installation Guide ...
Page 18: ...Introduction 17 Max 5m Max 5m ...
Page 29: ...Installing the Wall mount 28 Horizontal slide 45 45 Forward backward slide 0 383 ...
Page 77: ...Installing the Control Pad 76 For Canadian Users ...
Page 79: ...Installing the Control Pad 78 ...
Page 96: ...Installing the Touch Unit 95 Wavelength 932 to 952 nm ...
Page 99: ...Installing the Touch Unit 98 Adjustment range 79 5 140 5 15 76 ...
Page 138: ...Setting the Projector 137 c Select EDID from the Signal I O menu d Select 3240x1080 60Hz ...


