background image

4. Troubleshooting (DeviceNet) 


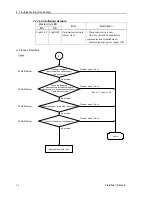
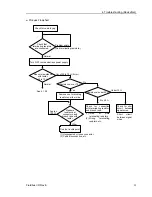
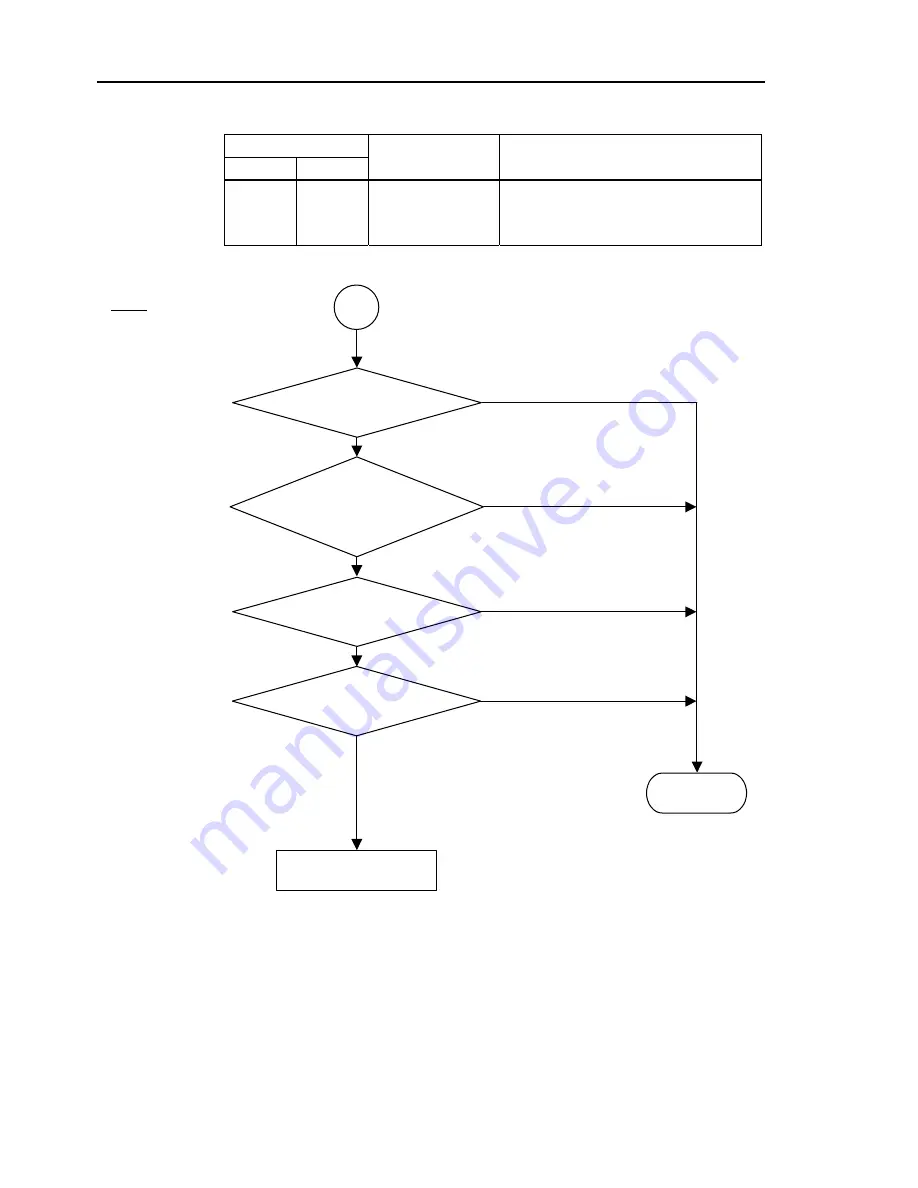
4.1.2.5 Absent Slave 

Master Unit LED 

MS NS 

Error Description 

Light 
OFF 

Green 
Light 
Blinking 

Absent slave 

- No slave (Error detection before 
communication establishment) 

- Communications power supply OFF 

 Process Flowchart 


†

 No Problem


Check 

Check the following: 

- Unconnected terminating resistor 

- Unconnected or loose connector/signal wire 

- Cable disconnection 

Finish


†

 No Problem


†

 No Problem


†

 No Problem


Problem exists. (Fix it.) 

Problem exists. (Fix it.)


Problem exists. (Fix it.)


Problem exists. (Fix it.)


No problem


No problem


No problem


No problem


Measure voltage of   

communications power supply 

at the master unit. 

Check that power is supplied to all slaves.

Check for master unit configuration.

Replace the master unit.


See 4.1.3.1 and 4.1.3.2.


94 

Fieldbus I/O Rev.6


Summary of Contents for EM07ZS1647F

Page 1: ...Rev 6 EM07ZS1647F EPSON RC Option Fieldbus I O ...

Page 2: ...E PSON RC Option Fieldbus I O Rev 6 ...

Page 3: ...EPSON RC Option Fieldbus I O Rev 6 Copyright 2005 2007 SEIKO EPSON CORPORATION All rights reserved Fieldbus I O Rev 6 i ...

Page 4: ...warranty period information However customers will be charged for repairs in the following cases even if they occur during the warranty period 1 Damage or malfunction caused by improper use which is not described in the manual or careless use 2 Malfunctions caused by customers unauthorized disassembly 3 Damage due to improper adjustments or unauthorized repair attempts 4 Damage caused by natural d...

Page 5: ...d Windows XP NOTICE No part of this manual may be copied or reproduced without authorization The contents of this manual are subject to change without notice Please notify us if you should find any errors in this manual or if you have any comments regarding its contents INQUIRIES Contact the following service center for robot repairs inspections or adjustments If service center information is not ...

Page 6: ... 266 61 1846 SUPPLIERS North South America EPSON AMERICA INC Factory Automation Robotics 18300 Central Avenue Carson CA 90746 USA TEL 1 562 290 5900 FAX 1 562 290 5999 E MAIL info robots epson com Europe EPSON DEUTSCHLAND GmbH Factory Automation Division Otto Hahn Str 4 D 40670 Meerbusch Germany TEL 49 0 2159 538 1391 FAX 49 0 2159 538 3170 E MAIL robot infos epson de iv Fieldbus I O Rev 6 ...

Page 7: ...y chapter in User s Guide to understand safety requirements before installing the robot system Conventions Important safety considerations are indicated throughout the manual by the following symbols Be sure to read the descriptions shown with each symbol WARNING This sign indicates that a danger of serious injury or death will exist if those instructions are not followed WARNING This sign indicat...

Page 8: ...vi Fieldbus I O Rev 6 ...

Page 9: ...eviceNet Network Construction 12 2 3 How to Setup a PROFIBUS DP Network 19 2 4 PROFIBUS DP Network Construction 20 2 5 How to Setup a EtherNet IP Network 24 2 6 EtherNet IP Network Construction 25 2 7 DeviceNet Board Installation 26 2 7 1 Board Appearance 26 2 7 2 Specifications 27 2 7 3 Software Installation 27 2 7 4 Board Installation 29 2 7 5 Master Mode 31 2 7 6 Slave Mode 37 2 8 PROFIBUS DP B...

Page 10: ...Mode 72 3 7 Remote Control Slave 72 3 8 Devices available for Fieldbus I O Option 73 3 9 Fieldbus I O Response Performance 73 DeviceNet 73 PROFIBUS DP 75 4 Troubleshooting 77 4 1 DeviceNet Troubleshooting 77 Exclusion 77 Tools 77 4 1 1 Examining a Problem 78 4 1 2 Problems and Countermeasures 80 4 1 3 Procedures for Examining Possible Causes 98 4 2 PROFIBUS DP Troubleshooting 111 Exclusion 111 Too...

Page 11: ...Table of Contents 5 Maintenance Parts List 151 Appendix A applicomIO Upgrade 153 Fieldbus I O Rev 6 ix ...

Page 12: ...Table of Contents x Fieldbus I O Rev 6 ...

Page 13: ...red devices connected on one fieldbus More flexible modification and expansion of a system because multiple devices are simply added to one fieldbus without additional wiring Slave devices can transmit self diagnostics information Controller RS 232c RS 232c Fieldbus Controller Sample Parallel Connection Sample Fieldbus Connection For each fieldbus on the RCxxx controller there is at least one boar...

Page 14: ...mber of necessary wires wiring time and cost Detachable communication connectors provide you with simple wiring between nodes and easy network separation or reconstruction Specified environment resistance cables allow you to construct an environment resistant system at low cost Open Standard Multi vendor Due to an open communication standard various devices from many manufacturers are available St...

Page 15: ...ting with a temperature controller The data transfer frequency is defined by master configuration For Change of State and Cyclic you can disable the ACK that is for verifying that communication is completed Never disable ACK since communication errors cannot be detected NOTE Functions of Master The Master device gathers and controls all nodes on one network A DeviceNet master can control up to 64 ...

Page 16: ...0 kbps 500 kbps Baud Rates Max Network Length Drop Length Total Drop Line Length Transfer Distance 500 kbps 250 kbps 125 kbps 100 m 250 m 500 m 6 m or under 6 m or under 6 m or under 39 m or under 78 m or under 156 m or under Maximum Nodes 64 including master unit Data Length Frame 8 byte The data can be divided and transferred Bus Access CSMA NBA Error Detection CRC error Duplicate node address c...

Page 17: ...t Detachable communication connector provides you a simple wiring between devices stations and an easy network separation or reconstruction Fast Communication PROFIBUS DP communication speed can be set up to 12Mbps This is faster than DeviceNet another communication standard supported by the fieldbus I O Open Standard Multi vendor Due to an open communication standard various devices from many man...

Page 18: ...eet GSD The connection type is token passing procedure and master slave communication The token passing procedure is applied to the PROFIBUS DP network with more than two master devices to transfer network control between masters The master slave communication is applied to the communication between the master device with network control and its slave devices Available baud rates are 9 6 kbps 19 2...

Page 19: ...on Method Hybrid token passing procedure and master slave communication Baud Rates 9 6 kbps 19 2 kbps 93 75 kbps 187 5 kbps 500 kbps 1500 kbps 3 Mbps 6 Mbps and 12 Mbps Baud Rates Cable Length Transfer Distance 12 Mbps 6 Mbps 3 Mbps 1500 kbps 500 kbps 187 5 kbps 93 75 kbps 19 2 kbps 9 6 kbps 100 m 100 m 100 m 200 m 400 m 1000 m 1200 m 1200 m 1200 m Maximum Stations 126 including master unit and re...

Page 20: ...he number of necessary wires wiring time and cost Detachable communication connectors provide you with simple wiring between nodes and easy network separation or reconstruction Specified environment resistance cables allow you to construct an environment resistant system at low cost You can use the generic Ethernet hub or Ethernet switch for the EtherNet IP However be sure to a use product complyi...

Page 21: ...uration For Change of State and Cyclic you can disable the ACK that is for verifying that communication is completed Never disable ACK since communication errors cannot be detected NOTE Functions of Master The Master device gathers and controls all nodes on one network A EtherNet IP master can control up to 127 nodes max 14 kbytes on one network A PLC is typically configured as a master and contro...

Page 22: ...0 80 EtherNet IP Communication Specifications Item Specification Supported Connection I O messaging connection Cyclic Change of State Explicit messaging connection All connections are conformed to EtherNet IP communication protocol Baud Rates 100 Mbps 10 Mbps Maximum Nodes 128 including master unit Data Length Frame 244 bytes Access Control Type CSMA CD Cable Universal Ethernet cable 10 Fieldbus I...

Page 23: ...efer to the following section 2 2 DeviceNet Network Construction 5 Configure nodes For details refer to respective manuals of your desired nodes 6 Turn ON the communications power supply and nodes Turn ON the communications power supply After that or simultaneously turn ON the nodes to supply power When the power to the nodes is supplied earlier than the power to the communications power supply co...

Page 24: ...ntrols a network and gathers data from its slaves The slaves including external I O and other devices output data in response to the master s output order and informs the master of its input status You can install masters anywhere in the network You can connect up to 64 nodes including the master on your network Trunk Line and Drop Line A trunk line is a backbone cable of DeviceNet network with a ...

Page 25: ...le to attach to environment resistant T branch taps and connectors Node Connection Nodes can be connected to a DeviceNet network by the following topologies tree multi drop T branch daisy chain For tree topology there is no limitation of daisy chain layer but drop line length is limited For details of drop line length refer to the following section Drop Line Length Trunk Line Branch Tap Daisy Chai...

Page 26: ...m Both Thick Cable and Thin Cable can be combined and used for trunk lines In this case the maximum network length is calculated using the following formulas Baud Rate Maximum Network Length 500 kbps Thick Cable Length Thin Cable Length 100m 250 kbps Thick Cable Length 2 5 Thin Cable Length 250m 125 kbps Thick Cable Length 5 0 Thin Cable Length 500m Drop Line Length The drop line length is the dis...

Page 27: ...ble Drop Line Unit A Current Capacity 8A 3A 4 57 Drop Line Length m 3A The following figures illustrate power supply configuration examples When an external power supply is installed on the network as shown in the figure below the current capacity is 11A and it exceeds the permissible current of the cable Trunk Line 1A Power Supply Tap External Power Supply 24 V DC 1A 1A 2A 2A 2A 2A Terminating Re...

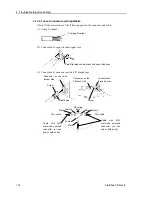
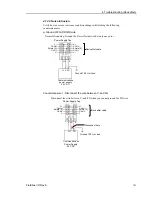
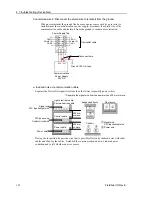
Page 28: ...or less do not connect V and FG wires Ground the network at only one point V V L CAN L S Shield H CAN H V V CAUTION Carefully connect the wires Incorrect wiring may cause node malfunction and severe damage to the entire DeviceNet network Procedure for Modifying and Installing Communication Cables Follow the steps described below to modify communication cables and connect them to connectors CAUTION...

Page 29: ... Cable signal wire MH 32 Phoenix Contact AI series Model Number Specifications Special Tool AI 0 5 8WH For Thin Cable power cable AI 0 25 8YE For Thin Cable signal wire AI 2 5 8BU For Thick Cable signal wire AI 1 8RD For Thick Cable signal wire CRIMPFOX UD6 5 Wrap or cover the cable with vinyl tape or heat shrink tubing Heat shrinkable Tube etc Loosen the screws securing the cables on the connecto...

Page 30: ...ble tension install enough thick cable length to allow for stretch Use a small flat blade screwdriver that has the correct width and thickness If you use a typical screwdriver whose point is narrow you cannot deeply insert it into the hole on the connector Specific screwdriver for DeviceNet connector screw OMRON XW4Z 00C Phoenix Contact SZF 1 0 6 3 5 Thickness Width 0 6 mm 3 5 mm 18 Fieldbus I O R...

Page 31: ...ection 2 4 PROFIBUS DP Network Construction 4 Configure stations For details refer to respective manuals of your desired stations 5 Turn ON the stations 6 Install the scanner board in your controller Refer to the section 2 8 PROFIBUS DP Board Installation later in this chapter 7 Configure a master and slaves Use the configuration management software for configuring a master and slaves scan list Fo...

Page 32: ...r of its input status The repeater is necessary for a network with more than 32 slaves to separate network segments The configurator used only for network installation configures a scan list of the slaves on the master device You can install masters anywhere on the network You can connect up to 126 stations including server and repeater on your network However we recommend you to use one device fo...

Page 33: ...P 3 DGND 5 VP 6 RxD TxD N 8 3 RxD TxD P 5 DGND 6 VP 8 RxD TxD N Shield Protective Ground Protective Ground Different manufacturers produce a wide range of PROFIBUS cables For details of the PROFIBUS cables see PROFIBUS International s website http www profibus com Terminating Resistor To reduce reflections of communication signal terminating resistors should be attached on both ends of each segmen...

Page 34: ... Configuration PROFIBUS DP allows you to install multiple masters on a single physical network All slave devices on the network can be accessed by different masters Only one master on the network can be used for device configuration The following figure illustrates the communication procedure for a multi master configuration Master 1 Master 3 Slave Slave Slave Slave Slave Master 2 Slave Slave Toke...

Page 35: ... you do not scratch on braided shield underneath Do not strip the cable covering more than necessary Excess stripping may cause short circuit and or make the cable more sensitive to noise Approx 47 5 mm 2 Carefully expand meshes of the braided shield and fold back the shield over the cable covering Cut off the shield at approx 10 mm from the stripped side of the cable covering 10 mm 3 Strip the co...

Page 36: ...your desired nodes 4 Turn ON the nodes 5 Install the scanner board in your controller Refer to the section 2 9 EtherNet IP Board Installation later in this chapter 6 Configure a master and slaves Use the configuration management software for configuring a master and slaves scan list For details please refer to the configuration management software manual To configure EPSON RC as a master refer to ...

Page 37: ...rms the master of its input status You can install masters anywhere in the network One master node can control up to 127 nodes Universal Ethernet cable is used for EtherNet IP Use a proper cable such as environmental resistance and refraction resistance that fulfills the environment For details see the website of ODVA http www odva org Wiring Wirings are conformed to EtherNet IP connection protoco...

Page 38: ...k LED and IO LED refer to the 4 Troubleshooting in this manual PCU DVNIO LED 2 Not in use RJ45 Connector Not in use C0 C1 C2 JP1 JP1 0 1 4 pin Terminal Watchdog Port Do not use this port Status Display LED 2 DeviceNet Port Jumper for Board Address PCI DVNIO C0 C1 C2 JP1 JP1 0 1 4 pin Terminal Watchdog Port Do not use this port Male 9 pin D Sub Port for Board Configuration Status Display LED 2 Left...

Page 39: ...a Size 1 to 255 bytes Automatic Detection Yes Devices can be detected automatically 2 7 3 Software Installation Before installing any boards in your controller you must install the applicomIO console application and drivers for the type of board you will be using 1 Start the controller 2 Run the C Install FieldBus Install applicomIO Disk1 Setup EXE from the install folder in the controller to star...

Page 40: ...r DeviceNet GSD for PROFIBUS DP 8 Complete the installation 9 The message to ensure the restart appears Click the Yes button 10 Start the C Install FieldBus Install SP Setup EXE and install the service pack No installation is necessary when a service pack is not attached to controller 11 After completing the installation of the service pack shutdown the computer 12 Proceed to 2 5 4 Board Installat...

Page 41: ... Short 4 1 Short 1 Short 0 Short 5 0 Short 0 Short 1 Short 6 1 Short 0 Short 1 Short 7 0 Short 1 Short 1 Short 8 1 Short 1 Short 1 Short 2 Install the board s in any available PCI slot in the controller 3 Connect the board s to the Fieldbus 4 Start the controller 5 The Windows Hardware Wizard will display a message that the applicomIO board was found and prompt you to restart the computer The appl...

Page 42: ...e that the board is correctly inserted and that the board configuration is correct 9 After all the boards are added the system should be restarted Close the applicomIO Console application and click the OK button on the Save modification dialog Click the OK button on the following dialog to restart Windows 10 After restarting the system continue with the following 2 5 5 Master Mode or 2 5 6 Slave M...

Page 43: ...mation EDS file that is necessary for the network setup Select the Equipment Library tab at the center of the dialog s right side and click the Add icon 3 Following dialog appears Specify the EDS file that is supplied from the device manufacturer 4 Click on the Protocol list under the board that was just added 5 Select Protocol Property Fieldbus I O Rev 6 31 ...

Page 44: ...stable for example more communication errors Set the configuration to minimize the load For the procedure for verifying the load on the bus using the applicomIO Console application refer to the 4 Troubleshooting in this manual NOTE 7 Click the Network Detection tab on the center left of the console window 8 Click the Read Network Configuration button to display the Network Detection dialog and rea...

Page 45: ...e following dialog will appear Select the Connection Configuration tab to verify the connection configuration Change the configuration if necessary Not every slave device supports all connection types Understand the specifications of the slave device you want to use and configure the connection correctly NOTE Fieldbus I O Rev 6 33 ...

Page 46: ...he Expert Mode dialog Never disable Ack When the Ack checkbox is unchecked a failed connection is not regarded as an error NOTE 11 When the system cannot identify the device you want to use its EDS file is not registered the following dialog will appear In this case obtain the EDS file from the device manufacturer and register it Then start from step 5 Network Detection of this procedure 34 Fieldb...

Page 47: ...ate New EDS File button When a new EDS file is created the following dialog will appear to verify the contents of the file 12 Select the Equipment Library tab on the center left of the console window and click the Add button to register the new EDS file in the system Fieldbus I O Rev 6 35 ...

Page 48: ...sh to register the configuration in the fieldbus board After a few seconds the board s state will show green in the status bar 14 Now the fieldbus board is ready to operate as a master Close the applicomIO Console application 36 Fieldbus I O Rev 6 ...

Page 49: ... under the board that was just added 3 Select Protocol Properties 4 Configure the baud rate MAC ID slave address and so on for the DeviceNet network In this example the MAC ID slave address is set to 005 Specify an unused address on the network for a slave device as well as other devices 5 Double click the DeviceNet Local Slave item NOTE Fieldbus I O Rev 6 37 ...

Page 50: ...e settings When the load exceeds 60 the DeviceNet network communications will be unstable for example more communication errors Restrict the input output sizes to the minimum necessary to minimize the load The load is also controlled by baud rate in the master configuration For the procedure for verifying the load on the bus using the applicomIO Console application refer to the 4 Troubleshooting i...

Page 51: ...O console application 11 The default slave EDS file is created The path is C Program Files Woodhead Direct link ApplicomIO2 3 ConfigIO Config01 applicomio eds You may make a copy of the default slave EDS file and modify it to create your original EDS file if necessary Edit the copy of the slave EDS file using Notepad You may want to change the VendName and ProductTypeStr Fieldbus I O Rev 6 39 ...

Page 52: ...ajRev 1 MinRev 2 VendName applicom international ProdTypeStr Communication Adapter ProdName applicomIO Scanner Catalog IO_Info Default 0x0000 Copy the EDS file to the system where the master is located Add the new slave device to the master using the new EDS file 12 On the master system scan the network for new devices The new slave device should be detected Use the EDS file created in previous st...

Page 53: ...his manual PCU DPIO C0 C1 C2 JP1 JP1 0 1 PROFIBUS DP Port LED 2 Not in use RJ45 Connector Not in use 4 pin Terminal Watchdog Port Do not use this port Jumper for Board Address Status Display LED 2 PCI DPIO C0 C1 C2 JP1 JP1 0 1 Configuration Port Communication Status LED Male 9 pin D Sub Port for Board Configuration Status Display LED 2 Left Communication Status LED Right Physical Error LED Jumper ...

Page 54: ...44 bytes Output Data Size 1 to 244 bytes Automatic Detection Yes Devices can be detected automatically 2 8 3 Software Installation Before installing any boards in your controller you must install the applicomIO console application and drivers for the type of board you will be using 1 Start the controller 2 Run the C Install FieldBus Install applicomIO Disk1 Setup EXE from the install folder in the...

Page 55: ... PROFIBUS DP EDS for DeviceNet 8 Complete the installation 9 The message to ensure the restart appears Click the Yes button 10 Start the C Install FieldBus Install SP Setup EXE and install the service pack No installation is necessary when a service pack is not attached to controller 11 After completing the installation of the service pack shutdown the computer 12 Proceed to 2 6 4 Board Installati...

Page 56: ...hort 2 1 Short 0 Short 0 Short 3 0 Short 1 Short 0 Short 4 1 Short 1 Short 0 Short 5 0 Short 0 Short 1 Short 6 1 Short 0 Short 1 Short 7 0 Short 1 Short 1 Short 8 1 Short 1 Short 1 Short 2 Install the board s in any available PCI slot in the controller 3 Connect the board s to the Fieldbus 4 Start the controller 5 The Windows Hardware Wizard will display a message that the applicomIO board was fou...

Page 57: ...ialog will appear when no board is detected Ensure that the board is correctly inserted and that the board configuration is correct 9 After all the boards are added the system should be restarted Close the applicomIO Console application and click the OK button on the Save modification dialog Click the OK button on the following dialog to restart Windows 10 After restarting the system continue with...

Page 58: ...on 2 Register the device information GSD file that is necessary for the network setup Select the Equipment Library tab at the center of the dialog s right side and click the Add icon 3 Following dialog appears Specify the GSD file that is supplied from the device manufacturer 4 Select Description Properties 46 Fieldbus I O Rev 6 ...

Page 59: ...ies dialog and click the OK button 6 Click on the Protocol list under the board that was just added 7 Select Protocol Properties 8 Configure the baud rate Master Profibus Address master address number of repeaters and so on for the PROFIBUS DP network Fieldbus I O Rev 6 47 ...

Page 60: ... console window 10 Click the Read Network Configuration button to display the Network Detection dialog and read in the devices on the fieldbus 11 Drag each device you want to scan from the Network Detection tab to the Master item in the list on the right 48 Fieldbus I O Rev 6 ...

Page 61: ...Click the OK button When the system cannot identify the device you want to use its GSD file is not registered the following dialog will appear In this case obtain the GSD file from the device manufacturer and register it Then start from step 5 Network Detection of this procedure Fieldbus I O Rev 6 49 ...

Page 62: ... to register the new GSD file in the system 14 Select File Download in Flash to register the configuration in the fieldbus board After a few seconds the board s state will show green in the status bar Now the fieldbus board is ready to operate as a master Close the applicomIO Console application 50 Fieldbus I O Rev 6 ...

Page 63: ...Select the Profibus Slave in the Cannel Properties dialog and click the OK button Though you can select the Profibus Master Slave as a slave it might not communicate properly in some Master To use only the slave function select the Profibus Slave NOTE 4 Click on the Protocol list under the board that was just added 5 Select Protocol Properties Fieldbus I O Rev 6 51 ...

Page 64: ...e as well as other devices NOTE 7 Double click the Local DP Slave item 8 The Local DP Slave property sheet will appear Select the Equipment device ID It must be the same number as the Master Profibus Address in step 4 In this manual the input output sizes are set to 8 bytes The input output sizes of each station may be restricted depending on the master For details of the permitted data size refer...

Page 65: ...ing slave configuration data in the configurator device or software that configures the master The standard GSD file for EPSON robot controller RC520 and RC420 is provided in the following path c Program Files Woodhead Direct Link applicomIO2 3 Equipment Library Profibus_gsd app0890 gsd For details of the PROFIBUS DP network configuration contact the manufacturer of the master device you use If yo...

Page 66: ...C1 C2 JP1 JP1 0 1 D Sub 9 pin Not in use Status Display LED 2 EtherNetI P Connector 4 pin Terminal Watchdog Port Do not use this port Jumper for Board Address LED 2 Not in use 2 9 2 Specifications Part Number applicom PCU ETHIO Modes Master Slave Baud Rates 10 100 Mbps Interface EtherNet IP 1 port Maximum Node 127 Connection Type Cyclic Change of State Explicit messaging Yes EDS support Yes Input ...

Page 67: ...oard you will be using 1 Start the controller 2 Run the C Install FieldBus Install applicomIO Disk1 Setup EXE from the install folder in the controller to start the installation 3 Select the desired language for the installer 4 Select Install Products 5 Select applicomIO Do not select applicomIO ActiveX 6 Allow the default components to be installed Fieldbus I O Rev 6 55 ...

Page 68: ...or PROFIBUS DP EDS for DeviceNet 8 Complete the installation 9 The message to ensure the restart appears Click the Yes button 10 Start the C Install FieldBus Install SP Setup EXE and install the service pack No installation is necessary when a service pack is not attached to controller 11 After completing the installation of the service pack shutdown the computer 12 Proceed to 2 9 4 Board Installa...

Page 69: ...hort 2 1 Short 0 Short 0 Short 3 0 Short 1 Short 0 Short 4 1 Short 1 Short 0 Short 5 0 Short 0 Short 1 Short 6 1 Short 0 Short 1 Short 7 0 Short 1 Short 1 Short 8 1 Short 1 Short 1 Short 2 Install the board s in any available PCI slot in the controller 3 Connect the board s to the Fieldbus 4 Start the controller 5 The Windows Hardware Wizard will display a message that the applicomIO board was fou...

Page 70: ...ck the OK button When installing more than two fieldbus boards in the system add all the boards using this dialog The following dialog will appear when no board is detected Ensure that the board is correctly inserted and that the board configuration is correct 9 Click the OK button The following dialog will appear Select EtherNet IP from Protocol and click the OK button 58 Fieldbus I O Rev 6 ...

Page 71: ...emory When you select Static set the values for each item 11 After all the boards are added the system should be restarted Close the applicomIO Console application and click the OK button on the Save modification dialog Click the OK button on the following dialog to restart Windows 12 After restarting the system continue with the following 2 9 5 Master Mode or 2 9 6 Slave Mode sections Fieldbus I ...

Page 72: ...rmation EDS file that is necessary for the network setup Select the Equipment Library tab at the center of the dialog s right side and click the Add icon 3 Following dialog appears Register the EDS file that is supplied from the device manufacturer 3 1 Click Next button 3 2 Specify the folder that EDS is stored and click the Next button 60 Fieldbus I O Rev 6 ...

Page 73: ...on 3 4 Click the Complete button to register the EDS file 4 Click the Network Detection tab on the center left of the console window 5 Click the Read Network Configuration button to display the Network Detection dialog and read in the devices on the fieldbus Fieldbus I O Rev 6 61 ...

Page 74: ...alog appears Uncheck the Link Parameter box and assign a value from 1 to 127 This number is called as device ID and necessary to create SPEL programs Click the OK button to complete the registration 8 After finishing devices registration select File Download in Flash to register the configuration in the fieldbus board 62 Fieldbus I O Rev 6 ...

Page 75: ... Installation After a few seconds the board s state will show green in the status bar Now the fieldbus board is ready to operate as a master Close the applicomIO Console application Fieldbus I O Rev 6 63 ...

Page 76: ...ts and outputs for the slave device In this example the Sizes and Instances of Input and Output are set as follows Output Instance 001 Output Size 256 bytes Input Instance 002 Input Size 256 bytes Value of Configuration Size is not available for EPSON RC Set 0 Words for this box Make sure that the input output size settings do not exceed 14 kbytes in total The input output sizes of each node may b...

Page 77: ...step 5 appears Configure by the procedures from step 7 You can create up to 32 Local Slaves if necessary 7 Select File Download in Flash to register the configuration in the fieldbus board After a few seconds the board s state will show green in the status bar 8 Close the applicomIO console application Fieldbus I O Rev 6 65 ...

Page 78: ...inal EDS file if necessary Edit the copy of the slave EDS file using Notepad You may want to change the VendName and ProductTypeStr Copy the EDS file to the system where the master is located Add the new slave device to the master using the new EDS file 10 On the master system scan the network for new devices The new slave device should be detected Use the EDS file created in previous steps for th...

Page 79: ... type name and board type properly and click the Read Configuration button Option Description Add Click this button to add a Fieldbus Delete Click this button to delete the last Fieldbus It will be dimmed when the last Fieldbus is not selected or there are no Fieldbuses installed Bus Type Click in the Bus Type field and click the arrow on the right side of the field to select the Fieldbus type Boa...

Page 80: ...2 Installation 68 Fieldbus I O Rev 6 ...

Page 81: ...pecified fieldbus device FbusIO_In Returns the status of an 8 bit input port FbusIO_InW Returns the status of a 16 bit input port FbusIO_IONumber Returns the bit number of the specified Fieldbus I O label FbusIO_Off Turns an output off FbusIO_On Turns an output on FbusIO_Out Simultaneously sets 8 output bits FbusIO_OutW Simultaneously sets 16 output bits FbusIO_Sw Returns the status of one input b...

Page 82: ...he Outputs off during Emergency Stop option should be enabled to remove all power to output devices when an emergency stop occurs NOTE 3 4 Waiting for Input or Output Status The SPEL Wait statement cannot be used for Fieldbus I O You can make your own function to handle this For example Function WaitFbusInput bus As Integer device As Integer bit As Integer state As Integer Do If FbusIO_Sw bus devi...

Page 83: ...e below Consult the documentation that came with the device for the values that can be used The msgParam parameter value is always 0 for DeviceNet messages Here is an example for DeviceNet EtherNet IP Send explicit message to the device Byte sendData 5 Byte recvData 10 Integer i sendData 0 14 Command sendData 1 1 Class sendData 3 1 Instance sendData 5 7 Attribute FbusIO_SendMsg 1 1 0 sendData recv...

Page 84: ... board Refer to the 2 Installation for instructions for the type of hardware you are using 2 Design your application to handle requests from the Fieldbus master and return data or execute functions 3 7 Remote Control Slave If the controller will be remotely controlled by a Fieldbus master your application must auto start and run in a continuous loop to service requests from the master Use OnErr Tr...

Page 85: ...digital input module 750 431 WAGO 4 channel digital output module 750 530 WAGO Photo sensor 42GNP 9000 QD1 Allen Bradley Motor Driver I F JUSP NS300 YASKAWA ELECTRIC Motor Driver SGDH YASKAWA ELECTRIC RC170 DeviceNet option RC170 SEIKO EPSON PROFIBUS DP Device Specifications Model Number Manufacturer 16 input module TDP 8C0 B18 02 Woodhead 16 output module TDN 808 B18 02 Woodhead Intelligent I O m...

Page 86: ...0 108 Node address 2 Connection Image Power Tap T branch Terminating Resistor To Standard Input Waveform Generator Power Supply 24V NPN Output PNP Output Waveform Modification Jig Input Module DeviceNet I F Board T branch Terminating Resistor Evaluation Signals with various pulse widths every 5 msec were input to the standard I O input and the input module of the fieldbus I O at 1 Hz For 10 minute...

Page 87: ...aveform Generator Power Supply 24V NPN Output PNP Output Waveform modification jig PROFIBUS I F Board Input Module D Sub Evaluation Signals with various pulse widths every 5 msec were input to the standard I O input and the input module of the fieldbus I O at 1 Hz For 10 minutes 600 seconds pulse widths of the received signals were measured at 12 Mbps and 9 6 kbps Result 12 Mbps The input devices ...

Page 88: ...3 Operation 76 Fieldbus I O Rev 6 ...

Page 89: ...y for damages or costs incurred by the use of this troubleshooting Before examining a problem on the network please ensure that your established DeviceNet system satisfies network specifications Refer to this troubleshooting and the section 2 2 DeviceNet Network Construction Tools Prepare the following tools for troubleshooting Philips screwdriver Flat blade screwdriver Tester Using the Woodhead N...

Page 90: ...Board Configuration C0 C1 C2 JP1 JP1 0 1 4 pin Terminal Watchdog Port Do not use this port Status Display LED 2 Left Module NetWork LED Right IO LED DeviceNet Port Jumper for Board Address The Module NetWork LED is on the left and the IO LED is on the right seen from the rear panel These LED names are used in applicomIO Console application and this manual Only in this troubleshooting section gener...

Page 91: ... of all slaves if the master has no status information 3 Absent Slave Status MS NS LEDs LED Color Light Condition MS Module Status Green Red ON Blinking OFF NS Network Status Green Red ON Blinking OFF 4 Physical Node Location of Absent Slave PLC Slave Branch Tap Communications Power Supply Terminating Resistor Slave Slave Slave Slave A communication time out error occurred Start the examination fr...

Page 92: ...t start up Green Light ON Light OFF Unestablished communication Refer to the section 4 1 2 3 Master Unestablished Communication No slave Error detection before communication establishment Communications power supply OFF Error detection before the communication establishment Duplicate MAC ID The MAC ID configuration was duplicated Red Light Blinking No Matter Configuration error Master unit configu...

Page 93: ...4 1 2 6 See 4 1 1 Examining Details of Trouble 2 Yes 3 Yes 4 Yes 5 6 7 8 9 Absent Slave LED No See 4 1 2 1 1 MS Green ON NS Red Blinking MS OFF NS OFF MS Green ON NS Red Blinking MS Green ON NS Red ON MS Green ON NS OFF No No No No MS Red Blinking No MS OFF NS Green Blinking No MS OFF NS OFF No Yes MS Red ON Other Broken Slave Unit Replace the unit Broken Master Unit Replace the Unit Examining a t...

Page 94: ...rk Scan list collation error Communications power supply OFF Error detection after the communication establishment 4 1 2 1 1 Slave Not Operating MS NS Master LED Condition Green Light ON Red Light Blinking Absent Slave LED Condition Light OFF Light OFF Process Flowchart 1 Check Replace the unit No Problem Yes No Supply power Finish Normal communication Is MS LED light ON Is power supplied to slave...

Page 95: ...nnector Supply power to the slave Broken unit Slave unit replacement Replace the broken slave unit with a new one 4 1 2 1 2 Slave Communication Error Detection Busoff Detection Not added MS NS Master LED Condition Green Light ON Red Light Blinking 1 Absent Slave LED Condition Communication error detection Green Light ON Red Light Blinking 2 Absent Slave LED Condition Busoff detection Green Light O...

Page 96: ...lem exists Fix it No change No change No change Immediately The unit is not found The unit is found Yes Problem exits Fix it The problem is fixed The problem is fixed The problem is fixed No See 4 1 3 1 and 4 1 3 2 See 4 1 3 3 No problem No problem Replace the trouble unit Check for noise influence Does an error occur immediately Normal Communication Analyze the network with NetMeter Consult the D...

Page 97: ...ps z For details refer to the section 4 1 3 2 Loose Connector and Signal Wire Connect the connectors and signal wires again Voltage drop of communications power supply Measure voltage of communications power supply at the unit with a trouble Normal 11V or more between V and V z If the voltage is 11 to 14 V the unit is a possible cause Fix the problem on the unit Check the voltage of the power supp...

Page 98: ...tion Master Unit LED MS NS Error Description Busoff detection Communication stopped due to critical error Green Light ON Red Light ON Duplicate MAC ID The MAC ID configuration was duplicated This error occurs only during unit start up 86 Fieldbus I O Rev 6 ...

Page 99: ... Immediately The unit is not found The unit is found Problem exits Fix it The problem is fixed The problem is fixed The problem is fixed No problem No problem See 4 1 3 1 and 4 1 3 2 See 4 1 3 3 Check for noise influence Divide the network and find the trouble unit Does an error occur immediately Yes No Normal Communication Analyze the network with NetMeter Consult the DeviceNet manufacturer Measu...

Page 100: ... taps z For details refer to the section 4 1 3 2 Loose Connector and Signal Wire Connect the connectors and signal wires again Voltage drop of communications power supply Measure voltage of communications power supply at the trouble unit Normal 11V or more between V and V z If the voltage is 11 to 14 V the unit is a possible cause Fix the problem on the unit Check the voltage of the power supply C...

Page 101: ...ected terminating resistor Unconnected or loose connector signal wire Cable disconnection Finish Measure voltage of communications power supply at the master unit No Problem No Problem No Problem Problem exists Fix it Problem exists Fix it Check that power is supplied to all slaves Replace the master unit Problem exists Fix it Problem exists Fix it No problem No problem No problem No problem Check...

Page 102: ... problem How to find the trouble point Remove the terminating resistor on one end of the network The trouble point is where resistance changes from 120 Ω Loose connector Loose signal wire Check for the connection of connectors and signal wires The connectors and signal wires should be firmly connected z Checkpoint Between the master and its slaves z For details refer to the section 4 1 3 2 Loose C...

Page 103: ...ror Description Red Light Blinking No Matter Configuration error Slave error detection Slave disconnected from the network Remote I O communication error Slave not added to the network Scan list collation error Duplicate MAC ID The MAC ID configuration was duplicated Fieldbus I O Rev 6 91 ...

Page 104: ...ck for noise influence Replace the unit No Normal Communication Check the following Unconnected terminating resistor Unconnected or loose connector signal wire Cable disconnection No Problem Problem exists Fix it No Problem Check for master unit configuration scan list configuration The problem is fixed The trouble unit is not found No problem No problem No problem Divide the network and find the ...

Page 105: ...tor Loose signal wire Check for the connection of connectors and signal wires The connectors and signal wires should be firmly connected z Checkpoint all nodes and all branch taps z For details refer to the section 4 1 3 2 Loose Connector and Signal Wire Connect the connectors and signal wires again Voltage drop of communications power supply Measure voltage of communications power supply at the u...

Page 106: ... Unconnected terminating resistor Unconnected or loose connector signal wire Cable disconnection Finish No Problem No Problem No Problem Problem exists Fix it Problem exists Fix it Problem exists Fix it Problem exists Fix it No problem No problem No problem No problem Measure voltage of communications power supply at the master unit Check that power is supplied to all slaves Check for master unit ...

Page 107: ...oblem How to find the trouble point Remove the terminating resistor on one end of the network The trouble point is where resistance changes from 120 Ω Loose connector Loose signal wire Check for the connection of connectors and signal wires The connectors and signal wires should be firmly connected z Checkpoint Between the master and its slaves z For details refer to the section 4 1 3 2 Loose Conn...

Page 108: ...eck Check the following Unconnected terminating resistor Unconnected or loose connector signal wire Cable disconnection Finish No Problem No Problem No Problem Problem exists Fix it Problem exists Fix it Problem exists Fix it Problem exists Fix it No problem No problem No problem No problem Measure voltage of communications power supply at the master unit Check that power is supplied to all slaves...

Page 109: ... problem How to find the trouble point Remove the terminating resistor on one end of the network The trouble point is where resistance changes from 120 Ω Loose connector Loose signal wire Check for the connection of connectors and signal wires The connectors and signal wires should be firmly connected z Checkpoint Between the master and its slaves z For details refer to the section 4 1 3 2 Loose C...

Page 110: ...CAN H Resistance Determination 0 Ω Shot circuit Under 50 Ω Three or more terminating resistors on one network 50 to 70 Ω Normal 70 to 120 Ω Error cable disconnection or disconnected signal wire on the trunk line Over 120 Ω Error cable disconnection or disconnected signal wire on drop line or trunk line Both CAN_H and CAN_L 4 How to find the trouble point Remove the terminating resistor on one end ...

Page 111: ...d branch taps with tester Resistance under 50 Ω Problem exists Add terminating resistors Out of 50 to 70 Ω Error Yes Other Approx 120 Ω 10 to 50 Ω Under 10 Ω No 1 Unconnected or loose connector 2 Cable disconnection etc 1 Three or more terminating resistors 2 Wrong terminating resistors etc Short circuit between signal wires Check for cable laying Find the trouble point Check for connection with t...

Page 112: ... blade screwdriver with even thickness 3 Connection of connector and unit T branch tap Cable side Screw Connector on the node mask side Connector on the T branch side Screw Connector on the cable side Cable with M12 micro size shielded connector at one end or both ends Thin cable Thin cable Cable with M12 micro size shielded connector at one end or both ends Female Male Female Male Male Female Mou...

Page 113: ... CAN H Shield S CAN L V V CAN H Shield S CAN L V V V S V V FG Communications power supply 24 V DC Ground 100 Ω or less DeviceNet cable Countermeasure 1 Disconnect the wire between V and FG Disconnect the wire between V and FG when you cannot ground the FG wire Power Supply Tap V CAN H Shield S CAN L V V CAN H Shield S CAN L V V V S V V FG Communications Power Supply 24 V DC Ground 100 Ω or less De...

Page 114: ...ect here Induced noise via communication cable Separate the DeviceNet signal wire from the other wires especially power wires Separate the signal wire from the power wires 300 mm or more Light electrical cable Communication cable Control cable Power cable Signal wire PLC input output wire PLC power wire Control circuit wire Power wire Suspended ducts Floor ducts 1 2 1 2 1 2 1 Signal wire PLC input...

Page 115: ...ons power supply and I O devices provide respective power sources separately Separating power source prevents noise caused by I O device operations from affecting communication Communications Power Supply 24V Power Supply Tap Disconnect I O devices from the communications power supply Fieldbus I O Rev 6 103 ...

Page 116: ...ure described below depending on the cable layout 1 Separating each block from the network Divide the network by block and check each block 1 Ensure that the master has no problem by connecting it to its slaves one by one MS NS green light ON 2 Divide the network in the middle of it and check for the communication condition MS NS green light ON Normal The trouble point is on the other half of the ...

Page 117: ...e Length 500 kbps 100 m 39 m 250 kbps 250 m 78 m Thick Cable 125 kbps 500 m 156 m 500 kbps 100 m 39 m 250 kbps 100 m 78 m Thin Cable 125 kbps 100 m 6 m 156 m 2 Terminating Resistor Ensure that two terminating resistors are connected to both ends of the network trunk line The terminating resistor should be 121 Ω 1 4 W 3 Cable and Branch Tap The cables and branch taps should meet the DeviceNet speci...

Page 118: ...he status bar and select Refresh Magenta Black The scanner board was initialized with an earlier version applicomIO Console application It is recommended that the scanner board be written into the flash memory reinitializing the scanner board again with the current version applicomIO Console application Red Black The scanner board was not initialized Initialize the scanner board to use it Yellow B...

Page 119: ... is displayed on the CAN tab Rx Number of receive data bytes and flames Tx Number of send data bytes and flames OverRun Number of communication overrun errors detected by CAN controller Errors Number of communication errors detected by CAN controller Bus Off Number of Busoff detections Baud Rate baud rate Bus Load Load on the bus maximum minimum current Use DeviceNet so that the load on a bus is u...

Page 120: ... The remote device is in error Check its status 32 Indicates that the parameters passed to the functions are not correct eg Number of requested variables too large 33 Response time out fault Additional information The device does not answer Check its status and the wiring The DeviceNet master has no device to be scanned in its configuration 34 Physical defect on the line Additional information No ...

Page 121: ...ut did not answer the request Check the device status 65 Connection denied Additional information Connection to the DeviceNet master is in progress or refused by the device 70 Connection finished Additional information Duplication of MAC ID detected on the DeviceNet network Modify the MAC ID of the DeviceNet master 79 Profile incompatible Additional information The device does not match the config...

Page 122: ... is a communication error A gray circle indicates that the corresponding device does not exist 4 When you select Equipment on the device tree in the left side of the window the window changes as shown below The input and output statuses of the selected device are shown in the right side of the window If you want to change output data click the byte number you want to change in the Output Mapping b...

Page 123: ...wever we do not guarantee the complete accuracy of the information and thus we decline any liability for damages or costs incurred by the use of this troubleshooting Before examining a problem on the network please ensure that your established PROFIBUS DP system satisfies network specifications Refer to this troubleshooting and the section 2 4 PROFIBUS DP Network Construction Tools Prepare the fol...

Page 124: ...play LED 2 PCI DPIO C0 C1 C2 JP1 JP1 0 1 Configuration Port Communication Status LED Male 9 pin D Sub Port for Board Configuration Status Display LED 2 Left Communication Status LED Right Physical Error LED Jumper for Board Address Female 9 pin D Sub PROFIBUS DP Port 4 pin Terminal Watchdog Port Do not use this port The Communication Status LED is on the left and the Physical Error LED is on the r...

Page 125: ... are disconnected from or not added to the network 1 See the status flag regarding to the removal and addition if the master has status information 2 See the BF ST LEDs of all slaves if the master has no status information 3 Absent Slave Status BF ST LEDs LED Color Light Condition BF Physical error Green Red ON Blinking OFF ST Communication Status Green Red ON Blinking OFF 4 Physical Node Location...

Page 126: ...ror Slave not added to the network Scan list collation error Nonstandard wiring No or too many terminating resistors Noise intrusion Light OFF Red Light ON Data link layer error Refer to the section 4 2 2 2 Master Data Link Layer Error Nonstandard wiring Noise intrusion Light OFF Light OFF Uninitialized network Refer to the section 4 2 2 3 Master Uninitialized Network Master unit power error Maste...

Page 127: ...T Red Blinking BF OFF ST Red Blinking BF OFF ST Red ON BF OFF ST OFF No No BF OFF ST Red ON No BF OFF ST OFF No Slave Physical Error 5 No 6 7 8 Master Data Link Error See 4 2 2 2 Slave Uninitialized Network Slave Data Link Error See 4 2 2 1 1 BF OFF ST Green ON See 4 2 2 1 1 See 4 2 2 1 2 See 4 2 2 1 3 See 4 2 2 1 4 See 4 2 2 4 Examining a trouble See 4 2 1 Examining Details of Trouble BF Red ON O...

Page 128: ...k Remote I O communication error Slave not added to the network Scan list collation error Nonstandard wiring No or too many terminating resistors Noise intrusion 4 2 2 1 1 Master Slave Communication Error BF ST Master LED Condition Light OFF Red Light Blinking Light OFF Green Light Blinking Absent Slave LED Condition Communication error Light OFF Red Light Blinking 116 Fieldbus I O Rev 6 ...

Page 129: ... No change No change Immediately The unit is not found The unit is found Yes Problem exists Fix it The problem is fixed The problem is fixed The problem is fixed No No problem No problem See 4 2 3 1 and 4 2 3 2 Replace the trouble unit See 4 2 3 3 Check for noise influence Does an error occur immediately Divide the network and find the trouble unit Normal Communication Consult the PROFIBUS manufac...

Page 130: ...al wires should be firmly connected z Checkpoint all stations and all branch taps z For details refer to the section 4 2 3 2 Loose Connector and Signal Wire Connect the connectors and signal wires again Electrical surges of device power supply Measure voltage of device power supply at the trouble unit It should be within the range of sufficient voltage for device operation Check voltage of the dev...

Page 131: ...ctor signal wire Cable disconnection Finish No Change No Change The trouble unit is not found Rarely Problem exists Fix it No change Immediately The unit is not found The unit is found Yes The problem is fixed The problem is fixed No No problem See 4 2 3 1 and 4 2 3 2 See 4 2 3 3 No change Check for noise influence Divide the network and find the trouble unit Does an error occur immediately Normal...

Page 132: ...connector Loose signal wire Check for the connection of connectors and signal wires The connectors and signal wires should be firmly connected z Checkpoint all stations and all branch taps z For details refer to the section 4 2 3 2 Loose Connector and Signal Wire Connect the connectors and signal wires again Noise external cause Check the noise intrusion via the following paths 1 to 3 1 Noise via ...

Page 133: ...wing Unconnected terminating resistor Unconnected or loose connector signal wire Cable disconnection Finish Measure voltage of all slave power supplies No Problem No Change No Problem exists Fix it Problem exists Fix it The problem is fixed No problem No problem No change Replace the unit Yes No See 4 2 3 1 and 4 2 3 2 Consult the PROFIBUS manufacturer Replace moving cable Replace deteriorated cab...

Page 134: ...y OFF Normal 100 to 120 Ω z Measuring point Connection of the trouble unit z For detail refer to the section 4 2 3 1 Connection Problem Fix the problem How to find the trouble point Remove the terminating resistor on one end of the network The trouble point is where resistance changes from 220 Ω Loose connector Loose signal wire Check for the connection of connectors and signal wires The connector...

Page 135: ...lem Replace the unit Yes No Consult the PROFIBUS manufacturer Normal Communication Causes of Error Possible Cause Examination Method Countermeasure Electrical surges of device power supply Measure voltage of device power supply at the trouble unit It should be within the range of sufficient voltage for device operation Check voltage of the device power supply Broken unit Replace the trouble unit w...

Page 136: ...ector signal wire Cable disconnection Finish No Change No Change The trouble unit is not found Rarely Problem exists Fix it No problem No change No change Immediately The unit is not found The unit is found Yes The problem is fixed The problem is fixed No See 4 2 3 1 and 4 2 3 2 See 4 2 3 3 Check for noise influence Does an error occur immediately Divide the network and find the trouble unit Norma...

Page 137: ...connector Loose signal wire Check for the connection of connectors and signal wires The connectors and signal wires should be firmly connected z Checkpoint all stations and all branch taps z For details refer to the section 4 2 3 2 Loose Connector and Signal Wire Connect the connectors and signal wires again Noise external cause Check the noise intrusion via the following paths 1 to 3 1 Noise via ...

Page 138: ...t power error Master unit configuration error Process Flowchart 7 No Problem Check Measure voltage of all slave power supplies Problem exists Fix it No problem Finish No Replace the master unit Yes No Check for master device configuration Problem exists Fix it No problem No Problem Consult the PROFIBUS manufacturer Normal Communication 126 Fieldbus I O Rev 6 ...

Page 139: ...sufficient voltage for device operation Check voltage of the device power supply Master device configuration error Check that the master device was configured properly After changing the configuration verify whether the problem is fixed Check the master unit configuration Broken master unit Replace the broken master unit with a new one Verify whether the problem is fixed Replace the master unit wi...

Page 140: ...ting resistor Unconnected or loose connector signal wire Cable disconnection No Change Problem exists Fix it No problem No change The problem is fixed Replace the unit Finish The trouble unit is not found Rarely Immediately The unit is not found The unit is found Yes No Consult the PROFIBUS manufacturer See 4 2 3 1 and 4 2 3 2 Divide the network and find the trouble unit Does an error occur immedi...

Page 141: ...oint Remove the terminating resistor on one end of the network The trouble point is where resistance changes from 220 Ω Loose connector Loose signal wire Check for the connection of connectors and signal wires The connectors and signal wires should be firmly connected z Checkpoint all stations and all branch taps z For details refer to the section 4 2 3 2 Loose Connector and Signal Wire Connect th...

Page 142: ...tance between signal wires with tester Resistance Determination 0 Ω Shot circuit Under 100 Ω Three or more terminating resistors on one network 100 to 120 Ω Normal Over 120 Ω Error cable disconnection disconnected signal wire one or zero terminating resistor 4 How to find the trouble point Remove the terminating resistor on one end of the network The resistance at the point where the terminating r...

Page 143: ...00 Ω Under 10 Ω No 1 Unconnected or loose connector 2 Cable disconnection etc 1 Three or more terminating resistors 2 Wrong terminating resistors etc Short circuit between signal wires Check for cable laying Find the trouble point Check for connection of terminating resistors Check that terminating resistors are connected Measure resistance with tester 100 to 120 Ω Remove one terminating resistor ...

Page 144: ...n of connector and unit 4 2 3 3 Noise Intrusion Verify how error occurrence condition changes while taking the following countermeasures Ground of FG wire Normal Grounding Peel the cable covering and ground the FG wire Peel the cable covering and secure the cable with FG clamps Secure the clamps to the intermediate plate of the board with screws to ground the shield Turn ON the terminating resisto...

Page 145: ...ing wire Induced noise via communication cable Separate the PROFIBUS DP signal wire from the other wires especially power wires Separate the signal wire from the power wires 300 mm or more Light electrical cable Communication cable Control cable Power cable Signal wire PLC input output wire PLC power wire Control circuit wire Power wire Suspended ducts Floor ducts 1 2 1 2 1 2 1 Signal wire PLC inp...

Page 146: ...ce the unit How to Divide Divide the network by block and check each block 1 Ensure that the master has no problem by connecting it to its slaves one by one BF ST light OFF green light ON or blinking 2 Divide the network in the middle of it and check for the communication condition BF ST light OFF green light ON or blinking Normal The trouble point is on the other half of the network Error The tro...

Page 147: ... m 100 m 200 m 400 m 1000 m 1200 m 1200 m 1200 m 2 Terminating Resistor Ensure that two terminating resistors are connected to both ends of the network The terminating resistor should be connected as shown below VP 6 390 Ω RxD TxD P 3 220 Ω RxD TxD N 8 390 Ω DGND 5 Data Line B Data Line A 3 Cable The cables should meet the PROFIBUS specifications Item Property Impedance 135 to 165 Ω Capacity 30 pf...

Page 148: ...ck the status bar and select Refresh Magenta Black The scanner board was initialized with the earlier version applicomIO Console application It is recommended that the scanner board be written into the flash memory reinitializing the scanner board again with the current version applicomIO Console application Red Black The scanner board was not initialized Initialize the scanner board to use it Yel...

Page 149: ...function Network diagnosis 1 Select the Network Detection tab in the left center of the applicomIO Console application 2 Click the Online Action button The Network Monitor dialog appears You can check the conditions of the following errors on this dialog Token Error Address Error Timeout Error Frame Error Network Cycle Bus Fault When an error occurs on the network it is added to the corresponding ...

Page 150: ...Diagnostic window Then select the slave you want on the device tree in the left side of the window The window changes as shown below To check the device condition in detail click the Diagnostic button in the Equipment information group box in the right side of the window If an error occurs the information is displayed in red 138 Fieldbus I O Rev 6 ...

Page 151: ...ication error A gray circle indicates that the corresponding device does not exist 5 When you select the slave on the device tree in the left side of the window the window changes as shown below The input and output statuses of the selected device are shown in the right side of the window If you want to change output data click the bite number you want to change in the Output Mapping box Then ente...

Page 152: ...has been made to ensure the information is accurate However we do not guarantee the complete accuracy of the information and thus we decline any liability for damages or costs incurred by the use of this troubleshooting Before examining a problem on the network please ensure that your established DeviceNet system satisfies network specifications Refer to this troubleshooting and the section 2 6 Et...

Page 153: ...rminal Watchdog Port Do not use this port Jumper for Board Address LED 2 Not in use The Module NetWork LED is on the left and the IO LED is on the right seen from the rear panel These LED names are used in applicomIO Console application and this manual Only in this troubleshooting section general names of the status display of the DeviceNet device are used instead The Network Status LED is express...

Page 154: ...formation 2 See the MS NE LEDs of all slaves if the master has no status information 3 Absent Slave Status MS NS LEDs LED Color Light Condition MS Module Status Green Red ON Blinking OFF NS Network Status Green Red ON Blinking OFF 4 Physical Node Location of Absent Slave RC420 Slave Ethernet Switch Slave Slave Slave Slave Master Ethernet Switch A communication time out error occurred Start the exa...

Page 155: ...rror Green Light ON Light OFF IP address not defined The IP address is not defined Red Light Blinking No Matter Critical error Refer to the section 4 3 3 Tests and diagnostics Unrecoverable critical error Red Light ON No Matter Module error Refer to the section 4 3 3 Tests and diagnostics Recoverable error occurred Light OFF No Matter error Refer to the section 4 1 2 5 Absent Slave No slave Error ...

Page 156: ...ool with the menu command Protocol Diagnostic or with the button See also To display the help select Start Program Direct Link applicomIO 2 3 Help 4 3 3 1 1 Ethernet IP channel on Ethernet diagnostics The EtherNet IP on Ethernet channel diagnostic information can be displayed by selecting the MULTI MSG ETH channel All devices in the configuration are visualized by a LED corresponding to the applic...

Page 157: ... address IP address IP address of the applicomIO master on this channel Sub Network Mask Sub network address of the applicomIO master on this channel Gateway IP Address Address of the gateway configured on the applicomIO master on this channel Primary DNS Address IP Address of the primary DNS server Secondary DNS Address IP address of the secondary DNS server Host Name Host name of the applicomIO ...

Page 158: ... connections Number of current connections Bytes received Number of bytes received Bytes transmitted Number of bytes transmitted Retries on time out Number of retries on reception of a time out IP tab Packets received Number of packets received Packets transmitted Number of packets transmitted Errors Number of IP errors 146 Fieldbus I O Rev 6 ...

Page 159: ... server devices Requests Number of requests Requests s umber of requests per second Useful bytes Number of useful data bytes Useful bytes s Number of useful data bytes per second Requests in error Number of requests in error Fieldbus I O Rev 6 147 ...

Page 160: ... from the DNS server IP address of the device has been resolved Requests Number of requests Requests s Number of requests per second Useful bytes Number of useful data bytes Useful bytes s Number of useful data bytes per second Connections Number of connections created for this device Time out errors Number of time outs received for this device Frame errors Number of frame errors for this device R...

Page 161: ...dress or name DNS functionality is available on the applicomIO solution It is available through the diagnostic tool DNS tab 1 Selects the type of resolution to be carried out IP Address the host name is obtained from the IP address Host Name the IP address is obtained from the host name 2 Carries out a resolution 3 Status Status of resolution carried out 0 No error 33 Response time out exceeded 13...

Page 162: ...howing result obtained Status 0 The station is present and has responded the response time is given in the Time column Status 33 The station is not present 3 Command field Clear Clears the list of results Ping Sends a PING command Loop Executes PING command in a loop Stop on Error If Loop has been selected stops if an error has occurred Status Status of the PING request 0 OK 33 TIME OUT 132 Resolu...

Page 163: ...5 Maintenance Parts List 5 Maintenance Parts List Part Name Code Specifications DeviceNet board R13B040701 PROFIBUS DP board R13B040702 EtherNet IP board R12B040719 Fieldbus I O Rev 6 151 ...

Page 164: ...5 Maintenance Parts List 152 Fieldbus I O Rev 6 ...

Page 165: ...he setup CD that is packaged with the product to the CD Rom drive on the controller Setup program starts automatically 3 Select the desired language for the installer 4 Select Products Installation 5 Select Installation 6 Select applicomIO Do not select applicomIO ActiveX Fieldbus I O Rev 6 153 ...

Page 166: ...ected the transition of the current setting will not be executed 8 Uninstall the current applicomIO before upgrading Following dialog appears Click the OK button Following dialog appears Check the Don t display this message box and click the Yes button 9 Install the default components 154 Fieldbus I O Rev 6 ...

Page 167: ...file 11 Complete the installation 12 The message to ensure the restart appears Click the Yes button 13 When a service pack is attached to the CD ROM install the service pack 14 After completing the installation of the service pack shutdown the computer Fieldbus I O Rev 6 155 ...

Page 168: ...Appendix A applicomIO Upgrade 156 Fieldbus I O Rev 6 ...

Reviews: