background image

8

Part Names and Functions

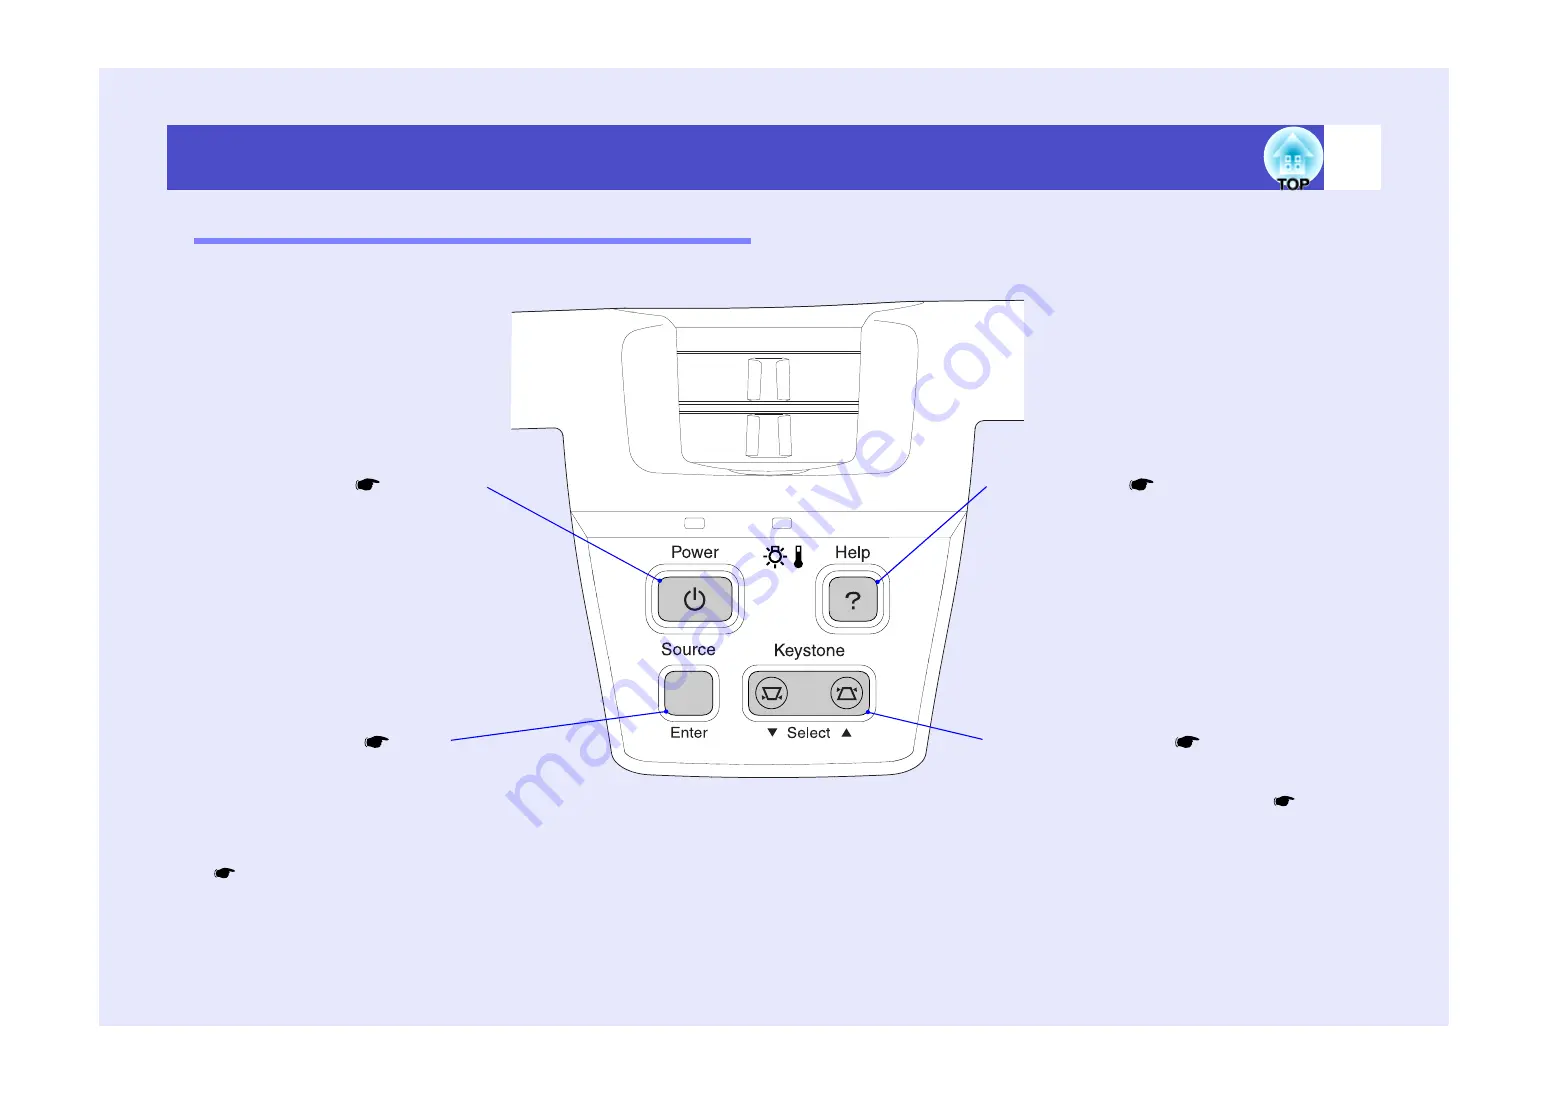
Control Panel

[Power] button 


p.33

p.35

Turns the projector power on and off.

[Source] button 


p.34

Switches the input source between the [Computer1/
Component Video1] port, [Computer2/Component 
Video2] port, [S-Video] port and [Video] port each 
time the button is pressed.
When pressed while a help menu is being displayed, 
it accepts the menu item that is currently selected. 


p.69

[Keystone] button 


p.40

Press to correct keystone distortion in images.
When pressed while a help menu is being 
displayed, it selects items in the menu. 


p.69

[Help] button 


p.69

Each time this button is pressed, it displays and 
hides the online help menu that can assist you if 
you have a problem.

Summary of Contents for EMP-54

Page 1: ...User s Guide ...

Page 2: ...hich may be useful to know regarding a topic Indicates a page where useful information regarding a topic can be found Click on the page number to display that page Indicates that an explanation of the underlined word or words in front of this symbol appears in the glossary of terms Click the underlined word or words to display the corresponding entry in the Glossary section of the Appendices p 94 ...

Page 3: ...t to one of two settings If projecting images in a dark room or onto a small screen and the images are too bright change the setting to Low In addition when the setting is changed to Low the amount of power consumed and noise produced are reduced and the operating life of the lamp can be extended Reduction in power consumption of approximately 20 Reduction in operating noise of approximately 10 Ap...

Page 4: ... pointer around on the computer screen during projection see Wireless Mouse Function on p 19 If using the wireless mouse function you can use the remote control to scroll back and forth through pages when projecting a PowerPoint presentation If the password Protect function is employed a password can be used to limit operation of the projector and changing of settings This means that the projector...

Page 5: ...o Images 24 Playing Sound from the Video Equipment 25 Preventing theft Password Protect 27 When Password Protect is enabled 27 Setting Password Protect 28 Basic Operations Turning On the Projector 32 Connecting the Power Cable 32 Turning On the Power and Projecting Images 33 Turning Off the Projector 35 Adjusting the Screen Image 37 Adjusting the Image Size Zoom Function 37 Focusing the Screen Ima...

Page 6: ...elp 74 Appendices Maintenance 83 Cleaning 83 Replacing Consumables 84 Saving a User s Logo 90 Optional Accessories 93 Glossary 94 List of ESC VP21 Commands 97 Command List 97 Communication Protocol 97 Cable Layouts 98 USB Connection Setup 99 List of Supported Monitor Displays 100 Specifications 101 Appearance 102 Index 103 ...

Page 7: ...rojecting Images from the Computer 17 If the Monitor Port is a Mini D Sub 15 pin Port 17 If the Monitor Port is a 13w3 Port 17 If the Monitor Port is a 5BNC Port 18 Using the Remote Control to Operate the Mouse Pointer Wireless Mouse Function 19 Connecting to an External Monitor 21 Connecting to a Video Source 22 Projecting Composite Video Images 22 Projecting S Video Images 23 Projecting Componen...

Page 8: ...tatus illuminated flashing indicates problems with the projector Front adjustable foot p 38 Extend and retract to adjust the projection angle when the projector is placed on a surface such as a shelf Lens cover Attach when not using the projector to prevent the lens from becoming dirty or damaged Foot adjust button p 38 Another foot adjust button is located on the right side Press both foot adjust...

Page 9: ...d Video port each time the button is pressed When pressed while a help menu is being displayed it accepts the menu item that is currently selected p 69 Keystone button p 40 Press to correct keystone distortion in images When pressed while a help menu is being displayed it selects items in the menu p 69 Help button p 69 Each time this button is pressed it displays and hides the online help menu tha...

Page 10: ...nnects the projector to a computer via the USB cable when using the wireless mouse function Computer images cannot be projected by the projector by using the USB cable to connect the computer Security lock p 95 Monitor Out port p 21 Outputs the projected analogue video signals or RGB video signals to an external monitor from the source that is connected to the Computer1 Component Video1 port This ...

Page 11: ...Air filter air intake vent p 83 p 89 This prevents dust and other foreign particles from getting inside the projector when air is drawn in It should be cleaned and replaced periodically Suspension bracket fixing points 4 points p 14 p 102 Install the optional ceiling mount here when suspending the projector from a ceiling Air intake vent p 83 Clean the air filters periodically Air intake vent p 83...

Page 12: ... Displays and hides the configuration menu Power button p 33 p 35 Turns the projector power on and off Input select buttons p 34 Computer1 2 Switches between images that are being input to the Computer1 Component Video1 port and the Computer2 Component Video2 port S Video Video Switches the signal source being input from the S Video port and the Video port Color Mode button p 44 Selects the colour...

Page 13: ...g area back Remote control light emitting area TIP Do not allow sunlight or light from fluorescent lamps to shine directly onto the projector s remote control light receiving areas otherwise it may interfere with the reception of signals from the remote control If delays in the responsiveness of the remote control occur or if it does not operate after it has been used for some time it probably mea...

Page 14: ... angle Approx 6 m 20 ft Approx 30º horizontally Approx 15º vertically Remote control light receiving area Remote control light emitting area Approx 30º Approx 30º Approx 30º Operating angle horizontal Operating distance approx 6 m 20 ft Approx 30º Approx 15º Approx 15º Approx 15º Operating angle vertical When suspended from the ceiling Operating distance approx 6 m 20 ft Operatingdistance approx 6...

Page 15: ...g mount is required when installing the projector on the ceiling p 93 CAUTION Before setting up the projector be sure to first read the separate Safety Instructions World Wide Warranty Terms Front projection Front projection Rear projection using a translucent screen Rear projection Front ceiling projection Front Ceiling projection Rear ceiling projection using a translucent screen Rear Ceiling pr...

Page 16: ... 4 3 Screen size cm in Projection distance cm ft Distancefrom centre of lens to bottom edge of screen cm in Shortest wide Longest tele 30 61 46 24 0 18 1 89 2 9 103 3 4 4 1 6 40 81 61 31 9 24 0 120 3 9 138 4 5 6 2 2 50 100 76 39 4 30 0 151 4 9 173 5 7 7 2 7 60 120 90 47 2 35 4 181 5 9 208 6 8 8 3 3 80 160 120 63 0 47 2 243 8 0 278 9 1 11 4 4 100 200 150 78 7 59 1 304 10 0 349 11 4 14 5 5 200 410 3...

Page 17: ...e output resolution so if necessary change the resolution to one that matches a setting in the List of Supported Monitor Displays while referring to the documentation provided with the computer CAUTION When connecting the projector to a computer be sure to check the following Turn off the power for both the projector and the computer before connecting them If the power for either device is on at t...

Page 18: ...d for the connection p 52 If more than one external component is connected to the projector after projection starts use the Computer1 2 button on the remote control or the Source button on the projector s control panel to select the Computer port as the input source p 34 If the Monitor Port is a 13w3 Port 13w3 cable commercially available To monitor port To Computer1 Component Video1 or Computer2 ...

Page 19: ...2 Component Video2 port blue TIP After projection starts change the Input Signal setting in the Image menu to either Computer1 or Computer2 to match the signals from the port being used for the connection p 52 If more than one external component is connected to the projector after projection starts use the Computer1 2 button on the remote control or the Source button on the projector s control pan...

Page 20: ...USB mouse USB cable accessory Macintosh OS 8 6 9 2 X 10 0 10 2 USB mouse USB cable accessory USB cable accessory To USB port To USB port TIP The USB cable can only be connected to computers with a standard USB interface If using a computer which is running Windows the computer must have had a full version of Windows 98 2000 Me XP Home Edition XP Professional installed If the computer is running a ...

Page 21: ...the Esc button Drag and drop While holding down the Enter button press the or button to drag items Release the Enter button to drop the items being dragged at the desired position TIP If the mouse button settings have been reversed at the computer the operation of the remote control buttons will also be reversed The wireless mouse function cannot be used while the following functions are being use...

Page 22: ...imes such as when giving presentations If the images being projected are from a source that is connected to the Computer2 Component Video2 port these images cannot be output to an external monitor Connect the external monitor using the cable that is provided with the monitor Cable provided with monitor To Monitor Out port black Monitor port TIP Video images cannot be output to an external monitor ...

Page 23: ...ctions If you try to force a connector to fit a device port with a different shape or number of terminals a malfunction or damage to the connector or port may result Do not bind the power cable and the connecting cable together If the power cable and the connecting cable are bound together image interference or errors in operation may result To video output port yellow To Video port yellow A V cab...

Page 24: ...S Video cable commercially available To S Video port To S Video output port TIP If more than one external component is connected to the projector after projection starts press the S Video Video button on the remote control or the Source button on the projector s control panel until S Video is displayed in the projected image p 34 Component video cable optional To component video output port To Com...

Page 25: ...fter projection starts press the Computer1 2 button on the remote control or the Source button on the projector s control panel to select the signal being input until Component Video1 YCbCr Component Video1 YPbPr Component Video2 YCbCr or Component Video2 YPbPr is displayed in the projected image p 34 To RGB output port Computer cable accessory To Computer1 Component Video1 or Computer2 Component ...

Page 26: ... EMP 74L use the accessory audio adapter and a commercially available RCA audio cable The default setting for the Audio Input command in the Audio menu is Audio1 when analogue RGB images from a computer or RGB video images or component video images are being input and Audio2 when composite video and S Video images are being input Change the setting depending on the equipment being connected or sel...

Page 27: ...button on the remote control and then select Volume from the Audio menu For details on this operation refer to Using the Configuration Menus p 66 Use the and buttons to adjust the volume The volume is increased or reduced each time a button is pressed After making the adjustment press the Menu button to exit the configuration menu 1 2 3 ...

Page 28: ...assword is entered three times in succession the message The projector s operation will be locked will be displayed for approximately five minutes and then the projector will switch to standby mode If this happens disconnect the power plug from the electrical outlet and then reinsert it and turn the projector s power back on A window requesting you to enter the password will be displayed so enter ...

Page 29: ...en press the Enter button 2 Select ON and then press the Enter button 3 Press the Esc button The next time the Timer setting is made you can set the time that the projector can be used without needing to enter a password If setting the time continue on to the next step If not setting the time continue on to step 5 Select Timer and then press the Enter button When User s Logo Protect is enabled ON ...

Page 30: ...on The message Change the password will be displayed so select Yes and then press the Enter button The default setting for the password is 0000 but you should be sure to change this to your own desired password If you select No the screen shown at step 1 will be displayed again Enter a 4 digit password Use the numeric keypad buttons to enter a 4 digit password The password entered will be displaye...

Page 31: ...password is entered projection will start again the Time elapsed setting will be reset to 0 and the countdown will start again Make a note of the password so that you do not forget it and keep it in a safe place If you lose the remote control you will not be able to enter the password Keep the remote control in a safe place at all times ...

Page 32: ...g Off the Projector 35 Adjusting the Screen Image 37 Adjusting the Image Size Zoom Function 37 Focusing the Screen Image 37 Adjusting the Image Angle and Automatic Keystone Correction Function 38 Manually Correcting Keystone Distortion 40 Adjusting the Image Quality 41 Adjusting Computer Images and RGB Video Images 41 Automatic Setup 41 Adjusting the Tracking 42 Adjusting the Sync 43 Selecting the...

Page 33: ... the accessory power cable to the projector Check that the power cable connector is facing the same way as the power inlet on the projector and then insert the power cable connector securely into the projector Connect the other end of the power cable to an earthed electrical outlet Wait until the Power indicator lights orange CAUTION Be sure to read the separate Safety Instructions World Wide Warr...

Page 34: ...d to indicate that the projector is starting up The Power indicator flashes green After a short period it stops flashing and lights steadily and projection starts Wait until the Power indicator lights green it normally takes about 40 seconds to change TIP The Password Protect setting may cause the password entry screen to be displayed each time the power is turned on If this happens enter the pass...

Page 35: ...at source will be projected without needing to press any of the buttons on the remote control or the projector s control panel If the No Signal message does not disappear check the connections again If a laptop computer or a computer with an LCD screen has been connected to the projector the images may not be projected straight away After starting projection check that the computer has been set up...

Page 36: ... power will not turn off at this time Press the Power button once more The lamp will switch off The Power indicator will flash orange and cool down will start The cool down period lasts for about 20 seconds When cool down is complete the Power indicator lights orange 1 2 Projector Remote control CAUTION If the message The projector is overheating Clean or replace the air filter and lower the room ...

Page 37: ...over Attach the lens cover to the lens when not using the projector in order to stop the lens from getting dusty or dirty 4 CAUTION Do not disconnect the power cable from the outlet while the Power indicator is still flashing orange otherwise it may result in errors in projector operation and reduce the lamp unit operating life 5 Lens cover ...

Page 38: ... the image further move the projector further away from the screen p 15 Focusing the Screen Image PROCEDURE Turn the focus ring to adjust the image focus TIP The E Zoom function lets you enlarge parts of the image p 49 Turn to W wide to enlarge the images Zoom ring Turn to T tele to reduce the images Focus ring TIP If the surface of the lens is dirty or misted over as a result of condensation it m...

Page 39: ... the two foot adjust buttons at either side lift up the front of the projector so that the front adjustable feet can extend Extend the front adjustable feet until the desired angle is obtained and then release the foot adjust buttons To retract the front adjustable feet gently push down on the projector while pressing the two foot adjust buttons Seen from the side Seen from above 10 1 Centre of le...

Page 40: ... setting If the zoom ring is turned to the W setting the available angle of tilt for automatic adjustment will be less 15º 15º Approx 15º above Approx 15º below TIP Automatic keystone correction is not carried out when the Projection command in the Advanced menu is set to Front If you would like to make further adjustments after automatic keystone correction has been carried out you can use the Ke...

Page 41: ...tor Projector If the bottom of the image is elongated If the top of the image is elongated TIP When keystone correction is carried out the projected image will become smaller If the images become uneven in appearance after keystone correction is carried out decrease the sharpness setting p 51 p 54 Keystone correction can also be carried out using the configuration menu p 58 If the value displayed ...

Page 42: ...ng for this item is ON automatic setup is not carried out If you press the Auto button on the remote control while computer or RGB video signals are being projected adjustment will then be carried out If you press the Auto button while the E Zoom or Freeze function is being used or while a configuration menu or help menu is being displayed the function will be cancelled when you press the Auto but...

Page 43: ...Tracking from the Image menu For details on this operation refer to Using the Configuration Menus p 66 Press the and buttons to set the tracking value to a value that causes the vertical stripes to disappear from the image The tracking value increases or decreases each time a button is pressed After making the adjustment press the Menu button to exit the configuration menu Adjusting the Tracking 1...

Page 44: ...nterference to disappear from the image The sync value increases or decreases each time a button is pressed After making the adjustment press the Menu button to exit the configuration menu Adjusting the Sync 1 2 3 TIP If you adjust the sync without adjusting the tracking first it will not be possible to get the best adjustment results Incorrect tracking adjustment may not be noticeable with some t...

Page 45: ...d The current setting appears in the top right corner of the screen each time the colour mode is changed Mode Application Dynamic Brightness is emphasised so that images are fresher and have greater modulation than in Presentation mode Presentation Brightness is emphasised to produce images that are ideal for presentations Theatre Movie images are optimised using natural tints Living Room Brightne...

Page 46: ...Enhancing Projection 46 A V Mute 46 Freeze 47 Wide screen Projection of Images from Video Equipment Changing the Aspect Ratio 48 E Zoom 49 Using the Configuration Menu Functions 50 List of Functions 51 Image Menu 51 Audio Menu 57 Setting Menu 58 User s Logo Menu 60 Advanced Menu 61 Info Menu 64 Reset All Menu 65 Using the Configuration Menus 66 ...

Page 47: ...utton The image and sound will then be paused Projection starts again when the A V Mute button on the remote control is pressed You can also continue normal projection by pressing the Esc button You can use the Background Color function in the Setting menu to set the screen appearance when the images and sound have been paused to any one of the following three settings p 58 Remote control Default ...

Page 48: ... possible to resume projection from the point where it was paused PROCEDURE Press the Freeze button The images will then be paused To continue projecting the images press the Freeze button once more You can also continue normal projection by pressing the Esc button Remote control TIP Pressing the Freeze button also clears configuration menu displays and help messages The freeze function still work...

Page 49: ...l video or onto DVDs can be viewed in 16 9 wide screen format PROCEDURE Press the Menu button on the remote control and then select Aspect Ratio from the Image menu For details on this operation refer to Using the Configuration Menus p 66 Press the and buttons to set the aspect ratio to either 4 3 or 16 9 and then press the Enter button After making the adjustment press the Menu button to exit the...

Page 50: ...at is to be enlarged or reduced Press the and buttons on the remote control to move the cross When the button is pressed the image is enlarged with the cross at its centre When the button is pressed the enlarged image is then reduced The enlargement ratio will appear on the screen You can scroll around the image by pressing the and buttons To cancel the E Zoom press the Esc button 1 Remote control...

Page 51: ...ettings and adjustments The menus have a hierarchical structure with a main menu that is divided into sub menus which are further divided into other sub menus The remote control is used to operate the menus Refer to Using the Configuration Menus p 66 for details on using the menus Main menu Sub menu Image ...

Page 52: ...tically and horizontally Press the Enter button on the remote control and make the adjustment using the display position adjustment screen that appears Depends on connection Tracking Adjusts computer images when vertical stripes appear in the images Depends on connection Sync Adjusts computer images when flickering fuzziness or interference appear in the images Flickering and fuzziness may also ap...

Page 53: ...Brightness is emphasised to produce images that are ideal for projecting TV images etc in bright rooms sRGB Images conform to the sRGB standard If set to sRGB the Abs Color Temp for the Color Adjustment command in the Advanced menu will be set to 6500K Blackboard Images with natural tints can be obtained when projecting onto a blackboard green Presentation Input Signal Selects the input signal in ...

Page 54: ...ustment values for the Image menu functions except for the Input Signal setting to their default settings Press the Enter button on the remote control to reset the settings Select Reset All to return all settings for menus such as Image and Audio to their default settings p 65 Sub menu Function Default ...

Page 55: ... position adjustment sub menu that appears Depends on connection Brightness Adjusts the image brightness Median value 0 Contrast Adjusts the difference between light and shade in the images Median value 0 Color Not available for RGB video Adjusts the colour intensity for the images Median value 0 Tint Not available for RGB video Adjustment is only possible when component video or NTSC signals are ...

Page 56: ...ery dark or very light and bright to make such images easier to see Living Room Brightness is emphasised to produce images that are ideal for projecting TV images etc in bright rooms sRGB Images conform to the sRGB standard If set to sRGB the Abs Color Temp for the Color Adjustment command in the Advanced menu will be set to 6500K Blackboard Images with natural tints can be obtained when projectin...

Page 57: ...n sub menu which appears When set to Auto the video signal format is set automatically Auto Aspect Ratio Sets the aspect ratio for projected images Depends on connection Reset Resets all adjustment values for the Image menu functions except for the Input Signal and Video Signal setting to their default settings Press the Enter button on the remote control to reset the settings Select Reset All to ...

Page 58: ...nput signals Audio1 for video and S Video input signals Audio2 Therefore if audio signals are being input to a different port from the default port you will need to select the audio signal input source Depends on connection Reset Resets all adjustment values for the Audio menu functions to their default settings Press the Enter button on the remote control to reset the settings Select Reset All to...

Page 59: ...olour mode name when the colour mode is switched When no image signals are being input When an incompatible signal is input When the air filter needs replacing ON Back ground Color Sets the screen status when the A V Mute button on the remote control is being pressed or when no image signals are being input to Black Blue or Logo To change the user s logo you need to record your own logo p 90 If th...

Page 60: ...However if Background Color has been set to Logo the setting cannot be returned to the default setting if the User s Logo Protect function of Password Protect has been set to ON Press the Enter button on the remote control to reset the settings Select Reset All to return all settings for menus such as Image and Audio to their default settings p 65 Sub menu Function Default ...

Page 61: ...ault Execute Records a user s logo p 90 Press the Enter button on the remote control and follow the procedure appearing on the screen A user s logo cannot be recorded if the User s Logo Protect function of Password Protect has been set to ON Cancel the Password Protect function before recording a user s logo EPSON logo ...

Page 62: ... a dark room or onto a small screen When Low is selected the brightness of the images is reduced the amount of electricity consumed and noise produced during projection are reduced and the lamp s operating life is extended High Startup Screen Sets whether the startup screen is displayed or not To change the user s logo you need to record your own user s logo p 90 This cannot be changed from enable...

Page 63: ...nt sub menu that appears RGB Press the Enter button on the remote control select R Red G Green or B Blue and make the adjustment in the colour adjustment sub menu that appears The settings can be made while viewing the projected image on the screen This item cannot be selected if sRGB has been selected as the Color Mode setting in the Image menu Abs Color Temp Depends on connection Projection Sets...

Page 64: ...etting will be applied after the power turns back on RS 232C Language Sets the language for message displays Press the Enter button on the remote control and select the language English Varies depending on country of purchase Reset Resets all adjustment values for the Advanced menu functions except for the Language setting to their default settings Press the Enter button on the remote control to r...

Page 65: ...the cumulative lamp operating time is reset to the initial default value Source Displays the input source which is currently being projected Input Signal Displays the input signal settings Does not appear when the input source is composite video or S video Video Signal Shows the video signal format Not displayed for computer RGB video or component video images Frequency Displays the horizontal and...

Page 66: ...trol to reset the settings Select Reset in an individual sub menu such as the Image or Audio menu to reset only the settings for the items in each sub menu The Input Signal User s Logo Lamp Hours and Language settings will not return to their default values If Background Color has been set to Logo the setting cannot be returned to the default setting if the User s Logo Protect function of Password...

Page 67: ...tton The configuration menu appears Select a menu item Press the or button to move to an item to be selected Contents of the menu screen of EMP 74L differs slightly Confirm the selection Press the Enter button to confirm the selection of a menu item The selected sub menu will then be displayed Contents of the menu screen of EMP 74L differs slightly 1 Remote control 2 3 ...

Page 68: ...ttons to change the setting Current setting value Currently selected setting item If you press the Enter button at items with a displayed the setting screen for that item will be displayed After making the setting press the Enter button to accept the setting The will change to green Select other menu items in the same way Press the Esc button once to return to the previous level Alternatively sele...

Page 69: ...s and what to do if a problem is found Using the Help 69 Problem Solving 71 Reading the Indicators 71 Power Indicator 71 Warning Indicator 72 When the Indicators Provide No Help 74 Problems relating to images 75 Problems when projection starts 80 Other problems 81 ...

Page 70: ... format PROCEDURE Press the Help button The help menu will be displayed Select a menu item If using the control panel the Select buttons function as the up and down keys If using the remote control press the and buttons to select an item Confirm the selection Press the Enter button to confirm the selection of a menu item 1 Projector 2 Remote control Projector 3 Remote control Projector ...

Page 71: ...erations in steps 2 and 3 to proceed through the menu to more detailed items The help menu is cleared when the Help button is pressed 4 TIP If the Help function does not provide a solution to the problem refer to Problem Solving p 71 ...

Page 72: ...th indicators are off check that the power cable is connected correctly and that power is being supplied normally Power Indicator lit flashing Status Cause Remedy or Status Standby condition Not abnormal Projection starts again when the Power button is pressed You can disconnect the power plug from the electrical outlet when the status light is in this condition Cool down in progress Not abnormal ...

Page 73: ...uctions World Wide Warranty Terms booklet Lamp timer failure Lamp out Take out the lamp and check if it is broken p 86 If the lamp is not broken reinstall it then reconnect the power cable and press the Power button on either the projector s control panel or the remote control to turn the power back on If the indicators still show a problem stop using the projector disconnect the power cable from ...

Page 74: ...ilters are blocked clean or replace them p 83 p 89 lit flashing Status Cause Remedy or Status Orange TIP If the projector is not operating properly even though the indicators are all showing normal refer to When the Indicators Provide No Help on the following page If an indicator is showing a status which does not appear in the previous tables contact your dealer or the nearest address provided at...

Page 75: ...ence distortion or black white checked patterns appear Image is truncated large or small p 78 Only part of the image is displayed Image colours are not right p 79 The whole image appears purplish or greenish images are black white colours appear dull etc Computer monitors and LCD screens have different colour reproduction performance so that the colours projected by the projector and the colours a...

Page 76: ...ting Message p 58 Have the configuration menu settings been made correctly Reset all of the settings p 65 Is the projected image completely black Some input images such as screen savers may be completely black Are the image signal format settings correct If a composite video or S Video source is connected to the projector use the Video Signal menu command to select the signal format Image Video Si...

Page 77: ...4 Has the correct video input port been selected Press the Computer1 2 button or S Video Video button on the remote control or the Source button on the projector s control panel to select the images p 34 Is the power for the computer or video source turned on Turn the power on for the devices p 33 Are the image signals being output to the projector If the image signals are only being output to the...

Page 78: ...als from the Computer1 Component Video1 port or the Computer2 Component Video2 port are being projected use the Input Signal menu command to set the signal format that matches the signal that is being projected from the connected equipment Image Input Signal p 52 p 55 If a composite video or S Video source is connected to the projector use the Video Signal menu command to select the signal format ...

Page 79: ...ally using the Position menu command If signals other than analogue RGB images from a computer or RGB video images are being input adjust the setting manually using the Position menu command Image Position p 51 p 54 Has the computer been set for dual display If dual display has been activated in the Display Properties of the computer s Control Panel the projector will only project about half of th...

Page 80: ...2 p 55 If a composite video or S Video source is connected to the projector use the Video Signal menu command to select the video signal format Image Video Signal p 56 Has the image brightness been adjusted correctly Use the Brightness menu command to adjust the brightness Image Brightness p 51 p 54 Are the cables connected correctly Check that all of the cables required for projection are securel...

Page 81: ...er1 Component Video1 port being projected The only images that can be displayed on an external monitor are those from the Computer1 Component Video1 port p 21 Problems when projection starts Check Remedy Have you pressed the Power button Press the Power button to turn the power on Are all of the indicators switched off The power cable is not connected correctly or power is not being supplied Conne...

Page 82: ...itting area facing towards the remote control light receiving area when it is operated Face the remote control towards the remote control light receiving area The operating angle for the remote control is approximately 30º horizontally and approximately 15º vertically p 13 Is the remote control too far from the projector The operating range for the remote control is approximately 6m p 13 Is direct...

Page 83: ...attery 84 Lamp Replacement Period 85 Replacing the Lamp 86 Resetting the Lamp Operating Time 88 Replacing the Air Filter 89 Saving a User s Logo 90 Optional Accessories 93 Glossary 94 List of ESC VP21 Commands 97 Command List 97 Communication Protocol 97 Cable Layouts 98 Serial connection 98 USB connection 98 USB Connection Setup 99 List of Supported Monitor Displays 100 Computer RGB Video 100 Com...

Page 84: ...creen clean the air filters and the air intake vent If the air filters become clogged with dust it can cause overheating and damage the projector Turn the projector upside down and use a vacuum cleaner to clean the air intake vent Cleaning the Projector Case Cleaning the Lens CAUTION Be sure to read the separate Safety Instructions World Wide Warranty Terms before cleaning CAUTION Do not use volat...

Page 85: ... holder out Remove the old battery and insert the new battery Check the position of the mark inside the battery holder to ensure that the battery is inserted the correct way Insert the battery holder into the remote control Push the battery holder in until it clicks Inserting the Battery CAUTION Be sure to read the Safety Instructions World Wide Warranty Terms before handling the battery 1 Catch 2...

Page 86: ...he message after the periods as when used continuously at low brightness described below When used continuously at high brightness Approx 1900 hours When used continuously at low brightness Approx 2900 hours Brightness Control p 61 EMP 74 54 only If you continue to use the lamp after this period the possibility of the lamp breaking becomes greater When the lamp replacement message appears replace ...

Page 87: ... the lamp cover and the mark on the projector are aligned Then lift up the lamp cover to remove it Loosen the two lamp fixing screws Use the screwdriver that is supplied with the spare lamp or some other flat tipped screwdriver to loosen the two lamp fixing screws that are securing the lamp to the projector Replacing the Lamp CAUTION If you are replacing the lamp because it has stopped working it ...

Page 88: ...s Install the lamp cover Insert the two cover tabs into the projector until the mark on the lamp cover is aligned with the mark on the projector then slide the lamp cover in until it clicks into place 4 5 6 1 2 Insert the cover so that the mark and the mark are aligned TIP Install the lamp securely If the lamp cover is removed the lamp turns off automatically as a safety precaution Moreover the la...

Page 89: ...DURE Connect the power cable turn on the projector s power and then press the Menu button The configuration menu will be displayed Select Lamp Hours Reset from the Info menu and then press the Enter button Contents of the menu screen of EMP 74L differs slightly Select Yes and then press the Enter button The lamp operating time will then be reset Resetting the Lamp Operating Time TIP Do not reset t...

Page 90: ...he knob of the air filter cover and lift up the air filter cover to remove it Replace the air filter with a new one Remove the old air filter and install the new air filter Place the new air filter so that it does not slip into the air intake vent Install the air filter cover First insert the tabs then press down on the opposite side until it clicks into place Replacing the Air Filter 1 2 Knob 3 4...

Page 91: ...If the User s Logo Protect function of Password Protect is set to ON a message is displayed and the user s logo can not be recorded To record a user s logo set User s Logo Protect to OFF first p 29 If keystone correction or E Zoom have been carried out they will be cancelled when the User s Logo menu is selected 3 TIP When you press the Enter button the images will be displayed at the original ima...

Page 92: ...mage to use Press the and buttons to select the part of the image to use as the user s logo and then press the Enter button Select Yes at the confirmation screen and then press the Enter button Select the zoom rate in the Zoom rate setting screen and then press the Enter button 4 TIP User s logos can be saved at up to 480 360 dots in size 5 6 ...

Page 93: ...Completed will be displayed 7 TIP Saving the user s logo may take a few moments about 15 seconds Do not use the projector or any other sources which are connected to the projector while the user s logo is being saved otherwise it may result in errors in projector operation Once a user s logo has been saved the logo setting cannot be returned to the factory default ...

Page 94: ...Aspect ratio 4 3 VGA HD15 PC cable ELPKC02 1 8 m 6 ft for mini D Sub 15 pin mini D Sub 15 pin This is the same computer cable as the projector s accessory computer cable VGA HD15 PC cable ELPKC09 3 m 9 8 ft for mini D Sub 15 pin mini D Sub 15 pin VGA HD15 PC cable ELPKC10 20 m 65 6 ft for mini D Sub 15 pin mini D Sub 15 pin Use this extension cable if the accessory computer cable is too short Remo...

Page 95: ...jector s lamp is cooled down after it has become hot through use Cool down is carried out automatically when the Power button is pressed to turn off the power Do not disconnect the power cable while cool down is in progress otherwise the cool down process will not work properly If the cool down period is not allowed to finish normally the projector s lamp and internal components will remain at hig...

Page 96: ...ntal 600 vertical dots which is used by IBM PC AT compatible computers S Video A video signal which has the luminance component and colour component separated in order to provide better image quality It refers to images which consist of two independent signals Y luminance signal and C colour signal SXGA A type of video signal with a resolution of 1280 horizontal 1024 vertical dots which is used by...

Page 97: ...r signal which is contained in the colour bar signal used in modern TV transmissions The name comes from the Y luminance signal and the CbCr chroma colour signals YPbPr The carrier signal which is contained in the colour bar signal used in high definition TV HDTV transmissions The name comes from the Y luminance signal and the PbPr colour difference signals ...

Page 98: ... error message is output and then the code is sent Communication Protocol Item Command Power ON OFF ON PWR ON OFF PWR OFF Signal selection Computer1 SOURCE 11 Component Video1 YCbCr SOURCE 14 Component Video1 YPbPr SOURCE 15 Computer2 SOURCE 21 Component Video2 YCbCr SOURCE 24 Component Video2 YPbPr SOURCE 25 Video SOURCE 41 S Video SOURCE 42 A V Mute ON OFF ON MUTE ON OFF MUTE OFF A V Mute Select...

Page 99: ...ntrol RS 232C At computer At projector PC serial cable At computer Signal Function GND 5 5 GND GND Signal wire ground RD 2 3 TD TD Transmit data TD 3 2 RD RD Receive data DTR 4 6 DSR DSR Data set ready DSR 5 4 DTR DTR Data terminal ready At projector USB connection Connector shape USB type B At projector At computer type B ...

Page 100: ...ownloaded together with the utility software so install this USB driver into the computer that is to be used Refer to the EMP Link21L User s Guide that is downloaded together with the utility software for instructions on installing the USB driver Change the COM Port setting in the Advanced menu to USB Turn the projector s power off After the cool down period has finished turn the projector s power...

Page 101: ...1200 1024 768 MAC13 640 480 1024 768 800 600 MAC16 832 624 1024 768 800 600 MAC19 1024 768 1024 768 800 600 MAC19 60 1024 768 1024 768 800 600 MAC21 1152 870 1016 768 794 600 SDTV 625i 50 720 540 1024 768 800 600 SDTV 525i 60 640 480 1024 768 800 600 SDTV 525p 60 640 480 1024 768 800 600 HDTV 750p 60 1280 720 1024 576 800 450 HDTV 1125i 60 1920 1080 1024 576 800 450 Component Video RGB Video Signa...

Page 102: ...ensation Weight Approx 2 9 kg 6 4 lbs Connectors Monitor Out 1 Mini D Sub 15 pin female Black Computer1 Component Video1 1 Mini D Sub 15 pin female Blue Computer2 Component Video2 1 Mini D Sub 15 pin female Blue S Video 1 Mini DIN 4 pin Video 1 RCA pin jack USB 1 USB connector B series Audio1 1 Stereo mini jack Audio2 1 Stereo mini jack Control RS 232C 1 D Sub 9 pin male Pixelworks DNXTM ICs are u...

Page 103: ...102 Appearance Units mm 4 M4 8 Centre of projector 104 53 29 21 60 73 57 7 315 78 5 49 4 2 9 87 Centre of lens 21 240 10 Distance from center of lens to suspension bracket fixing point ...

Page 104: ...port 9 Computer2 Component Video2 port 9 Computer cable 17 24 Connecting to a Computer 16 Connecting to a Video Source 22 Contrast 51 54 Control Panel 8 Control RS 232C port 9 Cool down 35 71 Cross 49 D Dynamic 44 52 55 E Eligible computers 16 EMP Link21L 99 ESC VP21 97 E Zoom 49 F Focus 37 Focus ring 7 Foot adjustment 38 Freeze 47 Frequency 64 G Glossary 94 H HDTV 100 Help function 69 High 61 I I...

Page 105: ...B 62 RGB Video 24 S Screen size 15 Security lock 9 Setting Menu 58 Setting Up the Projector 14 Sharpness 51 54 Sleep mode 58 Source 64 Speaker 7 25 Specifications 101 Squeeze mode 48 sRGB 44 52 55 Startup screen 61 Stereo mini jack audio cable 25 Storage temperature 101 Sub menu 50 Supported Monitor Displays 100 Suspension bracket fixing point 10 102 S Video 23 54 64 S Video port 9 Sync 41 51 SYNC...

Page 106: ... used in accordance with the instructions may cause harmful interference to radio or television reception However there is no guarantee that interference will not occur in a particular installation If this equipment does cause interference to radio and television reception which can be determined by turning the equipment off and on the user is encouraged to try to correct the interference by one o...

Page 107: ... the U S failure to strictly comply with SEIKO EPSON CORPORATION s operating and maintenance instructions SEIKO EPSON CORPORATION shall not be liable against any damages or problems arising from the use of any options or any consumable products other than those designated as Original EPSON Products or EPSON Approved Products by SEIKO EPSON CORPORATION General Notice EPSON is a registered trademark...

Reviews: