background image

Service Manual

Data Projector

EMP-S4

Summary of Contents for EMP-S4

Page 1: ...Service Manual Data Projector EMP S4 ...

Page 2: ... RESTRICTION This product is Type 1 information equipment and uses radio frequency energy It fully com plies with the rules of the Voluntary Control Council for Interference by Information Technol ogy Equipment VCCI Accordingly if this product is used in a residential area or place situated close to residential area it may interfere with reception of televisions or radios in the neighborhood Follo...

Page 3: ...I N G Procedures which if not strictly observed could result in personal injury are described under the heading WARNING C A U T I O N CAUTION signals a precaution which if ignored could result in damage to equip ment If assembly needs special attention or the procedure is different from the reversed disassembly procedure the correct procedure is described under the heading REASSEMBLY C H E C K P O...

Page 4: ...vision B Manual Revision History Service memo Make a note here of important technical information from Technical Information bulletins History Date Detail of change Rev A 2006 4 10 First Release Rev B 2006 5 9 Change in P 4 10 ...

Page 5: ...plied to the projector be careful not to touch the fans intake and exhaust Always wear gloves when disassembling and reassembling the projector in order to avoid injury from metallic parts with sharp edges Do not look directly into the projector s lens while power is being supplied to the projec tor otherwise your eyes may be injured 3 PREVENTING ACCIDENTS Place the projector on a stable level sur...

Page 6: ...aking out the component from the static proof bag 2 USE OF GENUINE PARTS When replacing the structural components inside the projector including the lamp assy use only replacement parts supplied by EPSON and listed in the projector s Parts List Use the accessory power cord and interface cable provided with the projector 3 SAFETY TESTING The following tests should be carried out on repair parts use...

Page 7: ... Connect the red lead wire to the line terminal 4 Connect the black lead wire crocodile clip to c in order to measure the insulation resistance 1 between a and c in the diagram below 5 Next insert the probe of the red lead wire into a 6 Set the measure switch to LOCK and then measure the insulation resistance after 1 minute 7 Check that the insulation resistance after 1 minute is 10 MΩ or more 8 N...

Page 8: ...ith no smoke or fire Check Item Tool Standard Ground continuity check Multimeter Should be no resistance 0 5 Ω or less a b c 1 1 Turn on the power switch 2 Set the range selection switch to Ω 3 Connect the black lead wire to the COM terminal 4 Connect the red lead wire to the V Ω Hz terminal 5 Check that the resistance at 1 in the diagram below is 0 5 Ω or less Display DC AC SW Power supply lines ...

Page 9: ...e pushed on as far as they will go To prevent problems caused by dirt getting into the optical system always disassemble and assemble the projector in an area which is free from floating dust When disconnecting the FPC cable from the CN502 of the MA board assembly release the connector locks To release the connector lock push up both ends of the connector simultaneously with tweezers When disconne...

Page 10: ...ures knowledge regarding electrical circuits and knowledge regarding static electricity 4 Others Any questions regarding repairs and service to this projector such as supply of parts and the contents of this Service Manual should be directed to EPSON at the address below Furthermore information regarding matters such as technical changes to the projector are released when necessary in the form of ...

Page 11: ...2 3 MA Board 2 8 2 3 1 External View of MA Board 2 8 2 3 2 Overview of Operation 2 9 2 4 Interface Connectors 2 10 2 5 Power Supply Ballast Unit 2 11 2 5 1 Power Supply Circuit Block Diagram 2 11 2 5 2 Overview of Operation 2 12 2 5 3 Connector CN2000 Pin Layout 2 13 2 6 RC Board Assembly 2 14 2 7 Speaker 2 15 2 8 Temperature Control 2 16 2 8 1 Sensors and Switches 2 16 2 8 2 Fan Operation 2 18 2 ...

Page 12: ...ch Springand and SW Cable 4 16 4 2 9 Removing the MA Board Assy 4 19 4 2 10 Removing the IF Case Set RC Filter and SW Light Shade Sheet B 4 23 4 2 11 Removing the MA Plate 4 24 4 2 12 Removing the Optical Engine 4 25 4 2 13 Removing the Focus Ring 4 25 4 2 14 Projection Lens 4 26 4 2 15 Removing the RC Board Assy RC Cable B Safety Switch Intake Duct Intake Fan and Intake Fan Sheet 4 27 4 2 16 Remo...

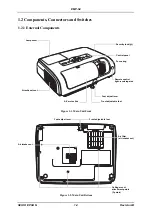
Page 13: ...Chapter 1 Product Specifications ...

Page 14: ... up to 800 x 600 dots approximately 1 677 billion pixels Quiet operation Operating noise at low brightness is only 30 dB Brief cool down period Instant Off function Cool down is completed in just a few seconds when turning the projector power off Easy to Operate The accessory remote control can be used for operations such as Freeze E Zoom Effect A V Mute User s Logo Capturing and Resize functions ...

Page 15: ...igh altitude higher than 1 500 meters above sea level the fan speed should be increased to cool the projector efficiently and extend the lamp life since air density is low at high altitude Select High for the Fan Speed in the Extended Menu to increase the fan speed Image Shift Function This allows the user to adjust the image position without moving the projector The image retains its original asp...

Page 16: ...it Front Figure 1 2 Main Unit Bottom Lamp cover Focus ring Air exhaust vent A V mute slide Foot adjust lever Security lock Control panel Remote control light receiving area Front adjustable foot Foot adjust lever Front adjustable foot Air intake vent Air filter air intake vent Ceiling mount attachment points 3 points ...

Page 17: ... or menu while viewing a configuration menu Help button Displays and closes the help which shows solutions if a problem occurs Enter button Automatically adjusts analogue RGB images from computers and RGB video images to the optimum images If a configuration menu or help screen is displayed it accepts and enters the current selection Wide Tele button Adjusts the image size If a configuration menu ...

Page 18: ...re 1 5 Major Internal Components Control Panel MA Board Lamp Assy Optical Engine Speaker IF unit Exhaust Fan Intake Fan 1 Upper case unit Intake Fan 2 Lamp lid detection switch Safety Switch Power Supply Unit TH Board Power Supply Fan Cover Lens Frame Assy Lamp Fan ...

Page 19: ...deo signals Menu button Displays and closes the configuration menu Color Mode button Changes the colour mode When you press the button the colour modes change in the following order Pointer button Press to indicate part of an image being pro jected as part of a presentation Esc button Stops the current function Displays the previous screen or menu while viewing a configuration menu Acts as a mouse...

Page 20: ...19 to 12 12 m Zoom Tele 30 to 300 inch 0 87 to 8 97 m Zoom Wide Brightness High Brightness 1800 ANSI lumens Color Mode Game Zoom Wide Low Brightness 1500 ANSI lumens Color Mode Game Zoom Wide Contrast 500 1 Color Mode Game High Brightness Brightness Uniformity 85 Typ Color Reproduction Full Color 16 77 million colors Sound Output 1W Monaural Color Mode PC Photo Presentation Theatre Game sRGB Black...

Page 21: ...c negative 0 3 V or 3 state 0 3 V on Y Video RGB 0 7 Vp p 75 Ω Mac 0 714 Vpp 75 Ω Audio Signal 500 mVrms 47 KΩ Input Terminal Video Composite Video RCA Yellow x 1 S Video Mini DIN Component Video Mini D sub 15 pin Blue in common with Analog RGB connector Video RGB Mini D sub 15 pin Blue in common with Analog RGB connector Audio RCA x 2 Whie Red Control I O USB I O I O Terminal USB connector series...

Page 22: ...102 7513S 15G2 08 Pin No Signal Name Pin No Signal Name 1 R 9 No pin 2 G 10 GND 3 B 11 GND 4 GND 12 SDA 5 GND 13 H Sync 6 GND 14 V Sync 7 GND 15 SCL 8 GND 15 10 5 11 6 1 CN103 7513S 15G2 Pin No Signal Name Pin No Signal Name 1 OUT A 9 T P 2 OUT B 10 GND 3 OUT C 11 T P 4 T P 12 T P 5 GND 13 H Sync 6 GND 14 V Sync 7 GND 15 T P 8 GND 15 10 5 11 6 1 ...

Page 23: ...ace USB Type B 1 4 3 S Video Interface Mini DIN4 pin CN503 UBB 4R D14C Pin No Signal Name 1 VBUS 2 D 3 D 4 GND 5 GND 6 GND GND 2 1 3 4 6 5 CN100 TCS7708 012020 1 2 5 6 3 4 Pin No Signal Name 1 GND 2 GND 3 Y signal input 4 C signal input 5 DET 6 GND GND ...

Page 24: ...1 12 EMP S4 SEIKO EPSON Revision B 1 4 4 CVBS Input Interface Audio Input Interface RCA pin jack x 3 J101 YKC21 4098N Pin No Signal Name 1 CVBS 2 GND 3 L 4 GND 5 R 6 GND ...

Page 25: ...1 13 EMP S4 SEIKO EPSON Revision B 1 5 External Views Figure 1 8 External Dimensions Unit mm ...

Page 26: ...1 14 EMP S4 SEIKO EPSON Revision B Figure 1 9 External Dimensions Unit Inch ...

Page 27: ...Chapter 2 Theory of Operation ...

Page 28: ...Video signals or S Video signals are provided to the MA Board from the CVBS input or S Video port Ana log signals are converted to digital signals at the MA board 2 The digital display signals are temporarily stored in video memory on the MA board 3 The R G and B light valves control the amount of light that passes through the valves 4 The light that passes through the light valves is combined by ...

Page 29: ...e connectors for the components and Main MA board are shown in the following diagram Figure 2 2 MA Board Connectors CN504 CN500 Photo Interrupter Lamp Fan CN708 CN704 CN705 CN300 CN502 CN706 CN501 CN707 CN701 CN503 CN1800 CN102 CN103 CN100 CN101 CN2000 CN1300 CN1500 CN1400 ...

Page 30: ...IC GAUGE5S AMP NRS FLASH ROM 16Mbit SST36VF1602E SST KEY MATRIX LED POWER SUPPLY LAMP Ballast AC PC VIDEO I F Power Supply Circuit HU MA N I F PANEL DRIVER B LO CK IR DD5 DD5 DD5 Thermister Thermister Newly added part DDC EEPROM BR24C21F ROHM PC FAN Driver MONITOR OUT TEST MONITOR OUT TEST CONECTOR CONECTOR USB USB B DSUB15 DDC RGB YUV Monitor Out TP TPA015 152 TI TI 2 8W RCA RCA L RCA RCA R Vol C...

Page 31: ...sys the Light Guide Unit the Panel on Prism POP Unit and the projection lens These four components together are called the Optical Engine Figure 2 4 Optical Engine Optical Engine Figure 2 5 Optical Engine Functional Diagram POP Unit Projection lens focus Light Guide Unit Light Valve B Light Valve G Light Valve R ...

Page 32: ...ed together at the factory They are only available as a matched pair and must always be replaced together when either the Optical Engine or MA Board has a failure Table 2 1 Component Name Function Other Lamp Assy An 170W discharge lamp is the light source Light Guide Unit The Light Guide Unit disperses the light from the light source via lens arrays A and B in order to provide uniform illumination...

Page 33: ...ximately 1 900 hours at high brightness or 2 900 hours at low brightness the luminance will drop by approximately 50 Figure 2 6 The Lamp may be replaced at any time Replace the Lamp Assy before the full 1900 hour period at high brightness or 2900 hour period at low brightness has been reached if it seems that the luminance of the lamp is unacceptable during actual use The cumulative operating time...

Page 34: ...emperature sensor circuit and fan control ballast power supply control and the Infrared RC board interface The MA board also contains an imaging processor PW465 EEPROM digitizers ADC and video decoder and SRAM memory 2 3 1 External View of MA Board Figure 2 8 MA Board Top Figure 2 9 MA Board Bottom The MA Board and the Optical Engine must always be replaced together ...

Page 35: ...l Remote control Receives and decodes IR signals from the remote control and supplies control signals to various MA board circuits Mouse control Converts pointer information contained within the remote control signals into mouse signals in PS 2 and USB serial format to send them to the computer Lamp control Controls the ballast and lamp illumination LED control Controls the display characteristics...

Page 36: ...connectors Figure 2 10 IF Board External Connectors Figure 2 11 MA Board Block Diagram Monitor Out port Computer port S Video port Video port Audio input Remote control light receiving area USB port CN503 CN100 CN103 CN101 CN102 Computer Component Video Output Computer Component Video Intput S Video USB TypeB Audio input CVBS input IC501 A D Converter PW190 IC104 Chroma IC1800 IC1801 Speaker ...

Page 37: ...nerate the AC power supply 170W for the lamps Figure 2 12 Power Supply Ballast Unit 2 5 1 Power Supply Circuit Block Diagram Figure 2 13 Power Supply Circuit Block Diagram Fuse Protects the power supply and internal circuitry from overcurrent on the AC supply line EMI filter circuit Eliminates interference from the AC power supply input AC Inlet AC Input AC100 240V Ballast output 250W DC output to...

Page 38: ...EMI filter regulator circuit eliminates interference noise from the AC line and generates the DC voltage for the regulators The DC voltages shown in the tables below are generated by a Switching Regulator No fluctuations in output potential occur as a result of load fluctuations and the individual output voltages cannot be adjusted Table 2 2 Output voltage Output voltage accuracy Ripple mVpp Rippl...

Page 39: ... B 2 5 3 Connector CN2000 Pin Layout Figure 2 14 Power Supply Connector connected to CN2000 on the MA board Pinout Definition Pin No Signal name 1 PFCON 2 5 V_T 3 GND 4 5 V_T 5 5 V_T 6 7 V 7 GND 8 13 V 9 GND 10 18 V 11 GND 12 NC 12 1 ...

Page 40: ... RC Receiver Sensor The output signals serial data received by the sensors are sent to IC104 on the MA board The MA board uses the serial data received from the remote control button switches to control the power ON OFF status menu start and control the display temporary stop blank etc The remote control function is illustrated in Figure 2 16 Figure 2 16 Remote Control Circuit Block Diagram Rear I...

Page 41: ... computer or video source The signal from the computer or video source is amplified by the audio control circuits on the AV board and then output to the built in speaker through connector CN1800 Figure 2 17 Speaker The following diagram illustrates the circuits that control the speaker Figure 2 18 Speaker Control Circuit Block Diagram Speaker IC1800 Audio Amp IC104 Audio input port CN101 CN1800 Sp...

Page 42: ...event the danger of burns that could occur if the lamp turned on accidentally The lamp lid detection switch is connected to CN900 on the MA board When the lamp lid opens IC501 IFCPU detects the lamp lid open signal and sends the Lamp OFF signal to turn off the lamp Figure 2 19 Lamp Lid Detection Switch Table 2 3 Sensor Switch Location Function Lamp lid detection switch On the Exhaust Duct Inner In...

Page 43: ...is is a backup overheating prevention switch mounted on the side of the Inner Exhaust Duct If overheating occurs around the Lamp Assy due to problems with the exhaust fan the lamp is normally turned off by the TH Board to prevent overheating The Safety Switch is provided as a backup in case the TH Board and temperature detection circuit fail simultaneously When the temperature rises above a given ...

Page 44: ...for more information on the LED status indicators 2 8 2 Fan Operation There are five cooling fans inside the projector These fans discharge heated air produced by the Lamp Assy power supply unit and ballast unit Figure 2 22 Fan Locations Table 2 4 Temperature Sensors Condition Warning Indicator Meaning Normal temperature Off Normal operation in progress Warning temperature Flashes orange If temper...

Page 45: ...l Circuit Block DAC0 DAC1 DAC2 DAC3 PE2 PE3 PE4 PE5 PW190 PW190 05L 05L PC3 PC4 PC5 PC6 PC7 FANDET0 FANDET1 FANAJST1 FANON1 FANAJST2 FANON2 FANDET2 FANAJST3 FANON3 FANDET3 Lamp Fan FANAJST4 FANON4 FANDET4 Power Supply Fan Exhaust Fan Intake Fan 2 Intake Fan 1 ...

Page 46: ...d immediately turns off the lamp and causes the warning indicator to light red Fan Operation Standby Mode Intake Fan LV G FAN Operates at a constant speed from power on Power Supply Fan Intake Fan LV R FAN The rotating speed is adjusted according to preset temperatures detected by the thermistor Exhaust Fan Turns on the power supply fan and starts to operate at low speed when the thermistor detect...

Page 47: ...vided in the International Warranty Conditions section of the Safety Instructions World Wide Warranty Terms booklet Internal temperature error overheating The lamp will turn off automatically and projection will stop Wait for about 5 minutes After about 5 minutes the projector will switch to standby mode so check the following two points Check that the air filter and air exhaust vent are clear and...

Page 48: ... booklet You cannot continue projecting until the lamp is replaced Check that the lamp cover and the lamp are securely installed If the lamp cover or the lamp is not securely installed the lamp does not switch on When using above an altitude of about 1500m make sure you set the High Altitude Mode to On Indicator Status Projector Status Problem and Remedy High speed cooling in progress This is not ...

Page 49: ...Chapter 3 Troubleshooting ...

Page 50: ...owing tools and equipment will be required in order to carry out troubleshooting and so you should check that they are on hand 3 1 2 Field Replacement Parts Many of the components that comprise a service unit have each been adjusted in relation to each other Therefore when replacing parts during troubleshooting or repair do not disassem ble service units in order to harvest and use constituent com...

Page 51: ...he operation indicator lights green and projection starts at maximum brightness Carry out the following three steps 1 Check and adjust the projector s Front Feet as appropriate for the projection position and distance 2 Adjust the image using the Focus Ring 3 Press the Auto button to optimize the display Display input output and image quality Use the Source and Enter buttons to change input Check ...

Page 52: ... due to external forces The vent hole should be clean and free from any foreign materials The Air Filter should be installed correctly Remove the Air Filter from the Lower Case to check that it is clean The Intake Fan inside the Air Filter frame should be clean and free from foreign materials The Lamp Lid should be securely attached to the Lower Case The Lamp Lid Detection Switch latch should be f...

Page 53: ...nterrupter Exhaust Fan LAMP Themistor RC Board Intake Fan 1 2 Light Valve R G B Power Supply Ballast Unit Power Supply Fan Lamp Lid Detection Switch Lamp Fan MA Board Removal Speaker MA Board Installation Upper Case Unit Installation MA Board CN502 Lock type connector MA Board CN504 MA Board CN706 MA Board CN701 MA Board CN300 MA Board CN704 CN705 MA Board CN501 MA Board CN708 MA Board CN1800 MA B...

Page 54: ...el Does the indicator flash green Does the indicator flash green To next page Replace the Power Supply Ballast Unit Press the Power button on the remote control Does the indicator flash green Reconnect or replace the control panel To START To START Refer to 2 9 LED Indicators on page 2 21 Replace tha Optical Engine and the MA Board No Yes No Yes No Yes No Yes ...

Page 55: ...ing the problem 3 If the power supply unit is recoverable but is not working properly for example if high tem peratures are causing the thermostat to shut down the power supply or if the overcurrent protection circuit has tripped then there is no need to replace the power supply unit 4 If the power supply unit is not recoverable and is not working properly for example if an overcurrent has repeate...

Page 56: ...p Assy Is the lamp turned on Replace the Optical Engine and MA Board Clean the areas around the Light Valves Does the image appear clearer Does the image appear clearer Clean the Projection Lens Does the image appear clearer Replace the Optical Engine and MA Board Does NO SIGNAL appear in the bottom left of the screen Replace the Optical Engine and MA Board 1 Adjust the height using the front adju...

Page 57: ...ange the display to Computer Does an image appear on the screen Replace the computer cable Does an image appear on the screen Replace the Optical Engine and MA Board Is the image quality good 1 Press the Menu button 2 Select the Image menu 3 Adjust the brightness and contrast Is the image quality good Replace the Optical Engine and MA Board Connect external devices to all the interfaces Connect a ...

Page 58: ...nd output from the built in speaker Reconnect CN1800 on the MA board Is sound output from the built in speaker Replace the audio cable Is sound output from the built in speaker Replace the speaker unit Is sound output from the built in speaker Replace the Optical Engine and MA Board Can the volume be adjusted Replace the Optical Engine and MA Board Can the audio output be started and stopped using...

Page 59: ...e button switch the input source Does pressing the Help button show the explanation display Does pressing the Enter button change the menu item Does pressing the or buttons correct keystone distortion Does pressing the TELE or WIDE buttons change the image size Replace the control panel Do all switches function normally Replace the Optical Engine and MA Board Remote Control Operation Do all switch...

Page 60: ... remote control Replace the Optical Engine and MA Board Do all buttons operate normally Replace the remote control Do all buttons operate normally Replace the Optical Engine and MA Board Does the remote control work 20 ft 6 m away from the front or rear of the projector Replace the remote control battery Does the remote control work 20 ft 6 m away from the front or rear of the projector Replace th...

Page 61: ...errupter Replace the Photo Interrupter cable Does opening closing the A V mute slide activate or deactivate A V Mute Does opening closing the A V mute slide activate or deactivate A V Mute Does opening closing the A V mute slide activate or deactivate A V Mute Replace the Optical Engine and MA Board Other ...

Page 62: ...mistor or Safety Switch Malfunctioning or dirty Exhaust Fan Intake Fan or Power Supply Fan Clean or replace as necessary Dirty air filter Malfunction of the Optical Engine Malfunction of Optical Engine Malfunctioning or dirty Light Guide Unit lenses mirrors etc Dirty Projection Lens Malfunctioning or dirty Light Valve Replace the Optical Engine and MA Board Charring of cables due to excessive heat...

Page 63: ...Chapter 4 Disassembly Assembly ...

Page 64: ...SEMBLY CHECK POINT The precautions in the two lists below WARNING and CAUTION must always be followed during disassembly and assembly Before starting the disassembly work on this product read and follow these precautions W A R N I N G Procedures which if not strictly observed could result in personal injury are described under the heading WARNING C A U T I O N CAUTION signals a precaution which if...

Page 65: ...mponents C A U T I O N Repairs on Epson product should only be performed by an Epson certified repair technician Turn off the power for both the projector and the host computer before disconnecting or connecting them Once all power has been turned off disconnect any interface cables that are still connected Use a vacuum cleaner to clean the air filter interface panel and outer case Use only recomm...

Page 66: ...en there is an uncertain point Table 4 1 Tools Needed Name Application Phillips screwdriver No 0 Disassembling the Focus ring Phillips screwdriver No 2 20 cm Disassembling the outer case and inner components Flathead screwdriver Disassembling the rear foot and the front foot Flathead precision screwdriver Removing the front foot Hexagonal box screwdriver 5 mm Removing the computer interface Brush ...

Page 67: ...agnet so keep it away from any storage media such as floppy disks and magnetic cards The Optical Engine is very sensitive to vibration and shocks so handle it with care Do not disassemble any components such as the power supply unit which do not have express disassembly procedures described in this Service Manual C H E C K P O I N T The Optical Engine and Main MA Board are paired together as a sin...

Page 68: ...ABLE RCR FIF 4 2 18 SHIELD PLATE LAMP 4 2 20 POWER SUPPLY ASSY 4 2 19 FAN POWER SUPPLYB 2406GL B49 4 2 19 FILTER POWER SUPPLY 4 2 20 CASE LOWER 4 2 20 MODEL NAME PLATE Power Lite S4 4 2 1 FILTER RC 4 2 7 FRAME AIR FILTER 4 2 5 AIR FILTER A 4 2 5 PRINTED CIRCUIT BOARD ASSEMBLY SW_R2 4 2 7 COVER LENS UNIT 4 2 8 CABLE SW Au 4 2 7 BUTTON SW 4 2 7 LENS LED 4 2 7 SET CASE IF 4 2 10 Cable RC B 4 2 15 PRI...

Page 69: ...CT LAMP Lamp Duct DUCT INTAKE Intake Duct FAN INTAKE Intake Fan SHEET INTAKE FAN Intake Fan Sheet POWER SUPPLY ASSY Power Supply Assy FAN POWER SUPPLYB 2406GL B49 Power Supply Fan B DUCT EXHAUST INNER Inner Exhaust Duct DUCT EXHAUST OUTER Outer Exhaust Duct FAN EXHAUST B Exhaust Fan B PRINTED CIRCUIT BOARD ASSEMBLY TH_R1 TH Board Assy CABLE RCR FIF Cable RCR FIF Lamp Cover Detection Switch Lamp Li...

Page 70: ...ON Revision B LENS LED LED Lens PRINTED CIRCUIT BOARD ASSEMBLY SW_R2 SW Board Assy CABLE SW Au SW Cable Au LID ASSY LAMP Lamp Lid Assy Table 4 2 Part Names given in the SPI Official Name used in SPI Names used this Chapter ...

Page 71: ...e the Lamp Lid Assy 2 Remove the two screws that secure the LAMP UNIT FOR AS and remove the LAMP UNIT FOR AS Figure 4 2 4 2 3 Removing the Rear Foot Rubber Foot 1 Pull and rotate the Rear Foot to remove the Rear Foot 2 Press a screwdriver or similar tool into the small slot beside the Rear Foot and pry the Rubber Foot out of the projector Lower Case Unit Figure 4 3 Lamp Lid Assy LAMP UNIT FOR AS R...

Page 72: ... the Front Foot Unit and take out the Front Foot Unit Figure 4 4 4 2 5 Removing the Air Filter Frame and Air Filter A 1 Slide the Air Filter Frame in the direction of the arrow with your fingers and remove the Air Filter Frame 2 Remove the Air Filter A from the Air Filter Frame Figure 4 5 Front Foot Unit Air Filter A Air Filter Frame ...

Page 73: ...ing the Upper Case 1 Remove the 7 C B P TITE 3x10 F ZB 3C screws that secure the Upper Case Unit Figure 4 6 2 Carefully lift the front of the Upper Case taking care not to pull the two cables connected to the Upper Case Figure 4 7 Upper Case CN502 ...

Page 74: ...4 12 EMP S4 SEIKO EPSON Revision B 3 Unlock connector CN502 on the MA Board and disconnect the Control Panel Cable and SW cable Figure 4 8 CN502 Locked Unlocked CN502 ...

Page 75: ...RC Filter from the Upper Case 2 Remove the SW Light Shade Sheet B from the SW Board Assy 3 Remove the 4 C C P TITE 3x6 F ZN 3C screws to remove the SW Board Assy 4 Unlock connector H179 and disconnect the SW Cable Au 5 Remove the SW Button 6 Remove the LED Lens Figure 4 9 RC Filter SW Board Assy SW Cable Au SW Button SW Light Shade Sheet B LED Lens ...

Page 76: ...nt tape as shown in Figure 4 10 Make sure that the fold is kept 1 cm away from the SW Board Assy Figure 4 10 After connecting the SW Cable be sure to secure the cable with a piece of heat resistant tape as shown in Figure 4 11 Figure 4 11 PRINTED CIRCUIT BOARD ASSEMBLY SW_R1 cable sw Au Heat Resistant Tape 1cm cable sw Heat Resistant Tape ...

Page 77: ...4 15 EMP S4 SEIKO EPSON Revision B C A U T I O N The SW Cable and the SW Cable Au should be routed as shown in Figure 4 12 Figure 4 12 cable sw Au cable sw ...

Page 78: ...terrupter Cover Lens Guide Lamp Lid Latch Springand and SW Cable 1 Remove a C C P TITE SCREW 3x8 F ZN 3C screw that secures the Cover Lens Unit and remove the Cover Lens Holder and the Lens Cover from the Upper Case E 2 Remove the Cover Lens Sheet from the Cover Lens Frame Figure 4 13 Cover Lens Sheet Lens Cover Cover Lens Holder ...

Page 79: ...tch Spring from the Cover Lens Frame 5 Disconnect the SW Cable from the Photo Interrupter Figure 4 14 C A U T I O N Apply the proper amount of lubricant to the surface indicated by gray shading Figure 4 15 Lamp Lid Latch Spring Cover Lens Frame Cover Lens Guide Photo Interrupter SW Cable Be sure to apply the lubricant not only when replacing parts but also when the Cover Lens does not slide smooth...

Page 80: ...ys perform operation check as described below 1 Turn the projector on leaving the Cover Lens open 2 After confirming that the blue image default is displpayed close the Cover Lens as shown in Figure 4 16 If the image turns balck there is no problem with the parts or the connection Figure 4 16 ...

Page 81: ...Valve R G B connection cables Figure 4 17 2 Disconnect the Light Valve R G B connection cables and 10 cable connectors that are connected to the MA Board Figure 4 18 Light Valve R Light Valve G Light Valve B Locked Unlocked CN704 CN2000 CN705 CN300 CN500 CN706 CN501 CN708 CN707 Light valve connectors CN701 ...

Page 82: ... 3C screw to remove the MA Board Assy Figure 4 19 C A U T I O N When installing the MA Board Assy pay attention to the followings 1 Fix both the RC Cable B and the Intake Fan Cable with two pieces of heat resistant tape as shown in Figure 4 20 Figure 4 20 MA Board Assy EMI Control Sheet Intake Fan Cable RC Cable B ...

Page 83: ...N 2 Route the Power Supply Fan Cable as shown in Figure 4 21 and press into the cable under the MA Board as far as it will go Figure 4 21 3 Route the cable of the Intake Fan as shown in Figure 4 22 Figure 4 22 Power Supply Fan Cable Intake Fan Cable ...

Page 84: ... I O N 4 Route the power cord as shown in Figure 4 23 and secure the cable with a heat resistant tape Gently squeeze the Power Supply Ballast Cable into the Power Supply Unit Figure 4 23 Heat Resistant Tape Power Cord Power Supply Ballast Cable ...

Page 85: ...F Case Set 2 Remove the 2 C B P TITE 3x10 F ZB 3C screws that secure the IF Case Set disconnect the Speaker Cable from connector CN1800 on the MA Board and remove the IF Case Set from the MA Board Assy 3 Remove the Remote Control RC Filter from the IF Case Set Figure 4 24 MA Borad Assy IF Case Set Speaker Cable RC Filter CN1800 SW Light Shade Sheet B ...

Page 86: ...C screws that secure the RCA connector and the 4 1 4 40x1 4 H H F NI O screws that secure D sub 15 Pin connectors 2 Remove the 2 C C 3x6 F ZN 3C screws that secure the MA Plate to the MA Board and remove the MA Plate from the MA Board Assy Figure 4 25 MA Board Assy 1 4 40x1 4 H H F NI O Screws MA Plate ...

Page 87: ... that secure the Optical Engine to the projector and remove the Optical Engine Figure 4 26 4 2 13 Removing the Focus Ring 1 Remove the three C P TYPE1 B TITET A SCREW 2x6 F ZB 3C screws that secure the Focus Ring and remove the Focus Ring from the Projection Lens Figure 4 27 Screw Screw Screw Screw Optical Engine Focus Ring ...

Page 88: ...on Lens 1 Remove the four C P S P1 SCREW 3x10 F ZN 3C screws that secure the Projection Lens and remove the Projection Lens from the Optical Engine 2 Remove the H N 3 F ZN 3C screw nut from the Optical Engine Figure 4 28 Optical Engine Projection Lens ...

Page 89: ...crew that secures the Safety Switch and remove the Safety Switch from the Inner Exhaust Duct 3 Remove the 5 C B P TITE 3x10 F ZB 3C screws that secure the Intake Duct to remove it 4 Remove the four C B P TITE SCREW 3x12 F ZN 3C screws that secure the Intake Fan and remove the Intake Fan 5 Remove the Intake Fan Sheet from the Intake Fan Figure 4 29 RC Board Assy RC Cable B Intake Duct Intake Fan In...

Page 90: ...4 28 EMP S4 SEIKO EPSON Revision B C A U T I O N Route the AC Inlet Cable as shown in the figure below and secure the ferrite core on the tab of the Lower Case Figure 4 30 Ferrite core ...

Page 91: ...on B 4 2 16 Removing the Lamp Duct and Lamp Fan B 1 Remove the two C B P TITE SCREW 3x10 F ZB 3C screws that secure the Lamp Duct and remove the Lamp Duct 2 Remove the Lamp Fan B from the Lower Case Figure 4 31 Lamp Duct Lamp Fan B ...

Page 92: ... Remove the C B P TITE 3x10 F ZB 3C screw that secures the Exhaust Fan Set and remove it Figure 4 32 C A U T I O N When installing the cable of both the Lamp Lid Detection Switch and the Exhaust Fan route them as shown in Figure 4 33 Figure 4 33 Exhaust Fan Set Lamp Lid Detection Switch Cable Exhaust Fan Cable ...

Page 93: ...cure the Exhaust Fan B and remove the Outer Exhaust Duct from the Exhaust Fan Set Figure 4 35 C A U T I O N When installing the Ballast Cable route the cable and move the ferrite core into the position as shown in Figure 4 34 Figure 4 34 Ballast Cable Ferrite Core Outer Exhaust Duct Exhaust Fan B ...

Page 94: ... TITE 3x8 F ZN 3C screw that secures the TH Board Assy Printed Circuit Board Assy TH_S2 and remove the TH Board Assy from the Inner Exhaust Duct 3 Remove the Cable RCR FIF from the TH Board Assy 4 Remove the C C P TITE 3x8 F ZN 3C screw that secures the Lamp Connector and remove the Lamp Connector from the Inner Exhaust Duct 5 Remove the 2 C B P TITE 3x10 F ZB 3C screws to remove the Inner Exhaust...

Page 95: ... Supply Fan B from the Power Supply Assy Figure 4 37 2 Remove the heat resistant tape that secures the Power Supply Cable 3 Remove the 4 C B P TITE 3x10 F ZB 3C screws that secure the Power Supply Assy and remove the Power Supply Assy Extra caution is required as one of the screws is located underneath the Insulation Plate Ballast Figure 4 38 Power Supply Fan B Power Supply Assy Isulation Plate Ba...

Page 96: ...S4 SEIKO EPSON Revision B 4 2 20 Removing the Lamp Shield Plate Power Supply Filter and Lower Case 1 Remove the Lamp Shield Plate from the Lower Case Figure 4 39 Power Supply Filter Lower Case Lamp Shield Plate ...

Page 97: ...Chapter 5 Appendix ...

Page 98: ...H 0 000kHz V 0 000Hz H 0 000kHz V 0 000Hz Sync Polarity Sync Polarity H V H V Sync Mode Sync Mode Detected Comp Mode Detected Comp Mode XXXXXXXXXXXXXXX XXXXXXXXXXXXXXX Total Operation Time Total Operation Time 0H 0H Lamp Op Time C Lamp Op Time C 0H 0H H M L H M L 0H 0H 0H 0H 0H 0H Lamp Replacement Lamp Replacement 0Times 0Times Lamp ON LampOFF Lamp ON LampOFF 0Times 0Times 0Times 0Times Cool Down ...

Page 99: ...o 0H Lamp Operation Time Reset to 0H Reset to 0H Lamp ON Reset to 1 Reset to 1 Lamp OFF Reset to 0 Reset to 0 Lamp Replacement Add 1 to the current value Reset to 0 Fatal Error 3 items No Change Reset to 0 Computer Computer Video Signal Video Signal No Signal No Signal Total Operation Time Total Operation Time 0H 0H Lamp Op Time C Lamp Op Time C 0H 0H H M L H M L 0H 0H 0H 0H 0H 0H Lamp Replacement...

Page 100: ...emote control for at least 5 seconds 2 Within 4 seconds after releasing the Menu button hit these buttons in order shown below Esc Esc Tele Wide The following sub menu is displayed Switch On or Off as necessary DIP SW No BIT Function Default Setting Setting Value Note SW1 0 reserved 1 Select USB key code 1 0 1 PageUp PageDown 2 reserved 3 reserved 4 reserved 5 reserved 6 Volume gauge display ON OF...

Page 101: ... Time to sleep mode 1 3 Time to sleep mode 1 4 Time to sleep mode 1 5 Time to sleep mode 0 6 Time to sleep mode 0 7 Time to sleep mode 0 SW4 0 reserved 1 reserved 2 Lamp noise analysis mode 0 0 OFF 1 ON 3 reserved 4 reserved 5 reserved 6 reserved 7 reserved SW6 0 reserved 1 reserved 2 reserved 3 Power button ON OFF when locking the buttons 1 0 OFF 1 ON 4 EMP Monitor standby mode ON OFF 0 0 OFF 1 O...

Page 102: ...5 6 EMP S4 SEIKO EPSON Revision B ...

Reviews: