background image

Printed in Japan

402168001

(9002466)

02.03-.1A(C05)

Printed on 100% recycled paper.

E

Summary of Contents for EMP-TW100

Page 1: ...Printed in Japan 402168001 9002466 02 03 1A C05 Printed on 100 recycled paper E ...

Page 2: ...connecting video equipment or a computer User s Guide this manual This User s Guide contains information on basic operation using the projector menus troubleshooting and maintenance General information Meaning of unit and projector When unit or projector appears in the text of this User s Guide they may refer to items which are accessories or optional equipment in addition to the main projector un...

Page 3: ...ojection 18 Using the Environment Setting Menus 18 Description of Functions 21 Saving and Retrieving Image Quality Settings Memory 22 Using the Menu Functions 24 Video Menu 25 Advanced Menu 29 Setting Menu 30 About Menu 31 Reset All Menu 32 Troubleshooting Using the Help 34 When Having Some Trouble 35 When the Indicators Provide No Help 37 Appendices Maintenance 44 Cleaning 44 Replacing Consumable...

Page 4: ...oother reproduction of images Uses five color modes You can select the desired color mode to match the images being projected from five preset modes in order to obtain the optimum image quality p 13 Includes a variety of color adjustment modes Various color settings can be adjusted to suit your preferences from individual RGB balance adjustment to setting the color temperature of your choice The a...

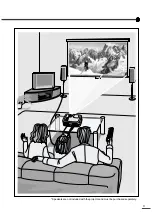
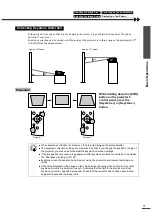
Page 5: ...3 Speakers are not included with the projector and must be purchased separately ...

Page 6: ......

Page 7: ...s 7 Turning Off the Projector 8 Adjusting the Screen Image 10 Adjusting the Image Size 10 Adjusting the Image Angle 10 Correcting Keystone Distortion 11 Displaying a Test Pattern 12 Adjusting the Image Quality 13 Focusing the Screen Image 13 Selecting the Color Mode 13 Selecting the Image Aspect Ratio 14 Normal mode 14 Squeeze mode 15 Zoom mode 15 Through mode 15 Squeeze Through mode 15 Automatic ...

Page 8: ...ctor and then insert the power cord connector securely into the projector 5 Connect the other end of the power cord to a grounded electrical outlet 6 Turn on the main power switch at the rear of the projector Wait until the indicator lights orange Connecting the Power Cord The buttons on the projector control panel and remote control cannot be operated while the indicator is flashing orange Wait u...

Page 9: ...e message No Signal may appear depending on the projector s menu settings p 30 Port Button to press Display at top right of screen Projector Remote control InputA Source A INPUT A InputB B INPUT B S Video S Video S Video Video Video Video D RGB A RGB DVI I D RGB D RGB A RGB A RGB If only one signal source has been connected the signals from that source will be projected without needing to press on...

Page 10: ...indicator has changed to light orange When the indicator lights orange cool down is complete The cool down period lasts for approximately 2 minutes This varies depending on factors such as the ambient air temperature 5 If not using the projector for long periods of time turn off the main power switch at the rear of the projector The projector buttons cannot be operated while the indicator is flash...

Page 11: ...ustable foot if it is extended Gently push down on the projector while pressing the foot adjust button 7 Attach the lens cover Attach the lens cover to the lens when not using the projector in order to stop the lens from getting dusty or dirty ...

Page 12: ...e set up so that it is tilting slightly horizontally or vertically To tilt the projector upward adjust the front adjustable foot to tilt the projector at an angle of up to a maximum 12 Procedure While pressing the foot adjust button lift up the front of the projector so that the front adjustable foot can extend Extend the front adjustable foot until the desired angle is obtained and then release t...

Page 13: ...become uneven in appearance after keystone correction is carried out decrease the Sharpness setting p 25 27 Keystone correction can also be carried out using the projector s environment setting menu p 30 If the value displayed in the gauge on the screen stops changing when horizontal or vertical keystone correction is being carried out it indicates that the limit for horizontal or vertical keyston...

Page 14: ...trol or the projector s control panel is pressed Crosshatch Grayscale pattern No pattern Displaying a Test Pattern The full environment setting menu cannot be displayed while a test pattern is being projected If you need to change a setting use the line menu or the Keystone buttons on the projector s control panel This can be used to adjust the focus and correct keystone distortion This can be use...

Page 15: ...ide the normal projecting range of 0 9 13 m 2 9 42 6 ft it may not be possible to obtain the correct focus If you have trouble obtaining the correct focus check the projection distance Selecting the Color Mode Mode name Gamma Color Temp Priority element Use Dynamic Original 1 6700 K adjustable Color Ideal for projecting images with greater modulation and intensity Theatre Original 2 6700 K adjusta...

Page 16: ...the Image Aspect Ratio Input signal Normal Squeeze Zoom Through Squeeze Through Video SDTV O O O O O Video HDTV O O Computer SVGA or lower O O O Computer XGA or higher O O Do not use the aspect mode function to elongate or compress image that are being projected for commercial purposes or in public places such as hotel lobbies or stores as doing so may infringe the rights of the original copyright...

Page 17: ...s output in 4 3 format are truncate at top and bottom by a set amount and then projected in a 16 9 format If the input signal resolution is 1280 x 720 dots or less the images are projected onto the screen with the input signal resolution unchanged Because of this the size of the displayed images will change depending on the input resolution The picture quality will be best for sections of the imag...

Page 18: ...e remote control The screen will appear black while the adjustment is being made Automatic Adjustment of Computer Images Automatic adjustment may not work properly with some types of signals which are output by computers In such cases you may need to adjust the tracking and synchronization manually using projector s environment setting menu p 27 Remote control Focusing the Screen Image Selecting t...

Page 19: ...d Operating Full Menus 18 Displaying and Operating Line Menus 20 Description of Functions 21 Black Level Adjustment 21 White Level Adjustment 21 Color Adjustment 21 Saving and Retrieving Image Quality Settings Memory 22 Saving Settings 22 Retrieving Saved Image Quality Settings 23 Using the Menu Functions 24 Video Menu 25 Video 25 Computer 27 Advanced Menu 29 Setting Menu 30 About Menu 31 Video 31...

Page 20: ...control panel The environment setting menu appears Full menus consist of a main menu and sub menus The sub menu that corresponds to the currently selected item in the main menu displayed in yellow appears 2 Select the items to be changed in the main menu If using the projector s control panel press the and buttons If using the remote control tilt the Select button up and down Function Summary Refe...

Page 21: ...ector s control panel or the remote control 7 Exit the menu display Press the Menu button on either the projector s control panel or the remote control If a setting is executed or a sub menu item continues to another level Enter or Select appears after the item name In such cases press the Select button on either the projector s control panel or the remote control to select a setting value in the ...

Page 22: ...ns If using the remote control press the Select button to the left and right 4 Set other items in the same way Repeat steps 2 and 3 to continue making settings To return to a previous menu level press the Esc button on the projector s control panel or the remote control 5 Exit the menu display Press the Menu or Esc button on either the projector s control panel or the remote control Displaying and...

Page 23: ...side differences in light areas become more distinct but contrast is reduced This adjusts the hues of light shades to the desired hues Modes for adjusting the Color Temperature and for adjusting each individual R G B setting are available Use the Color Temp item in the Video menu to change the setting p 26 28 Color temperature setting This mode can be used to adjust the color temperature and flesh...

Page 24: ...ustment values appearing as are currently set 2 Select Memory from the Video sub menu If using the projector s control panel press the and buttons If using the remote control tilt the Select button up and down 3 Select the memory number 1 6 to use for saving the settings If using the projector s control panel press the and buttons If using the remote control tilt the Select button to the left and ...

Page 25: ...s 1 to 6 corresponding to the image quality settings to be retrieved The images being projected will be adjusted according to the settings that are retrieved Retrieving Saved Image Quality Settings Remote control Using the Environment Setting Menus Memory Description of Functions ...

Page 26: ...available in the environment setting menus using the full menus as examples The menus have a hierarchical structure with a main menu that is divided into sub menus Refer to Using the Environment Setting Menus p 18 for details on using the menus Memory Color Adjustment Video Setting Advanced About Black Level White Level Sharpness Color 0 Tint Color Mode Reset Execute Select Enter Reset All 0 0 0 0...

Page 27: ...int Adjustment is only possible for NTSC signals Adjust the image tint 0 Color Mode Corrects the vividness of the image color You can select from five different quality settings depending on the surroundings Dynamic Ideal for projecting images with greater modulation and intensity Theatre Ideal for enjoying presentations such as movies which have large numbers of dark scenes Natural Ideal for enjo...

Page 28: ...tting is adjusted to the side the brightness is automatically corrected in accordance with the setting value so that the color does not become saturated so that an S shaped gamma curve can be easily created Each RGB component can be adjusted to give the desired level of coloration to dark intermediate and light ranges Color Temp 6700K Flesh tone adjustment 2 RGB Offset R 0 G 0 B 0 Gain R 0 G 0 B 0...

Page 29: ...sentations such as movies which have large numbers of dark scenes Natural Ideal for enjoying presentations in a natural atmosphere PC Ideal for use in making images as bright as possible when projecting computer images sRGB Images conform to the sRGB standard PC Tracking A RGB and InputB A RGB only Adjusts computer images when vertical stripes appear in the images 0 Sync A RGB and InputB A RGB onl...

Page 30: ...tting is adjusted to the side the brightness is automatically corrected in accordance with the setting value so that the color does not become saturated so that an S shaped gamma curve can be easily created Each RGB component can be adjusted to give the desired level of coloration to dark intermediate and light ranges Color Temp 7500K Flesh tone adjustment 5 RGB Offset R 0 G 0 B 0 Gain R 0 G 0 B 0...

Page 31: ...t the type of images being viewed 3 Noise Reduction Can only be adjusted for 525i and 625i image signals Reduces image interference and makes the image quality softer Two modes are available Use the setting that best suits the images being viewed It is recommended that you set this function to OFF when viewing images sources such as DVDs which are relatively free from interference OFF Position Adj...

Page 32: ... black Black Screen is completely black and a no signal message appears Blue Screen is completely blue and a no signal message appears Logo The user s logo is displayed and a no signal message appears Blue Startup Screen Sets whether the startup screen is displayed or not ON Blank Sets the screen status when the Blank button on the remote control is pressed The screen status can be selected from B...

Page 33: ...ent values in the Setting menu to the default values Press the Select on either the projector s control panel or the remote control to display the confirmation screen and select Yes Select Reset All to return all menu settings to their default settings p 32 About Menu Video InputA YCbCr YPbPr InputB YCbCr YPbPr S Video Video Main menu Sub menu Function Default setting About Lamp Displays the cumul...

Page 34: ...ion attributes Resolution Displays the input resolution Refresh Rate Displays the refresh rate Reset All Menu Main menu Sub menu Function Default setting Reset All Execute Resets all items in all environment setting menus to their default settings Press the Select on either the projector s control panel or the remote control to display the confirmation screen and select Yes To return the settings ...

Page 35: ...3 Troubleshooting This chapter describes troubleshooting procedures for the projector Using the Help 34 When Having Some Trouble 35 When the Indicators Provide No Help 37 ...

Page 36: ...led items To return to the previous menu press the Esc button on either the remote control or the projector s control panel You can exit the Help menu at any time by pressing the Help button on either the projector s control panel or the remote control If the Help function does not provide a solution to the problem refer to When Having Some Trouble p 35 or When the Indicators Provide No Help p 37 ...

Page 37: ...p 46 Lamp operating error This can happen when the main power switch at the rear of the projector was turned off before the cool down period had finished the last time the projector was turned off and it was then turned back on again before one hour had passed When turning off the projector wait 2 minutes After about 2 minutes the cooling fan will stop When the cooling fan stops turn off the main ...

Page 38: ...rojector Setup Guide p 44 Lamp will soon need to be replaced No abnormality Have a new replacement lamp ready The lamp service life can become shorter than normal as a result of the usage conditions and so the lamp should be replaced as soon as possible The appearance of the indicator at this time will vary depending on the status of the projector p 45 Standby condition No abnormality Projection s...

Page 39: ...n then use the Power button on either the remote control or the projector s control panel p 8 Have you pressed the Power button on either the remote control or the projector s control panel Press the Power button on either the remote control or the projector s control panel p 7 Is sleep mode active When sleep mode has been set to ON the lamp turns off automatically if no operations are carried out...

Page 40: ...on Turn on the power p 7 Check the mode which corresponds to the frequency of the image signals being output from the computer Refer to the documentation provided with your computer for details on changing the resolution and frequency of the image signals being output from the computer p 50 If a laptop computer or a computer with a LCD screen has been connected to the projector it is necessary to ...

Page 41: ...is may cause the images to appear fuzzy Turn off the power and wait for the condensation to disappear Does the input signal setting match the connected source Use the Video Signal Input A or Input B commands in the Advanced menu to select the signal format that matches the connected source Advanced Video Signal Input A Input B p 29 Are the cables connected correctly Check that all cables that are ...

Page 42: ...splay setting Refer to the video driver manual for the computer s monitor for further details Condition The image colors are not right Probable cause Remedy Are the cables connected correctly Check that all cables that are required for projection are connected correctly Setup Guide Has the image contrast been adjusted correctly Use the White Level command in the Video menu to adjust the contrast V...

Page 43: ...rol does not work Probable cause Remedy Is the remote control being pointed at the right angle The operating angle for the remote control is approximately 30 horizontally and approximately 30 vertically Use the remote control within these ranges Setup Guide Is the remote control too far from the projector The operating distance for the remote control is approximately 10 m 30 ft Use the remote cont...

Page 44: ...the projector is turned off the indicator switches off Is the fan still operating After the Power button on either the remote control or the projector s control panel is pressed to turn off the power the cool down period starts After the cool down period is complete the indicator changes to a steady orange and you can then turn off the main power switch at the rear of the projector The cool down p...

Page 45: ...the Air Filter 44 Replacing Consumables 45 Lamp Replacement Period 45 Replacing the Lamp 46 Resetting the Lamp Operating Time 47 Replacing the Air Filter 48 Optional Accessories 49 List of Supported Signal Resolutions 50 Component Video Input 50 Composite Video S Video Input 50 RGB Input 51 Specifications 52 Appearance 54 Part Names and Functions 55 Front Top 55 Control Panel 56 Rear 57 Base 57 Re...

Page 46: ...and damage the projector Stand up the projector in order to prevent dust getting inside the projector and then use a vacuum cleaner to clean away the dust from the air filter Cleaning Cleaning the Projector Case Cleaning the Lens Cleaning the Air Filter If the air filter is difficult to clean or if it is broken it should be replaced Contact your dealer for a spare air filter Replacement lamps are ...

Page 47: ...use the lamp after this period the possibility of the lamp breaking becomes greater When the lamp replacement message appears replace the lamp with a new one as soon as possible even if it is still working The warning message appears after 2900 hours of use but the actual life of each individual lamp will vary depending on the characteristics of the lamp and on the way it has been used Some lamps ...

Page 48: ...cesses on the side to lift it up and out from the projector 5 Install the new lamp Hold the lamp so that it faces the correct way to fit into the projector and then insert the lamp until it clicks into place and tighten the two fixing screws Replacing the Lamp If the lamp stops working and needs to be replaced there is the danger that the lamp may break when handled If replacing the lamp of a proj...

Page 49: ...e projector s control panel or the remote control 3 Reset the lamp operating time Select Yes and then press the Select on either the projector s control panel or the remote control Install the lamp securely If the lamp cover is removed the lamp turns off automatically as a safety precaution Moreover the lamp will not turn on if the lamp or the lamp cover is not installed correctly Replacement lamp...

Page 50: ...e air filter to remove it In order to prevent any dust on the air filter from getting into the projector be sure to stand up the projector so that the handle is at the top 3 Install the new air filter First insert the tabs and then press down on the opposite side until it clicks into place Replacing the Air Filter Dispose of used air filters properly in accordance with your local regulations ...

Page 51: ...15 pin mini D Sub 15 pin Computer cable ELPKC10 20 m 65 6 ft for mini D Sub 15 pin mini D Sub 15 pin Use this extension cable if the accessory computer cable is too short Digital video cable ELPKC20 3 m 9 8 ft DVI D male male DVI cable for connecting the projector to a computer with a digital RGB output interface Digital video cable ELPKC21 3 m 9 8 ft for DVI D DFP 20 pin DFP cable for connecting ...

Page 52: ...spect 1280 720 16 9 aspect 590 442 4 3 aspect 786 442 16 9 aspect SDTV 625p 768 576 768 432 When zoomed 960 720 4 3 aspect 1280 720 16 9 aspect 1280 720 16 9 aspect 700 525 4 3 aspect 934 525 16 9 aspect HDTV 750p 16 9 1280 720 1280 720 16 9 aspect 1178 664 16 9 aspect HDTV 1125p 16 9 1920 1080 1280 720 16 9 aspect 886 498 16 9 aspect Composite Video S Video Input Signal Resolution Aspect Normal D...

Page 53: ...80 720 800 600 XGA 43i 60 70 75 85 iMac 1 1024 768 1024 576 When zoomed 960 720 1280 720 1152 864 70 75 85 1152 864 1152 648 When zoomed 960 720 1280 720 QVGA 60 75 85 1280 960 1280 720 When zoomed 960 720 1280 720 SXGA 43i 60 75 85 1280 1024 1280 720 When zoomed 900 720 1280 720 MAC13 640 480 960 720 640 480 MAC16 832 624 960 720 832 624 MAC19 1024 768 960 720 MAC21 1152 870 954 720 SDTV 525i 60H...

Page 54: ...W x 720 H dots x 3 Focus adjustment Manual Zoom adjustment Manual approx 1 1 35 Lamp light source UHE lamp 150 W Model No ELPLP17 Power supply 100 120 VAC 2 7A 200 240 VAC 1 3A 50 60 Hz Operating temperature 5 C 35 C 41 F 95 F No condensation Storage temperature 10 C 60 C 14 F 140 F No condensation Weight Approx 4 2 kg 9 3 lbs Connectors A RGB D RGB DVI I 1 DVI I InputA 1 3RCA pin jack InputB 1 Mi...

Page 55: ...md 4 EMC USA FCC 47CFR Part15B Class B DoC Canada ICES 003 Class B European Community The EMC Directive 89 336 EEC EN55022 1998 Class B EN55024 1998 IEC61000 4 2 IEC61000 4 3 IEC61000 4 4 IEC61000 4 5 IEC61000 4 6 IEC61000 4 8 IEC61000 4 11 IEC61000 3 2 IEC61000 3 3 Australia New Zealand AS NZS 3548 1995 A1 1997 A2 1997 Class B CISPR Pub 22 1993 A1 1995 A2 1996 Class B ...

Page 56: ...54 Appearance 274 10 79 114 4 49 348 13 7 104 4 09 Units mm inch ...

Page 57: ... projector Security lock p 60 Air exhaust vent Remote control light receiving area Setup Guide Receives signals from the remote control Front adjustable foot p 10 Extend and retract to adjust the projection angle Lens cover Attach when not using the projector to prevent the lens from becoming dirty or damaged Foot adjust button p 10 Press this button while lifting up the projector in order to make...

Page 58: ...ode between Dynamic Theatre Natural PC sRGB each time the button is pressed Pattern button p 12 Projects a test pattern for image adjustment The test pattern switches between Crosshatch Grayscale Pattern Off each time the button is pressed and buttons p 20 These buttons select adjustment values in environment setting menus and the online help Select button p 18 20 34 Displays the line menu Pressin...

Page 59: ... Video signal to the projector from other video sources A RGB D RGB DVI I port Setup Guide Inputs digital analog RGB video signals from a computer InputB port Setup Guide Inputs analog RGB video signals from a computer and component video signals from other video sources RS 232C port Connects the projector to a computer using an RS 232C cable This port is for service use and should not normally be...

Page 60: ...en saved using the Memory command in the Video menu and adjusts the images being projected Help button p 34 Displays the online help menu to assist you if you have a problem Input button p 7 S Video Changes video input to the source connected to the S Video port Video Changes video input to the source connected to the Video port A Changes video input to the source connected to the InputA port B Ch...

Page 61: ...arrier signal Y luminance signal and the chroma color signal which are contained in the color bar signal Contrast The relative brightness of the light and dark areas of an image can be increased or decreased in order to make text and graphics stand out more clearly or to make them appear softer Cool down The cooling process for the projector lamp continues even after the Power button on either the...

Page 62: ...ith a resolution of 800 horizontal x 600 vertical dots which is used by IBM PC AT compatible computers DOS V computers SXGA A type of image signal with a resolution of 1280 horizontal x 1024 vertical dots which is used by IBM PC AT compatible computers DOS V computers Synchronization Sync The signals output from computers have a specific frequency If the projector frequency does not match this fre...

Page 63: ... 31 Lens cleaning 44 Lens cover 55 Main menu 18 24 Main Power switch 6 8 57 Memory 22 26 28 Menus 18 24 Motion Detect 22 29 Noise reduction 22 29 No Signal 30 Offset adjustment 26 28 Operating temperature 52 Operation indicator 35 55 Optional accessories 49 Overheating 36 Part Names and Functions 55 Position 16 29 Power cord 6 Power inlet 6 57 Progressive 22 29 Projection angle 10 Rear adjustable ...

Page 64: ......

Page 65: ... being produced can be expected to be within the variation accepted due to quantity production and testing on a statistical basis as required by 47CFR 2 909 Operation is subject to the following two conditions 1 this device may not cause harmful interference and 2 this device must accept any interference received including interference that may cause undesired operation Trade Name EPSON Type of Pr...

Page 66: ...aged to try to correct the interference by one or more of the following measures Reorient or relocate the receiving antenna Increase the separation between the equipment and receiver Connect the equipment into an outlet on a circuit different from that to which the receiver is connected Consult the dealer or an experienced radio TV technician for help WARNING The connection of a non shielded equip...

Page 67: ...SEIKO EPSON CORPORATION s operating and maintenance instructions SEIKO EPSON CORPORATION shall not be liable against any damages or problems arising from the use of any options or any consumable products other than those designated as Original EPSON Products or EPSON Approved Products by SEIKO EPSON CORPORATION EPSON is a registered trademark and PowerLite is a trademark of SEIKO EPSON CORPORATION...

Page 68: ...Printed in Japan 402168002 9002466 02 03 1A C05 Printed on 100 recycled paper E ...

Reviews: