background image

16      

Installing the Options

5. Turn the printer on when you finish installing the option.

ROM Module 

Follow the instructions below to install the Adobe PostScript 3 
ROM module (C83237

).

1. Follow steps 1 through 3 in “Memory Module” on page 11.

2. A slot for a ROM module is shown below.

3. Hold the ROM module oriented as shown, then push the 

ROM module into the slot evenly until the button comes up.

4. Replace the leftside casing of the printer and tighten the two 

retaining screws.

5. Turn the printer on when you finish installing the option.

Summary of Contents for EPL-N2050

Page 1: ......

Page 2: ...tions maintenance troubleshooting and technical specifications Administrator s Guide Provides network administrators with information on both the printer driver and network settings Quick Reference Provides you with information on replacing consumables clearing jammed paper understanding the control panel and a panel message index Attach the included quick reference box to the front of your printe...

Page 3: ...stered trademarksandEPSON ESC P 2is a trademark of SEIKO EPSON CORPORATION Speedo Fontware FaceLift Swiss and Dutch are trademarks of Bitstream Inc CG Times and CG Omega are registered trademarks of Miles Inc Univers is a registered trademark of Linotype AG and or its subsidiaries Antique Olive is a trademark of Fonderie Olive Albertus is a trademark of Monotype Corporation plc Coronet is a tradem...

Page 4: ...EPSON EUROPE B V Address Prof J H Bavincklaan 5 1183 AT Amstelveen The Netherlands Declares that the Product Product Name Laser Printer Model XJB 1 Conforms to the following Directive s and Norm s Directive 89 336 EEC EN 55022 Class B EN 61000 3 2 EN 61000 3 3 EN 50082 1 IEC 801 2 IEC 801 3 IEC 801 4 Directive 73 23 EEC EN 60950 November 1999 H Horiuchi President of EPSON EUROPE B V ...

Page 5: ...the Imaging Cartridge 7 3 Installing the Options Memory Module 11 Hard Disk Drive 15 ROM Module 16 Interface 17 Large Capacity Paper Unit 19 Duplex Unit 23 Multibin Unit 25 Shifter 29 Envelope Feeder 31 4 Testing and Connecting the Printer Plugging in the Printer 33 Testing the Printer 34 Loading paper 34 Printing a status sheet 35 Connecting to the Computer 36 ...

Page 6: ...e Guide 38 System requirements for the Online Guide 39 Installing Microsoft Internet Explorer 40 6 Safety Information Laser Safety 42 CDRH Regulations 43 Laser Safety Labels 43 Ozone Safety 44 ENERGY STAR Compliance 45 For United Kingdom Users 45 Index ...

Page 7: ...lies whenever you open the printer cover Even if you are familiar with other types of printers be sure to follow these precautions carefully to ensure safe efficient operation Do not touch the areas specified on the caution label inside the rear cover If the printer has been in use these areas can be very hot CAUTION Hot Surface Avoid Contact ...

Page 8: ...ide the printer unless instructed to do so in this guide Neverforcetheprinter scomponentsintoplace Althoughthe printer is designed to be sturdy rough handling can damage it Be sure not to scratch the surface of the drum When you removetheImagingCartridge from the printer always setthe unit on a clean smooth surface Also avoid touching the drum since oils from your skin can permanently damage its s...

Page 9: ...reduce its functional life When handling the cartridge always set it on a clean smooth surface Do not attempt to modify or take apart the cartridge It cannot be refilled Do not touch the toner and avoid all contact with your eyes Allow the Imaging Cartridge to reach room temperature before installation w Warning Do not dispose of used Imaging Cartridges in fire as they can explode and cause injury...

Page 10: ...nenlärminformations Verordnung 3 GSGV 18 01 1991 Der arbeitsplatzbezogene schalldruckpegel beträgt 70 dB A oder weniger gemäß ISO 7779 Important Safety Instructions Read all of these instructions before operating your printer Follow all warnings and instructions marked on the printer Unplug the printer from the electrical outlet before cleaning Use a damp cloth for cleaning and do not use liquid o...

Page 11: ... into Only use an electrical outlet that meets the power requirements for this printer Never push objects of any kind through cabinet slots as they may touch high voltage points or short out parts which could result in fire or electric shock Never spill liquid of any kind on the printer Except as specifically explained in this guide do not attempt to service this product yourself Opening or removi...

Page 12: ...rain or water C If it does not operate normally when the operating instructions are followed Adjust only those controls that are covered by the operating instructions since improper adjustment of other controls may result in damage and willoften require extensive work by a qualifiedtechnician to restore the product to normal operation D If it has been dropped or the cabinet has been damaged E If i...

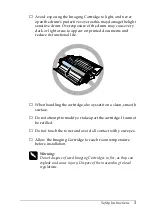
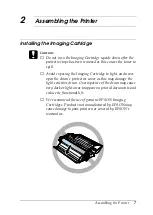
Page 13: ...l Avoid exposing the Imaging Cartridge to light and never open the drum s protective cover as this may damage the light sensitive drum Overexposure of the drum may cause very dark or light areas to appear on printed documents and reduce its functional life We recommend the use of genuine EPSON Imaging Cartridges Products not manufactured by EPSON may cause damage to your printer not covered by EPS...

Page 14: ...mbling the Printer 1 While holding the Imaging Cartridge horizontally gently shake it a few times to distribute the toner evenly 2 Push the button on the front cover of your printer and open it as shown below ...

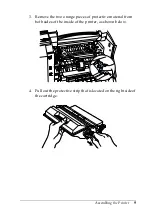
Page 15: ... the Printer 9 3 Remove the two orange pieces of protective material from both sides of the inside of the printer as shown below 4 Pull out the protective strip that is located on the right side of the cartridge ...

Page 16: ...slight downward angle into the printer Push the cartridge into the printer until it is firmly seated in its proper position c Caution To avoid spilling toner do not tilt the Imaging Cartridge 6 Close the front cover of the printer by pushing it upward until it clicks into place c Caution Never transport the printer while the Imaging Cartridge is installed ...

Page 17: ...ory module you can increase printer memory to 256 MB You may want to add memory if you are having difficulty printing complex graphics intensive pages using the Duplex Unit or if you regularly use numerous downloaded fonts You can purchase memory modules from various vendors Be sure the memory module you purchase meets the following requirements DRAM type Synchronous Dynamic RAM Double In line Mem...

Page 18: ...tus sheet shows just 256 MB because the maximum memory size for this printer is 256 MB w Warning Avoid touching electrical components that are exposed after you have removed the printer s casing They may be very hot if the printer has been in use 1 Make sure the printer is off 2 Face the left side of the printer 3 Loosen the two retaining screws on the back of the printer and remove the left side ...

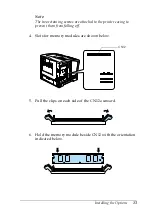
Page 19: ...g screws are attached to the printer casing to prevent them from falling off 4 Slots for memory modules are shown below 5 Pull the clips on each side of the CN12 outward 6 Hold the memory module beside CN12 with the orientation indicated below CN12 ...

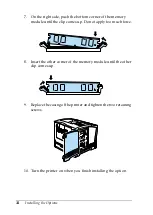
Page 20: ... memory module until the clip comes up Do not apply too much force 8 Insert the other corner of the memory module until the other clip comes up 9 Replace the casing of the printer and tighten the two retaining screws 10 Turn the printer on when you finish installing the option ...

Page 21: ...rough 3 in Memory Module on page 11 2 Align the two pins with the two holes and the connector with the socket then press the Hard Disk Drive against the socket and connector until they are firmly connected 3 Tighten the two screws with a screwdriver 4 Replace the leftside casing of the printer and tighten the two retaining screws ...

Page 22: ...M module C83237 1 Follow steps 1 through 3 in Memory Module on page 11 2 A slot for a ROM module is shown below 3 Hold the ROM module oriented as shown then push the ROM module into the slot evenly until the button comes up 4 Replace the leftside casing of the printer and tighten the two retaining screws 5 Turn the printer on when you finish installing the option ...

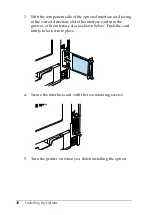
Page 23: ...ution Before you install the interface card be sure to discharge any static electricity by touching a grounded piece of metal Otherwise you may damage static sensitive components 1 Face the rear of the printer with the power off 2 Remove the two screws that secure the interface slot cover and remove the cover ...

Page 24: ...e card facing in the correct direction slide the interface card into the grooves of the interface slot as shown below Push the card firmly to lock it into place 4 Secure the interface card with the two retaining screws 5 Turn the printer on when you finish installing the option ...

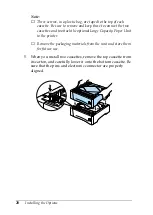
Page 25: ...nal Large Capacity Paper Unit 1 Turn off the printer 2 Unplug the printer s power cord from the electrical outlet 3 The optional Large CapacityPaper Unitis available asa single or double paper cassette 4 Carefully remove one cassette from its carton and place it on the floor or a flat stable surface ...

Page 26: ...e two cassettes and to attach the optional Large Capacity Paper Unit to the printer Remove the packaging materials from the unit and store them for future use 5 When you install two cassettes remove the top cassette from its carton and carefully lower it onto the bottom cassette Be sure that the pins and electronic connector are properly aligned ...

Page 27: ...argeCapacityPaperUnit Insertandtightenthethreescrews as shown below c Caution The printer weighs about 26 kg 57 4 lb always lift it with two or more people Grasp the printer at the locations indicated below 7 Lift the printer and carefully place it on the Large Capacity Paper Unit Be sure that the pins and electronic connector are properly aligned ...

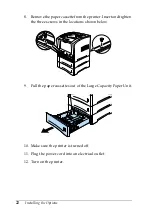
Page 28: ...from the printer Insert and tighten the three screws in the locations shown below 9 Pull the paper cassettes out of the Large Capacity Paper Unit 10 Make sure the printer is turned off 11 Plug the power cord into an electrical outlet 12 Turn on the printer ...

Page 29: ... of a sheet of paper automatically To install the unit follow the instructions below c Caution Open the inner tray of the Duplex Unit and remove the protective insert otherwise the printer will not function properly 1 Make sure the printer is off 2 Open the rear cover of the printer ...

Page 30: ...ied on the caution labels inside the rear cover If the printer has been in use these areas can be very hot 4 Slowly tilt it and slide it into the printer until it clicks as shown in the illustration below Do not force the unit into the printer as it is designed to join smoothly 5 Close the rear cover of the printer 6 Turn the printer on when you finish installing the option ...

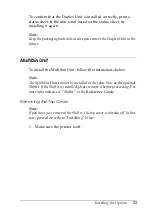
Page 31: ...re Multibin Unit To install the Multibin Unit follow the instructions below Note The Multibin Unit cannot be installed at the same time as the optional Shifter If the Shifter is installed please remove it before proceeding For more information see Shifter in the Reference Guide Removing the Top Cover Note If you have just removed the Shifter the top cover is already off In this case proceed direct...

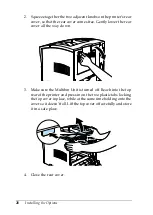
Page 32: ... lower the rear cover all the way down 3 Make sure the Multibin Unit is turned off Reach into the top rear of the printer and press in on the two plastic tabs locking the top cover in place while at the same time holding onto the cover so itdoesn t fall Lift thetop cover off carefully and store it in a safe place 4 Close the rear cover ...

Page 33: ... the back 2 Before lifting the Multibin Unit make sure that you understand how it fits onto the printer 3 Carefully lift the Multibin Unit holding it so that the drawers are facing the same direction as the front of the printer Lift the unit over the printer tilt the front end slightly downward and fit the metal hook into the hook slot ...

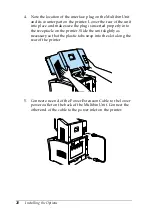
Page 34: ...and make sure the plug is inserted properly into the receptacle on the printer Slide the unit slightly as necessary so that the plastic tabs snap into the slot along the rear of the printer 5 Connect one end of the Power Extension Cable to the lower power outlet on the back of the Multibin Unit Connect the other end of the cable to the power inlet on the printer ...

Page 35: ...nish installing the option Shifter Installing To install the Shifter follow the instructions below Note The Shifter cannot be used in combination with the optional Multibin Unit If the Multibin Unit is installed please remove it before proceeding See Multibin Unit in the Reference Guide 1 Follow steps 1 through 4 in Removing the Top Cover on page 25 ...

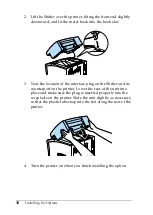
Page 36: ...on of the interface plug on the Shifter and its counterpart on the printer Lower the rear of the unit into place and make sure the plug is inserted properly into the receptacle on the printer Slide the unit slightly as necessary so that the plastic tabs snap into the slot along the rear of the printer 4 Turn the printer on when you finish installing the option ...

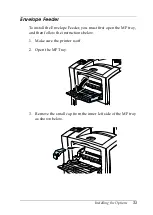
Page 37: ...Feeder To install the Envelope Feeder you must first open the MP tray and then follow the instructions below 1 Make sure the printer is off 2 Open the MP Tray 3 Remove the small cap from the inner left side of the MP tray as shown below ...

Page 38: ...lope Feeder horizontally with both hands 5 Note the location of the interface plug on the Envelope Feeder and its counterpart on the printer Be sure that the plug is inserted properly into the receptacle on the printer 6 Push it straight into position directly above the MP tray 7 Turn the printer on when you finish installing the option ...

Page 39: ...nt of the printer is turned off as shown below 2 Insert the power cord into the AC inlet at the back of the printer Then plug the other end into a properly grounded electrical outlet c Caution Avoid using electrical outlets that other appliances are plugged into Only use electrical outlets that meet the power requirements for this printer ...

Page 40: ...ns including the current settings To print a status sheet follow the steps below Loading paper 1 Open the MP tray if it is closed against the body of the printer Pull out the extension tray if necessary 2 Fan a stack of paper and tap it on a flat surface to even its edges With the printable side down load the stack by inserting it all the way into the tray Adjust the guides to match the size of yo...

Page 41: ...e message on the display starts flashing and the printer starts printing the status sheet 4 Check the following points in the printed status sheet The printer can print the status sheet clearly The information on the options installed to the printer is printed correctly If you can find the installed option s name underHardware Configurations itmeans thatthe printer can recognize the installed opti...

Page 42: ... use the serial interface or parallel interface to connect the printer directly to a computer Note Your printer also has room for an optional interface connector For more information see Interface on page 17 To connect the parallel interface follow the steps below 1 Make sure both the printer and the computer are off 2 Connect the parallel cable to the serial interface or parallel interface connec...

Page 43: ...ecure the connector by pushing the two wire clips together until they lock in place on both sides of the connector 4 Connect the other end of the cable to your computer and fasten it as required 5 Turn on the printer then turn on your computer ...

Page 44: ...es the control panel clearing paper jams and replacing the Imaging Cartridge See the Reference Guide for detailed information about your printer functions maintenance troubleshooting technical specifications and printer options Using the Online Guide To learn more about your printer see the Printer Software CD ROM It contains detailed instructions on how to use the printer and information on insta...

Page 45: ...commended Display 640 x 480 pixel or 800 x 600 pixel resolution with High Color 16 bit or True Color 32 bit setting Browser Web browser Microsoft Internet Explorer 4 0 or later recommended System System 7 5 1 System 7 6 or later recommended Memory 16 MB 32 MB or more recommended Hard disk space 4 MB to install the User s Guide 15 MB to install Microsoft Internet Explorer CD ROM drive Double speed ...

Page 46: ... file located in the Printer Software CD at Msie W9x_nt40 Nt4sp3 Readme txt Msie W9x_nt40 Nt4sp3 Readme txt Msie W9x_nt40 Nt4sp3 Readme txt Msie W9x_nt40 Nt4sp3 Readme txt Read also License txt License txt License txt License txt in the same directory 1 Insert the Printer Software CD in your CD ROM drive If a dialog box appears with options to view or install the guide click Quit 2 Double click th...

Page 47: ...After This 41 For Macintosh 1 Insert the Printer Software CD in your CD ROM drive 2 Double click the Internet Explorer folder 3 Follow the on screen instructions to install Internet Explorer ...

Page 48: ...within protective housings and external covers the laser beam cannot escape from the machine during any phase of user operation The EPL N2050 is a page printer which utilizes a semiconductor laser There is no possibility of danger from the laser provided that the printer is operated according to the instructions in the guides provided w Warning Use of controls or adjustments or performance of proc...

Page 49: ...tates The label shown below indicates compliance with the CDRH regulations and must be attached to laser products marketed in the United States Laser Safety Labels w Warning Use of controls adjustments or performance of procedures other than those specified in this guide may result in hazardous radiation exposure Your printer is a Class 1 laser product as defined in IEC 825 specifications The labe...

Page 50: ...enerates less than 0 002 ppm for 2 hours of continuous printing in a closed room of approximately 29 8 m Minimize exposure risk To minimize the risk of exposure to ozone Do not use more than one laser printer in a confined area see Ozone exposure limit above Do not use your printer in conditions of extremely low humidity Do not use your printer in a room with poor ventilation Avoid long continuous...

Page 51: ...ax machines copiers and scanners in an effort to reduce air pollution caused by power generation For United Kingdom Users Use of options Epson UK Limited shall not be liable against any damages or problems arising from the use of any options or consumable productsotherthan thosedesignatedasoriginalEPSONproducts or EPSON approved products by Epson UK Limited Safety information Warning This applianc...

Page 52: ...s The green and yellow wire must be connected to the terminal in the plug which is marked with the letter E or the Earth symbol G The blue wire must be connected to the terminal in the plug marked with the letter N The brown wire must be connected to the terminal in the plug marked with the letter L If damage occurs to the plug replace the cord set or consult a qualified electrician Replace fuses ...

Page 53: ...e 16 Interface card 17 L Large Capacity Paper Unit installing 7 Laser printer precautions 1 Laser safety 42 Laser safety labels 43 Loading paper 34 M Memory module 11 Microsoft Internet Explorer 40 Multibin Unit 25 O Online guide 38 Options 11 Duplex Unit 23 Envelope Feeder 31 Hard Disk Drive 15 Interface Card 17 Memory module 11 ROM module 16 Ozone safety 44 P Parallel cable 36 Parallel interface...

Page 54: ...48 Index System Requirements 39 T Testing the printer 34 ...

Page 55: ......

Reviews: