background image

2-16

Printing with the EPL-N2750

Adjusting print density

Changing the print density affects all text and graphics; avoid
making unnecessary changes. When making changes, check the
new settings by printing several pages with various kinds of text
and graphics.

If your printouts are too light or too dark, change the Density
setting in the printer driver.

If you are printing from an application or operating system that
does not support your printer driver, you can change this setting
from the printer’s LCD panel by using SelecType. For details, see
“SelecType Settings” on page 3-12.

Note:

Increasing the print density increases toner consumption. If you select
darker printing, you may need to replace the imaging cartridge more
often.

Summary of Contents for EPL-N2750

Page 1: ...rpose tray power switch lock lever cover A cover C1 Duplex Unit connector optional interface slot cover serial interface connector ethernetinterface connector AC inlet 10 Bin Multi Purpose Unit connector 5 Bin Multi Purpose Unit connector parallel interface connector cover B ...

Page 2: ...oducts other than those designated as Original Epson Products or Epson Approved Products by SEIKO EPSON CORPORATION EPSON and EPSON ESC P are registered trademarks and EPSON ESC P 2 is a trademark of SEIKO EPSON CORPORATION Speedo Fontware FaceLift Swiss and Dutch are trademarks of Bitstream Inc CG Times and CG Omega are registered trademarks of Miles Inc Univers is a registered trademark of Linot...

Page 3: ... 2 ...

Page 4: ...0 Available Paper 2 2 Basic Printing Operations 2 3 Loading paper into the MP tray 2 4 Loading paper into the lower cassette 2 8 Selecting the paper size 2 12 Special Printing Operations 2 13 Printing on custom size paper 2 13 Printing one sheet at a time 2 13 Optimizing Print Quality 2 14 Resolution Improvement Technology RITech 2 15 Enhanced MicroGray 2 15 Adjusting print density 2 16 Chapter 3 ...

Page 5: ... Menu 3 17 Config Menu 3 20 Setup Menu 3 24 Parallel Menu 3 26 Serial Menu 3 27 Network Menu 3 30 AUX Menu 3 32 LJ4 Menu 3 34 GL2 Menu 3 36 PS3 Menu 3 39 ESCP2 Menu 3 40 FX Menu 3 43 I239X Menu 3 45 Chapter 4 Using Options Printer Options 4 2 500 Sheet Lower Cassette Unit 4 4 Installing the 500 Sheet Lower Cassette Unit 4 4 Using the 500 Sheet Lower Cassette Unit 4 9 Large Capacity Paper Unit 4 10...

Page 6: ...stalling the Hard Disk Drive 4 44 Removing the Hard Disk Drive 4 50 Reformatting the Hard Disk Drive 4 55 Memory Modules 4 55 Installing a memory module 4 56 Removing a memory module 4 61 Adobe PostScript 3 ROM Module 4 66 Installing the ROM module 4 66 Removing the ROM module 4 71 Optional Interfaces 4 74 Installing an interface card 4 75 Removing an interface card 4 77 Chapter 5 Maintenance and ...

Page 7: ...ical Specifications Paper Specifications A 2 Printer A 4 General A 4 Environmental A 5 Safety approvals A 5 Mechanical A 6 Electrical A 7 Interface A 7 Parallel interface A 7 Ethernet interface A 14 Options and Consumables A 15 500 Sheet Lower Cassette Unit A 15 Large Capacity Paper Unit A 16 Duplex Unit A 17 5 Bin Multi Purpose Unit A 18 10 Bin Multi Purpose Unit A 19 Memory Module A 19 Imaging c...

Page 8: ... ESC P 2 and FX Commands C 13 ESC P 2 mode C 13 FX mode C 17 PJL Commands C 22 I239X Emulation Commands C 23 Page format C 24 Text C 25 Auxiliary functions C 28 AGM mode C 28 Appendix D Working with Fonts Printer and Screen Fonts D 2 Available Fonts D 2 Adding Fonts D 7 Selecting Fonts D 8 Downloading Fonts D 8 EPSON BarCode Fonts D 9 System requirements D 10 Installing EPSON BarCode Fonts D 11 Pr...

Page 9: ... viii ...

Page 10: ...to the Quick Reference Guide for help on understanding printer messages clearing paper jams and replacing the imaging cartridge Keep the Quick Reference Guide in the included storage box which you can attach directly to the printer Refer to this Reference Guide for detailed information about your printer About This Guide This guide contains the following information Chapter 1 Controlling the print...

Page 11: ...eshooting gives helpful information for what to do if you encounter a printing problem Appendix A Technical Specifications contains technical information about your printer and its options Appendix B Symbol Sets lists the symbol sets available in each emulation mode with tables of the characters for each set Appendix C Command Summary lists the commands that can be embedded in print jobs to contro...

Page 12: ...hat contributes to a professional appearance In addition EPSON s Enhanced MicroGray technology provides you with better halftoning when printing graphics This printer is intended to be used in network environments Network administrators should refer to the included Administrator s Guide when setting up the printer for use on a network After the printer is set up on the network install the printer ...

Page 13: ...calable fonts and one bitmap font in LJ4 emulation mode Toner Save mode You can reduce the amount of toner used when printing rough drafts by using the Toner Save mode Options The following options are available for use with the EPL N2750 Duplex Unit The Duplex Unit C81318 allows you to print on both sides of the paper The Duplex Unit can handle the following paper and envelope sizes A3 A4 A5 B4 B...

Page 14: ...terface serial interface and Ethernet interface you can install one of a variety of optional interfaces See Optional Interfaces on page 4 74 for details ROM module TheoptionalAdobe PostScript 3 Kit C83241 ROMmodule generates crisp PostScript output See Adobe PostScript 3 ROM Module on page 4 66 for details Optional paper sources The optional paper sources listed below are available to increase pap...

Page 15: ...it on page 4 10 Optional output trays The multiple bin units listed below can be used as sorters mail boxes or large capacity stackers When you use these units you cannot use the standard face down tray 5 Bin Multi Purpose Unit The5 Bin Multi Purpose Unit C81320 accommodates upto500 printed sheets in total To use this option see 5 Bin Multi Purpose Unit on page 4 27 10 Bin Multi Purpose Unit The 1...

Page 16: ...Controlling the printer 1 1 Chapter 1 Controlling the printer Controlling the Printer 1 2 Printer driver 1 2 Control panel 1 2 ...

Page 17: ... that settings you make in your application software override printer driver settings See the printer driver s online help for more information Installtheprintersoftwareinyourcomputeras instructedbyyour network administrator An Administrator s Guide is included in this printer package to guide your network administrator when setting up the printer for use on a network Control panel Use the control...

Page 18: ...paper into the MP tray 2 4 Loading paper into the lower cassette 2 8 Selecting the paper size 2 12 Special Printing Operations 2 13 Printing on custom size paper 2 13 Printing one sheet at a time 2 13 Optimizing Print Quality 2 14 Resolution Improvement Technology RITech 2 15 Enhanced MicroGray 2 15 Adjusting print density 2 16 ...

Page 19: ...may be changed by the manufacturer at any time EPSON cannot guarantee the quality ofanytypeofpaper Always testsamplesofpaperstockbeforepurchasing large quantities or printing large jobs Labels Use only labels designed for laser printers or plain paper copiers Use the MP tray to print on this medium To prevent the adhesive from coming into contact with printer parts always use labels that completel...

Page 20: ...t when printing on envelopes test a sample for print quality and proper feeding before you buy a large number of envelopes Colored paper You can use colored paper as long as it meets the weight limits shown under the specifications for paper Do not however use coated paper paper to which a clear or colored coating has been added Transparencies You can use overhead projector transparencies and adhe...

Page 21: ...lower cassette You can load the following paper sizes The loading orientation differs depending on the paper size as explained below See Paper Specifications on page A 2 for actual measurements Note When you load Executive G letter HTL Ledger B4 G Legal and other custom paper sizes select the paper size in the printer driver then set the paper size for the MP tray using the SelecType Tray Menu For...

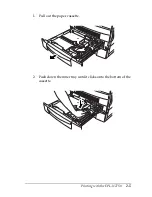
Page 22: ...Printing with the EPL N2750 2 5 1 Pull out the paper cassette 2 Push down the inner tray until it clicks onto the bottom of the cassette ...

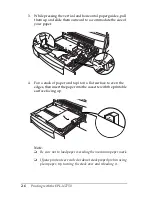
Page 23: ...he size of your paper 4 Fan a stack of paper and tap it on a flat surface to even the edges theninsertthepaperintothecassettewiththeprintable surface facing up Note Be sure not to load paper exceeding the maximum paper mark If your printouts are curled or do not stack properly when using plain paper try turning the stack over and reloading it ...

Page 24: ... Adjust the vertical and horizontal paper guides to fit your paper size Note Make sure to adjust the paper guides to the paper size you load otherwise the printer will not print properly 6 Push the paper cassette back into the printer ...

Page 25: ... when used in combination with the MP tray You can load the following paper sizes The loading orientation differs depending on the paper size as explained below See Paper Specifications on page A 2 for actual measurements The paper loading procedure is the same for the standard lower cassette and the optional 500 Sheet Lower Cassette Unit Follow these steps to load paper into the standard lower ca...

Page 26: ...Printing with the EPL N2750 2 9 1 Pull out the paper cassette 2 Push down the inner tray until it clicks onto the bottom of the cassette ...

Page 27: ...he EPL N2750 3 While pressing the vertical paper guide pull it up and slide it outward to accommodate the size of paper you are loading 4 Insert the horizontal paper guide into the slot for the paper size you want to load ...

Page 28: ...with the metal retaining clips inside the cassette Note Be sure not to load paper exceeding the maximum paper mark If your printouts are curled or do not stack properly when using plain paper try turning the stack over and reloading it Make sure to adjust the paper guides to the paper size you load otherwise the printer will not print properly 6 Set the paper size with the paper size dial ...

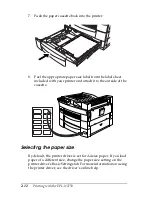
Page 29: ...t included with your printer and attach it to the outside of the cassette Selecting the paper size By default the printer driver is set for A4 size paper If you load paper of a different size change the paper size setting on the printer driver s Basic Settings tab For more information on using the printer driver see the driver s online help ...

Page 30: ... printer driver s Basic Settings tab Select User Defined Size then choose a Unit size and type the Paper Width andPaperHeightsettingsforyourcustompaper ClickOKtosave your custom paper size To make this setting from the printer s control panel access OneTouch mode 1 and set the page size to CTM custom For details see OneTouch mode 1 on page 3 7 Note After making custom paper size settings in the pr...

Page 31: ...esired paper source Adjust the paper guides to match the paper size you are loading 5 Send a print job from your application The LCD panel shows Manual Feed and the selected page size and tray 6 Press the On Line button on the control panel to print The sheet of paper is fed and printed 7 Press On Line again to print the next page if necessary Repeat this step for every page to be printed Optimizi...

Page 32: ... the More Settings dialog box accessed through the Basic Settings tab of the printer driver If you are printing from an application or operating system that does not support your printer driver you can also change this setting from the printer s display panel using OneTouch mode 2 For details see OneTouch mode 2 on page 3 8 Enhanced MicroGray Enhanced MicroGray Enh MG is EPSON s new printer techno...

Page 33: ...ur printouts are too light or too dark change the Density setting in the printer driver If you are printing from an application or operating system that does not support your printer driver you can change this setting from the printer s LCD panel by using SelecType For details see SelecType Settings on page 3 12 Note Increasing the print density increases toner consumption If you select darker pri...

Page 34: ...OneTouch mode 2 3 8 Using SelecType 3 9 When to use SelecType 3 9 How to make the settings 3 9 SelecType menu table 3 10 SelecType Settings 3 12 Test Menu 3 12 Emulation Menu 3 13 Printing Menu 3 13 Tray Menu 3 17 Config Menu 3 20 Setup Menu 3 24 Parallel Menu 3 26 Serial Menu 3 27 Network Menu 3 30 AUX Menu 3 32 LJ4 Menu 3 34 GL2 Menu 3 36 PS3 Menu 3 39 ESCP2 Menu 3 40 FX Menu 3 43 I239X Menu 3 4...

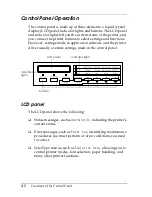
Page 35: ...e in application software and the printer driver usually override settings made in the control panel LCD panel The LCD panel shows the following Status messages such as Warming Up indicating the printer s current status Error messages such as Paper Out identifying maintenance procedures you must perform or error conditions you need to correct SelecType menus such as Emulation Menu allowing you to ...

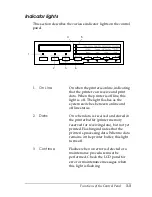
Page 36: ...s the system switches between online and offline status 2 Data On when data is received and stored in the printer buffer printer memory reserved for receiving data but not yet printed Flashing indicates that the printer is processing data When no data remains in the printer buffer this light turns off 3 Continue Flashes when an error is detected or a maintenance procedure must be performed Check t...

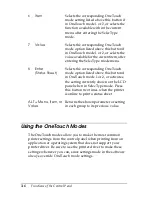
Page 37: ...ails see Using the OneTouch Modes on page 3 6 5 OneTouch mode 2 On when the printer is in OneTouch mode 2 For details see Using the OneTouch Modes on page 3 6 6 SelecType On when the printer is in the SelecType mode For more information on the SelecType mode see Using SelecType on page 3 9 1 On Line Switches the printer between online and offline status 1 4 5 2 3 6 7 8 ...

Page 38: ...blem as described in Status and Error Messages on page 6 18 If used in combination with the ALT button the printer is reset 4 SelecType ALT Selects a OneTouch mode or SelecType mode Press this button once to enter OneTouch mode 1 Press this button again to enter OneTouch mode 2 Press this button once more to enter the SelecType mode Pressing this button while in the SelecType mode returns the prin...

Page 39: ... OneTouch mode 1 or 2 or selects the function available within the current menu after entering the SelecType mode 7 Value Selects the corresponding OneTouch mode option listed above this button if in OneTouch mode 1 or 2 or selects the valueavailableforthe currentitem after entering the SelecType mode menu 8 Enter Status Sheet Selects the corresponding OneTouch mode option listed above this button...

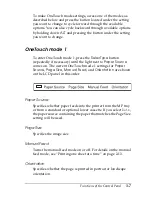
Page 40: ...l the light next to Paper Source comes on The current OneTouch mode 1 settings for Paper Source Page Size Manual Feed and Orientation are shown on the LCD panel in this order Paper Source Specifies whether paper feeds into the printer from the MP tray or from a standard or optional lower cassette If you select Auto the paper source containing the paper that matches the Page Size setting will be us...

Page 41: ...e LCD panel in this order RITech Turns the RITech setting on or off RITech produces smoother and crisper lines text and graphics Copies Specifies the number of copies to be printed up to 999 MP Tray Size Allows you to specify the paper size for the MP tray Toner Save Mode Turns the Toner Save mode on or off When turned on the printer saves toner by substituting a gray shade for the black inside of...

Page 42: ...witching mode Specifying a channel and configuring the interface Choosing the size of the memory buffer used to receive data Keep in mind the following when using SelecType settings A number of SelecType settings can be made directly using the OneTouch modes Print a status sheet to see the current SelecType settings How to make the settings Use the buttons on the printer s control panel to enter S...

Page 43: ...menu press Item To display values for an item press Value An asterisk appears beside the currently activated value Press ALT in combination with each button to display menus items or values in reverse order See SelecType menu table on page 3 10 for a list of SelecType menus and items 4 To activate a new setting press Enter An asterisk appears beside the setting 5 To exit SelecType mode press On Li...

Page 44: ...Offset B L Offset B Size Ignore Auto Cont Page Protect Image Optimum Paper Type Setup Menu Time Out Standby Lang Toner Toner Out Multibin Total Pages SelecType Init Parallel Menu Parallel I F Speed Bi D Buffer Size Serial Menu Serial I F Word Length Baud Rate Parity Stop Bit DTR DSR Xon Xoff Buffer Size Network Menu Network I F Network Config Get IPAddress IP Byte 1 IP Byte 2 IP Byte 3 IP Byte 4 S...

Page 45: ... Item to select a status sheet or font sample then press Enter to print There are no settings to select by pressing Value Status Sheet Network Status Sheet AUX Status Sheet PS3 Status Sheet Prints a sheet describing the current printer status Use this item to check whether your printer is working correctly PS3 Menu Error Sheet ESCP2 Menu Font Pitch Condensed T Margin Text CG Table Country Auto CR ...

Page 46: ...the LJ4 ESCP2 FX GL2 or I239X menus as necessary The options you can set are the same for every interface Available only when the optional Adobe PostScript3 ROM module is installed Available only when an optional interface card is installed Printing Menu This menu allows you to make standard print settings such as paper source and page size even when printing from an application or operating syste...

Page 47: ...her paper feeds into the printer from the MP tray the lower cassette or from an optional paper source If you select Auto paper feeds from the paper source containing paper that matches your Page Size setting Item Values default in bold Paper Source Auto MP LC1 LC2 LC3 Page Size A4 A3 A5 B4 B5 LT B HLT LGL GLT GLG EXE F4 MON C10 DL C5 C6 IB5 CTM Wide A4 Off On Orientation Port Land Out Bin Face Dow...

Page 48: ...lecting this setting changes the right and left margins from 4 mm to 3 4 mm Orientation Specifies whether the page is printed in portrait or landscape orientation For example this page is printed in portrait orientation Note You can also make this setting directly from OneTouch mode 1 Out Bin Specifies the output destination if you have installed the 5 Bin or 10 Bin Multi Purpose Unit Copies Desig...

Page 49: ... PCL6 or PS3 mode Auto Eject Page Sets whether or not to output paper when the time out limit is reached according to the Time Out setting in the Setup Menu The default is off or paper is not printed when the time out limit is reached Duplex Turns duplex printing on or off This item is available only when the optional Duplex Unit is installed Binding Sets the binding direction of the printout This...

Page 50: ...o slightly different locations on Bin 1 This process is repeated resulting in each set of printed copies being offset from the next set This setting is available only when the 5 Bin Multi Purpose Unit is installed When this mode is selected you cannot use Bin 2 to Bin 5 Tray Menu This menu allows you to specify the size and type of paper loaded in the MP tray Accessing this menu also lets you chec...

Page 51: ...t the MP tray has the lowest priority Item Values default in bold MP Mode Normal Last MP Tray Size Auto A4 A3 A5 B4 B5 LT B HLT LGL GLT GLG EXE F4 MON C10 DL C5 C6 IB5 LC1 Size A4 A3 B4 LT B LGL GLT LC2 Size 500 Sheet Lower Cassette Unit A4 A3 B4 LT B LGL GLT Large Capacity Paper Unit A4 LT LC3 Size 500 Sheet Lower Cassette Unit A4 A3 B4 LT B LGL GLT Large Capacity Paper Unit A4 LT MP Type Plain P...

Page 52: ...ur paper size from this menu Note You can also make the MP Tray Size setting directly from OneTouch mode 2 For details see Using the OneTouch Modes on page 3 6 LC1 Size LC2 Size LC3 Size Displays the paper size loaded in the standard and optional lower cassettes You cannot change the paper size from this menu MP Type Lets you set the paper type loaded in the MP tray LC1 Type LC2 Type LC3 Type Lets...

Page 53: ...so make the RITech setting directly from OneTouch mode 2 For details see Using the OneTouch Modes on page 3 6 Item Values default in bold RITech On Off Toner Save Off On Density 1 2 3 4 5 Top Offset 150 0 0 0 150 0 mm in 0 5 mm increments Left Offset 150 0 0 0 150 0 mm in 0 5 mm increments T Offset B 150 0 0 0 150 0 mm in 0 5 mm increments L Offset B 150 0 0 0 150 0 mm in 0 5 mm increments Size Ig...

Page 54: ...nt density increases toner consumption If you select darker print you may need to replace the imaging cartridge more often Top Offset Make fine adjustments to the vertical position of the printing on the page c Caution Be sure that the printed image does not extend beyond the edge of the paper Otherwise you may damage the printer Left Offset Makes fine adjustments to the horizontal position of the...

Page 55: ...le only when the optional Duplex Unit is installed Size Ignore If you want to ignore a paper size error select On When you turn this item on the printer keeps printing even if the image size exceeds the printable area for the specified size of paper This may cause smudges because of toner that is not transferred onto the paper properly When this item is off the printer stops printing if a paper si...

Page 56: ... Page Protect usually works best if set to Auto You will need to increase your printer s memory if memory errors continue to occur Note Changing the Page Protect setting reconfigures the printer s memory which causes any downloaded fonts to be erased Image Optimum When this mode is on the quality of graphics is reduced It reduces the amount of graphics data when the data reaches the memory limit a...

Page 57: ...hannels Standby Saves power by reducing the power to the fixing heater if the printer receives no data for 60 minutes In this mode the printer begins warming up as soon as you send a print job and is ready to print in about 60 seconds at the rated voltage Lang Specifies the language displayed on the LCD panel and that printed on the status sheet Item Values default in bold Time Out 0 5 60 300 in i...

Page 58: ...t is recommended that you set to Stop when you cannot check the printouts on the spot Multibin Selects the mode setting for the optional 5 Bin or 10 Bin Multi Purpose Units If you want to change the settings for a multibin unit always consult your printer s administrator and inform all other users to avoid confusion Changing these settings often is not recommended Note To make the new settings eff...

Page 59: ...the parallel interface Parallel I F Allows you to activate or deactivate the parallel interface Speed Specifies the pulse width of the ACKNLG signal when receiving data in the Compatibility or Nibble mode When this option is set to Fast the pulse width is about 1 µs When this option is set to Normal the pulse width is about 10 µs Bi D Allows you to specify the bidirectional communication mode When...

Page 60: ...n the printer and the computer when using the serial interface Serial I F Allows you to activate or deactivate the serial interface Word Length You can select an 8 bit or 7 bit word length See your computer manual and software documentation for the proper setting Item Values default in bold Serial I F On Off Word Length 8 7 Baud Rate 9600 19200 38400 57600 76800 115200 300 600 1200 2400 4800 Parit...

Page 61: ...printer Stop bits signal the end of a character DTR Use DTR Data Terminal Ready to turn the printer s DTR communications protocol on or off You can use DTR protocol in combination with the Xon Xoff option setting DSR When DSR Data Set Ready is set to Off the signal level is permanently set high allowing the printer to send data to the computer For most communications purposes this option should be...

Page 62: ... Panel 3 29 Buffer Size Determines the amount of memory to be used for receiving data and printing data If set to Maximum more memory is allocated for receiving data If set to Minimum more memory is allocated for printing data ...

Page 63: ... all items between and including IP Byte 1 and GW Byte 4 are not available Their default values will be used Item Values default in bold Network I F On Off Network Config No Yes Get IPAddress Panel AUTO PING IP Byte 1 0 192 255 IP Byte 2 0 168 255 IP Byte 3 0 192 255 IP Byte 4 0 168 255 SM Byte 1 0 to 255 SM Byte 2 0 to 255 SM Byte 3 0 to 255 SM Byte 4 0 to 255 GW Byte 1 0 to 255 GW Byte 2 0 to 25...

Page 64: ...ss the Continue and SelecType buttons simultaneously until Reset All appears on the LCD panel Alternatively turn off the printer then after 5 seconds turn it back on Resetting the printer erases all print jobs Make sure the On Line light is not flashing when you reset the printer ...

Page 65: ...to Yes Item Values default in bold AUX I F On Off AUX Config No Yes Get IPAddress Panel Auto PING IP Byte 1 0 to 255 IP Byte 2 0 to 255 IP Byte 3 0 to 255 IP Byte 4 0 to 255 SM Byte 1 0 to 255 SM Byte 2 0 to 255 SM Byte 3 0 to 255 SM Byte 4 0 to 255 GW Byte 1 0 to 255 GW Byte 2 0 to 255 GW Byte 3 0 to 255 GW Byte 4 0 to 255 NetWare On Off AppleTalk On Off NetBEUI On Off AUX Init Buffer Size Normal...

Page 66: ...et to Maximum more memory is allocated for receiving data If set to Minimum more memory is allocated for printing data Note To make the new settings effective press the Continue and SelecType buttons simultaneously until Reset All appears on the LCD panel Alternatively turn off the printer then after 5 seconds turn it back on Resetting the printer erases all print jobs Make sure the On Line light ...

Page 67: ...O PcBlt775 IBM DN PcMultiling PcE Europe PcTk437 PcEur858 Pc1004 WiAnsi WiE Europe WiTurkish WiBALT DeskTop PsText VeInternati VeUS MsPublishin Math 8 PsMath VeMath PiFont Legal UK ANSI ASCII Swedis2 Italian Spanish German Norweg1 French2 Windows McText PcIcelandic PcLt774 PcTurk1 PcPortugues PcEt850 PcTurk2 PcCanFrench PcS1437 PcNordic 8859 3 ISO 8859 4 ISO WiBaltic WiEstonian WiLatvian Mazowia C...

Page 68: ...s scalable and of fixed pitch You can select from 0 44 to 99 99 cpi characters per inch in 0 01 cpi increments This item may not appear depending on the Font Source or Font Number settings Height Specifies the default font height if the font is scalable and proportional You can select from 4 00 to 999 75 points in 0 25 point increments This item may not appear depending on the Font Source or Font ...

Page 69: ...lect command When 4 is selected the commands are set as compatible with the HP LaserJet 4 When 4K is selected the commands are set as compatible with the HP LaserJet 4000 5000 and 8000 When 5S is selected thecommands aresetascompatiblewith theHPLaserJet 5Si GL2 Menu This menu lets you set the printer to emulate a plotter allowing you to use software which requires a plotter for output The LJ4GL2 m...

Page 70: ...he printer RAM such as downloaded fonts may be erased when you change the emulation mode GL Mode Specifies whether the printer uses a direct emulation of the GL 2 plotter language or the HP LaserJet 4 emulation of GL 2 End Butt Square Triangular Round Join Mitered Miteredbeveled Triangular Round Beveled None Pen 0 through 6 0 05 0 35 5 00 mm in 0 05 increments Print Options Settings Paper size Pri...

Page 71: ...Allows you to choose a pen which you can then set the thickness for in the Pen 0 through Pen 6 menu item The LJ4GL2 mode supports two pens 0 and 1 while the GLlike mode supports seven pens 0 through 6 End Specifies the way in which lines end Join Specifies the way in which lines are joined Pens 0 through 6 Allows you to set the thickness of the pens used to make the printout Pen 0 and Pen 1 are av...

Page 72: ...nal Adobe PostScript3 ROM module is installed For installation instructions see Adobe PostScript 3 ROM Module on page 4 66 See also your Adobe PostScript3 Kit documentation Error Sheet When you select On the printer prints out an error sheet Item Values default in bold Error Sheet Off On ...

Page 73: ...rgin 0 40 0 50 1 50 inch in 0 05 inch increments Text 1 62 66 99 lines CGTable PcUSA Italic PcMultilin PcPortugue PcCanFrenc PcNordic PcTurkish2 PcIcelandic PcE Europe BpBRASCII BpAbicomp Roman 8 PcEur858 ISO Latin1 8859 15 ISO PcS1437 PcTurkish1 8859 9 ISO Mazowia CodeMJK PcGk437 PcGk851 PcGk869 8859 7 ISO PcCy855 PcCy866 PcUkr866 Bulgarian Hebrew7 Hebrew8 PcHe862 PcAr864 Country USA France Germa...

Page 74: ...pica 1 6 inch If you change the Orientation Page Size or T Margin settings the page length setting automatically returns to the default setting for each paper size CG Table Use the character generator CG table option to select the graphics character table or the italics table The graphics table contains graphic characters for printing lines corners shaded areas international characters Greek chara...

Page 75: ...ach carriage return CR If this is set to On a line feed command is sent with each carriage return Set to On if your text lines overlap Bit Image The printer is able to emulate the graphics densities set with the printer commands If you select Dark the bit image density is high and if you select Light the bit image density is low If you select BarCode the printer converts bit images to bar codes by...

Page 76: ...ing Item Values default in bold Font Courier Prestige Roman Sans Serif Script Orator S OCR A OCR B Pitch 10 12 15 cpi Prop Condensed Off On T Margin 0 40 0 50 1 50 inch in 0 05 inch increments Text 1 62 66 99 lines CGTable PcUSA Italic PcMultilin PcPortugue PcCanFrenc PcNordic PcTurkish2 PcIcelandic PcE Europe BpBRASCII BpAbicomp Roman 8 PcEur858 ISO Latin1 8859 15 ISO Country USA France Germany U...

Page 77: ... table The graphics table contains graphic characters for printing lines corners shaded areas international characters Greek characters and mathematical symbols If you select Italic the upper half of the character table is defined as italic characters Country Use this option to select one of the fifteen international symbol sets See International character sets on page B 33 for samples of the char...

Page 78: ...s If you select Dark the bit image density is high and if you select Light the bit image density is low If you select BarCode the printer converts bit images to bar codes by automatically filling in any vertical gaps between dots This produces unbroken vertical lines that can be read by a bar code reader This mode will reduce the size of the image being printed and may also cause some distortion w...

Page 79: ...e Page Selects the character tables Character tables contain the characters and symbols used by different languages The printer prints text based on the selected character table Item Values default in bold Font Courier Prestige Gothic Orator Script Presentor Sans Serif Pitch 10 12 15 17 20 24 cpi Prop Code Page 437 850 858 860 863 865 T Margin 0 30 0 40 1 50 inch in 0 05 inch increments Text 1 63 ...

Page 80: ...printer position goes beyond the right margin If this setting is off the printer does not print any characters beyond the right margin and does not perform any line wrapping until it receives a carriage return character This function is handled automatically by most application software Auto LF Ifyou set this option to Off the printerdoes not send an automatic line feed LF command with each carria...

Page 81: ...ical gaps between dots This produces unbroken vertical lines that can be read by a bar code reader This mode will reduce the size of the image being printed and may also cause some distortion when printing bit image graphics ZeroChar Selects whether the printer prints a slashed or unslashed zero Character Set Selects character table 1 or 2 ...

Page 82: ... Multi Purpose Unit 4 27 Installing the 5 Bin Multi Purpose Unit 4 27 Removing the 5 Bin Multi Purpose Unit 4 33 Using the 5 Bin Multi Purpose Unit 4 33 10 Bin Multi Purpose Unit 4 36 Installing the 10 Bin Multi Purpose Unit 4 36 Removing the 10 Bin Multi Purpose Unit 4 42 Using the 10 Bin Multi Purpose Unit 4 43 Hard Disk Drive 4 44 Installing the Hard Disk Drive 4 44 Removing the Hard Disk Drive...

Page 83: ...r in the following sizes A4 Letter The Duplex Unit C81318 allows you to print on both sides of a sheet of plain paper one sheet at a time The Duplex Unit accommodates the following paper and envelope sizes A3 A4 A5 B4 B5 IB5 Ledger Legal G Legal Letter G Letter Executive H Letter The 5 Bin Multi Purpose Unit C81320 can be used as a mailbox a sorter a multiple sorter or a large capacity stacker Out...

Page 84: ...The following envelope sizes are supported Monarch Commercial 10 DL C5 C6 IB5 The Hard Disk Drive C82377 allows you to print complex and large print jobs at high speed Memory modules expand your printer s memory The Adobe PostScript3 Kit C83241 ROM modulegenerates crisp PostScript output A variety of interface cards provide additional links between your printer and computers or networks Before ins...

Page 85: ... Large Capacity Paper Unit Please note that you will need the assistance of at least two other people to lift up the printer when installing this option Follow these steps to install the 500 Sheet Lower Cassette Unit 1 Turn off the printer 2 Unplug the printer s power cord from the electrical outlet 3 Remove all interface cables from the interface connectors 4 Unpack the 500 Sheet Lower Cassette U...

Page 86: ...with the front of each cassette facing the same direction Ifyou plan to installtheLargeCapacity PaperUnit at the same time refer to the instructions under Installing the Large CapacityPaperUnit onpage4 10tocompletetheinstallation of both units 6 Remove the side cover from the bottom of the printer ...

Page 87: ...s 7 With the assistance of two or more people grasp the printer at the positions indicated below and lift it carefully c Caution The printer weighs about 30 kg 66 1 lb always lift it with two or more people front rear ...

Page 88: ...hose of the cassette unit then lower the printer until it rests securely on the unit 9 Make sure all corners of the printer fit firmly onto the unit 10 Pull out the paper cassette and fasten the 500 Sheet Lower Cassette Unit using the fittings and screws provided ...

Page 89: ...On the back of the printer fasten the unit using the fittings and screws provided 12 Pull the paper cassette out and remove the protective materials 13 Attach the side cover to the bottom of the cassette unit as shown below ...

Page 90: ... cord into an electrical outlet 17 Turn on the printer Using the 500 Sheet Lower Cassette Unit Each 500 Sheet Lower Cassette Unit can store 500 sheets of plain paper You can load the following paper sizes The loading orientation differs depending on the paper size as explained below See Paper Specifications on page A 2 for actual measurements Loading Orientation Paper Size Vertical A4 Letter Gover...

Page 91: ...the optional Large Capacity Paper Unit when first setting up the printer Please note that you will need the assistance of at least two other people to lift up the printer when installing this option Follow these steps to install the optional Large Capacity Paper Unit 1 Turn off the printer 2 Unplug the printer s power cord from the electrical outlet 3 Remove all interface cables from the interface...

Page 92: ...1 5 With the assistance of two or more people place the unit near the printer Note The unit has four handles that you can use to lift it with Pull the handles out from the locations shown below when you need to use them ...

Page 93: ...et Lower Cassette Unit stack it on top of the Large Capacity Paper Unit For instructions on how to prepare the Lower Cassette Unit for installation see Installing the 500 Sheet Lower Cassette Unit on page 4 4 Note All subsequent illustrations show both an optional 500 Sheet Lower Cassette Unit and an optional Large Capacity Paper Unit 8 Remove the side cover from the bottom of the printer ...

Page 94: ...13 9 With the assistance of two or more people grasp the printer at the positions indicated below and lift it carefully c Caution The printer weighs about 30 kg 66 1 lb always lift it with two or more people front rear ...

Page 95: ...s securely on the unit 11 Make sure all corners of the printer fit firmly onto the unit Then pull out the paper cassette and fasten the unit using the fittings and screws provided Note Also fasten the 500 Sheet Lower Cassette Unit with the fittings and screws provided if you re installing both options at the same time ...

Page 96: ...ded if you re installing both options at the same time 13 Pull the paper cassette out of the unit and remove the protective materials 14 Peel the appropriate cover and cassette numbering labels from the label sheet included with the Large Capacity Paper Unit and attach it to the unit Note Do the same for the optional 500 Sheet Lower Cassette Unit if you are installing it at the same time ...

Page 97: ... the back of the printer 16 Attach the included L shaped printer support to the side of the unit as shown below 17 Reconnect all interface cables 18 Plug the power cord into an electrical outlet 19 Turn on the printer Using the Large Capacity Paper Unit This unit can hold 2 500 sheets of plain paper and is useful for feeding paper you use often and in large amounts ...

Page 98: ...o the Large Capacity Paper Unit 1 Pull out the paper cassette 2 Fan a stack of paper and tap it on a flat surface to even the edges Insert the paper into the cassette making sure the amount of paper does not exceed the maximum paper mark inside the cassette ...

Page 99: ...t 3 Push the paper cassette back into the unit Duplex Unit Installing the Duplex Unit Follow these steps to install the optional Duplex Unit 1 Turn off the printer 2 Unplug the printer s power cord from the electrical outlet 3 Remove all interface cables from the interface connectors 4 Unpack the Duplex Unit and remove all protective materials ...

Page 100: ...tions 4 19 c Caution When removing the Duplex Unit from the box do not grasp the area indicated by the warning label shown below Otherwise you may damage the unit Note Keep all packing materials for future use ...

Page 101: ...4 20 Using Options 5 Remove the cover and connector cover on the side of the printer ...

Page 102: ...Using Options 4 21 6 Insert the paper transfer unit as shown below 7 Fasten the paper transfer unit with the included screws ...

Page 103: ...4 22 Using Options 8 Connect the cable on the right side of the paper transfer unit to the connector on the printer 9 Remove the covers shown below ...

Page 104: ...n angle and insert the two tabs at the base of the unit into the slots marked with arrows on the printer Push to attach the upper portion of the unit onto the printer 11 Fasten the screws as shown below The screws are already inside the Duplex Unit ...

Page 105: ...e attached to the Duplex Unit then plug the ends of the cable into the appropriate connectors at the side of the printer 13 Replace the connector cover and fasten the screw 14 Afteryou install the Duplex Unit slide thetethertension lever to the position shown below ...

Page 106: ...rectly print a status sheet by pushing the Enter button on the control panel twice while the printer is online If the unit is not listed on the status sheet make sure the cables connecting the Duplex Unit to the printer are connected securely Removing the Duplex Unit Follow these steps to remove the Duplex Unit 1 Turn off the printer 2 Unplug the printer s power cord from the electrical outlet 3 R...

Page 107: ...ex Unit The Duplex Unit enables you to print on both sides of plain paper and supports the following paper sizes A3 A4 A5 B4 B5 Ledger Legal G Legal Letter G Letter Executive H Letter To use the Duplex Unit select the Duplex Print Unit check box in the printer driver This check box is accessed by clicking the Settings button in the Optional Settings tab of the printer driver When using the Duplex ...

Page 108: ...Bin Multi Purpose Unit 1 Turn off the printer 2 Unplug the printer s power cord from the electrical outlet 3 Remove all interface cables from the interface connectors 4 Unpack the 5 Bin Multi Purpose Unit and remove all protective materials Note Keep all packing materials for future use 5 Remove the printer covers as shown below ...

Page 109: ...4 28 Using Options 6 Place the unit on top of the printer taking care not to drop the unit 7 Fasten the screw on the front of the unit ...

Page 110: ...Using Options 4 29 8 Fasten the screw on the back of the unit then attach the cable to the connector on the back of the printer 9 Attach the covers as shown below ...

Page 111: ...4 30 Using Options 10 Insert the tray shown below into Bin 1 The tray has the number 1 printed on the top right corner Note that this tray differs in shape from the trays for the other bins top ...

Page 112: ...g Options 4 31 11 Insert the trays shown below into Bins 2 to 4 starting from the bottom These trays are numbered from 2 to 4 Note that these trays differ in shape from the trays for Bins 1 and 5 top bottom ...

Page 113: ...nted on the top right corner Note that the this tray differs in shape from the trays for the other bins 13 Open the back cover of the unit and remove all protective materials 14 Reconnect all interface cables 15 Plug the power cord into an electrical outlet 16 Turn on the printer top bottom ...

Page 114: ... Unplug the printer s power cord from the electrical outlet 3 Remove the trays from the unit 4 Remove the connector cover and unplug the unit cable 5 Remove the screw cover on the front side of the printer then remove the screws from the front and back of the unit and lift the unit off the printer carefully 6 Replace the covers on the printer 7 Plug the power cord into an electrical outlet 8 Turn ...

Page 115: ...nus For details see SelecType Settings on page 3 12 The 5 Bin Multi Purpose Unit has a total capacity of 500 sheets Bin 1 holds 250 sheets Bins 2 through 4 hold 50 sheets each and Bin 5 holds 100 sheets Note When this unit is installed you cannot use the standard face down tray Changing the outputmode too frequently could cause confusion and should be avoided Before changing the output mode always...

Page 116: ...int job into each bin This allows you to print more than five copies of a print job at a time up to 500 sheets Note If you printer does not have at least 64 MB of memory printing in this mode will produce only one copy of your document In this case please use the sorter feature or add more memory to your printer Using the large capacity stacker feature When in Stacker mode this unit functions as a...

Page 117: ...rinter s power cord from the electrical outlet 3 Remove all interface cables from the interface connectors 4 Unpack the unit by opening the carton from the top and removing the contents Note The 10 Bin Multi Purpose Unit itself is heavy so you will need the assistance of at least one person to lift the inner box containing the unit out of the carton and to remove the unit from the inner box ...

Page 118: ...with the included fittings and screws as shown below 6 Attach the lower support clamp to the bottom of the printer as shown Press up on the clamp until it clicks into place 7 Open the cover on the back side of the 10 Bin Multi Purpose Unit and remove the protective materials inside ...

Page 119: ...ort bar into the lower support clamp on the printer and the other end into the lower support clamp on the 10 Bin Multi Purpose Unit Then roll the 10 Bin Multi Purpose Unit toward the printer until the magnets on the unit make contact with the metal plates ...

Page 120: ...ing Options 4 39 9 Tighten the screw at the bottom of the unit to secure the lower support bar 10 Remove the stickers from the holes on the face down tray then attach the lower paper guide as shown below ...

Page 121: ...nto the opening on the lower paper guide and lower the guide onto the hooks on the 10 Bin Multi Purpose Unit Tighten the screws on both sides of the paper guide then close the upper paper guide cover 12 Attach the cables from the 10 Bin Multi Purpose Unit to the printer and the paper guide as shown below ...

Page 122: ...s are of the same shape 14 If you need to adjust the height of the unit remove the cover on the front wheel first then turn the front screws to the left Turn the top screw to adjust the height of the unit then turn the front screws to the right to secure the top screw Replace the front wheel cover ...

Page 123: ...in Multi Purpose Unit Follow these steps to remove the 10 Bin Multi Purpose Unit 1 Turn off the printer 2 Unplug the printer s power cord from the electrical outlet 3 Remove all the trays from the unit 4 Detach the cable from the printer and the paper guide 5 Remove the paper guide from both the 10 Bin Multi Purpose Unit and the printer 6 Roll the unit away from the printer until the lower support...

Page 124: ...odes from the printer s control panel using the SelecType menus For details see SelecType Settings on page 3 12 This option has a total capacity of 2 000 sheets Each bin can hold 200 sheets Note When this unit is installed you cannot use the standard face down tray Changing the output mode too frequently could cause confusion and should be avoided Before changing the output mode always consult you...

Page 125: ...job into each bin This allows you to print more than ten copies of a print job at a time up to 2 000 sheets Note If you printer does not have at least 64 MB of memory printing in this mode will produce only one copy of your document In this case please use the sorter feature or add more memory to your printer Using the large capacity stacker feature When in Stacker mode this unit functions as a la...

Page 126: ...the interface connectors 4 Remove the 5 Bin or 10 Bin Multi Purpose Unit if it is installed For instructions see Removing the 5 Bin Multi Purpose Unit on page 4 33 or Removing the 10 Bin Multi Purpose Unit on page 4 42 5 Open the top cover of the face down tray 6 Loosen the two retaining screws and remove the plate ...

Page 127: ... To avoid losing the retaining screws do notremove them completely from the plate w Warning Avoid touching electrical components that are exposed after you remove the plate They may be very hot if the printer has been in use ...

Page 128: ...he Hard Disk Drive socket Its relative location is as shown below 8 Unpack the Hard Disk Drive 9 Hold the Hard Disk Drive such that its electrical connector is on the same side as the socket on the circuit board HardDiskDrive socket ...

Page 129: ... 48 Using Options 10 Lower and attach the drive onto the circuit board making sure the connector is securely fastened into the socket 11 Fasten the two screws provided in the positions illustrated below ...

Page 130: ...late to its original position Place the two outside tabs of the plate under the edge of the opening with the inside tabs on top of the edge 13 Push the plate down into place Then fasten the two retaining screws that you loosened earlier ...

Page 131: ...t the electronic connector on the Hard Disk Drive is securely connected to the socket on the circuit board Removing the Hard Disk Drive Follow these steps to remove the Hard Disk Drive 1 Turn off the printer w Warning To avoid electrical shock do not attempt to remove a Hard Disk Drive unless the printer is turned off 2 Unplug the printer s power cord from the electrical outlet 3 Remove all interf...

Page 132: ...Purpose Unit if it is installed For instructions see Removing the 5 Bin Multi Purpose Unit on page 4 33 or Removing the 10 Bin Multi Purpose Unit on page 4 42 5 Open the top cover of the face down tray 6 Loosen the two retaining screws and remove the plate ...

Page 133: ... To avoid losing the retaining screws do notremove them completely from the plate w Warning Avoid touching electrical components that are exposed after you remove the plate They may be very hot if the printer has been in use ...

Page 134: ...Using Options 4 53 7 Remove the two screws that secure the Hard Disk Drive onto the circuit board as shown below 8 Grasp both sides of the Hard Disk Drive and gently pull it out ...

Page 135: ...ate to its original position Place the two outside tabs of the plate under the edge of the opening with the inside tabs on top of the edge 10 Push the plate down into place Then fasten the two retaining screws that you loosened earlier ...

Page 136: ...Drive see To reformat the Hard Disk Drive follow the instructions below on page 6 30 Memory Modules The printer comes with 16 MB of memory By installing an optional Dual In line Memory Module DIMM you can increase printer memory up to a maximum of 256 MB You may want to add memory if you are having difficulty printing complex graphics intensive pages using one of the optional multibin units with t...

Page 137: ...ght Installing a memory module Follow these steps to install an optional memory module 1 Turn off the printer w Warning To avoid electrical shock do not attempt to install a DIMM unless the printer is turned off 2 Unplug the printer s power cord from the electrical outlet 3 Remove all interface cables from the interface connectors 4 Remove the 5 Bin or 10 Bin Multi Purpose Unit if it is installed ...

Page 138: ...he two retaining screws and remove the plate Note To avoid losing the retaining screws do not remove them completely from the plate w Warning Avoid touching electrical components that are exposed after you remove the plate They may be very hot if the printer has been in use ...

Page 139: ...4 58 Using Options 7 Identify the DIMM slot Its relative location is as shown below 8 Push the clips on each side of the DIMM slot outward DIMM slot ...

Page 140: ...lowing orientation then insert it into the slot Do not apply too much force 10 Push one end of the DIMM into the slot until the clip comes up 11 With your other hand push down the other end of the DIMM into the slot until the clip comes up to retain the memory module securely ...

Page 141: ...late to its original position Place the two outside tabs of the plate under the edge of the opening with the inside tabs on top of the edge 13 Push the plate down into place Then fasten the two retaining screws that you loosened earlier ...

Page 142: ...onal memory module try reinstalling the module Make sure that the module is securely attached to the DIMM slot Removing a memory module Follow these steps to remove a memory module 1 Turn off the printer w Warning To avoid electrical shock do not attempt to remove a DIMM unless the printer is turned off 2 Unplug the printer s power cord from the electrical outlet 3 Remove all interface cables from...

Page 143: ...Purpose Unit if it is installed For instructions see Removing the 5 Bin Multi Purpose Unit on page 4 33 or Removing the 10 Bin Multi Purpose Unit on page 4 42 5 Open the top cover of the face down tray 6 Loosen the two retaining screws and remove the plate ...

Page 144: ...ot remove them completely from the plate w Warning Avoid touching electrical components that are exposed after you remove the plate They may be very hot if the printer has been in use 7 Push the clips on each side of the DIMM slot outward to release the memory module ...

Page 145: ...s 8 Grasp both sides of the memory module and pull the module out 9 Return the plate to its original position Place the two outside tabs of the plate under the edge of the opening with the inside tabs on top of the edge ...

Page 146: ... down into place Then fasten the two retaining screws that you loosened earlier 11 Gently replace the top cover until it clicks shut 12 Reconnect all interface cables 13 Plug the power cord into an electrical outlet 14 Turn on the printer ...

Page 147: ...dule unless the printer is turned off 2 Unplug the printer s power cord from the electrical outlet 3 Remove all interface cables from the interface connectors 4 Remove the 5 Bin or 10 Bin Multi Purpose Unit if it is installed For instructions see Removing the 5 Bin Multi Purpose Unit on page 4 33 or Removing the 10 Bin Multi Purpose Unit on page 4 42 5 Open the top cover of the face down tray 6 Lo...

Page 148: ... To avoid losing the retaining screws do not remove them completely from the plate w Warning Avoid touching electrical components that are exposed after you remove the plate They may be very hot if the printer has been in use ...

Page 149: ... Using Options 7 Identify the slots for ROM modules Their relative locations are as shown below 8 Hold the ROM module in the following orientation then insert the ROM module into slot A slot A slot B slot C ...

Page 150: ... Push the ROM module into the slot evenly until the button comes up 10 Return the plate to its original position Place the two outside tabs of the plate under the edge of the opening with the inside tabs on top of the edge ...

Page 151: ...d earlier 12 Gently replace the top cover until it clicks shut To confirm that the Adobe PostScript 3 ROM module is installed correctly print a status sheet If PS3 is not listed as an installed emulation on the status sheet try reinstalling the module making sure that it is securely fastened to the ROM slot ...

Page 152: ...s turned off 2 Unplug the printer s power cord from the electrical outlet 3 Remove all interface cables from the interface connectors 4 Remove the 5 Bin or 10 Bin Multi Purpose Unit if it is installed For instructions see Removing the 5 Bin Multi Purpose Unit on page 4 33 or Removing the 10 Bin Multi Purpose Unit on page 4 42 5 Open the top cover of the face down tray 6 Loosen the two retaining sc...

Page 153: ...etely from the plate w Warning Avoid touching electrical components that are exposed after you remove the plate They may be very hot if the printer has been in use 7 Push down the button on the side of the ROM slot until the module comes up 8 Pull the ROM module up and out of the slot ...

Page 154: ...ate to its original position Place the two outside tabs of the plate under the edge of the opening with the inside tabs on top of the edge 10 Push the plate down into place Then fasten the two retaining screws that you loosened earlier ...

Page 155: ... section describes how to install the optional interface cards listed below To add a direct connection to an Ethernet system use an optional Ethernet Card C82362 C82363 To add a serial or parallel interface to your printer use one of the following 32KB Serial Interface Card C82307 32KB Parallel Interface Card C82310 To add a direct connection to an IBM mini or mainframe system use one of the follo...

Page 156: ...N twinaxial interface the printer can be used in place of the following IBM system printers 4210 5224 models 1 and 2 5256 models 1 2 and 3 3218 non IPDS 4214 model 2 5225 models 1 2 3 and 4 and 5219 D01 and D02 The coaxial interface allows the printer to be connected to the following IBM control units and mainframe systems 3174 3276 4274 and 3270 To add a direct connection to your GPIB network use...

Page 157: ... secure the interface slot cover and remove the cover 6 With the component side of the optional interface card facing up slide the interface card into the grooves of the interface slot as shown below Push the card firmly to lock it into place 7 Secure the interface card by fastening the two retaining screws ...

Page 158: ...r Removing an interface card Follow these steps to remove an interface card 1 Turn off the printer 2 Unplug the printer s power cord from the electrical outlet 3 Face the back of the printer 4 Remove all interface cables from the interface connectors 5 Remove the tworetainingscrews that fasten the interface card to the printer 6 Pull the interface card out 7 Replace the original interface slot cov...

Page 159: ...4 78 Using Options ...

Page 160: ...Transportation 5 1 Chapter 5 Maintenance and Transportation Replacing the Imaging Cartridge 5 2 Cleaning the Printer 5 6 Cleaning the inside of the printer 5 6 Cleaning the printer case 5 8 Transporting the Printer 5 8 ...

Page 161: ...ions see Setup Menu on page 3 24 Once the toner level is displayed on the LCD panel simply count the asterisks between the E empty and the F full Each asterisk represents about 25 of the total toner capacity If you see only one asterisk on the LCD panel prepare a replacement imaging cartridge Replace the cartridge with the S051068 imaging cartridge even if the cartridge you remove has a different ...

Page 162: ...cover A w Warning Do not touch the hot areas indicated by the caution labels inside the printer cover 3 Remove the imaging cartridge by pulling the handles on the front of the cartridge toward you 4 Dispose of the used imaging cartridge as a nonburnable item CAUTION Hot Surface Avoid Contact ...

Page 163: ...5 While holding the new imaging cartridge horizontally gently shake it a few times to distribute the toner evenly c Caution Do not turn the imaging cartridge upside down Do not expose the imaging cartridge to room light any longer than necessary Overexposing the cartridge may cause abnormally dark or light areas to appear on the printed page and reduce the life of the cartridge ...

Page 164: ...e with your hand and remove the tape then take your hand away slowly w Warning When you remove the tape the handle may spring up quickly enough to hurt your fingers To avoid this hold the handle firmly while peeling off the tape 7 Pick up the imaging cartridge by the carrying handles and insert the cartridge all the way into the printer ...

Page 165: ...inter The printer needs only minimal cleaning If you notice a decline in print quality clean the inside of the printer as described below You should also clean the outside ofthe printer everyfew months These procedures are described later in this section Cleaning the inside of the printer Follow these steps to clean the inside of the printer 1 Make sure the printer is turned off ...

Page 166: ...tion label If the printer has been in use the fuser may be hot Do not touch it Let the printer cool before you clean the inside 3 Wipe the inside with a soft clean cloth 4 Remove the imaging cartridge from the printer 5 Carefully remove any dirt with a soft cloth 6 Reinstall the imaging cartridge CAUTION Hot Surface Avoid Contact ...

Page 167: ...lectronic components Transporting the Printer If you need to transport your printer carefully repack it using the original box and packing materials Follow these steps to repack the printer 1 Turn off the printer 2 Open cover A and remove the imaging cartridge 3 Unplug the power cord from the electrical outlet 4 Disconnect all interface cables from the printer 5 Remove all installed options For in...

Page 168: ...ed and paper jam problems 6 2 Clearing paper jams 6 3 Solving printer operation problems 6 12 Solving print quality problems 6 14 Solving printer option problems 6 18 Status and Error Messages 6 18 Hex Dump Mode 6 29 Resetting the Printer 6 29 Reformatting the Hard Disk Drive 6 30 Where to Get Help 6 31 ...

Page 169: ...es shown on the printer s LCD panel Printer Problems Preventing paper feed and paper jam problems To prevent frequent paper feed or paper jam problems use this checklist of corrective measures Use a high quality paper that is not too thin or too rough Fan the stack of paper and tap its edges to align it before loading Be sure that you do not load too much paper into the paper cassettes Be sure to ...

Page 170: ...areas where jams may be occurring such as LC1 standard lower cassette or A cover A See the relevant sections for instructions on clearing paper jams Note Check for jams at all paper sources or paths indicated on the LCD panel The printer cannot resume printing until all the jams are cleared The LCD panel displays up to four paper sources or paths at the same time Other areas where jams may be occu...

Page 171: ...bered LC1 and any optional 500 Sheet Lower Cassette Units and the Large Capacity Paper Unit are numbered LC2 LC3 and so on from top to bottom Follow these steps to clear paper jammed in the optional lower cassettes 1 Pull out the cassette indicated on the LCD panel 2 Carefully remove any paper you find jammed inside the cassette or printer A D C2 C3 C1 C1 C2 C3 B E F G MP LC1 LC2 LC3 MP LC1 LC2 LC...

Page 172: ...d on the LCD panel until all error messages disappear When the paper jam is cleared completely the jammed page s print data is automatically reprinted Jam A Jam B This message indicates that there may be a paper jam inside cover A or cover B on the right side of the printer Follow these steps to clear paper jammed inside cover A or B 1 Gently open cover A Note Because the toner on the paper inside...

Page 173: ... opening the printer do not touch the hot areas indicated by caution labels inside cover A 2 Remove any paper you find jammed inside the printer 3 If you do not see any paper inside cover A open cover B CAUTION Hot Surface Avoid Contact ...

Page 174: ...essage indicates that there may be a paper jammed inside cover C1 C2 or C3 on the right side of the lower cassettes Follow these steps to clear paper jammed inside the right covers of the lower cassettes 1 Open the cover indicated on the LCD panel The names of the cassettes are indicated on each cassette Note Because the toner on the paper inside the printer may not have been fixed on the page ton...

Page 175: ...ally reprinted Jam D This message indicates that there may be a paper jam inside the cover of the Duplex Unit which is also known as cover D Follow these steps to clear paper jammed inside the cover of the Duplex Unit 1 Open cover D Note Because the toner on the paper inside the printer may not have been fixed on the page toner may come off on your hands when you remove the paper If you spill tone...

Page 176: ...r jam inside cover E on the back of the 5 Bin Multi Purpose Unit Follow these steps to clear paper jammed inside the cover of the 5 Bin Multi Purpose Unit 1 Open cover E Note Because the toner on the paper inside the printer may not have been fixed on the page toner may come off on your hands when you remove the paper If you spill toner on your clothing rinse it off with cold water Using hot water...

Page 177: ...m inside cover F on the paper guide of the 10 Bin Multi Purpose Unit Follow these steps to clear paper jammed inside the 10 Bin Multi Purpose Unit s paper guide 1 Open cover F Note Because the toner on the paper inside the printer may not have been fixed on the page toner may come off on your hands when you remove the paper If you spill toner on your clothing rinse it off with cold water Using hot...

Page 178: ...Purpose Unit Follow these steps to clear paper jammed at the back of the 10 Bin Multi Purpose Unit 1 Move the 10 Bin Multi Purpose Unit away from the printer 2 Open cover G on the back of the 10 Bin Multi Purpose Unit Note Because the toner on the paper inside the printer may not have been fixed on the page toner may come off on your hands when you remove the paper If you spill toner on your cloth...

Page 179: ...tlet is controlled by an outside source such as a wall switch make sure the switch is turned on or plug another electrical device into the outlet to check whether the outlet is operating properly The On Line light is on but nothing prints Your computer may not be properly connected to the printer Refer to the connecting instructions in the Setup Guide The interface cable may not be securely plugge...

Page 180: ...ed in securely Make sure you use a double shielded twisted pair parallel interface cable no longer than 1 8 meters six feet in length The Image Optimum setting may be set to Auto or On If it is certain unexpected fonts may be printed to increase the printing speed Turn the Image Optimum setting off in the SelecType Config Menu The emulation setting for that port may not be correct Specify the corr...

Page 181: ...n page 3 9 for more information Your settings may have been changed by your application software Perform a factory reset initialize with the SelecType Init function in the SelecType Setup Menu For more information see Setup Menu on page 3 24 You may not have reset the printer after making settings Press the ALTand Continue buttons atthe same time to reset the printer and activate the new settings ...

Page 182: ... prints a blank page Install a new imaging cartridge as described in Replacing the Imaging Cartridge on page 5 2 Uneven darkness Take out the imaging cartridge shake it from side to side and reinstall it Your paper may be moist or damp Printing is sensitive to moisture absorbed by the paper Do not store your paper in a humid or damp environment Install a new imaging cartridge as described in Repla...

Page 183: ...roken Smooth high quality copier paper is recommended for best results See Paper Specifications on page A 2 for information on choosing paper Completely blank pages Check the Toner function in the SelecType Setup Menu If the Toner message indicates that the amount of toner is low E F replace the imaging cartridge as described in Replacing the Imaging Cartridge on page 5 2 Check that the imaging ca...

Page 184: ...The Toner Save mode may be on Turn off the Toner Save mode by using the control panel s OneTouch mode 2 or SelecType Config Menu Image is too dark Darken the Density setting in the Expanded Settings dialog box accessed through the Optional Settings tab of the printer driver You can also change this setting from the printer s control panel using SelecType For details see Config Menu on page 3 20 If...

Page 185: ...n hold a maximum of 500 sheets and the Large Capacity Paper Unit can hold 2 500 sheets of 75g m 20 lb paper Even with additional memory installed complex pages don t print and a Mem Overflow message still appears The Page Protect setting in the printer driver or SelecType may need to be changed You may not have enough memory installed Printing at 300 dpi may solve the problem When printing in Mult...

Page 186: ...erly reinstallthe Duplex Unit To clear the error message 1 press Continue or 2 reset the printer by pressing the ALT and Reset buttons at the same time Check Duplex P Size This message appears when the paper you loaded differs from the paper size selected in the printer driver s Basic Settings tab or SelecType Load the correct paper size or change the paper size setting then open the Duplex Unit c...

Page 187: ...P tray is open Pull up the latch on cover A then close the cover firmly w Warning Do not touch the hot areas indicated on the caution labels inside cover A If you still cannot close the cover the imaging cartridge may not be installed correctly Reinstall the imaging cartridge as described in Replacing the Imaging Cartridge on page 5 2 Cover C1 C2 C3 Open The cover on the right side of the standard...

Page 188: ...x printing The printer prints only on the top side and ejects the paper To correct this error follow the directions below If Auto Cont is set to Off in the SelecType Config Menu 1 press the Continue button or 2 reset the printer by pressing the ALT and Reset buttons at the same time If Auto Cont is set to On in the SelecType Config Menu the error is corrected automatically Face down Full The face ...

Page 189: ...nter is offline and data remains in the printer s memory press the Form Feed button to print out the data and clear the buffer After printing Ready appears on the LCD panel HDD CHECK The printer is checking the optional Hard Disk Drive Image Optimum The printer cannot print at the requested quality level because of insufficient memory and the printer reduces the quality automatically so that it ca...

Page 190: ...3 A PostScript 3 ROM module not supported by this printer is installed or a supported module is installed incorrectly See Adobe PostScript 3 ROM Module on page 4 66 to make sure you are using the correct PostScript3 module If you are try reinstalling the module Invalid ROM A The ROM module in slot A is not supported by this printer or a supported module is installed incorrectly See Adobe PostScrip...

Page 191: ...then press the On Line button The printer feeds paper according to the Paper Source setting If you do not want to print this job in the manual feed mode press Continue For detailed information on the manual feed mode see Printing one sheet at a time on page 2 13 Mem Overflow The printer has insufficient memory available for the current task To correct this error do one of the following 1 press the...

Page 192: ...ed in Installing the 10 Bin Multi Purpose Unit on page 4 36 then press Continue Need Memory Yourprinterlacks theprintermemoryrequiredtoprintyourprint job Reduce the amount of images or text in the print job or install an optional memory module See Memory Modules on page 4 55 Offline The printer is not ready to print Outbin Select Error The printer cannot feed paper to the output tray you selected ...

Page 193: ...eat PressContinue to resume printing If this message appears again change the Page Protect setting in the SelecType Config Menu PS3 Hard Disk Full The writing of PostScript 3 commands on the optional Hard Disk Drive is no longer possible as the amount of space allocated to PostScript 3 on the Hard Disk Drive is used up Ready The printer is ready to receive data and print Remove Output Paper This m...

Page 194: ...et the printer by pressing the ALT and Reset buttons at the same time ROM CHECK The printer is checking the ROM RAM CHECK The printer is checking the RAM Self Test The printer is performing a quick internal check Service Req xxxx A controller error or a print engine error has been detected Write down the error number listed on the LCD panel xxxx and turn off the printer Wait at least five seconds ...

Page 195: ... to It is also possible that writing to the ROM in slot A began but did not complete properly To correct this error do one of the following 1 turn off the printer and remove the ROM then turn on the printer or 2 reset the printer by pressing the ALT and Reset buttons at the same time Write Error ROM P The program ROM cannot be written to It is also possible that writing to the ROM was not complete...

Page 196: ...ke sure the paper is loaded and the printer is off 2 Hold down the Form Feed button while you turn on the printer Make sure you hold the button down until you see the message HEX Dump on the LCD panel 3 Run any program that causes the printer to print Your printer prints out all the codes it receives in hexadecimal format 4 To turn off the Hex Dump mode turn off the printer or reset it by pressing...

Page 197: ... interfaces by holding down the ALT and Reset buttons until Reset All appears on the LCD panel You can also reset all emulation modes and interfaces by turning the printer off and back on again Note Reset All clears all print jobs received from all interfaces be careful not to disrupt someone else s print job Reformatting the Hard Disk Drive To reformat the Hard Disk Drive follow the instructions ...

Page 198: ...operating properly and you cannot solve your problem with the troubleshooting information in this guide and online help contact EPSON customer support services for assistance We will be able to help you much more quickly if you are able to give the exact information indicated below Serial number of your printer The serial number label is on the back of the printer Printer model Brand and model of ...

Page 199: ...6 32 Troubleshooting ...

Page 200: ...A 5 Safety approvals A 5 Mechanical A 6 Electrical A 7 Interface A 7 Parallel interface A 7 Ethernet interface A 14 Options and Consumables A 15 500 Sheet Lower Cassette Unit A 15 Large Capacity Paper Unit A 16 Duplex Unit A 17 5 Bin Multi Purpose Unit A 18 10 Bin Multi Purpose Unit A 19 Memory Module A 19 Imaging cartridge A 20 ...

Page 201: ...nnot guarantee the quality ofanytypeofpaper Always testsamplesofpaperstockbeforepurchasing large quantities or printing large jobs Note Use recycled paper under normal temperature and humidity conditions only Poor quality paper may reduce print quality cause paper jams and other problems Paper weight Paper types Plain paper recycled paper labels envelopes transparencies colored paper card stock le...

Page 202: ...in Government Legal 216 330 mm 8 5 13 in Ledger 279 432 mm 11 17 in Government Letter 203 267 mm 8 10 5 in F4 210 330 mm 8 3 13 in Supported paper size range 86 140 mm to 297 432 mm 3 4 5 5 in to 11 7 17 in Envelopes Monarch 98 191 mm 3 9 7 5 in Commercial 10 105 241 mm 4 1 9 5 in DL 110 220 mm 4 3 8 7 in C5 162 229 mm 6 4 9 in C6 114 162 mm 4 5 6 4 in International B5 176 250 mm 7 9 8 in Printabl...

Page 203: ...d paper source First page printing time 11 2 seconds minimum on A4 or Letter size paper Warm up time 60 seconds maximum at rated voltage Paper feed Automatic or manual feed Paper feed alignment Center alignment for all paper sizes Input paper supply 75 g m paper Up to 250 sheets in the MP tray and up to 500 sheets in the lower cassette Paper type MP tray Plain paper such as copier paper and recycl...

Page 204: ... P 2 mode ESC P 9 pin printer emulation FX mode IBM Proprinter emulation I239X mode Optional emulation Adobe PostScript 3 Resident fonts 80 scalable fonts and one bitmap font in LJ4 mode and PCL6 mode RAM 16 MB expandable up to 256 MB Temperature operation 10 to 35 C 50 to 95 F storage 0 to 35 C 32 to 95 F Humidity operation 15 to 85 RH storage 15 to 85 RH Altitude 2 500 meters 8 200 feet maximum ...

Page 205: ...2 class B EN 50082 1 IEC 60801 2 IEC 60801 3 IEC 60801 4 EN 61000 3 2 EN 61000 3 3 Australian model AS NZS 3548 class B Dimensions and weight Height 428 mm 16 9 inches Width 535 mm 21 1 inches Depth 559 mm 22 inches in depth Weight Approx 30 kg 66 1 lb without the imaging cartridge Durability 5 years or 600 000 sheets whichever comes first ...

Page 206: ...e below The column heading Direction refers to the direction of signal flow as viewed from the printer 120 V model 230 V model Voltage 108 V to 132 V 198 V to 264 V Rated frequency 50 Hz to 60 Hz Rated current 11 A 6 A Power consumption Less than 1050 W Less than 1050 W Powerconsumption in Standby mode Less than 45 W Pin No Direction IEEE 1284 B connector Compatibility Nibble ECP 1 IN nStorbe Host...

Page 207: ...eriphAck 12 OUT PError AckDataReq nAckReverse 13 OUT Select Xflag 14 IN nAutoFd HostBusy HostAck 15 NC 16 GND 17 CG 18 OUT PeripheralLogic High 19 30 GND 31 IN nlnit nReverse Request 32 OUT nFault nDataAvail nPeriphRequest 33 GND 34 NC 35 OUT 5V 36 IN nSelectln IEEE1284 Active Pin No Direction IEEE 1284 B connector Compatibility Nibble ECP ...

Page 208: ...d in print data When low DATA is valid Negotiation phase Latch pulse used to read in extensibility request values Nibble mode Always high ECP mode Used to transfer data and addresses from the host to the printer with handshaking via PeriphAck Busy Compatibility mode Forward channel data Negotiation phase Extensibility request value Nibble mode Not used ECP mode Bidirectional data ...

Page 209: ...n switched from low to high generates an interrupt that notifies the host that there is data available ECP mode Used to transfer data from the printer to the host with handshaking via HostAck nAutoFd Compatibility mode Highsignalindicatesthattheprinterisnot ready to receive data Negotiation phase Reflects the BUSY status of the forward channel Reverse data transfer phase In nibble mode this signal...

Page 210: ... 2 and then 6 Reverse final phase High until the host requests a data transfer This signal conforms with nDataAvail nFault ECP mode Low signal authorizes nReverseRequest The host looks at this signal in order to determine whether or not it has permission to drive the data signals Compatibility mode Always high Negotiation phase Xflag indicates the extensibility flag Used to respond to the extensib...

Page 211: ...g this signal low indicates to the printer that the host is ready to receive data When this signal is subsequently set high it indicates that the host received the data Reverse idle phase This signal is set high in response to a PtrClk nAck low pulse in order to return to reverse data phase If this signal is set high at the same time that IEEE 1284 Active nSelectIn is set low the IEEE 1284 idle ph...

Page 212: ...ity mode Low signal indicates that an error occurred Negotiation phase This signalis set high in order to authorize 1284 compatibility In nibble mode after the host sets HostBusy nAutoFd high this signal is set low in order to indicate that the transmission data is ready Reverse data transfer phase This signal is set low in order to indicate to a nibble mode host that the transmission data is read...

Page 213: ...ector Compatibility mode Always low Negotiation phase This signal is set high at the same time that HostBusy is low in order to request 1284 mode Reverse data transfer phase This signal is set high to indicate that the bus direction is from the printer to the host This signal is set low to terminate 1284 mode setting the bus direction from the host to the printer Reverse idle phase Same as reverse...

Page 214: ...d delivery system Cassette capacity Up to 500 sheets 75 g m or 20 lb paper First print with A4 Letter 12 seconds Continuous printing speed with A4 Letter 27 pages per minute Paper types Plain paper such as copier paper and recycled paper Power supply DC 5V and 24V supplied by the printer Dimensions and weight Height 127 5 mm 5 inches Width 535 mm 21 1 inches Depth 544 mm 21 4 inches Weight 8 kg 17...

Page 215: ...m Cassette capacity Up to 2 500 sheets 75 g m or 20 lb paper First print with A4 Letter 12 seconds Continuous printing speed with A4 Letter 27 pages per minute Paper types Plain paper such as copier paper and recycled paper Power supply DC 5V and 24V supplied by the printer Dimensions and weight Height 284 mm 11 2 inches Width 535 mm 21 1 inches Depth 545 mm 21 5 inches Weight 17 kg 37 5 lb ...

Page 216: ...Paper weight 60 to 90 g m 16 to 24 lb Feeding speed 20 1 seconds or less for the first A4 or Letter size sheet 16 9 pages per minute for subsequent sheets from MP tray to face down tray Power supply DC 5V and 24V supplied by the printer Dimensions and weight Height 255 mm 10 inches Width 55 mm 2 2 inches Depth 415 mm 16 3 inches Weight 2 kg 4 lb ...

Page 217: ...ycled paper card stock envelopes transparencies labels thick paper for Bin 1 only Paper weight 60 to 90 g m 16 to 24 lb Output capacity Bin1 250 sheets Bin 2 Bin 3 Bin 4 50 sheets Bin 5 100 sheets Total 500 sheets Power supply DC 5V and 24V supplied by the printer Dimensions and weight Height 356 mm 14 inches Width 481 mm 18 9 inches Depth 543 mm 21 4 inches Weight 12 2 kg 26 9 lb ...

Page 218: ...to 24 lb Output capacity Bin 1 to Bin 10 200 sheets Total 2 000 sheets Power supply DC 5V and 24V supplied by the printer Dimensions and weight Height 863 mm 34 inches Width 480 mm 19 inches Depth 512 mm 20 2 inches Weight 29 5 kg 65 lb DRAM type Synchronous Dynamic RAM Dual In line Memory Module SDRAM DIMM Memory size 16 MB 32 MB 64 MB 128 MB or 256 MB Type 168 pin type 64 bit with SPD Access spe...

Page 219: ...ng If you print a few pages at a time or print dense text exceeding the 5 print ratio your cartridge may print fewer pages Storage temperature 0 to 35 C 32 to 95 F Storage humidity 15 to 85 RH Shelf life 18 months after production Life Up to 15 000 pages under the following conditions Letter or A4 size paper continuous printing and 5 print ratio ...

Page 220: ... Symbol Sets B 2 In LJ4 Emulation EPSON GL2 Mode B 3 International character sets for ISO B 25 In ESC P2 or FX Modes B 26 International character sets B 33 Characters available with the ESC command B 34 In I239X Emulation Mode B 34 In EPSON GL 2 Mode B 34 ...

Page 221: ...ally you would probably never need to adjust the printer s settings However if you are writing your own printer control programs or if you are using older software that cannot control fonts refer to the following sections for symbol set details When you are considering which font to use you should also consider which symbol set to combine with the font Available symbol sets vary depending on which...

Page 222: ...r 8859 15 ISO 9N 76 typefaces Line Printer PcBlt775 26U 76 typefaces IBM DN 11U 76 typefaces Line Printer PcMultilingual 12U 76 typefaces Line Printer PcE Europe 17U 76 typefaces PcTk437 9T 76 typefaces PcEur858 13U 76 typefaces Line Printer Pc1004 9J 76 typefaces WiAnsi 19U 76 typefaces WiE Europe 9E 76 typefaces WiTurkish 5T 76 typefaces WiBALT 19L 76 typefaces DeskTop 7J 76 typefaces PsText 10J...

Page 223: ...nsion 3Q OCR B Code 39 0Y Code 39 2 types EAN UPC 8Y EAN UPC 2 types Courier SWC Dutch 801 SWC Zapf Humanist 601 SWC Ribbon 131 SWC Clarendon Condensed SWC Swiss 742 SWC Swiss 742 Condensed SWC Incised 901 SWC Original Garamond SWC Audrey Two SWC Flareserif 821 SWC Swiss 721 SWM Dutch 801 SWM Swiss 721 SWA Swiss 721 Narrow SWA Zapf Calligraphic 801 SWA ITC Avant Garde SWA ITC Bookman SWA Century S...

Page 224: ...Symbol Sets B 5 IBM US 10U Roman 8 8U ...

Page 225: ...B 6 Symbol Sets Roman Extension 0E Roman 9 4U ...

Page 226: ...Symbol Sets B 7 ECM94 1 0N 8859 2 ISO 2N ...

Page 227: ...B 8 Symbol Sets 8859 9 ISO 5N 8859 10 ISO 6N ...

Page 228: ...Symbol Sets B 9 8859 15 ISO 9N PcBlt775 26U ...

Page 229: ...B 10 Symbol Sets IBM DN 11U PcMultilingual 12U ...

Page 230: ...Symbol Sets B 11 PcE Europe 17U PcTk437 9T ...

Page 231: ...B 12 Symbol Sets PcEur858 13U Pc1004 9J ...

Page 232: ...Symbol Sets B 13 WiAnsi 19U WiE Europe 9E ...

Page 233: ...B 14 Symbol Sets WiTurkish 5T WiBALT 19L ...

Page 234: ...Symbol Sets B 15 DeskTop 7J PsText 10J ...

Page 235: ...B 16 Symbol Sets VeInternational 13J VeUS 14J ...

Page 236: ...Symbol Sets B 17 MsPublishing 6J Math 8 8M ...

Page 237: ...B 18 Symbol Sets PsMath 5M VeMath 6M ...

Page 238: ...Symbol Sets B 19 PiFont 15U Legal 1U ...

Page 239: ...B 20 Symbol Sets Windows 9U McText 12J ...

Page 240: ...Symbol Sets B 21 Symbol 19M Wingdings 579L ...

Page 241: ...B 22 Symbol Sets OCR A 0O OCR B 1O ...

Page 242: ...Symbol Sets B 23 OCR B Extension 3Q Code 39 0Y ...

Page 243: ...B 24 Symbol Sets EAN UPC 8Y International character sets for ISO To obtain the symbol sets listed below substitute the characters in the ANSI ASCII sets with the characters in the table below ...

Page 244: ...B 5C 5D 5E 60 7B 7C 7D 7E ANSI ASCII 0U Norweg 1 0D French 0F HP German 0G Italian 0l JlS ASCII 0K Swedis 2 0S Norweg 2 1D UK 1E French 2 1F German 1G HP Spanish 1S Chinese 2K Spanish 2S IRV 2U Swedish 3S Portuguese 4S IBM Portuguese 5S IBM Spanish 6S ...

Page 245: ...le available available not available EPSON Prestige available available not available available not available EPSON Roman available available not available available not available EPSON Sans serif available available not available available not available Swiss 721 SWM available available available available not available Letter Gothic SWC available available available available not available Dutch...

Page 246: ...Symbol Sets B 27 Pc 437 U S Standard Europe Pc 850 Multilingual Pc 860 Portuguese ...

Page 247: ...B 28 Symbol Sets Pc 863 Canadian French Pc 865 Nordic Roman 8 ...

Page 248: ...Symbol Sets B 29 8859 15 ISO Pc 857 Turkish ...

Page 249: ...B 30 Symbol Sets Pc 861 Icelandic Pc 852 East Europe ...

Page 250: ...Symbol Sets B 31 BRASCII Abicomp ISOLatin 1 ...

Page 251: ...B 32 Symbol Sets Pc858 OCR A ...

Page 252: ... can select one of the following international character sets using the Remote Control Panel utility or the ESC R command Available for ESC P 2 emulation only Country ASCII code hex 23 24 40 5B 5C 5D 5E 60 7B 7C 7D 7E USA France Germany UK Denmark Sweden Italy Spain Japan Norway Denmark II Spain II Latin America Korea Legal ...

Page 253: ... mode are Pc437 Pc850 Pc858 Pc860 Pc863 and Pc865 See In ESC P2 or FX Modes on page B 26 The available fonts are EPSON Sans Serif Courier SWC EPSON Prestige EPSON Gothic EPSON Presentor EPSON Orator and EPSON Script In EPSON GL 2 Mode The available symbol sets in the EPSON GL 2 mode are the same as those in LaserJet 4000 emulation mode See In LJ4 Emulation EPSON GL2 Mode on page B 3 ...

Page 254: ...tion C 2 LaserJet 4000 PCL5e LJ4 Emulation Commands C 3 GL 2 context commands C 10 ESC P 2 and FX Commands C 13 ESC P 2 mode C 13 FX mode C 17 PJL Commands C 22 I239X Emulation Commands C 23 Page format C 24 Text C 25 Auxiliary functions C 28 AGM mode C 28 ...

Page 255: ...r some have operational differences because the printers use different technologies For more information on selecting emulation modes see Emulation Menu on page 3 13 For information on character sets supportedin each emulation mode see Appendix B Symbol Sets LJ 4 Hewlett Packard LaserJet 4000 PCL5e ESC P2 EPSON LQ 570 1070 LQ 2170 24 pin FX EPSON FX 870 1170 FX 880 or LX 100 9 pin GL 2 Hewlett Pac...

Page 256: ... C 3 LaserJet 4000 PCL5e LJ4 Emulation Commands This section lists the printer commands supported in the LJ4 emulation mode For more information on printer commands see Hewlett Packard s LaserJet 4000 reference manual ...

Page 257: ...nit of measure ESC u D Simplex Duplex print ESC l S Output Media bin selection ESC l G Paper Media source ESC l H Page size ESC l A Page length ESC l P Orientation ESC l O Print direction ESC a P Top margin ESC l E Text length ESC l F Left margin ESC a L Right margin ESC a M Clear horizontal margins ESC 9 Perforation skip ESC l L Horizontal Motion Index HMI ESC k H Vertical Motion Index VMI ESC l ...

Page 258: ...Command Summary C 5 Line spacing ESC l D Alphanumeric ID Media selection by type only ESC n W operation string ...

Page 259: ...mbol set ESC id Secondary symbol set ESC id Primary spacing ESC s P Secondary spacing ESC s P Primary pitch ESC s H Secondary pitch ESC s H Set pitch mode ESC k S Primary height ESC s V Secondary height ESC s V Primary style ESC s S Secondary style ESC s S Primary font stroke weight ESC s B Secondary font stroke weight ESC s B Primary typeface family ESC s T Secondary typeface family ESC s T Prima...

Page 260: ...Command Summary C 7 Secondary font default ESC 3 Enable underline ESC d D Disable underline ESC d Transparent print data ESC p X data ...

Page 261: ...D ESC X Select secondary font with ID ESC X Font descriptor ESC s W data Download character ESC s W data Character code ESC c E Raster resolution ESC t R Raster graphics presentation ESC r F Start raster graphics ESC r A Raster Y offset ESC b Y Set raster compression mode ESC b M Transfer raster data by row ESC b W data End raster graphics version B ESC rB End raster graphics version C ESC rC Rast...

Page 262: ...tangle height PCL unit ESC c B Rectangle height decipoints ESC c V Fill rectangular area ESC cP Pattern ID ESC c G Define pattern ESC c W data User defined pattern control ESC c Q Set pattern reference point ESC p R Macro ID ESC f Y Macro control ESC f X Set status readback location type ESC s T Set status readback location unit ESC s U Inquire status readback entity ESC s I Flush all pages ESC r ...

Page 263: ...tions ESC Y Disable display functions ESC Z Enter GL 2 mode ESC B GL 2 plot horizontal size ESC c K GL 2 plot vertical size ESC c L Set picture frame anchor point ESC c0T Picture frame horizontal size ESC c X Picture frame vertical size ESC c Y Enter PCL mode ESC A Reset ESC E Primary font FI Secondary font FN Scalable or bitmapped fonts SB Transparency mode TR Screened vectors SV Number of pens N...

Page 264: ... Bezier relative BR Plot absolute PA Plot relative PR Pen down PD Pen up PU Relative arc three point RT Polyline encoded PE Circle CI Fill rectangle absolute RA Fill rectangle relative RR Edge rectangle absolute EA Edge rectangle relative ER Fill wedge WG Edge wedge EW Polygon mode PM Fill polygon FP Edge polygon EP Circle CI ...

Page 265: ...acter size SI Relative character size SR Character slant SL Extra space ES Standard font definition SD Alternate font definition AD Character fill mode CF Label origin LO Label LB Define label terminator DT Character plot CP Transparent data TD Define variable text path DV Line type LT Line attribute LA Pen width PW Pen width unit selection WU Select pen SP Symbol mode SM ...

Page 266: ... and FX emulation modes ESC P 2 mode General operation Fill type FT Anchor corner AC Raster fill definition RF User defined line type UL Scale SC Input window IW Input P1 and P2 IP Input relative P1 and P2 IR Default values DF Initialize IN Rotate coordinate system RO Comment CO Initialize printer ESC Control paper loading ejecting ESC EM n ...

Page 267: ...SC 2 Set n 180 inch line spacing ESC 3 n Set n 360 inch line spacing ESC n Set page format ESC c nn Set page length in defined units ESC C nn Set page length in lines ESC C n Set page length in inches ESC C NUL Set bottom margin for continuous paper ESC N n Cancel top bottom margin for continuous paper ESC O Set left margin ESC l n Set right margin ESC Q n ...

Page 268: ...tally HT Set vertical tabs ESC B nn Tab vertically VT Perform n 180 inch line feed ESC J n Reverse n 180 inch line feed ESC j n Select typeface ESC k n Select font by pitch and point ESC X nn Select 10 cpi ESC P Select 12 cpi ESC M Select 15 cpi ESC g Select proportional mode on off ESC p 1 0 Select Letter Quality or draft ESC x n Select italic font ESC 4 Cancel italic font ESC 5 Select bold font ...

Page 269: ...le strike printing ESC G Cancel double strike printing ESC H Select superscript subscript printing ESC Sn Select condensed printing ESC S I Cancel superscript subscript printing ESC T Select line score ESC nn Turn underline on off ESC 1 0 Select character style ESC q n Select double width printing one line ESC SO Set intercharacter space ESC SP n Define unit ESC U nn Assign character table ESC t S...

Page 270: ...escribes allFXand LQcommands by topic Copy ROM to RAM ESC Select user defined set ESC n Set upper control codes ESC 6 Cancel upper control codes ESC 7 Print data as characters ESC Select bit image printing ESC Select graphic mode ESC G nn Print raster graphics ESC c v hm ...

Page 271: ... paper loading ejecting ESC EM n Carriage return CR Form feed FF Set page length in lines ESC C n Set page length in inches ESC C NUL Set skip over perforation ESC N n Cancel skip over perforation ESC O Line feed LF Select 1 8 inch line spacing ESC 0 Select 7 72 inch line spacing ESC 1 Select 1 6 inch line spacing ESC 2 Select n 216 inch line spacing ESC 3 n Perform n 216 inch line spacing ESC J T...

Page 272: ...if you send the ESC x command Set absolute horizontal print position ESC n1 n2 Set relative horizontal print position ESC n1 n2 Set left margin ESC l n Set right margin ESC Q n Tab horizontally HT Set horizontal tabs ESC D nn Select letter quality or draft ESC x n Select typeface family ESC k n Set printing mode ESC n ...

Page 273: ...SI Cancel condensed printing DC2 Select double width printing one line SO Cancel double width printing one line DC4 Turn double width printing on off ESC W 1 0 Turn double height printing on off ESC w 1 0 Select bold font ESC E Cancel bold font ESC F Select double strike printing ESC G Cancel double strike printing ESC H Select superscript subscript printing ESC Sn Cancel superscript subscript pri...

Page 274: ...n actual FX printer Set intercharacter space ESC SP n Select character tables ESC t n Assign character tables ESC t nn Select international character set ESC R n Set upper control codes ESC 6 Cancel upper control codes ESC 7 Define user defined characters ESC Copy ROM to RAM ESC Select user defined set ESC n Set upper control codes ESC I n ...

Page 275: ...Select 9 dot bit image printing ESC m n COMMENT PJL COMMENT words CR LF DEFAULT PJL DEFAULT LPARM variable value CR LF DINQUIRE PJL DINQUIRE LPARM variable CR LF ECHO PJL ECHO Words CR LF ENTER PJL ENTER LANGUAGE CR LF EOJ PJL EOJ NAME CR LF INFO PJL INFO read only variable CR LF INITIALIZE PJL INITIALIZE CR LF INQUIRE PJL INQUIRE LPARM variable CR LF JOB PJL JOB NAME START END CR LF OPMSG PJL OPM...

Page 276: ...s supported in the I239X emulation mode For more information on these commands see IBM s 2390 2391 reference manual SET PJL SET LPARM variable value CR LF STMSG PJL STMSG DISPLAY CR LF UEL ESC 12345X USTATUS PJL USTATUS variable value CR LF USTATUSOFF PJL USTATUSOFF CR LF PJL PJL CR LF ...

Page 277: ...perforation ESC O Set horizontal margins ESC X Set line space to 1 8 inch ESC 0 Set line space to 7 72 inch ESC 1 Activate line spacing for text ESC 2 Set line spacing for graphics n 180 n 216 or n 360 inch ESC 3 n Set line spacing for text n 72 inch ESC A n Set vertical units 1 180 1 216 or 1 360 inch ESC Set vertical tab stops ESC B Set default tab stops ESC R Set horizontal tab stops ESC D ...

Page 278: ... 5 Reverse line feed ESC Back space BS Space SP Horizontal tab HT Vertical tab VT Move current print position 1 120 inch ESC d Set top of form ESC 4 Select 10 pitch font DC2 Select 12 pitch font ESC Start 17 cpi printing SI Start 17 cpi printing ESC SI Proportional spacing ESC P Begin subscript superscript ESC S End subscript superscript ESC T Select font and pitch ESC I Select print or font ESC I...

Page 279: ...C 26 Command Summary Select character set 2 ESC 6 Select character set 1 ESC 7 Select page code ESC T Print one character ESC Print character from A Code Page ESC Select character quality ESC d ...

Page 280: ...ouble width printing by line DC4 Double width printing ESC W Begin emphasized bold print ESC E End emphasized bold print ESC F Begin double strike print ESC G End double strike print ESC H Normal density bit image graphics ESC K Double density bit image graphics half speed ESC L Double density bit image graphics normal speed ESC Y High density bit image graphics ESC Z Graphic print mode ESC g Bar ...

Page 281: ...ion Bit image Set initial conditions ESC K Cancel 1 line CAN Select paper tray ESC F Set line spacing for graphics n 180 n 216 or n 360 inch ESC 3 Set line spacing for text n 60 inch ESC A Move paper vertically n 180 n 216 or n 360 inch ESC J Line feed LF Normal density bit image graphics ESC K Double density bit image graphics half speed ESC L ...

Page 282: ...Command Summary C 29 Double density bit image graphics normal speed ESC Y High density bit image graphics ESC Z Graphic print mode ESC g Select graphic mode ESC ...

Page 283: ...C 30 Command Summary ...

Page 284: ...and Screen Fonts D 2 Available Fonts D 2 Adding Fonts D 7 Selecting Fonts D 8 Downloading Fonts D 8 EPSON BarCode Fonts D 9 System requirements D 10 Installing EPSON BarCode Fonts D 11 Printing with EPSON BarCode Fonts D 12 EPSON BarCode Font specifications D 16 ...

Page 285: ...an image or character The printer however uses an outline font that is created from a mathematical formula that describes the outline of each character Using outline fonts allows the printer to render any character in the requested size Note The distinction between printer and screen fonts is not as important when you are using TrueType fonts which are included with Windows TrueType is an outline ...

Page 286: ...Working with Fonts D 3 The fonts provided with the printer are shown below according to the emulation mode ...

Page 287: ...sed SWC Condensed Condensed Bold Condensed Italic Condensed Bold Italic Univers Condensed Incised 901 SWC Medium Bold Italic Antique Olive OriginalGaramond SWC Medium Bold Italic Bold Italic Garamond Audrey Two SWC Marigold Flareserif 821 SWC Medium Extra Bold Albertus Swiss 721 SWM Medium Bold Italic Bold Italic Arial Dutch 801 SWM Medium Bold Italic Bold Italic Times New Swiss 721 SWA Medium Bol...

Page 288: ...old Italic Bold Italic New Century Schoolbook Dutch 801 SWA Medium Bold Italic Bold Italic Times ITC Zapf Chancery SWA Italic ITC Zapf Chancery Medium Italic Symbol Set SWM Symbol Symbol Set SWA SymbolPS More WingBats SWM Wingdings ITC Zapf Dingbats SWA ITC Zapf Dingbats Letter Gothic SWC Medium Bold Italic Letter Gothic Courier SWA Medium Bold Italic Bold Italic CourierPS Line Printer Line Printe...

Page 289: ... P 2 and FX modes Available only in ESC P 2 mode Note Depending on the print density or on the quality or color of the paper OCR A and OCR B fonts may not be readable Print a sample and make sure the fonts can be read before printing large quantities Font name Family Courier SWC Medium Bold EPSON Prestige EPSON Roman EPSON Sans serif Swiss 721 SWM Medium Bold Letter Gothic SWC Medium Bold Dutch 80...

Page 290: ...Test menu Follow these steps to print font samples 1 Make sure that paper is loaded 2 Press Menu while the printer is online 3 Press Item until the font sample you want appears 4 Press Enter a Font Sample sheet is printed Adding Fonts You can install more fonts into your Windows operating system Most font packages include an installer for this purpose Font name Family Courier SWC Medium Bold EPSON...

Page 291: ... not include font selection you can select fonts with SelecType when in the LJ4 ESC P 2 FX or I239X menu Downloading Fonts Fonts that reside on your computer s hard disk can be downloaded or transferred to the printer so they can be printed Downloaded fonts also called soft fonts remain in printer memory until you turn off the printer or otherwise reinitialize it If you plan on downloading many fo...

Page 292: ...u to easily print barcodes that conform to a variety of barcode standards EPSON BarCode Fonts support the following types of barcodes Barcode Standard EPSON BarCode OCR B Check Digit Comments EAN EPSON EAN 8 Yes Yes Creates EAN abbreviated version barcodes EPSON EAN 13 Yes Yes Creates EAN standard version barcodes UPC A EPSON UPC A Yes Yes Creates UPC A barcodes UPC E EPSON UPC E Yes Yes Creates U...

Page 293: ...pecified with the font name EPSON ITF CD No Yes EPSON ITF CD Num Yes Yes EPSON ITF Num Yes No Codabar EPSON Codabar No No Printing of OCR B and check digits can be specified with the font name EPSON Codabar CD No Yes EPSON Codabar CD Num Yes Yes EPSON Codabar Num Yes No Printer EPSON EPL 5700EPL 5700i EPL 5700L EPL N1600 EPL N4000 EPL N4000 EPL C8000 EPL C8200 EPL N2700 ENL N2050 EPL N2750 or late...

Page 294: ...Fonts into the appropriate drive 3 Click Start point to Settings then click Control Panel 4 Double click Fonts Computer IBM PC series or IBM compatible with an i386SX or higher CPU Operating system Microsoft Windows 98 95 Windows 2000 NT 4 0 3 5x Hard disk 15 30 KB free space This differs depending on the font Printer driver EPSON EPL 5700 Advanced EPSON EPL 5700i Advanced EPSON EPL 5700L Advanced...

Page 295: ... you want to install or click the Select All button to install all EPSON BarCode Fonts 8 Click OK The selected EPSON BarCode Fonts are installed in the Windows Fonts folder Printing with EPSON BarCode Fonts Follow these steps to create and print barcodes using EPSON BarCode Fonts The application featured in these instructions is Microsoft WordPad The actual procedure may differ slightly when print...

Page 296: ...Working with Fonts D 13 1 Open a document in your application andenter the characters you want to convert to a barcode 2 Select the characters then select Font from the Format menu ...

Page 297: ...N BarCode Font you want to use then set the font size and click OK Note In Windows NT 4 0 3 5x you cannot use font sizes larger than 96 points when printing barcodes 4 The characters you selected appear as barcodes similar to those shown below ...

Page 298: ...inputting and formatting barcode characters Do not apply shading or special character formatting such as bold italic or underline Print barcodes in black and white only When rotating characters only specify rotation angles of 90 180 and 270 Monochrome Printer Driver Color Printer Driver Color not available Black Print Quality 600 dpi 600 dpi Toner Save Not selected Not selected Zoom Options Not se...

Page 299: ...N BarCode Font is selected the resulting barcode may have more characters than were originally input For best results use only the font sizes recommended in EPSON BarCode Font specifications on page D 16 for the EPSON BarCode Font you are using Barcodes in other sizes may not be readable with all barcode readers Note Depending on the print density or on the quality or color of the paper barcodes m...

Page 300: ...ed not be input by hand Left right margin Left right guard bar Center bar Check digit OCR B Print Sample EPSON EAN 13 EAN 13 is the standard 13 digit EAN barcode Character type Numbers 0 to 9 Number of characters Up to 7 characters Font size 52 pt to130 pt up to 96 pt in Windows NT Recommended sizes are 52 pt 65 pt standard 97 5 pt and 130 pt EPSON EAN 8 ...

Page 301: ...rgin Left right guard bar Center bar Check digit OCR B Print Sample EPSON UPC A UPC A is the UPC A standard barcode specified by the American Universal Product Code UPC Symbol Specification Manual Character type Numbers 0 to 9 Number of characters Up to 12 characters Font size 60 pt to150 pt up to 96 pt in Windows NT Recommended sizes are 60 pt 75 pt standard 112 5 pt and 150 pt EPSON EAN 13 ...

Page 302: ...des are inserted automatically and need not be input by hand Left right margin Left right guard bar Center bar Check digit OCR B Character type Numbers 0 to 9 Number of characters Up to 11 characters Font size 60 pt to150 pt up to 96 pt in Windows NT Recommended sizes are 60 pt 75 pt standard 112 5 pt and 150 pt ...

Page 303: ...mbol Specification Manual The following codes are inserted automatically and need not be input by hand Left right margin Left right guard bar Check digit OCR B The numeral 0 EPSON UPC A Character type Numbers 0 to 9 Number of characters Up to 6 characters Font size 60 pt to150 pt up to 96 pt in Windows NT Recommended sizes are 60 pt 75 pt standard 112 5 pt and 150 pt ...

Page 304: ...on it is important to keep at least one space between the barcode and the surrounding text to prevent overlapping Spaces in Code39 barcodes should be input as _ underbars When printing two or more barcodes on one line separate the barcodes with a tab or select a font other than a BarCode Font and input the space If a space is input while a Code39 font is selected the barcode will not be correct EP...

Page 305: ...C When the code set of a line of characters is changed in the middle of the line a conversion code is automatically inserted Font size When OCR B is not used 26 pt or more up to 96 pt in Windows NT Recommended sizes are 26 pt 52 pt 78 pt and 104 pt When OCR B is used 36 pt or more up to 96 pt in Windows NT Recommended sizes are 36 pt 72 pt 108 pt and 144 pt EPSON Code39 EPSON Code39 CD EPSON Code3...

Page 306: ...cations that automatically delete spaces from the ends of lines or change multiple spaces into tabs When printing two or more barcodes on one line separate the barcodes with a tab or select a font other than a BarCode Font and input the space If a space is input while Code128 is selected the barcode will not be correct The following codes are inserted automatically and need not be input by hand Le...

Page 307: ...is important to keep at least one space between the barcode and the surrounding text to prevent overlapping Interleaved 2 of 5 treats every two characters as one set When there are an odd number of characters EPSON ITF fonts automatically add a zero to the beginning of the character string EPSON Code128 Character type Numbers 0 to 9 Number of characters No limit Font size When OCR B is not used 26...

Page 308: ...t quiet zone Start Stop character Check digit The numeral 0 added to the beginning of character strings as needed Print Sample EPSON Codabar Four Codabar fonts are available allowing you to enable and disable the automatic insertion of check digits and OCR B EPSON ITF EPSON ITF CD EPSON ITF Num EPSON ITF CD Num ...

Page 309: ...entary character If neither a Start nor a Stop character is input these characters are automatically input as the letter A The following codes are inserted automatically and need not be input by hand Left right quiet zone Start Stop character when not input Check digit Character type Numbers 0 to 9 Symbols Number of characters No limit Font size When OCR B is not used 26 pt or more up to 96 pt in ...

Page 310: ...Working with Fonts D 27 Print Sample EPSON Codabar EPSON Codabar CD EPSON Codabar Num EPSON Codabar CD Num ...

Page 311: ...D 28 Working with Fonts ...

Page 312: ... particular language cpi characters per inch A measure of the size of fixed width text characters default A value or setting that takes effect when the printer is turned on reset or initialized dots per inch dpi The number of dots per inch is a measure of printer resolution The higher the number of dots the higher the resolution download To transfer information from the computer to the printer dow...

Page 313: ...itions interface The connection between the printer and the computer A parallel interface transmits data one character or code at a time and a serial interface transmits data one bit at a time landscape Printing that is oriented sideways on the page This orientation gives you a page that is wider than it is high and is useful for printing spreadsheets memory The part of the printer s electronic sy...

Page 314: ...set of operating commands that determines how data sent from the computer is interpreted and acted upon Printer emulations replicate existing printers such as the HP LaserJet 4 proportional font A font whose characters have varying amounts of horizontal space depending on the width of the character Thus the uppercase M takes up more horizontal space than the lowercase l RAM Random Access Memory RA...

Page 315: ...ontrol panel serif The small decorative strokes that come off the main lines of a character status sheet A report that lists the printer settings and other printer information symbol set A collection of symbols and special characters Symbols are assigned to specific codes in a character table TrueType An outline font format that was developed jointly by Apple Computer and Microsoft Corporation Tru...

Reviews: