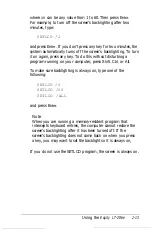
background image

where 

XX

 can be any value from 1 to 60. Then press 

Enter.

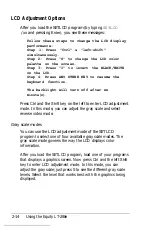
For example, to turn off the screen’s backlighting after two

minutes, type:

SETLCD /2

and press 

Enter. 

If you don’t press any key for two minutes, the

system automatically turns off the screen’s backlighting. To turn

it on again, press any key. To do this without disturbing a

program running on your computer, press 

Shift, Ctrl, 

or 

Alt.

To make sure backlighting is always on, type one of the

following:

SETLCD /0

SETLCD /00

SETLCD /ALL

and press 

Enter.

Note

When you are running a memory-resident program that

intercepts keyboard entries, the computer cannot restore the

screen’s backlighting after it has been turned off. If the

screen’s backlighting does not come back on when you press
a key, you may want to set the backlight so it is always on,

If you do not use the SETLCD program, the screen is always on.

Using the 

Equity LT-286e

2-13

Summary of Contents for Equity LT-286e

Page 1: ......

Page 2: ...rse video mode displays black characters on a white background You may want to use the reverse video mode for most applications because the black characters on a white background provide enhanced readability See page 2 15 in your User s Guide for instructions The Equity LT 286e comes with an empty plastic box in the slot for the hard disk drive If your dealer has not already installed the hard dis...

Page 3: ...EPSON E Q U l T Y T M L T T M 2 8 6 e User s Guide ...

Page 4: ... of information contained herein While every precaution has been taken in the preparation of this publication Epson America assumes no responsibility for errors or omissions Nor is any liability assumed for damages resulting from the use of the information contained herein Further this publication and features described herein are subject to change without notice TRADEMARKS AT and XT are trademark...

Page 5: ...C 20402 Stock No 004 000 00450 7 Note If the interference stops it was probably caused by the computer or its periph eral devices To further isolate the problem Disconnect the peripheral devices and their input output cables one at a time If the interference stops it is caused by either the peripheral device or its I O cable These devices usually require shielded I O cables For Epson peripheral de...

Page 6: ...iv ...

Page 7: ...cting the Power Cord 1 13 6 Starting the System 1 14 Turning On the Computer 1 14 Adjusting Screen Contrast and Brightness 1 16 Initial Screen Display 1 16 7 Running the SETUP Program 1 17 Starting the SETUP Program 1 18 8 Inserting the Install Diskette 1 21 Chapter 2 Using the Equity LT 286e Using the AC Adapter 2 1 Using the Battery 2 2 Connecting the Battery Pack 2 4 Status Indicator Bar 2 7 Op...

Page 8: ...ard Disk 2 23 Protecting the Data on Your Hard Disk 2 24 Improving Hard Disk Performance 2 24 Turning Off the Hard Disk 2 25 Modifying the AUTOEXEC BAT File 2 25 Resetting the Computer 2 27 Turning Off the Computer 2 28 Chapter 3 Using MS DOS With Your Computer Starting and Exiting MS DOS 3 2 Changing the Current Drive 3 2 The MS DOS Command Format 3 4 Entering MS DOS Commands 3 5 Storing Data 3 5...

Page 9: ...sing the MS DOS Shell Program 3 24 Using HELP 3 25 Using MENU 3 27 MENU Utility Options 3 28 Using an AUTOEXEC BAT File 3 29 Creating an AUTOEXEC BAT File 3 30 Starting an Application Program 3 31 Chapter 4 Troubleshooting The Computer Won t Start 4 1 The LCD Screen Is Blank 4 2 The Monitor Screen Is Blank 4 3 The Computer Locks Up 4 4 Diskette Problems 4 4 Hard Disk Problems 4 5 vii ...

Page 10: ...Monitor B 1 Connecting an External Diskette Drive B 3 Installing the Internal Modem B 4 Installing the RAM Card B 5 Connecting an External Keyboard B 6 Installing an Option Card B 7 Installing a Math Coprocessor B 13 Appendix C Specifications Main Unit C 1 Interfaces C 1 Keyboard C 2 Mass Storage C 2 Display C 2 Power Supply C 3 Power Requirements C 3 Physical Dimensions C 3 Environmental Requirem...

Page 11: ...quity LT 286e comes with the following Q An 80C286 microprocessor CI 1MB megabyte of internal RAM memory CI One 20 or 40MB removable hard disk 0 One 1 44MB 3 z inch diskette drive CI A high contrast paper white backlit LCD liquid crystal display screen CI An internal proprietary modem slot Cl A 2 3 size IBM PC AT compatible 8 16 bit internal expansion slot Ci A high capacity battery pack to power ...

Page 12: ...nter or external modem to your Equity LT 286e You can connect a color monitor to the computer to take advantage of the color and the larger display A slide switch lets you change between the LCD and an external CRT display The LT 286e supports MDA CGA EGA and extended EGA video modes You can also connect an Epson external 5 inch diskette drive to the computer to easily exchange data with other com...

Page 13: ...S DOS includes the following manuals Q MS DOS Installation Guide Use this manual to install MS DOS on your hard disk CI MS DOS Reference Manual Use this manual to learn about the features of MS DOS and for a complete description of each MS DOS command Ll MS DOS Shell User s Guide Use this manual to learn about the new MS DOS Shell feature Q MS DOS Command Summary Use this as a quick reference when...

Page 14: ...ves Chapter 3 provides basic instructions for using MS DOS with your computer You can find more detailed information about MS DOS in the MS DOS manuals Chapter 4 provides troubleshooting guidelines you can follow if you encounter any problems while using your Equity LT 286e Appendix A describes the DIP switches and slide switches you need to change if you modify your system s configuration Appendi...

Page 15: ... you contact the business where you purchased your Epson product to request assistance If the people there do not have the answer to your question they can obtain it through our dealer support program Epson is confident that this policy will provide you with the assistance you need Call the Epson Consumer Information Center at 1 800 922 8911 for the following Cl The location of the nearest Epson d...

Page 16: ...s that provide the computer with information about its configuration each time you turn it on The switches are called DIP switches and slide switches Both sets of switches are located on the bottom of the computer When the LT 286e is shipped from the factory these switches are set for the following type of system Ci The internal diskette drive is drive A 0 The LCD screen is set for EGA mode 0 The ...

Page 17: ...ching an external monitor or diskette drive see Appendix B for instructions Do not turn on the computer printer or any peripherals until the instructions tell you to do so Otherwise you may damage some part of your equipment 1 Unpacking As you unpack the components be sure to inspect each item If anything is missing or damaged consult your Epson dealer 1 2 Setting Up Your System ...

Page 18: ... information Please keep a copy of your sales receipt for warranty verification Your receipt is all that is required for warranty service Be sure to keep your packing materials They provide the best protection for your computer if you need to ship it later 3 Installing the Hard Disk Drive 1 Your hard disk drive which is either 20MB or 40MB comes in its own package Your dealer may have installed th...

Page 19: ...the computer and hold the hard disk drive with the PUSH button on the left and the retractable tabs on the right 3 Position the hard disk drive directly above the hard disk drive slot on the computer The connectors on the hard disk drive fit into the sockets on the computer 1 4 Setting Up Your System ...

Page 20: ...TYPE indicator on the left side identifies the type of hard disk drive You use this TYPE for the SETUP program A 20MB hard disk is TYPE 2 a 40MB hard disk is TYPE 17 A new hard disk drive must be partitioned and formatted to run an operating system The MS DOS installation program called SELECT performs these functions See your MS DOS Installation Guide for details after you complete the remaining ...

Page 21: ... 25 pin D shaped female connector Most Epson printers have parallel interfaces To connect a printer to the computer you need an IBM PC compatible printer cable If you re not sure which one you need consult your Epson dealer Once you have a printer cable follow these steps to connect your printer to the parallel interface labeled PRINTER on the computer 1 Place the printer next to your computer 2 B...

Page 22: ...able has a 25 pin D shaped male connector See your printer manual if you cannot identify this connector Connect this end to the parallel connector labeled PRINTER on the right side of the computer as shown below If the plug has retaining screws tighten them by hand or with a screwdriver Setting Up Your System 1 7 ...

Page 23: ...onnector and push them into place 6 Plug the printer s power cable into an electrical outlet The standard DIP switch settings for the LT 286e define your parallel port as the primary parallel port If you think the DIP switch settings have been changed or you would like a different setting see Setting the DIP Switches in Appendix A 1 8 Setting Up Your System ...

Page 24: ... follow the steps above for connecting a parallel device Make sure the serial port is set up to function properly If you are using the port for a serial printer you must also redirect printer output from the parallel port to the serial port Use the MS DOS MODE command or the Epson MENU program to make these changes See your MS DOS Reference Manual for instructions The standard DIP switch settings ...

Page 25: ...d so the back panel is facing you Position the back panel slightly over the edge of the desk or table 3 The end of the AC adapter cable is shaped like a box Notice the plastic safety cover that protects the connector on the AC adapter Slide the release tab in the direction shown on the tab to release the safety cover Lift off the cover and store it in a safe place 1 10 Setting Up Your System ...

Page 26: ... slots on the connector on the back panel of the computer Press the connector box up until it snaps into place Be sure to read Using the AC Adapter in Chapter 2 for more information about the AC adapter Setting Up Your System 1 11 ...

Page 27: ... replace the safety cover that protects the connector WARNING Do not connect or disconnect the AC adapter when the computer is turned on Keep the AC adapter at least six inches away from your computer and disks 1 12 Setting Up Your System ...

Page 28: ...Power Cord Follow these steps to connect the power cord 1 Connect the power cord to the adapter s input socket 2 Plug the other end of the power cord into a grounded 120 volt AC wall outlet Setting Up Your System 1 13 ...

Page 29: ...ocated on the status indicator bar The right disk in use icon indicates that the hard disk drive is in use The left disk in use icon indicates that the built in diskette drive is in use D Always wait at least five seconds after you switch off the power before switching it back on Turning the power off and on rapidly can damage the computer s circuitry Cl Do not leave a beverage on top of or next t...

Page 30: ... toward the back of the computer power switch The speed indicator on the status bar shows your operating speed 12 MHz and after a few seconds the computer begins to perform an internal self test This is a diagnostic program the computer runs whenever you turn it on The power on self test checks the RAM random access memory keyboard system board and peripheral interfaces before the computer begins ...

Page 31: ...ove the lever down The brightness lever on the left controls the intensity of the screen s backlighting To make the backlighting brighter move the lever up To decrease the backlighting move the lever down When you re running the computer on the battery do not make the screen brighter than necessary to read the text clearly This helps to conserve the battery s charge Initial Screen Display After th...

Page 32: ...ave installed an external 5 inch diskette drive The SETUP program automatically displays these configuration settings il The type of display you re using including screen width LI The amount of RAM in your computer U Whether you have installed an 80C287 math coprocessor The settings you specify with the SETUP program are recorded in a special area of memory called CMOS RAM This memory is backed up...

Page 33: ...S SETUP The first prompt is Current date is mm dd yyyy Enter new date MM DD YYYY Enter the correct date in the format shown or press Enter to use the displayed date If you type an invalid entry the program beeps The cursor returns to the beginning of the field so you can enter the correct value 4 Next you see this prompt Current time is hh mm ss Enter new time HH MM SS Enter the correct time in th...

Page 34: ...TURN SETUP then displays these prompts E n t e r d i s k d r i v e C t y p e 1 4 7 F o r d i s k T Y P E d e t a i l s p r e s s E S C If you press ESC SETUP displays a list of hard disk types The detail in this list is for service personnel only If you have a 20MB hard disk the type is 2 A 40MB hard disk drive is type 17 Enter the disk type for drive C either 2 or 17 and press Enter 6 SETUP displ...

Page 35: ...nter 9 After you specify the disk drive types SETUP displays other system parameters The screen looks similar to the following CMOS SETUP Current date is 04 17 1989 Enter new date MM DD YYYY Current time is 10 00 00 Enter new time HH MM SS Primary display is Color display Current screen width is 80 column Fixed disk drive C type 2 Fixed disk drive D type Not installed Diskette drive A is Diskette ...

Page 36: ...es SETUP automatically displays the type you specified the first time you ran the program 8Inserting the Install Diskette Follow these steps to insert the MS DOS Install diskette 1 Hold the diskette with the printed label facing up and the arrow pointing into the diskette drive as shown below Insert the diskette in the drive so that it clicks into place When the diskette is all the way in the rele...

Page 37: ... which is called SELECT The SELECT program automatically partitions and formats your hard disk creates an AUTOEXEC BAT file and a CONFIG SYS file based on your responses to prompts and copies the MS DOS files to the hard disk After you have copied the MS DOS files onto the hard disk your original MS DOS diskettes become your backup copies Store these diskettes in a safe place See your MS DOS Insta...

Page 38: ...connect the AC adapter to the battery pack and to an electrical outlet the AC adapter recharges the battery See the next section for details If you are not using the AC adapter and the Battery in Use icon on the status indicator bar starts flashing save all your work and power off the computer before connecting the AC adapter When the battery is low connecting the AC adapter may reset the computer...

Page 39: ... Use icon on the status indicator bar starts flashing and you hear a beep After the Battery in Use icon starts to flash you have a maximum of 10 to 15 minutes before the battery charge is completely gone If you continue using the computer without connecting the adapter power runs out and you will lose data To recharge the battery leave the battery pack connected to the computer and connect the AC ...

Page 40: ...extensive use of the hard disk or if you are using the diskette drive you may need to recharge the battery sooner To increase the amount of time you can operate the LT 286e using the battery follow these guidelines u cl CI cl Lower the brightness of the backlight to its lowest level Use the brightness lever on the right side of the screen Select a clock speed of 8 MHz Set the CLOCK slide switch on...

Page 41: ... the status indicator bar go dark indicating the battery is discharged 4 Now give the battery a full eight hour charge Connecting the Battery Pack Before you can use the LT 286e without the AC adapter you must install the battery pack Follow these steps 1 Make sure the power switch on the computer is off 2 Turn the computer around so its back is facing you Position the back of the computer slightl...

Page 42: ...ed you can either use the power from the battery pack or attach the AC adapter for unlimited power To remove the battery pack follow these steps 1 Make sure the computer is off 2 Disconnect the AC adapter 3 Turn the computer around so the back is facing you Make sure the back of the computer is slightly over the edge of the desk so you can slide the battery pack down Using the Equity LT 286e 2 5 ...

Page 43: ...e of the battery pack toward you press down on the battery pack Slide the battery pack down and off the computer Note When you are not using the battery pack replace the safety cover that protects the metal connector 2 6 Using the Equity LT 286e ...

Page 44: ... the hard disk drive Indicates when you are accessing the internal diskette drive Indicates when the FDD EXTANT slide switch is in the EXT position Displays the current CPU clock speed either 8 MHz or 12 MHz Indicates when you are using the battery pack blinks when the battery pack charge is low Indicates when you select an external CRT Using the Equity LT 286e 2 7 ...

Page 45: ...al keyboard CAPS Indicates when the internal keyboard is in Caps Lock mode does not respond to the modes of an external keyboard WARNING Do not turn off your computer when either disk drive indicator is illuminated Also do not remove a diskette when the right diskette indicator is illuminated If you do you may lose data The SCRL NUM and CAPS icons indicate whether the corresponding key functions a...

Page 46: ...and close the screen as shown below Be sure the screen locks into the bottom part of the computer To open the screen press the latch release button in the center of the computer shown below Then lift the screen back You can position the screen at a variety of viewing angles Using the Equity LT 286e 2 9 ...

Page 47: ...e screen Using the Handle The Equity LT 286e has a convenient carrying handle To use the handle pull it out from the computer as shown below Be sure the screen is closed whenever you carry the computer by its handle To avoid accidental damage to your Equity LT 286e always store the computer in a flat horizontal position Do not leave it standing upright on its back panel 2 10 Using the Equity LT 28...

Page 48: ...ot change the execution speed while you are running a program Always complete your current operation and exit the program first You must turn the computer off before changing execution speed To change the speed follow these steps 1 Turn off the computer 2 Turn the computer upside down 3 Move the CLOCK switch located on the bottom of the computer n m C L O C K 1812 m CRT LCD Ia FDD EXT INT The CLOC...

Page 49: ...t Period Use the SETLCD program to specify a backlight period which is the length of time the LCD screen remains illuminated before the computer turns it off Initially the screen is always on When the computer turns off the screen s backlighting the screen is in standby mode To conserve the battery s charge when you are running your computer without the AC adapter specify a backlight period using ...

Page 50: ...ng on your computer press Shift Ctrl or Alt To make sure backlighting is always on type one of the following SETLCD 0 SETLCD 00 SETLCD ALL and press Enter Note When you are running a memory resident program that intercepts keyboard entries the computer cannot restore the screen s backlighting after it has been turned off If the screen s backlighting does not come back on when you press a key you m...

Page 51: ... key on the left to enter LCD adjustment mode In this mode you can adjust the gray scale and select reverse video mode Gray scale modes You can use the LCD adjustment mode of the SETLCD program to select one of four available gray scale modes The gray scale mode governs the way the LCD displays color information After you load the SETLCD program load one of your programs that displays a graphics s...

Page 52: ...e as described above press I to reverse the display mode The I stands for invert Press I again to switch back to normal mode Press Enter to exit this function Special Keys on the Equity LT 286e Keyboard The illustration below shows the Equity LT 286e keyboard Certain keys on your keyboard serve special functions when your computer is running application programs For instructions on how to use keys...

Page 53: ...ab to the left in Shift mode Ctrl Works with other keys to perform special functions such as editing operations in MS DOS Shift Changes the letter keys from lowercase to uppercase while held down and changes other keys from their normal characters or functions to their alternate characters or functions When the Caps icon is illuminated changes letter keys from uppercase to lowercase Alt Works with...

Page 54: ...eleting the character to the left Backspace Control cursor location within application programs With Num Lock on you can use these keys as a numeric keypad Used by some application programs Using Diskettes Use diskette drives to store data on diskettes and retrieve and use stored data The Equity LT 286e has a 1 44MB 3 l z inch diskette drive it also supports an optional external 1 2MB 5 inch diske...

Page 55: ...ity LT 286e Be sure to buy high quality diskettes to use in your Equity LT 286e You can use two kinds of diskettes Cl 3 l z inch 720KB double sided double density diskettes Ll 3 l z inch 1 44MB double sided high density diskettes On a 720KB diskette you can store the equivalent of about 300 pages of text You can store twice as much information on 1 44MB diskettes but the 3 z inch diskette drives o...

Page 56: ...ttes Note You must format double sided double density 3 l z mch diskettes to store 720KB of data if you are using double sided high density 3 l nch diskettes you must format them to store 1 44MB of data Caring for Diskettes The 3 z inch diskettes are sturdy and reliable but are not indestructible To avoid damaging your diskettes and losing data take these precautions Ci Do not remove a diskette or...

Page 57: ... severe damage LI Do not expose a diskette s magnetic surface by sliding the metal shutter Never touch a diskette s magnetic surface The oil on your fingertips can damage the diskette and also the drive LI Do not place anything on top of your diskettes and make sure they do not get bent CI Never wipe brush or try to clean diskettes in any way Ci Store diskettes properly in diskette containers If y...

Page 58: ...licks into place To remove a diskette press the release button on the diskette drive When the diskette pops out of the drive pull it out and store it properly in a diskette container WARNING Never remove a diskette or turn off the computer while the diskette drive icon is on This might cause loss of data Also be sure to remove all diskettes before you turn off the computer Using the Equity LT 286e...

Page 59: ...rotecting Diskettes You can write protect a diskette to prevent its data from being altered When a diskette is write protected you can copy data from it but you cannot store new data modify existing data erase files or format the diskette The write protect mechanism is a small switch on the lower right corner on the back of the diskette To write protect the diskette slide the switch down toward th...

Page 60: ... available keep only files you use regularly on the hard disk Store your other files on diskettes Note You must prepare a new hard disk before using it for the first time Perform all procedures in your MS DOS Installation Guide Caring for the Hard Disk To avoid damaging your hard disk take these precautions U Keep your computer away from magnetic fields such as electrical appliances telephones and...

Page 61: ...n program diskettes before copying the program files to the hard disk Copy your data files frequently to keep your backup diskettes up to date Use the Epson MENU utility or the MS DOS BACKUP command to back up your hard disk files Use the MENU utility or the MS DOS DISKCOPY command to make copies of your system and program diskettes For instructions on using these backup utilities see Chapter 3 or...

Page 62: ...be sure to set a realistic time period To specify a power off time type the following at the system prompt HDDPSAVE xx where xx can be any value from 1 to 18 Then press Enter To keep the hard disk drive on at all times type one of the following and press Enter HDDPSAVE 0 HDDPSAVE 00 HDDPSAVE ALL Modifying the AUTOEXEC BAT File The SELECT program you use to install MS DOS creates a file named AUTOE...

Page 63: ... the power off period for the hard disk each time you power on the computer Also by adding the SETLCD utility to the AUTOEXEC BAT file you can modify the gray scale modes at any time To modify the AUTOEXEC BAT file created by SELECT follow these steps 1 Type COPY AUTOEXEC BAT CON AUTOEXEC BAT and press Enter 2 Type SETLCD 5 and press Enter This turns off backlighting after five minutes Use any tim...

Page 64: ...set the computer There are three ways to reset Because each is more powerful than the last try them in the order listed here 1 If you are using MS DOS hold down Ctrl and Alt and press Del The screen goes blank for a moment and then the computer reloads MS DOS MS DOS must be either on the hard disk or on a diskette in drive A If this does not correct the problem try the second method 2 Press the RE...

Page 65: ...computer save your data exit the program you are using and then remove all diskettes from the disk drives First turn off any peripherals such as a printer a monitor or an external diskette drive Then turn off the computer 2 28 Using the Equity LT 286e ...

Page 66: ...depends on how you plan to use your computer If you use it only for running application programs the few MS DOS commands you need are introduced in this chapter If you use advanced features or create your own programs see your MS DOS manuals for a complete description of the features of the operating system This chapter describes the following MS DOS functions 0 Starting and exiting MS DOS CI Chan...

Page 67: ...ram MS DOS must be running in memory If you have prepared your hard disk according to the procedures in the MS DOS Installation Guide MS DOS loads automatically from your hard disk whenever you turn on your computer provided you do not have a diskette in the diskette drive Before you turn off the computer make sure the MS DOS command prompt such as C or C appears on the screen Then remove your dis...

Page 68: ...nter For example if the current drive is C and you want to log onto drive A type A and press Enter Your screen now displays the A prompt showing that you are operating from drive A Drive A continues to be the current drive until you log onto a different drive or turn off or reset your computer To access a program or file on another drive without first logging onto that drive specify the drive iden...

Page 69: ...g files that are not on the current drive or directory A pathname tells MS DOS where to find a file and consists of one or more directory names separated by backslashes See Using Pathnames later in this chapter There are two kinds of MS DOS commands internal and external Internal commands are commands that are built into MS DOS and can be used any time MS DOS is loaded into memory External command...

Page 70: ...ly the command prompt reappears so you can try again Type the correct command and press Enter Storing Data You store all your work and programs in files on your hard disk or diskettes A data file contains information such as words numbers or pictures A program contains instructions that the computer can understand and execute The kind of file you create depends on the MS DOS commands or applicatio...

Page 71: ...Microsoft Word uses DOC for its word processing files Such default extensions help an application program distinguish its own data files from files created by other programs If you have programs that use default extensions avoid using those particular extensions in other contexts You can type the name and the extension in either lowercase or uppercase letters but do not use uppercase or lowercase ...

Page 72: ...irectories on your diskettes You may find this useful for organizing the files on your backup diskettes The subdirectory structure of a hard disk can be represented with a tree like diagram like this Root directory I LEDGER WORDPROC I l l ACCOUNTS SALES BUSINESS PERSONAL STORIES LETTERS In this example the original directory the root directory has two subdirectories named LEDGER and WORDPROC Each ...

Page 73: ...nsisting of up to three characters CI The root directory does not have a name it is identified by a backslash The Current Directory MS DOS always recognizes one directory as the current or default directory just as it always recognizes one drive as being the current or default drive The current directory is the directory in which MS DOS performs your commands unless you tell it otherwise If you wa...

Page 74: ...current directory type DIR and press Enter MS DOS lists the names of the files in the current directory on the current drive If you are logged onto drive C but want to see a directory of the files on the diskette in drive A type DIR A and press Enter A directory listing looks like this Volume in drive C is DOS400 Volume Serial Number is 3728 0CF6 Directory of C COMMAND COM 37557 12 19 88 12 00a CO...

Page 75: ...e shown previously in this chapter if you had a file named APRIL TXT stored in the subdirectory named LETTERS the full pathname of that file would be This pathname tells MS DOS to start at the root directory and go through two subdirectories WORDPROC and PERSONAL to find the LETTERS subdirectory Once in the LETTERS subdirectory MS DOS finds the file called APRIL TXT The first backslash tells MS DO...

Page 76: ...t directory Creating Directories The MKDIR command lets you create directories To create the directory LEDGER within your root directory for example type the following and press Enter MKDIR LEDGER You can abbreviate the name of this command to MD For example to create a SALES directory under the LEDGER directory type the following and press Enter MD LEDGER SALES To check that the LEDGER directory ...

Page 77: ...CHDIR or CD followed by the pathname of the directory you want to use For example to change from any directory to the directory LEDGER which is a subdirectory of the root directory type the following and press Enter CD LEDGER The backslash identifies the LEDGER directory as a subdirectory of the root directory Once you are working within a directory you can access any of the files it contains with...

Page 78: ...h you want to copy the file For example if you are in the LETTERS directory and want to copy the file APRIL TXT to the BUSINESS directory type the following and press Enter COPY APRIL TXT WORDPROC BUSINESS The command has three parts the word COPY the name of the file you want to copy APRIL TXT and the name of the directory to which you want to copy this file WORDPROC BUSINESS You must include spa...

Page 79: ...ting prepares the diskette so that MS DOS can store data on it You need to do this before you use the diskette for the first time You can also reformat previously used diskettes This process erases all data on the diskette Always be sure you no longer need any files on a diskette before reformatting it You can format two kinds of 3 z inch diskettes Double sided double density diskettes can be form...

Page 80: ... drive A and strike ENTER when ready 3 Insert the diskette you want to format into drive A and press Enter When the diskette is formatted you see this message and prompt Format complete Volume label 11 characters ENTER for none 4 Enter up to 11 characters for the volume label to be stored on the diskette and press Enter FORMAT displays these messages 1447664 bytes total disk space 1447664 bytes av...

Page 81: ...u are not in the directory containing the file FORMAT COM use the CD command to change to that directory 2 Type the following and press Enter FORMAT A F 720 You see this prompt Insert new diskette for drive A and strike ENTER when ready 3 Insert the diskette you want to format into drive A and press Enter When the diskette is formatted you see this message and prompt Format complete Volume label 1...

Page 82: ...tility provides an easy way to perform these functions See the section on MENU later in this chapter Copying Data It is very important to keep backup diskettes containing copies of the files you create There are several ways to copy data and program files CI Use the DISKCOPY command to make an exact duplicate of a diskette LI Use the COPY command to copy individual files Ll Use the BACKUP command ...

Page 83: ...inch diskette or to copy data from a 1 44MB diskette to a 720KB diskette You also cannot use DISKCOPY to copy data between a hard disk and a diskette To use DISKCOPY follow these steps 1 Make sure your original diskette the one you are copying from is write protected See Chapter 2 for instructions 2 If necessary log onto drive C If you are not in the directory containing the file DISKCOPY COM use ...

Page 84: ...Y copies the files from memory to the target diskette it prompts you to reinsert the source diskette so it can copy the remaining data to the computer s memory if necessary Insert the source diskette in drive A and press any key 7 DISKCOPY copies the rest of the source diskette s files to the computer s memory and then prompts you to reinsert the target diskette Insert the target diskette in drive...

Page 85: ...arget diskette or directory has the same name as the file you are copying the copy automatically replaces overwrites the existing file MS DOS does not provide a warning Be careful you do not accidentally replace a file that you want to keep tl If you are copying to a diskette the diskette must be formatted To use the COPY command type COPY at the command prompt followed by the drive identifiers an...

Page 86: ...d uses the current drive For example if the current drive is C and you want to copy the file REPORT from drive A to drive C without changing the filename enter the command as follows COPY A REPORT MS DOS writes the copy to drive C because drive C is the current drive You can save a few keystrokes by omitting the drive identifier of the current drive but it is equally correct to include all the dri...

Page 87: ... which you specified their names Using BACKUP The BACKUP command lets you store files in a special format for archive purposes You normally use BACKUP to back up hard disk files however you can use it to copy files from any disk to another hard disk to diskette diskette to hard disk diskette to diskette or hard disk to hard disk There are advantages to using the BACKUP command CI BACKUP can split ...

Page 88: ...ch make readable copies of files BACKUP creates files that you cannot use until you restore them to the disk by using the RESTORE command You can use switches with BACKUP to back up files created after a certain date or to specify files stored in a certain directory You can also tell BACKUP to add only those files that were modified since the last time you ran BACKUP This process speeds up the bac...

Page 89: ...e sure that is what you want to do If you are sure press Y then Enter You can also use the ERASE command to delete files ERASE works exactly like the DEL command Using the MS DOS Shell Program MS DOS 4 01 provides a new Shell feature that lets you run programs and choose operating system commands from menus instead of the MS DOS command prompt The Shell feature is designed for both new and experie...

Page 90: ... the MS DOS command prompt and press Enter 2 3 4 The screen displays a menu of MS DOS commands Use the cursor keys to highlight the command you want information about then press Enter If there is more than one page of information about the command you see the prompt PgUp at the top of the screen Press the PgUp key to display the rest of the text To return to the HELP menu press ESC Press ESC again...

Page 91: ...o request help information for more than one command Follow these steps 1 At the command prompt type HELP and the names of the commands you want information about Then press Enter Separate each command name with a space For example to see information about DISKCOPY FORMAT and COPY type the following and press Enter HELP DISKCOPY FORMAT COPY 2 MS DOS displays help information for the first command ...

Page 92: ...at for each one To access the MENU utility log onto the directory containing the file MENU EXE Type MENU at the command prompt and press Enter You see this main menu EXIT File Utilities Disk Utilities Mode Settings Help Enter DOS Command To select an option use the arrow keys to highlight your selection then press Enter Most options contain submenus keep highlighting your selection and pressing En...

Page 93: ...OS CHKDSK DISKCOPY DISKCOMP and FORMAT commands Mode Settings Lets you change your configuration settings This option also lets you select alternate code pages character sets and redirect data from the parallel port to the serial port Because you can perform so many tasks from the Mode Settings submenus this option is a powerful alternative to the MS DOS MODE command Help Lets you access the Epson...

Page 94: ...ber of times you need to change directories or specify pathnames Add the command that starts your most commonly used application program such as a word processor or spreadsheet program so MS DOS loads it automatically when you turn on or reset the computer rd Change the MS DOS command prompt so it displays the current directory or your name or anything else you want See your MS DOS Reference Manua...

Page 95: ...e instructions to use the COPY command 1 At the C prompt type the following and press Enter COPY CON C AUTOEXEC BAT 2 Type the commands you want to include in the file exactly as you want MS DOS to execute them Press Enter at the end of each line After you type the last command press Enter to move the cursor to the next blank line 3 Now press F6 and then Enter COPY creates a file named AUTOEXEC BA...

Page 96: ...if necessary and type the name of the program s executable file See the documentation for your application program if you are not sure what to type When you press Enter MS DOS runs the application program When you exit the program the MS DOS command prompt reappears Be sure to exit the application program properly and return to the command prompt before turning off your computer Using MS DOS With ...

Page 97: ... Consumer Information number 1 800 922 891 1 for the location of your nearest authorized Epson Customer Care Center When you contact your dealer or Epson Customer Care Center be ready to provide the serial number of your computer located on the bottom of the computer its configuration including the type of disk drives and options and the names and version numbers of any software programs you are u...

Page 98: ...start contact your Epson dealer The LCD Screen Is Blank If the computer starts but no image appears on the LCD screen follow these steps to solve the problem 1 Use the contrast and brightness levers to adjust the screen display 2 To save power you may have defined a backlight period so that the LCD screen turns off automatically after a specified period of time If this happens press any key to res...

Page 99: ... the computer Check that the monitor s power cable is securely connected to the monitor and to an electrical outlet and that the monitor cable is properly connected to both the monitor and the computer Then turn both power switches back on Check that the CRT LCD slide switch is in the CRT position See Setting the Slide Switches in Appendix A for instructions Turn off the power switches on both the...

Page 100: ...ter you ve waited a reasonable amount of time follow the steps in Chapter 2 to reset the computer Note Changing the execution speed while running an application program could cause the computer to lock up Always exit the program and turn off the computer before changing the execution speed Diskette Problems If you have trouble with a diskette follow these steps to define the problem 1 Is the diske...

Page 101: ... leave program diskettes write protected but some programs don t work properly on write protected diskettes 3 Try formatting a blank diskette to determine if the diskette drive is operating properly If you cannot format a diskette contact your Epson dealer Hard Disk Problems If you have problems with your hard disk when you first start to use it make sure it is properly set up See the instructions...

Page 102: ...ish setting up your computer Setting the DIP Switches The Equity LT 286e has two sets of DIP switches that you access from the bottom of the computer These are small on off switches that provide your computer with information each time you turn it on A DIP switch is either on up or off down To change a setting use a hard thin object such as a small screwdriver The first set has ten switches that c...

Page 103: ...sing the DIP Switches To locate the DIP switches follow these steps 1 Remove the expansion slot cover on the left side of the computer Press down on the release tab and lift off the expansion slot cover 2 Pull out the carrying handle 3 Turn the computer upside down with the handle away from you A 2 DIP Switches and Slide Switches ...

Page 104: ...hown below Lift up on the two tabs while you press on the grated squares to release the cover Slide the cover away from you toward the handle The DIP switches are located on the right side of the computer DIP Switches and Slide Switches A 3 ...

Page 105: ...tting Function 1 ON Not used must be ON 2 ON Selects attached enhanced color display OFF Selects attached monochrome or color display 3 ON Reserved must be ON 4 ON Reserved must be ON 5 ON Reserved must be ON 6 ON Selects expanded LCD mode OFF Selects standard LCD mode 7 ON Selects EGA configuration see the CRT LCD switch settings OFF Selects default EGA configuration 8 ON Selects default EGA conf...

Page 106: ...ects internal diskette drive as drive A external diskette drive is drive B Selects external 5 la inch diskette drive as drive A internal diskette drive is drive B Not used must be ON Selects color for primary display Selects monochrome for primary display Reserved Selects internal serial port as primary Selects internal serial port as secondary Enables internal serial port Disables internal serial...

Page 107: ...dapter to use enhanced color display in normal mode OFF ON ON ON Selects EGA enhanced graphics adapter to use enhanced color display in enhanced mode OFF ON ON OFF The following switches are located on SW1 These DIP switches define how the video controller is interpreted by the computer Switch l This switch is not used and must always be set to ON Switch 2 This switch defines the type of external ...

Page 108: ... margin on the top and bottom of the screen Switch 7 Switch 8 Switch 9 Switch 10 These switches define the EGA configuration The following switches are located on SW2 These DIP switches define how the computer identifies peripherals attached to the computer Switch l This switch is not used and must be set to ON Switch 2 This switch defines your diskette drive assignments Set this switch to ON to i...

Page 109: ...option card that offers serial ports you may need to disable the internal serial port if it conflicts with the port on the option card Set this switch to ON to enable the serial port Set this switch to OFF to disable the serial port Switch 8 This switch tells the computer whether the parallel port on the side of the computer is configured as a primary port or a secondary port Set this switch to ON...

Page 110: ...et the cover on the computer and slide it back into position as shown below Press firmly until the cover snaps into position 2 Turn the computer right side up with the handle facing you 3 Replace the expansion slot cover on the left side of the computer The cover has two tabs that fit into slots on the computer s cover DIP Switches and Slide Switches A 9 ...

Page 111: ...4 Lift the cover up into place and slide the release tab up to secure the cover 5 Slide the handle back into place 4 10 DIP Switches and Slide Switches ...

Page 112: ...ette drive The slide switches are located on the bottom of the computer Follow these steps 1 Turn the computer off 2 Disconnect all cables from the computer including the AC adapter 3 Turn the computer upside down with the back panel closest to you Set the slide switches only when the computer is turned off n I 1 m C L O C K 1 m CRT LCD m FDD EXT INT DIP Switches and Slide Switches A 11 ...

Page 113: ...e computer Leave the switch in the right position if you plan to use the LCD External diskette drive Slide the FDD EXT INT switch to the left if you plan to connect an external 5 1 4 inch diskette drive to the computer Leave the switch in the right position if you do not plan to use an external diskette drive You are now ready to set up and use your LT 286e computer See Chapter 1 for details on se...

Page 114: ...ions below to connect it to the computer 1 Be sure both the computer and monitor as well as any other peripheral devices are turned off 2 Turn the computer upside down and set the CRT LCD slide switch to CRT This slide switch setting lets the computer know you will be using a monitor instead of the LCD screen See Setting the Slide Switches in Appendix A for details 3 Turn the computer right side u...

Page 115: ...r 9 If necessary plug the monitor s power cable into the power inlet on the monitor Some monitors come with permanently attached power cables Then plug the power cable into an electrical outlet When you are ready to use the computer turn on the monitor and any other peripheral devices then turn on the computer Text displays on the external monitor screen instead of the computer s LCD screen B 2 In...

Page 116: ...external drive is drive B When SW2 2 is OFF the external drive is drive A See Setting the DIP Switches in Appendix A for details Make sure the FDD EXT INT slide switch is set to FDD EXT See Setting the Slide Switches in Appendix A Place the external diskette drive near the LT 286e Lower the interface cover on the front right side of the computer when the front of the computer is facing you Connect...

Page 117: ...external diskette drive and any other peripheral devices then turn on the computer Installing the Internal Modem You can install the optional Epson internal modem in your LT 286e Follow these steps 1 Make sure the computer is turned off 2 Press down on the release tab to lower the modem cover on the back left side of the computer when the front of the computer is facing you ...

Page 118: ... Close the modem cover Press up on the release tab to secure the cover 6 Connect the modem to a phone line Installing the RAM Card You can install the optional Epson 1MB RAM card in your LT 286e Follow these steps 1 Make sure the computer is turned off 2 Press down on the release tab to lower the RAM card cover on the back right side of the computer when the front of the computer is facing you ...

Page 119: ...Keyboard You can attach an external keyboard to your LT 286e The socket for the external keyboard is on the front right side of the computer Follow these steps 1 Make sure the computer is turned off 2 Lower the interface cover on the front right side of the computer when the front of the computer is facing you Press down on the release tab to lower the cover external keyboard port B 6 Installing O...

Page 120: ...lanning on connecting an external monitor to this port Installing an Option Card You can also install a size IBM PC AT compatible internal expansion card in your LT 286e You can install a 2 3 size option card provided it physically fits in the expansion slot on the LT 286e You cannot install a full length option card Also you cannot install an 8 bit card that interferes with the 16 bit connector i...

Page 121: ...secondary parallel port 278 if the internal parallel port is the primary parallel port 378 If you want the parallel port on the option card to be the primary parallel port you must disable the internal parallel port by setting DIP switch SW2 9 to OFF See Setting the DIP Switches in Appendix A for details WARNING You cannot install an optional video card in the expansion slot video cards interfere ...

Page 122: ...all cables including the AC adapter 2 Remove the expansion slot cover on the left side of the computer Press down on the release tab and lift off the expansion slot cover 3 Pull out the carrying handle 4 Turn the computer upside down with the handle away from you Installing Options B 9 ...

Page 123: ...rd cover as shown below Lift up on the two tabs while you press on the grated squares to release the cover Slide the cover away from you toward the handle 6 Remove the bracket on the side of the computer B 10 Installing Options ...

Page 124: ... socket inside the expansion slot Insert the connector directly into the socket Secure the card with the screw you removed from the bracket 8 Set the cover on the computer and slide it back into position as shown below Press firmly until the cover snaps into position Installing Options B 11 ...

Page 125: ...cing you 10 Replace the expansion slot cover on the left side of the computer The cover has two tabs that fit into slots on the computer s cover tabs 11 Lift the cover up into place and slide the release tab up to secure the cover B 12 Installing Options ...

Page 126: ...sily install the math coprocessor in your LT 286e However to do so you need to access the motherboard which contains sensitive circuitry If you have any doubts about the installation procedure ask your Epson dealer for assistance or contact a Customer Care Center To install the math coprocessor follow these steps 1 Turn off the computer 2 To remove the hard disk press the PUSH button to release th...

Page 127: ... on the math coprocessor lines up with the notch on the outline on the motherboard Press the math coprocessor firmly into place 6 Replace the motherboard cover 7 Reinstall the hard disk Insert the hard disk drive straight down it will not go in correctly if you attempt to press it in at an angle B 14 Installing Options ...

Page 128: ...bit parallel 25 pin D type female connector Serial RS 232C programmable asynchronous 9 pin D type male connector Video 9 pin female connector supports MDA CGA EGA and extended EGA External diskette drive 15 pin D type female connector Expanded keyboard Keyboard connector Speaker Option slot Internal One 2 3 size IBM PC AT compatible slot Memory Internal RAM memory card slot allows expansion to 2MB...

Page 129: ...sk Interchangeable pop out 20MB or 40MB hard disk designed for low power consumption 28ms average access time built in 16 bit bus AT compatible controller Diskette drives One internal 1 44MB 3 z inch diskette drive Optional external 5 inch 1 2MB diskette drive Display Large 640x480 dots high contrast paper white backlit LCD display with 16 level gray scale continuous brightness and contrast contro...

Page 130: ...to 2 l z hours 12 5 volt AC adapter can recharge battery pack while operating computer with automatic 100 240V sensing Power Requirements 100 240 VAC 50 60 Hz NiCad rechargeable battery pack 9 6 volts 4 ampere hours Physical Dimensions Height 3 46 inches 88 mm Width 12 9 inches 318 mm Depth 11 7 inches 296 5 mm with handle retracted 13 9 inches 354 mm with battery pack Weight 16 4 lbs 7 4 kg with ...

Page 131: ...ing When traveling by airplane take your LT 286e into the passenger compartment as carry on luggage to prevent it from being stored in an unpressurized storage compartment Options Modem Internal 2400 baud Hayes compatible auto dial Memory Expansion cards Carrying case 1MB RAM expansion card One 2 3 size IBM PC AT compatible slot Soft case for carrying computer C 4 Specifications ...

Page 132: ...AC voltage from a wall socket into the proper DC voltage to power your Equity LT 286e The AC adapter provides enough power to recharge the NiCad battery pack while you operate the computer Application program A software program that performs a specific task such as word processing spreadsheet analysis or database management ASCII American Standard Code for Information Interchange A standard system...

Page 133: ...ource of light Backlight period The length of time your LCD screen stays illuminated in the absence of keyboard activity To restore backlighting to your screen after the backlight period has elapsed press any key To change the backlight period run the SETLCD program see Chapter 2 Backup A copy of a program data file or disk kept in case the original is damaged or lost Batch file A text file contai...

Page 134: ... byte represents one character of data C G A Color Graphics Adapter A type of color monitor that can display graphics You can plug a CGA monitor directly into the built in CRT connector on the side panel of the Equity LT 286e Character Anything you can print or display in a single space on the page or screen including numbers letters punctuation marks and graphic symbols Chip A hardware component ...

Page 135: ...m of symbols for representing data or instructions Also any software program or part of a program COM1 The name that MS DOS uses to identify the primary serial port COM2 The name that MS DOS uses to identify a secondary serial port Command An instruction you enter on a keyboard to direct the computer to perform a specific function COMMAND COM The program file that enables MS DOS to perform command...

Page 136: ...internal modem as well as your hard disk and diskette drive Control code A character generated by holding down the Ctrl key and pressing another key on the keyboard that instructs the computer to perform a specific function Controller A hardware component of your computer that oversees the operation of the hard disk or diskette drive Coprocessor An optional integrated circuit chip that assists the...

Page 137: ...ctory The directory in which you are working MS DOS executes a command in the current directory unless you include a pathname with the command Also called the default directory Current drive The disk drive A or C for example you are currently using MS DOS executes a command in the current drive unless you include a drive identifier with the command Also called the default drive Cursor The highligh...

Page 138: ...ining program code Data length The number of bits per character in serial transmissions Default A value or setting that takes effect when you turn on or reset the computer Also a response to a command the system uses unless you provide a different response Default directory A synonym for current directory Default drive A synonym for current drive Delimiter A character usually a semicolon comma or ...

Page 139: ...ry A list of files on a hard disk or diskette Disk A general term meaning either a diskette or a hard disk Disk drive The physical device either a hard disk drive or a diskette drive that allows the computer to read from and write to a disk A diskette drive has a slot into which you insert a diskette A hard disk is permanently sealed inside its own container Diskette A flat piece of flexible plast...

Page 140: ...mple A or C ECD Enhanced Color Display EGA Enhanced Graphics Adapter A type of video monitor that can display graphics Executable file A file containing program instructions In MS DOS executable files must have an extension of BAT COM or EXE To perform the instructions in the file type its name at the command prompt with or without the extension Execution speed The speed at which the CPU can execu...

Page 141: ...program file External commands are distinguished from internal commands such as DIR or ERASE which are not stored in separate program files File A group of related pieces of information sometimes called records or entries stored together on a disk Text files consist of words and sentences Program files consist of code Computers use program files to perform instructions Filename A name of up to eig...

Page 142: ...e mode The mapping of colors to shades of gray on the LCD screen GW BASIC Microsoft s extended version of the BASIC programming language Hard disk A sealed mass storage device you use to store data permanently A hard disk can process data more rapidly and can store many more files than a diskette Hardware Any physical component of a computer system such as a monitor printer keyboard or CPU Hexadec...

Page 143: ...nterface A hardware or software connection used to transmit data between equipment or programs Internal command A command such as DIR or ERASE that MS DOS does not store in a separate program file You can execute internal commands from any drive or directory Kilobyte KB A unit used to measure storage space in a computer s memory or on a disk One kilobyte equals 1 024 bytes LCD Liquid Crystal Displ...

Page 144: ...omputer s internal timing clock One megahertz is one million cycles per second The Equity LT 286e operates at 8 or 12 MHz Memory The area where the computer stores data Memory contents may be permanent ROM or temporary RAM See also ROM and RAM Memory expansion module An optional component that adds memory to your computer Memory resident program A program you can access while another program is ru...

Page 145: ...ystem from Microsoft that comes with your computer See Operating system NiCad The type of battery used by your Equity LT 286e NiCad stands for nickel cadmium Numeric keypad The number keyboard Operating speed keys grouped on the upper right side of the The speed at which the CPU can execute commands The Equity LT 286e has operating speeds of 8 MHz and 12 MHz Also called execution speed or clock sp...

Page 146: ...6e is accessed from the bottom of the computer Parallel A type of interface that transmits data in groups of bits Distinguished from serial a type of interface in which bits are transmitted one at a time Parameter A term added to a command that tells the computer how to perform the command for example what data file to use or what particular conditions to expect Parity A bit used to verify the acc...

Page 147: ...on diagnostics A set of self testing routines the computer performs automatically every time you turn it on Program A disk file that contains coded instructions telling the computer what to do and how to do it Prompt A message on the screen that requests information or tells you the action you need to perform next R A M Random Access Memory The portion of the computer s memory that runs programs a...

Page 148: ...d a computer s operating system so you can retry a task or begin using a different operating system Resetting erases the computer s RAM RGB Red Green Blue A type of color monitor ROM Read Only Memory The portion of the computer s memory that contains permanent instructions and cannot be modified The power on diagnostic programs for example are stored in ROM Unlike RAM ROM retains its contents even...

Page 149: ...tted one bit at a time as distinguished from parallel a type of interface in which data bits are transmitted in groups Shell An MS DOS program that lets you run programs and perform operating system commands from menus Slide Switch A switch on the bottom of the LT 286e that controls certain operational features Software The programs that enable the computer to perform the tasks and functions you i...

Page 150: ... MS DOS command that affects the way the command works See Parameter System board See motherboard System diskette A diskette from which you can boot the operating system An MS DOS system diskette must contain the file COMMAND COM plus two hidden MS DOS program files To create a system diskette use the S switch with the FORMAT command for example FORMAT A S Target diskette The diskette to which you...

Page 151: ...xamples of utility programs Volume label A name up to eleven characters in length you can assign to a diskette or hard disk To add or change a volume label for a diskette or hard disk that has already been formatted use the MS DOS LABEL command Wildcard character A character that represents an unknown character or group of characters MS DOS recognizes two wildcard characters and The asterisk repre...

Page 152: ...23 Backup copies 1 22 2 22 2 24 diskettes 3 17 Batteries NiCad 2 2 Battery pack 1 3 1 3 2 2 2 5 2 7 charge preserving 2 1 2 12 charging 2 3 4 2 7 2 11 connecting 2 4 6 recharging 2 1 2 removing 2 5 using 2 2 6 Brightness 4 3 adjusting 1 16 lever 1 16 2 3 C Caps Lock 2 8 2 16 Carrying case 3 C 4 handle 2 10 A 2 See also Handle CGA video mode 2 A 6 CLOCK slide switch 2 3 A 12 Clock speed 2 3 A 1 A 1...

Page 153: ...e Delimiters 3 4 Diagnostic program See Self test DIP switches 1 1 1 8 9 1 17 4 1 2 A 1 10 accessing A 2 setting A 1 10 Directories changing 3 12 13 copying 3 13 creating 3 11 12 deleting 3 14 listing 3 9 10 using 3 6 14 Disk drive indicators 1 14 utilities MENU 3 28 DISKCOPY command 3 17 19 4 4 using 3 18 19 Diskette drive assignments A 7 Diskette drives 1 17 1 19 2 7 2 17 A l C 2 3 z inch 1 2 17...

Page 154: ... 1 10 1 17 1 20 A 5 A 7 A 11 12 C 1 See also Diskette drive 5 inch connecting B 3 4 keyboard 1 A 5 C 2 connecting B 6 7 monitor A 1 A 6 B 1 2 connecting B 1 2 F FASTOPEN 2 24 FDD EXT INT slide switch 2 7 A 12 B 3 File extension 3 4 5 utilities MENU 3 28 Filename 3 4 5 Files merging 3 22 Formatting 1 44MB diskette 3 15 16 720 diskette 3 16 17 G Gray scale modes 2 12 2 14 GW BASIC 2 H Handle using 2...

Page 155: ...tment mode 2 14 15 display C 2 mode A 7 options defining 2 12 15 Levers brightness 4 2 contrast 4 2 M Magnetic fields 2 10 2 23 Math coprocessor 2 1 17 MDA video mode 2 Memory card 2 See also RAM MENU utility 3 1 9 2 24 3 18 3 23 3 27 using 3 27 28 Merging files 3 20 3 22 Microprocessor 1 2 C 1 MODE command 1 9 Mode settings MENU 3 28 Modem 1 C 4 cover B 4 installing B 4 5 Monitor external 4 3 A 1...

Page 156: ... 5 A 8 port parallel 1 8 A 8 B 8 serial 1 9 A 8 Printer connecting 1 6 10 PROMPT command 3 29 PUSH button 1 4 R RAM random access memory 1 1 15 1 17 2 27 C 1 memory card C l installing B 5 6 Read only memory ROM 1 17 Real time clock C 2 Registration card 1 3 RESET button 2 27 RESTORE command 3 23 Reverse video mode 2 12 2 15 RGB VIDEO port B 2 Root directory 3 7 8 3 10 13 3 30 RS 232C port 1 9 S S...

Page 157: ...3 7 Subdirectory structure 3 8 SUBST command 3 11 Switch CLOCK 2 11 Switches MS DOS 3 4 System configuration A 1 starting 1 14 16 T Target diskette 3 19 20 file 3 20 Troubleshooting 4 1 5 TYPE indicator 1 5 U Unpacking 1 2 3 Using directories 3 6 14 MS DOS 3 1 32 V Video controller A 6 interface 1 modes C l CGA 2 A 6 EGA 2 1 1 A l A 6 extended EGA 2 MDA 2 Viewing angles 2 9 W Warranty verification...

Page 158: ...lowing E x c e l l e n t G o o d Fair Poor n Organization of this manual cl cl cl cl n Technical accuracy cl cl Ll tl n Completeness of instructions cl cl Ll cl E Clarity of concepts and wording ci cl cl cl W Quality of examples and pictures ci Ll cl Cl n Quantity of examples and pictures cl cl cl cl Comments Name Address City State Zip Please tear out and mail in Thank you EPSON ...

Page 159: ...PLACE EPSON America Inc 2780 Lomita Blvd Torrance CA 90505 MS 4 1 Fold Here Tape Here Do Not Staple l ...

Page 160: ...brightness lever contrast lever internal diskette drive handle Port diskette drive port hard disk drive status indicator bar expansion slot cover handle ...

Page 161: ......

Reviews: