background image

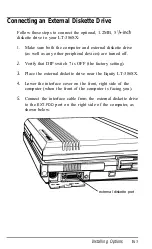
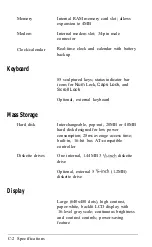
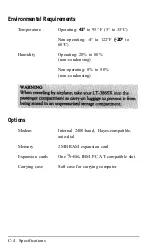
CRT mode enabled automatically by

inserting a connector into the RGB

VIDEO 

port before power on

External RGB monitor supported (VGA-
compatible)

Power Supply

Externally attached, rechargeable NiCad
battery pack (4000 milliampere-hours);
lasts from 1 to 3 hours

12/5-volt AC adapter (can recharge

battery pack while operating computer)
with automatic 120-240V sensing

Power Requirements

120-240 VAC, 50/60 Hz

NiCad rechargeable battery pack, 9.6
volts, 4 ampere-hours

Physical Dimensions

Height

3.46 inches (88 mm)

Width

12.9 inches (318 mm)

Depth

11.7 inches (296.5 mm), with handle

retracted; 13.9 inches (354 mm) with
battery pack

Weight

17 lbs (7.7 kg) with battery and hard disk

drive

Specifications C-3

Summary of Contents for Equity LT-386SX

Page 1: ...EQUITY LT 386SX User s Guide EPSON ...

Page 2: ...y caused by the computer or its peripheral devices To further isolate the problem Disconnect the peripheral devices and their input output cables one at a time If the interference stops it is caused by either the peripheral device or its I O cable These devices usually require shielded I O cables For Epson peripheral devices you can obtain the proper shielded cable from your dealer For non Epson p...

Page 3: ...EPSON EQUITY LTT M 386SX User s Guide ...

Page 4: ...ion has been taken in the preparation of this publication Epson America assumes no responsibility for errors or omissions Nor is any liability assumed for damages resulting from the use of the information contained herein Further this publication and features described herein are subject to change without notice T R A D E M A R K S AT and XT are trademarks and IBM is a registered trademark of Inte...

Page 5: ...provided 7 This product should be operated from the type of power source indicated on the marking label If you are not sure of the type of power available consult your dealer or local power company 8 This product is equipped with a three wire grounding type plug a plug having a third grounding pin This plug will only fit into a grounding type power outlet This is a safety feature If you are unable...

Page 6: ...power cord or plug is damaged or frayed B If liquid has been spilled into the product C If the product has been exposed to rain or water D If the product does not operate normally when you follow the operating instructions Adjust only those controls that are covered by the operating instructions since improper adjustment of other controls may result in damage and will often require extensive work ...

Page 7: ...Turning On the Computer 1 15 Adjusting Screen Contrast and Brightness 1 17 Initial Screen Display 1 18 7 Running the SETUP Program 1 18 Starting the SETUP Program 1 19 Setting the Date 1 20 Setting the Diskette Drive s 1 21 Setting the Hard Disk Drive 1 21 Setting the Primary Display 1 22 Setting the Keyboard 1 22 Setting the Scratch RAM Option 1 23 Setting the CPU Clock Setting 1 23 Setting the S...

Page 8: ...ing Diskettes for the Equity LT 386SX 2 19 Caring for Diskettes 2 20 Inserting and Removing Diskettes 2 22 Making Backup Copies 2 23 Write Protecting Diskettes 2 23 Using the Hard Disk Drive 2 24 Caring for the Hard Disk 2 24 Protecting the Data on Your Hard Disk 2 25 Improving Hard Disk Performance 2 25 Turning Off the Hard Disk 2 26 Modifying the AUTOEXEC BAT File 2 26 Resetting the Computer 2 2...

Page 9: ... Using DISKCOPY 3 18 Using COPY 3 20 Using BACKUP 3 22 Deleting Data 3 24 Using the MS DOS Shell Program 3 24 Using HELP 3 25 Using MENU 3 27 MENU Utility Options 3 28 Using an AUTOEXEC BAT File 3 29 Creating an AUTOEXEC BAT File 3 30 Starting an Application Program 3 31 Using Memory Beyond 640KB 3 31 About EMM386 SYS 3 33 Chapter 4 Troubleshooting The Computer Won t Start 4 1 The LCD Screen Is Bl...

Page 10: ...ing the RAM Card B 5 Connecting an External Keyboard B 6 Installing an Option Card B 7 Installing a Math Coprocessor B 13 Appendix C Specifications Main Unit C 1 Interfaces C 1 Keyboard C 2 Mass Storage C 2 Display C 2 Power Supply C 3 Power Requirements C 3 Physical Dimensions C 3 Environmental Requirements C 4 Options C 4 Appendix D System Diagnostics Starting the Diagnostics Program D 2 Creatin...

Page 11: ... 14 DMA Controller Test D 14 Interrupt Controller Test D 15 Timer Test D 15 RTC Test D 16 CMOS Validity Test D 16 Memory Diagnostics D 17 BIOS ROM Test D 18 Parity Test D 18 Pattern Test D 18 Walking 1 s Test D 19 Walking 0 s Test D 19 Address Test D 19 Refresh Test D 20 Hard Disk Diagnostics D 20 Hard Disk Parameters D 21 Hard Disk Format D 24 Auto Interleave D 25 Media Analysis D 26 Performance ...

Page 12: ...ata Line Test D 35 Video Diagnostics D 36 Adapter Test D 36 Attribute Test D 36 80x25 Display Test D 36 40x25 Display Test D 37 320x200 Graphics Test D 37 640x200 Graphics Test D 37 Page Selection Test D 37 Color Test D 37 640x350 Graphics Test D 37 640x480 Graphics Test D 38 Video Error Message D 38 Miscellaneous Diagnostics D 38 Printer Adapter Test D 38 Communication Adapter Test D 39 Keyboard ...

Page 13: ...Appendix F Using Other Reference Diskette Utilities Using Microsoft Windows 386 F 1 Using Microsoft Windows Version 3 0 F 3 Using VGARAM F 4 Using SCROLL F 5 Glossary Index xi ...

Page 14: ...86SX comes with the following CI An 80386SX microprocessor c3 2MB megabytes of internal RAM memory Q One 1 44MB 3 z inch diskette drive D A high contrast paper white backlit LCD liquid crystal display screen CI A slot for a 2MB RAM card CI An internal proprietary modem slot Ll A size IBM PC AT compatible 8 16 bit internal expansion slot LI A high capacity battery pack to power the LT 386SX rubber ...

Page 15: ...This socket is easily accessible from the bottom of the computer so you can install the chip yourself Or if you prefer have an authorized Epson dealer or Customer Care Center install the coprocessor for you The built in serial and parallel interfaces allow you to attach almost any peripheral device such as an Epson printer or external modem to your Equity LT 386SX You can connect a VGA color monit...

Page 16: ...T 386SX comes with MS DOS version 4 01 by Microsoft MS DOS 4 01 provides a Shell feature that lets you run programs and choose operating system commands from menus instead of the MS DOS command prompt Designed for both new and experienced users of MS DOS the Shell program lets you tailor your system to your own needs and manage your programs and data more efficiently You ll find the following MS D...

Page 17: ...about any MS DOS command MENU provides an easy way to run some MS DOS commands for routine operations such as file copying and disk management You can use any application program designed for the IBM Personal Computer PC XT or PC AT on your Equity LT 386SX You may also want to use powerful 32bit software such as Microsoft Windows 386 with your computer In addition to the MS DOS operating system yo...

Page 18: ...bout MS DOS in the MS DOS manuals Chapter 4 provides troubleshooting guidelines you can follow if you encounter any problems while using your Equity LT 386SX Appendix A describes the DIP switches you may need to change if you modify your system s configuration Appendix B explains how to attach options such as an external color monitor external diskette drive or keyboard to your Equity LT 386SX and...

Page 19: ...d support to its dealers and Customer Care Centers Therefore we ask that you contact the business where you purchased your Epson product to request assistance If the people there do not have the answer to your question they can obtain it through our dealer support program Epson is confident that this policy will provide you with the assistance you need Call the Epson Consumer Information Center at...

Page 20: ...information about using the computer The LT 386SX has one set of DIP switches that provide the computer with information about its configuration each time you turn it on The DIP switches are located on the bottom of the computer When the LT 386SX is shipped from the factory the DIP switches are set for the following type of system 0 The internal diskette drive is drive A 0 If an external drive is ...

Page 21: ...es not match this configuration you need to change the appropriate switches as described in Appendix A before you begin If you plan to modify your computer by attaching an external monitor or diskette drive see Appendix B for instructions Do not turn on the computer printer or any peripherals until the instructions tell you to do so Otherwise you may damage some part of your equipment 1 Unpacking ...

Page 22: ...e MS DOS Reference Manual MS DOS Shell User s Guide MS DOS Command Summary You ll also find a registration card with the main unit Fill out this card now and mail it to Epson With your registration card on file Epson can send you update information Please keep a copy of your sales receipt for warranty verification Your receipt is all that is required for warranty service Be sure to keep your packi...

Page 23: ...can skip this step If your dealer has not installed the hard disk your computer contains a box with a label that says This box is empty You install the hard disk drive above the keyboard panel on the computer To access the slot for the hard disk drive open the screen by pressing the latch release button in the center of the computer Then lift the screen up and back Follow these steps to install th...

Page 24: ... the box releases lift it straight up and out Store the empty hard disk box with your other packing materials 3 Face the front of the computer and hold the hard disk drive with the PUSH button on the left and the retractable tabs on the right Setting Up Your System 1 5 ...

Page 25: ...lot on the computer The connectors on the hard disk drive fit into the sockets on the computer 5 Keep the hard disk drive level and lower it straight down into the slot If you lower either side first the connectors do not fit into the sockets 1 6 Setting Up Your System ...

Page 26: ...e your MS DOS Installation Guide for instructions after you complete the remaining steps in this chapter 3Connecting a Printer The Equity LT 386SX has both parallel and serial interfaces ports You can easily connect a printer or plotter that has either type of interface Just follow the instructions below Of course Epson offers a full range of printer products consult your Epson dealer for more inf...

Page 27: ...r printer to the parallel interface labeled PRINTER on the computer 1 Place the printer next to your computer 2 Before you connect the printer make sure the power switches on the computer and printer are off The power switch for your computer is located on the right side of the machine 3 Press down on the release tab to open the computer s interface cover as shown below release tab 4 One end of th...

Page 28: ...s retaining screws tighten them by hand or with a screwdriver 5 Connect the other end of the cable to the printer as shown in the following illustration To secure the cable squeeze the clips at each side of the printer connector and push them into place Setting Up Your System 1 9 ...

Page 29: ...ace If you have a printer or other peripheral device that uses a serial interface connect it to the serial interface labeled RS232C on the right side of the computer serial port The Equity LT 386SX uses an IBM PC AT compatible 9 pin D shaped male connector so be sure you have a compatible cable or an adapting cable that converts the 9 pin output to the standard 25 pin output To connect a serial de...

Page 30: ...rd DIP switch settings for the LT 386SX define your RS232C port as the primary serial port If you think the DIP switch settings have been changed or you would like a different setting see Appendix A 4Connecting the AC Adapter Follow these steps to connect the AC adapter 1 Make sure the computer s power switch located on the right side of the computer is turned off 2 Turn the computer around so the...

Page 31: ...on the AC adapter Slide the release tab in the direction shown on the tab to release the safety cover Lift off the cover and store it in a safe place 4 Slide this box up into the slots on the connector on the back panel of the computer Press the connector box up until it snaps into place 1 12 Setting Up Your System ...

Page 32: ...ure to read Using the AC Adapter in Chapter 2 for more information about the AC adapter When you are not using the AC adapter replace the safety cover that protects the connector Setting Up Your System 1 13 ...

Page 33: ... Power Cord Follow these steps to connect the power cord 1 Connect the power cord to the adapter s input socket 2 Plug the other end of the power cord into a grounded 120 volt AC wall outlet 1 24 Setting Up Your System ...

Page 34: ...bar The left disk in use icon indicates that the hard disk drive is in use The right disk in use icon indicates that the built in diskette drive is in use See Status Indicator Bar in Chapter 2 for further information Always wait at least five seconds after you switch off the power before switching it back on Turning the power off and on rapidly can damage the computer s circuitry Do not leave a be...

Page 35: ...ipheral devices such as a printer an external diskette drive or a color monitor rive on 2 Turn on the computer by pressing the power switch on the right side of the computer Press the switch toward the back of the computer power switch 1 16 Setting Up Your System ...

Page 36: ...n the right side of the screen to adjust the screen s contrast and brightness The levers are shown below contrast lever The contrast lever on the right determines how bright the characters appear against the background To increase the contrast move the lever up To decrease it move the lever down The brightness lever on the left controls the intensity of the screen s backlighting To make the backli...

Page 37: ...s is a simple procedure that you must do at least once You may need to do it again later if you want to change a setting The SETUP program is stored in the computer s read only memory ROM You can access this program whenever you turn on or reset the computer The SETUP program lets you specify the following LI The current date and time Li Whether you have installed an external 5 inch diskette drive...

Page 38: ...d up by a battery so it will not be erased when you turn off or reset the computer Whenever you turn on the computer it reads the settings stored in CMOS RAM If there are any differences between those settings and the DIP switch settings you see an error message If this occurs run SETUP again or change your DIP switch settings Starting the SETUP Program When you turn on or reset the computer the f...

Page 39: ...Hz Shadow RAM setting Enabled Stand by mode set Power down tine is 00 min Start up LCD cntrt Positive ESC Eut J tc Select PgUp PgDn Modify Press the arrow keys to move through the menu selections Press Page Up or Page Down to change the selected setting Setting the Date The computer s setting for the current month is highlighted A calendar in the lower right hand portion of the menu displays the c...

Page 40: ... B If you have set DIP switch 1 to off to reverse the designations of the A and B drives set drive B to 1 44MB 3 l z and if you have attached an external diskette drive set drive A to 1 2MB 5 1 4 See Appendix A for more information on the DIP switches Setting the Hard Disk Drive You may have either of two types of hard disk drives installed in the Equity LT 386SX Type 2 is the 20MB hard disk drive...

Page 41: ...lt selection is VGA or EGA If you are using the LCD and you choose color 80x25 monochrome or color 40x25 the computer displays the error message CMOS display type mismatch at the completion of the self test If you select Not installed the computer skips the display self test when you turn on or reset the computer Setting the Keyboard There are two options for the keyboard installed or not installe...

Page 42: ...memory as the scratch RAM location Setting the CPU Clock Setting This setting determines the execution speed the Equity LT 386SX uses every time you turn on the computer During operation you can change the speed by holding down the Ctrl key and then pressing the left Shift and F keys simultaneously The CM left Shift F hot key combination does not change the setting the computer uses when you turn ...

Page 43: ...de is enabled the computer sounds two short beeps Hold down Ctrl and press left Shift and L again to disable standby mode The computer sounds a single beep to signal that standby mode is disabled If you are installing or running software that requires a lot of disk access time during which there is little or no keyboard input it is best to set standby mode to 00 off to prevent the LCD from going d...

Page 44: ...t to run SETUP again At the completion of the self test the computer displays a table listing the current settings for the Equity LT 386SX An example of this table is shown below Main Processor 80386 Numeric Processor Present Floppy Drive A 1 44MB 3 1 2 Floppy Drive B 1 2MB 5 1 4 Display Type GA or EGA ROM BIOS Date 09 15 89 Base Memory size 640 KB Ext Memory size 3328 KB Hard Disk C Type 17 Hard ...

Page 45: ...e release button pops out For more information on inserting removing and caring for diskettes see Chapter 2 2 Reset the LT 386SX and ignore the SETUP prompt The computer automatically loads the operating system and starts the MS DOS installation program which is called SELECT The SELECT program automatically partitions and formats your hard disk creates an AUTOEXEC BAT file and a CONFIG SYS file b...

Page 46: ... hard disk your original MS DOS diskettes become your backup copies Store these diskettes in a safe place See your MS DOS Installation Guide for a complete description of SELECT and how to install MS DOS on your computer Setting Up Your System 1 27 ...

Page 47: ...nnect the AC adapter to the battery pack and to an electrical outlet the AC adapter recharges the battery See the next section for details If you are not using the AC adapter and the Battery in Use icon on the status indicator bar starts flashing save all your work and power off the computer before connecting the AC adapter When the battery is low connecting the AC adapter may reset the computer B...

Page 48: ... Battery in Use icon starts to flash you have a maximum of 10 to 15 minutes before the battery charge is completely gone If you continue using the computer without connecting the adapter power runs out and you may lose data To recharge the battery leave the battery pack connected to the computer and connect the AC adapter to the battery pack Then connect the power cord to the AC adapter and to an ...

Page 49: ...erate the LT 386SX using the battery follow these guidelines CI Lower the brightness of the backlight to its lowest readable level Use the brightness lever on the right side of the screen Q Select a clock speed of 8 MHz In the SETUP menu choose the 8 MHz option for CPU clock setting Or during operation you can hold down Ctrl and press left Shift and F simultaneously to change the computer s clock ...

Page 50: ...20 minutes the icons on the status indicator bar go dark indicating the battery is discharged Now give the battery a full eight hour charge Connecting the Battery Pack Before you can use the Equity LT 386SX without the AC adapter you must install the battery pack Follow these steps 1 Enclosed in the box with the battery pack is a set of rubber pads Attach these pads to the bottom of the pack as sh...

Page 51: ...er the edge of the desk to make it easier to slide the battery pack into place 4 Remove the safety cover that protects the metal connector on the battery pack 5 Align the two metal connectors on the battery pack with the slots on the back of the computer as shown below 6 Pull the battery pack up until it snaps into place Using the Equity LT 386SX 2 5 ...

Page 52: ...computer is off 2 Disconnect the AC adapter 3 Turn the computer around so the back is facing you Make sure the back of the computer is slightly over the edge of the desk so you can slide the battery pack down 4 While pulling the release tabs on each side of the battery pack toward you press down on the battery pack Slide the battery pack down and off the computer 2 6 Using the Equity LT 386SX ...

Page 53: ...sk drive Indicates when you are accessing the internal diskette drive Indicates that the DIP switches are configured for an external diskette drive See Appendix A Displays the current CPU clock speed either 8 MHz or 16 MHz Indicates when you are using the battery pack blinks when the battery pack charge is low Indicates when you select an external monitor Using the Equity LT 386SX 2 7 ...

Page 54: ...icates when the internal keyboard is in Num Lock mode does not respond to the modes of an external keyboard CAPS Indicates when the internal keyboard is in Caps Lock mode does not respond to the modes of an external keyboard The SCRL NUM and CAPS icons indicate whether the corresponding key functions are enabled See Special Keys on the Equity LT 386SX Keyboard later in this chapter 2 8 Using the E...

Page 55: ...computer shown below Then lift the screen back You can position the screen at a variety of viewing angles When you are not using the computer or you want to move it turn it off and close the screen as shown below Be sure the screen locks into the bottom part of the computer Using the Equity LT 386SX 2 9 ...

Page 56: ...6SX has a convenient carrying handle To use the handle pull it out from the computer as shown below Be sure the screen is closed whenever you carry the computer by its handle To avoid accidental damage to your Equity LT 386SX always store the computer in a flat horizontal position Do not leave it standing upright on its back panel 2 10 Using the Equity LT 386SX ...

Page 57: ...ding down Ctrl and pressing left Shift and F simultaneously The status indicator bar displays the current clock speed Selecting LCD Screen Contrast The LCD can display white letters on a black background positive LCD contrast or black letters on a white background negative LCD contrast You can select the contrast in the SETUP menu See the description of running the SETUP program in Chapter 1 At an...

Page 58: ...k so that it is easily accessible when you need it You also can start the program using the Reference diskette To start the program from the Reference diskette follow the steps below 1 Insert the Reference diskette into drive A 2 Type A and press Enter 3 Type SETLCD and press Enter or If you want to use run SETLCD as a memory resident program type SETLCD R and press Enter If you start the program ...

Page 59: ...D MAGENTA LT MAGENTA BROWN WHITE BRT WHITE You use the following keys to make menu selections t B F7 F9 F10 Selects the color you want to change Darkens the level of gray Lightens the level of gray Moves the menu to the right half of the screen when pressed the first time and to the left half of the screen when pressed again Hides the menu Pressing F8 again returns the menu to the screen Resets al...

Page 60: ...8 8 11 20 40 14 24 45 50 32 36 56 63 The 16 gray scale numbers listed in the right column above represent the only shades available to define any color You also can change the gray scale number for specific colors without displaying the SETLCD menu by entering the color number and the desired gray scale number as parameters in the SETLCD command The format for this function of SETLCD is S E T L C ...

Page 61: ...lor This may be any one or two digit number from the column titled Gray Scale Number in the table above cc gg is the parameter for changing the gray scale for a second or subsequent color You can change as many colors as you want by using a slash between the parameters For example the following command sets color number 0 black to gray scale number 63 and it sets color number 7 white to gray scale...

Page 62: ...or instructions on how to use keys for specific software functions consult the manual that came with the program you re running The Num Lock Scroll Lock and Caps Lock keys work as toggles press them once to turn on a function and again to turn it off When a function is on the corresponding icon on the status indicator bar is displayed When a function is off the icon disappears 2 16 Using the Equit...

Page 63: ...ate characters or functions When the Caps icon is displayed changes letter keys from uppercase to lowercase Works with other keys to enter alternate character codes Sends text on the screen to the printer Used by some application programs Used by some application programs Turning on Num Lock activates the keypad and scroll functions for the keys assigned to those functions Other character function...

Page 64: ...the character at the cursor Ends a line of keyboard input or executes a command Moves the cursor back one space deleting the character to the left Control cursor location within application programs Used by some application programs Using Diskettes Use diskette drives to store data on diskettes and retrieve and use stored data The Equity LT 386SX has a 1 44MB 3 z inch diskette drive it also suppor...

Page 65: ...y LT 386SX Be sure to buy high quality diskettes to use in your Equity LT 386SX You can use two kinds of diskettes LI 3 l z inch 720KB double sided double density diskettes Q 3 z inch 1 44MB double sided high density diskettes On a 720KB diskette you can store the equivalent of about 300 pages of text You can store twice as much information on 1 44MB diskettes but the 3 z inch diskette drives on s...

Page 66: ...s any data previously stored on a diskette so be sure to format only new blank diskettes or diskettes that contain data you want to erase See Chapter 3 for information about formatting diskettes Caring for Diskettes The 3 z inch diskettes are sturdy and reliable but are not indestructible To avoid damaging your diskettes and losing data take these precautions Cl Do not remove a diskette or turn of...

Page 67: ... in extreme cold or heat The temperature in a car in the middle of summer or winter can cause severe damage Do not expose a diskette s magnetic surface by sliding the metal shutter Never touch a diskette s magnetic surface The oil on your fingertips can damage the diskette and also the drive Do not place anything on top of your diskettes and make sure they do not get bent Never wipe brush or try t...

Page 68: ...e arrow on the left side pointing into the computer Slide the diskette into the drive until it clicks into place To remove a diskette press the release button on the diskette drive When the diskette pops out of the drive pull it out and store it properly in a diskette container 2 22 Using the Equity LT 386SX ...

Page 69: ...ing Diskettes You can write protect a diskette to prevent its data from being altered When a diskette is write protected you can copy data from it but you cannot store new data modify existing data erase files or format the diskette The write protect mechanism is a small switch on the lower right comer on the back of the diskette To write protect the diskette slide the switch down toward the edge ...

Page 70: ...er system However to ensure that you always have plenty of space available keep only files you use regularly on the hard disk Store your other files on diskettes Caring for the Hard Disk To avoid damaging your hard disk take these precautions 0 Keep your computer away from magnetic fields such as electrical appliances telephones and loudspeakers Q Keep your computer in a moderate environment Hard ...

Page 71: ...on program diskettes before copying the program files to the hard disk Copy your data files frequently to keep your backup diskettes up to date Use the Epson MENU utility or the MS DOS BACKUP command to back up your hard disk files Use the MENU utility or the MS DOS DISKCOPY command to make copies of your system and program diskettes For instructions on using these backup utilities see Chapter 3 o...

Page 72: ...ccess it So be sure to set a realistic time period To specify a power off time type the following at the system prompt HDDP SAVE xx where xx can be any value from 1 to 18 Then press Enter To keep the hard disk drive on at all times type one of the following and press Enter HDDPSAVE 0 HDDPSAVE 00 HDDPSAVE ALL Modifying the AUTOEXEC BAT File The SELECT program you use to install MS DOS creates a fil...

Page 73: ...r AUTOEXEC BAT file By adding this utility you can set the power off period for the hard disk each time you power on the computer To modify the AUTOEXEC BAT file created by SELECT follow these steps 1 At the MS DOS command prompt in the root directory C type the following and press Enter COPY AUTOEXEC BAT CON AUTOEXEC BAT 2 Type HDDPSAVE 5 and press Enter This turns off power to the hard disk if y...

Page 74: ...et the computer There are three ways to reset Because each is more powerful than the last try them in the order listed here 1 If you are using MS DOS hold down Ctrl and Alt and press Del The screen goes blank for a moment and then the computer reloads MS DOS MS DOS must be either on the hard disk or on a diskette in drive A If this does not correct the problem try the second method 2 Press the RES...

Page 75: ...computer save your data exit the program you are using and then remove all diskettes from the disk drives First turn off any peripherals such as a printer a monitor or an external diskette drive Then turn off the computer Using the Equity LT 386SX 2 29 ...

Page 76: ...t MS DOS depends on how you plan to use your computer If you use it only for running application programs the few MS DOS commands you need are introduced in this chapter If you use advanced features or create your own programs see your MS DOS manuals for a complete description of the features of the operating system This chapter describes the following MS DOS functions Starting and exiting MS DOS ...

Page 77: ...gram MS DOS must be running in memory If you have prepared your hard disk according to the procedures in the MS DOS Installation Guide MS DOS loads automatically from your hard disk whenever you turn on your computer provided you do not have a diskette in the diskette drive Before you turn off the computer make sure the MS DOS command prompt such as C or C appears on the screen Then remove your di...

Page 78: ... filename To log onto another drive type the name of the drive followed by a colon Then press Enter For example if the current drive is C and you want to log onto drive A type A and press Enter Your screen now displays the A prompt showing that you are operating from drive A Drive A continues to be the current drive until you log onto a different drive or turn off or reset your computer To access ...

Page 79: ... that are not on the current drive or directory A pathname tells MS DOS where to find a file and consists of one or more directory names separated by backslashes See Using Pathnames later in this chapter There are two kinds of MS DOS commands internal and external Internal commands are commands that are built into MS DOS and can be used any time MS DOS is loaded into memory External commands are s...

Page 80: ...ly the command prompt reappears so you can try again Type the correct command and press Enter Storing Data You store all your work and programs in files on your hard disk or diskettes A data file contains information such as words numbers or pictures A program contains instructions that the computer can understand and execute The kind of file you create depends on the MS DOS commands or applicatio...

Page 81: ...s Microsoft Word uses DOC for its word processing files Such default extensions help an application program distinguish its own data files from files created by other programs If you have programs that use default extensions avoid using those particular extensions in other contexts You can type the name and the extension in either lowercase or uppercase letters but do not use uppercase or lowercas...

Page 82: ...ubdirectories on your diskettes You may find this useful for organizing the files on your backup diskettes The subdirectory structure of a hard disk can be represented with a tree like diagram like this Root directory LEDGER WORDPROC ACCOUNTS SALES PERSONAL BUSINESS STORIES LETTERS In this example the original directory the root directory has two subdirectories named LEDGER and WORDPROC Each of th...

Page 83: ...sisting of up to three characters U The root directory does not have a name it is identified by a backslash The Current Directory MS DOS always recognizes one directory as the current or default directory just as it always recognizes one drive as being the current or default drive The current directory is the directory in which MS DOS performs your commands unless you tell it otherwise If you want...

Page 84: ...current directory type DIR and press Enter MS DOS lists the names of the files in the current directory on the current drive If you are logged onto drive C but want to see a directory of the files on the diskette in drive A type DIR A and press Enter A directory listing looks like this Volume in drive C is DOS400 Volume Serial Number is 3728 0CF6 Directory of C COMMAND COM 37557 12 19 88 12 00a CO...

Page 85: ... in this chapter if you had a file named APRIL TXT stored in the subdirectory named LETTERS the full pathname of that file would be WORDPROC PERSONAL LETTERS APRIL TXT This pathname tells MS DOS to start at the root directory and go through two subdirectories WORDPROC and PERSONAL to find the LETTERS subdirectory Once in the LETTERS subdirectory MS DOS finds the file called APRIL TXT The first bac...

Page 86: ...t directory Creating Directories The MKDIR command lets you create directories To create the directory LEDGER within your root directory for example type the following and press Enter MKDIR LEDGER You can abbreviate the name of this command to MD For example to create a SALES directory under the LEDGER directory type the following and press Enter MD LEDGER SALES To check that the LEDGER directory ...

Page 87: ... CHDIR or CD followed by the pathname of the directory you want to use For example to change from any directory to the directory LEDGER which is a subdirectory of the root directory type the following and press Enter CD LEDGER The backslash identifies the LEDGER directory as a subdirectory of the root directory Once you are working within a directory you can access any of the files it contains wit...

Page 88: ...is command you must specify the name of the file you want to copy as well as the directory to which you want to copy the file For example if you are in the LETTERS directory and want to copy the file APRIL TXT to the BUSINESS directory type the following and press Enter APRIL TXT WORDPROC BUSINESS The command has three parts the word COPY the name of the file you want to copy APRIL TXT and the nam...

Page 89: ...t Formatting prepares the diskette so that MS DOS can store data on it You need to do this before you use the diskette for the first time You can also reformat previously used diskettes This process erases all data on the diskette Always be sure you no longer need any files on a diskette before reformatting it You can format two kinds of 3 z inch diskettes Double sided double density diskettes can...

Page 90: ... f o r d r i v e A and strike ENTER when ready 3 Insert the diskette you want to format into drive A and press Enter When the diskette is formatted you see this message and prompt Format complete Volume label 11 characters ENTER for none 4 Enter up to 11 characters for the volume label to be stored on the diskette and press Enter FORMAT displays these messages 1447664 bytes total disk space 144766...

Page 91: ...u are not in the directory containing the file FORMAT COM use the CD command to change to that directory 2 Type the following and press Enter FORMAT A F 720 You see this prompt Insert new diskette for drive A and strike ENTER when ready 3 Insert the diskette you want to format into drive A and press Enter When the diskette is formatted you see this message and prompt Format complete Volume label 1...

Page 92: ...DOS command prompt by pressing N and Enter Copying Data It is very important to keep backup diskettes containing copies of the files you create There are several ways to copy data and program files LI Use the DISKCOPY command to make an exact duplicate of a diskette Cl Use the COPY command to copy individual files CI Use the BACKUP command to back up the files on a hard disk or diskette in a speci...

Page 93: ... DISKCOPY to copy data between a hard disk and a diskette To use DISKCOPY follow these steps 1 Make sure your original diskette the one you are copying from is write protected See Chapter 2 for instructions 2 If necessary log onto drive C If you are not in the directory containing the file DISKCOPY COM use the CD command to change to that directory 3 Type the following and press Enter DISKCOPY A A...

Page 94: ...Y copies the files from memory to the target diskette it prompts you to reinsert the source diskette so it can copy the remaining data to the computer s memory if necessary Insert the source diskette in drive A and press any key 7 DISKCOPY copies the rest of the source diskette s files to the computer s memory and then prompts you to reinsert the target diskette Insert the target diskette in drive...

Page 95: ...arget diskette or directory has the same name as the file you are copying the copy automatically replaces overwrites the existing file MS DOS does not provide a warning Be careful you do not accidentally replace a file that you want to keep CI If you are copying to a diskette the diskette must be formatted To use the COPY command type COPY at the command prompt followed by the drive identifiers an...

Page 96: ...d uses the current drive For example if the current drive is C and you want to copy the file REPORT from drive A to drive C without changing the filename enter the command as follows COPY A REPORT MS DOS writes the copy to drive C because drive C is the current drive You can save a few keystrokes by omitting the drive identifier of the current drive but it is equally correct to include all the dri...

Page 97: ...n which you specified their names Using BACKUP The BACKUP command lets you store files in a special format for archive purposes You normally use BACKUP to back up hard disk files however you can use it to copy files from any disk to another hard disk to diskette diskette to hard disk diskette to diskette or hard disk to hard disk There are advantages to using the BACKUP command 0 BACKUP can split ...

Page 98: ...ch make readable copies of files BACKUP creates files that you cannot use until you restore them to the disk by using the RESTORE command You can use switches with BACKUP to back up files created after a certain date or to specify files stored in a certain directory You can also tell BACKUP to add only those files that were modified since the last time you ran BACKUP This process speeds up the bac...

Page 99: ...are sure that is what you want to do If you are sure press Y then Enter You can also use the ERASE command to delete files ERASE works exactly like the DEL command Using the MS DOS Shell Program MS DOS 4 01 provides a Shell feature that lets you run programs and choose operating system commands from menus instead of the MS DOS command prompt The Shell feature is designed for both new and experienc...

Page 100: ...at the MS DOS command prompt and press Enter 2 The screen displays a menu of MS DOS commands Use the cursor keys to highlight the command you want information about then press Enter 3 If there is more than one page of information about the command you see the prompt PgUp at the top of the screen Press Page Up to display the rest of the text 4 To return to the HELP menu press ESC Press ESC again to...

Page 101: ...o request help information for more than one command Follow these steps 1 At the command prompt type HELP and the names of the commands you want information about Then press Enter Separate each command name with a space For example to see information about DISKCOPY FORMAT and COPY type the following and press Enter HELP DISKCOPY FORMAT COPY 2 MS DOS displays help information for the first command ...

Page 102: ...for each one To access the MENU utility log onto the directory containing the file MENU EXE Type MENU at the command prompt and press Enter You see this main menu EXIT File U t i l i t i e s Disk Utilities Mode Settings Help Enter DOS Command To select an option use the arrow keys to highlight your selection then press Enter Most options contain submenus keep highlighting your selection and pressi...

Page 103: ...S CHKDSK DISKCOPY DISKCOMP and FORMAT commands Mode Settings Lets you change your configuration settings This option also lets you select alternate code pages character sets and redirect data from the parallel port to the serial port Because you can perform so many tasks from the Mode Settings submenus this option is a powerful alternative to the MS DOS MODE command Help Lets you access the Epson ...

Page 104: ...er of times you need to change directories or specify pathnames Cl Add the command that starts your most commonly used application program such as a word processor or spreadsheet program so MS DOS loads it automatically when you turn on or reset the computer D Change the MS DOS command prompt so it displays the current directory or your name or anything else you want See your MS DOS Reference Manu...

Page 105: ...e instructions to use the COPY command 1 At the C prompt type the following and press Enter COPY CON C AUTOEXEC BAT 2 Type the commands you want to include in the file exactly as you want MS DOS to execute them Press Enter at the end of each line After you type the last command press Enter to move the cursor to the next blank line 3 Now press F6 and then Enter COPY creates a file named AUTOEXEC BA...

Page 106: ...command prompt before turning off your computer Using Memory Beyond 640KB Your Equity LT 386SX comes with at least 2MB of random access memory RAM MS DOS and your application programs that run under MS DOS use the first 640KB of memory By converting the extended memory above 1MB to expanded memory you may use this memory for certain application programs for example Lotus 1 2 3 that support the Lot...

Page 107: ...program capable of saving an ASCII text file you can modify CONFIG SYS using the MS DOS COPY or EDLIN command To modify CONFIG SYS using the COPY command follow these steps 1 Log onto the root directory of the hard disk or diskette from which you boot MS DOS 2 Type the following and press Enter COPY CONFIG SYS CON CONFIG SYS 3 Type the following and press Enter DEVICE EMM386 SYS You can add one or...

Page 108: ...phs describe the items in the command line d path specifies a pathname You need to add the pathname if the file EMM386 SYS is not in the root directory of the disk used to boot MS DOS For example if EMM386 SYS is in a directory called DOS on drive C be sure to include a pathname like this DEVICE C DOS EMM386 SYS size allows you to specify the number of kilobytes of extended memory to use as expand...

Page 109: ...r expansion option board You can use more than one X parameter to exclude more than one range of memory Mx indicates the address of the EMM386 SYS page frame Do not include this parameter unless you want to force EMM386 SYS to use a particular address The options for x are shown below if x is 0 1 2 3 4 5 6 7 8 C000 C400 C800 CC00 D000 D400 D800 DC00 EOOO 3 34 Using MS DOS With Your Computer ...

Page 110: ...S the Equity LT 386SX displays a message when you turn it on or reset it listing the device parameters For instance MICROSOFT Expanded Memory Manager 386 Version 4 00 C Copyright MICROSOFT Corporation 1988 Page Frame Base Address adjusted EMM386 SYS Installed Extended memory allocated 2048 KB System memory allocated 385 KB Expanded memory available 3432 KB Page frame base address C8000 H FASTOPEN ...

Page 111: ...Information number 1 800 922 89 11 for the location of your nearest authorized Epson Customer Care Center When you contact your dealer or Epson Customer Care Center be ready to provide the serial number of your computer located on the bottom of the computer its configuration including the type of disk drives and options and the names and version numbers of any software programs you are using The C...

Page 112: ...o image appears on the LCD screen follow these steps to solve the problem 1 Use the contrast and brightness levers to adjust the screen display 2 To save power you may have set a time period for standby mode in the SETUP menu so that the computer turns off the LCD screen automatically after a specified period of time with no key input If this happens press any key to restore the display To turn of...

Page 113: ... the computer and monitor are turned on 2 Use the controls on the monitor to adjust the brightness and contrast 3 Remove any diskette from drive A then turn off the power switches on the monitor and the computer Check that the monitor s power cable is securely connected to the monitor and to an electrical outlet and that the monitor cable is properly connected to both the monitor and the computer ...

Page 114: ...reasonable amount of time follow the steps in Chapter 2 to reset the computer Diskette Problems If you have trouble with a diskette follow these steps to define the problem 1 Is the diskette damaged To find out use DISKCOPY to make a copy of the diskette Using the copy repeat the operation that caused the problem If the operation works using the copy diskette the original diskette is probably dama...

Page 115: ...ing a blank diskette to determine if the diskette drive is operating properly If you cannot format a diskette contact your Epson dealer Diskette Drive Problems If you are having problems with the internal or external diskette drive check the following 1 Have the drive designations been exchanged using DIP switch 1 See Appendix A 2 If your problem is with the external drive be sure that DIP switch ...

Page 116: ... hard disk to verify that the disk has not sustained a severe shock Reread the section on caring for the hard disk drive in Chapter 2 Also see the instructions for setting up the hard disk in your MS DOS Installation Guide If the hard disk still does not work contact your Epson dealer or have an authorized Epson Customer Care Center check your hard disk Never open the airtight container that enclo...

Page 117: ...tion using these switches Then return to Chapter 1 to finish setting up your computer Setting the DIP Switches The Equity LT 386SX has one set of DIP switches that you access from the bottom of the computer These are small on off switches that provide your computer with information each time you turn it on A DIP switch is either on up or off down To change a setting use a hard thin object such as ...

Page 118: ...ow these steps 1 Remove the expansion slot cover on the left side of the computer Press down on the release tab and lift off the expansion slot cover 2 Pull out the carrying handle 3 Turn the computer upside down with the handle away from you A 2 DIP Switches ...

Page 119: ...over as shown below Lift up on the two tabs while you press on the grated squares to release the cover Slide the cover away from you toward the handle The DIP switches are located on the right side of the computer DIP Switches A 3 ...

Page 120: ...T IS 3F8H THROUGH 3FFH 2F8H THROUGH 2FFH ENABLE THE SERIAL PORT DISABLE THE SERIAL PORT PARALLEL PORT IS 378H THROUGH 37FH 278H THROUGH 27FH ENABLE PARALLEL PORT DISABLE PARALLEL PORT INTERNAL 13 DRIVE EXTERNAL 8 DRIVE ALWAYS BE ON The following table lists the system functions these switches control DIP switch settings 1 ON Defines the internal 1 44MB 3 binch diskette drive as A and the external ...

Page 121: ...u to exchange the definitions for diskette drives A and B When switch 1 is ON the factory setting drive A is the internal 3 z inch diskette drive and drive B is an optional external 5 inch diskette drive By turning switch 1 to OFF you define the internal diskette drive as B and the optional external drive as A Switch 2 defines the primary display The LT 386SX recognizes the LCD as the primary disp...

Page 122: ...card you have installed you will not be able to use the port on the option card unless you disable the internal serial port Switch 5 defines the internal parallel port labeled PRINTER on the right side of the computer as LPT1 or LPT2 If the switch is ON the factory setting the port is LPT1 if it is OFF the port is LPT2 When switch 6 is ON the factory setting the internal parallel port is enabled i...

Page 123: ... settings you need to replace the expansion card cover Follow these steps 1 Set the cover on the computer and slide it back into position as shown below Press firmly until the cover snaps into position 2 Turn the computer right side up with the handle facing you DIP Switches A 7 ...

Page 124: ...er on the left side of the computer The cover has two tabs that fit into slots on the computer s cover 4 Lift the cover up into place and slide the release tab up to secure the cover 5 Slide the handle back into place A 8 DIP Switches ...

Page 125: ...rocessor Connecting an External Color Monitor If you plan to use an external monitor with your Equity LT 386SX follow the instructions below to connect it to your computer 1 Be sure both the computer and monitor as well as any other peripheral devices are turned off 2 Place your monitor near the Equity LT 386SX 3 If necessary connect the monitor cable to the monitor Some monitors come with permane...

Page 126: ...r 7 If necessary plug the monitor s power cable into the power inlet on the monitor Some monitors come with permanently attached power cables Then plug the power cable into an electrical outlet When you are ready to use the computer turn on the monitor and any other peripheral devices then turn on the computer Text displays on the external monitor screen instead of the computer s LCD screen B 2 In...

Page 127: ...al devices are turned off Verify that DIP switch 7 is OFF the factory setting Place the external diskette drive near the Equity LT 386SX Lower the interface cover on the front right side of the computer when the front of the computer is facing you Connect the interface cable from the external diskette drive to the EXT FDD port on the right side of the computer as shown below external diskette port...

Page 128: ...and then turn on the computer Now run the SETUP program as described in Chapter 1 Installing the Internal Modem Follow these steps to install the optional Epson internal modem in your Equity LT 386SX 1 Make sure the computer is turned off 2 Press down on the release tab to lower the modem cover on the back left side of the computer when the front of the computer is facing you B 4 Installing Option...

Page 129: ...odem cover Close the modem cover Press up on the release tab to secure the cover Connect the modem to a phone line Installing the RAM Card Follow these steps to install the optional Epson 2MB RAM card in your LT 386SX 1 Make sure the computer is turned off 2 Turn the computer so that its right side is facing you as shown below Press down on the release tab to lower the RAM card cover ...

Page 130: ...he new memory size to CMOS RAM SETUP is described in detail in Chapter 1 Connecting an External Keyboard You can attach an external keyboard to your LT 386SX The socket for the external keyboard is on the front right side of the computer Follow these steps 1 Make sure the computer is turned off 2 Lower the interface cover on the front right side of the computer when the front of the computer is fa...

Page 131: ...onal keyboard adapter to the external keyboard port Then attach the connector from the external keyboard to the adapter Installing an Option Card You can also install a size IBM PC AT compatible internal expansion card in your LT 386SX You can install a 2 4ze option card provided it physically fits in the expansion slot on the LT 386SX You cannot install a full length option card Also you cannot i...

Page 132: ...rts For example if you install an option card with a parallel port you must assign that port as the secondary parallel port 278H if the internal parallel port is the primary parallel port 378H If you want the parallel port on the option card to be the primary parallel port you must define the internal parallel port as the secondary parallel port by setting DIP switch 5 to OFF See Setting the DIP S...

Page 133: ...all cables including the AC adapter 2 Remove the expansion slot cover on the left side of the computer Press down on the release tab and lift off the expansion slot cover 3 Pull out the carrying handle 4 Turn the computer upside down with the handle away from you Installing Options B 9 ...

Page 134: ...rd cover as shown below Lift up on the two tabs while you press on the grated squares to release the cover Slide the cover away from you toward the handle 6 Remove the bracket on the side of the computer B 10 Installing Options ...

Page 135: ... socket inside the expansion slot Insert the connector directly into the socket Secure the card with the screw you removed from the bracket 8 Set the cover on the computer and slide it back into position as shown below Press firmly until the cover snaps into position Installing Options B 11 ...

Page 136: ... you 10 Replace the expansion slot cover on the left side of the computer The cover has two tabs that fit into slots on the computer s cover 11 Lift the cover up into place and slide the release tab up to secure the cover 12 Slide the handle back into place ...

Page 137: ... off the computer close it and disconnect all cables 2 Turn the computer upside down with the handle away from you 3 Remove the cover for the coprocessor socket by putting your fingernail or a coin into the recession on the bottom of the cover and lifting up 4 Insert the 80387SX coprocessor chip into the socket so that the round indentation indicating pin 1 is in the upper right hand corner and th...

Page 138: ...e through SETUP or software command Ctrl left Shift F 2MB 640KB standard and 1280KB extended 80387SX coprocessor optional Standard 8 bit parallel Z pin D type female connector RS 232C programmable asynchronous 9 pin D type male connector 15 pin female connector supports VGA monitor 15 pin D type female connector Keyboard connector for optional external keyboard Internal One size IBM PC AT compatib...

Page 139: ...xternal keyboard Mass Storage Hard disk Interchangeable pop out 20MB or 40MB hard disk designed for low power consumption 28ms average access time built in 16 bit bus AT compatible controller Diskette drives One internal 1 44MB 3 z inch diskette drive Optional external 5 ich 1 2MB diskette drive Display Large 640x480 dots high contrast paper white backlit LCD display with 16 level gray scale conti...

Page 140: ...1 to 3 hours 12 5 volt AC adapter can recharge battery pack while operating computer with automatic 120 240V sensing Power Requirements 120 240 VAC 50 60 Hz NiCad rechargeable battery pack 9 6 volts 4 ampere hours Physical Dimensions Height 3 46 inches 88 mm Width 12 9 inches 318 mm Depth 11 7 inches 296 5 mm with handle retracted 13 9 inches 354 mm with battery pack Weight 17 lbs 7 7 kg with batt...

Page 141: ...0 to 60 C Humidity Operating 20 to 80 non condensing Non operating 8 to 80 non condensing Options Modem Internal 2400 baud Hayes compatible auto dial Memory 2MB RAM expansion card Expansion cards One 2 size IBM PC AT compatible slot Carrying case Soft case for carrying computer C 4 Specifications ...

Page 142: ...itor CI Printer and communications ports After you start the diagnostics program you can create a database that records the location of faulty memory chips if any exist This database displays a graphic representing your computer s memory board and identifies the faulty chips Once you select a test you need to specify how long to run it You use the Run Time Parameters window to specify a certain le...

Page 143: ...ntinue Creating a Database You can create a database to record the location of faulty memory chips that are causing memory errors To graphically represent the memory board on the screen you need to identify your system s memory configuration In the lower portion of the screen you see this message Press Esc to bypass database creation Press ESC if you do not want to create the database The diagnost...

Page 144: ... program stores this information in a file called DIAGS CNF 3 If a database with this vendor name and model number does not exist you see this message Database does not exist press any key except Esc to continue To create the database press any key other than ESC Now you respond to the screen prompts to update the configuration You can accept the default values that the diagnostics program present...

Page 145: ... Hard Disk Video Miscl Keyboard The program s title copyright information and the date and time appear at the top of the screen The options line shows these categories of tests System Board Memory Hard Disk Floppy Keyboard Video and Miscellaneous After you select a category the diagnostics program provides a submenu of the available diagnostics tests When the main menu first appears you see the su...

Page 146: ...menu selections A short message describing each test you highlight appears at the bottom of the screen You use these keys to make menu selections and run diagnostics tests t L t Enter F2 F3 F4 F5 F6 Move to the next window or device Move to the previous window or device Move to the next test Move to the previous test Start the test Set the Run Time Parameters Select or deselect a test Select all t...

Page 147: ...n You can press F4 to select all tests for all devices and press F5 to deselect all selected tests Once you select a test it remains selected until you deselect it If you run a test or a group of tests and start testing again the diagnostics program performs the same tests unless you deselect them You must enter certain parameters for the hard disk drive and the diskette drive tests If you use F3 ...

Page 148: ...ant to run you must set the Run Time Parameters Setting the Run Time Parameters To specify the Run Time Parameters press F2 to move to the Run Time Parameters window The diagnostics program displays default values for each of the run time parameters You can press ESC at any time to exit the Run Time Parameters window and return to the submenu of diagnostics tests The first run time parameter defin...

Page 149: ... Enter if you want the program to pause when an error occurs during a test The program pauses and waits for you to press Enter before continuing This lets you view the error message and make notes about the error This is the default setting Press N and Enter if you want the diagnostics program to continue when an error occurs The next prompt is Error logging Y N N Press Y and Enter to record the e...

Page 150: ...he diagnostics program needs no additional information After you specify whether to create the error log the program returns to the main menu You see this message in the Run Time Parameters window Test Mode Continuous Passbound Testing If you selected Passbound testing you see this prompt No of Passes 00001 Specify the number of times from 1 to 65535 you want the program to run the test s Or press...

Page 151: ... want to use to store or print the error messages Press Enter to select the device or press ESC to exit the pop up window and return to the Error logging prompt If you select Log errors on disk the program displays another pop up window Floppy disk A Floppy disk B Hard disk C Highlight the disk where you want to store the error messages Press Enter to select the specified disk drive The program cr...

Page 152: ...ed to your parallel port assigned LPT1 If you select the serial port the program writes the error messages to the device connected to your serial port assigned COM1 If you select Cancel error logging the program changes the error logging response from Y to N When you specify the device for error logging one of the error messages may appear Floppy disk A not present Floppy disk B not present Hard d...

Page 153: ...ompletes the current test before it stops If you specified Wait on error in the Run Time Parameters the program pauses each time an error occurs When you press Enter the program continues the diagnostics testing Running the Tests When a test completes you see this prompt Press ENTER to return to MAIN MENU Press Enter to return to the main menu If an error occurs during a test note the error messag...

Page 154: ...st verifies the operation of each major component on the system board It checks the instructions registers and flags of the CPU When the test completes successfully you see this message Basic functionality test of CPU passed OK CPU Protected Mode Test This test switches to protected mode and checks the protected mode instructions such as LSL VERR and LAR When the test completes successfully you se...

Page 155: ...ocessor is not installed you see this message Numeric Data processor not present DMA Controller Test This test performs read write tests on the memory address registers and page registers of DMA controller 1 and 2 During the test you see this message Testing Programmable DMA Controller When the test completes successfully you see this message Programmable DMA Controller test passed OK D 14 System ...

Page 156: ...letes successfully you see this message Programmable Interrupt Controller test passed OK Timer Test This test verifies the accuracy of the timer count by comparing it to the periodic interrupt of the system s real time clock RTC During the test you see this message Testing Programmable Interval Timer When the test completes successfully you see this message Programmable Interval Timer test passed ...

Page 157: ...ge Testing Real Time Clock When the test completes successfully you see this message Real Time Clock test passed CMOS Validity Test This test checks the system s CMOS RAM During the test you see this message Testing CMOS validity When the test completes successfully you see this message CMOS validity test passed OK D 16 System Diagnostics ...

Page 158: ...s you must change the addresses to their original locations for the memory tests to work properly If an error occurs during a memory test the program displays this message PRESS ENTER TO VIEW FAULTY MEMORY CHIP To view the faulty memory chip you must have created a database If not you see this message database not created If you have created a database the program displays the diagram of the mothe...

Page 159: ...m absolute memory location xxxxxxxxh Checking for parity error When the parity test completes without an error you see this message Parity test passed OK Pattern Test This test performs a read write test of memory and identifies any memory faults During the test you see these messages Testing from absolute base xxxxxxxxh Performing Pattern test in memory When the test completes successfully you se...

Page 160: ...ed OK Walking 0 s Test This test checks the voltage in the data lines for any shorts and checks for any data bits that are always 0 During the test you see these messages Testing from absolute base xxxxxxxxh When the test completes successfully you see this message Walking 0S test in memory passed OK Address Test This test checks for any shorts in the address line When the test completes successfu...

Page 161: ... tests listed in the Hard Disk submenu provide a complete diagnostics check of the system s hard disk drive Hard Disk Format Auto Interleave Media Analysis Perform Test Seek Test Read Verify Test Check Test Cyl Force Bad Tracks Hard disk diagnostics tests may be destructive or non destructive Destructive diagnostics destroy data on the hard disk Non destructive diagnostics do not destroy data on t...

Page 162: ...ll of the following parameters before performing a hard disk test Disk drive identifier Disk drive type Interleave factor Bad track list Start cylinder number End cylinder number Start head number End head number Disk drive identifier The program displays the following prompt for the disk drive identifier Disk Drive C D c If only one hard disk is connected to the computer the program assumes it is...

Page 163: ... cylinders Number of heads Number of sectors per track Write precom Write precom cylinder number Landing zone Interleave factor The program displays the following prompt for the interleave factor Interleave 1 16 The interleave factor affects the performance of your hard disk The default value is 3 When you execute the Auto Interleave test the diagnostics program determines the best interleave valu...

Page 164: ...lysis test the program automatically marks the bad tracks when it formats the hard disk Start and end cylinder numbers The program displays the following prompts for the starting and ending cylinder numbers Start cylinder number End cylinder number Enter the first and last cylinder numbers on which you want to perform the tests The default for the start cylinder number is 0 and the default for the...

Page 165: ...arameters required for the selected diagnostics test the program begins executing the test Hard Disk Format Use this test when installing a new hard disk in your computer It preformats your hard disk on the hardware level You must still format the hard disk for your operating system You may need to reformat a hard disk if you have a serious problem with the drive However before executing this prog...

Page 166: ...gram performs an analysis of the surface of the hard disk to determine the bad tracks The program displays the following messages after you specify the hard disk parameters W A R N I N G All data on Hard disk you have specified may be LOST Do you still want to continue Y N Press Y and Enter to start formatting the hard disk Press N and Enter to stop the operation Auto Interleave This test lets the...

Page 167: ...peration Media Analysis This test identifies the bad tracks on the hard disk The diagnostics program performs a comprehensive analysis of the surface of the hard disk to find the bad tracks The program uses three different bit patterns for this test It formats the hard disk marks the bad tracks and displays the bad track list When you select Media Analysis the program requests the following hard d...

Page 168: ...of data transferred The interleave factor is the most critical factor in determining disk performance Changing the interleave factor can drastically change disk performance The program measures the data transfer rate in kilobytes per second To measure the data transfer rate the program reads 64KB of data 15 times and counts the number of timer ticks using this formula Transfer rate 64KB x 15 x 18 ...

Page 169: ...d disk parameters Disk drive identifier Disk drive type Start cylinder number End cylinder number Start head number End head number Read Verify Test This test checks the read and verify capability of the hard disk on the specified range of cylinders and heads The program performs both sequential and random read and verify operations It reports any errors found When you select Seek Test the program...

Page 170: ...d Tracks Use this test to mark bad tracks on the hard disk without formatting the disk When you select Force Bad Tracks the program requests the following hard disk parameters Disk drive identifier Disk drive type Start cylinder number End cylinder number Start head number End head number The following message appears after you specify the hard disk parameters W A R N I N G All data on Hard disk y...

Page 171: ... memory required is 128KB The controller displays one of the following messages when an error occurs during a diagnostics procedure Address mark not found Attachment failed to respond Bad ECC on disk read Bad sector flag detected Controller has failed Drive activity failed ECC corrected data error Requested sector not found Reset failed Seek operation failed Write fault on selected drive When you ...

Page 172: ... disk diagnostics tests may be destructive or non destructive Destructive diagnostics destroy data on the diskette These tests include Diskette Format Random R W Test Sequential R W Test Non destructive diagnostics do not destroy data on the diskette These tests include Drive Speed Test Disk Change Line Test The program requests the following parameter before performing a floppy disk test Floppy D...

Page 173: ...iskette drive should rotate a 1 2MB diskette at 360 rpm and a 360KB diskette at 300 rpm Again allow one percent tolerance To perform this test insert a diskette into the drive you plan to test Use a diskette you have formatted with the Diskette Format test Random R W Test This test checks the random seek capability of a floppy disk drive It performs a random read write operation on the diskette in...

Page 174: ...ou insert or remove a diskette from a floppy disk drive To perform this test insert a diskette into the drive you plan to test Use a diskette you have formatted with the Diskette Format test Floppy Disk Error Messages The program displays two types of error messages while testing the floppy disk drive messages the program itself generates and those the controller generates The program may display ...

Page 175: ... mark BAD CRC error BAD DMA error BAD SEEK error Diskette WRITE PROTECTED Media change error Record not found TIMEOUT error These errors could occur because of a faulty drive controller or cable or if you attempt to run a test on a write protected or unformatted diskette Keyboard Diagnostics The tests listed in the Keyboard submenu provide a complete diagnostics check of the keyboard 1 Controller ...

Page 176: ... screen When you press a key the program displays the scan code and the ASCII code of the key See the Keyboard Scan ASCII Codes section later in this appendix for a complete list of the scan codes and ASCII codes for your keyboard Press Ctrl Break at any time to end this test Keyboard Clock Line Test This test checks the keyboard clock line Keyboard Data Line Test This test checks the keyboard dat...

Page 177: ... 40x25 Display Test 320x200 Graphics Test 640x200 Graphics Test Page Selection Test Color Test 640x350 Graphics Test 640x480 Graphics Test Adapter Test This test checks the memory assigned to the display adapter Attribute Test This test checks the display attributes of the video adapter In LCD mode colors are converted to 16 shades of gray 80x25 Display Test This test checks the 80x25 display feat...

Page 178: ...t checks the high resolution 600x200 graphics display feature of the display adapter Page Selection Test This test checks the paging function of the display adapter Color Test This test checks the background and border color mapping of the display adapter In LCD mode colors are converted to 16 shades of gray 640x350 Graphics Test This test checks the 640x350 graphics display with 16 colors In LCD ...

Page 179: ...Test detected a read write error in the display memory This indicates a problem with the display controller Contact your dealer Miscellaneous Diagnostics The tests listed in the Miscellaneous submenu provide a complete diagnostics check of the parallel and serial ports Printer Adapter Test This test checks the parallel port and the printer by sending a pattern to the printer If the printer does no...

Page 180: ...ust connect a special RS 232C connector to the serial port The connector requires the following settings RD and TD shorted DSR and DTR shorted CTS and RTS shorted You can purchase an AT type loopback connector from most electronic supply stores This connector allows the test to send out and receive the same data for the purpose of the test This test checks the serial port for the following paramet...

Page 181: ...ed E r r o r Framing error E r r o r Overrun error E r r o r P a r i t y e r r o r E r r o r Time out These error messages indicate a problem with the controller or with the test cable Make sure the test connector is secure If the error persists contact your dealer D 40 System Diagnostics ...

Page 182: ...creen SYSRq Scroll Lock Num Lock Home t Page Up F1 F2 F3 F4 F5 F6 F7 F8 F9 F10 F11 F12 29 0C 47 48 49 0C 3B 3C 3D 3E 3F 40 41 42 43 44 85 86 60 2D EO EO EO 2D 00 00 00 00 00 00 00 00 00 00 00 00 No codes Ignored System Diagnostics D 41 ...

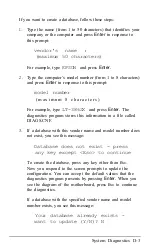
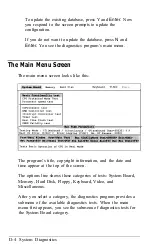
Page 183: ... No codes Ignored D 42 System Diagnostics ...

Page 184: ... No codes Ignored System Diagnostics D 43 ...

Page 185: ... b n m comma Right Shift Alt space bar Caps Lock Insert Delete Shift SysRq Shift Shift Num Lock Shift Scroll Lock Shift Shift Home Shift t Shift Page Up Num Lock P No codes Ignored D 44 System Diagnostics ...

Page 186: ... F11 Shift F12 Shift Shift t Shift Shift Esc Shift 1 Shift 2 Shift 3 Shift 4 Shift 5 Shift 6 Shift 7 Shift 8 No codes Ignored 54 55 56 57 58 59 5A 5B 5C 5D 87 88 OD 48 4D 01 02 03 04 05 06 07 08 09 I 00 00 00 00 00 00 00 00 00 00 00 00 2B EO EO 1B 21 40 23 24 25 5E 26 2A I System Diagnostics D 45 ...

Page 187: ... E Shift R Shift T Shift Y Shift U Shift I Shift O Shift P Shift 0 Shift Shift Enter Shift Ctrl Shift A Shift S Shift D _ 0A 0B 4F 50 51 0E OF 10 11 12 13 14 15 16 17 18 19 1A 1B 1C 28 29 E0 E0 E0 08 00 51 57 45 52 54 59 55 49 4F 50 7B 7D 0D 1E 41 1F 53 20 44 No codes Ignored D 46 System Diagnostics ...

Page 188: ...hift C Shift V Shift B Shift N Shift M Shift Shift Shift Left Shift Right Shift Shift Alt Shift PrtSc SysRq Shift Shift space bar 21 22 23 24 25 26 27 28 2C 2D 2E 2F 30 31 32 33 34 35 28 39 46 47 48 4A 4B 4C 3A 22 5A 58 43 56 42 4E 4D 3C 3E 3F 7C 20 No codes Ignored System Diagnostics D 47 ...

Page 189: ... No codes Ignored D 48 System Diagnostics ...

Page 190: ... No codes Ignored System Diagnostics D 49 ...

Page 191: ...14 14 15 19 16 15 17 09 18 OF 19 10 1A 1B 1B 1D 1C 0A 2B 1C 1E 01 1F 13 20 04 21 06 22 07 23 08 24 0A 25 0B 26 0C 2C 2D 1A 18 No codes Ignored D 50 System Diagnostics ...

Page 192: ... No codes Ignored System Diagnostics D 51 ...

Page 193: ... No codes Ignored D 52 System Diagnostics ...

Page 194: ... No codes Ignored System Diagnostics D 53 ...

Page 195: ... No codes Ignored D 54 System Diagnostics ...

Page 196: ... No codes Ignored System Diagnostics D 55 ...

Page 197: ...Num Lock Shift J Num Lock Shift K Num Lock Shift L Num Lock Shift Num Lock Shift M Num Lock Shift Num Lock Shift No codes Ignored 4F 50 51 4E 52 53 00 00 00 2B 00 00 D 56 System Diagnostics ...

Page 198: ...ion diskette on a blank 1 44MB diskette using the DISKCOPY command You can do this using the Epson MENU utility or the MS DOS Shell or you can type the following at the C DOS prompt and press Enter DISKCOPY A A The DISKCOPY command is described in detail in your MS DOS Reference Manual 3 Remove the diskette in drive A and insert your Reference diskette To copy the BVSCALLS DLL file from the Refere...

Page 199: ...ur LCD you must replace the original BVSCALLS DLL file with the version of that file on your Reference diskette 1 Create a new directory in the OS 2 directory on your hard disk For this example the new directory name is LCD Type CD OS2 and press Enter to change to the OS2 directory Then type MD LCD and press Enter to make a new directory 2 Copy all the files from the DLL directory into the LCD dir...

Page 200: ...and press Enter COPY A BVSCALLS DLL C DLL 2 Type CD and press Enter to change to the root directory 3 Type the following and press Enter COPY CONFIG SYS CON 4 Type the following and press Enter LIBPATH C OSZ DLL 5 Press F6 and then press Enter 6 Reboot the computer CONFIG SYS 7 Delete the files in the LCD directory and then delete the LCD directory The reason this procedure is required after OS 2 ...

Page 201: ...ides LCD video drivers for Windows 386 on your Reference diskette If you have purchased Microsoft Windows 386 version 2 11 for your Equity LT 386SX you can use these drivers to display Windows 386 on your LCD Follow the steps below to install these drivers 1 Make a duplicate of the Windows 386 Setup and Build diskette on a blank 720KB diskette using the DISKCOPY command You can do this using the E...

Page 202: ...splay adapter keyboard type and mouse that the Setup program has assumed the LT 386SX has Use the down arrow key to highlight VGA in this list and press Enter 6 The Setup program shows a list of display adapters The last item on this list is Other requires disk provided by a hardware manufacturer Use the down arrow key to highlight this selection and press Enter 7 When Setup asks you to insert the...

Page 203: ...w to confirm that your system includes these hardware and software components Computer MS or PC DOS System Display VGA Mouse Microsoft or IBM PS 2 Keyboard Enhanced 101 or 102 key US and Non US keyboards Keyboard Layout Standard US Language English American Network No network installed No Changes The above list matches my computer 2 Use the arrow key to highlight VGA and press Enter 3 On the next ...

Page 204: ...ases the display speed for the Equity LT 386SX Follow these steps to use VGARAM 1 Insert your Reference diskette into the diskette drive 2 Type A and press Enter to log onto drive A 3 Type the following and press Enter VGARAM 4 The LT 386SX displays the message below V G A m o d e i s a c t i v e The video BIOS remains in RAM until you reset or turn off the Equity LT 386SX F 4 Using Other Referenc...

Page 205: ...port enabled The SCROLL utility remains active in memory until you reset or turn off the Equity LT 386SX If you frequently need to use SCROLL you may want to add this utility to your AUTOEXEC BAT file Once placed in the AUTOEXEC BAT file the utility becomes active every time you turn on or reset the computer See Chapter 3 for a complete description of the AUTOEXEC BAT file and how it functions To ...

Page 206: ...s AC voltage from a wall socket into the proper DC voltage to power your Equity LT 386SX The AC adapter provides enough power to recharge the NiCad battery pack while you operate the computer Application program A software program that performs a specific task such as word processing spreadsheet analysis or database management ASCII American Standard Code for Information Interchange A standard sys...

Page 207: ...ut an external source of light Backup A copy of a program data file or disk kept in case the original is damaged or lost Base memory The amount of memory in the computer below 1MB that is available to MS DOS and application programs usually 640KB Also called main memory Batch file A text file containing one or more MS DOS commands each stored on a separate line You use batch files to automate MS D...

Page 208: ...quence or group of bits usually eight In the ASCII encoding system a byte represents one character of data Character Any number letter punctuation mark or graphic symbol which can be represented by one byte of data Chip A hardware component of your system formally known as an integrated circuit Examples of chips include memory chips and the 80386SX microprocessor Clock speed See Execution speed CM...

Page 209: ...DOS uses to identify a secondary serial port Command An instruction you enter on a keyboard to direct the computer to perform a specific function COMMAND COM The program file that enables MS DOS to perform commands such as DIR COPY and ERASE You must store this file in the root directory of your hard disk if you want to boot MS DOS from the hard disk Command prompt The characters MS DOS displays t...

Page 210: ...disk or diskette drive Coprocessor An optional integrated circuit chip that assists the CPU in performing numeric calculations Copy protected program A type of program that cannot be copied Some copy protected programs require you to leave the program diskette in the diskette drive while you are using it Some also require the computer to be running at 8 MHz instead of 16 MHz CPU Central Processing...

Page 211: ...rent drive unless you include a drive identifier with the command Also called the default drive Cursor The highlighted marker that shows your position on the screen and moves as you enter and delete data Cylinder A storage area on a hard disk A cylinder on a hard disk is similar to a track on a diskette Data The information a computer stores or processes Data diskette A formatted diskette you use ...

Page 212: ...nt parts of an MS DOS command Device A piece of equipment that is part of a computer system and performs a specific task Examples include your hard disk diskette drive monitor and printer Also DEVICE is the MS DOS or OS Z command you use to install a device driver in the CONFIG SYS file Diagnostics The tests and procedures the computer performs to check its internal circuitry and set up its config...

Page 213: ...ontainer Diskette A flat piece of flexible plastic coated with magnetic material and used to store data Also called a floppy disk Diskette drive The physical device that enables the computer to read from and write to a diskette DOS Short for MS DOS The Disk Operating System that controls the computer s input and output functions See Operating system Double density A type of diskette Double density...

Page 214: ... MHz or 16 MHz Also called clock speed or operating speed Expanded memory Memory that specially written MS DOS application programs can use with an Expanded Memory Specification EMS device driver e g EMM386 SYS Expansion slot A particular kind of connector that can accommodate an option card You can use the expansion slot in your Equity LT 386SX for example to connect a 2 3 size IBM AT compatible ...

Page 215: ...entries stored together on a disk Text files consist of words and sentences Program files consist of code Computers use program files to perform instructions Filename A name of up to eight characters MS DOS uses to identify a file FL backlighting The LCD screen panel type It consists of a double layered structure to provide a high contrast font pattern on a white background Brightness originates f...

Page 216: ...can store many more files than a diskette Hardware Any physical component of a computer system such as a monitor printer keyboard or CPU Hexadecimal A base 16 numbering system commonly used by programmers Hidden file A file whose name is not listed by the DIR command MS DOS stores two hidden files in the root directory of your hard disk Some application programs also create hidden files High densi...

Page 217: ...ytes LCD Liquid Crystal Display A form of flat panel display LED Light emitting diode An indicator light like those used for the LT 386SX battery and external diskette drive LIM EMS 4 0 Version 4 0 of the Lotus Intel Microsoft Expanded Memory Specification a protocol that allows certain application programs to use paged memory To take advantage of LIM EMS 4 0 you must have the file EMM386 SYS on y...

Page 218: ...l timing clock One megahertz is one million cycles per second The Equity LT 386SX operates at 8 or 16 MHz Memory The area where the computer stores data Memory contents may be permanent ROM or temporary RAM See also ROM and RAM Memory expansion card An optional card that adds 2MB of memory to your computer Memory resident program A program that remains in RAM so that you can access it while anothe...

Page 219: ...used by your Equity LT 386SX NiCad stands for nickel cadmium Numeric keypad The number keys grouped on the right side of the keyboard The keys used for the keypad show numbers and characters in boxes in the lower right portion of the key cap Keypad functions are activated by turning on Num Lock To access the scroll functions shown along the front side of the key press Shift with the appropriate cu...

Page 220: ...use fax or network You can access the expansion slot on the LT 386SX from the bottom of the computer Parallel A type of interface that transmits data in groups of bits Distinguished from serial a type of interface in which bits are transmitted one at a time Parameter A term added to a command that tells the computer how to perform the command for example what data file to use or what particular co...

Page 221: ...cted to a computer Port An input output connection on a computer to which you can attach a peripheral Power on diagnostics A set of self testing routines the computer performs automatically every time you turn it on Power on self test See Power on diagnostics Program A disk file that contains coded instructions telling the computer what to do and how to do it Prompt A message on the screen that re...

Page 222: ...om the disk and displays it on the screen Read write head The physical device inside a disk drive that reads and records data on the magnetic surface of a disk Real time clock A battery powered clock in the computer that keeps track of the current time and date even when the computer s power is turned off Reset To reload a computer s operating system so you can retry a task or begin using a differ...

Page 223: ...serial interface You can easily connect an RS 232C compatible device to your Equity LT 386SX Scratch RAM A portion of RAM used for running OS 2 VDISK or certain other programs The SETUP menu gives you the option to choose BIOS stack area 30 00 or the top of base memory as the location for scratch RAM Sector A contiguous section of a disk track that provides a location at which the computer can acc...

Page 224: ...and functions you indicate Source diskette The diskette from which you are copying files as opposed to the target diskette the diskette to which you are copying files Standby mode A power saving feature you can define in SETUP and enable or disable with a hot key sequence Ctrl left Shift L After the computer has not received any keyboard input for the period of time defined in SETUP it turns off t...

Page 225: ... See Motherboard System diskette A diskette from which you can boot the operating system An MS DOS system diskette must contain the file COMMAND COM plus two hidden MS DOS program files To create a system diskette use the S switch with the FORMAT command for example FORMAT A S Target diskette The diskette to which you are copying files as opposed to the source diskette the diskette from which you ...

Page 226: ...olution display adapter that can display monochrome text at up to 720x400 resolution 16 color graphics at 640x480 resolution or 256 color graphics at 320x200 resolution Volume label A name up to eleven characters in length you can assign to a diskette or hard disk To add or change a volume label for a diskette or hard disk that has already been formatted use the MS DOS LABEL command Wildcard chara...

Page 227: ...Write protect To prevent a diskette from being overwritten When a diskette is write protected you cannot erase change or record over its contents 22 Glossary ...

Page 228: ...p copies 1 27 2 23 2 25 diskettes 3 17 3 22 3 23 Base memory 1 19 20 1 23 1 25 C 1 Batteries NiCad 2 2 C l Battery pack 1 3 1 3 2 1 2 2 4 7 C 3 charge preserving 1 17 1 24 2 1 2 3 4 2 11 charging 2 14 connecting 2 4 6 recharging 2 14 removing 2 6 using 2 2 6 BIOS 1 23 D 17 20 F 4 Brightness 1 17 2 3 4 2 C 2 adjusting 1 17 2 3 4 2 lever 1 17 2 3 4 2 BVSCALLS DLL E 1 3 C Caps Lock 2 8 2 16 2 17 C 2 ...

Page 229: ... 23 24 2 3 2 7 2 11 C 1 changing 2 1 23 2 3 2 11 CRT LCD display mode 2 1 2 Current directory 3 8 9 3 12 drive 3 2 3 changing 3 3 Customer Care Centers 5 1 4 4 1 4 6 Data copying 3 13 3 17 23 4 4 deleting 3 24 protecting 2 20 25 storing 3 5 6 Date 1 20 Default drive See Current drive Delimiters 3 4 DEVICE command 3 32 35 Diagnostic program power on 1 17 system D 1 56 DIP switches 1 1 2 1 10 11 1 1...

Page 230: ...ecution speed 2 1 17 18 1 23 24 2 3 2 7 2 11 C l changing 1 23 2 3 2 11 Expanded memory 3 31 35 Expansion card cover A 2 3 B 1 12 replacing A 7 8 B l 1 13 cards 1 A 6 B 7 13 slot 1 C 1 Extended memory 3 31 3 33 3 35 C l External color monitor 2 1 1 2 1 11 1 16 1 22 2 7 4 3 A 5 B 1 2 commands 3 4 CRT icon 2 7 diskette drive 2 3 l l 1 18 1 21 2 7 2 18 4 5 A 4 6 connecting 1 11 1 16 B 3 4 keyboard 3 ...

Page 231: ...0 A 6 D l D 38 See also Parallel interface self test 1 17 serial port 1 1 1 10 11 1 25 A 4 6 C 1 D 39 See also RS 232C port Invert LCD 1 24 2 11 K Keyboard 3 1 20 1 22 2 8 2 16 18 B 1 B 6 7 C 1 2 D l D 34 35 D 41 56 adapter B 7 connector C 1 external 3 2 8 B 1 B 6 7 C l Keypad 2 17 18 L LCD 1 4 6 1 2 1 24 2 3 2 8 2 11 15 4 2 3 A 5 B 2 C 2 D 36 38 E 1 3 F 1 5 contrast 1 1 17 1 24 2 11 C 2 drivers 4...

Page 232: ...manuals 3 4 1 3 3 1 operating system 3 4 3 1 35 starting 3 2 using 3 1 35 MS Windows F 1 4 N Num Lock 2 8 2 16 18 C 2 D 41 42 D 44 D 51 D 55 56 O On line information 3 25 Operating system 3 4 1 3 1 26 27 3 1 35 E 1 3 commands 3 1 3 4 5 3 11 3 13 3 17 24 3 26 30 See also MS DOS and OS 2 Option card 1 A 6 B 7 13 Option slot 1 C 1 Optional devices 3 B 1 13 Optional video card B 8 OS 2 1 23 E 1 3 P Pa...

Page 233: ... F 4 Real time clock C 2 Reference diskette 1 3 2 12 2 26 D 2 E 1 2 F 1 5 Registration card 1 3 RESET button 2 28 RESTORE command 3 23 Reverse video mode 1 24 2 11 RGB VIDEO port 2 1 22 A 5 B 2 Root directory 2 27 3 7 8 3 10 13 3 30 3 32 E 2 F 5 RS232C port l l 1 10 11 A 6 C 1 D 39 S Safety rules 1 13 1 15 Scratch RAM 1 18 1 20 1 23 Screen closing 2 9 10 opening 1 4 2 9 10 Scroll Lock 2 8 2 16 17 ...

Page 234: ... MS DOS 3 4 3 32 System configuration 1 2 A 1 starting 1 15 17 T Target diskette 3 19 20 file 3 20 Troubleshooting 4 1 6 Type 1 20 21 1 25 D 21 22 Unpacking 1 2 3 Using directories 3 6 14 MS DOS 3 1 35 V VGA 2 6 1 20 1 22 1 24 25 2 12 4 3 C 1 C 3 D 38 F 1 4 VGARAM F 4 Video card B 8 controller 1 24 drivers E 1 3 F 1 5 interface 1 2 1 22 A 5 B 2 Viewing angles 2 9 W Warranty verification 1 3 Wildca...

Page 235: ...ernal diskette drive e x ternal keyboard port serial port external diskette port external monitor port status indicator bar expansion slot cover handle ...

Reviews: