background image

User's Guide

Printing

Maintaining the Printer

Solving Problems

NPD6448-00 EN

Summary of Contents for ET-1810 Series

Page 1: ...User s Guide Printing Maintaining the Printer Solving Problems NPD6448 00 EN ...

Page 2: ...ws 28 Printing from a Computer Mac OS 46 Printing Documents from Smart Devices iOS 51 Printing Documents from Smart Devices Android 52 Printing on Envelopes 52 Printing on Envelopes from a Computer Windows 52 Printing on Envelopes from a Computer Mac OS 53 Printing Web Pages 53 Printing Web Pages from a Computer 53 Printing Web Pages from Smart Devices 53 Printing Using a Cloud Service 54 Maintain...

Page 3: ...ethod to the Computer 118 Making Wi Fi Settings from the Control Panel 119 Connecting a Smart Device and Printer Directly Wi Fi Direct 121 About Wi Fi Direct 122 Connecting to Devices Using Wi Fi Direct 122 Checking the Network Connection Status 123 Checking the Network Status Using Network Light 123 Printing a Network Connection Report 124 Printing a Network Status Sheet 129 Checking the Network ...

Page 4: ...Guide to This Manual Introduction to the Manuals 5 Searching for Information 5 Printing Only the Pages You Need 6 About This Manual 6 Trademarks 7 Copyright 8 ...

Page 5: ...pport or the Epson worldwide support website at http support epson net Digital manual To view the Web manual visit the following website enter the product name and then go to Support http epson sn Searching for Information The PDF manual allows you to search for information you are looking for by keyword or jump directly to specific ections using the bookmarks This section explains how to use a PD...

Page 6: ...5 To specify pages that are not in series divide the pages with commas Example 5 10 15 About This Manual This section explains the meaning of marks and symbols notes on descriptions and operating system reference information used in this manual Marks and Symbols Caution Instructions that must be followed carefully to avoid bodily injury cImportant Instructions that must be observed to avoid damage...

Page 7: ...ws is used to refer to all versions Microsoft Windows 10 operating system Microsoft Windows 8 1 operating system Microsoft Windows 8 operating system Microsoft Windows 7 operating system Microsoft Windows Vista operating system Microsoft Windows XP operating system Microsoft Windows XP Professional x64 Edition operating system Microsoft Windows Server 2019 operating system Microsoft Windows Server...

Page 8: ...bility assumed for damages resulting from the use of the information herein The information contained herein is designed only for use with this Epson product Epson is not responsible for any use of this information as applied to other products Neither Seiko Epson Corporation nor its affiliates shall be liable to the purchaser of this product or third parties for damages losses costs or expenses in...

Page 9: ...Important Instructions Safety Instructions 10 Printer Advisories and Warnings 10 Protecting Your Personal Information 12 ...

Page 10: ...ntrols that are not covered by the operating instructions Place the printer near a wall outlet where the plug can be easily unplugged Do not place or store the printer outdoors near excessive dirt or dust water heat sources or in locations subject to shocks vibrations high temperature or humidity Take care not to spill liquid on the printer and not to handle the printer with wet hands Keep the pri...

Page 11: ... correct orientation of the connectors Each connector has only one correct orientation Inserting a connector in the wrong orientation may damage both devices connected by the cable Place the printer on a flat stable surface that extends beyond the base of the printer in all directions The printer will not operate properly if it is tilted at an angle Allow space above the printer so that you can fu...

Page 12: ...ors or fire alarms and could lead to accidents due to malfunction When using this printer near automatically controlled devices follow all posted warnings and directions on these devices Advisories and Warnings for Transporting or Storing the Printer When storing or transporting the printer avoid tilting it placing it vertically or turning it upside down otherwise ink may leak Before transporting ...

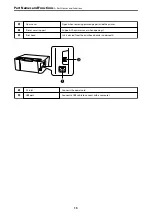
Page 13: ...Part Names and Functions Part Names and Functions 14 ...

Page 14: ... ejected paper F Stopper Position the stopper to prevent print outs from falling from the output tray A Printer cover Open when removing jammed paper inside the printer Keep this cover closed while the printer is not in use to prevent foreign substances from entering the printer B Ink tank cap Open to refill the ink tank C Ink tank cover D Ink tank unit Contains the ink tanks E Ink reservoir tank ...

Page 15: ...er cover support Supports the printer cover when opening it H Print head Ink is ejected from the print head nozzles underneath A AC inlet Connects the power cord B USB port Connects a USB cable to connect with a computer Part Names and Functions Part Names and Functions 15 ...

Page 16: ...Guide to the Control Panel Buttons and Functions 17 Checking Lights and Printer Status 18 ...

Page 17: ...on down for five seconds until the P button flashes to run print head cleaning Functions using Button Combination PIN Code Setup WPS Hold down the and buttons simultaneously to start PIN Code Setup WPS Wi Fi Direct Simple AP Setup Hold down the and buttons simultaneously to start Wi Fi Direct Simple AP Setup Restore Default Network Settings Turn the printer on while holding down the button to rest...

Page 18: ...ar the error and try again Initial ink charging may not be complete See the Start Here poster to complete initial ink charging No paper is loaded or more than one sheet has been fed at a time Load paper and press the button A paper jam has occurred Remove the paper and press the button If the paper jam error continues after removing the paper and turning the power off and on again paper may remain...

Page 19: ...essage saying that you can continue printing is displayed on the computer press the button to continue printing The lights stop flashing for the time being however they will continue to flash at regular intervals until the ink pad is replaced Borderless printing is not available but printing with a border is available The printer has started in recovery mode because the firmware update failed Foll...

Page 20: ... and how often this is required will vary according to the number of pages you print using the borderless print option The need for replacement of the pad does not mean that your printer has ceased to operate in accordance with its specifications The printer will advise you when the pad requires replacing and this can only be performed by an authorised Epson Service provider The Epson warranty doe...

Page 21: ...Loading Paper Paper Handling Precautions 22 List of Paper Type 22 Loading Paper in the Rear Paper Feeder 23 Loading Envelopes in the Rear Paper Feeder 24 Loading Various Paper 26 ...

Page 22: ...occur frequently for manual 2 sided printing when printing on one side of pre printed paper Reduce the number of sheets to half or less or load one sheet of paper at a time if paper jams continue Make sure you are using long grain paper If you are not sure what type of paper you are using check the paper packaging or contact the manufacturer to confirm the paper specifications Fan and align the ed...

Page 23: ...Glossy Photo Paper Glossy Epson Matte Paper Heavyweight Epson Double Sided Matte Paper Epson Matte Epson Photo Quality Ink Jet Paper Epson Double sided Photo Quality Ink Jet Paper Epson Photo Quality Ink Jet Loading Paper in the Rear Paper Feeder 1 Pull out the paper support 2 Slide the edge guides 3 Load paper at the center of the paper support with the printable side facing up Loading Paper Load...

Page 24: ...g edge as the width of the user defined size load paper long edge first 4 Slide the edge guides to the edges of the paper 5 Slide out the output tray Note Return the remaining paper to its package If you leave it in the printer the paper may curl or the print quality may decline Loading Envelopes in the Rear Paper Feeder 1 Open the feeder guard and pull out the paper support Loading Paper Loading ...

Page 25: ... the paper support with the flap facing down cImportant Do not load more than the maximum number of sheets specified for the envelopes 4 Slide the edge guides to the edges of the envelopes 5 Slide out the output tray Loading Paper Loading Envelopes in the Rear Paper Feeder 25 ...

Page 26: ...a single sheet of defined size plain paper with binding holes at the left or right Adjust the print position of your file to avoid printing over the holes Loading Long Papers When loading paper longer than legal size store the paper support and then flatten the leading edge of the paper Loading Paper Loading Various Paper Loading Long Papers 26 ...

Page 27: ...Printing Printing Documents 28 Printing on Envelopes 52 Printing Web Pages 53 Printing Using a Cloud Service 54 ...

Page 28: ...pending on the application See the application s help for details 1 Load paper in the printer Loading Paper in the Rear Paper Feeder on page 23 2 Open the file you want to print 3 Select Print or Print Setup from the File menu 4 Select your printer Printing Printing Documents Printing from a Computer Windows 28 ...

Page 29: ...n see the online help for explanations of the setting items Right clicking an item displays Help 7 Click OK to close the printer driver window 8 Click Print Related Information Available Paper and Capacities on page 132 List of Paper Type on page 22 Printing Printing Documents Printing from a Computer Windows 29 ...

Page 30: ...rinting Presets 3 Enter a Name and if necessary enter a comment 4 Click Save Note To delete an added preset click Add Remove Presets select the preset name you want to delete from the list and then delete it 5 Click Print The next time you want to print using the same settings select the registered setting name from Printing Presets and click OK Related Information Loading Paper in the Rear Paper ...

Page 31: ... 3 is disabled access the printer driver window click Extended Settings on the Maintenance tab and then select Enable EPSON Status Monitor 3 However it may not be available when the printer is accessed over a network or is used as a shared printer 1 On the printer driver s Main tab select the method of 2 Sided Printing 2 Click Settings make the appropriate settings and then click OK 3 Set the othe...

Page 32: ...ever it may not be available when the printer is accessed over a network or is used as a shared printer 1 On the printer driver s Main tab select the type of long edge binding you want to use from 2 Sided Printing 2 Click Settings select Booklet and then select Center Binding or Side Binding Center Binding Use this method when printing a small number of pages that can be stacked and easily folded ...

Page 33: ... 2 Click Layout Order make the appropriate settings and then click OK 3 Set the other items on the Main and More Options tabs as necessary and then click OK 4 Click Print Related Information Loading Paper in the Rear Paper Feeder on page 23 Printing Using Easy Settings on page 28 Printing to Fit the Paper Size Select the paper size you loaded in the printer as the Destination Paper Size setting Pr...

Page 34: ...Information Loading Paper in the Rear Paper Feeder on page 23 Printing Using Easy Settings on page 28 Printing a Reduced or Enlarged Document at any Magnification You can reduce or enlarge the size of a document by a specific percentage Note This feature is not available with borderless printing 1 On the printer driver s More Options tab select the document size from the Document Size setting 2 Se...

Page 35: ...her 1 On the printer driver s Main tab select 2x1 Poster 2x2 Poster 3x3 Poster or 4x4 Poster as the Multi Page setting 2 Click Settings make the appropriate settings and then click OK Note Print Cutting Guides allows you to print a cutting guide 3 Set the other items on the Main and More Options tabs as necessary and then click OK 4 Click Print Related Information Loading Paper in the Rear Paper F...

Page 36: ... 2x2 Poster is selected and Overlapping Alignment Marks is selected in Print Cutting Guides 1 Prepare Sheet 1 and Sheet 2 Cut off the margins of Sheet 1 along the vertical blue line through the center of the top and bottom cross marks Printing Printing Documents Printing from a Computer Windows 36 ...

Page 37: ...marks then temporarily tape the two sheets together from the back 3 Cut the taped sheets in two along the vertical red line through the alignment markers this time the line to the left of the cross marks Printing Printing Documents Printing from a Computer Windows 37 ...

Page 38: ...t steps 1 to 4 to tape Sheet 3 and Sheet 4 together 6 Cut off the margins of Sheet 1 and Sheet 2 along the horizontal blue line through the center of the left and right side cross marks Printing Printing Documents Printing from a Computer Windows 38 ...

Page 39: ...e the edge of Sheet 1 and Sheet 2 on top of Sheet 3 and Sheet 4 and align the cross marks and then temporarily tape them together from the back Printing Printing Documents Printing from a Computer Windows 39 ...

Page 40: ...heets in two along the horizontal red line through the alignment markers this time the line above the cross marks 9 Tape the sheets together from the back Printing Printing Documents Printing from a Computer Windows 40 ...

Page 41: ...h a Header and Footer You can print information such as a user name and printing date in headers or footers 1 On the printer driver s More Options tab click Watermark Features and then select Header Footer Printing Printing Documents Printing from a Computer Windows 41 ...

Page 42: ...al or an anti copy pattern on your printouts If you print with an anti copy pattern the hidden letters appear when photocopied in order to distinguish the original from the copies Anti Copy Pattern is available under the following conditions Paper Type Plain paper Borderless Not selected Quality Standard 2 Sided Printing Off Manual Long edge binding or Manual Short edge binding Color Correction Au...

Page 43: ...file and then repeat the above steps 4 When you select a print job added to Print Project Lite in the Job Arranger Lite window you can edit the page layout 5 Click Print from the File menu to start printing Note If you close the Job Arranger Lite window before adding all the print data to the Print Project the print job you are currently working on is canceled Click Save from the File menu to save...

Page 44: ...ettings 4 Set the other items on the Main and More Options tabs as necessary and then click OK 5 Click Print Note Certain characters may be altered by patterns such as appearing as Application specific patterns and underlines may alter content printed using these settings Print quality may decrease in photos and other images when using Color Universal Print settings Printing is slower when using C...

Page 45: ...ction from the Color Correction setting Automatic This setting automatically adjusts the tone to match the paper type and print quality settings Custom Click Advanced you can make your own settings 2 Set the other items on the Main and More Options tabs as necessary and then click OK 3 Click Print Related Information Loading Paper in the Rear Paper Feeder on page 23 Printing Using Easy Settings on...

Page 46: ... other items on the Main and More Options tabs as necessary and then click OK 3 Click Print Note Deblurring may not always be possible depending on the circumstances Related Information Loading Paper in the Rear Paper Feeder on page 23 Printing Using Easy Settings on page 28 Printing from a Computer Mac OS Printing Using Easy Settings Note Operations and screens differ depending on the application...

Page 47: ...ails or d to expand the print window 4 Select your printer 5 Select Print Settings from the pop up menu 6 Change the settings as necessary 7 Click Print Related Information Available Paper and Capacities on page 132 List of Paper Type on page 22 Printing Printing Documents Printing from a Computer Mac OS 47 ...

Page 48: ...ick OK Note To delete an added preset click Presets Show Presets select the preset name you want to delete from the list and then delete it 4 Click Print The next time you want to print using the same settings select the registered preset name from the Presets Related Information Loading Paper in the Rear Paper Feeder on page 23 Printing Using Easy Settings on page 46 Printing Several Pages on One...

Page 49: ...e you loaded in the printer as the Destination Paper Size setting 1 Select the size of the paper you set in the application as the Paper Size setting 2 Select Paper Handling from the pop up menu 3 Select Scale to fit paper size 4 Select the paper size you loaded in the printer as the Destination Paper Size setting 5 Set the other items as necessary 6 Click Print Related Information Loading Paper i...

Page 50: ...per size you set in the application as the Paper Size setting 4 Set the other items as necessary 5 Click Print Related Information Loading Paper in the Rear Paper Feeder on page 23 Printing Using Easy Settings on page 46 Adjusting the Print Color You can adjust the colors used in the print job These adjustments are not applied to the original data PhotoEnhance produces sharper images and more vivi...

Page 51: ... available options 3 Click the arrow next to Advanced Settings and make the appropriate settings 4 Set the other items as necessary 5 Click Print Related Information Loading Paper in the Rear Paper Feeder on page 23 Printing Using Easy Settings on page 46 Printing Documents from Smart Devices iOS You can print documents from a smart device such as a smartphone or tablet Printing Documents Using Ep...

Page 52: ...printing Printing Documents Using Epson Print Enabler Note Operations may differ depending on the device 1 On your Android device install the Epson Print Enabler plug in from Google Play 2 Go to Settings on your Android device select Printing and then enable Epson Print Enabler 3 From an Android application such as Chrome tap the menu icon and print whatever is on the screen Note If you do not see...

Page 53: ...t Print from the File menu or another command to access the print dialog 4 Select the size as the Paper Size setting 5 Select Print Settings from the pop up menu 6 Select Envelope as the Media Type setting 7 Set the other items as necessary 8 Click Print Printing Web Pages Printing Web Pages from a Computer Epson Photo allows you to display web pages crop the specified area and then edit and print...

Page 54: ...rtphone tablet PC or laptop anytime and practically anywhere To use this service you need to register the user and the printer in Epson Connect The features available on the Internet are as follows Email Print When you send an email with attachments such as documents or images to an email address assigned to the printer you can print that email and the attachments from remote locations such as you...

Page 55: ...ting using a printer in a remote location you can print by changing the printer on the usual applications window See the Epson Connect web portal for details on how to setup or print https www epsonconnect com http www epsonconnect eu Europe only Printing Printing Using a Cloud Service 55 ...

Page 56: ...57 Improving Print Quality 57 Cleaning the Printer 62 Cleaning Spilled ink 62 Checking the Total Number of Pages Fed Through the Printer 62 Saving Power 63 Installing or Uninstalling Applications Separately 64 Transporting and Storing the Printer 69 ...

Page 57: ... turn off the printer during head cleaning If the head cleaning is incomplete you may not be able to print Head cleaning consumes ink and should not be performed more than necessary When ink is low you may not be able to clean the print head If print quality has not improved after repeating nozzle check and head cleaning 3 times wait for at least 12 hours without printing and then run the nozzle c...

Page 58: ... are clogged Hold the y button down for five seconds until the power light starts flashing Print head cleaning starts Note It may take some time to start print head cleaning C or close to C If most lines are missing or not printed this indicates most nozzles are clogged Run Power Cleaning For details see Related information below 5 When the power light stops flashing print a nozzle check pattern a...

Page 59: ...were too low to be seen in the ink tank windows You performed the nozzle check and head cleaning several times and then waited for at least 12 hours without printing but print quality still did not improve Before running this feature read the following instructions cImportant Make sure that there is enough ink in the ink tanks Visually check all ink tanks are at least a third full Low ink levels d...

Page 60: ...elf can dry out if it is not covered Just like placing a cap on a fountain pen or an oil pen to prevent it from drying make sure the print head is capped properly to prevent the ink from drying When the power cord is unplugged or a power outage occurs while the printer is in operation the print head may not be capped properly If the print head is left as it is it will dry out causing nozzles ink o...

Page 61: ...ler inside cImportant Do not use tissue paper to clean the inside of the printer The print head nozzles may be clogged with lint Cleaning the Paper Path Windows 1 Access the printer driver window 2 Click Paper Guide Cleaning on the Maintenance tab 3 Follow the on screen instructions Cleaning the Paper Path Mac OS 1 Select System Preferences from the Apple menu Printers Scanners or Print Scan Print...

Page 62: ...e tank wipe it off using a napless clean cloth or cotton swab If ink spills on the desk or floor wipe it off immediately When ink is dried it will be difficult to remove the smear To prevent the smear from spreading blot the ink with a dry cloth and then wipe it with a moist cloth If ink gets on your hands wash them with water and soap Checking the Total Number of Pages Fed Through the Printer You...

Page 63: ...indow 2 Click Printer and Option Information on the Maintenance tab 3 Do one of the following Note Your product may have the Power Off Timer feature or Power Off If Disconnected and Power Off If Disconnected features depending on the location of purchase Select the time period before the printer enters sleep mode as the Sleep Timer setting and click Send To make the printer turn off automatically ...

Page 64: ...e period in the Power Off If Inactive or Power Off If Disconnected setting and then click Apply Installing or Uninstalling Applications Separately Connect your computer to the network and install the latest version of applications from the website Log in to your computer as an administrator Enter the administrator password if the computer prompts you Installing the Applications Separately Note Whe...

Page 65: ... genuine Epson printer driver is installed Windows You can check if a genuine Epson printer driver is installed on your computer by using one of the following methods Select Control Panel View devices and printers Printers Printers and Faxes and then do the following to open the print server properties window Windows Windows 10 Windows 8 1 Windows 8 Windows 7 Windows Server 2019 Windows Server 201...

Page 66: ... a genuine Epson printer driver is installed on your computer by using one of the following methods Select System Preferences from the Apple menu Printers Scanners or Print Scan Print Fax and then select the printer Click Options Supplies and if the Options tab and Utility tab are displayed on the window a genuine Epson printer driver is installed on your computer Maintaining the Printer Installin...

Page 67: ...ns 3 Open Control Panel Windows 10 Windows Server 2019 Windows Server 2016 Click on the start button and then select Windows System Control Panel Windows 8 1 Windows 8 Windows Server 2012 R2 Windows Server 2012 Select Desktop Settings Control Panel Windows 7 Windows Vista Windows XP Windows Server 2008 R2 Windows Server 2008 Windows Server 2003 R2 Windows Server 2003 Click the start button and sel...

Page 68: ...er 3 To uninstall the printer driver select System Preferences from the Apple menu Printers Scanners or Print Scan Print Fax and then remove the printer from the enabled printers list 4 Quit all running applications 5 Select Go Applications Epson Software Uninstaller 6 Select the application you want to uninstall and then click Uninstall cImportant The Uninstaller removes all drivers for Epson ink...

Page 69: ...in the list you cannot update using the EPSON Software Updater Check for the latest versions of the applications from your local Epson website http www epson com Transporting and Storing the Printer When you need to store the printer or transport it when moving or for repairs follow the steps below to pack the printer 1 Turn off the printer by pressing the P button 2 Make sure the power light turn...

Page 70: ...p onto the ink tank securely 6 Close the ink tank cover securely 7 Prepare to pack the printer as shown below 8 Place the printer in the plastic bag and fold it closed Maintaining the Printer Transporting and Storing the Printer 70 ...

Page 71: ...9 Pack the printer in its box using the protective materials Maintaining the Printer Transporting and Storing the Printer 71 ...

Page 72: ...leak even if the cap on the ink bottle is tightened securely Be sure to keep the ink bottle upright when tightening the cap and take precautions to prevent ink from leaking when transporting the bottle for example putting the bottle in a bag Do not put opened ink bottles in the box with printer If print quality has declined the next time you print clean and align the print head Related Information...

Page 73: ...Solving Problems The Printer Does Not Work as Expected 74 Checking Lights and Printer Status 95 Paper Gets Jammed 97 It is Time to Refill the Ink 100 Print Quality is Poor 105 Cannot Solve Problem 113 ...

Page 74: ...nter back on and turn it off by pressing the P button Power Turns Off Automatically The Power Off Timer feature or Power Off If Inactive and Power Off If Disconnected feature is enabled Solutions Windows Click Printer and Option Information on the printer driver s Maintenance tab Disable the Power Off If Inactive and Power Off If Disconnected settings Disable the Power Off Timer setting Mac OS Sel...

Page 75: ...Unavailable Paper Types on page 134 Paper handling is inappropriate Solutions Follow paper handling precautions Paper Handling Precautions on page 22 Too many sheets are loaded in the printer Solutions Do not load more than the maximum number of sheets specified for the paper For plain paper do not load above the line indicated by the triangle symbol on the edge guide Available Paper and Capacitie...

Page 76: ...load more than the maximum number of sheets specified for the paper For plain paper do not load above the line indicated by the triangle symbol on the edge guide Available Paper and Capacities on page 132 Several Sheets of Paper are Fed at a Time The following causes can be considered The installation location is inappropriate Solutions Place the printer on a flat surface and operate in the recomm...

Page 77: ...e Paper and Capacities on page 132 Multiple sheets of paper are loaded Solutions Load one sheet of paper at a time Multiple sheets of paper feed at the same time during manual 2 sided printing Solutions Remove any paper that is loaded in the paper source before you reload the paper Paper Out Error Occurs Paper is not loaded in the center of the rear paper feeder Solutions When a paper out error oc...

Page 78: ...a genuine Epson printer driver Checking if a genuine Epson printer driver is installed Windows on page 65 When you have identified the problem follow the solution displayed on the screen When you cannot solve the problem check the following according to your situation The printer is not recognized over a network connection Cannot connect to a Network on page 78 The printer is not recognized using ...

Page 79: ...e wireless router the settings do not match the new router Solutions Make the connection settings again so that they match the new wireless router The SSIDs connected from the computer or smart device and computer are different Solutions When you are using multiple wireless routers at the same time or the wireless router has multiple SSIDs and devices are connected to different SSIDs you cannot co...

Page 80: ...nnection report and then check the IP address and the subnet mask assigned to the printer To print the network connection report press the button on the printer s control panel Restart the wireless router or reset the network settings for the printer There is a problem with the network settings on the computer Solutions Try accessing any website from your computer to make sure that your computer s...

Page 81: ...ge at a lower resolution or a smaller size If you have tried all of the solutions and have not solved the problem try uninstalling and then reinstalling the printer driver You may be able to clear the problem by updating the software to the latest version To check the software status use the software update tool Checking if a genuine Epson printer driver is installed Windows on page 65 Checking if...

Page 82: ...e default printer Solutions Right click the printer icon in Control Panel View devices and printers or Printers Printers and Faxes and click Set as default printer Note If there are multiple printer icons see the following to select the correct printer Example USB connection EPSON XXXX Series Network connection EPSON XXXX Series network If you install the printer driver multiple times copies of th...

Page 83: ...rk Wait for about 10 seconds and then turn on the devices in the following order wireless router computer or smart device and then printer Move the printer and computer or smart device closer to the wireless router to help with radio wave communication and then try to make network settings again The printer is not connected to the network Solutions Press the button to print the network connection ...

Page 84: ...e default printer Solutions Right click the printer icon in Control Panel View devices and printers or Printers Printers and Faxes and click Set as default printer Note If there are multiple printer icons see the following to select the correct printer Example USB connection EPSON XXXX Series Network connection EPSON XXXX Series network If you install the printer driver multiple times copies of th...

Page 85: ...ink levels are displayed a connection has been successfully established between the computer and the printer Check the following if a connection has not been established The printer is not recognized over a network connection Cannot connect to a Network on page 85 The printer is not recognized using a USB connection The Printer Cannot Connect by USB Mac OS on page 88 Check the following if a conne...

Page 86: ...e wireless router the settings do not match the new router Solutions Make the connection settings again so that they match the new wireless router The SSIDs connected from the computer or smart device and computer are different Solutions When you are using multiple wireless routers at the same time or the wireless router has multiple SSIDs and devices are connected to different SSIDs you cannot co...

Page 87: ...ned to the printer To print the network connection report press the button on the printer s control panel Restart the wireless router or reset the network settings for the printer There is a problem with the network settings on the computer Solutions Try accessing any website from your computer to make sure that your computer s network settings are correct If you cannot access any website there is...

Page 88: ...a genuine Epson printer driver If you are printing a large data size image the computer may run out of memory Print the image at a lower resolution or a smaller size If you have tried all of the solutions and have not solved the problem try uninstalling and then reinstalling the printer driver You may be able to clear the problem by updating the software to the latest version To check the software...

Page 89: ...he devices in the following order wireless router computer or smart device and then printer Move the printer and computer or smart device closer to the wireless router to help with radio wave communication and then try to make network settings again The printer is not connected to the network Solutions Press the button to print the network connection report If the report shows that the network con...

Page 90: ...evice and the printer are connected correctly The cause and solution to the problem differ depending on whether or not they are connected Check the connection with the smart device Use Epson Smart Panel to check the connection between the smart device and the printer Open the Epson Smart Panel If you cannot connect to the printer tap at the top of the screen to reset If you are not using Epson Sma...

Page 91: ... that they match the new wireless router The SSIDs connected from the computer or smart device and computer are different Solutions When you are using multiple wireless routers at the same time or the wireless router has multiple SSIDs and devices are connected to different SSIDs you cannot connect to the wireless router Connect the computer or smart device to the same SSID as the printer Example ...

Page 92: ...ere is a problem with the network settings on the smart device Solutions Try accessing any website from your smart device to make sure that your smart device s network settings are correct If you cannot access any website there is a problem on the smart device Check the network connection of the computer See the documentation provided with the smart device for details Suddenly the Printer Cannot P...

Page 93: ...y website from your smart device to make sure that your smart device s network settings are correct If you cannot access any website there is a problem on the smart device Check the network connection of the computer See the documentation provided with the smart device for details Cannot Operate the Printer as Expected Operations are Slow Printing Is Too Slow The following causes can be considered...

Page 94: ...can Print Fax and then select the printer Click Options Supplies Options or Driver Select Off as the Quiet Mode setting Printing Slows Down Dramatically During Continuous Printing The function that prevents the printer mechanism from overheating and being damaged is operating Solutions You can continue printing To return to normal printing speed leave the printer idle for at least 30 minutes Print...

Page 95: ...o clear the error and try again Initial ink charging may not be complete See the Start Here poster to complete initial ink charging No paper is loaded or more than one sheet has been fed at a time Load paper and press the button A paper jam has occurred Remove the paper and press the button If the paper jam error continues after removing the paper and turning the power off and on again paper may r...

Page 96: ...n a message saying that you can continue printing is displayed on the computer press the button to continue printing The lights stop flashing for the time being however they will continue to flash at regular intervals until the ink pad is replaced Borderless printing is not available but printing with a border is available The printer has started in recovery mode because the firmware update failed...

Page 97: ...be performed by an authorised Epson Service provider The Epson warranty does not cover the cost of this replacement Related Information Removing Jammed Paper on page 97 Contacting Epson Support on page 150 Paper Gets Jammed Check the error displayed on the control panel and follow the instructions to remove the jammed paper including any torn pieces Next clear the error cImportant Remove the jamme...

Page 98: ...the printer cover until it clicks cImportant Do not touch the parts shown in the illustration inside the printer Doing so may cause a malfunction 4 Remove the jammed paper Solving Problems Paper Gets Jammed Removing Jammed Paper 98 ...

Page 99: ...ide the printer Doing so may cause a malfunction 5 Close the printer cover For safety the printer cover is closed in two steps Note The printer cover must be closed completely before it can be opened again Solving Problems Paper Gets Jammed Removing Jammed Paper 99 ...

Page 100: ...k Ink Bottle Handling Precautions Read the following instructions before refilling ink Storing precautions for ink Keep the ink bottles out of direct sunlight Do not store the ink bottles in high or freezing temperatures Epson recommends using the ink bottle before the date printed on the package When storing or transporting an ink bottle do not tilt the bottle and do not subject it to impacts or ...

Page 101: ... line could damage the printer Ink consumption To maintain optimum print head performance some ink is consumed from all ink tanks during maintenance operations such as print head cleaning Ink may also be consumed when you turn the printer on When printing in monochrome or grayscale color inks instead of black ink may be used depending on the paper type or print quality settings This is because a m...

Page 102: ... you want to refill 3 While holding the ink bottle upright turn the cap slowly to remove it cImportant Epson recommends the use of genuine Epson ink bottles Be careful not to spill any ink 4 Check the upper line a in the ink tank Solving Problems It is Time to Refill the Ink Refilling the Ink Tanks 102 ...

Page 103: ...e filling port for the correct color ink starts pouring and the flow stops automatically when the ink reaches the upper line If the ink does not start flowing into the tank remove the ink bottle and reinsert it However do not remove and reinsert the ink bottle when the ink has reached the upper line otherwise ink may leak Solving Problems It is Time to Refill the Ink Refilling the Ink Tanks 103 ...

Page 104: ... otherwise the bottle may be damaged or ink may leak Note If any ink remains in the ink bottle tighten the cap and store the bottle upright for later use 7 Close the ink tank cover firmly Related Information Ink Bottle Codes on page 135 Ink Bottle Handling Precautions on page 100 Solving Problems It is Time to Refill the Ink Refilling the Ink Tanks 104 ...

Page 105: ...the ink tanks to the upper lines and then use the Power Cleaning utility to replace the ink inside the ink tubes After you use the utility perform a nozzle check to see if print quality has improved Checking and Cleaning the Print Head on page 57 Running Power Cleaning on page 59 Print Quality is Poor with Black Ink The print head nozzles may be clogged Solutions Perform a nozzle check to see if t...

Page 106: ...type setting does not match the paper loaded Solutions Select the appropriate paper type setting for the type of paper loaded in the printer List of Paper Type on page 22 The print quality is set to low Solutions When printing on plain paper print using a higher quality setting Windows Select High from Quality on the printer driver s Main tab Mac OS Select Fine as Print Quality from the print dial...

Page 107: ...Solutions If print quality does not improve even after aligning the print head disable the bidirectional setting During bidirectional or high speed printing the print head prints while moving in both directions and vertical lines may be misaligned Disabling this setting may slow down printing speed but improve print quality Windows Clear Bidirectional Printing on the printer driver s More Options ...

Page 108: ...n appears or the top or bottom of the paper is smeared load paper in the correct direction and slide the edge guides to the edges of the paper Loading Paper in the Rear Paper Feeder on page 23 The paper path is smeared Solutions When vertical banding horizontal to the printing direction appears or the paper is smeared clean the paper path Cleaning the Paper Path on page 61 The paper is curled Solu...

Page 109: ... the paper path Cleaning the Paper Path on page 61 Images or Photos are Printed in Unexpected Colors The following causes can be considered The print head nozzles may be clogged Solutions Perform a nozzle check to see if the print head nozzles are clogged Perform a nozzle check and then clean the print head if any of the print head nozzles are clogged If you have not used the printer for a long ti...

Page 110: ...pport borderless printing you cannot select Borderless Select a paper type that supports borderless printing Windows Select Borderless on the printer driver s Main tab Mac OS Select a borderless paper size from Paper Size Paper for Borderless Printing on page 134 Edges of the Image are Cropped During Borderless Printing Because the image is slightly enlarged the protruding area is cropped Solution...

Page 111: ...ppropriate paper size setting The margin setting in the application software is not within the print area Solutions Adjust the margin setting in the application so that it falls within the printable area Printable Area on page 143 Printed Characters Are Incorrect or Garbled The following causes can be considered The USB cable is not connected correctly Solutions Connect the USB cable securely to t...

Page 112: ...ver window The Printed Image Is Inverted The image is set to invert horizontally in the print settings Solutions Clear any mirror image settings in the printer driver or the application Windows Clear Mirror Image on the printer driver s More Options tab Mac OS Clear Mirror Image from the print dialog s Print Settings menu Mosaic Like Patterns in the Prints Images or photos with a low resolution we...

Page 113: ...int head cleaning uses some ink Checking and Cleaning the Print Head on page 57 Turn off the printer wait for at least 12 hours and then check if the clogging has cleared If the problem is clogging leaving the printer for a while without printing may solve the problem You can check the following items while the printer is off Check that you are using genuine Epson ink bottles Try to use genuine Ep...

Page 114: ...Related Information Before Contacting Epson on page 150 Contacting Epson Support on page 150 Solving Problems Cannot Solve Problem Cannot Solve Printing Problems 114 ...

Page 115: ...puter or Devices Connecting to a Printer that has been Connected to the Network 116 Re setting the Network Connection 117 Connecting a Smart Device and Printer Directly Wi Fi Direct 121 Checking the Network Connection Status 123 ...

Page 116: ...following website and then enter the product name Go to Setup and then start setting up http epson sn Setting up using the software disc only for the models that come with a software disc and users with Windows computers with disc drives Insert the software disc into the computer and then follow the on screen instructions Selecting the Printer Follow the on screen instructions until the following ...

Page 117: ...rinter You need to make these settings if you change your Internet service provider and so on Making Settings for Connecting to the Computer We recommend using the installer to connect the printer to a computer You can run the installer using one of the following methods Setting up from the website Access the following website and then enter the product name Go to Setup and then start setting up h...

Page 118: ... the on screen instructions Changing the Connection Method to the Computer This section explains how to change the connection method when the computer and the printer have been connected Changing from USB to a Network Connection Using the installer and re set up in a different connection method Setting up from the website Access the following website and then enter the product name Go to Setup and...

Page 119: ...ng If the wireless router supports WPS you can make settings by using push button setup After connecting the printer to the network connect to the printer from the device that you want to use computer smart device tablet and so on Related Information Making Wi Fi Settings by Push Button Setup on page 119 Making Wi Fi Settings by PIN Code Setup WPS on page 121 Making Wi Fi Settings by Push Button S...

Page 120: ... Hold down the button on the printer for at least five seconds until the light and the light flash alternately The connection setting will start When a connection is established the light turns on Note The printer is in a connection error status when the light and the light flash simultaneously After clearing the printer error by pressing the button on the printer reboot the wireless router place ...

Page 121: ...ablished the light turns on Note See the documentation provided with your wireless router for details on entering a PIN code The printer is in a connection error status when the light and the light flash simultaneously After clearing the printer error by pressing the button on the printer reboot the wireless router place it close to the printer and try again If it still does not work print a netwo...

Page 122: ...he printer is connected by Wi Fi the Wi Fi is temporarily disconnected Connecting to Devices Using Wi Fi Direct This method allows you to connect the printer directly to devices without a wireless router The printer acts as a wireless router 1 While holding down the button press the button until the light and the light flash alternately Wait until the process ends When a connection is established ...

Page 123: ...n to allow the connection request Press the button if you want to reject the connection request Related Information Printing a Network Status Sheet on page 129 Checking the Network Connection Status on page 123 Checking the Network Connection Status You can check the network connection status in the following way Related Information Checking the Network Status Using Network Light on page 123 Print...

Page 124: ...rt is printed Messages and Solutions on the Network Connection Report Check the messages and error codes on the network connection report and then follow the solutions a Error code b Messages on the Network Environment Related Information E 1 on page 125 E 2 E 3 E 7 on page 125 E 5 on page 126 E 6 on page 126 Adding or Replacing the Computer or Devices Checking the Network Connection Status Printi...

Page 125: ...upports WPS You cannot use push button setup if your wireless router does not support WPS Makes sure your SSID uses only ASCII characters alphanumeric characters and symbols The printer cannot display an SSID that contains non ASCII characters Makes sure you know your SSID and password before connecting to the wireless router If you are using a wireless router with its default settings the SSID an...

Page 126: ... address from the Network Status part on the network connection report If your wireless router is using shared authentication with WEP security make sure the authentication key and index are correct If the number of connectable devices on the wireless router is less than the number of network devices that you want to connect make settings on the wireless router to increase the number of connectabl...

Page 127: ...es IP address subnet mask and default gateway are correct if you have set the printer s Obtain IP Address to Manual Reset the network address if they are incorrect You can check the IP address subnet mask and default gateway from the Network Status part on the network connection report If DHCP is enabled change the printer s Obtain IP Address setting to Auto If you want to set the IP address manua...

Page 128: ...seconds and then turn it on Make network settings again using the installer You can run it from the following website http epson sn Setup You can register several passwords on a wireless router that uses WEP security type If several passwords are registered check if the first registered password is set on the printer Related Information Printing a Network Status Sheet on page 129 Making Settings f...

Page 129: ...with the wireless router No more devices can be connected Disconnect one of the connected devices if you want to add another one Computer and smart devices that can be connected simultaneously are connected in full in the Wi Fi Direct Simple AP connection To add another computer or smart device disconnect one of the connected devices or connect it to the other network first You can confirm the num...

Page 130: ...re multiple DHCP servers on the same network you can find out the actual address assigned to the computer the referred DNS server etc Format ipconfig all Examples pathping command You can confirm the list of routers passing through the destination host and the routing of communication Format pathping xxx xxx xxx xxx Examples pathping 192 0 2 222 Adding or Replacing the Computer or Devices Checking...

Page 131: ...Product Information Paper Information 132 Consumable Products Information 135 Software Information 136 Product Specifications 142 Regulatory Information 147 ...

Page 132: ...ght White Ink Jet Paper A4 Up to the line indicated by the triangle symbol on the edge guide Paper suitable for printing documents and photos Media Name Size Loading Capacity Sheets Epson Photo Quality Ink Jet Paper A4 80 Epson Double sided Photo Quality Ink Jet Paper Letter A4 80 Epson Matte Paper Heavyweight A4 20 Epson Double Sided Matte Paper A4 1 Paper suitable for printing photos Media Name ...

Page 133: ...or borderless and 2 sided printing Paper for Borderless Printing on page 134 Paper for 2 Sided Printing on page 134 Plain papers Plain paper includes copy paper Size Loading Capacity Sheets Letter A4 B5 A5 A6 B6 16K 195 270 mm Up to the line indicated by the triangle symbol on the edge guide 1 Legal 8 5 13 in Indian Legal 1 User Defined 2 mm 54x86 to 215 9x1200 1 1 Load one sheet of paper at a tim...

Page 134: ...ight White Ink Jet Paper Epson Double sided Photo Quality Ink Jet Paper Epson Double Sided Matte Paper Related Information Available Paper and Capacities on page 132 Commercially Available Paper Plain paper Copy paper Related Information Available Paper and Capacities on page 132 Unavailable Paper Types Do not use the following papers Using these types of paper causes paper jams and smears on the ...

Page 135: ...actured by Epson may cause damage that is not covered by Epson s warranties and under certain circumstances may cause erratic printer behavior Note Ink bottle codes may vary by location For the correct codes in your area contact Epson support Although the ink bottles may contain recycled materials this does not affect printer function or performance Specifications and appearance of the ink bottle ...

Page 136: ... Note Operations differ depending on the application See the application s help for details Accessing the printer driver from the control panel To make settings that apply to all of the applications access from the control panel Windows 10 Windows Server 2019 Windows Server 2016 Click on the start button and then select Windows System Control Panel View devices and printers in Hardware and Sound R...

Page 137: ...driver window 2 Click Extended Settings on the Maintenance tab 3 Make the appropriate settings and then click OK See the online help for explanations of the setting items Related Information Application for Printing from a Computer Windows Printer Driver on page 136 Application for Printing from a Computer Mac OS Printer Driver The printer driver controls the printer according to the commands from...

Page 138: ...es with a variety of layouts You can also perform image correction and adjust the position while viewing a preview of your document You can also brighten up your images by adding text and stamps wherever you like When printing on genuine Epson photo paper the ink performance is maximized creating a beautiful finish with excellent coloring See the application s help for details Note Windows Server ...

Page 139: ...ing Easily from an Android Application Epson Print Enabler Epson Print Enabler is an application that allows you to wirelessly print your documents emails photos and web pages right from your Android phone or tablet Android v4 4 or later With a few taps your Android device will discover an Epson printer that is connected to the same wireless network Search for and install Epson Print Enabler from ...

Page 140: ...e screen and then select the active connection method to confirm the printer s IP address Note You can also check the IP address by printing the network connection report 2 Launch a Web browser from a computer or smart device and then enter the printer s IP address Format IPv4 http the printer s IP address IPv6 http the printer s IP address Examples IPv4 http 192 168 100 201 IPv6 http 2001 db8 100...

Page 141: ...lies Show Printer Webpage Since the printer uses a self signed certificate when accessing HTTPS a warning is displayed on the browser when you start Web Config this does not indicate a problem and can be safely ignored Application for Setting up the Device on a Network EpsonNet Config EpsonNet Config is an application that allows you to set the network interface addresses and protocols See the ope...

Page 142: ... the application name in the search charm and then select the displayed icon Windows 7 Windows Vista Windows XP Click the start button and then select All Programs or Programs Epson Software EPSON Software Updater Note You can also start EPSON Software Updater by clicking the printer icon on the task bar on the desktop and then selecting Software Update Starting on Mac OS Select Go Applications Ep...

Page 143: ...chanism Printing with borders A 3 0 mm 0 12 in B 3 0 mm 0 12 in C 41 0 mm 1 61 in D 37 0 mm 1 46 in Borderless printing A 44 0 mm 1 73 in B 40 0 mm 1 57 in Printable Area for Envelopes Print quality may decline in the shaded areas due to the printer s mechanism A 3 0 mm 0 12 in B 3 0 mm 0 12 in C 18 0 mm 0 71 in D 41 0 mm 1 61 in Interface Specifications For Computer Hi Speed USB USB 3 0 cables ar...

Page 144: ...mplies with WPA2 standards with support for WPA WPA2 Personal Network Functions and IPv4 IPv6 Functions Supported Remarks Network Printing EpsonNet Print Windows IPv4 Standard TCP IP Windows IPv4 IPv6 WSD Printing Windows IPv4 IPv6 Windows Vista or later Bonjour Printing Mac OS IPv4 IPv6 IPP Printing Windows Mac OS IPv4 IPv6 PictBridge Printing Wi Fi IPv4 Digital camera Epson Connect Email Print R...

Page 145: ...ated Frequency Range 50 60 Hz 50 60 Hz Rated Current 0 4 0 2 A 0 2 A Power Consumption with USB Con nection Printing Approx 12 0 W ISO IEC24712 Ready mode Approx 3 0 W Sleep mode Approx 0 7 W Power off Approx 0 2 W Printing Approx 12 0 W ISO IEC24712 Ready mode Approx 3 0 W Sleep mode Approx 0 7 W Power off Approx 0 2 W Note Check the label on the printer for its voltage For European users see the...

Page 146: ...e 20 to 40 C 4 to 104 F Freezing Temperature 15 C 5 F Ink thaws and is usable after approximately 2 hours at 25 C 77 F You can store for one month at 40 C 104 F System Requirements Windows Windows Vista Windows 7 Windows 8 8 1 Windows 10 or later 32 bit 64 bit Windows XP SP3 32 bit Windows XP Professional x64 Edition SP2 Windows Server 2003 SP2 or later Mac OS Mac OS X v10 6 8 or later Note Mac OS...

Page 147: ...recommended modification of the products Frequency Maximum Radio Frequency Power Transmitted 2400 2483 5 MHz 20 dBm EIRP Standards and Approvals for Australian Model EMC AS NZS CISPR32 Class B Epson hereby declares that the following equipment Models are in compliance with the essential requirements and other relevant provisions of AS NZS4268 B631E Epson cannot accept responsibility for any failur...

Page 148: ...licenses warrants of fitness road passes food stamps tickets etc Note Copying these items may also be prohibited by law Responsible use of copyrighted materials Printers can be misused by improperly copying copyrighted materials Unless acting on the advice of a knowledgeable attorney be responsible and respectful by obtaining the permission of the copyright holder before copying published material...

Page 149: ...Where to Get Help Technical Support Web Site 150 Contacting Epson Support 150 ...

Page 150: ...nformation Product serial number The serial number label is usually on the back of the product Product model Product software version Click About Version Info or a similar button in the product software Brand and model of your computer Your computer operating system name and version Names and versions of the software applications you normally use with your product Note Depending on the product net...

Page 151: ...nd wishes to provide you with a high level of customer service In addition to your product documentation we provide the following sources for obtaining information Internet URL http www epson co nz Access the Epson New Zealand World Wide Web pages Worth taking your modem here for the occasional surf The site provides a download area for drivers Epson contact points new product information and tech...

Page 152: ...r information support and services are World Wide Web http www epson co th Information on product specifications drivers for download Frequently Asked Questions FAQ and e mail are available Epson Call Centre Phone 66 2685 9899 Email support eth epson co th Our Call Centre team can help you with the following over the phone Sales enquiries and product information Product usage questions or problems...

Page 153: ...lati Mas Square Blok A2 No 17 Serpong Banten 082120090084 082120090085 esstag epson indonesia co id esstag support epson indonesia co id SEMARANG Epson Sales and Service Semarang Komplek Ruko Metro Plaza Block C20 Jl MT Haryono No 970 Semarang JAWA TENGAH 024 8313807 024 8417935 esssmg epson indonesia co id esssmg support epson indonesia co id JAKARTA Epson Sales and Service Jakarta MANGGA DUA Ruk...

Page 154: ... Saimin Ruko Villa Bukit Mas RM 11 Kec Dukuh Pakis Surabaya 60225 031 5120994 sby technical epson indonesia co id sby admin epson indonesia co id YOGYAKARTA Epson Service Center Yogyakarta YAP Square Block A No 6 Jl C Simanjutak Yogyakarta DIY 0274 581 065 ygy technical epson indonesia co id ygy admin epson indonesia co id JEMBER Epson Service Center Jember JL Panglima Besar Sudirman Ruko no 1D Je...

Page 155: ...pson indonesia co id bdj technical epson indonesia co id DENPASAR EPSON SALES AND SERVICE Denpasar JL MAHENDRADATA NO 18 DENPASAR BALI 0361 3446699 9348428 dps admin epson indonesia co id dps technical epson indonesia co id JAKARTA EPSON SALES AND SERVICE CILANDAK CIBIS Business Park Tower 9 LT MEZZANINE Jalan TB Simatupang No 2 Jakarta Selatan DKI JAKARTA 12560 021 80866777 esscibis support1 epso...

Page 156: ...nload and products enquiry are available Helpline Service product information and ordering consumables BSNL Lines Toll free number 18004250011 Accessible 9am to 6pm Monday through Saturday Except public holidays Service CDMA Mobile Users Toll free number 186030001600 Accessible 9am to 6pm Monday through Saturday Except public holidays Help for Users in the Philippines To obtain technical support a...

Page 157: ...cessible 9am to 6pm Monday through Saturday Except public holidays Our Customer Care team can help you with the following over the phone Sales enquiries and product information Product usage questions or problems Enquiries on repair service and warranty Epson Philippines Corporation Trunk Line 632 706 2609 Fax 632 706 2663 Where to Get Help Contacting Epson Support Help for Users in the Philippine...

Reviews: