background image

ET-2400 User's Guide

Summary of Contents for ET-2400

Page 1: ...ET 2400 User s Guide ...

Page 2: ......

Page 3: ...lets and More 19 Using Epson Email Print 20 Using Epson Remote Print 20 Setting Up Printing on a Chromebook 21 Android Printing Using the Epson Print Enabler 21 Using Epson Print and Scan App with Windows Tablets 22 Wi Fi Networking 23 Network Security Recommendations 23 Wi Fi Direct Mode Setup 24 Enabling Wi Fi Direct Mode 24 Wi Fi Protected Setup WPS 25 Using WPS to Connect to a Network 25 Print...

Page 4: ...ic Print Settings Windows 48 Print Quality Options Windows 50 Multi Page Printing Options Windows 50 Selecting Double sided Printing Settings Windows 51 Double sided Printing Options Windows 53 Selecting Additional Layout and Print Options Windows 54 Custom Color Correction Options Windows 56 Image Options and Additional Settings Windows 57 Header Footer Settings Windows 58 Selecting a Printing Pr...

Page 5: ...ences Mac 84 Printing Your Document or Photo Mac 85 Checking Print Status Mac 86 Printing from a Smartphone or Tablet 87 Printing with Epson Photo 88 Cancelling Printing Using a Product Button 88 Scanning 89 Starting a Scan 89 Starting a Scan Using the Product Buttons 89 Changing Default Scan Job Settings 90 Setting Up a WSD Port Windows 7 Windows Vista 90 Starting a Scan Using Epson ScanSmart 91 ...

Page 6: ...ing Ink 123 Ink Safety Precautions 123 Checking Ink Levels on Your Product 125 Disabling Special Offers with Windows 125 Purchase Epson Ink 127 Ink Bottle Part Numbers 127 Refilling the Ink Tanks 127 Adjusting Print Quality 133 Print Head Maintenance 133 Print Head Nozzle Check 133 Checking the Nozzles Using the Product Buttons 134 Checking the Nozzles Using a Computer Utility 136 Print Head Clean...

Page 7: ... Network Problems 163 Product Cannot Connect to a Wireless Router or Access Point 164 Network Software Cannot Find Product on a Network 166 Product Does Not Appear in Mac Printer Window 167 Wireless Network Connection is Unstable on a Mac 167 Cannot Print Over a Network 168 Cannot Scan Over a Network 169 Solving Copying Problems 170 Product Makes Noise But Nothing Copies 170 Product Makes Noise Wh...

Page 8: ...189 Grainy Printout 190 Incorrect Colors 191 Solving Scanning Problems 192 Scanning Software Does Not Operate Correctly 193 Cannot Start Epson Scan 2 193 Scanning is Slow 194 Solving Scanned Image Quality Problems 194 Image Consists of a Few Dots Only 195 Line of Dots Appears in All Scanned Images 195 Straight Lines in an Image Appear Crooked 196 Scanned Image Quality Problems 196 Characters are N...

Page 9: ...cations 210 Interface Specifications 210 Network Interface Specifications 210 Safety and Approvals Specifications 211 Notices 213 Important Safety Instructions 213 General Printer Safety Instructions 213 Wireless Connection Safety Instructions 215 FCC Compliance Statement 215 Binding Arbitration and Class Waiver 216 Trademarks 219 Copyright Notice 220 libTIFF Software Acknowledgment 220 A Note Con...

Page 10: ......

Page 11: ...11 ET 2400 User s Guide Welcome to the ET 2400 User s Guide For a printable PDF copy of this guide click here ...

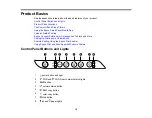
Page 12: ...vated Printing Epson Connect Solutions for Smartphones Tablets and More Setting Up Printing on a Chromebook Android Printing Using the Epson Print Enabler Using Epson Print and Scan App with Windows Tablets Control Panel Buttons and Lights 1 power button and light 2 Wi Fi and Wi Fi Direct network status lights 3 Wi Fi button 4 network status button 5 B W copy button 6 color copy button 7 stop butt...

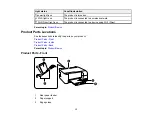
Page 13: ...i Fi Direct light is on The product is connected to a device using Wi Fi Direct Parent topic Product Basics Product Parts Locations See these sections to identify the parts on your product Product Parts Front Product Parts Inside Product Parts Back Parent topic Product Basics Product Parts Front 1 Rear paper feeder 2 Paper support 3 Edge guides ...

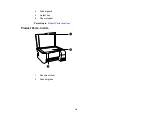
Page 14: ...14 4 Feeder guard 5 Output tray 6 Paper stopper Parent topic Product Parts Locations Product Parts Inside 1 Document cover 2 Scanner glass ...

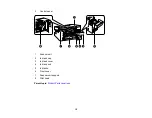
Page 15: ...15 3 Control panel 1 Scanner unit 2 Ink tank cap 3 Ink tank cover 4 Ink tank unit 5 Ink tanks 6 Front cover 7 Scanner unit support 8 Print head Parent topic Product Parts Locations ...

Page 16: ...ficiency Changing the Power Off and Sleep Timer Settings Windows Changing the Power Off and Sleep Timer Settings Mac Parent topic Product Basics Changing the Power Off and Sleep Timer Settings Windows You can use the printer software to change the time period before the printer enters sleep mode or turns off automatically 1 Access the Windows Desktop and right click the icon for your product in th...

Page 17: ... want as the Sleep Timer setting 6 Click Send 7 Click OK to close the open program windows Parent topic The Power Off and Sleep Timers Changing the Power Off and Sleep Timer Settings Mac You can use the printer software to change the time period before the printer enters sleep mode or turns off automatically 1 In the Apple menu or the Dock select System Preferences Select Print Fax Print Scan or P...

Page 18: ...ick Apply 6 If you see the confirmation message click Yes and close the Printer Settings window Parent topic The Power Off and Sleep Timers Using the Epson Smart Panel Mobile App Use this free Apple and Android app to set up and control your Epson product Epson Smart Panel also lets you check product status Note App features may vary depending on your Epson product 1 Visit epson com connect U S or...

Page 19: ... ask your product to print photos calendars recipes photo props and more Click here for more information 1 Connect your product to your network See the link below 2 Set up your product s email address for use with Epson Connect See the link below to activate it from the product control panel 3 Click here for instructions on how to set up your product and voice assistant to use the voice activated ...

Page 20: ... about Email Print create your Epson Connect account and register your product to the Epson Connect service 3 Now you are ready to send and print emails to your product s Email Print address Note Go to epsonconnect com and log into your Epson connect account to personalize your product s email adjust print settings and set up other Epson Connect services Parent topic Epson Connect Solutions for Sm...

Page 21: ... Epson Printer on Your Chromebook U S or Setting Up Your Epson Printer on Your Chromebook Canada Parent topic Product Basics Android Printing Using the Epson Print Enabler You can wirelessly print your documents emails photos and web pages right from your Android phone or tablet Android v4 4 or later With a few taps your Android device will discover your nearby Epson product and print 1 Connect yo...

Page 22: ...rive Note The Epson Print and Scan app does not support Windows 10 Mobile printing and does not supply scanning functions for products without scanners 1 Connect your Epson product to your wireless network See the link below 2 Download the Epson Print and Scan app from the Microsoft Windows Store 3 Connect your Windows tablet to the same wireless network as your product 4 Open the Epson Print and ...

Page 23: ...er the wireless LAN Your router may already have a default password enabled by your Internet service provider ISP See your ISP and router documentation for instructions on how to change the default password and better secure your network Connect your product only to a network protected by a firewall Connecting your product directly to the Internet may leave it vulnerable to security threats Instea...

Page 24: ...duct 2 Computer with a wireless interface 3 Other wireless device Enabling Wi Fi Direct Mode Parent topic Wi Fi Networking Enabling Wi Fi Direct Mode You can enable Wi Fi Direct mode to allow direct communication between your product and computer or other devices without a wireless router or access point Make sure paper is loaded before you begin Note If you are printing from a computer make sure ...

Page 25: ...ten on the network status sheet Parent topic Wi Fi Direct Mode Setup Wi Fi Protected Setup WPS If your network uses a WPS enabled wireless router or access point you can quickly connect your product to the network using Wi Fi Protected Setup WPS Note To check if your router is WPS enabled look for a button labeled WPS on your router or access point If there is no hardware button there may be a vir...

Page 26: ...n a network To print the status sheet hold down the network status button on the product for at least seven seconds Note If you release the button before seven seconds elapses a network connection report is printed instead of a network status sheet Examine the settings shown on the network status sheet to diagnose any problems you may have Parent topic Wi Fi Networking Printing a Network Connectio...

Page 27: ...ote Error codes and messages listed here may not all apply to your product Error Codes and Messages Error code and message Solution E 1 Confirm that the network cable is connected and network devices such as hub router or access point are turned on Make sure your router access point and or hub are turned on and the network cable is securely connected to your device and to your product If you are t...

Page 28: ...t and remove any obstacles between them Also move your product away from devices such as wireless phones or microwaves Confirm that the SSID shown on the network connection report matches the label on your router or access point Also make sure your SSID uses only ASCII characters and symbols or your product cannot display the SSID correctly If you are trying to connect using the WPS push button me...

Page 29: ... product s MAC address so it is not filtered Locate the MAC address on the network connection report and check your router or access point documentation for instructions If your router or access point is using shared authentication with WEP security confirm that you are using the correct authentication key and index If your router or access point limits the number of connected devices raise the co...

Page 30: ...ned on and do the following If your product s Obtain IP Address setting is set to Manual check the IP address subnet mask and default gateway addresses on the network connection report to see if they are correct If not correct the settings If DHCP is enabled set your product s Obtain IP Address setting to Auto If you want to use the DHCP assigned address as a static address set the Obtain IP Addre...

Page 31: ...ork settings If your router or access point uses WEP security with several registered passwords make sure that the first registered password is set on your product E 13 Confirm the following Entered security key password is correct Index of the security key password is set to the first number Connection and network setup of the PC or other device is correct Contact your network administrator for a...

Page 32: ...connect an existing connected device first Parent topic Printing a Network Connection Report Changing or Updating Network Connections See these sections to change or update how your product connects to a network Accessing the Web Config Utility Changing a USB Connection to a Wi Fi Connection Connecting to a New Wi Fi Router Disabling Wi Fi Features Parent topic Wi Fi Networking Accessing the Web C...

Page 33: ...i Router If you change the wireless router you have been using on your network you need to update your product s Wi Fi connection to the new router Note If you switch to a 5 GHz wireless router set the router to operate in dual band 2 4 GHz and 5 GHz mode If your router uses a single network name SSID for both the 2 4 GHz and 5 GHz band give each band its own network name SSID instead such as Home...

Page 34: ... features make a note of your product s SSID network name and password and any network settings selected for the Epson Connect services you may use These settings will be reset to their default values 1 Turn off the product 2 Hold down the network status button and press the power button until the Wi Fi light and Wi Fi Direct light flash alternately Then release both buttons When the Wi Fi light a...

Page 35: ...pacity Double sided Printing Capacity Compatible Epson Papers Borderless Paper Type Compatibility Paper or Media Type Settings Loading Paper in the Sheet Feeder You can print documents and photos on a variety of paper types and sizes 1 Flip the feeder guard forward then raise the paper support 2 Slide the edge guides out all the way ...

Page 36: ...u are inserting a stack of paper fan the sheets first and tap the stack on a flat surface to even the edges Note Do not fan or curl photo paper 5 Do one of the following Insert paper glossy or printable side up and short edge first in the center of the paper support ...

Page 37: ...aper support Load them printable side up and flap edge left Load a sheet of loose leaf or other paper with holes facing as shown To load a sheet of paper longer than legal size close the paper support and flatten the leading edge of the paper as shown ...

Page 38: ...ng it or load one envelope at a time Do not load envelopes that are curled folded or too thin or that have plastic windows or exposed adhesive flaps Check the paper package for any additional loading instructions Do not place objects on the feeder guard Doing so may prevent paper from feeding Do not leave paper in the printer as the paper may curl or the print quality may decline If you use paper ...

Page 39: ...5 13 4 inches 216 340 mm or Oficio 9 8 46 12 4 inches 215 315 mm size 1 sheet Epson Presentation Paper Matte Epson High Quality Ink Jet Paper 80 sheets Epson Premium Presentation Paper Matte Epson Photo Paper Glossy Epson Premium Photo Paper Glossy Epson Ultra Premium Photo Paper Glossy Epson Premium Photo Paper Semi gloss Epson Value Photo Paper Glossy 20 sheets If paper feeds incorrectly or prin...

Page 40: ...er 8 5 11 inches 216 279 mm 1 sheet You cannot print double sided on the following paper types Epson High Quality Ink Jet Paper Epson Presentation Paper Matte Epson Photo Paper Glossy Epson Value Photo Paper Glossy Epson Premium Photo Paper Glossy Epson Premium Photo Paper Semi gloss Epson Ultra Premium Photo Paper Glossy Epson Premium Presentation Paper Matte Envelopes Parent topic Loading Paper ...

Page 41: ...10 297 mm S041117 100 Letter 8 5 11 inches 216 279 mm S041111 100 Epson Photo Paper Glossy 4 6 inches 102 152 mm S041809 S042038 50 100 A4 8 3 11 7 inches 210 297 mm S041140 20 Letter 8 5 11 inches 216 279 mm S041141 20 Epson Premium Photo Paper Glossy 4 6 inches 102 152 mm S041727 100 5 7 inches 127 178 mm S041464 20 8 10 inches 203 254 mm S041465 20 Letter 8 5 11 inches 216 279 mm S041667 50 Eps...

Page 42: ... Double sided Letter 8 5 11 inches 216 279 mm S041568 50 Epson Value Photo Paper Glossy Letter 8 5 11 inches 216 279 mm S400031 50 4 6 inches 102 152 mm S400032 S400033 S400034 20 50 100 Parent topic Loading Paper Borderless Paper Type Compatibility You can print borderless photos on compatible paper types in compatible sizes Borderless Paper Types Epson Premium Photo Paper Glossy Epson Ultra Prem...

Page 43: ...n Paper Bright White Paper Epson Ultra Premium Photo Paper Glossy Ultra Premium Photo Paper Glossy Epson Premium Photo Paper Glossy Premium Photo Paper Glossy Epson Photo Paper Glossy Epson Value Photo Paper Glossy Photo Paper Glossy Epson Premium Photo Paper Semi gloss Premium Photo Paper Semi Gloss Epson Premium Presentation Paper Matte Epson Premium Presentation Paper Matte Double sided Premium...

Page 44: ...ng Originals on the Scanner Glass Placing Originals on the Scanner Glass You can place originals up to this size on the scanner glass Letter 8 5 11 inches 216 279 mm or A4 8 3 11 7 inches 210 297 mm 1 Open the document cover Note If there is any dust or dirt on the scanner glass the scanning range may expand to include it so the image of the original may be displaced or reduced Remove any dust and...

Page 45: ... 1 5 mm from the edge of the scanner glass Manually position your original away from the edges to prevent cropping Note When placing bulky originals such as books prevent exterior light from shining directly onto the scanner glass 3 Close the document cover gently to keep your original in place Caution Do not push down on the document cover or scanner glass or you may damage the product Remove you...

Page 46: ...py a black and white original press the B W copy button To copy a color original press the color copy button To copy a black and white or color original in draft mode press the B W copy button or the color copy button and the stop button at the same time To make more than one copy repeatedly press the B W copy button or the color copy button for the number of copies you need up to 20 copies For ex...

Page 47: ...ancelling Printing Using a Product Button Printing with Windows You can print with your product using any Windows application as described in these sections Note If you are using your Epson product with the Windows 10 S operating system you cannot use the software described in this section You also cannot download and install any Epson product software from the Epson website for use with Windows 1...

Page 48: ...e print command in your application Note You may need to select a print icon on your screen the Print option in the File menu or another command See your application s help utility for details 3 If necessary select your product name as the printer you want to use Note You may also need to select Properties or Preferences to view your print settings You see the Main tab of your printer settings win...

Page 49: ...g that matches the print quality you want to use 9 Select a Color option To print a color document or photo select the Color setting To print text and graphics in black or shades of gray select the Black Grayscale setting 10 To print on both sides of the paper select a 2 Sided Printing option 11 To print multiple pages on one sheet of paper or print one image on multiple sheets of paper select one...

Page 50: ...and image printing Standard Vivid For text and graphics with good quality and print speed High For photos and graphics with high print quality More Settings Opens a window that lets you choose among levels of speed and quality Parent topic Selecting Basic Print Settings Windows Multi Page Printing Options Windows You can select any of the available options in the Multi Page menu to set up your mul...

Page 51: ...ending on other settings you have chosen or if you are accessing the product over a network 1 Select one of the following options for 2 Sided Printing Manual Long edge binding to print your double sided print job by printing one side and prompting you to flip the paper over on the long edge to print the other side Manual Short edge binding to print your double sided print job by printing one side ...

Page 52: ...ect the double sided printing options you want to use 4 Click OK to return to the Main tab 5 Print a test copy of your double sided document to test the selected settings 6 Follow any instructions displayed on the screen during printing ...

Page 53: ...e options on the Binding Settings window to set up your double sided print job Binding Edge Options Select a setting that orients double sided print binding in the desired direction Binding Margin Options Select options that define a wider margin to allow for binding Booklet Select the Booklet checkbox to print double sided pages as a booklet Create Folded Booklet Options Select the Booklet checkb...

Page 54: ...on to size your image to fit the paper you loaded Select the size of your document or photo as the Document Size setting and the size of your paper as the Output Paper setting If you want to center your image on the paper select the Center option Select the Zoom to option to reduce or enlarge your document or photo by a specific percentage Select the percentage in the menu 2 Select one of the foll...

Page 55: ...tern and click the Settings button to customize the pattern Watermark adds a visible watermark to your printout Note Click the Add Delete button to create your own watermark and click the Settings button to customize the watermark Header Footer adds information such as the date and time to the top or bottom of your printout Note Click the Settings button to customize the text and location of the h...

Page 56: ...r tones Depending on the selected color mode you can also adjust the midtone density using the Gamma setting Fix Photo Improves the color contrast and sharpness of flawed photos Note Fix Photo uses a sophisticated face recognition technology to optimize photos that include faces For this to work both eyes and the nose must be visible in the subject s face If your photo includes a face with an inte...

Page 57: ... increase readability Emphasize Thin Lines Adjusts the weight of printed lines to increase visibility Edge Smoothing Smooths jagged edges in low resolution images such as screen captures or images from the Web Fix Red Eye Reduces or removes red eye in photos Print Text in Black Prints colored text in black For Color Text Prints colored text on a background pattern or underlined For Color Graphs an...

Page 58: ...ft to right Parent topic Selecting Additional Layout and Print Options Windows Header Footer Settings Windows You can select any of the Header Footer Settings options to add headers or footers when you print The items are available to print at the top or bottom of your pages in either the left right or center of the page Note These settings are not saved with your document ...

Page 59: ...come from the Windows Control Panel on your computer Parent topic Selecting Additional Layout and Print Options Windows Selecting a Printing Preset Windows For quick access to common groups of print settings you can select a printing preset on the Main or More Options tab Note You can create your own preset by clicking the Add Remove Presets button 1 Click the Main or More Options tab ...

Page 60: ...ur cursor over one of the Printing Presets to view its list of settings 3 Click on a preset to change its settings or delete it or use any of the available options on the screen to control your printing presets 4 To choose a preset for printing select it 5 Click OK ...

Page 61: ... to all the print jobs you send to your product 1 Access the Windows Desktop and right click the icon for your product in the right side of the Windows taskbar or click the up arrow and right click 2 Select Printer Settings 3 Click the Maintenance tab You see the maintenance options 4 Click the Extended Settings button ...

Page 62: ...these settings on the Extended Settings window Enable EPSON Status Monitor 3 Enables product monitoring for ink and paper supplies and other issues Thick Paper and Envelopes Prevents ink from smearing when you print on envelopes or other thick paper Short Grain Paper Prevents ink from smearing when you print on envelopes or other thick paper and the Thick Paper setting does not help Separator Page...

Page 63: ... Refine screening pattern Prints graphics with a finer screening pattern Allow Applications to Perform ICM Color Matching Allows applications to perform ICM color matching Always Use the Driver s Paper Source Setting Prints using the paper source setting in the printer driver rather than the setting in your application Barcode mode Reduces bleeding when printing barcodes on plain paper letterhead ...

Page 64: ...64 You see your application s Print window such as this one 2 Click OK or Print to start printing Parent topic Printing with Windows Related tasks Selecting Basic Print Settings Windows ...

Page 65: ...g right click on any paused print job and click Restart Parent topic Printing with Windows Locking Printer Settings Windows Windows administrators can lock access to some printer settings to prevent unauthorized changes 1 Do one of the following Windows 11 Click search for Settings and select it Select Bluetooth devices Printers scanners Select your product name and select Printer properties Windo...

Page 66: ...and select Properties 2 Click the Optional Settings tab Note You can prevent access to the Optional Settings tab by changing the user or group permissions in the Security tab 3 Click Driver Settings You see this window 4 Select the checkbox for each setting you want to lock To lock all print settings select All Document Settings 5 Under Advanced Settings select the setting option you want to use f...

Page 67: ...ou select the arrangement size and other settings for the custom anti copy pattern Watermark Various text watermarks Lets you select the text for the watermark or prohibit watermarks Add Delete Lets you add or delete a customized text or image based watermark Settings Lets you select the size position color and other watermark settings Header Footer Off Prohibits headers or footers On Allows heade...

Page 68: ... Allows printing of 16 pages on one sheet of paper Parent topic Locking Printer Settings Windows Selecting Default Print Settings Windows When you change your print settings in a program the changes apply only while you are printing in that program session If you want to change the print settings you use in all your Windows programs you can select new default print settings 1 Access the Windows De...

Page 69: ...ults selected for printing You can still change them as needed for printing in any program session Changing the Language of the Printer Software Screens Parent topic Printing with Windows Related tasks Selecting Basic Print Settings Windows Changing the Language of the Printer Software Screens You can change the language used on the Windows printer software screens ...

Page 70: ...ter Settings You see the printer settings window 3 Click the Maintenance tab You see the maintenance options 4 Select the language you want to use as the Language setting 5 Click OK to close the printer software window The printer software screens appear in the language you selected the next time you access them Parent topic Selecting Default Print Settings Windows ...

Page 71: ...side of the Windows taskbar or click the up arrow and right click 2 Select Software Update Settings You see this window 3 Do one of the following To change how often the software checks for updates select a setting in the Check every menu To disable the automatic update feature select the Never option 4 Click OK to exit Note If you choose to disable the automatic update feature you can check for u...

Page 72: ... topic Printing from a Computer Selecting Print Settings Windows 10 S Select the settings for your print job in your Windows 10 S application 1 Open a photo or document for printing 2 Select the print command in your application Note You may need to select a print icon on your screen the Print option in the File menu or another command See your application s help utility for details 3 If necessary...

Page 73: ... window like this 4 Select the type of paper you loaded as the Media setting Note The setting may not exactly match the name of your paper Check the paper type settings list for details 5 Click the Advanced button ...

Page 74: ... you loaded as the Paper Size setting 7 To print multiple copies select or enter the number as the Copy Count setting 8 To print multiple copies of multi page documents in sets select the Collated checkbox 9 Click OK You return to the printing preferences window ...

Page 75: ...rt printing Parent topic Printing with the Built in Epson Driver Windows 10 S Related references Paper or Media Type Settings Printing on a Mac You can print with your product using any Mac printing program as described in these sections Note If you have an Internet connection it is a good idea to check for updates to your product software on Epson s support website or using Epson Software Updater...

Page 76: ...c Print Settings Mac Select the basic settings for the document or photo you want to print 1 Open a photo or document for printing 2 Select the print command in your application Note You may need to select a print icon on your screen the Print option in the File menu or another command See your application s help utility for details 3 Select your product as the Printer setting 4 If necessary click...

Page 77: ...Note The print window may look different depending on the Mac OS version and the application you are using 5 Select the Copies and Pages settings as necessary Note If you do not see these settings in the print window check for them in your application before printing ...

Page 78: ...rinting They may be accessible by selecting Page Setup from the File menu Note Paper sizes may include additional options such as Borderless 7 Select any application specific settings that appear on the screen such as those shown in the image above for the Preview application 8 Select Print Settings or Printer Features from the pop up menu You see these settings ...

Page 79: ...upports borderless printing 12 Select any of the available print options Print Quality Options Mac Print Options Mac Parent topic Printing on a Mac Related references Paper or Media Type Settings Related tasks Selecting Page Setup Settings Mac Print Quality Options Mac You can select any of the available Print Quality options to fine tune the quality of your print Some settings may be unavailable ...

Page 80: ...Print Settings Mac Selecting Page Setup Settings Mac Depending on your application you may be able to select the paper size and orientation settings from the print window Note If you do not see these settings in the print window check for them in your application before printing They may be accessible by selecting Page Setup from the File menu 1 Select the size of the paper you loaded as the Paper...

Page 81: ...nting on a Mac Related tasks Selecting Basic Print Settings Mac Selecting Print Layout Options Mac You can select a variety of layout options for your document or photo by selecting Layout from the pop up menu on the print window To print multiple pages on one sheet of paper select the number of pages in the Pages per Sheet pop up menu To arrange the print order of the pages select a Layout Direct...

Page 82: ...e Color Matching and Color Options settings to fine tune the colors in your printout or turn off color management in your printer software 1 Select Color Matching from the pop up menu in the print window 2 Select one of the available options 3 Select Color Options from the pop up menu in the print window Note The available settings on the Color Options menu depend on the option you selected on the...

Page 83: ... Mode setting for printing photos and graphics and the Fix Red Eye setting to reduce or remove red eye in photos Depending on the selected color mode you can also adjust the midtone density using the Gamma setting Fix Photo Improves the color contrast and sharpness of flawed photos Click the arrow next to Advanced Settings and select the Fix Red Eye setting to reduce or remove red eye in photos No...

Page 84: ...System Preferences 2 Select Print Fax Print Scan or Printers Scanners select your product and select Options Supplies 3 Select Driver or Options You see a screen like this 4 Select any of the available printing preferences 5 Click OK Printing Preferences Mac Parent topic Printing on a Mac Printing Preferences Mac You can select these settings on the Options or Driver tab ...

Page 85: ...print quality Remove white borders Removes white margins that may appear when you print borderless photos Warning Notifications Lets you choose whether or not to receive warning notifications from the printer software for various operating conditions Establish bidirectional communication Allows the product to communicate with the computer Do not change the default setting unless you experience iss...

Page 86: ...tatus Mac Parent topic Printing on a Mac Related tasks Selecting Basic Print Settings Mac Checking Print Status Mac During printing you can view the progress of your print job control printing and check ink status 1 Click the printer icon when it appears in the Dock ...

Page 87: ...ply Levels Parent topic Printing Your Document or Photo Mac Printing from a Smartphone or Tablet You can print from a smartphone or tablet running iOS or Android using the Epson Smart Panel app Note Your device must be connected to the same wireless network as your Epson product and Epson Smart Panel must be configured for use with your product 1 Download the Epson Smart Panel app from your device...

Page 88: ...duct as described on the Start Here sheet and installed the Epson Photo software See the Epson Photo help utility for more information Note If you are using your Epson product with the Windows 10 S operating system you cannot use Epson Photo You also cannot download and install any Epson product software from the Epson website for use with Windows 10 S you must obtain software only from the Window...

Page 89: ... Smartphone or Tablet Parent topic Scanning Starting a Scan Using the Product Buttons You can scan an image and save it as a PDF using your product s control panel buttons You can change the default scan settings using the Event Manager utility on the computer 1 Make sure you installed the product software and connected the product to your computer using a USB cable 2 Place your original on the pr...

Page 90: ...e Job Settings 4 Open the Edit Job Settings drop down list and select the scan job settings you want to view or change 5 Change the settings as necessary 6 Click OK 7 Click Close to close the Event Manager window Parent topic Starting a Scan Using the Product Buttons Setting Up a WSD Port Windows 7 Windows Vista You can scan to a networked Windows computer using WSD Web Services for Devices You mu...

Page 91: ...d Sound Printers 10 Make sure that an icon appears for your product s name on the network When you use WSD select your product name to scan over the network Parent topic Starting a Scan Using the Product Buttons Starting a Scan Using Epson ScanSmart You can start the Epson ScanSmart program to scan originals and easily review and edit scanned images After that you can save print or share them Wind...

Page 92: ...on product with the Windows 10 S operating system you cannot use the software described in this section You also cannot download and install any Epson product software from the Epson website for use with Windows 10 S you must obtain software only from the Windows Store Windows 11 Click then search for Epson Scan 2 and select it Windows 10 Click and select EPSON Epson Scan 2 Windows 8 x Navigate to...

Page 93: ...3 Windows other versions Click or Start and select All Programs or Programs Select EPSON Epson Scan 2 Epson Scan 2 Mac Open the Applications folder open the Epson Software folder and select Epson Scan 2 ...

Page 94: ...94 You see an Epson Scan 2 window like this ...

Page 95: ...n You also cannot download and install any Epson product software from the Epson website for use with Windows 10 S you must obtain software only from the Windows Store 1 Open your scanning program and select its scanning option See your scanning program help for instructions 2 Select your product Note In certain programs you may need to select your product as the source first If you see a Select S...

Page 96: ...96 You see an Epson Scan 2 window like this ...

Page 97: ...Smart Panel Mobile App Scanning a Document or Photo in Epson ScanSmart You can scan and review documents and photos in Epson ScanSmart Note The images in this guide show Windows screens Mac screens may be slightly different Depending on your product model and software version not all options may be available 1 Place your original on the product for scanning 2 Open Epson ScanSmart on your computer ...

Page 98: ...elect an option for the Scan area setting if necessary Note The Scan area setting limits the scan area to a selected size starting at the placement arrow on the scanner bed It does not scale the image to the selected size 4 Select SCAN ...

Page 99: ...to crop the selected image Control click two images select Stitch Images and follow the on screen instructions to combine them into a single image 6 In Photo Editing Mode the following enhancement options are available Auto Color Enhancement automatically adjusts the brightness contrast and saturation of your photos Restore Faded Colors restores the colors in faded photos automatically Remove Red ...

Page 100: ...ow Saving a Scan Attaching a Scan to Email Sending a Scan to a Cloud Service Printing a Scan Parent topic Scanning Saving a Scan You can save a scanned image to your computer in a variety of formats 1 Make sure your originals are scanned and reviewed See the link below 2 In the Select Action window click Save ...

Page 101: ...Document or Photo in Epson ScanSmart Attaching a Scan to Email You can attach a scanned image to an email as a file attachment Note Your email app and account settings should be configured before scanning You must install a MAPI type email program such as Outlook Express Windows Live Mail Entourage or Mac Mail Attach to Email only supports 32 bit MAPI compatible mail apps Web based email services ...

Page 102: ...cter Recognition language If you also want to save a copy of the scanned image to your computer make sure the checkbox is selected and select the folder on your computer in which to save the file 4 Click Attach to E mail Your email program opens with the file attached to a new email Parent topic Scanning a Document or Photo in Epson ScanSmart Sending a Scan to a Cloud Service You can upload scanne...

Page 103: ...pe and scan date for the file name are automatically detected You can change them as necessary You can save the scanned image in a variety of formats If you select Searchable PDF as the File type setting you can select the OCR Optical Character Recognition language If you also want to save a copy of the scanned image to your computer click the checkbox 5 Click Send Parent topic Scanning a Document...

Page 104: ...e the print settings if necessary Select the number of copies you want to print If you also want to save a copy of the scanned image to your computer click the checkbox The document type and scan date for the file name are automatically detected You can change them as necessary You can save the scanned image in a variety of formats If you select Searchable PDF as the File type setting you can sele...

Page 105: ...ng the Save Settings Save Settings Customizing Action Icons Parent topic Scanning Changing the Epson Product If you are using more than one Epson product with Epson ScanSmart you can change the product that you are using with your computer Note A product connected to your computer via USB takes priority over a product with a Wi Fi connection 1 On the main screen click Change You see a screen like ...

Page 106: ... such as the resolution document size and more Note If you select Auto Mode you cannot change the scan settings 1 Click the Settings button You see a screen like this 2 Do one of the following To change Document Mode settings select Document Mode Custom Settings To change Photo Mode settings select Photo Mode and click Close When you start a scan you will be prompted to select scan settings ...

Page 107: ...107 You see a screen like this 3 Change the settings as necessary and click Save Parent topic Selecting Epson ScanSmart Settings ...

Page 108: ...108 Changing the File Name Settings You can change the default file naming method for your scans 1 Click the Settings button You see a screen like this 2 Click the File Name Settings tab ...

Page 109: ...a prefix for the file name Select the date format Select a numbering format as the counter format 4 Click Close Parent topic Selecting Epson ScanSmart Settings Changing the Save Settings You can change the file type options for saving your scans 1 Click the Settings button ...

Page 110: ...110 You see a screen like this 2 Click the Save Settings tab ...

Page 111: ...Click Close Parent topic Selecting Epson ScanSmart Settings Save Settings You can change the settings for how scanned images are saved PDF Options Setting Options Description General Generate PDF A File Creates a PDF that conforms to PDF A 1 standards Create file with all pages Saves all pages as one file Compression Level Selects the compression level for color or grayscale images ...

Page 112: ... add ICC profiles to the image TIFF Options Setting Options Description Byte Order Windows Macintosh Specifies the operating system where the scanned image will be used Compression Windows only Specifies the compression format and level for Color Grayscale and B W images File size increases with higher quality Embed ICC Profile Windows only Allows you to add ICC profiles to the image Parent topic ...

Page 113: ...113 You see a screen like this 2 Click the Customize Actions tab ...

Page 114: ...an your document and save the scanned image in various file formats in your operating system s Documents or My Documents folder or open it in your scanning program You can preview the scanned image and select or change settings as necessary Note If you are using your Epson product with the Windows 10 S operating system you cannot use the software described in this section You also cannot download ...

Page 115: ...115 You see this window ...

Page 116: ...setting 6 Select the Resolution setting you want to use for your scan 7 Select the Rotate setting to rotate the scanned image 8 Select the Correct Document Skew setting to correct skewed originals image contents or both 9 Click the Preview button Epson Scan 2 previews your original and displays the results in the Epson Scan 2 window 10 Do one of the following If you re scanning in Document Mode se...

Page 117: ...an 2 Image Format Options Scan Resolution Guidelines Parent topic Scanning Additional Scanning Settings Main Settings Tab You can select these additional scanning settings on the Epson Scan 2 Main Settings tab Not all adjustment settings may be available depending on other settings you have chosen Rotate Rotates the original image clockwise to the desired angle before scanning it Select Auto to al...

Page 118: ... image This setting is available only if you select Grayscale or Black White as the Image Type setting Brightness Adjusts the overall lightness and darkness of the scanned image Contrast Adjusts the difference between the light and dark areas of the overall scanned image Gamma Adjusts the midtone density of the scanned image Unsharp Mask Makes the edges of certain image areas clearer Turn off this...

Page 119: ...he CD included with your product If you are downloading your product s software you must download and install the required Epson Scan 2 OCR Component to scan using OCR with Epson Scan 2 Select Epson Software Updater in the Windows Start menu or Mac Epson Software folder and select the component and PDF extension files to download and install them 1 Load your original in the product for scanning 2 ...

Page 120: ...ting and select a Folder setting for your document 12 Click Scan The scanned image is saved as a searchable PDF Parent topic Scanning in Epson Scan 2 Image Format Options You can select different image formats and related options For details on available options click the icon on the Epson Scan 2 Image Format Options window Not all image formats have options BITMAP bmp A standard image file format...

Page 121: ...e PDF file Recognized text in the scanned document can be searched Parent topic Scanning in Epson Scan 2 Scan Resolution Guidelines The Resolution setting measured in dpi dots per inch controls the amount of detail captured in your scans Increasing the resolution raises the amount of detail captured but comes with the following disadvantages Larger file sizes It takes longer to scan your originals...

Page 122: ...ou will scan the image at 100 or a smaller size Select the Epson Scan 2 Resolution setting based on how you will use the scanned image Email view on a computer screen post on the web 96 to 200 dpi Print fax convert to editable text OCR create searchable PDF 200 to 300 dpi Parent topic Scanning in Epson Scan 2 ...

Page 123: ...ecautions Keep ink bottles and the ink tanks out of the reach of children Do not allow children to drink from or handle the ink bottles and bottle caps Do not tilt or shake an ink bottle after opening it otherwise ink may leak Be careful not to touch any ink when you handle the ink tanks ink tank caps and opened ink bottles or ink bottle caps If ink gets on your skin wash it thoroughly with soap a...

Page 124: ... opening an ink bottle Epson recommends using it as soon as possible Wipe off any ink around the tanks and ports with a clean lint free cloth or cotton swab Store ink bottles in a cool dark place Keep them out of direct sunlight Do not store the ink bottles in high or freezing temperatures Store the ink bottles in the same environment as the product When storing or transporting an opened ink bottl...

Page 125: ...the ink levels are above the lower lines on the ink tanks If any of the ink tanks are below the lower line fill them up to the upper line on the ink tank Parent topic Refilling Ink Related references Ink Safety Precautions Related tasks Refilling the Ink Tanks Disabling Special Offers with Windows You can disable special offers messages from Epson using a utility on your Windows computer 1 Access ...

Page 126: ...126 You see this window 2 To disable promotional offers deselect the Display Epson Offers checkbox Parent topic Refilling Ink ...

Page 127: ...Yields vary considerably based on images printed print settings paper type frequency of use and temperature Ink Bottle Part Numbers Parent topic Refilling Ink Ink Bottle Part Numbers Use these part numbers when you order or purchase new ink bottles Ink color Part number Black 522120 Cyan 522220 Magenta 522320 Yellow 522420 Parent topic Purchase Epson Ink Refilling the Ink Tanks Make sure you have ...

Page 128: ...128 1 Open the ink tank cover 2 Open the cap for the ink tank you are going to fill Note Make sure the color of the ink tank label matches the ink color you want to fill ...

Page 129: ...ing its cap Warning If ink gets on your skin wash it thoroughly with soap and water If ink gets into your eyes flush them immediately with water If ink gets into your mouth spit it out and see a doctor right away Seek medical advice if problems persist Keep the ink bottles out of the reach of children and do not drink the ink 4 Check the upper line a on the ink tank ...

Page 130: ...ling port then slowly stand the bottle up to insert it Wait for the ink to fill the tank Do not squeeze the bottle Ink flows into the tank and stops automatically when the ink is filled to the upper line Note Do not force the bottles into position they are keyed for each color ...

Page 131: ...ched the upper line otherwise ink may leak 6 When the ink tank is full remove the ink bottle and securely close the ink tank cap as shown Note Do not leave the ink bottle inserted otherwise the bottle may be damaged or ink may leak Note If any ink remains in the bottle replace the bottle cap and tighten it Store the bottle upright for later use ...

Page 132: ... Repeat the previous steps as necessary for each ink tank you need to fill 8 Close the ink tank cover Parent topic Refilling Ink Related concepts Purchase Epson Ink Related references Ink Safety Precautions ...

Page 133: ...int quality declines You can check for clogged nozzles before you clean them so you don t clean them unnecessarily Note You may not be able to clean the print head when the ink level in any of the tanks is low You may have to refill the ink tank first If you still see white or dark lines or gaps in your printouts even after cleaning the print head several times you can run a Power Cleaning Print H...

Page 134: ...ew sheets of plain paper in the product 3 Hold down the stop button and press the power button to turn the product on 4 When the product turns on release both buttons The product prints a nozzle check pattern Note It can take a few seconds for the nozzle check pattern to start printing If it does not start printing after a few seconds make sure there is paper loaded in the product ...

Page 135: ...s in the lines Print head is clean Print head needs cleaning Print head needs Power Cleaning 6 Do one of the following If there are no gaps the print head is clean and you can continue printing If there are gaps or the pattern is faint clean the print head ...

Page 136: ...er Cleaning the Print Head Using the Product Buttons Checking the Nozzles Using a Computer Utility You can check the print head nozzles using a utility on your Windows or Mac computer 1 Load a few sheets of plain paper in the product 2 Do one of the following Windows Access the Windows Desktop and right click the icon for your product in the right side of the Windows taskbar or click the up arrow ...

Page 137: ...137 You see a window like this 4 Click Print ...

Page 138: ... see if there are gaps in the lines Print head is clean Print head needs cleaning Print head needs Power Cleaning 6 Do one of the following If there are no gaps click Finish If there are gaps or the pattern is faint clean the print head ...

Page 139: ... print head Note You may not be able to clean the print head when the ink level in any of the tanks is low You may have to refill the ink tank first Cleaning the Print Head Using the Product Buttons Cleaning the Print Head Using a Computer Utility Parent topic Print Head Maintenance Related topics Refilling Ink Cleaning the Print Head Using the Product Buttons You can clean the print head using th...

Page 140: ...ead is clean Print head is clean Print head needs cleaning Print head needs Power Cleaning 5 Do one of the following If there are no gaps the print head is clean and you can continue printing If there are gaps or the pattern is faint clean the print head ...

Page 141: ...cking the Nozzles Using the Product Buttons Cleaning the Print Head Using a Computer Utility You can clean the print head using a utility on your Windows or Mac computer 1 Make sure no product lights are indicating errors 2 Load a few sheets of plain paper in the product 3 Do one of the following Windows Access the Windows Desktop and right click the icon for your product in the right side of the ...

Page 142: ...leaning cycle Caution Never turn off the product or open the front cover during a cleaning cycle or you may not be able to print 6 When the cleaning cycle is finished you can check to see if the nozzles are clean click Print Nozzle Check Pattern and click Print ...

Page 143: ...nt head is clean Print head needs cleaning Print head needs Power Cleaning If there are no gaps click Finish If there are gaps or the pattern is faint click Clean to clean the print head again If almost the entire pattern is missing click Finish and perform a Power Cleaning ...

Page 144: ...ing turn off the product and wait at least 12 hours before running another Power Cleaning Caution Running a Power Cleaning consumes a lot of ink so you should run it only if necessary Make sure each ink tank is at least one third full before running a Power Cleaning or it may damage the product Caution Power Cleaning may cause the ink pads to reach their capacity sooner When an ink pad reaches the...

Page 145: ...t click Select Printer Settings and click the Maintenance tab Mac In the Apple menu or the Dock select System Preferences Select Print Fax Print Scan or Printers Scanners select your product and select Options Supplies Select Utility and select Open Printer Utility 4 Select Power Cleaning You see a window like this 5 Follow the on screen instructions to run a Power Cleaning 6 When Power Cleaning i...

Page 146: ...ou notice misalignment of vertical lines or you see dark or light horizontal bands you may need to align the print head Note Banding may also occur if your print head nozzles need cleaning Aligning the Print Head Using a Computer Utility Parent topic Adjusting Print Quality Related concepts Print Head Cleaning Related tasks Loading Paper in the Sheet Feeder Aligning the Print Head Using a Computer...

Page 147: ...nters Scanners select your product and select Options Supplies Select Utility and select Open Printer Utility 3 Select Print Head Alignment 4 Click Next then click Print to print an alignment sheet Note Do not cancel printing while you are printing a head alignment pattern You see a window like this ...

Page 148: ... set and click Realignment Then print another alignment sheet and check it Note Click Skip where available if you want to skip a particular alignment sheet 6 When you are done click Finish Parent topic Print Head Alignment Related tasks Loading Paper in the Sheet Feeder Cleaning the Paper Path If you see ink on the back of a printout you can clean the paper path to remove any excess ink Caution Do...

Page 149: ...ou can view an option that displays the number of sheets of paper that have fed through the product Note You can also view the number of sheets of paper fed through the product by printing a nozzle check Checking the Sheet Counter Windows Checking the Sheet Counter Mac Parent topic Adjusting Print Quality Checking the Sheet Counter Windows You can check the number of sheets of paper that have fed ...

Page 150: ...ecking the Number of Sheets Fed Checking the Sheet Counter Mac You can check the number of sheets of paper that have fed through the product by checking the sheet counter 1 In the Apple menu or the Dock select System Preferences Select Print Fax Print Scan or Printers Scanners select your product and select Options Supplies Select Utility and select Open Printer Utility 2 Select Printer and Option...

Page 151: ...151 You see this window 3 After checking the number of sheets fed into the printer click OK to close the window Parent topic Checking the Number of Sheets Fed ...

Page 152: ...Remove all the paper 5 Clean the scanner glass with a soft dry cloth If the glass is stained with grease or some other material use a small amount of glass cleaner and a soft cloth to remove it Wipe off all remaining liquid Caution Do not press the glass surface with any force Be careful not to scratch or damage the surface of the glass Caution Be careful not to get water onto the printer mechanis...

Page 153: ...or turning it upside down otherwise ink may leak When storing or transporting an ink bottle after removing its seal do not tilt the bottle and do not subject it to impacts or temperature changes Otherwise ink may leak even if the cap on the ink bottle is tightened securely Be sure to keep the ink bottle upright when tightening the cap and take measures to prevent ink from leaking when transporting...

Page 154: ...e Make sure the print head is capped properly to prevent the ink from drying 1 Turn off the product 2 Open the front cover and check to see if the print head is in the far right position the home position If not turn on the product wait for the print head to move to the far right then turn the product off again 3 Make sure the power light turns off and then unplug the power cable 4 Disconnect any ...

Page 155: ...155 6 Open the ink tank cover and make sure that the ink tank caps are securely closed as shown 7 Close the ink tank cover ...

Page 156: ...he plastic bag and fold it closed Pack the printer in its box using the protective materials If print quality has declined when you print again clean and align the print head Parent topic Cleaning and Transporting Your Product Related concepts Print Head Cleaning Print Head Alignment ...

Page 157: ...ly for free updates to your product software Visit epson com support U S or epson ca support Canada and select your product Windows Your printer software automatically checks for updates You can also manually update the software by selecting Software Update here Accessing the Windows Desktop and right clicking the icon for your product in the right side of the Windows taskbar or clicking the up ar...

Page 158: ... Changing Automatic Update Options Product Light Status You can often diagnose problems with your product by checking its lights 1 power light 2 Wi Fi light 3 Wi Fi Direct light 4 ink light 5 paper light Light status Condition solution The power light is flashing The product is busy Wait for the power light to stop flashing before turning off the product The ink light is on Initial ink charging ma...

Page 159: ...al is stuck inside the product Open the front cover and remove any jammed paper or protective materials Turn the product off and then back on again If the error continues contact Epson for support The Wi Fi and Wi Fi Direct lights are flashing A Wi Fi connection error has occurred Press the Wi Fi button to clear the error and try again The ink light is on The paper light is on The Wi Fi and Wi Fi ...

Page 160: ...ks Loading Paper in the Sheet Feeder Related topics Wi Fi Networking Running a Product Check Running a product check helps you determine if your product is operating properly 1 Press the power button to turn the product off 2 Load a few sheets of plain paper in the product 3 Hold down the stop button and press the power button to turn the product on 4 When the product turns on release both buttons...

Page 161: ...puter cable software or selected settings Check the other solutions in this book or try uninstalling and reinstalling your printer software If the page prints but the nozzle check pattern has gaps clean or align the print head If the page prints but almost the entire nozzle check pattern is missing perform a Power Cleaning If the page does not print the product may have a problem Check the other s...

Page 162: ... cannot turn the product on or off try these solutions If you cannot turn on your product make sure the power cord is securely connected and hold down the power button a little longer If you cannot turn off your product hold down the power button a little longer If you still cannot turn off your product unplug the power cord plug the power cord back in then turn your product on and off again using...

Page 163: ...re disconnect the cable and carefully follow the instructions on the Start Here sheet Also make sure your system meets the requirements for your operating system Close any other programs including screen savers and virus protection software and install your product software again In Windows make sure your product is selected as the default printer and the correct port is shown in the printer prope...

Page 164: ...utes of pressing the WPS button on your router Hold down the Wi Fi button on the product for 3 seconds Make sure to place your product within contact range of your 2 4 GHz router or access point Avoid placing your product near a microwave oven 2 4 GHz cordless phone or large metal object such as a filing cabinet Note If you are using a 5 GHz wireless router set the router to operate in dual band 2...

Page 165: ...following order wireless router computer or smart device and then your product Move your product and computer or smart device closer to the wireless router to help with radio wave communication and then try to make network settings again If the IP address assigned to the product is 169 254 XXX XXX and the subnet mask is 255 255 0 0 the IP address may not be assigned correctly Check the IP address ...

Page 166: ...arting it 4 Download your product software from the Epson website using the instructions on the Start Here sheet If you have replaced your router reinstall your product software to connect to the new router Note If you are using a 5 GHz wireless router set the router to operate in dual band 2 4 GHz and 5 GHz mode If your router uses a single network name SSID for both the 2 4 GHz and 5 GHz band gi...

Page 167: ...he product wirelessly via EpsonNet Setup and the Wi Fi light on your product is not solid green make sure your product software was installed correctly If necessary reinstall your software Note If you are using a 5 GHz wireless router set the router to operate in dual band 2 4 GHz and 5 GHz mode If your router uses a single network name SSID for both the 2 4 GHz and 5 GHz band give each band its o...

Page 168: ...ssign IP addresses using DHCP set the IP address manually Make sure your computer and product are both using the same wireless network If network printing is slow print a network status sheet and check the signal strength If it is poor place your product closer to your router or access point Avoid placing your product near a microwave oven cordless phone or large metal object such as a filing cabi...

Page 169: ...the product to your computer with a USB cable Check the scanning setting assigned in Epson Event Manager If you are scanning a large original at a high resolution a network communication error may occur Try scanning again at a lower resolution If network communication was interrupted while starting Epson Scan 2 exit Epson Scan 2 wait a few seconds and restart it If Epson Scan 2 cannot restart turn...

Page 170: ...ing Problems Check these solutions if you have problems copying with your product Product Makes Noise But Nothing Copies Product Makes Noise When It Sits for a While Copies Have Incorrect or Faint Colors Position Size or Margins of Copies are Incorrect Parent topic Solving Problems Product Makes Noise But Nothing Copies If your product makes a noise but nothing copies try these solutions Run a noz...

Page 171: ...sure your paper is not curled When vertical banding appears or the paper is smeared clean the paper path When horizontal banding appears or the top or bottom of the paper is smeared load paper in the correct direction and slide the edge guides to the edges of the paper Parent topic Solving Copying Problems Position Size or Margins of Copies are Incorrect If the position size or margins of your cop...

Page 172: ...fore reloading paper If paper jams when you load only one or two sheets try loading more sheets at a time Do not load more than the recommended number of sheets Do not load more than the recommended number of sheets If paper jams when you print on both sides of the paper try loading fewer sheets Make sure your paper meets the specifications for your product Try cleaning the paper path Do not place...

Page 173: ...Jam Problems If you have problems with paper jams try these solutions 1 Cancel the print job from your computer if necessary 2 Gently pull out any jammed paper from the rear paper feed slot 3 Open the front cover ...

Page 174: ...174 4 Open the scanner unit until it clicks Caution Do not touch the parts shown here or you may damage the product ...

Page 175: ...h the buttons on the control panel while your hand is inside the printer If the printer starts operating it could cause an injury Be careful not to touch the protruding parts to avoid injury 5 Gently remove any jammed paper ...

Page 176: ...ilting the printer placing it vertically or turning it upside down otherwise ink may leak 6 Close the scanner unit 7 Close the front cover 8 Carefully follow all paper loading instructions when you load new paper Parent topic Solving Paper Problems ...

Page 177: ...ing Printing Using a Product Button Loading Paper in the Sheet Feeder Solving Problems Printing from a Computer Check these sections if you have problems while printing from your computer Nothing Prints Product Icon Does Not Appear in Windows Taskbar Printing is Slow Parent topic Solving Problems Nothing Prints If you have sent a print job and nothing prints try these solutions Make sure your prod...

Page 178: ... delete all jobs from the Windows Spooler Click Print Queue on the Maintenance tab in the printer settings window and cancel any stalled print jobs In Windows do one of the following to open the Epson Printer Connection Checker and follow the on screen instructions to check the connection status Windows 11 Click then search for Epson Printer Connection Checker and select it Windows 10 Click and se...

Page 179: ... product name select Printing Preferences and select your product name again if necessary Windows Vista Click select Control Panel and click Printer under Hardware and Sound Right click your product name select Printing Preferences and select your product name again if necessary 2 Click the Maintenance tab 3 Click the Extended Settings button 4 Select Enable EPSON Status Monitor 3 and click OK 5 C...

Page 180: ...and 2 4 GHz and 5 GHz mode If your router uses a single network name SSID for both the 2 4 GHz and 5 GHz band give each band its own network name SSID instead such as Home Network 2 4 GHz and Home Network 5 GHz See your router documentation or contact your internet service provider for instructions For the fastest printing select the following settings in your product software Make sure the paper ...

Page 181: ...t your computer and try printing again Parent topic Solving Problems Printing from a Computer Related references Windows System Requirements Mac System Requirements Paper or Media Type Settings Related tasks Selecting Basic Print Settings Windows Selecting Extended Settings Windows Selecting Basic Print Settings Mac Selecting Printing Preferences Mac Solving Page Layout and Content Problems Check ...

Page 182: ... multiple copies Parent topic Solving Page Layout and Content Problems Blank Pages Print If blank pages print unexpectedly try these solutions Make sure you selected the correct paper size settings in your printing program and printer software If a blank page exists in a document you are printing and you want to skip printing it select the Skip Blank Page setting in your printer software if availa...

Page 183: ...e edges of the copy are cropped move the original slightly away from the corner Clean the scanner glass and the document cover If there is dust or stains on the glass the copy area may extend to include the dust or stains Load paper in the correct direction and slide the edge guides against the edges of the paper You can use the preview option in your printer software to check your margins before ...

Page 184: ...erences Mac Incorrect Characters Print If incorrect characters appear in your prints try these solutions before reprinting Make sure any cables are securely connected at both ends In Windows delete all jobs from the Windows Spooler Click Print Queue on the Maintenance tab in the printer settings window and cancel any stalled print jobs If your product is connected to a USB hub connect it directly ...

Page 185: ...ur paper size in your printing program If the image is slightly enlarged and cropped during borderless printing change the Expansion setting You can use the preview option in your printer software to check your margins before you print Parent topic Solving Page Layout and Content Problems Related references Paper or Media Type Settings Related tasks Selecting Basic Print Settings Windows Selecting...

Page 186: ...ed Printout Faint Printout or Printout Has Gaps Grainy Printout Incorrect Colors Parent topic Solving Problems White or Dark Lines in Printout If you notice white or dark lines in your prints also called banding try these solutions before you reprint Run a nozzle check to see if any of the print head nozzles are clogged Then clean the print head if necessary Make sure the paper type setting matche...

Page 187: ...ms Related concepts Print Head Nozzle Check Print Head Cleaning Print Head Alignment Power Cleaning Related references Paper or Media Type Settings Related tasks Checking Ink Levels on Your Product Selecting Basic Print Settings Windows Selecting Basic Print Settings Mac Related topics Loading Paper Refilling Ink Blurry or Smeared Printout If your printouts are blurry or smeared try these solution...

Page 188: ...paper If you print on both sides of a sheet of paper smudges may appear on the reverse side of heavily saturated or dark images If one side of a sheet will contain a lighter image or text print that side first Adjust the density and or ink drying time settings The ink levels may be low and you may need to refill the ink Visually check the ink levels Run a nozzle check to see if any of the print he...

Page 189: ...s try these solutions Run a nozzle check to see if any of the print head nozzles are clogged Then clean the print head if necessary The ink levels may be low Visually check the ink levels Make sure the paper type setting matches the type of paper you loaded Make sure your paper is not damp curled old or loaded incorrectly in your product Align the print head Adjust the print quality in the product...

Page 190: ...ecking Ink Levels on Your Product Selecting Basic Print Settings Windows Selecting Basic Print Settings Mac Cleaning the Paper Path Related topics Loading Paper Refilling Ink Grainy Printout If your printouts are grainy try these solutions Make sure you loaded the printable side of the paper correctly for your product Select a higher print quality setting and turn off any high speed settings in yo...

Page 191: ...leaning Print Head Alignment Related tasks Selecting Basic Print Settings Windows Selecting Basic Print Settings Mac Related topics Loading Paper Incorrect Colors If your printouts have incorrect colors try these solutions Make sure the paper type setting matches the paper you loaded Make sure the Black Grayscale or Grayscale setting is not selected in your printer software If you selected Standar...

Page 192: ...ity Note Power Cleaning consumes a lot of ink so run this utility only if you cannot improve print quality by cleaning the print head Parent topic Solving Print Quality Problems Related concepts Print Head Nozzle Check Print Head Cleaning Power Cleaning Related references Paper or Media Type Settings Compatible Epson Papers Related tasks Checking Ink Levels on Your Product Selecting Basic Print Se...

Page 193: ... the scanner software settings If resetting the settings does not solve the problem uninstall and reinstall the scanner software Parent topic Solving Scanning Problems Related concepts Uninstall Your Product Software Related references Windows System Requirements Mac System Requirements Cannot Start Epson Scan 2 If you cannot start Epson Scan 2 try these solutions Make sure your product is turned ...

Page 194: ...nstall both versions and install one version If you upgraded your operating system but did not reinstall Epson Scan 2 try reinstalling it Parent topic Solving Scanning Problems Related concepts Uninstall Your Product Software Related topics Starting a Scan Scanning is Slow If scanning becomes slow try these solutions Scan your original at a lower resolution if possible Make sure your system meets ...

Page 195: ...document cover with too much force Parent topic Solving Scanned Image Quality Problems Related references Additional Scanning Settings Main Settings Tab Related tasks Placing Originals on the Scanner Glass Line of Dots Appears in All Scanned Images If a line of dots appears in all your scanned images try these solutions Clean the scanner glass with a soft dry lint free cloth or use a small amount ...

Page 196: ...ge try these solutions Image is Distorted or Blurry Make sure your original is not wrinkled or warped This may prevent the original from laying flat on the scanner glass Do not move your original or your product during scanning Do not press on the document cover or the original with too much force Your product will not operate properly while tilted at an angle Place your product on a flat stable s...

Page 197: ...use printers and monitors use different color systems monitors use RGB red green and blue and printers typically use CMYK cyan magenta yellow and black Check the color matching and color management capabilities of your computer display adapter and the software you are using to see if they are affecting the palette of colors you see on your screen To adjust the colors in your scanned image adjust t...

Page 198: ... in an Image You may see a ripple pattern called a moiré in scanned images of printed documents This is caused by interference from differing pitches in the scanner s screen and your original s halftone screen To reduce this effect adjust these Epson Scan 2 settings if available and try scanning again Select the Descreening setting Select a lower Resolution setting Parent topic Solving Scanned Ima...

Page 199: ...t and select All Programs or Programs Select EPSON Epson Scan 2 Epson Scan 2 Utility Mac Open the Applications folder open the Epson Software folder and select Epson Scan 2 Utility 2 Click the Other tab 3 Click Reset and confirm your choice Note If resetting the Epson Scan 2 settings does not solve your problem uninstall Epson Scan 2 and re install it Parent topic Solving Scanned Image Quality Pro...

Page 200: ... Printer Software Uninstall Note If you see a User Account Control window click Yes or Continue In the next window select your product and click OK Then follow any on screen instructions 4 Do one of the following to uninstall Epson Event Manager then follow any on screen instructions Windows 11 Windows 10 8 x Select Epson Event Manager and click Uninstall Windows 7 Windows Vista Open the Windows C...

Page 201: ...he Uninstaller utility visit and select your product 2 Click Downloads 3 Select your operating system click Utilities locate the Uninstaller utility and click Download 4 Run the file you downloaded 5 Double click the Uninstaller icon 6 In the Epson Uninstaller screen select the checkbox for each software program you want to uninstall 7 Click Uninstall 8 Follow the on screen instructions to uninsta...

Page 202: ... purchase such as a store receipt and date of purchase Computer configuration Description of the problem Then call U S 562 276 4382 7 AM to 4 PM Pacific Time Monday through Friday Canada 905 709 3839 7 AM to 4 PM Pacific Time Monday through Friday Days and hours of support are subject to change without notice Toll or long distance charges may apply Purchase Supplies and Accessories You can purchas...

Page 203: ...aper Specifications Printable Area Specifications Scanning Specifications Ink Specifications Dimension Specifications Electrical Specifications Environmental Specifications Interface Specifications Network Interface Specifications Safety and Approvals Specifications Windows System Requirements To use your product and its software your computer should use one of these Microsoft operating systems Wi...

Page 204: ...nada select your product and select Downloads Parent topic Technical Specifications Mac System Requirements To use your product and its software your Mac should use one of these operating systems macOS 12 x macOS 11 x macOS 10 15 x macOS 10 14 x macOS 10 13 x macOS 10 12 x OS X 10 11 x OS X 10 10 x OS X 10 9 x OS X 10 8 x OS X 10 7 x Note For the latest product software available for your operatin...

Page 205: ... mm Legal 8 5 14 inches 216 356 mm Executive 7 25 10 5 inches 184 267 mm 8 5 13 inches 216 330 mm Mexico Oficio 8 5 13 4 inches 216 340 mm Oficio 9 8 46 12 4 inches 215 315 mm 4 6 inches 102 152 mm 5 7 inches 127 178 mm 8 10 inches 203 254 mm 3 5 5 inches 89 127 mm Half Letter 5 5 8 5 inches 140 216 mm User defined size paper from 2 12 3 39 inches 54 86 mm to 8 5 47 24 inches 215 9 1200 mm Paper t...

Page 206: ...aper may not feed or the print quality may decline depending on the paper types Parent topic Technical Specifications Related references Compatible Epson Papers Compatible Epson Papers Printable Area Specifications Note When printing borderless quality may decline in the expanded printable area Single sheets borders 1 Top bottom left right margins 0 12 inch 3 mm minimum ...

Page 207: ...erless 1 Reduced print quality area top 1 73 inches 44 mm minimum 2 Reduced print quality area bottom 1 57 inches 40 mm minimum Envelopes 1 Left right margins 0 12 inch 3 mm minimum 2 Top bottom margins 0 12 inch 3 mm minimum 3 Reduced print quality area right 0 71 inch 18 mm minimum 4 Reduced print quality area left 1 61 inches 41 mm minimum ...

Page 208: ...ches 216 297 mm Scanner glass US letter or A4 Scanning resolution 1200 dpi main scan 2400 dpi sub scan Output resolution 50 to 9600 dpi in 1 dpi increments Image data Color 48 bits per pixel internal 16 bits per pixel per color internal 24 bits per pixel external 8 bits per pixel per color external Grayscale 16 bits per pixel internal 8 bits per pixel external Black and white 16 bits per pixel int...

Page 209: ...ecifications Related concepts Purchase Epson Ink Dimension Specifications Height Stored 7 0 inches 179 mm Printing 10 0 inches 253 mm Width Stored 14 8 inches 375 mm Printing 14 8 inches 375 mm Depth Stored 13 7 inches 347 mm Printing 22 8 inches 578 mm Weight without ink and power cord 8 6 lb 3 9 kg Parent topic Technical Specifications Electrical Specifications Power supply rating 100 to 240 V I...

Page 210: ...35 C Storage 4 to 104 F 20 to 40 C 1 month at 104 F 40 C Humidity without condensation Operating 20 to 80 RH Storage 5 to 85 RH Parent topic Technical Specifications Interface Specifications Interface type Hi Speed USB Device Class for computers USB 3 0 cables are not supported Note Epson cannot guarantee the operation of externally connected devices Parent topic Technical Specifications Network I...

Page 211: ...CC part 15 Subpart B class B Canada Safety CAN CSA C22 2 No 60950 1 EMC CAN CSA CEI IEC CISPR 22 Class B This equipment contains the following wireless module Manufacturer Seiko Epson Corporation Type J26H006 This product conforms to Part 15 of FCC Rules and RSS 210 of the IC Rules Epson cannot accept responsibility for any failure to satisfy the protection requirements resulting from a non recomm...

Page 212: ...nt complies with FCC IC radiation exposure limits set forth for an uncontrolled environment and meets the FCC radio frequency RF Exposure Guidelines in Supplement C to OET65 and RSS 102 of the IC radio frequency RF Exposure rules This equipment should be installed and operated so that the radiator is kept at least 7 9 inches 20 cm or more away from a person s body excluding extremities hands wrist...

Page 213: ...se only the type of power source indicated on the printer s label Use only the power cord that comes with the printer Use of another cord may cause fires or shock Do not use the cord with any other equipment Make sure the AC power cord meets the relevant local safety standard Place the printer near a wall outlet where the plug can be easily unplugged Avoid plugging the printer into an outlet on th...

Page 214: ...ith a cable ensure the correct orientation of the connectors Each connector has only one correct orientation Inserting a connector in the wrong orientation may damage both devices connected by the cable Do not put your hand inside the printer while it is printing Do not touch the flat white cable inside the printer Do not move the print head by hand this may damage the printer Do not spill liquid ...

Page 215: ...d if not installed and used in accordance with the instructions may cause harmful interference to radio or television reception However there is no guarantee that interference will not occur in a particular installation If this equipment does cause interference to radio and television reception which can be determined by turning the equipment off and on the user is encouraged to try to correct the...

Page 216: ... to this Agreement binding arbitration shall be administered by JAMS a nationally recognized arbitration authority pursuant to its code of procedures then in effect for consumer related disputes but excluding any rules that permit joinder or class actions in arbitration for more detail on procedure see Section 1 6 below You and Epson understand and agree that a the Federal Arbitration Act 9 U S C ...

Page 217: ...ipate in the selection of the arbitrator The arbitrator is bound by the terms of this Agreement The arbitrator and not any federal state or local court or agency shall have exclusive authority to resolve all disputes arising out of or relating to the interpretation applicability enforceability or formation of this Agreement including any claim that all or any part of this Agreement is void or void...

Page 218: ...s fees and costs that your attorney reasonably accrues for investigating preparing and pursuing the Dispute in arbitration Except as agreed upon by you and Epson in writing the arbitrator shall determine the amount of fees costs and expenses to be paid by Epson pursuant to this Section 1 6d e Attorney s Fees Epson will not seek its attorney s fees and expenses for any arbitration commenced involvi...

Page 219: ...tion 1 5 is found to be unenforceable the entire Section 1 but only Section 1 shall be null and void Parent topic Notices Trademarks EPSON and Epson Smart Panel are registered trademarks EPSON Exceed Your Vision is a registered logomark and Epson ConnectTM and Remote PrintTM are trademarks of Seiko Epson Corporation Windows is a registered trademark of Microsoft Corporation in the United States an...

Page 220: ...any consumable products other than those designated as Original Epson Products or Epson Approved Products by Seiko Epson Corporation Seiko Epson Corporation shall not be held liable for any damage resulting from electromagnetic interference that occurs from the use of any interface cables other than those designated as Epson approved Products by Seiko Epson Corporation This information is subject ...

Page 221: ...Use of Copyrighted Materials Epson encourages each user to be responsible and respectful of the copyright laws when using any Epson product While some countries laws permit limited copying or reuse of copyrighted material in certain circumstances those circumstances may not be as broad as some people assume Contact your legal advisor for any questions regarding copyright law Parent topic Copyright...

Reviews: