


169
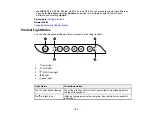
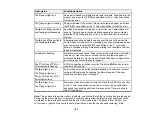
• If you are connecting the product via Wi-Fi Protected Setup (WPS) and the
Wi-Fi light on your
product is not solid green, make sure you press the
Wi-Fi
button on the product within 2 minutes of
pressing the WPS button on your router. Hold down the
Wi-Fi
button on the product for 3 seconds.
• If you are printing a large data size image, the computer may run out of memory. Print the image at a
lower resolution or a smaller size.
Parent topic:
Related concepts
Uninstall Your Product Software
Related tasks
Enabling Wi-Fi Direct Mode
Using WPS to Connect to a Network
Printing a Network Status Sheet
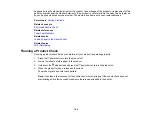
Cannot Scan Over a Network
If you have problems scanning over a network, try these solutions:
• Make sure you are scanning from a computer. If you want to scan from your product control panel, you
must connect the product to your computer with a USB cable.
• Check the scanning setting assigned in Epson Event Manager.
• If you are scanning a large original at a high resolution, a network communication error may occur. Try
scanning again at a lower resolution.
• If network communication was interrupted while starting Epson Scan 2, exit Epson Scan 2, wait a few
seconds, and restart it. If Epson Scan 2 cannot restart, turn off your product, turn it back on, and try
restarting Epson Scan 2 again.
• Check the scanner setting and reset the connection if necessary using Epson Scan 2 Utility:
Windows 11:
Click
, then search for
Epson Scan 2 Utility
and select it. Make sure your product is
selected. If necessary, select the
Other
tab and click
Reset
.
Windows 10:
Click
and select
EPSON
>
Epson Scan 2 Utility
. Make sure your product is
selected. If necessary, select the
Other
tab and click
Reset
.
Windows 8.x
: Navigate to the
Apps
screen, select
EPSON
, and select
Epson Scan 2 Utility
. Make
sure your product is selected. If necessary, select the
Other
tab and click
Reset
.
Summary of Contents for ET-2400
Page 1: ...ET 2400 User s Guide ...
Page 2: ......
Page 10: ......
Page 94: ...94 You see an Epson Scan 2 window like this ...
Page 96: ...96 You see an Epson Scan 2 window like this ...
Page 110: ...110 You see a screen like this 2 Click the Save Settings tab ...
Page 113: ...113 You see a screen like this 2 Click the Customize Actions tab ...
Page 115: ...115 You see this window ...
Page 137: ...137 You see a window like this 4 Click Print ...


