background image

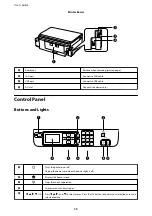
F

Returns to the previous screen.

G

0 - 9

Enters numbers, characters, and symbols.

H

Starts printing, copying and scanning in black and white.

I

Starts printing, copying and scanning in color.

Icons Displayed on the LCD Screen

The following icons are displayed on the LCD screen depending on the printer's status.

Turns on when the wired (Ethernet) network is disabled and an Ethernet cable is not
connected.

Turns on while the printer is connected to a wired (Ethernet) network.

Turns on while the printer is not connected to a wireless (Wi-Fi) network.

Turns on while the printer is connected to a wireless (Wi-Fi) network. The number of
bars indicates the signal strength of the connection. The more bars there are, the
stronger the connection.

Indicates a problem with the printer's wireless (Wi-Fi) network connection, or that the
printer is searching for a wireless (Wi-Fi) network connection.

Indicates that Wi-Fi Direct is enabled.

Indicates that Wi-Fi Direct is disabled.

Turns on when Eco Mode is enabled.

Entering Characters

To enter characters and symbols for network settings from the control panel, use the numerical keypad and
buttons. Press a button on the keypad several times until the character you want to enter is displayed. Press the OK
button to confirm the entered characters.

The displayed screen varies depending on the setting items. The following is the screen for entering the password
for your Wi-Fi network.

Icons

Descriptions

l

Deletes a character to the left (backspace).

OK

Confirms the entered characters.

User's Guide

Printer Basics

16

Summary of Contents for ET-3600/L605

Page 1: ...User s Guide NPD5453 01 EN ...

Page 2: ...urred by the purchaser or third parties as a result of accident misuse or abuse of this product or unauthorized modifications repairs or alterations to this product or excluding the U S failure to strictly comply with Seiko Epson Corporation s operating and maintenance instructions Seiko Epson Corporation and its affiliates shall not be liable for any damages or problems arising from the use of an...

Page 3: ...ULAR PURPOSE IN NO EVENT SHALL SAM LEFFLER OR SILICON GRAPHICS BE LIABLE FOR ANY SPECIAL INCIDENTAL INDIRECT OR CONSEQUENTIAL DAMAGES OF ANY KIND OR ANY DAMAGES WHATSOEVER RESULTING FROM LOSS OF USE DATA OR PROFITS WHETHER OR NOT ADVISED OF THE POSSIBILITY OF DAMAGE AND ON ANY THEORY OF LIABILITY ARISING OUT OF OR IN CONNECTION WITH THE USE OR PERFORMANCE OF THIS SOFTWARE Microsoft Windows and Win...

Page 4: ...i Fi Direct Simple AP Settings 22 Making Advanced Network Settings 23 Checking the Network Connection Status 25 Checking the Network Status Using Network Icon 25 Printing a Network Connection Report 25 Printing a Network Status Sheet 29 Replacing or Adding New Access Points 29 Changing the Connection Method to a Computer 29 Disabling Wi Fi from the Control Panel 31 Disconnecting Wi Fi Direct Simpl...

Page 5: ... Number of Pages Fed Through the Printer Windows 85 Checking the Total Number of Pages Fed Through the Printer Mac OS X 85 Saving Power 85 Saving Power Control Panel 85 Menu Options for Setup Mode Menu Options for Maintenance 86 Menu Options for Paper Setup 86 Menu Options for Print Status Sheet 87 Menu Options for Printer Settings 87 Menu Options for Common Settings 87 Menu Options for Network Se...

Page 6: ... 120 Printed Characters Are Incorrect or Garbled 121 The Printed Image Is Inverted 121 Mosaic Like Patterns in the Prints 121 Uneven Colors Smears Dots or Straight Lines Appear in the Copied Image 121 Moiré Cross Hatch Patterns Appear in the Copied Image 122 An Image of the Reverse Side of the Original Appears in the Copied Image 122 The Printout Problem Could Not be Cleared 122 Other Printing Pro...

Page 7: ...ifications 134 Environmental Specifications 135 System Requirements 135 Regulatory Information 136 Standards and Approvals 136 Restrictions on Copying 137 Transporting the Printer 137 Where to Get Help 140 Technical Support Web Site 140 Contacting Epson Support 140 User s Guide Contents 7 ...

Page 8: ...d on solving problems You can obtain the latest versions of the above manuals with the following methods Paper manual Visit the Epson Europe support website at http www epson eu Support or the Epson worldwide support website at http support epson net Digital manual Start EPSON Software Updater on your computer EPSON Software Updater checks for available updates of Epson software applications and t...

Page 9: ...dows is used to refer to all versions Microsoft Windows 10 operating system Microsoft Windows 8 1 operating system Microsoft Windows 8 operating system Microsoft Windows 7 operating system Microsoft Windows Vista operating system Microsoft Windows XP operating system Microsoft Windows XP Professional x64 Edition operating system Microsoft Windows Server 2012 R2 operating system Microsoft Windows S...

Page 10: ...ed Do not place or store the printer outdoors near excessive dirt or dust water heat sources or in locations subject to shocks vibrations high temperature or humidity Take care not to spill liquid on the printer and not to handle the printer with wet hands Keep the printer at least 22 cm away from cardiac pacemakers Radio waves from this printer may adversely affect the operation of cardiac pacema...

Page 11: ...nnectors Each connector has only one correct orientation Inserting a connector in the wrong orientation may damage both devices connected by the cable Place the printer on a flat stable surface that extends beyond the base of the printer in all directions The printer will not operate properly if it is tilted at an angle Allow space above the printer so that you can fully raise the document cover L...

Page 12: ...vices such as automatic doors or fire alarms and could lead to accidents due to malfunction When using this printer near automatically controlled devices follow all posted warnings and directions on these devices Advisories and Warnings for Using the LCD Screen The LCD screen may contain a few small bright or dark spots and because of its features it may have an uneven brightness These are normal ...

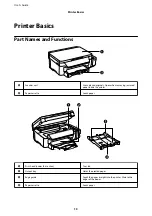
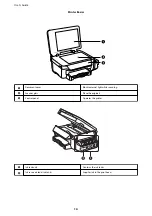
Page 13: ...oving jammed paper inside the printer B Paper cassette Loads paper A Print head under this section Fires ink B Output tray Holds the ejected paper C Edge guide Feeds the paper straight into the printer Slide to the edges of the paper D Paper cassette Loads paper User s Guide Printer Basics 13 ...

Page 14: ...rnal light while scanning B Scanner glass Place the originals C Control panel Operates the printer A Ink tank unit Contains the ink tanks B Ink reservoir tank Ink tank Supplies ink to the print head User s Guide Printer Basics 14 ...

Page 15: ...ntrol Panel Buttons and Lights A Turns the printer on or off Unplug the power cord when the power light is off B Displays the home screen C Stops the current operation D Displays menus and messages E l u r d OK Press l u r and d to select menus Press the OK button to confirm your selection or run the selected feature User s Guide Printer Basics 15 ...

Page 16: ...nection The more bars there are the stronger the connection Indicates a problem with the printer s wireless Wi Fi network connection or that the printer is searching for a wireless Wi Fi network connection Indicates that Wi Fi Direct is enabled Indicates that Wi Fi Direct is disabled Turns on when Eco Mode is enabled Entering Characters To enter characters and symbols for network settings from the...

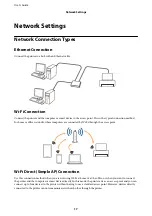
Page 17: ... through the access point Wi Fi Direct Simple AP Connection Use this connection method when you are not using Wi Fi at home or at the office or when you want to connect the printer and the computer or smart device directly In this mode the printer acts as an access point and you can connect up to four devices to the printer without having to use a standard access point However devices directly con...

Page 18: ...g methods Setting up from the website Access the following website and then enter the product name http epson sn Go to Setup and then click Download in the download and connect part Click or double click the downloaded file to run the installer Follow the on screen instructions Setting up using the software disc only for the models that come with a software disc and users with computers with disc ...

Page 19: ... Windows Select the connection type and then click Next Mac OS X Select the connection type Follow the on screen instructions The necessary software is installed User s Guide Network Settings 19 ...

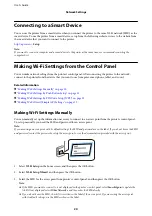
Page 20: ...Settings on page 22 Making Wi Fi Settings Manually You can manually set up the information necessary to connect to an access point from the printer s control panel To set up manually you need the SSID and password for an access point Note If you are using an access point with its default settings the SSID and password are on the label If you do not know the SSID and password contact the person who...

Page 21: ...on report Related Information Entering Characters on page 16 Checking the Network Connection Status on page 25 When You Cannot Make Network Settings on page 113 Making Wi Fi Settings by Push Button Setup You can automatically set up a Wi Fi network by pressing a button on the access point If the following conditions are met you can set up by using this method The access point is compatible with WP...

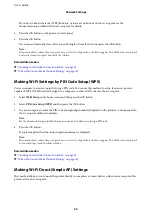
Page 22: ... Use a computer to enter a PIN code into the access point 1 Select Wi Fi Setup on the home screen and then press the OK button 2 Select PIN Code Setup WPS and then press the OK button 3 Use your computer to enter the PIN code an eight digit number displayed on the printer s control panel into the access point within two minutes Note See the documentation provided with your access point for details...

Page 23: ...ton 6 Check the SSID and password displayed on the printer s control panel On the network connection screen of the computer or smart device select the SSID shown on the printer s control panel to connect 7 Enter the password displayed on the printer s control panel on the computer or smart device 8 After the connection is established press the OK button on the printer s control panel 9 Press the O...

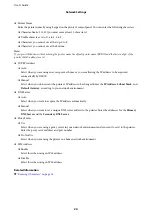
Page 24: ...hen you do not want the printer s IP address to be changed Enter the IP Address Subnet Mask and Default Gateway according to your network environment DNS Server Auto Select when you want to acquire the IP address automatically Manual Select when you want to set a unique DNS server address to the printer Enter the addresses for the Primary DNS Server and the Secondary DNS Server Proxy Server Use Se...

Page 25: ... Connection Report You can print a network connection report to check the status between the printer and the access point 1 Load papers 2 Select Setup on the home screen and then press the OK button 3 Select Network Settings Connection Check The connection check starts 4 Press the x button to print the network connection report If an error has occurred check the network connection report and then ...

Page 26: ...ction report and then follow the solutions a Error code b Messages on the Network Environment a Error code Code Solution E 1 Make sure that the Ethernet cable is connected to the printer a hub or other network devices Make sure that the hub or other network devices are turned on User s Guide Network Settings 26 ...

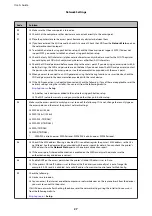
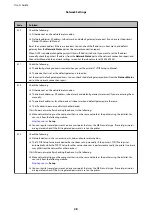
Page 27: ...tup Another smart device was added to the network using push button setup The Wi Fi network was set up using any method other than push button setup E 5 Make sure the access point s security type is set to one of the following If it is not change the security type on the access point and then reset the printer s network settings WEP 64 bit 40 bit WEP 128 bit 104 bit WPA PSK TKIP AES WPA2 PSK TKIP ...

Page 28: ...them manually The network addresses for other devices subnet mask and default gateway are the same The IP address does not conflict with other devices If it still does not work after checking the above try the following Make network settings on the computer that is on the same network as the printer using the installer You can run it from the following website http epson sn Setup You can register ...

Page 29: ...o four computers and smart devices in Wi Fi Direct Simple AP connection To add another computer or smart device disconnect one of the connected devices first Related Information Connecting to a Computer on page 18 Web Config on page 93 When You Cannot Make Network Settings on page 113 Printing a Network Status Sheet You can check the detailed network information by printing it 1 Load papers 2 Sele...

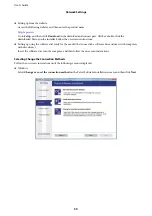
Page 30: ...ting up using the software disc only for the models that come with a software disc and users with computers with disc drives Insert the software disc into the computer and then follow the on screen instructions Selecting Change the Connection Methods Follow the on screen instructions until the following screen is displayed Windows Select Change or re set the connection method on the Select Softwar...

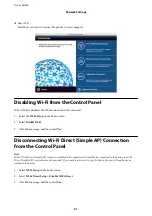
Page 31: ...necting Wi Fi Direct Simple AP Connection from the Control Panel Note When Wi Fi Direct Simple AP connection disabled all computers and smart devices connected to the printer in Wi Fi Direct Simple AP connection are disconnected If you want to disconnect a specific device disconnect from the device instead of the printer 1 Select Wi Fi Setup on the home screen 2 Select Wi Fi Direct Setup Disable W...

Page 32: ...rom the Control Panel You can restore all network settings to their defaults 1 Select Setup on the home screen 2 Select Restore Default Settings Network Settings 3 Check the message and then select Yes User s Guide Network Settings 32 ...

Page 33: ...p too thick too thin or paper that has stickers stuck to it Using these types of paper causes paper jams and smears on the printout Fan and align the edges of the envelopes before loading When the stacked envelopes are puffed up with air press them down to flatten them before loading Do not use envelopes that are curled or folded Using these envelopes causes paper jams and smears on the printout D...

Page 34: ...er available in your area contact Epson support When printing on genuine Epson paper at a user defined size only Standard or Normal print quality settings are available Although some printer drivers allow you to select a better print quality the printouts are printed using Standard or Normal Commercially Available Paper Media Name Size Loading Capacity Sheets or Envelopes 2 Sided Printing Plain pa...

Page 35: ...sy Photo Paper Prem Glossy Epson Premium Glossy Epson Matte Paper Heavyweight Matte Epson Matte Plain paper plain papers plain papers Envelope Envelope Envelope For smart devices these media types can be selected when printing using Epson iPrint Loading Paper in the Paper Cassette 1 Check that the printer is not operating and then pull out the paper cassette 2 Slide the edge guides to their maximu...

Page 36: ... facing down load paper against the front edge guide cImportant Make sure the paper does not extend beyond the triangle symbol at the end of the paper cassette Do not load more than the maximum number of sheets specified for the paper For plain paper do not load above the line indicated by the triangle symbol on the edge guide User s Guide Loading Paper 36 ...

Page 37: ... load paper with the binding holes at the top or the bottom Adjust the print position of your file to avoid printing over the holes 5 Slide the side edge guides to the edges of the paper 6 Insert the paper cassette all the way 7 On the control panel set the size and type of the paper you loaded in the paper cassette Note You can also display the paper size and paper type settings screen by selecti...

Page 38: ...8 Slide out the output tray Related Information Paper Handling Precautions on page 33 Available Paper and Capacities on page 34 User s Guide Loading Paper 38 ...

Page 39: ...ing directly onto the scanner glass 1 Open the document cover 2 Remove any dust or stains on the scanner glass 3 Place the original face down and slide it to the corner mark Note A range of 1 5 mm from the edges of the scanner glass is not scanned 4 Close the cover gently User s Guide Placing Originals on the Scanner Glass 39 ...

Page 40: ... Remove the originals after scanning Note If you leave the originals on the scanner glass for a long time they may stick to the surface of the glass User s Guide Placing Originals on the Scanner Glass 40 ...

Page 41: ...the printer cImportant Make the paper settings on the control panel 2 Open the file you want to print 3 Select Print or Print Setup from the File menu 4 Select your printer 5 Select Preferences or Properties to access the printer driver window 6 Make the following settings Document Size Select the paper size you loaded in the printer Orientation Select the orientation you set in the application Pa...

Page 42: ...k OK to close the printer driver window 8 Click Print Related Information Available Paper and Capacities on page 34 Loading Paper in the Paper Cassette on page 35 List of Paper Types on page 35 Printing Basics Mac OS X Note Explanations in the section use TextEdit as an example Operations and screens differ depending on the application See the application s help for details When printing envelopes...

Page 43: ...nter Presets Select when you want to use the registered settings Paper Size Select the paper size you loaded in the printer Orientation Select the orientation you set in the application Note If the above setting menus are not displayed close the print window select Page Setup from the File menu and then make settings When printing on envelopes select landscape orientation User s Guide Printing 43 ...

Page 44: ...ing settings Media Type Select the type of paper you loaded Print Quality Select the print quality Selecting Fine provides higher quality printing but the printing speed may be slower Grayscale Select to print in black or shades of gray Note If you are printing high density data on plain paper letterhead or preprinted paper select Normal Vivid as the Print Quality setting to make your printout viv...

Page 45: ...e Paper and Capacities on page 34 Printing on 2 Sides Windows Note Manual 2 sided printing is available when EPSON Status Monitor 3 is enabled If EPSON Status Monitor 3 is disabled access the printer driver click Extended Settings on the Maintenance tab and then select Enable EPSON Status Monitor 3 Manual 2 sided printing may not be available when the printer is accessed over a network or is used ...

Page 46: ...reen instructions Related Information Loading Paper in the Paper Cassette on page 35 Printing Basics Windows on page 41 Printing on 2 Sides Mac OS X 1 Load paper in the printer 2 Open the file you want to print 3 Access the print dialog 4 Select Two sided Printing Settings from the pop up menu 5 Select the bindings and Document Type Note Printing may be slow depending on the Document Type setting ...

Page 47: ...ropriate settings and then click OK to close the window 6 Set the other items on the Main and More Options tabs as necessary and then click OK 7 Click Print Related Information Loading Paper in the Paper Cassette on page 35 Printing Basics Windows on page 41 Printing Several Pages on One Sheet Mac OS X 1 Load paper in the printer 2 Open the file you want to print 3 Access the print dialog 4 Select...

Page 48: ...ss the printer driver window 4 Make the following settings on the More Options tab Document Size Select the paper size you set in the application Output Paper Select the paper size you loaded in the printer Fit to Page is selected automatically Note If you want to print a reduced image at the center of the page select Center 5 Set the other items on the Main and More Options tabs as necessary and ...

Page 49: ...per in the Paper Cassette on page 35 Printing Basics Mac OS X on page 42 Printing Multiple Files Together for Windows Only Job Arranger Lite allows you to combine several files created by different applications and print them as a single print job You can specify the print settings for combined files such as layout print order and orientation 1 Load paper in the printer 2 Open the file you want to...

Page 50: ...ger Lite for details 9 Select Print from the File menu Related Information Loading Paper in the Paper Cassette on page 35 Printing Basics Windows on page 41 Printing One Image on Multiple Sheets to Create a Poster for Windows Only This feature allows you to print one image on multiple sheets of paper You can create a larger poster by taping them together 1 Load paper in the printer 2 Open the file...

Page 51: ...on page 35 Printing Basics Windows on page 41 Making Posters Using Overlapping Alignment Marks Here is an example of how to make a poster when 2x2 Poster is selected and Overlapping Alignment Marks is selected in Print Cutting Guides User s Guide Printing 51 ...

Page 52: ... of Sheet 1 along the vertical blue line through the center of the top and bottom cross marks 2 Place the edge of Sheet 1 on top of Sheet 2 and align the cross marks then temporarily tape the two sheets together from the back User s Guide Printing 52 ...

Page 53: ...along the vertical red line through the alignment markers this time the line to the left of the cross marks 4 Tape the sheets together from the back 5 Repeat steps 1 to 4 to tape Sheet 3 and Sheet 4 together User s Guide Printing 53 ...

Page 54: ...e horizontal blue line through the center of the left and right side cross marks 7 Place the edge of Sheet 1 and Sheet 2 on top of Sheet 3 and Sheet 4 and align the cross marks and then temporarily tape them together from the back User s Guide Printing 54 ...

Page 55: ...8 Cut the taped sheets in two along the horizontal red line through the alignment markers this time the line above the cross marks 9 Tape the sheets together from the back User s Guide Printing 55 ...

Page 56: ...printing features available on the printer driver Related Information Windows Printer Driver on page 95 Mac OS X Printer Driver on page 97 Adding a Printing Preset to Print Easily If you create your own preset of frequently used print settings on the printer driver you can print easily by selecting the preset from the list User s Guide Printing 56 ...

Page 57: ... Page Setup or Print from the File menu Select the printer from Format For select the paper size and then enter a percentage in Scale Close the window and then print following the basic printing instructions Adjusting the Print Color You can adjust the colors used in the print job PhotoEnhance produces sharper images and more vivid colors by automatically adjusting the contrast saturation and brig...

Page 58: ...elect an anti copy pattern Click Settings to change details such as the size and density Printing a Watermark for Windows Only You can print a watermark such as Confidential on your printouts You can also add your own watermark Click Watermark Features on the More Options tab and then select a watermark Click Settings to change details such as the density and position of the watermark Printing a H...

Page 59: ... use local print printing from a smart device that is connected to the same wireless network as your printer or remote print printing from a remote location over the Internet To use remote print register your printer in the Epson Connect service Related Information Epson Connect Service on page 93 Installing Epson iPrint You can install Epson iPrint on your smart device from the following URL or Q...

Page 60: ...nter you do not need to select it again from the next time D Select what you want to print such as photos documents and web pages E Displays the screen to make print settings such as paper size and paper type F Displays photos and documents you selected G Starts printing Note To print from the document menu using iPhone iPad and iPod touch running iOS start Epson iPrint after transferring the docu...

Page 61: ...ling Printing Note In Windows you cannot cancel a print job from the computer once it has been completely sent to the printer In this case cancel the print job by using the printer s control panel When printing several pages from Mac OS X you cannot cancel all of the jobs by using the control panel In this case cancel the print job from the computer If you have sent a print job from Mac OS X v10 6...

Page 62: ...ect Cancel Related Information Windows Printer Driver on page 95 Canceling Printing Mac OS X 1 Click the printer icon in the Dock 2 Select the job you want to cancel 3 Cancel the job Mac OS X v10 8 x or later Click next to the progress meter Mac OS X v10 6 8 to v10 7 x Click Delete User s Guide Printing 62 ...

Page 63: ...5 Placing Originals on the Scanner Glass on page 39 Menu Options for Copy Mode on page 63 Menu Options for Copy Mode Note Available menus vary depending on the layout you selected Number of copies Enter the number of copies Layout With Border Copies with margins around the edges 2 up Copies two single sided originals onto a single sheet in 2 up layout ID Card Scans both sides of an ID card and cop...

Page 64: ...es one side of an original onto a single side of paper 1 2 Sided Copies two single sided originals onto both sides of a single sheet of paper Press the r button to configure the binding position of the paper Document Orientation Select the orientation of your original Quality Copies in optimal quality to match the type of original Density Increase the level of density when the copying results are ...

Page 65: ...nd then press the OK button 6 Check settings such as the save format and change them if necessary 7 Press the x button Related Information Placing Originals on the Scanner Glass on page 39 Menu Options for Scanning to the Cloud Format Select the format in which to save the scanned image Scan Area Select the scan area To crop the white space around the text or image when scanning select Auto Croppi...

Page 66: ...k the initial 15 characters of the computer s name are displayed on the control panel If you set a network scan name in Epson Event Manager it is displayed on the control panel 5 Press the OK button and then select the file format 6 Press the x button Related Information Placing Originals on the Scanner Glass on page 39 Epson Event Manager on page 98 Scanning to a Computer WSD Note This feature is...

Page 67: ...uter 1 Turn the printer on 2 Click start and then click Network on the computer 3 Right click the printer and then click Install Click Continue when the User Account Control screen is displayed Click Uninstall and start again if the Uninstall screen is displayed Note The printer name you set on the network and model name EPSON XXXXXX XX XXXX are displayed on the network screen You can check the pr...

Page 68: ...an icon with the printer s name on the network is displayed Select the printer name when using with WSD Related Information Printing a Network Status Sheet on page 29 Scanning from a Computer Scanning Using Epson Scan 2 You can scan using the scanner driver Epson Scan 2 You can scan originals using detailed settings that are suitable for text documents See the Epson Scan 2 help for an explanation ...

Page 69: ...ow opens and the previewed image is displayed On the Advanced Settings tab you can make detailed image adjustment settings that are suitable for text documents such as the following Unsharp Mask You can enhance and sharpen the outlines of the image Descreening You can remove moiré patterns web like shadows that appear when scanning printed papers such as a magazine Text Enhancement You can make bl...

Page 70: ... after selecting the save format File Name Confirm the save file name displayed You can change settings for the file name by selecting Settings from the list Folder Select the save folder for the scanned image from the list You can select another folder or create a new folder by selecting Select from the list 6 Click Scan Related Information Placing Originals on the Scanner Glass on page 39 Epson ...

Page 71: ...an save the scanned data on a smart device or to Cloud services send it by email or print it Installing Epson iPrint You can install Epson iPrint on your smart device from the following URL or QR code http ipr to c Scanning Using Epson iPrint Start Epson iPrint from your smart device and select the item you want to use from the home screen The following screens are subject to change without notice...

Page 72: ...you do not need to select it again from the next time D Displays the scanning screen E Displays the screen where you can make scan settings such as resolution F Displays scanned images G Starts scanning H Displays the screen where you can save scanned data to a smart device or Cloud services I Displays the screen where you can send scanned data by email J Displays the screen where you can print sc...

Page 73: ...nners or Print Scan Print Fax and then select the printer 2 Click Options Supplies Utility Open Printer Utility 3 Click EPSON Status Monitor Ink Bottle Codes Epson recommends the use of genuine Epson ink bottles Epson warranty does not cover damage caused by inks other than those specified including any genuine Epson ink not designed for this printer or any third party ink Other products not manuf...

Page 74: ...p at room temperature for at least three hours before using it Do not open the ink bottle package until you are ready to fill the ink tank The ink bottle is vacuum packed to maintain its reliability If you leave an ink bottle unpacked for a long time before using it normal printing may not be possible Visually check ink levels in the actual ink tanks Continued use of the printer when the ink is ex...

Page 75: ...nk This one off process consumes a quantity of ink and therefore these bottles may print fewer pages compared to subsequent ink bottles Refilling the Ink Tanks 1 Enter Setup from the home screen 2 Select Maintenance Reset Ink Levels 3 Press the x button 4 Open the ink tank unit cover and then remove the cap of the ink tank After removing the cap place it on the protruding portion on the ink tank a...

Page 76: ... dispose of the top of the cap If any ink remains in the ink bottle after refilling the tank use the top of the cap to seal the ink bottle cap 6 Refill the ink tank with the correct colored ink up to the upper line on the ink tank cImportant It may be difficult to see inside the ink tank Refill the ink tank carefully to prevent ink from spilling out from the ink inlet User s Guide Refilling Ink 76...

Page 77: ...tton 10 Follow the instructions on the LCD screen to reset the ink levels Note You can reset the ink levels even if you did not fill the ink to the upper line Note that doing so may cause a difference between the approximate ink levels and the actual ink levels To keep your printer operating at the optimum condition refill the ink tanks up to the upper line and then reset the ink levels Related In...

Page 78: ... Ink Bottle Handling Precautions on page 74 User s Guide Refilling Ink 78 ...

Page 79: ... printing and then run the nozzle check again and repeat the head cleaning if necessary We recommend to turn off the printer If print quality has still not improved contact Epson support To prevent the print head from drying out do not unplug the printer while the power is on Checking and Cleaning the Print Head Control Panel 1 Load A4 size plain paper in the printer 2 Enter Setup from the home sc...

Page 80: ...king and Cleaning the Print Head Mac OS X 1 Load A4 size plain paper in the printer 2 Select System Preferences from the menu Printers Scanners or Print Scan Print Fax and then select the printer 3 Click Options Supplies Utility Open Printer Utility 4 Click Nozzle Check 5 Follow the on screen instructions Related Information Loading Paper in the Paper Cassette on page 35 Replacing Ink inside the I...

Page 81: ...t solve the problem after trying all of the methods above contact Epson support Replacing Ink inside the Ink Tubes Windows 1 Access the printer driver window 2 Click Power Ink Flushing on the Maintenance tab 3 Follow the on screen instructions Related Information Windows Printer Driver on page 95 Replacing Ink inside the Ink Tubes Mac OS X 1 Select System Preferences from the menu Printers Scanner...

Page 82: ... to align the print head Vertical Alignment Find and enter the number for the most solid pattern in each group Horizontal Alignment Find and enter the number for the least separated and overlapping pattern Note The test pattern may vary by model Related Information Loading Paper in the Paper Cassette on page 35 Aligning the Print Head Windows 1 Load A4 size plain paper in the printer 2 Access the ...

Page 83: ...ning the Paper Path for Ink Smears When the printouts are smeared or scuffed clean the roller inside cImportant Do not use tissue paper to clean the inside of the printer The print head nozzles may be clogged with lint 1 Load A4 size plain paper in the printer 2 Enter Setup from the home screen 3 Select Maintenance Paper Guide Cleaning 4 Follow the on screen instructions to clean the paper path No...

Page 84: ...o hard Be careful not to scratch or damage the surface of the glass A damaged glass surface can decrease the scan quality Checking the Total Number of Pages Fed Through the Printer You can check the total number of pages fed through the printer Checking the Total Number of Pages Fed Through the Printer Control Panel The information is printed together with the nozzle check pattern 1 Load A4 size p...

Page 85: ...int Scan Print Fax and then select the printer 2 Click Options Supplies Utility Open Printer Utility 3 Click Printer and Option Information Saving Power The printer enters sleep mode or turns off automatically if no operations are performed for a set period You can adjust the time before power management is applied Any increase will affect the product s energy efficiency Please consider the enviro...

Page 86: ...nt if your printouts look blurry or text and lines are misaligned Run Horizontal Alignment if your printouts contain horizontal banding at regular intervals Paper Guide Cleaning Use this feature to feed a plain paper for cleaning when there are ink stains on the internal rollers or a paper feed problem has occurred Related Information Checking and Cleaning the Print Head on page 79 Aligning the Pr...

Page 87: ...paper size or type settings in Paper Setup and the print settings do not match Auto Error Solver Select an action to perform when a 2 sided printing error occurs Enabled If a 2 sided job is sent when there is no paper available that supports 2 sided printing the printer displays an error message and then automatically prints on only one side of the paper Disabled The printer displays an error mess...

Page 88: ...ountry or region Your product may not have this feature depending on the location of purchase Language Select the display language Scroll Speed Select the scroll speed of the LCD screen Related Information Saving Power on page 85 Menu Options for Network Settings Select the menus on the control panel as described below Setup Network Settings Network Status Displays or prints the network settings a...

Page 89: ...re any problems with the connection see the report to solve the problem Advanced Setup Changes the network settings such as the printer name or TCP IP Address Related Information Printing a Network Connection Report on page 25 Making Wi Fi Settings by Push Button Setup on page 21 Making Wi Fi Settings by PIN Code Setup WPS on page 22 Disabling Wi Fi from the Control Panel on page 31 Making Wi Fi D...

Page 90: ...for Universal Print Settings Select the menus on the control panel as described below Setup Universal Print Settings These print settings are applied when you print using an external device without using the printer driver Top Offset Adjust the top margin of the paper Left Offset Adjust the left margin of the paper Top Offset in Back Adjust the top margin for the back of the page when performing 2...

Page 91: ...rformed for a set time period You can adjust the time before power management is applied Any increase will affect the product s energy efficiency Please consider the environment before making any change 2 Sided Copy Sets 2 sided copying as the default setting Related Information Saving Power on page 85 Menu Options for Quiet Mode Select the menus on the control panel as described below Setup Quiet...

Page 92: ...Resets all settings to the default User s Guide Menu Options for Setup Mode 92 ...

Page 93: ...te for details https www epsonconnect com http www epsonconnect eu Europe only Web Config Web Config is an application that runs in a web browser such as Internet Explorer and Safari on a computer or smart device You can confirm the printer status or change the network service and printer settings To use the Web Config connect the printer and the computer or device to the same network Note The fol...

Page 94: ...un Web Config 1 Access the devices and printers screen in Windows Windows 10 Right click the start button or press and hold it and then select Control Panel View devices and printers in Hardware and Sound Windows 8 1 Windows 8 Windows Server 2012 R2 Windows Server 2012 Select Desktop Settings Control Panel View devices and printers in Hardware and Sound or Hardware Windows 7 Windows Server 2008 R2...

Page 95: ...2 R2 Windows Server 2012 Select Desktop Settings Control Panel View devices and printers in Hardware and Sound Right click on your printer or press and hold it and then select Printing preferences Windows 7 Windows Server 2008 R2 Click the start button and select Control Panel View devices and printers in Hardware and Sound Right click on your printer and select Printing preferences Windows Vista ...

Page 96: ...select Control Panel View devices and printers in Hardware and Sound Right click on your printer and then select Printer properties Click the Optional Settings tab Windows Vista Windows Server 2008 Click the start button and select Control Panel Printers in Hardware and Sound Right click on your printer and then select Properties Click the Optional Settings tab Windows XP Windows Server 2003 R2 Wi...

Page 97: ...ity Making Operation Settings for the Mac OS X Printer Driver Accessing the Operation Settings Window of the Mac OS X Printer Driver Select System Preferences from the menu Printers Scanners or Print Scan Print Fax and then select the printer Click Options Supplies Options or Driver Operation Settings of the Mac OS X Printer Driver Skip Blank Page Avoids printing blank pages Quiet Mode Prints quie...

Page 98: ...st user switching Select Go Applications Epson Software Epson Scan 2 Epson Event Manager Epson Event Manager is an application that allows you to manage scanning from the control panel and save images to a computer You can add your own settings as presets such as the document type the save folder location and the image format See the application s help for details Note Windows Server operating sys...

Page 99: ...ng on Mac OS X Select Go Applications Epson Software Epson Easy Photo Print E Web Print for Windows Only E Web Print is an application that allows you to easily print web pages with various layouts See the application s help for details You can access the help from the E Web Print menu on the E Web Print tool bar Note Windows Server operating systems are not supported Check for supported browsers ...

Page 100: ... 10 Click the start button and select All apps EpsonNet EpsonNet Config V4 EpsonNet Config Windows 8 1 Windows 8 Windows Server 2012 R2 Windows Server 2012 Enter the application name in the search charm and then select the displayed icon Windows 7 Windows Vista Windows XP Windows Server 2008 R2 Windows Server 2008 Windows Server 2003 R2 Windows Server 2003 Click the start button and select All Pro...

Page 101: ...ions Windows 10 Windows 8 1 Windows 8 Windows 7 Windows Vista Windows Server 2012 R2 Windows Server 2012 Windows Server 2008 R2 Windows Server 2008 Click Uninstall Change or Uninstall Windows XP Windows Server 2003 R2 Windows Server 2003 Click Change Remove or Remove Note If the User Account Control window is displayed click Continue 7 Follow the on screen instructions Uninstalling Applications Ma...

Page 102: ...installing an application you need to uninstall it first 1 Quit all running applications 2 When installing the printer driver or Epson Scan 2 disconnect the printer and the computer temporarily Note Do not connect the printer and the computer until you are instructed to do so 3 Access to the following website and then enter the product name http epson sn 4 Select Setup and then click Download 5 Cl...

Page 103: ...dating Note If you cannot find the application you want to update in the list you cannot update using the EPSON Software Updater Check for the latest versions of the applications from your local Epson website http www epson com Related Information EPSON Software Updater on page 99 User s Guide Network Service and Software Information 103 ...

Page 104: ...ake sure that Epson Scan 2 and Epson Event Manager are installed on the computer Invalid IP address and subnet mask Enter them correctly See your documentation Enter the correct IP address or default gateway Contact your network administrator for assistance Update the root certificate to use cloud services Run Web Config and then update the root certificate Recovery Mode The printer has started in...

Page 105: ...rtcut icon to the taskbar If EPSON Status Monitor 3 is disabled click Extended Settings on the Maintenance tab and then select Enable EPSON Status Monitor 3 Related Information Windows Printer Driver on page 95 Checking Printer Status Mac OS X 1 Select System Preferences from the menu Printers Scanners or Print Scan Print Fax and then select the printer 2 Click Options Supplies Utility Open Printe...

Page 106: ...herwise you may be injured Never touch the buttons on the control panel while your hand is inside the printer If the printer starts operating it could cause an injury Be careful not to touch the protruding parts to avoid injury 1 Open the scanner unit with the document cover closed 2 Remove the jammed paper User s Guide Solving Problems 106 ...

Page 107: ... white flat cable translucent part and ink tubes inside the printer Doing so may cause a malfunction 3 Close the scanner unit Removing Jammed Paper from the Paper Cassette 1 Close the output tray User s Guide Solving Problems 107 ...

Page 108: ...out the paper cassette 3 Remove the jammed paper 4 Align the edges of the paper and slide the edge guides to the edges of the paper 5 Insert the paper cassette in the printer User s Guide Solving Problems 108 ...

Page 109: ...Removing Jammed Paper from the Rear Cover 1 Remove the rear cover 2 Remove the jammed paper 3 Remove jammed paper from the rear cover User s Guide Solving Problems 109 ...

Page 110: ...ert the rear cover in the printer Paper Does Not Feed Correctly Check the following points and then take the appropriate actions to solve the problem Place the printer on a flat surface and operate in the recommended environmental conditions Use paper supported by this printer User s Guide Solving Problems 110 ...

Page 111: ...ct direction and slide the edge guides against the edges of the paper Related Information Removing Jammed Paper on page 105 Loading Paper in the Paper Cassette on page 35 Paper Feeds at a Slant Load paper in the correct direction and slide the edge guides against the edges of the paper Related Information Loading Paper in the Paper Cassette on page 35 Several Sheets of Paper are Fed at a Time When...

Page 112: ...e printer driver s Maintenance tab and then check the following Check if there are any paused print jobs Cancel printing if necessary Make sure the printer is not offline or pending If the printer is offline or pending clear the offline or pending setting from the Printer menu Make sure the printer is selected as the default printer from the Printer menu there should be a check mark on the menu it...

Page 113: ...ort and then follow the printed solutions Related Information Cannot Connect from Devices Even Though Network Settings are No Problem on page 113 Messages and Solutions on the Network Connection Report on page 26 Cannot Connect from Devices Even Though Network Settings are No Problem If you cannot connect from the computer or smart device to the printer even though the network connection report do...

Page 114: ...r or smart device to a 5 GHz SSID you cannot be able to connect to the printer because the printer only supports communication over 2 4 GHz Connect the computer or smart device to the same SSID as the printer Most access points have a privacy separator feature that blocks the communication from unauthorized devices If you cannot connect to the network even if the devices and access point are conne...

Page 115: ...mputer Windows Select Control Panel Network and Internet Network and Sharing Center Mac OS X Click the Wi Fi icon at the top of the computer screen A list of SSIDs is displayed and the connected SSID is indicated with a check mark Suddenly the Printer Cannot Print over a Network Connection When you have changed your access point or provider try making network settings for the printer again Connect...

Page 116: ... connection failed check the network connection report and then follow the printed solutions Try accessing any website from your computer to make sure that your computer s network settings are correct If you cannot access any website there is a problem on the computer See the manual provided with your computer for more details Related Information Checking the SSID Connected to the Printer on page ...

Page 117: ...rmation Checking and Cleaning the Print Head on page 79 Banding or Unexpected Colors Appear The print head nozzles may be clogged Perform a nozzle check to check if the print head nozzles are clogged Clean the print head if any of the print head nozzles are clogged Related Information Checking and Cleaning the Print Head on page 79 Colored Banding Appears at Intervals of Approximately 3 3 cm Selec...

Page 118: ...n printing speed Windows Clear High Speed on the printer driver s More Options tab Mac OS X Select System Preferences from the menu Printers Scanners or Print Scan Print Fax and then select the printer Click Options Supplies Options or Driver Select Off as the High Speed Printing setting Print Quality is Poor Check the following if the print quality is poor due to blurry prints banding missing col...

Page 119: ...on paper Try to use genuine Epson ink bottles This product is designed to adjust colors based on the use of genuine Epson ink bottles The use of non genuine ink bottles may cause print quality to decline Use ink bottles with the correct part code for this printer Epson recommends using the ink bottle before the date printed on the package Related Information Refilling the Ink Tanks on page 75 Repl...

Page 120: ...rect to any other option If changing the setting does not work use any color correction method other than PhotoEnhance in Color Management Related Information Adjusting the Print Color on page 57 Printed Photos are Sticky You may be printing on the wrong side of the photo paper Make sure you are printing on the printable side When printing on the wrong side of the photo paper you need to clean the...

Page 121: ...rt the computer Related Information Canceling Printing on page 61 The Printed Image Is Inverted Clear any mirror image settings in the printer driver or the application Windows Clear Mirror Image on the printer driver s More Options tab Mac OS X Clear Mirror Image from the print dialog s Print Settings menu Mosaic Like Patterns in the Prints When printing images or photos print using high resoluti...

Page 122: ... the original on the scanner glass and then place a piece of black paper over it Lower the copy density setting on the control panel Related Information Menu Options for Copy Mode on page 63 The Printout Problem Could Not be Cleared If you have tried all of the solutions and have not solved the problem try uninstalling and then reinstalling the printer driver Related Information Uninstalling Appli...

Page 123: ...return to normal printing speed leave the printer idle for at least 30 minutes Printing speed does not return to normal if the power is off Cannot Cancel Printing from a Computer Running Mac OS X v10 6 8 If you want to stop printing from your computer make the following settings Run Web Config and then select Port9100 as the Top Priority Protocol setting in AirPrint Setup Select System Preferences...

Page 124: ...start button select Control Panel Hardware and Sound Scanners and Cameras and then check if the printer is displayed Windows XP Windows Server 2003 R2 Windows Server 2003 Click the start button select Control Panel Printers and Other Hardware Scanner and Cameras and then check if the printer is displayed If you cannot scan using any TWAIN compliant applications uninstall and then reinstall the TWA...

Page 125: ...ect the Advanced Settings tab and then Image Option Text Enhancement When scanning from the scanner glass place black paper or a desk pad over the original Related Information Placing Originals on the Scanner Glass on page 39 Scanning Using Epson Scan 2 on page 68 Text is Blurred In Epson Scan 2 select the Advanced Settings tab and then Image Option Text Enhancement In Epson Scan 2 when Image Type...

Page 126: ...when Saving as a Searchable PDF On the Image Format Options window in Epson Scan 2 check that Text Language is set correctly on the Text tab Check that the original is placed straight Use an original with clear text Text recognition may decline for the following types of originals Originals that have been copied a number of times Originals received by fax at low resolutions Originals on which the ...

Page 127: ...n and then select All Programs or Programs EPSON Epson Scan 2 Epson Scan 2 Utility Mac OS X Select Go Applications Epson Software Epson Scan 2 Utility 2 Select the Other tab 3 Click Reset Note If initialization does not solve the problem uninstall and re install Epson Scan 2 Related Information Uninstalling Applications on page 100 Installing Applications on page 102 Other Scanning Problems Scanni...

Page 128: ...oo loud enable Quiet Mode Enabling this feature may reduce printing speed Windows printer driver Enable Quiet Mode on the Main tab Mac OS X printer driver Select System Preferences from the menu Printers Scanners or Print Scan Print Fax and then select the printer Click Options Supplies Options or Driver Select On as the Quiet Mode setting Control panel From the home screen select Setup Quiet Mode...

Page 129: ...the x button to reset the ink levels Depending on the usage conditions the message may be displayed when there is still ink in the tank If the message is displayed even when more than half of the ink remains in the ink tanks the printer may be malfunctioning Contact Epson support Related Information Refilling the Ink Tanks on page 75 User s Guide Solving Problems 129 ...

Page 130: ... for Single Sheets Print quality may decline in the shaded areas due to the printer s mechanism A 3 0 mm 0 12 in B 3 0 mm 0 12 in C 47 0 mm 1 85 in D 45 0 mm 1 77 in Printable Area for Envelopes Print quality may decline in the shaded areas due to the printer s mechanism A 3 0 mm 0 12 in B 5 0 mm 0 20 in C 47 0 mm 1 85 in D 18 0 mm 0 71 in Scanner Specifications Scanner Type Flatbed Photoelectric ...

Page 131: ...l 8 bits per pixel per color external Grayscale 16 bits per pixel internal 8 bits per pixel external Black and white 16 bits per pixel internal 1 bits per pixel external Light Source LED Interface Specifications For Computer Hi Speed USB Network Function List Functions Supported Remarks Network Interfaces Ethernet Wi Fi Infrastructure Ad hoc Wi Fi Direct Simple AP Concurrent Connection Ethernet an...

Page 132: ...lt Settings File Sharing Setup Network Printing EpsonNet Print Windows IPv4 Standard TCP IP Windows IPv4 IPv6 WSD Printing Windows IPv4 IPv6 Windows Vista or later Bonjour Printing Mac OS X IPv4 IPv6 IPP Printing Windows Mac OS X IPv4 IPv6 UPnP Printing IPv4 Information appliance PictBridge Printing Wi Fi IPv4 Digital camera Epson Connect Email Print IPv4 AirPrint iOS Mac OS X IPv4 IPv6 iOS 5 or l...

Page 133: ...ess Securities WEP 64 128bit WPA2 PSK AES 3 1 Complies with either IEEE 802 11b g n or IEEE 802 11b g depending on location of purchase 2 Not supported for IEEE 802 11b 3 Complies with WPA2 standards with support for WPA WPA2 Personal Ethernet Specifications Standards IEEE802 3i 10BASE T 1 IEEE802 3u 100BASE TX IEEE802 3az Energy Efficient Ethernet 2 Communication Mode Auto 10Mbps Full duplex 10Mb...

Page 134: ...ght Approx 6 6 kg 14 6 lb Without the ink and the power cord Electrical Specifications Model 100 to 240 V Model 220 to 240 V Model Rated Frequency Range 50 to 60 Hz 50 to 60 Hz Rated Current 0 5 to 0 3 A 0 3 A Power Consumption with USB Con nection Standalone copying Approx 11 W ISO IEC24712 Ready mode Approx 4 4 W Sleep mode Approx 1 5 W Power off Approx 0 3 W Standalone copying Approx 11 W ISO I...

Page 135: ...s at 25 C 77 F You can store for one month at 40 C 104 F System Requirements Windows 10 32 bit 64 bit Windows 8 1 32 bit 64 bit Windows 8 32 bit 64 bit Windows 7 32 bit 64 bit Windows Vista 32 bit 64 bit Windows XP SP3 or later 32 bit Windows XP Professional x64 Edition SP2 or later Windows Server 2012 R2 Windows Server 2012 Windows Server 2008 R2 Windows Server 2008 Windows Server 2003 R2 Windows...

Page 136: ...ensing This equipment complies with FCC IC radiation exposure limits set forth for an uncontrolled environment and meets the FCC radio frequency RF Exposure Guidelines in Supplement C to OET65 and RSS 102 of the IC radio frequency RF Exposure rules This equipment should be installed and operated so that the radiator is kept at least 7 9 inches 20 cm or more away from a person s body excluding extr...

Page 137: ...tage Government issued revenue stamps and securities issued according to legal procedure Exercise caution when copying the following items Private marketable securities stock certificates negotiable notes checks etc monthly passes concession tickets etc Passports driver s licenses warrants of fitness road passes food stamps tickets etc Note Copying these items may also be prohibited by law Respons...

Page 138: ...leaking when you transport the bottle Do not put opened ink bottles in the box with printer 1 Turn off the printer by pressing the P button 2 Make sure the power light turns off and then unplug the power cord cImportant Unplug the power cord when the power light is off Otherwise the print head does not return to the home position causing the ink to dry and printing may become impossible 3 Disconne...

Page 139: ...ing the protective materials When you use the printer again make sure you remove the tape securing the print head If print quality has declined the next time you print clean and align the print head Related Information Part Names and Functions on page 13 Checking and Cleaning the Print Head on page 79 Aligning the Print Head on page 81 User s Guide Appendix 139 ...

Page 140: ... you give them the following information Product serial number The serial number label is usually on the back of the product Product model Product software version Click About Version Info or a similar button in the product software Brand and model of your computer Your computer operating system name and version Names and versions of the software applications you normally use with your product Not...

Page 141: ...as a final backup to make sure our clients have access to advice Operators on the Helpdesk can aid you in installing configuring and operating your Epson product Our Pre sales Helpdesk staff can provide literature on new Epson products and advise where the nearest dealer or service agent is located Many types of queries are answered here We encourage you to have all the relevant information on han...

Page 142: ...tem application programs and any information you feel is required Transportation of Product Epson recommends retaining product packaging for future transportation Securing the ink tank with tape and keeping the product upright is also recommended Help for Users in Singapore Sources of information support and services available from Epson Singapore are World Wide Web http www epson com sg Informati...

Page 143: ...rung Hanoi City Vietnam Help for Users in Indonesia Contacts for information support and services are World Wide Web http www epson co id Information on product specifications drivers for download Frequently Asked Questions FAQ Sales Enquiries questions through e mail Epson Hotline Phone 62 21 572 4350 Fax 62 21 572 4357 Our Hotline team can help you with the following over the phone or fax Sales ...

Page 144: ...esia co id PEKANBARU ESC PEKANBARU JL TUANKU TAMBUSAI NO 353 PEKANBARU RIAU 62761 21420 pkb technical epson indonesia co id DKI JAKARTA ESS JAKARTA KEIAI WISMA KEIAI LT 1 JL JEND SUDIRMAN KAV 3 JAKPUS DKI JAKARTA 6221 5724335 ess support epson indonesia co id EAST JAWA ESS SURABAYA JL JAWA NO 2 4 KAV 29 RUKO SURYA INTI SURABAYA JATIM 6231 5014949 esssby support epson indonesia co id BANTEN ESS SER...

Page 145: ... www epson com my Information on product specifications drivers for download Frequently Asked Questions FAQ Sales Enquiries questions through e mail Epson Call Centre Phone 60 1800 8 17349 Sales enquiries and product information Product usage questions or problems Enquiries on repair services and warranty Head Office Phone 603 56288288 Fax 603 5628 8388 603 5621 2088 Help for Users in India Contac...

Page 146: ...n product specifications drivers for download Frequently Asked Questions FAQ and E mail Enquiries are available Epson Philippines Customer Care Toll Free PLDT 1800 1069 37766 Toll Free Digital 1800 3 0037766 Metro Manila 632 441 9030 Web Site http customercare epson com ph E mail customercare epc epson som ph Our Customer Care team can help you with the following over the phone Sales enquiries and...

Reviews: