background image

L

R4CD180
Setup Guide

Rev. C

COVER4.FM

A5 size

12/18/03

Proof Sign-off:
KOW N.Mizuno S.Koide
H.Kimura
NOC K. Lee

Summary of Contents for Expression 10000XL Series

Page 1: ...L R4CD180 Setup Guide Rev C COVER1 FM A5 size 12 18 03 Proof Sign off KOW N Mizuno S Koide H Kimura NOC K Lee ...

Page 2: ...nning It also includes information on settings and functions of the scanner software EPSON Scan Information is also available on maintenance troubleshooting technical specifications and customer support Information on Epson Scanner Software online help Provides you with detailed information on EPSON Scan To access the Software online help click the Help button in the EPSON Scan window Information ...

Page 3: ... 03 Proof Sign off KOW N Mizuno S Koide H Kimura NOC K Lee Color Image Scanner Setup Guide 1 Safety Instructions 1 2 Getting to Know Your Scanner 3 3 Installing the Software 5 4 Setting Up the Scanner 8 5 Using Your Scanner 14 6 Options 18 7 Problems 29 ...

Page 4: ...s arising from the use of any options or any consumable products other than those designated as Original Epson Products or Epson Approved Products by Seiko Epson Corporation EPSON Scan is based in part on the work of the Independent JEPG Group EPSON is a registered trademark of Seiko Epson Corporation Microsoft and Windows are registered trademarks of Microsoft Corporation in the United States of ...

Page 5: ...with this product only Use with other equipment may result in fire or electric shock Use only the type of power source indicated on the scanner s label and always supply power directly from a standard domestic electrical outlet with the power cord that meets the relevant local safety standards Connect all equipment to properly grounded electrical outlets Avoid using outlets on the same circuit as ...

Page 6: ...aged If the scanner does not operate normally or exhibits a distinct change in performance Do not adjust controls that are not covered by the operating instructions For Hong Kong and Singapore users Replace fuses only with those with of the correct size and rating If you plan to use the scanner in Germany observe the following To provide adequate short circuit protection and over current protectio...

Page 7: ...uno S Koide H Kimura NOC K Lee 2 Getting to Know Your Scanner Unpacking the Scanner YourEPSONExpression10000XLcomesshippedwithCD ROMs that include driver software to run your scanner and some additional items The contents may vary in certain locations scanner USB interface cable power cord Setup Guide CD ROMs ...

Page 8: ...ment Feeder B81321 Allows you to scan up to 100 single or double sided pages automatically This option feeds a document from the top page down which preserves the original page order Using this option with an optical character recognition OCR software you can use the scanned text in word processing programs as if you had typed it by yourself EPSON Network Image Express Card B80839 Enables an Epson...

Page 9: ...tall the software on a disk or in a partition that does not use UFS Note for Mac OS X 10 3 users Do not use the Fast User Switching function while using Expression 10000XL Insert the software CD in the CD ROM or DVD drive and then start the installer following the instructions below For Windows users 1 The installer starts automatically If necessary start it by double clicking the EPSON CD ROM ico...

Page 10: ...reen instructions For Macintosh users Installing EPSON Scan 1 For Mac OS X users Double click the EPSON CD ROM icon on your desk top Double click the EPSON Scan folder in the EPSON folder and then double click the Mac OS X folder For Mac OS 9 users Double click the EPSON Scan folder in the EPSON folder Double click the Mac OS 9 folder and then double click your preferred language folder If the EPS...

Page 11: ...nfolderdoesnotopenautomatically double click the EPSON CD ROM icon 2 Double click the language folder you prefer and then double click the Installer icon Follow the on screen instruction until all of the software is installed 3 When a message appears to indicate that installation is complete click OK Note If you do not have Adobe Photoshop Elements and LaserSoft SilverFast on your computer yet ins...

Page 12: ...not operate properly if it is tilted at an angle Place the scanner close enough to the computer for the interface cable to reach it easily Place the scanner near an electrical outlet where the power cord can be easily unplugged Keep the scanner away from high temperature humidity and excessive dirt or dust Also avoid using or storing the scanner in places subject to rapid changes of temperature an...

Page 13: ...ev C SETUP FM A5 size 12 18 03 Proof Sign off KOW N Mizuno S Koide H Kimura NOC K Lee Allow space behind the scanner for the cables and space above the scanner so that you can fully raise the document cover 573 mm 150 mm or more 458 mm 656 mm 132 mm ...

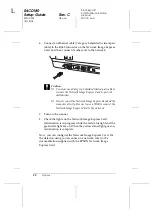
Page 14: ...canner to your computer 1 Make sure that the scanner is turned off The scanner is off when the Power button is raised 2 Connect the power cord to the AC inlet on the back of the scanner and then plug the other end into an electrical outlet Note When you connect the power cord to the AC inlet you need to force it in at the entrance otherwise the transportation lock will not be released Power button...

Page 15: ...use cCaution Whenever you turn off the scanner wait at least 10 seconds before turning it back on Connecting the Scanner to Your Computer See the sections below to connect the scanner using the USB or IEEE 1394 interface Note Be sure to install the scanner software before connecting the scanner to your computer See Installing the Software on page 5 for details Do not use the USB interface cable an...

Page 16: ...ce cable to the USB port on the back of the scanner and the other end to an USB hub or the USB port on your computer Note For USB 2 0 Hi speed connection make sure USB 2 0 Host Driver by Microsoft is installed on your computer If you connect your scanner through more than one hub your system may not work properly In this case try connecting the scanner directly to the computer s USB port Also your...

Page 17: ...nd of an IEEE 1394 interface cable to the IEEE 1394 port on the back of the scanner 2 Connect the other end of the cable to the IEEE 1394 port on your computer or another IEEE 1394 device If there are already IEEE 1394 devices connected to your computer connect the scanner so that it is the last IEEE 1394 device in the daisy chain Note Basically use an IEEE 1394 interface cable that comes with 2 s...

Page 18: ... Open the document cover and place the document face down on the document table Note An area of 1 0 5 mm from the horizontal and the vertical edges of the document table glass cannot be scanned 3 Close the document cover Note Do not place heavy objects on the top of the scanner Do not move the scanner while it is scanning a document this is to avoid the scanned image becoming distorted corner of t...

Page 19: ...erence Guide on your computer see Installing the Software on page 5 to install it from the CD ROM Note for Macintosh users Most illustrations shown in this section are for Windows They may be different in appearance from what actually appears on your screen however the instructions are the same except as noted Note for Mac OS X 10 3 users Do not use the Fast User Switching function while using Exp...

Page 20: ...pression 10000XL EPSON Scan starts Note for Windows XP users Do not choose WIA EPSON Expression10000XL from the menu to select the scanner If you select it you cannot use the Epson scanner functions fully 3 Specify the Document Type Image Type and Destination settings to match your images 4 Click Preview to preview the image 5 Use Target Size to specify the output size of the scanned image ...

Page 21: ...Mizuno S Koide H Kimura NOC K Lee 6 Click Scan EPSON Scan starts scanning 7 The scanned image is sent to Adobe Photoshop Elements Click Close to finish EPSON Scan if necessary 8 Select Save As from the File menu in Adobe Photoshop Elements 9 Type a file name select a file format and then click Save ...

Page 22: ...ible to scan films and slides in full color Once you install the Transparency Unit you can leave it in place even when you want to return to scanning reflective paper documents Unpacking the Transparency Unit Make sure that all the items shown below are included and have not been damaged during shipping Contact your Epson dealer if any item is missing or damaged Transparency Unit film holders tran...

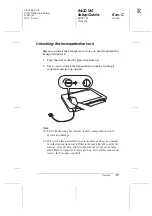
Page 23: ...es up 2 Use a coin to unlock the transportation lock by turning it counterclockwise one quarter Note Before transporting the scanner lock its transportation lock to prevent any damage If the unit s lamp assembly is not in its home position you cannot turn the transportation lock If this is the case attach the unit to the scanner close the unit and turn the scanner on the unit s lamp assembly then ...

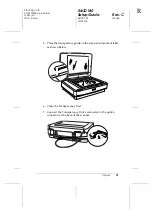
Page 24: ...Make sure the scanner is turned off and then unplug the power cord from the scanner 2 Open the scanner s document cover and then remove it by lifting the back of the cover straight up 3 Align the pins of the unit with the holes of the scanner and then lower the unit until it rests securely on the scanner with the pins in the holes 4 Remove the reflective documents mat from the Transparency Unit as...

Page 25: ...8 03 Proof Sign off KOW N Mizuno S Koide H Kimura NOC K Lee 5 Place the transparency guide on the scanner s document table as shown below 6 Close the Transparency Unit 7 Connect the Transparency Unit s connector to the option connector at the back of the scanner ...

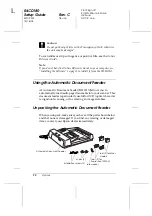
Page 26: ... it from the CD ROM Using the Automatic Document Feeder A3 Automatic Document Feeder B81321 allows you to automatically load multi page documents into your scanner This document feeder is particularly useful for OCR optical character recognition scanning or for creating an image database Unpacking the Automatic Document Feeder When you unpack make sure you have all the parts shown below and that n...

Page 27: ...you may need to have someone help you lift it The Automatic Document Feeder is large so you should clear sufficient space around the scanner Follow the steps below to install the Automatic Document Feeder on your Epson scanner 1 Make sure your scanner is turned off and then unplug the power cord 2 Open the scanner s document cover and then remove it by lifting the back of the cover straight up 3 A...

Page 28: ...e them as shown below 4 Insert the installation screws into the holes on the back of the scanner and then secure them using the included screwdriver 5 Align the installation screws with the holes in the Automatic Document Feeder Slide so that the holes are over the installation screws wWarning The Automatic Document Feeder is heavy Get assistance when lifting it ...

Page 29: ...s using the included screwdriver 7 Attach the Automatic Document Feeder s connector to the scanner s option interface 8 Close the Automatic Document Feeder For details on how to use the Automatic Document Feeder see the Online Reference Guide Note If you do not have the Online Reference Guide on your computer see Installing the Software on page 5 to install it from the CD ROM ...

Page 30: ...ve to having the scanner connected to a server PC For information on how to use it refer to the documentation supplied with EPSON Network Image Express Card Note Do not install other option card except the EPSON Network Image Express Card B80839 otherwise damage may occur System requirements The Network Image Express Card supports the following environments Windows Macintosh Operating system Windo...

Page 31: ...s you may need to use them again if you re install the shield plate 3 Insert the Network Image Express Card in your scanner s optional interface slot and then tighten the screws cCaution Do not install or uninstall the Network Image Express Card from the scanner while the scanner is turned on otherwise damage may occur 4 Initialize the Network Image Express Card To initialize turn on the scanner w...

Page 32: ...ss Card to prevent malfunction Do not connect the Network Image Express Card and the computer directly Be sure to use a HUB to connect the Network Image Express Card to the network 7 Turn on the scanner 8 Check the lights on the Network Image Express Card Initialization is in progress while the red status light and the green data light are on When the yellow status light goes on initialization is ...

Page 33: ...l flashing contact your dealer Red Try the scanning operation again Off Make sure the scanner is connected to your computer and turned on Problem Solution The New Hardware Wizard appears on your screen Click Cancel and then follow the steps described in Installing the Software on page 5 Disconnect the scanner before installing the software You see a message about a HI SPEED USB device on Windows X...

Page 34: ... must have Microsoft Internet Explorer or Netscape Navigator versions 5 0 or later to read the Online Reference Guide Note If you do not have the Online Reference Guide on your computer see Installing the Software on page 5 to install it from the CD ROM On screen Help for EPSON Scan Click the Help button or question mark that appears on the screen in these programs The corner of your photo is not ...

Page 35: ...CHATSWOOD 2067 NSW Phone 2 9903 9000 Fax 2 9903 9177 EPSON SINGAPORE PTE LTD No 1 Temasek Avenue 36 00 Millenia Tower Singapore 039192 Phone 065 633 77 911 Fax 065 633 41 185 EPSON HONG KONG LTD 20 F Harbour Centre 25 Harbour Road Wanchai Hong Kong Phone 2585 4300 Fax 2827 7083 EPSON TAIWAN TECHNOLOGY TRADING LTD 14F No 7 Song Ren Road Taipei Taiwan 110 Phone 02 8786 6688 Fax 02 8786 6633 EPSON IT...

Page 36: ...L R4CD180 Setup Guide Rev C COVER4 FM A5 size 12 18 03 Proof Sign off KOW N Mizuno S Koide H Kimura NOC K Lee ...

Reviews: