FilmScan 200
Rev. A
3-18
3.2.8.4 Optical Unit, Preview Motor, and APS Holder Sensor Removal
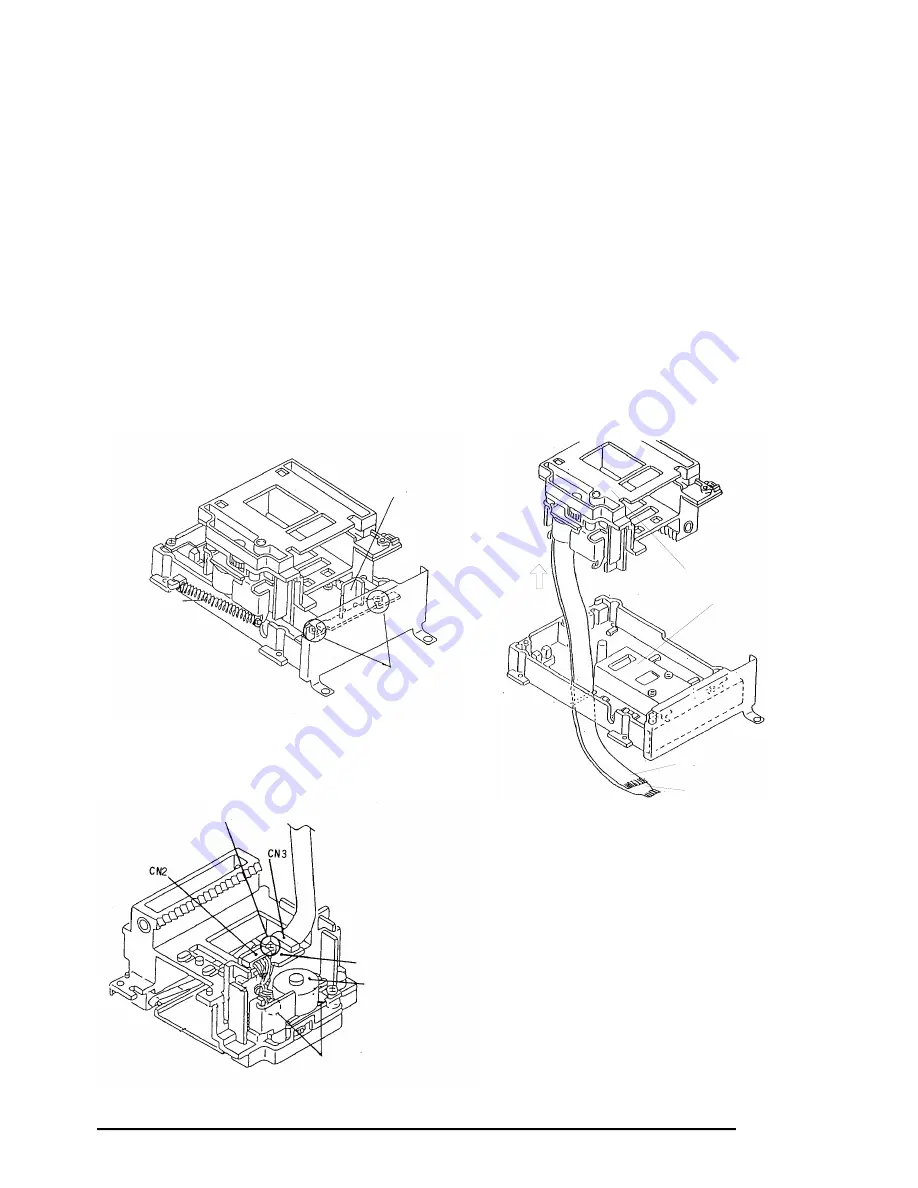
Optical Unit Removal (Figures 3-22 and 3-23)
Step 1:
Remove the engine unit (Refer to section 3.2.8.)
Step 2:
Remove the main scan motor unit (Refer to section 3.2.8.1.)
Step 3:
Remove the frame (Refer to section 3.2.8.3.)
Step 4:
Remove the holder spring.
Step 5:
Remove two CBB (black: M3 x 6) screws that secures the shaft holding plate B and take it
away (Refer to section 3.2.8.2.)
Step 6:
Remove two CBB (black: M3 x 6) screws that secures the shaft holding plate A and the ground
wire for the optical unit, then take the shaft holding plate A away.
Step 7
Dislocate the FFC and FPC of the carrier holder block from the back side of the optical unit.
Then the carrier holder block and the optical unit are separated.
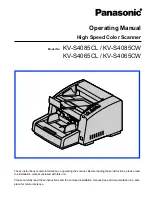
Preview Motor Removal (Figure 3-24)
Step 8:
Remove CBB (black: M3 x 6) screw that secures the motor junction board.
Step 9:
Disconnect the cable of the preview motor from the CN2 on the motor junction board.
Step 10:
Remove two CBB (black: M2.5 x 3) screws that secures the preview motor and take it away.
APS Holder Sensor Removal (Figure 3-25)
Step 11:
Disconnect CN4 of the APS holder sensor from the motor junction board.
Step 12:
Remove CBB (black: M2 x 5) screws that secures the micro switch board A to the carrier
holder block.
FPC for APS Holder
FFC for Motor
Junction Board
Carrier Holder Block
Optical Unit
Figure 3-23. FFC and FPC Dislocation
Shaft Holding Plate A
Screw
Holder Spring
Figure 3-22. Optical Unit and Carrier Holder Block
Screw
Preview Motor
Motor Junction Board
Screw
Figure 3-24. Preview Motor Removal
Summary of Contents for FILMSCAN 200
Page 1: ...EPSON FILM SCANNER FilmScan 200 SERVICE MANUAL SEIKO EPSON CORPORATION 4007375 ...
Page 5: ...v REVISION SHEET Revision Issued Data Contents Rev A FEBRUARY 28 1997 First issue ...
Page 8: ...EPSON SEIKO EPSON CORPORATION ...
Page 75: ...CHAPTER 4 ADJUSTMENT No adjustment is required in this product ...
Page 85: ...CHAPTER 6 MAINTENENCE 6 1 MAINTENENCE 6 1 6 2 LUBRICATION 6 1 ...
Page 86: ...APPENDIX A 1 CONNECTOR PIN ASSIGNMENTS 1 A 2 EXPLOED DIAGRAM 8 ...
Page 88: ...FilmScan 200 Rev A A 2 Figure A 2 Cable Connection SCSI Model ...
Page 95: ...APPENDIX Rev A A 9 Figure A 4 FilmScan 200 Bi D Model Exploded Diagram 2 2 ...
Page 96: ...FilmScan 200 Rev A A 10 Figure A 5 FilmScan 200 SCSI Model Exploded Diagram 1 2 ...
Page 97: ...APPENDIX Rev A A 11 Figure A 6 FilmScan 200 SCSI Model Exploded Diagram 2 2 ...
Page 98: ...FilmScan 200 Rev A A 12 Figure A 7 APS Holder option Exploded Diagram ...
Page 100: ...FilmScan 200 Rev A 6 2 Shaft 1 G 36 1 G 36 Figure 6 1 Lubrication Points ...


