background image

Loading paper with the front push tractor

When using the push tractor, it is a good idea to set the Auto tear-off function in the Default Setting
mode to 

On

. See “About Your Printer’s Default Settings” on page 92 for more information.

Follow these steps to load paper using the front push tractor:

1. Make sure the printer is turned off.

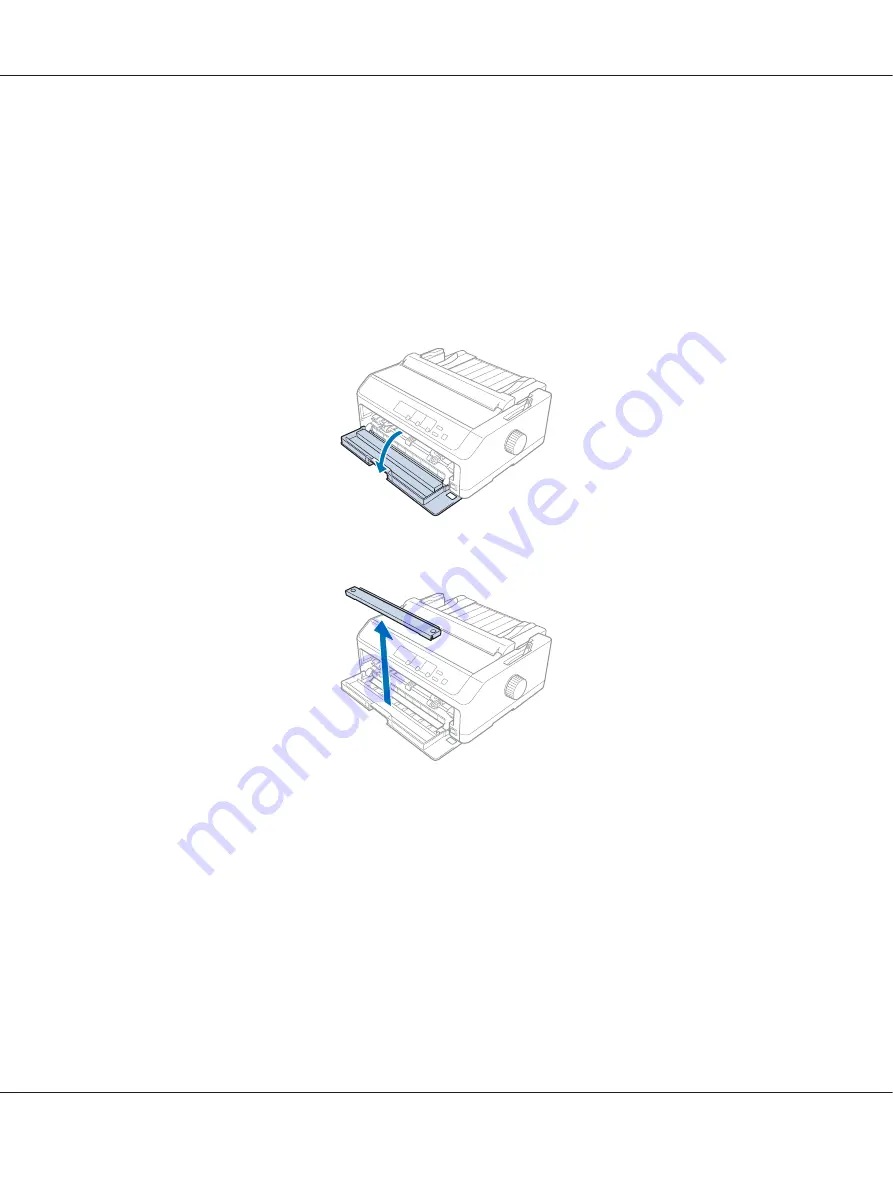
2. Open the front cover. Make sure the tractor is installed in the front push position.

3. Remove the sub cover to insert the paper.

FX-890II/FX-890IIN/FX-2190II/FX-2190IIN     User’s Guide

Paper Handling     

27

Summary of Contents for FX-2190II

Page 1: ...User s Guide NPD5749 01 EN ...

Page 2: ...ith Seiko Epson Corporation s operating and maintenance instructions Seiko Epson Corporation shall not be liable for any damages or problems arising from the use of any options or any consumable products other than those designated as Original Epson Products or Epson Approved Products by Seiko Epson Corporation EPSON and ESC PR are registered trademarks EPSON EXCEED YOUR VISION EXCEED YOUR VISION ...

Page 3: ...stem Microsoft Windows 8 operating system Microsoft Windows 7 operating system Microsoft Windows Vista operating system Microsoft Windows XP operating system Microsoft Windows Server 2016 operating system Microsoft Windows Server 2012 R2 operating system Microsoft Windows Server 2012 operating system Microsoft Windows Server 2008 R2 operating system Microsoft Windows Server 2008 operating system M...

Page 4: ... 15 Chapter 1 Paper Handling Selecting a Paper Source 16 Printing on continuous paper 16 Printing on single sheets cut sheet 18 Setting the Paper Release Lever 19 Adjusting the Paper Thickness Lever 19 Loading Continuous Paper 21 Positioning your continuous paper supply 21 Loading continuous paper with the tractor 21 Using the tear off function 42 Loading Single Sheets 44 Available paper types 44 ...

Page 5: ...rview 66 Printer settings 67 Monitoring settings 69 Setting Utility 69 Using EPSON Status Monitor 3 69 Setting up EPSON Status Monitor 3 70 Accessing EPSON Status Monitor 3 72 Installing EPSON Status Monitor 3 72 Using Bi D Adjustment 73 Making adjustment with Bi D Adjustment 73 Using Printer Setting 74 Changing printer setting 75 Setting Up Your Printer on a Network 76 Sharing the printer 76 Sett...

Page 6: ...ring a Paper Jam 111 Aligning Vertical Lines in Your Printout 111 Cancelling Printing 112 Using the printer driver 113 Using the printer s control panel 113 Printing a Self Test 113 Printing Hex Dump 114 Chapter 5 Where To Get Help Technical Support Web Site 116 Contacting Customer Support 116 Before Contacting Epson 116 Help for Users in Europe 117 Help for Users in Indonesia 117 Help for Users i...

Page 7: ...4 Assembling the roll paper holder 134 Installing the roll paper holder 135 Loading roll paper 135 Removing roll paper 138 Additional Tractor Unit 138 Additional Sheet Guide 138 Chapter 7 Product Information Printer Parts 139 Printer Specifications 141 Mechanical 141 Electronic 144 Electrical 145 Environmental 146 Paper 147 Recommended printable area 151 Command Lists 153 Epson ESC P control codes...

Page 8: ...Index FX 890II FX 890IIN FX 2190II FX 2190IIN User s Guide Contents 8 ...

Page 9: ...s information on setting up the printer and installing the software User s Guide this manual Provides overall information and instructions on using the printer Network Guide FX 890IIN FX 2190IIN only Provides network information on management and printer settings FX 890II FX 890IIN FX 2190II FX 2190IIN User s Guide Where to Find Information 9 ...

Page 10: ...inutes before touching them Important Safety Instructions Read all of these safety instructions before using the printer In addition follow all warnings and instructions marked on the printer itself Some of the symbols used on your printer are to ensure safety and proper use of the printer Visit the following Web site to learn the meaning of the symbols http support epson net symbols When setting ...

Page 11: ... you use an extension cord with the printer make sure the total ampere rating of all devices pluggedintotheextensioncorddoesnotexceedthecord sampererating Also makesurethetotal ampere of all devices plugged into the electrical outlet does not exceed the electrical outlet s ampere rating Use only the power cord that comes with this product Use of another cord may result in fire or electric shock Th...

Page 12: ...e printer and refer servicing to qualified service personnel under the following conditions i If the power cord or plug is damaged ii If liquid has entered the printer iii If the printer has been dropped or the cabinet damaged iv If the printer does not operate normally or exhibits a distinct change in performance Do not use aerosol blowers which contain flammable gas inside or around this product...

Page 13: ...y safety such as transportation devices related to aviation rail marine automotive etc disaster prevention devices various safety devices etc or functional precision devices etc you should use this product only after giving consideration to including fail safes and redundancies into your design to maintain safety and total system reliability Because this product was not intended for use in applica...

Page 14: ...ed on the product For United Kingdom users Use of options Epson UK Limited shall not be liable against any damages or problems arising from the use of any options or consumable products other than those designated as Original Epson Products or Epson Approved Products by Epson UK Limited Safety information Warning This appliance must be earthed Refer to the rating plate for voltage and check that t...

Page 15: ... marked with the letter L If damage occurs to the plug replace the cord set or consult a qualified electrician Replace fuses only with a fuse of the correct size and rating For Singapore users Replace fuses only with fuses of the correct size and rating For German users Maschinenlärminformations Verordnung 3 GPSGV Der höchste Schalldruckpegel beträgt 70 dB A oder weniger gemäss EN ISO 7779 Das Ger...

Page 16: ...aths and tractor positions are best for your continuous paper printing needs See Loading continuous paper with the tractor on page 21 for tractor installation and paper loading instructions Using the push tractor positions If you often need to tear off sheets of continuous paper for example if you are printing purchase ordersorsalesslips itisbesttousethetractorinthefrontorrearpushposition Thisallo...

Page 17: ...ith the best paper jam prevention and allows you to load continuous paper from the front rear or bottom of the printer However you cannot use the tear off feature when the tractor is in the pull position Note To use the tractor in the pull position you can remove the tractor from the rear push position and reinstall it in the pull position or you can purchase the optional pull tractor unit FX 890I...

Page 18: ...rdinarycontinuous paper from the rear slot Please note that loading paper from the rear slot results in a curvedpaperpath whichmayaffectloadingperformance sousethefrontorbottom slot whenever possible Caution Do not load continuous paper with labels from the rear slot The labels may come off the backing sheets inside the printer and cause a paper jam Printing on single sheets cut sheet You can load...

Page 19: ...on Alsosetthelever to this position when using the rear push and pull tractors in combination Front push tractor position Forloadingcontinuouspaperusingthetractorinstalledinthefrontpushposition Alsosetthelever to this position when using the front push and pull tractors in combination Pull tractor position For loading continuous paper from the tractor installed on top of the printer in the pull po...

Page 20: ...m2 2 parts original 1 copy 1 3 parts original 2 copies 2 4 parts original 3 copies 4 5 parts original 4 copies 6 6 parts original 5 copies 7 7 parts original 6 copies 3 7 Labels 2 Cards 3 Envelopes 2 20 lb 4 24 lb 5 1 See the paper specifications in Paper on page 147 for more details 2 Changethelever positiontooneleveldowniftheprintedresultsaretoolight Changetheleverposition toonelevel up if the p...

Page 21: ...ng the tractor in the pull position on page 31 Using two tractors in a push pull combination on page 40 Using the tractor in the rear push position If your tractor is in the rear push position skip to Loading paper with the rear push tractor on page 22 for instructions on loading paper This section provides instructions for following Installing the tractor in the rear push position on page 22 Load...

Page 22: ...open the paper guide cover by pulling its back edge forward 2 Slide the sheet guide along the path and lift it at an angle to remove it 3 Lower the tractor into the printer s mounting slots and press down both ends of the tractor to make sure that it is firmly seated See Loading paper with the rear push tractor on page 22 for instructions on loading continuous paper using the rear push tractor Loa...

Page 23: ... the sheet guide is removed from the printer 3 Set the paper release lever to the rear push tractor position 4 Release the left and right sprockets by pulling the blue sprocket lock levers forward FX 890II FX 890IIN FX 2190II FX 2190IIN User s Guide Paper Handling 23 ...

Page 24: ...he printer indicates the point furthest to the left where printing can begin 6 Make sure your paper has a clean straight edge Then open both sprocket covers and fit the first four holes of the paper with the printable side down over the tractor pins 7 Close the sprocket covers 8 Slide the right sprocket to remove any slack in the paper then lock it in place by pushing the blue sprocket lock down F...

Page 25: ...in Removing continuous paper on page 42 to remove your printed document If the first line on your page appears too high or low you can change its position using the Micro Adjust function as described in Adjusting the top of form position on page 56 Caution Never use the knob to adjust the top of form position this may damage the printer or cause it to lose the top of form position Removing the tra...

Page 26: ...structionsin Removingthe tractor from the pull position on page 38 1 Makesuretheprinteristurnedoff Ifnecessary installthesheetguideonyourprinterasdescribed in the supplied setup sheet 2 If the sheet guide is installed in the front remove it by grasping the fins on both sides and pulling the guide slightly up and away from the printer 3 Insertthetractorintotheprinter smountingslotsandpressdownbothe...

Page 27: ...ut Your Printer s Default Settings on page 92 for more information Follow these steps to load paper using the front push tractor 1 Make sure the printer is turned off 2 Open the front cover Make sure the tractor is installed in the front push position 3 Remove the sub cover to insert the paper FX 890II FX 890IIN FX 2190II FX 2190IIN User s Guide Paper Handling 27 ...

Page 28: ...s Lever on page 19 for instructions 5 Release the left and right sprockets by pushing the blue sprocket lock levers backward 6 Slide the left sprocket approximately 12 mm 0 5 inch from the far left position and pull the blue leverforwardtolockitinplace Thenslidetherightsprockettomatchthewidthofyourpaper but do not lock it approx 12 mm 0 5 inch FX 890II FX 890IIN FX 2190II FX 2190IIN User s Guide P...

Page 29: ...he tractor pins Then close the sprocket covers 9 Slide the right sprocket to remove any slack in the paper then lock it in place by pushing the sprocket lock down 10 Close the front cover with the continuous paper positioned as shown below 11 Make sure the sheet guide is lying flat on the printer and slide the edge guides to the middle of the sheet guide FX 890II FX 890IIN FX 2190II FX 2190IIN Use...

Page 30: ...e appears too high or low you can change its position by using the Micro Adjust function as described in Adjusting the top of form position on page 56 Caution Never use the knob to adjust the top of form position this may damage the printer or cause it to lose the top of form position Removing the tractor from the front push position Follow these steps to remove the tractor from the front push pos...

Page 31: ...n provides instructions of following Installing the tractor in the pull position on page 31 Loading paper with the pull tractor on page 33 Removing the tractor from the pull position on page 38 Installing the tractor in the pull position Before installing the tractor in the pull position remove it from its current position If the tractor is in the front push position remove it by pressing the trac...

Page 32: ...ling its back edge forward 2 Lift the printer cover and pull it straight up 3 Press the tabs on each side of the paper tension unit upward and pull it towards you Store the paper tension unit in a safe place FX 890II FX 890IIN FX 2190II FX 2190IIN User s Guide Paper Handling 32 ...

Page 33: ...e of the sheet guide 5 Lower the tractor into the printer s mounting slots and press down both ends of the tractor to make sure it is firmly seated Loading paper with the pull tractor Follow these steps to load paper using the pull tractor FX 890II FX 890IIN FX 2190II FX 2190IIN User s Guide Paper Handling 33 ...

Page 34: ... removed the tractor is installed in the pull position the sheet guide is lying flat on the printer 2 Set the paper release lever to the pull tractor position 3 Release the sprockets by pulling the sprocket lock levers forward FX 890II FX 890IIN FX 2190II FX 2190IIN User s Guide Paper Handling 34 ...

Page 35: ...erisoffbeforeyouinsertthepaperinthepaperslot Ifyouinsertthepaperwhileit is on a paper jam may occur 6 Insert the paper into the rear front or bottom paper slot as shown in the illustration below until it emerges between the platen and the ribbon guide Then pull up the paper until the perforation between the first and second pages is even with the top of the printer s ribbon Rear slot Load paper in...

Page 36: ... slot with the printable side facing up 7 Fit four holes of the paper over the tractor pins on both sprockets Then close the sprocket covers 8 Slide the right sprocket to remove any slack in the paper then lock it in place FX 890II FX 890IIN FX 2190II FX 2190IIN User s Guide Paper Handling 36 ...

Page 37: ...rint quality may deteriorate 13 If necessary follow the steps in Adjusting the top of form position on page 56 to adjust the current position of the paper Caution Never use the knob to adjust the top of form position this may damage the printer or cause it to lose the top of form position 14 Attach the printer cover by inserting the front tabs into the slots on the printer then lowering the cover ...

Page 38: ...ractor Follow these steps to remove continuous paper from the pull tractor 1 After you finish printing tear off the paper supply at the perforation nearest the paper entry slot 2 To feed paper forward and eject it hold down the LF FF button Caution Never press the Load Eject or Tear Off Bin button when you are using the pull tractor the paper could come off the pull tractor and jam the printer Rem...

Page 39: ...tor s lock tabs tilt the tractor toward you and lift it off the printer 5 Storethe tractorinasafeplace orinstallitin thefrontorrearpushpositionas describedin Using thetractorinthefrontpushposition onpage26or Usingthetractorintherearpushposition on page 21 6 Reinstall the paper tension unit by lower it onto the printer s mounting pegs Then press down on both ends of the unit until it clicks into pl...

Page 40: ...3 Set the paper release lever to the front or rear push position depending on the position of your push tractor 4 Turn on the printer and press the Load Eject button to advance the paper to the top of form position Then press the LF FF button until the perforation between the first and second pages is even with the top of the printer s ribbon Caution Never use the knob to move the paper this may d...

Page 41: ...ion with the printer cover opened or removed but maximum safety and print speed are achieved when the cover is closed 11 The printing starts from the current position without advancing the paper After you finish printing tear off the printed document at the perforation nearest the paper exit slot The table below summarizes the various methods of feeding continuous paper with two tractors and shows...

Page 42: ...See Adjusting the tear off position on page 55 for more information Caution Never use the tear off function with the pull tractor the paper may come off the pull tractor and jam the printer After you finish printing tear off the printed document at the perforation nearest the paper exit slot Never use the tear off function to feed continuous paper with labels backward they may come off their backi...

Page 43: ...rd to the standby position Then open the sprocket covers of the tractor and remove the paper Caution Always tear off the printed document before you press the Load Eject button Reverse feeding several pages at a time may cause a paper jam Advancing paper to the tear off position automatically To automatically advance the printed documents to the tear off position turn on the auto tear off mode and...

Page 44: ...d and the paper slots you can use with each paper type See Adjusting the Paper Thickness Lever on page 19 for instructions on how to adjust the paper thickness lever Paper type Available paper slot s Ordinary paper front and rear Multipart forms carbonless 2 parts original and one copy front and rear 3 parts original and two copies 4 parts original and three copies 5 parts original and four copies...

Page 45: ...ide Front sheet guide Installing the front sheet guide Follow these steps to install the sheet guide in the front position 1 Open the front cover and then remove the tractor unit if it is installed in the front push position To remove it press the tractor s lock tabs then tilt the tractor up and pull it out of the printer 2 Fit the plastic tabs on the sheet guide over the mounting notches on the p...

Page 46: ...per set the paper thickness lever located under the printer cover to 0 as shown below If you are loading a single sheet multipart form set the paper thickness lever to the proper position as shown in the table below Multipart form type Paper thickness lever position 2 parts original 1 copy 1 3 parts original 2 copies 2 4 parts original 3 copies 4 5 parts original 4 copies 6 6 parts original 5 copi...

Page 47: ...per place your hand flat on the paper and push it to completely into the feed slot Ifthefirstlineonyourpageappearstoohighorlow youcanadjustitspositionusingtheMicroAdjust function See Adjusting the top of form position on page 56 Loading paper in the rear sheet guide Follow these steps to load paper in the rear sheet guide Note Make sure the sheet guide is in the upright position FX 890II FX 890IIN...

Page 48: ...e the paper release lever to the single sheet position 2 Turn on the printer if necessary 3 Slide the left edge guide until it locks in place next to the triangle mark on the sheet guide Then adjust the right edge guide to match the width of your paper FX 890II FX 890IIN FX 2190II FX 2190IIN User s Guide Paper Handling 48 ...

Page 49: ... adjust the top of form position See Adjusting the top of form position on page 56 for more information Loading Special Paper Multipart forms Your printer can print on both single sheet and continuous multipart forms It can use multipart forms with up to six parts including the original Caution Use only carbonless multipart forms When using multipart forms with a line of glue at the top of the for...

Page 50: ...Do not load paper that is curled or has been folded Labels When printing on labels use only the type of labels that are mounted on continuous backing sheets withsprocketholesforusewithatractorfeeder Donottrytoprintonsinglesheetswithlabelsbecause the printer may not feed labels on a shiny backing sheet properly Thick paper such as continuous paper with labels requires a straight or almost straight ...

Page 51: ...thfrom the rear slot is curved labels may come off their backing sheets inside the printer and cause a paper jam Do not load paper that is curled or has been folded Tear off and eject labels When using continuous forms always tear off and eject labels as described below 1 Tear off the last label form that has entered the printer perforation nearest the paper entry slot 2 Press the LF FF button to ...

Page 52: ...own and push them completely into the feed slot Note Be sure to place the envelope printable side down and insert the top edge of the envelope into the printer first The print head must not print past the left or right edge of the envelope or other thick paper Make sure your application program prints entirely within the recommended printable area of your envelope See Recommended printable area on...

Page 53: ...f Binbuttonseveraltimesuntiltheleft Tear Off Bin light is on Use postcards under the following temperature and humidity conditions Temperature 15 to 25 C 59 to 77 F Humidity 30 to 60 RH When loading A6 size cards always load them long edge first Switching Between Continuous Paper and Single Sheets You can easily switch between continuous paper with a rear push tractor and single sheets without rem...

Page 54: ... next step Reverse feeding several pages at a time may cause a paper jam 2 Press the Load Eject button to feed the continuous paper backward to the standby position The paper is still attached to the push tractor but is no longer in the paper path 3 Move the sheet guide to the upright position 4 Set the paper release lever to the single sheet position 5 Load single sheets as described in Loading S...

Page 55: ...ise adjustments to the top of form and tear off positions Adjusting the tear off position Ifyourpaperperforationisnotalignedwiththetear offedge youcanusetheMicroAdjustfunctionto move the perforation to the tear off position Caution Neverusetheknobtoadjustthetear offposition thismaydamagetheprinterorcauseittolosethe tear off position Note The tear off position setting remains in effect until you ch...

Page 56: ...nd a maximum tear off position If you try to adjust the tear off position beyond these limits the printer beeps and stops moving the paper 4 Tear off the printed pages 5 Press the Pause button to save the adjusted setting Whenyouresumeprinting theprinterautomaticallyfeedsthepaperbacktothetop of formposition and begins printing Adjusting the top of form position The top of form position is the posi...

Page 57: ...p of form position 1 Make sure the printer is turned on 2 Load paper then lift up the printer cover Note If the tractor is in a push position press the Load Eject button to advance continuous paper to the current top of form position 3 Hold down the Pause button for about three seconds The Pause light starts flashing and the printer enters the Micro Adjust mode 4 Press the LF FF button to move the...

Page 58: ...n 5 After you set the top of form position press the Pause button to save the adjusted setting Note For your safety Epson recommends operating the printer with the printer cover closed The printer will function with the printer cover opened or removed but maximum safety and print speed are achieved when the cover is closed FX 890II FX 890IIN FX 2190II FX 2190IIN User s Guide Paper Handling 58 ...

Page 59: ...isplays on the following pages may differ depending on the version of the printer driver When you wish to reinstall or upgrade the printer driver uninstall the printer driver that has been installed already Using the Printer Driver You can access the printer driver from your Windows applications or from the Start menu Screens and procedures that appear in this manual are mostly from Windows 10 unl...

Page 60: ...t so you must verify that the printer driver settings match your requirements Accessing the printer driver from Windows applications Follow these steps to access the printer driver from a Windows application Note The screen shots used in this procedure are from the Windows 10 operating system The content on the screen may vary depending on your computer s environment 1 Select Print from the File m...

Page 61: ... Preferences window appears and you see the Layout Paper Quality User Defined Paper and Extension Settings menus These menus contain the printer driver settings FX 890II FX 890IIN FX 2190II FX 2190IIN User s Guide Printer Software 61 ...

Page 62: ... to access the printer driver from the Start menu Note The screen shots used in this procedure are from the Windows 10 operating system The content on the screen may vary depending on your computer s environment 1 For Windows 10 Right clicktheStartmenu clickControlPanel andthenclickViewdevicesandprintersfrom the Hardware and Sound category FX 890II FX 890IIN FX 2190II FX 2190IIN User s Guide Print...

Page 63: ... For Windows 7 Server 2008 R2 Click Start and click Devices and Printers For Windows Vista Server 2003 R2 Click Start click Control Panel click Hardware and Sound and then click Printers For Windows XP Professional edition Click Start and click Printers and Faxes For Windows XP Home edition Click Start click Control Panel first and then click Printers and Faxes FX 890II FX 890IIN FX 2190II FX 2190...

Page 64: ...lick Printing preferences The screen displays the Layout Paper Quality User Defined Paper and Extension Settings menus These menus display the printer driver settings FX 890II FX 890IIN FX 2190II FX 2190IIN User s Guide Printer Software 64 ...

Page 65: ... for more information Changing the printer driver settings Your printer driver has two menus from which you can change the printer driver settings Layout Paper Quality You can also change settings on the Utility menu in the printer software For an overview of the available settings see Printer Driver Settings Overview on page 66 Note ForWindowsXP youcanalsoviewonlinehelpbyright clickingitemsinthed...

Page 66: ...u have checked your printer driver settings and changed them if necessary you are ready to print Printer Driver Settings Overview The following tables show the Windows printer driver settings Note that not every setting is available in all versions of Windows For more details see Help for the printer driver FX 890II FX 890IIN FX 2190II FX 2190IIN User s Guide Printer Software 66 ...

Page 67: ...dard Expanded and None Bit Image printing When Standard or Expanded is selected the printer uses the device fonts Expanded includes more fonts than Standard When None is selected the printer uses bit map images instead of the device fonts For details on the fonts which are included in each table see Electronic on page 144 Printable Area If Standard is selected the size of the top margin is 4 2mm I...

Page 68: ...indows 10 Right clicktheStartmenu clickControlPanel andthenclickViewdevicesandprintersfrom the Hardware and Sound category For Windows 8 8 1 Click Desktop on the Start screen move the cursor to the top right corner of the screen click Settings and then click Control Panel Next click View devices and printers from the Hardware and Sound category For Windows 7 Click Start and click Devices and Print...

Page 69: ...erSettingsutilitydialogboxwhereyoucan change the printer settings Using EPSON Status Monitor 3 EPSON Status Monitor 3 allows you to monitor your printer s status alerts you when printer errors occur and provides troubleshooting instructions when needed EPSON Status Monitor 3 is available when The printer is connected directly to the host computer via the parallel port LPT1 or the USB port Your sys...

Page 70: ...Right clicktheStartmenu clickControlPanel andthenclickViewdevicesandprintersfrom the Hardware and Sound category For Windows 8 8 1 Click Desktop on the Start screen move the cursor to the top right corner of the screen click Settings and then click Control Panel Next click View devices and printers from the Hardware and Sound category For Windows 7 Click Start and click Devices and Printers For Wi...

Page 71: ...bar Thesetting sexampleisshownon the right window By clicking the shortcut icon you can access the Monitoring Preferences dialog box easily Allow monitoring of shared printers When this check box is selected a shared printer can be monitored by other PCs Note If the server s OS isWindows Vista select RunasAdministratorwhen opening the printer properties before checking Note Click the Default butto...

Page 72: ...printer status information in this window Note It might not be possible to retrieve the printer status during printing In this situation click the EPSON Status Monitor 3 button in the Utility tab and use the printer with the status window left open Installing EPSON Status Monitor 3 Follow the steps below to install EPSON Status Monitor 3 1 Make sure that the printer is off and that Windows is runn...

Page 73: ...rect settings If you turned off the printer during the adjustment process restart Bi D Adjustment again Do not turn off Packet mode setting Network connection is not supported Make sure that the printer s status is ready before making Bi D Adjustment If Bi D Adjustment is not printed properly set the printer s font setting to default and try again 1 Open theUtilitymenu thenclickthe Bi DAdjustmenti...

Page 74: ...nd the vertical line that is aligned the best Then select the corresponding line number in the Bi D Adjustment window 5 Click Set The adjustment value will be stored in the printer Using Printer Setting This utility tool allows you to display current settings stored in the printer change settings of the printer and read settings stored in the file or save settings to the file FX 890II FX 890IIN FX...

Page 75: ...ng printer setting To change printer settings follow the steps below 1 Open the Utility menu then click the Printer Setting icon To find out how to open the Utility menu see Using the Printer Driver on page 59 The Printer Setting windows appears 2 Changethenecessaryprintersettings Fordetailsonhowtousethistool refertotheprinterdriver Help FX 890II FX 890IIN FX 2190II FX 2190IIN User s Guide Printer...

Page 76: ...on page 80 Note When sharing the printer be sure to set EPSON Status Monitor 3 so that the shared printer can be monitored on the printer server and clients See Setting up EPSON Status Monitor 3 on page 70 When connecting to a shared printer beyond a router error and warning notification for shared printers during printing is not available in some cases because of the router s settings Theprinters...

Page 77: ...For Windows Vista Click Start click Control Panel click Hardware and Sound and then click Printers 2 For Windows 10 8 8 1 or 7 Right click your printer icon click Printer properties and then click the Sharing tab in the appearing screen For Windows Vista or XP Right click your printer icon and click Sharing in the menu that appears For Windows XP if the following menu appears click either Network ...

Page 78: ...ts on page 80 Sharing the printer when the firewall is on Note To share files and printers when Windows Firewall is on perform the following procedure Windows 10 1 Right click the Start menu click Control Panel click System and Security and then click Windows Firewall 2 Click Turn Windows Firewall on or off in the window on the left Make sure that Block all incoming connections including those in ...

Page 79: ...then click Windows Firewall 2 Click Turn Windows Firewall on or off in the window on the left Make sure that Block all incoming connections including those in the list of allowed programs is not selected and then click OK 3 Click Allow a program or feature through Windows Firewall in the window on the left 4 Select Share file and printer and then click OK Windows Vista 1 Click Start and then click...

Page 80: ...ronastandardnetworksystemusingtheserver Microsoft workgroup If you cannot access the shared printer due to the network system ask the administrator of the network for assistance This section describes how to install the printer driver by accessing the shared printer from the Printers folder You can also access the shared printer from Network Neighborhood or My Network on the Windows desktop When y...

Page 81: ...2 Right click the icon for the printer you wish to change the settings for and then click Printer properties FX 890II FX 890IIN FX 2190II FX 2190IIN User s Guide Printer Software 81 ...

Page 82: ...3 Click the Ports tab and then click Add Port 4 When the Printer Ports window appears select Local Port and then click New Port FX 890II FX 890IIN FX 2190II FX 2190IIN User s Guide Printer Software 82 ...

Page 83: ...e server and clients use different OS The on screen displays on the following pages may differ depending on the version of Windows OS Note When installing in Windows 10 8 8 1 7 Vista and XP clients you must access Windows 10 8 8 1 7 Vista and XP with the Administrator If the computers of the server and clients have the same OS and the same architecture you do not have to install the printer driver...

Page 84: ... Select the name of the printer then click OK Then follow the on screen instructions Note If you also want to install EPSON Status Monitor 3 see Installing EPSON Status Monitor 3 on page 72 for instructions If you want to use EPSON Status Monitor 3 for the shared printer reinstall the printer driver as instructed in Setting for the clients on page 80 after installing the printer driver and EPSON S...

Page 85: ...icon on the task bar 2 When cancelling all printing documents select Cancel All Documents on the Printer menu Whencancellingaspecifieddocument selectadocumentyouwanttocancelandselectCancelon the Document menu The printing job is canceled Uninstalling the Printer Software When you wish to reinstall or upgrade the printer driver uninstall the printer driver that has been installed already FX 890II F...

Page 86: ...Monitoring Preferences dialog box Uninstalling the printer driver and EPSON Status Monitor 3 1 Quit all applications 2 Right click the Start menu and then click Control Panel 3 Click Uninstallaprogram Windows 10 8 8 1 7 or Vista or double click the AddorRemove Programs icon Windows XP 4 Select the desired printer then right click Uninstall Change FX 890II FX 890IIN FX 2190II FX 2190IIN User s Guid...

Page 87: ...ake sure that nothing is selected in the Printer Model tab Open Utility tab and select EPSON Status Monitor 3 for EPSON XXXXXX ESC P and click OK You can uninstall only the EPSON Status Monitor 3 6 Follow the on screen instructions FX 890II FX 890IIN FX 2190II FX 2190IIN User s Guide Printer Software 87 ...

Page 88: ...clearsbufferandreturns to its default settings 3 Pitch Item U button Selects one of the pitch settings To select a pitch see Selecting a Font and Pitch on page 90 When the printer enters the Default Setting mode the buttonworksasan ItemU button You can press the ItemU button to select the previous menu 4 Menu When you press the Pitch and Tear Off Bin buttons at the same time the printer enters or ...

Page 89: ...inuous paper from the standby position Feeds continuous paper backward to the standby position if a sheet is loaded 7 Micro Adjust When you hold down the Pause button for three seconds the printer enters the Micro Adjust mode In this mode you can press the LF FF and Load Eject buttons to adjust the top of form or tear off position See Using the Micro Adjust Function on page 55 8 LF FF button Feeds...

Page 90: ...selected Both the lights are off when bin 1 of the optional cut sheet feeder is selected The right light is on when bin 2 of the optional cut sheet feeder is selected 13 Pitch lights Indicate which pitch is selected 14 Font lights Indicate which font is selected Selecting a Font and Pitch You can select one of the printer s five fonts and pitch by using the buttons on the printer s control panel a...

Page 91: ...the three Font lights indicate the desired font as shown below N N O USD N O N HSD N O O Draft O N N Roman O N O Sans Serif O On N Off 3 Press the Pitch button until the Three Pitch lights indicate the desired pitch as shown below N N O 10 cpi N O N 12 cpi N O O 15 cpi O N N 17 cpi O N O 20 cpi O O O PS O On N Off 4 Make sure that the desired font and pitch are selected FX 890II FX 890IIN FX 2190I...

Page 92: ...e Changing default settings on page 97 Item Setting value 1 Page length for front tractor 2 Length in inches 3 3 5 4 5 5 6 7 8 8 5 11 70 6 12 14 17 Page length for rear tractor 2 Length in inches 3 3 5 4 5 5 6 7 8 8 5 11 70 6 12 14 17 Skip over perforation Off On Auto tear off 2 Off On Auto tear off wait time 2 0 5 seconds 3 seconds Auto line feed Off On Print direction Bi D Uni D Software ESC P I...

Page 93: ...Filtering 3 Off On Link Speed Duplex 3 Auto 10BASE T Half Duplex 10BASE T Full Duplex 100BASE T Half Duplex 100BASE T Full Duplex Baud rate 3 19200 BPS 9600 BPS 4800 BPS 2400 BPS 1200 BPS 600 BPS Parity 3 None Odd Even Ignore Data length 3 8 bit 7 bit Auto CR IBM PPDS 3 Off On Manual feed wait time 1 second 1 5 seconds 2 seconds 3 seconds Buzzer Off On IBM character table 3 4 Table 2 Table1 Low no...

Page 94: ...automatically moves the unused paper back to the top of form position and starts printing so you can use all of the next page When auto tear off is off and you are using continuous paper with the front or rear push tractor you need to move the perforation to the tear off position manually by pressing the Tear Off Bin button See Using the tear off function on page 42 for more information Auto tear ...

Page 95: ...an select Parallel Serial USB and Network depending on which interface your computer uses Note Serial and Network are available only on Network compatible models Auto I F interface wait time This setting is effective only when I F mode is set to Auto This setting specifies how long the printer waits when no longer the printer receives data You can specify 10 seconds or 30 seconds for the auto inte...

Page 96: ...On for systems that do not have CR code control Manual feed wait time The amount of wait time between the time paper is inserted into the sheet guide and when it is fed If the paper feeds before adjusting its position you can increase the wait time Buzzer beeper The printer beeps when an error occurs See Using the Error Indicators on page 101 for more information on printer errors If you do not wa...

Page 97: ...ets you need to load a new sheet of paper each time the printer ejects a printed sheet from the sheet guide For your safety Epson recommends operating the printer with the printer cover closed The printer will function with the printer cover opened or removed but maximum safety and print speed are achieved when the cover is closed If you turn off the printer prior to exiting default setting mode a...

Page 98: ...d parameter until you find the desired setting After setting the selected parameter to the desired setting you may either continuetomakechangestootherparametersbypressingtheItemDbuttonortheItemUbutton or exit the default setting mode by pressing the Menu Pitch and Tear Off Bin buttons Note You cannot change the setting value to the previous item You have to press the Set button until the value you...

Page 99: ...ock Reset function Unlock Lock Menu function Unlock Lock 1 Settings with bold weight mean the standard factory settings Note Before entering the lock out setting mode you need to load A4 or letter size single sheet paper or continuous paper that is at least 210 mm 8 3 inches wide See Loading Continuous Paper on page 21 and Loading Single Sheets on page 44 for instructions on loading continuous pap...

Page 100: ...ItemU button The printer prints the first menu and the current value of the menu 4 Press the ItemD button or the ItemU button to select the menu parameters which you wish to change Press the Set button to scroll through the values within the selected parameter until you find the desired setting After setting the selected parameter to the desired setting you may continuetomakechangestootherparamete...

Page 101: ...nd reload your paper correctly See Loading Continuous Paper on page 21 or Loading Single Sheets on page 44 for paper loading instructions O Pause The paper release lever is set to the wrong position Set the paper release lever to the position for the paper source you want to use If paper from another paper source is currently in the paper path press the Load Eject button to eject the paper then mo...

Page 102: ...operating your printer have simple solutions Use the information in this section to find the source of and solution to printer problems that occur Determine the type of problem that occurred and see the appropriate section below Power supply problems on page 103 Paper Handling on page 108 Printing position problems on page 107 Printing or printout quality problems on page 103 You can also use the ...

Page 103: ...oltage rating does not match the voltage of your electrical outlet Check the printer and the outlet voltage ratings If the voltages do not match unplug the printer immediately and contact your dealer Warning Do not reconnect the power cord to an electrical outlet with the wrong voltage for your printer The printer does not work and the control panel lights are off Cause What to do The printer is t...

Page 104: ... off timer is enabled the printer turns off even if the power switch is in the ON position Turn off the power switch and then turn it back on See Default Setting mode on page 92 The printer does not print when the computer sends data Cause What to do The printer is paused Press the Pause button to turn off the Pause light The interface cable is not plugged in securely Check that both ends of the c...

Page 105: ...ectly for your paper Move the paper thickness lever to a lower setting See Adjusting the Paper Thickness Lever on page 19 for instructions The ribbon is worn out Replace the ribbon cartridge as described in Replacing the Ribbon Cartridge on page 119 Part of the printout is missing or dots are missing in random positions Cause What to do The ribbon has too much slack the ribbon has comeloose orther...

Page 106: ... page 144 and your computer documentation The wrong character table is selected in your software Select the correct character table using your software or the default settingmode Thecharactertablesettinginyoursoftware overrides settings made in the default setting mode The printer you want to use is not selected in your software Choose the correct printer from the Windows desktop or in your applic...

Page 107: ...the Windows desktop or in your application before printing You moved the paper using the knob while the printer was on Adjust the top of form position using the Micro Adjust function See Adjusting the top of form position on page 56 Caution Never use the knob to adjust the top of form position this may damage the printer or cause it to lose the top of form position The printer prints on or too far...

Page 108: ...ed too far to the left or right far the printer to detect that it is there Move the paper and the edge guides a little to the left or right The paper is not loaded properly See LoadingSingleSheets onpage44forinstructionsonloading single sheet paper The paper thickness lever is set incorrectly Setthepaper thicknesslevertomatchthethicknessofyourpaper See Adjusting the Paper Thickness Lever on page 1...

Page 109: ...ou want to use The paper thickness lever is set incorrectly Setthepaper thicknesslevertomatchthethicknessofyourpaper See Adjusting the Paper Thickness Lever on page 19 Your paper may be the wrong size or thickness for the printer Make sure that the paper size and thickness are within the specified ranges See Paper on page 147 for information on the continuous paper specifications The paper supply ...

Page 110: ...esattheperforation ThenpresstheLoad Eject button to feed the paper backward to the standby position Network problems The printer does not print when using a network Cause What to do The network setting is wrong Check whether or not print jobs from other computers are being printed through the network When the print job is executed the printer or your computer may have a problem Check the connectio...

Page 111: ... the paper out of the printer Caution Use the knob on the right side of the printer to clear paper jams only when the printer is off Otherwise you may damage the printer or change the top of form or tear off position 5 Close the printer cover then turn on the printer Make sure the Paper Out and Pause lights are off Aligning Vertical Lines in Your Printout If you notice that the vertical lines in y...

Page 112: ... to perform bidirectional adjustment 1 Make sure paper is loaded and the printer is turned off Caution Whenever you turn off the printer wait at least five seconds before turning it back on otherwise you may damage the printer 2 While holding down the Pause button turn on the printer The printer enters the bidirectional adjustment mode and then prints instructions and the first set of alignment pa...

Page 113: ...s probably caused by your printer driver settings application settings computer or interface cable Be sure to use a shielded interface cable If the self test does not print properly there is a problem with the printer See Problems and Solutions on page 102 for possible causes and solutions to the problem You can print the self test using either single sheets or continuous paper See Loading Continu...

Page 114: ...p printing If paper remains in the printer press the Load Eject button to eject the printed page Then turn off the printer Caution Do not turn off the printer while it is printing the self test Always press the Pause button to stop printing and the Load Eject button to eject the printed page before you turn off the printer Printing Hex Dump If you are an experienced user or a programmer print a he...

Page 115: ...rs printed in the right column with the printout of the hexadecimal codes you can check the codes being received by the printer If characters are printable they appear in the right column as ASCII characters Nonprintable codes such as control codes are represented by dots 4 To exit the hex dump mode press the Pause button and eject the printed page s and turn off the printer Caution Donotturnoffth...

Page 116: ...ontacting Epson If your Epson product is not operating properly and you cannot solve the problem using the troubleshooting information in your product documentation contact customer support services for assistance If customer support for your area is not listed below contact the dealer where you purchased your product Customer support will be able to help you much more quickly if you give them the...

Page 117: ...les Enquiries questions through e mail Help for Users in Singapore Sources of information support and services available from Epson Singapore are World Wide Web http www epson com sg Information on product specifications drivers for download Frequently Asked Questions FAQ Sales Enquiries and Technical Support via e mail are available Help for Users in Malaysia Contacts for information support and ...

Page 118: ... available Help for Users in the Philippines Toobtaintechnicalsupportaswellasotheraftersalesservices usersarewelcometocontacttheEpson Philippines Corporation World Wide Web http www epson com ph Information on product specifications drivers for download Frequently Asked Questions FAQ and E mail Enquiries are available FX 890II FX 890IIN FX 2190II FX 2190IIN User s Guide Where To Get Help 118 ...

Page 119: ... not covered by Epson s warranties Your printer uses the following ribbon cartridge Epson black ribbon cartridge FX 890II FX 890IIN S015329 FX 2190II FX 2190IIN S015335 For users in America S015327 For worldwide users Replacing the ribbon cartridge Follow these steps to install or replace the ribbon cartridge Warning You need to move the print head by hand to replace the ribbon cartridge If you ha...

Page 120: ...he upright position then pull it up to remove it 4 Slide the print head so that it does not hit the paper tension unit Caution Never move the print head while the printer is turned on this can damage the printer FX 890II FX 890IIN FX 2190II FX 2190IIN User s Guide Options and Consumables 120 ...

Page 121: ...the print head 6 Grasp the used cartridge by its handle and pull it up and out of the printer 7 Hold both sides of the ribbon guide and pull it until it is out of the cartridge FX 890II FX 890IIN FX 2190II FX 2190IIN User s Guide Options and Consumables 121 ...

Page 122: ...o fit the plastic hooks into the slots on the printer Note Do not touch the white cable inside the printer 9 Slide the ribbon guide into the print head until it clicks in place Caution When inserting the ribbon guide press firmly until it clicks FX 890II FX 890IIN FX 2190II FX 2190IIN User s Guide Options and Consumables 122 ...

Page 123: ...rting the front tabs into the slots on the printer and lowering the cover into place Cut Sheet Feeder Two types of optional cut sheet feeders are available for use with your printer as shown below Single bin cut sheet feeder FX 890II FX 890IIN C80637 FX 2190II FX 2190IIN C80639 FX 890II FX 890IIN FX 2190II FX 2190IIN User s Guide Options and Consumables 123 ...

Page 124: ...erinabin see Loadingpaperinthesingle bincut sheetfeeder on page126 or Loading paper in the high capacity cut sheet feeder on page 129 Note You cannot install and use the optional cut sheet feeders when the tractor unit is installed in the pull position See Removing the tractor from the pull position on page 38 for instructions on removing the tractor from the pull position Installing the cut sheet...

Page 125: ...the cut sheet feeder in both hands pressdown on the latch levers and fit the notches over the printer s mounting posts as shown below Release the latch levers to lock the feeder in place If you are installing the high capacity or double bin cut sheet feeder see the following illustration single bin cut sheet feeder FX 890II FX 890IIN FX 2190II FX 2190IIN User s Guide Options and Consumables 125 ...

Page 126: ...gle bin high capacity ordouble bincut sheetfeeder For instructions see Loading paper in the single bin cut sheet feeder on page 126 or Loading paper in the high capacity cut sheet feeder on page 129 Loading paper in the single bin cut sheet feeder The single bin cut sheet feeder holds up to 50 sheets of paper Follow these steps to load paper in the single bin cut sheet feeder Caution Do not load m...

Page 127: ...printer cover is set to 0 2 Slide the left paper guide of the cut sheet feeder so it is aligned with the triangle mark Next slide the right paper guide to roughly match the width of your paper Slide the paper support midway between the paper guides 1 Paper guides 2 Paper support FX 890II FX 890IIN FX 2190II FX 2190IIN User s Guide Options and Consumables 127 ...

Page 128: ...lat surface to even up the stack 5 Insert the paper stack printable side down along the left paper guide 6 Adjust the right paper guide so that it matches your paper s width Make sure the position of the guide allows the paper to move up and down freely 7 Push back the paper set levers to clamp the paper against the guide rollers FX 890II FX 890IIN FX 2190II FX 2190IIN User s Guide Options and Con...

Page 129: ... holds up to 150 sheets of paper or up to 25 envelopes Follow these steps to load paper in the high capacity cut sheet feeder Caution Do not load multipart forms carbon paper or labels in the high capacity cut sheet feeder 1 Set the paper release lever to the single sheet position Also make sure the paper thickness lever located under the printer cover is set to 0 if you are using ordinary single ...

Page 130: ...k it in place by pushing backitslocklever Next slidetherightpaperguidetoroughlymatchthewidthofyourpaper Slide the paper support to midway between the paper guides 4 Pull both paper set levers forward until the paper guides retract and lock open to allow paper loading FX 890II FX 890IIN FX 2190II FX 2190IIN User s Guide Options and Consumables 130 ...

Page 131: ...e allows the paper to move up and down freely If you are loading envelopes push back the envelope levers as shown below 8 Push back the paper set levers to clamp the paper or envelopes against the guide rollers The cut sheet feeder automatically loads paper when the printer receives data Ifthefirstlineonyourpageappearstoohighorlow youcanadjustitspositionusingtheMicroAdjust function See Adjusting t...

Page 132: ...0640 Follow these steps to assemble the double bin cut sheet feeder 1 Remove the gear cover from the back of the high capacity cut sheet feeder by pressing down the tab and pulling the cover backward Store it in a safe place 2 Hold the single bin cut sheet feeder in both hands Fit the notches in the single bin cut sheet feeder over the mounting posts on the back of the high capacity cut sheet feed...

Page 133: ...selection purposes It is best to select the paper path in your application program because software settings usually override the printer s control panel settings However if you cannot select the paper path in your application selectapathbypressingtheTearOff Binbuttonuntilthelightindicatesthebinyouwant as shown below O On N Off F Flashing The cut sheet feeder you selected automatically loads paper...

Page 134: ...ese steps to assemble the roll paper holder 1 Fit the arc bearings into the stand as shown 2 Place the base plate on the stand and fasten the two together with the plastic spacing clips Make sure you orient the stand and base plate as shown below 3 Hook the tension lever onto both ends of the stand as shown below While pulling up on the tension lever fit the wire ends ofthe tension lever into the ...

Page 135: ...nter into the two holes in the base plate Caution The roll paper holder is not fastened to the printer only the printer s weight and the two positioning pegs hold it in place If you pick up the printer be careful not to drop the roll paper holder Loading roll paper Follow these steps to load a roll of paper after you install the roll paper holder 1 Makesuretheprinteristurnedoffandthesheetguideisre...

Page 136: ...ur roll paper 3 Cut the leading edge of the roll paper straight across 4 Insert the roll paper holder shaft into the center of the paper roll as shown 5 Placetheshaftandpaperrollontherollpaperholdersothepaperfeedsfromthebottomoftheroll Then turn on the printer FX 890II FX 890IIN FX 2190II FX 2190IIN User s Guide Options and Consumables 136 ...

Page 137: ...ll paper to separate the printout from the unused paper Slide the edge guides to the middle of the sheet guide You are now ready to print When you finish printing press the LF FF button to advance the paper then tear off the paper using the tear off edge of the paper tension unit pull it toward you for a clean cut FX 890II FX 890IIN FX 2190II FX 2190IIN User s Guide Options and Consumables 137 ...

Page 138: ...3791 For worldwide users C933801 For users in India By using two tractors at the same time the paper jams are reduced and continuous paper feeding is improved For details on installing the additional tractor unit see Using two tractors in a push pull combination on page 40 Additional Sheet Guide You can install the optional sheet guide C933781 for the FX 890II FX 890IIN C933811 for the FX 2190II F...

Page 139: ...Information Printer Parts 1 sheet guide 2 paper guide cover 3 printer cover 4 front cover 5 power switch 6 control panel 7 paper release lever FX 890II FX 890IIN FX 2190II FX 2190IIN User s Guide Product Information 139 ...

Page 140: ...e 1 14 parallel interface 15 LAN port 1 2 16 sprockets 3 17 AC inlet 18 wing 19 paper thickness lever 1 For Network compatible model 2 For Ethernet cable Category 5 or better shielded twisted pair cable 3 tractor unit parts FX 890II FX 890IIN FX 2190II FX 2190IIN User s Guide Product Information 140 ...

Page 141: ...raphics printing Unidirec tional text or graphics printing can be selected using software com mands Line spacing 1 6 inch or programmable in 1 432 inch increments Printable columns FX 890II FX 890IIN 80 columns at 10 cpi FX 2190II FX 2190IIN 136 columns at 10 cpi Resolution Maximum 240 144 dpi near letter quality Paper feed methods Friction front rear Push tractor front rear Pull tractor front bot...

Page 142: ...h capacity cut sheet feeder up to 150 sheets of 82 g m 22 lb paper up to 25 plain or bond envelopes up to 30 airmail envelopes Note The total thickness of the paper stack can be up to 15 mm 0 59 inch Reliability Total print volume 52 million lines except print head MTBF 25 000 POH 25 duty Print head life 400 million strokes wire 2 Approx 400 million characters Draft 10 cpi 14 dots character FX 890...

Page 143: ...knob Depth 320 mm 12 6 inches not including the sheet guide Weight approx 9 4 kg 20 7 lb Ribbon Black ribbon cartridge S015329 for FX 890II FX 890IIN S015335 for FX 2190II FX 2190IIN For users in America S015327 for FX 2190II FX 2190IIN For worldwide users Ribbon life approx 7 5 million characters Draft 10 cpi 14 dots character for FX 890II FX 890IIN approx 12 million characters Draft 10 cpi 14 do...

Page 144: ...rallel interface with IEEE 1284 nibble mode support one Hi Speed USB interface serial interface and Network interface Buffer 128KB Fonts Bitmap fonts Epson Draft 10 12 15 cpi Epson Roman 10 12 15 cpi proportional Epson Sans Serif 10 12 15 cpi proportional Bar code fonts EAN 13 EAN 8 Interleaved 2 of 5 UPC A UPC E Code 39 Code 128 POSTNET FX 890II FX 890IIN FX 2190II FX 2190IIN User s Guide Product...

Page 145: ... Bulgaria Bulgarian PC 774 LST 1283 1993 Estonia Estonian PC 771 Lithuanian ISO 8859 2 PC 866 LAT Latvian PC 866 UKR Ukranian PC APTEC Arabic PC 708 Arabic PC 720 Arabic PC AR 864 Arabic PC437 Slovenia PC MC PC1250 PC1251 KZ1048 Kazakhstan Character sets 13 international character sets USA France Germany UK Denmark I Sweden Italy Spain I Japan Norway Denmark II Spain II Latin America Electrical 20...

Page 146: ...prox 0 8 W in sleep mode When the configured time passes in the following condition the printer enters sleep mode not error not pause There is no data in input buffer This product is also designed for IT power systems with a phase to phase voltage of 220 to 240 V Note Check the label on the back of the printer for the voltage of your printer Environmental Temperature Humidity without condensation ...

Page 147: ...65 mm 0 0025 inch 0 14 mm 0 0055 inch 0 065 mm 0 0025 inch 0 14 mm 0 0055 inch Weight 52 g m2 14 lb 90 g m2 24 lb 52 g m2 14 lb 90 g m2 24 lb Quality Plain paper and recycled paper 182 to 216 mm 7 2 to 8 5 inches for the optional cut sheet feeder for FX 890II FX 890IIN 182 to 420 mm 7 2 to 16 5 inches for the optional cut sheet feeder for FX 2190II FX 2190IIN 210 to 364 mm 8 3 to 14 3 inches for t...

Page 148: ...mm 3 9 inch 148 mm 5 8 inch Thickness 0 22 mm 0 0087 inch Weight 192 g m2 51 lb Quality Plain paper and recycled paper Continuous paper ordinary and multipart Minimum Maximum FX 890II FX 890IIN FX 2190II FX 2190IIN Width 101 6 mm 4 0 inch 254 0 mm 10 0 inch 406 4 mm 16 0 inch Length one page 101 6 mm 4 0 inch 558 8 mm 22 0 inch Copies 1 original 5 copies Total thickness 0 065 mm 0 0025 inch 0 49 m...

Page 149: ...per Uncut length on the edges should be 1mm or more The horizontal and vertical perforation cuts should not cross Print quality may deteriorate when printing on paper that uses paper stapling single double stapling Continuous labels front and bottom entry only Note Use only labels mounted on continuous backing sheets Minimum Maximum FX 890II FX 890IIN FX 2190II FX 2190IIN Label size See the figure...

Page 150: ...inch 0 52 mm 0 0205 inch Differences in thickness within the recommended printable area must be less than 0 25 mm 0 0098 inch Weight 45 g m2 12 lb 90 g m2 24 lb Quality Bond envelopes plain envelopes and airmail envelopes without glue on the flap Roll paper rear entry with optional roll paper holder only Minimum Maximum Width 216 mm 8 5 inch Length Thickness 0 07 mm 0 0028 inch 0 09 mm 0 0035 inch...

Page 151: ... 3 mm 0 12 inch The maximum printable width is 203 2 mm 8 0 inches For paper wider than 209 2 mm 8 2 inches the side margins increase to match the width of the paper FX 2190II FX 2190IIN The minimum left and right margins are 3 mm 0 12 inch The maximum printable width is 345 4 mm 13 6 inches For paper wider than 351 4 mm 13 8 inches the side margins increase to match the width of the paper FX 890I...

Page 152: ...ide margins increase to match the width of the paper FX 2190II FX 2190IIN The minimum left and right margins are 13 mm 0 51 inch The maximum printable width is 345 4 mm 13 6 inches For paper wider than 371 4 mm 14 6 inches the side margins increase to match the width of the paper Envelopes A The minimum top and bottom margins are 4 2 mm 0 17 inch B The minimum left and right margins are 3 mm 0 12 ...

Page 153: ... and IBM PPDS emulation control codes For more information about the commands contact Epson Customer Services See Contacting Customer Support on page 116 for details Epson ESC P control codes Selecting an Epson ESC P printer in your software allows you to use advanced fonts and graphics General operation ESC ESC U ESC EM Paper feeding FF LF ESC 0 ESC 2 ESC 3 ESC 1 ESC A CR FX 890II FX 890IIN FX 21...

Page 154: ...ESC 6 ESC 7 ESC I Bit image ESC K ESC L ESC Y ESC Z ESC ESC Bar code ESC B IBM PPDS emulation control codes This printer emulates the IBM Proprinter using the commands below General operation NUL DC3 ESC j BEL CAN DC1 ESC Q ESC K ESC U ESC F Paper feeding FF LF ESC 5 ESC A ESC 0 ESC 1 ESC 2 ESC 3 CR ESC Page format ESC C ESC C0 ESC X ESC N ESC O ESC 4 Print position motion ESC d ESC R ESC D HT ESC...

Page 155: ...ctmaycauseradiointerference in which case the user may be required to take adequate measures Theconnectionofanon shieldedprinterinterfacecabletothisprinterwillinvalidatetheEMC standards of this device You are cautioned that changes or modifications not expressly approved by Seiko Epson Corporation could void your authority to operate the equipment Safety approvals For users in U S and Canada Safet...

Page 156: ... own expense For users in Europe The following models are CE marked and in compliance with all the applicable EU Directives For further details visit the following website to access the full declaration of conformities containing reference to the Directives and harmonized standards used to declare conformity https www epson eu conformity FX 890II PB31A FX 890IIN PB31B FX 2190II PB32A FX 2190IIN PB...

Page 157: ...inal packing materials Warning You need to move the print head by hand to remove the ribbon cartridge If you have just used the printer the print head may be hot let it cool for a few minutes before touching it 1 Remove any paper loaded in the printer Make sure the printer is turned off 2 Unplug the power cord from the electrical outlet then disconnect the interface cable from the printer If an op...

Page 158: ...uide ribbon cartridge wing tractor unit wire and power cord if necessary in their original packing materials and place them in the printer s original box FX 890II FX 890IIN FX 2190II FX 2190IIN User s Guide Product Information 158 ...

Page 159: ... the size of text characters compress printing This function reduces the size of the data You can compress your printing data to the ratio of 75 continuous paper Paperthathassprocket feedholesonbothsides isperforatedbetweenpages andissuppliedinafoldedstack Alsocalledfanfold paper control code A special code used to control a printer function such as performing a carriage return or line feed cpi A ...

Page 160: ... font A style of type designated by a name such as Roman or Sans Serif form feed FF A control code and control panel button that advances the paper to the next top of form position halftoning A method ofusing dotpatternsto representanimage Halftoning makes it possible toproduce varying shadesof grayusing only black dots or a nearly infinite array of colors using only a few colors of dots hex dump ...

Page 161: ...per inch cpi The standard is 10 cpi platen The black flat part that provides a backing for the paper during printing portrait Printing that is oriented upright on the page as opposed to landscape in which printing is sideways on the page This is the standard orientation for printing letters or documents printer driver A software program that sends commands from the computer for using the functions...

Page 162: ...acktothe top of form position tear off position Thepositiontheprinterfeedsthepapertowhentheautotear offmodeison UsingtheMicroAdjustfunction youcanadjustthe position so that the paper s perforation meets the printer s tear off edge top of form position The position on the paper that the printer recognizes as the first printable line This is the default top margin position unidirectional printing Pr...

Page 163: ...s labels specifications 149 Continuous paper loading 21 removing 42 specifications 148 switching from 53 switching to 54 Control panel 101 buttons and lights 88 Customer support 116 Cut sheet feeder assembling the double bin cut sheet feeder 132 installing 124 loading paper 126 selecting the paper path 133 D Default settings changing 97 99 option list 92 Driver printer driver 59 E Edge guide 29 En...

Page 164: ... Page length for front tractor 93 Page length for rear tractor 94 Paper release lever 19 Paper source selecting 16 Paper specifications 147 Paper thickness lever 19 Parallel I F interface bidirectional mode 95 Parallel interface 95 Print direction 94 Auto print direction Auto 94 Bidirectional Bi d printing 94 Unidirectional Uni d printing 94 Printer sharing 76 Printer driver accessing 59 settings ...

Page 165: ...53 command lists IBM PPDS emulation 153 electrical 145 electronic 144 environmental 146 mechanical 141 paper 147 recommended printable area 151 safety approvals 155 Status Monitor 3 59 69 T Tear off function 42 Tear Off Bin button 88 Technical support 116 Transporting the printer 157 Troubleshooting USB problems 110 U Ultra Speed Draft USD 90 Uninstalling printer software 85 USB interface 95 probl...

Reviews: