Programmer’s Easy Lesson
Before you start, note that we haven’t claimed that one easy lesson
will make you an FX maestro. It takes more than one lesson to learn
the full value of the feature-packed FX printer. In fact, the more time
you spend with this manual, the more your printer will cooperate
with your every command. But some of you want to see something
from a new printer right now-no matter what. The next few pages
are especially for you.
If you get stuck, the proper set-up procedures are covered in full in
Chapter 1.
First Steps
1. Make all connections with the power OFF! Connect your FX to
your computer via the printer cable that you purchased separately.
(Some computers require special printer interface boards, also pur-
chased separately).
2. To use continuous-feed printer paper with pin-feed holes, set the
friction-control lever and the paper bail toward the front of the
printer. If you are using the FX-80, pull the paper under the plastic
separator and through the paper path. If you are using the FX-100,
you may need to first install the tractor unit, then pull the paper
under it. In case the paper starts to jam on either model, refer to
Chapter 1 for tips on inserting paper. As you straighten the paper,
you will probably need to adjust the pin feeders.
To use either a single sheet of paper or roll paper without pin-
feed holes on the FX-80, first move the pin feeders out of the way. If
a tractor unit is installed on your FX-100, you will need to remove
it. Then, for either model, push the friction-control lever toward
the rear of the printer, pull the paper bail forward, and insert the
paper under the plastic separator. Use the manual-feed knob to
7
Summary of Contents for FX-80
Page 1: ......
Page 22: ......
Page 23: ......
Page 26: ......
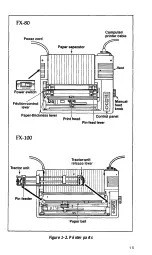
Page 31: ...Figure 1 1 The FX 80 and FX 100 printers 14 ...
Page 32: ...Figure 1 2 Printer parts 1 5 ...
Page 38: ...Figure 1 8 DIP switch vent 21 ...
Page 42: ...Figure 1 11 Ribbon insertion 25 ...
Page 51: ...Figure 1 20 Paper thickness adjustment 34 ...
Page 85: ......
Page 92: ......
Page 95: ......
Page 97: ...80 ...
Page 109: ......
Page 117: ...Figure 7 3 Staggering STAIR STEPS 100 ...
Page 119: ...Table 7 1 Line spacing commands 102 ...
Page 129: ...112 ...
Page 147: ...130 ...
Page 181: ...Figure 12 4 Corner of the FX 80 design ...
Page 189: ...Figure 12 10 Most distinct version Figure 12 11 Reversed version 172 ...
Page 215: ...198 ...
Page 231: ...214 ...
Page 249: ......
Page 269: ......
Page 272: ...iv ...
Page 283: ......
Page 290: ......
Page 305: ...282 ...
Page 311: ...288 ...
Page 323: ...300 ...
Page 339: ......
Page 343: ...320 ...
Page 349: ...326 ...
Page 353: ...330 ...
Page 354: ...Schematic 331 ...


