background image

Maintenance  6. Arm #2 


150


G10 / G20 Rev.20 


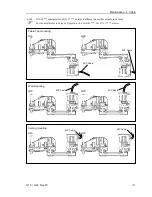
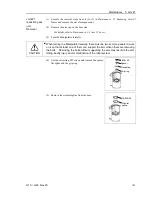
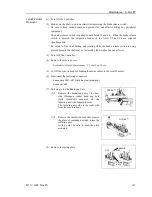
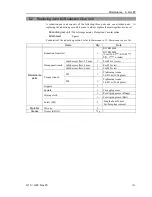
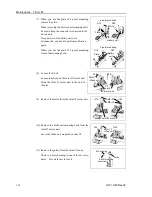
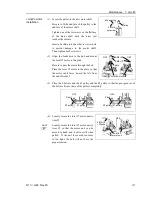
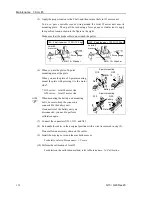
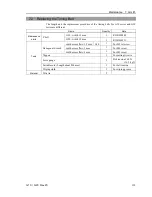
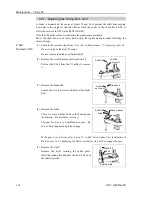
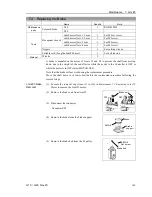
(6)  Mount the spring plate. 


2-M4

×

Spring   

plate 

G10 

G20 


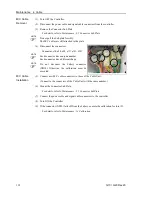
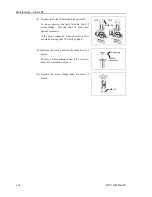
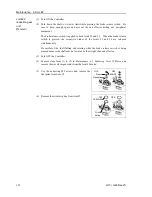
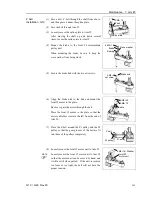
(7)  Connect the connectors X221, X21, and X62. 


(8)  Re-bundle the cables in their original positions 

with a wire tie removed in the removal procedure 
step (5). 

Do not allow unnecessary strain on the cables. 


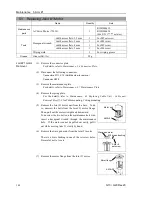
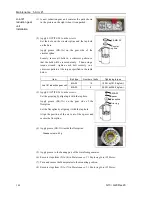
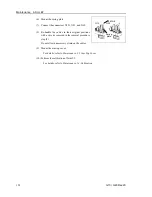
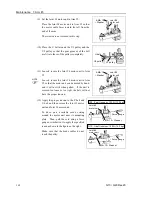
(9)  Mount the arm top cover. 

For details, refer to 

Maintenance: 3.1 Arm Top Cover


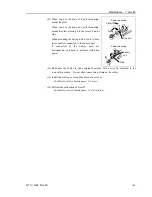
(10) Perform the calibration of Joint #2. 

For details, refer to 

Maintenance: 14. Calibration.


Summary of Contents for G10 Series

Page 1: ...Rev 20 EM183R3619F SCARA ROBOT G10 G20 series MANIPULATOR MANUAL ...

Page 2: ...MANIPULATOR MANUAL G10 G20 series Rev 20 ...

Page 3: ...G10 G20 Rev 20 i SCARA ROBOT G10 G20 series Manipulator Manual Rev 20 Copyright 2007 2018 SEIKO EPSON CORPORATION All rights reserved ...

Page 4: ...rranty period information However customers will be charged for repairs in the following cases even if they occur during the warranty period 1 Damage or malfunction caused by improper use which is not described in the manual or careless use 2 Malfunctions caused by customers unauthorized disassembly 3 Damage due to improper adjustments or unauthorized repair attempts 4 Damage caused by natural dis...

Page 5: ...untries Other brand and product names are trademarks or registered trademarks of the respective holders NOTICE No part of this manual may be copied or reproduced without authorization The contents of this manual are subject to change without notice Please notify us if you should find any errors in this manual or if you have any comments regarding its contents MANUFACTURER ...

Page 6: ...retailer where you purchased this product Use of the chemical symbols Pb Cd or Hg indicates if these metals are used in the battery This information only applies to customers in the European Union according to DIRECTIVE 2006 66 EC OF THE EUROPEAN PARLIAMENT AND OF THE COUNCIL OF 6 September 2006 on batteries and accumulators and waste batteries and accumulators and repealing Directive 91 157 EEC a...

Page 7: ...ontrol Unit Drive Unit EPSON RC 7 0 Ver 7 1 2 or later The motions of the manipulators such as in emergency stops vary depending on the Controllers since they have different control methods Details are described in the manual Turning ON OFF Controller When you see the instruction Turn ON OFF the Controller in this manual be sure to turn ON OFF all the hardware components For the Controller composi...

Page 8: ...vi G10 G20 Rev 20 ...

Page 9: ...g 19 2 3 2 Wall Mounting 25 2 3 3 Ceiling Mounting 31 2 3 4 G10 65 G10 85 For S N1 or later 37 2 4 Specifications 38 2 5 How to Set the Model 41 3 Environments and Installation 42 3 1 Environmental Conditions 42 3 2 Base Table 46 3 3 Mounting Dimensions 45 3 4 Unpacking and Transportation 49 3 4 1 Precautions for Transportation 49 3 4 2 Transportation 50 3 5 Installation 50 3 5 1 Table Top Mountin...

Page 10: ...etting the Mechanical Stop of Joint 3 84 5 3 Setting the Cartesian Rectangular Range in the XY Coordinate System of the Manipulator for Joints 1 and 2 86 5 4 Standard Motion Range 87 Maintenance 1 Safety Maintenance 93 2 General Maintenance 94 2 1 Maintenance Inspection 94 2 1 1 Schedule for Maintenance Inspection 94 2 1 2 Inspection Point 95 2 2 Overhaul Parts Replacement 96 2 3 Greasing 98 2 4 T...

Page 11: ...2 Replacing Joint 1 Reduction Gear Unit 142 6 Arm 2 145 6 1 Replacing Joint 2 Motor 146 6 2 Replacing Joint 2 Reduction Gear Unit 151 7 Arm 3 154 7 1 Replacing Joint 3 Motor 155 7 2 Replacing the Timing Belt 159 7 2 1 G10 160 7 2 2 G20 164 7 3 Replacing the Brake 165 8 Arm 4 167 8 1 Replacing Joint 4 Motor 168 8 1 1 G10 168 8 1 2 G20 172 8 2 Replacing the Timing Belt 174 8 2 1 G10 175 8 2 2 G20 17...

Page 12: ...198 10 2 2 G20 205 11 Lithium Battery 210 11 1 Replacing the Battery Unit Lithium Battery 212 11 2 Replacing the Battery Board 214 12 LED Lamp 216 13 Radiating Unit 218 14 Calibration 220 14 1 About Calibration 220 14 2 Calibration Procedure 221 14 3 Accurate Calibration of Joint 2 231 14 4 Calibration Procedure without using Calibration Wizard 233 15 Maintenance Parts List 237 15 1 Common Parts 2...

Page 13: ...Setup Operation This volume contains information for setup and operation of the G10 G20 series Manipulators Please read this volume thoroughly before setting up and operating the Manipulators ...

Page 14: ......

Page 15: ...erations are indicated throughout the manual by the following symbols Be sure to read the descriptions shown with each symbol WARNING This symbol indicates that a danger of possible serious injury or death exists if the associated instructions are not followed properly WARNING This symbol indicates that a danger of possible serious injury or death caused by electric shock exists if the associated ...

Page 16: ...ot system Designing and or constructing the robot system without understanding the safety requirements is extremely hazardous may result in serious bodily injury and or severe equipment damage to the robot system and may cause serious safety problems The Manipulator and the Controller must be used within the environmental conditions described in their respective manuals This product has been desig...

Page 17: ...crew spline is applied the load exceeding the allowable value it is necessary to replace the ball screw spline unit The allowable loads differ depending on distance where the load is applied to For calculating the allowable load see the calculation formula below Allowable bending moment G10 G20 M 50 000 N mm Example If 500 N load is applied at 100 mm from the end of the spline nut Moment M F L 100...

Page 18: ...ow power status to secure the safety of an operator However operating the robot system while someone is inside the safeguarded area is extremely hazardous and may result in serious safety problems in case that the Manipulator moves unexpectedly Immediately press the Emergency Stop switch whenever the Manipulator moves abnormally while the robot system is operated WARNING To shut off power to the r...

Page 19: ...earings are likely to cause oil film shortage in such situation To prevent early breakdown move the joints larger than 50 degrees for about five to ten times a day Joint 3 If the up and down motion of the hand is less than 10 mm move the joint a half of the maximum stroke for five to ten times a day Oscillation resonance may occur continuously in low speed Manipulator motion Speed approx 5 to 20 d...

Page 20: ...akes work This will shorten the life of the brakes due to the worn friction plates Normal brake life cycle About 2 years when the brakes are used 100 times day Do not turn OFF the Controller while the Manipulator is operating If you attempt to stop the Manipulator in emergency situations such as Safeguard Open make sure to stop the Manipulator using the Emergency Stop switch of the Controller If t...

Page 21: ...ter the Emergency Stop switch is pressed The free running time angle distance of the Manipulator are shown below However remember that the values vary depending on following conditions Weight of the end effector Weight of work piece Operating pose Weight Speed Accel etc Conditions for Measurement G10 G20 Accel Setting 100 100 Speed Setting 100 100 Load kg 10 20 Weight Setting 10 20 Joint 1 Start p...

Page 22: ... Stop switch of the Controller If the Manipulator is stopped by turning OFF the Controller while it is operating following problems may occur Reduction of the life and damage of the reduction gear unit Position gap at the joints In addition if the Controller was forced to be turned OFF by blackouts and the like while the Manipulator is operating make sure to check the following points after power ...

Page 23: ...hown below However remember that the values vary depending on following conditions Weight of the end effector Weight of work piece Operating pose Weight Speed Accel etc Conditions for Measurement G10 G20 Accel Setting 100 100 Speed Setting 100 100 Load kg 10 20 Weight Setting 10 20 Joint 1 Start point of operation Target point Stop point Joint 2 Point where the emergency stop signal is input Contr...

Page 24: ... Joint 4 The shaft cannot be rotated by hand until the electromagnetic brake applied to the shaft has been released Move the shaft while pressing the brake release switch Joint 3 and 4 brake release switch Joint 1 rotating Joint 2 rotating Joint 3 up and down Joint 4 rotating Arm 1 Arm 2 Base Shaft The brake release switch affects both Joints 3 and 4 When the brake release switch is pressed in eme...

Page 25: ...or less __ 0 Z 100 25000 or less 18000 or less _ 100 Z 200 11000 or less 200 Z 300 15000 or less 7500 or less 300 Z 420 11000 or less 5500 or less G20 Z position mm Tip load 5kgor less 10kgor less 15kgor less 20kgor less __ 0 Z 100 25000 or less 18000 or less 12000 or less 9000 or less _ 100 Z 200 11000 or less 7000 or less 5500 or less 200 Z 300 15000 or less 7500 or less 5000 or less 3500 or les...

Page 26: ...band to prevent hands or fingers from being caught in the Manipulator B Do not enter the work space when the Manipulators operating It is extremely hazardous since the Arm may collide and cause serious safety problems C Hazardous voltage exists while the Manipulator is ON To avoid electric shock do not touch any internal electric parts D You can catch your hand or fingers between the shaft and cov...

Page 27: ...Setup Operation 1 Safety G10 G20 Rev 20 15 Location Warning Label NOTE F Be careful of the hand falling while the brake release switch is being pressed Location Label G H ...

Page 28: ...Setup Operation 1 Safety 16 G10 G20 Rev 20 Location of Labels Table Top Mounting G10 G20 Wall Mounting G10 G20 W D C C A B E F G H B A D C F H G E Ceiling Mounting G10 G20 R B A C C D F E H G ...

Page 29: ...ing dimensions of the end effector are compatible with those for the E2H Manipulators our existing models Space Saving Compactness achieved by using a ductless design Reduce the system height by the new short stroke Z 180 mm lineup Motion Range Extended The motion range has been extended by 20 compared to the E2 series Improved Productivity The numbers of user wires and pneumatic tubes have been i...

Page 30: ...ment Cleanroom model Cleanroom model Manipulator includes additional features that reduce dust emitted by the Manipulator to enable use in clean room environments Protected model IP54 IP65 The protected model Manipulators operate under adverse conditions with dust and oily smoke G10 G20 D Normal G10 G20 D Manipulators do not have bellows The normal G10 G20 D Manipulator without bellows option oper...

Page 31: ...15 pin D sub connector User connector 9 pin D sub connector CE label Fitting black or blue for ø4 mm pneumatic tube Fitting white for ø6 mm pneumatic tube Fitting white for ø4 mm pneumatic tube LED lamp UR label Color differs depending on the shipment time The brake release switch affects both Joints 3 and 4 When the brake release switch is pressed in emergency mode the brakes for both Joints 3 an...

Page 32: ...les indicates the stroke margin by mechanical stop ø39 5 mechanical stop diameter Mount eyebolt at shipment Detail of A Calibration point position of Joints 3 and 4 Reference through hole View from the bottom of the base Root both side chamfer C0 5 G10 65 S G10 G20 85 S G20 A0 S a 250 450 600 G10 G20 1S G10 G20 4S b 180 420 c 813 5 1053 5 d 213 5 26 5 ...

Page 33: ... additional parts and specifications for the Table Top mounting Cleanroom model when compared with the Standard model in appearance Upper bellows Plate cover For static electricity countermeasure Cover for Table Top mounting surface Exhaust port Lower bellows Plate cover For static electricity countermeasure ...

Page 34: ...ameter Detail of A Calibration point position of Joint 3 and 4 indicates the stroke margin by mechanical stop Reference through hole View from the bottom of the base G10 65 C G10 G20 85 C G20 A0 C a 250 450 600 G10 G20 1C G10 G20 4C b 150 390 c 870 5 1129 5 d 205 5 34 5 Mount eyebolt at shipment 90 or more Space for cables Root both side chamfer C0 5 ...

Page 35: ...of the end part of G10 G20 D without bellows option refer to G10 G20 S G10 G20 P only Plate cover For oil resistant G10 G20 P only Plate cover For oil resistant Upper bellows Stainless steel plate for Table Top mounting surface Exhaust port Lower bellows Stainless steel plate Stainless steel plate User connector Protected model User connector Protected model Joint 3 and 4 brake release switch Prot...

Page 36: ... 5 Conical hole ø4 90 1 mm flat cut Max ø18 through hole ø25 h7 shaft diameter 90 or more Space for cables indicates the stroke margin by mechanical stop ø39 5 mechanical stop diameter Mount eyebolt at shipment Detail of A Calibration point position of Joints 3 and 4 Reference through hole View from the bottom of the base Root both side chamfer C0 5 ...

Page 37: ...ite for ø6 mm pneumatic tube Fitting black or blue for ø6 mm pneumatic tube Joint 1 rotating LED lamp UR label Color differs depending on the shipment time The brake release switch affects both Joints 3 and 4 When the brake release switch is pressed in emergency mode the brakes for both Joints 3 and 4 are released simultaneously When the LED lamp is lighting or the controller power is on the curre...

Page 38: ...25 h7 shaft diameter 90 or more Space for cables indicates the stroke margin by mechanical stop ø39 5 mechanical stop diameter Detail of A Calibration point position of Joints 3 and 4 Reference through hole View from the bottom of the base Detail of B G10 65 SW G10 G20 85 SW G20 A0 SW a 250 450 600 G10 G20 1SW G10 G20 4SW b 180 420 c 27 5 212 5 d 420 660 ...

Page 39: ...wing figure shows the additional parts and specifications for the Wall mounting Cleanroom model when compared with the Standard model in appearance Upper bellows Plate cover For static electricity countermeasure Exhaust port Lower bellows Plate cover For static electricity countermeasure ...

Page 40: ...25 h7 shaft diameter 90 or more Space for cables indicates the stroke margin by mechanical stop Detail of A Calibration point position of Joints 3 and 4 Reference through hole View from the bottom of the base ø39 5 mechanical stop diameter Detail of B G10 65 CW G10 G20 85 CW G20 A0 CW a 250 450 600 G10 G20 1CW G10 G20 4CW b 150 390 c 29 5 288 5 d 515 774 ...

Page 41: ...s option For dimensions of the end part of G10 G20 DW without bellows option refer to G10 G20 SW G10 G20 PW only Plate cover For oil resistant G10 G20 PW only Plate cover For oil resistant Upper bellows Exhaust port Lower bellows Stainless steel plate Stainless steel plate User connector Protected model User connector Protected model Joint 3 and 4 brake release switch Protected model Fittings with...

Page 42: ... Reference hole Tolerance applies to the pin hole Conical hole ø4 90 1 mm flat cut Max ø18 through hole ø25 h7 shaft diameter 90 or more Space for cables indicates the stroke margin by mechanical stop Detail of A Calibration point position of Joints 3 and 4 Reference through hole View from the bottom of the base ø39 5 mechanical stop diameter Detail of B ...

Page 43: ...hite for ø6 mm pneumatic tube Fitting black or blue for ø6 mm pneumatic tube LED lamp UR label Color differs depending on the shipment time The brake release switch affects both Joints 3 and 4 When the brake release switch is pressed in emergency mode the brakes for both Joints 3 and 4 are released simultaneously For G6 1 Joint 4 has no brake on it When the LED lamp is lighting or the controller p...

Page 44: ...iameter 90 or more Space for cables indicates the stroke margin by mechanical stop Detail of A Calibration point position of Joints 3 and 4 ø39 5 mechanical stop diameter Detail of B Tolerance applies to the pin hole G10 65 SR G10 G20 85 SR G20 A0 SR a 250 450 600 G10 G20 1SR G10 G20 4SR b 180 420 c 27 5 212 5 d 420 660 ...

Page 45: ...he additional parts and specifications for the Ceiling mounting Cleanroom model when compared with the Standard model in appearance Upper bellows Plate cover For static electricity countermeasure Exhaust port Lower bellows Plate cover For static electricity countermeasure Cover for Ceiling mounting surface ...

Page 46: ...4CR b 150 390 c 29 5 288 5 d 515 774 Tolerance applies to the pin hole Conical hole ø4 90 1 mm flat cut Max ø18 through hole ø25 h7 shaft diameter 90 or more Space for cables indicates the stroke margin by mechanical stop Detail of A Calibration point position of Joints 3 and 4 ø39 5 mechanical stop diameter Detail of B ...

Page 47: ...of the end part of G10 G20 DR without bellows option refer to G10 G20 SR G10 G20 PR only Plate cover For oil resistant G10 G20 PR only Plate cover For oil resistant Upper bellows Stainless steel plate for Ceiling mounting surface Exhaust port Lower bellows Stainless steel plate Stainless steel plate User connector Protected model User connector Protected model Joint 3 and 4 brake release switch Pr...

Page 48: ...4PR b 150 390 c 33 292 d 518 5 777 5 Tolerance applies to the pin hole Conical hole ø4 90 1 mm flat cut Max ø18 through hole ø25 h7 shaft diameter 90 or more Space for cables indicates the stroke margin by mechanical stop Detail of A Calibration point position of Joints 3 and 4 ø39 5 mechanical stop diameter Detail of B ...

Page 49: ...ts form The additional screw holes processed on G10 85 are not for the end effector or other equipments Standard model G10 65 S G10 85 S Heat sink Heat sink Screw hole G20 85 S Same as before Cleanroom model G10 65 C G10 85 C Heat sink Heat sink Screw hole G20 85 C Same as before Protection model G10 65 P G10 85 P Heat sink Heat sink Screw hole G20 85 P Same as before ...

Page 50: ...5 8800 mm s 85 11000 mm s A0 11500mm s Joint 3 1 1100 mm s 4 2350 mm s Joint 4 G10 2400 deg s G20 1700 deg s Repeatability Joints 1 2 0 025 mm Joint 3 0 01 mm Joint 4 0 005 deg Max motion range Joint 1 65 152 deg 107 deg 85 A0 Joint 2 65 152 5 deg a 130 deg 85 A0 Joint 3 1 180 mm G10 G20 1S D 150 mm G10 G20 1C P D with bellows option 4 420 mm G10 G20 4S D 390 mm G10 G20 4C P D with bellows option ...

Page 51: ...m2 86 psi Environmental requirements Ambient Temperature 5 to 40 C with minimum temperature variation Ambient relative humidity 10 to 80 no condensation Equivalent continuous A weighted sound pressure level 5 LAeq 70 dB A Applicable Controller 6 RC180 RC700 A Assignable Value Default values Speed 1 to 5 to 100 Accel 7 1 to 10 to 120 SpeedS 1 to 50 to 2000 AccelS 1 to 200 to 25000 Fine 0 to 10000 t...

Page 52: ...n a quantity to interfere with satisfactory operation of the equipment Water 4 Water splashing against the enclosure from any direction shall have no harmful effect G10 G20 P IP65 Dust 6 No ingress of dust Water 5 Water projected by a nozzle against enclosure from any direction shall have no harmful effects 3 In the case of PTP command Maximum operating speed for CP command is 2000 mm s on horizon...

Page 53: ...model may result in abnormal or no operation of the Manipulator and or cause safety problems If the custom specifications number MT is described on MODEL of the signature label S N label the Manipulator has custom specifications A label with only the custom specifications number may be attached depending on shipment time The custom specifications may require a different configuration procedure che...

Page 54: ...When using Manipulators in inadequate environments that do not meet the above conditions please contact us 1 The ambient temperature conditions are for the Manipulators only For the Controller the Manipulators are connected to refer to the Controller manual For the Protected model Manipulator be sure to install the robot system in an environment that also meets the following conditions Item Condit...

Page 55: ...heck whether the Manipulator will damage the food or not The Manipulator cannot be used in corrosive environments where acid or alkaline is used In a salty environment where the rust is likely to gather the Manipulator is susceptible to rust The controller used with the Protected model Manipulator does not have protection features for dusty wet or oily environment The controller must be placed in ...

Page 56: ...The torque and reaction force produced by the movement of the Manipulator are as follows G10 G20 Max Reaction torque on the horizontal plate 1000 Nm 1000 Nm Max Horizontal reaction force 4500 N 7500 N Max Vertical reaction force 2000 N 2000 N The threaded holes required for mounting the Manipulator base are M12 Use mounting bolts with specifications conforming to ISO898 1 property class 10 9 or 12...

Page 57: ... RC180 RC620 54 35 49 11 82 44 Power Cable Connector Straight Signal Cable Connector 83 76 Power Cable Connector L shaped 35 RC700 A Do not remove the M C cables from the Manipulator For environmental conditions regarding space when placing the Controller on the base table refer to the Controller manual WARNING To ensure safety a safeguard must be installed for the robot system For details on the ...

Page 58: ...they may reach Be sure to allow for the following extra spaces in addition to the space required for mounting the Manipulator Controller and peripheral equipment Space for teaching Space for maintenance and inspection Ensure a space to open the rear side cover and the maintenance cover for maintenance Space for cables The minimum bend radius of the power cable is 90 mm When installing the cable be...

Page 59: ...7 8 Z 0 to 360 207 8 307 Z 360 to 390 218 3 d Motion range of Joint 1 degree 152 152 152 e Motion range of Joint 2 degree 152 5 152 5 Z 0 to 360 152 5 152 5 Z 360 to 390 151 f Mechanical stop area 199 4 183 3 285 4 g Joint 1 angle to hit mechanical stop degree 3 3 3 h Joint 2 angle to hit mechanical stop degree 3 5 3 5 Z 0 to 360 3 5 3 5 Z 360 to 390 5 The bellows for G10 G20 DW are options at shi...

Page 60: ...cal stop degree 3 3 3 h Joint 2 angle to hit mechanical stop degree 3 5 3 5 5 3 5 The bellows for G10 G20 DW are options at shipment G10 65 R G10 G20 85 R G20 A0 R Ceiling Mounting Center of Joint 3 Maximum space G10 65 R G10 G20 85 G20 A0 R SR DR CR PR DR bellows a Length of Arm 1 mm 250 450 600 b Length of Arm 2 mm 400 400 400 c Motion range 306 5 207 8 218 3 307 d Motion range of Joint 1 degree...

Page 61: ...ers caught The arm is secured with a wire tie Leave the wire tie secured until you finish the installation so as not to get hands or fingers caught To carry the Manipulator secure the Manipulator to the delivery equipment or pass belts through the eyebolts and hoist it with your hands Make sure to hold the areas indicated in gray in the figure bottom of Arm 1 and bottom of the base by hand Ceiling...

Page 62: ...le 3 5 Installation CAUTION The robot system must be installed to avoid interference with buildings structures utilities other machines and equipment that may create a trapping hazard or pinch points Oscillation resonance may occur during operation depending on rigidity of the installation table If the oscillation occurs improve rigidity of the table or change the speed or acceleration and deceler...

Page 63: ... 106 lb G20 A0 Approximately 50 kg 111 lb Standard Model 1 Secure the base to the base table with four bolts Use bolts with specifications conforming to ISO898 1 Property Class 10 9 or 12 9 Tightening torque 73 5 N m 750 kgf cm 20 mm Screw Hole depth 20 mm or more 4 M12 40 Spring Washer Plane Washer 2 Using nippers cut off the wire tie binding the shaft and arm retaining bracket on the base Bolt M...

Page 64: ...ximately 55 kg 122 lb When installing the Manipulator to the wall support the Manipulator and then secure the anchor bolts Removing the support without securing the anchor bolts properly is extremely hazardous and may result in fall of the Manipulator Standard Model 1 Unpack the manipulator with retaining the arm posture 2 Secure the base to the wall with six bolts Use bolts with specifications co...

Page 65: ...imately 50 kg 111 lb When installing the Manipulator to the ceiling support the Manipulator and then secure the anchor bolts Removing the support without securing the anchor bolts properly is extremely hazardous and may result in fall of the Manipulator Standard Model 1 Unpack the manipulator with retaining the arm posture 2 Secure the base to the ceiling with four bolts Use bolts with specificati...

Page 66: ...del Refer to the installation procedure of each Manipulator model and install the Manipulator When the Manipulator is a Protected model be aware of the followings WARNING Connect the power cable connection and the signal cable connector to the Manipulator immediately after the Manipulator installation The Manipulator without connecting them may result in electric shock and or malfunction of the ro...

Page 67: ...d to ground it may result in the fire or electric shock CAUTION When connecting the Manipulator to the Controller make sure that the serial numbers on each equipment match Improper connection between the Manipulator and Controller may not only cause improper function of the robot system but also serious safety problems The connection method varies with the Controller used For details on the connec...

Page 68: ...Setup Operation 3 Environments and Installation 56 G10 G20 Rev 20 Cable Connections Connect the power connector and signal connector of the M C cables to the Controller Signal Connector Power Connector ...

Page 69: ... Diameter 0 59 MPa 6 kgf cm2 86 psi 2 ø6 mm ø4 mm 2 ø4 mm ø2 5 mm Fittings for ø6 mm and ø4 mm outer diameter pneumatic tubes are supplied on both ends of the pneumatic tubes When the Manipulator is a Protected model be aware of the followings CAUTION Be sure to use IP54 or IP65 compliant wires and tubes when using the Manipulator under special environmental conditions adverse condition with dust ...

Page 70: ...ctor Wall Mounting Fitting black or blue for ø6 mm pneumatic tube User connector 15 pin D sub connector User connector 9 pin D sub connector Fitting white for ø6 mm pneumatic tube Fitting black or blue for ø4 mm pneumatic tube Fitting white for ø4 mm pneumatic tube Ceiling Mounting Fitting black or blue for ø4 mm pneumatic tube Fitting white for ø4 mm pneumatic tube Fitting black or blue for ø6 mm...

Page 71: ...the Manipulator and then get hands fingers or feet caught To carry the Manipulator have four or more people to work on it and secure the Manipulator to the delivery equipment or hold the bottom of Arm 1 and the bottom of the base by hand When holding the bottom of the base by hand be very careful not to get hands or fingers caught Stabilize the Manipulator with your hands when hoisting it Unstable...

Page 72: ... 2 For details on the motion range refer to Setup Operation 5 2 Motion Range Setting by Mechanical Stops 2 Attach the eyebolts on the upper back side of Arm 1 3 Tie the lower end of the shaft and arm and the base and arm together with a wire tie Be careful not to tie them too tight Otherwise the shaft may bend Bolt M4 15 Washer M6 Arm mounting bolt M12 20 Wire tie Eyebolt Attached at shipment 4 Pa...

Page 73: ...Removing the anchor bolts without supporting is extremely hazardous and may result in fall of the Manipulator 1 Turn OFF the power on all devices and unplug the cables Remove the mechanical stops if using them to limit the motion range of Joints 1 and 2 For details on the motion range refer to Setup Operation 5 2 Motion Range Setting by Mechanical Stops 2 Cover the arm with a sheet so that the arm...

Page 74: ...ts Removing the anchor bolts without supporting is extremely hazardous and may result in fall of the Manipulator 1 Turn OFF the power on all devices and unplug the cables Remove the mechanical stops if using them to limit the motion range of Joints 1 and 2 For details on the motion range refer to Setup Operation 5 2 Motion Range Setting by Mechanical Stops 2 Cover the arm with a sheet so that the ...

Page 75: ... when Jump motion is performed the upper limit mechanical stop may hit the Manipulator and the robot system may not function properly Use a split muff coupling with an M4 bolt or larger to attach the end effector to the shaft Brake release switch Joints 3 and 4 cannot be moved up down by hand because the electromagnetic brake is applied to the joints while power to the robot system is turned OFF T...

Page 76: ... the manipulator with an end effector the end effector may interfere with the Manipulator because of the outer diameter of the end effector the size of the work piece or the position of the arms When designing your system layout pay attention to the interference area of the end effector ...

Page 77: ...6 Mount eyebolt at shipment 37 110 B A 81 Common Dimensions Wall Mounting Table Top Mounting From the base mounting face 485 5 From the base mounting face 326 From the reference hole 110 5 From the base mounting face 326 From the base mounting face 355 5 Ceiling Mounting 200 For G10 65 G10 85 manipulator of S N 1 or later the form of arm bottom is different from the others The additional screw hol...

Page 78: ...re not designed to work with loads exceeding 10 kg G20 series The total weight of the end effector and the work piece must not exceed 20 kg The G20 series Manipulators are not designed to work with loads exceeding 20 kg Always set the Weight parameters according to the load Setting a value that is smaller than the actual load may cause errors excessive shock insufficient function of the Manipulato...

Page 79: ...equipment near Arm 2 When you attach the equipment to the end of Arm 2 WM M L1 2 L1 L2 2 WM M LM 2 L2 2 WM M L1 L2 LM equivalent weight weight of camera etc length of Arm 1 length of Arm 2 distance from rotation center of Joint 2 to center of gravity of camera etc Example A 1 kg camera is attached to the end of the G10 series arm 450 mm away from the rotation center of Joint 2 with a load weight o...

Page 80: ...1 2 3 4 5 6 7 8 9 10 kg Weight setting 100 100 100 100 90 70 100 G10 65 G10 85 110 110 110 80 The percentage in the graph is based on the speed at rated weight 5 kg as 100 G20 series 140 120 100 80 60 40 20 0 5 10 15 20 kg Weight setting 120 120 100 80 70 The percentage in the graph is based on the speed at rated weight 10 kg as 100 ...

Page 81: ...t setting 165 160 150 100 90 80 165 G10 65 G10 85 125 125 110 125 The percentage in the graph is based on the acceleration deceleration at rated weight 5 kg as 100 G20 series 180 160 140 120 100 80 60 40 20 G20 85 G20 A0 120 110 100 90 75 120 170 120 80 70 160 0 5 10 15 20 kg Weight setting The percentage in the graph is based on the acceleration deceleration at rated weight 10 kg as 100 ...

Page 82: ...f the load weight of the end effector and work piece must be 0 45 kg m2 or less The G20 series Manipulators are not designed to work with a moment of inertia exceeding 0 45 kg m2 Always set the moment of inertia parameter to the correct moment of inertia Setting a value that is smaller than the actual moment of inertia may cause errors excessive shock insufficient function of the Manipulator and o...

Page 83: ...nd EPSON RC Enter a value into the Load inertia text box on the Inertia panel Tools Robot Manager You may also execute the Inertia command from the Command Window Automatic acceleration deceleration setting of Joint 4 by Inertia moment of inertia G10 series 0 0 05 0 10 0 15 0 20 0 25 kg m2 Moment of inertia setting 120 100 80 60 40 20 100 50 35 30 G20 series 0 0 10 0 20 0 30 0 40 0 50 kg m2 Moment...

Page 84: ...y may cause errors excessive shock insufficient function of the Manipulator and or shorten the life cycle of parts mechanisms The acceptable eccentric quantity of load in G10 series and G20 series Manipulators is 0 mm at the default rating and 200 mm at the maximum When the eccentric quantity of load exceeds the rating change the setting of eccentric quantity parameter of Inertia command After the...

Page 85: ...ia eccentric quantity G10 series and G20 series The percentage in the graph is based on the acceleration deceleration at rated eccentricity 0 mm as 100 120 100 80 60 40 20 0 50 100 150 200 mm Eccentricity setting 70 50 25 100 Calculating the Moment of Inertia Refer to the following examples of formulas to calculate the moment of inertia of load end effector with work piece The moment of inertia of...

Page 86: ...a using the basic formulas a Moment of inertia of a rectangular parallelepiped h b L Mass m Rectangular parallelepiped s center of gravity Rotation center m m L 2 b 2 h 2 12 b Moment of inertia of a cylinder m m L 2 r 2 2 Mass m L r Cylinder s center of gravity Rotation center c Moment of inertia of a sphere m r 2 m L 2 2 5 Sphere s center of gravity r Mass m L Rotation center ...

Page 87: ...ove Joint 3 up and down Adjust the position of Joint 3 for the Manipulator motion after considering the relation between the current position and the destination position The upper limit of Joint 3 during horizontal motion using Jump command can be set by the LimZ command Automatic acceleration deceleration vs Joint 3 position G10 series and G20 series 120 100 80 60 40 20 0 100 200 300 400 mm Heig...

Page 88: ...mum motion range of the Manipulator There are three methods for setting the motion range described as follows 1 Setting by pulse range for all joints 2 Setting by mechanical stops for Joints 1 to 3 3 Setting the Cartesian rectangular range in the X Y coordinate system of the Manipulator for Joints 1 and 2 Mechanical stop Rectangular range setting Pulse range Motion range Mechanical stop When the m...

Page 89: ... target position specified by the command is within the pulse range before operating If the target position is out of the set pulse range an error occurs and the Manipulator does not move EPSON RC The pulse range can be set on the Range panel shown by selecting Tools Robot Manager You may also execute the Range command from the Command Window 5 1 1 Max Pulse Range of Joint 1 The 0 zero pulse posit...

Page 90: ...el Table Top Mounting Ceiling Wall Mountings A Max Motion Range G10 65 152 5 degrees 130 degrees G10 G20 85 S D 152 5 degrees G10 G20 85 C P D bellows Z 0 to 360 151 degrees Z 360 to 390 151 degrees G20 A0 152 5 degrees 152 5 degrees B Max Pulse Range G10 65 2776178 2366578 G10 G20 85 S D 2776178 G10 G20 85 C P D bellows Z 0 to 360 2748871 Z 360 to 390 2748871 G20 A0 2776178 2776178 The bellows fo...

Page 91: ...ellows 390 mm 2108621 The bellows for G10 G20 D are options at shipment For the Cleanroom model G10 G20 C and Protected model G10 G20 P D with bellows option the motion range set with the Joint 3 mechanical stop cannot be changed 5 1 4 Max Pulse Range of Joint 4 The 0 zero pulse position of Joint 4 is the position where the flat face on the shaft end is facing toward the tip of Arm 2 With the 0 pu...

Page 92: ... to any length less than the maximum stroke Table Top Mounting Mechanical stop of Joint 2 Adjustable Mechanical stop of Joint 1 Fixed Mechanical stop of Joint 3 Lower limit mechanical stop Do not move the upper limit mechanical stop Mechanical stop of Joint 1 Adjustable Mechanical stop of Joint 2 Fixed Wall Mounting Mechanical stop of Joint 1 Fixed Mechanical stop of Joint 1 Adjustable Ceiling Mou...

Page 93: ...l stop settings Install the bolts in the holes corresponding to the angle that you want to set a b c d e f g h Joint 1 Mechanical Stops Joint 1 Mounting Arm Length a b c d e f g h Table Top 65 85 A0 152 107 60 15 15 60 107 152 Ceiling 85 A0 Ceiling 65 Wall 65 85 A0 a b c d e f g h Setting Angle 152 107 60 15 15 60 107 152 Pulse Value 7048761 5738041 4369067 3058347 2184534 873814 495161 1805881 de...

Page 94: ...122 5 152 5 152 5 122 5 G10 G20 85 CR CW PR PW DR bellows DW bellows 85 100 130 130 100 Table Top 65 122 5 152 5 152 5 122 5 Ceiling Wall 65 100 130 130 100 The bellows for G10 G20 D are options at shipment Setting Angle 100 121 122 5 151 152 5 Pulse Value 1820445 2202738 2230045 2748871 2776178 Setting Angle 152 5 151 122 5 121 100 Pulse Value 2776178 2748871 2230045 2202738 1820445 degree In the...

Page 95: ... arm by hand until it touches the mechanical stops and make sure that the arm does not hit any peripheral equipment during operation 6 Operate the joint changed at low speeds until it reaches the positions of the minimum and maximum pulse range Make sure that the arm does not hit the mechanical stops Check the position of the mechanical stop and the motion range you set Example Using G10 854S The ...

Page 96: ...be removed Push the shaft up to a position where the Joint 3 mechanical stop can be changed When you press the brake release switch the shaft may lower and rotate due to the weight of the end effector Be sure to hold the shaft by hand while pressing the button Lower limit mechanical stop 2 M5 6 set screw Brake release switch Shaft 3 Turn OFF the Controller 4 Loosen the lower limit mechanical stop ...

Page 97: ...mechanical stop by 80 mm and changing the lower limit Z coordinate value to 100 in 180 mm stroke 100 25 131072 66 32 1081344 EPSON RC Execute the following command from the Command Window JRANGE 3 1081344 0 Sets the pulse range of Joint 3 Example When lowering the mechanical stop by 320 mm and changing the lower limit Z coordinate value to 100 in 420 mm stroke 100 50 131072 66 32 540672 EPSON RC E...

Page 98: ... RC Execute the following commands from the Command Window MOTOR ON Turns ON the motor SPEED 5 Sets low speed PULSE 0 0 540672 0 Moves to the lower limit pulse position of Joint 3 In this example all pulses except those for Joint 3 are 0 Substitute these 0s with the other pulse values specifying a position where there is no interference even when lowering Joint 3 5 3 Setting the Cartesian Rectangu...

Page 99: ... the Area limited by mechanical stop and radius of the end effector The total value is specified as the maximum area Table Top Mounting Center of Joint 3 Maximum space Motion range Area limited by mechanical stop Base mounting face G20 A0 G10 G20 85 G10 65 G10 G20 85 S 207 8 G10 G20 85 C 218 3 degree a b c d e f g h j k q G10 65 152 3 152 5 3 5 199 4 212 4 250 650 620 7 626 6 152 5 G10 G20 85 S D ...

Page 100: ... r s G10 65 W 107 3 130 3 5 291 2 306 5 250 650 473 1 485 5 130 133 5 231 2 G10 G20 85 SW DW 152 5 183 3 207 8 450 850 531 6 553 9 152 5 156 123 3 G10 G20 85 CW PW DW bellows 151 5 218 3 151 G20 A0 W 152 5 3 5 285 4 307 600 1000 575 4 605 2 152 5 225 4 m n p t G10 G20 1SW DW 180 5 5 202 5 G10 G20 4SW DW 420 G10 G20 1CW PW DW bellows 150 1 1 8 240 5 G10 G20 4CW PW DW bellows 390 The bellows for G10...

Page 101: ...10 65 R 107 3 130 3 5 291 2 306 5 250 650 473 1 485 5 130 133 5 231 2 G10 G20 85 SR DR 152 152 5 183 3 207 8 450 850 797 3 807 8 152 5 156 123 3 G10 G20 85 CR PR DR bellows 151 5 218 3 151 G20 A0 R 152 5 3 5 285 4 307 600 1000 929 8 943 8 152 5 225 4 m n p t G10 G20 1SR DR 180 5 5 447 5 G10 G20 4SR DR 420 G10 G20 1CR PR DR bellows 150 1 1 8 485 5 G10 G20 4CR PR DR bellows 390 The bellows for G10 G...

Page 102: ...Setup Operation 5 Motion Range 90 G10 G20 Rev 20 ...

Page 103: ...Maintenance This volume contains maintenance procedures with safety precautions for G10 G20 series Manipulators ...

Page 104: ......
Page 105: ...urses Do not enter the operating area while the power is ON Entering the operating area with the power ON is extremely hazardous and may cause serious safety problems as the Manipulator may move even it seems to be stopped When you check the operation of the Manipulator after replacing parts be sure to check it while you are outside of the safeguarded area Checking the operation of the Manipulator...

Page 106: ...ing trouble and ensuring safety Be sure to perform the maintenance inspections in accordance with the schedule 2 1 Maintenance Inspection 2 1 1 Schedule for Maintenance Inspection Inspection points are divided into five stages daily monthly quarterly biannual and annual The inspection points are added every stage If the Manipulator is operated for 250 hours or longer per month the inspection point...

Page 107: ...lean up if necessary External appearance of Manipulator External cables Check for bends or improper location Repair or place it properly if necessary Safeguard etc Check tension of timing belts Tighten it if necessary Inside of Arm 2 Grease conditions Refer to Maintenance 2 3 Greasing Battery Refer to Maintenance 11 Lithium Battery Inspection While the Power is ON Manipulator is operating Inspecti...

Page 108: ...th the maximum motion speed and maximum acceleration deceleration in continuous operation applied on the Manipulator For the EPSON RC 7 0 Ver 7 2 x or later firmware Ver 7 2 x x or later the recommended replacement time for the parts subject to maintenance motors reduction gear units and timing belts can be checked in the Maintenance dialog box of the EPSON RC 7 0 For details refer to the followin...

Page 109: ...atus button to open the Browse For Folder dialog 3 Select the folder where the information is stored 4 Click OK to view the Controller Status Viewer dialog 5 Select Robot from the tree menu on the left side Dialog image EPSON RC 7 0 For the parts subject to overhaul refer to Maintenance 15 Maintenance Parts List For details of replacement of each part refer to the Maintenance section Please contac...

Page 110: ...horoughly with soap and water Greasing part Greasing Interval Grease Refer to Maintenance Joint 1 Joint 2 Reduction gear units Overhaul timing SK 1A 5 2 Replacing the Joint 1 Reduction Gear Unit 6 2 Replacing the Joint 2 Reduction Gear Unit Joint 3 Ball screw spline unit At 100 km of operation 50 km for first greasing AFB 10 1 Greasing the Ball Screw Spline Unit Joint 4 Backlash less gear In Joint...

Page 111: ... the EPSON RC 5 0 For details refer to the following manual Robot Controller RC180 Appendix Alarm Greasing Joint 4 Backlash less gear G10 only Name Quantity Note Maintenance Parts For Ball Screw spline AFB grease Proper quantity R13ZA00330200 Tools Flat blade screwdriver 1 Hexagonal wrench width across flats 3 mm 1 For M4 screw Grease gun or Plastic syringe 10 to 20g Wiping cloth 1 For wiping grea...

Page 112: ...be fastened in a crisscross pattern as shown in the figure below 1 5 3 7 2 6 4 8 Bolt hole Do not fasten all bolts securely at one time Divide the number of times that the bolts are fastened into two or three and fasten the bolts securely with a hexagonal wrench Then use a torque wrench so that the bolts are fastened with tightening torques shown in the table above 2 5 Matching Origins After parts...

Page 113: ...ry board Joint 1 motor Joint 2 reduction gear unit Joint 1 reduction gear unit Brake release switch Ball screw spline unit Joint 4 motor Cable unit Z belt U belt Joint 2 motor Joint 4 brake Arm cover Joint 3 brake Figure G10 851S LED lamp Power cable Signal cable G10 C Cleanroom model G10 D P Protected model D With bellows option Bellows C D P Brake release switch for D P Bellows C D P Gasket D P ...

Page 114: ...ase switch Ball screw spline unit Joint 3 motor Cable unit Z belt U belt Joint 2 motor Arm cover Joint 3 brake LED lamp Power cable Signal cable Joint 4 motor G20 C Cleanroom model G20 D P Protected model D With bellows option Figure G20 851P Bellows C D P Brake release switch for D P Bellows C D P Gasket D P Gasket P Gasket D P Gasket D P Gasket D P Gasket D P Gasket D P Gasket D P Gasket D P Gas...

Page 115: ...release switch Ball screw spline unit Joint 4 motor Cable unit Z belt U belt Joint 2 motor Joint 4 brake Arm cover Joint 3 brake LED lamp Power cable Signal cable G10 CW Cleanroom model G10 DW PW Protected model D With bellows option Figure G10 851PW Bellows C D P Brake release switch for D P Bellows C D P Gasket D P Gasket P Gasket D P Gasket D P Gasket D P Gasket D P Gasket D P Gasket D P Gasket...

Page 116: ...release switch Ball screw spline unit Joint 3 motor Cable unit Z belt U belt Joint 2 motor Arm cover Joint 3 brake LED lamp Power cable Signal cable Joint 4 motor G20 CW Cleanroom model G20 DW PW Protected model D With bellows option Figure G20 851PW Bellows C D P Brake release switch for D P Bellows C D P Gasket D P Gasket P Gasket D P Gasket D P Gasket D P Gasket D P Gasket D P Gasket D P Gasket...

Page 117: ...ase switch Ball screw spline unit Joint 4 motor Cable unit Z belt U belt Joint 2 motor Joint 4 brake Arm cover Joint 3 brake LED lamp Power cable Signal cable G10 CR Cleanroom model G10 DR PR Protected model D With bellows option Figure G20 851PR Bellows C D P Brake release switch for D P Bellows C D P Gasket D P Gasket P Gasket D P Gasket D P Gasket D P Gasket D P Gasket D P Gasket D P Gasket D P...

Page 118: ...se switch Ball screw spline unit Joint 3 motor Cable unit Z belt U belt Joint 2 motor Arm cover Joint 3 brake LED lamp Power cable Signal cable Joint 4 motor G20 CR Cleanroom model G20 DR PR Protected model D With bellows option Figure G20 851PR Bellows C D P Brake release switch for D P Bellows C D P Gasket D P Gasket P Gasket D P Gasket D P Gasket D P Gasket D P Gasket D P Gasket D P Gasket D P ...

Page 119: ...0 65 For S N 1 or later The following maintenance parts have been added for G10 65 manipulator of S N 1 or later Standard model G10 65 S Heat sink Radiating unit Cleanroom model G10 65 C Heat sink Radiating unit Protection model G10 65 P Heat sink Radiating unit ...

Page 120: ... procedure with the power ON is extremely hazardous and may result in electric shock and or malfunction of the robot system Be careful not to get any foreign substances in the Manipulator connectors and pins during maintenance Turning ON the power to the robot system when any foreign substances exist in them is extremely hazardous and may result in electric shock and or malfunction of the robot sy...

Page 121: ...m cap Side cover Connector plate Connector sub plate Wall mounting Ceiling mounting Maintenance plate Arm top cover Arm bottom cover Side cover Arm cap Arm cap Side cover Connector plate Connector sub plate Maintenance plate Arm top cover Arm bottom cover Side cover Arm cap Arm cap Side cover Connector plate Connector sub plate Base bottom cover Except G10 G20 SR ...

Page 122: ...o their original locations Arm Top Cover Removal 1 Turn ON the Controller 2 Press and hold the brake release switch to let the shaft down Be sure to keep enough space and prevent the end effector hitting any peripheral equipment The brake release switch affects both Joints 3 and 4 When the brake release switch is pressed the brakes for both Joints 3 and 4 are released simultaneously Be careful of ...

Page 123: ...t G20 P only Gaskets are installed to G20 P Arm Top Cover Installation 1 Set the arm top cover to the arm and secure with the arm top cover mounting bolts After mounting the arm top cover make sure that the lower limit mechanical stop does not touch the cylindrical part of the arm top cover Cylinder part of the arm top cover Shaft Lower limit mechanical stop Brake release switch When bellows are i...

Page 124: ...c remove the end effector If it is not necessary to remove the cover completely move the shaft to the lower limit and lower the arm bottom cover Then perform maintenance or inspection When bellows are installed to the manipulator remove or pull down the lower bellows and then remove the arm bottom cover For bellows removal refer to Maintenance 9 Bellows G10 G20 S Standard model G10 G20 C Cleanroom...

Page 125: ... caps to remove them 3 3 1 G10 G20 S Standard model G10 G20 C Cleanroom model Arm side Common part Base side For the arm cap 4 M4 8 For the side cover 4 M4 15 Table Top mounting For the side cover 4 M4 15 For the arm cap 4 M4 8 Wall mounting For the side cover 4 M4 15 For the arm cap 4 M4 8 Ceiling mounting For the side cover 4 M4 15 For the arm cap 4 M4 8 ...

Page 126: ...Gasket Sealing washer Table Top mounting For the side cover 4 M4 15 For the arm cap 4 M4 8 Gaskets Sealing washer Wall mounting For the side cover 4 M4 15 For the arm cap 4 M4 8 Gaskets Sealing washer Ceiling mounting For the side cover 4 M4 15 For the arm cap 4 M4 8 Gaskets Sealing washer Gaskets and sealing washers are installed to G10 G20 D P Protected model ...

Page 127: ...bles disconnection or contact failure is extremely hazardous and may result in electric shock and or improper function of the robot system When routing the cables observe the cable locations after removing the connector plate Be sure to place the cables back to their original locations Unscrew the connector plate mounting bolts and remove the plate G10 G20 S Standard model G10 G20 C Cleanroom mode...

Page 128: ...s may result in damage to the cables disconnection and or contact failure Damaged cables disconnection or contact failure is extremely hazardous and may result in electric shock and or improper function of the robot system When routing the cables observe the cable locations after removing the connector sub plate Be sure to place the cables back to their original locations Unscrew the connector sub...

Page 129: ...ate 4 M4 10 User plate Gasket Sealing washer A gasket and sealing washers are installed to G10 G20 D P Protected model 3 7 Maintenance Plate Unscrew the maintenance plate mounting bolts and remove the plate G10 G20 S Standard model G10 G20 C Cleanroom model G10 G20 D P Protected model Table Top mounting 4 M4 5 Maintenance plate 4 M4 8 Maintenance plate Gasket Spacer Wall mounting 4 M4 5 4 M4 8 Mai...

Page 130: ... unit Unscrew the base bottom cover mounting bolts and remove the cover G10 G20 C Cleanroom model G10 G20 D P Protected model Table Top mounting 8 M3 8 8 M3 8 Gasket Ceiling mounting 8 M3 8 8 M3 8 Gasket A gasket is installed to G10 G20 D P Protected model A base bottom cover is not installed to G10 G20 S Standard model NOTE ...

Page 131: ...onnect the power plug from the power source Performing any replacement procedure with the power ON is extremely hazardous and may result in electric shock and or malfunction of the robot system Be careful not to get any foreign substances in the Manipulator connectors and pins during maintenance Turning ON the power to the robot system when any foreign substances exist in them is extremely hazardo...

Page 132: ...xes For details of the calibration refer to Maintenance 14 Calibration Name Quantity Note Maintenance parts Cable unit 1 Each manipulator model Refer to Maintenance 15 Maintenance parts Battery Unit Lithium battery 1 R13ZA00600300 Tools Hexagonal wrench width across flats 3 mm 1 For M4 screw width across flats 4 mm 1 For M5 screw width across flats 5 mm 1 For M6 screw Spanner width across flats 5 ...

Page 133: ...or later is different from other models in its form For the detail refer to Setup Operation 2 6 4 G10 65 For S N 1 or later G10 G20 Table Top mounting Cable Unit Cable Unit G10 G20 Wall mounting Cable Unit Cable Unit G10 G20 Ceiling mounting Cable Unit Cable Unit NOTE ...

Page 134: ... result in damage to the cables disconnection and or contact failure Damaged cables disconnection or contact failure is extremely hazardous and may result in electric shock and or improper function of the robot system When routing the cables observe the cable locations after removing the cover Be sure to place the cables back to their original locations Be sure to connect the cables properly Do no...

Page 135: ...tor plate For details refer to Maintenance 3 4 Connector Plate 5 Connect the spare battery to connector XB11 The position data of Joint 1 motor is stored with the battery on Arm 2 Connect the spare battery otherwise the Joint 1 position data will be lost 6 Disconnect the air tubes ground wire D sub cable and seven connectors X10 X20 X30 X111 X121 X131 XB10 connected to the connector plate inner si...

Page 136: ...Arm 1 Cover 9 Remove the arm top cover For details refer to Maintenance 3 1 Arm Top Cover 10 Remove the user plate For details of user plate removal refer to Maintenance 3 6 User Plate 11 Disconnect the D sub cable air tubes and connector of the brake release switch from the user plate Mounting screws for the D sub cable are very small Be sure to keep the screws Press the ring on the fitting and p...

Page 137: ... 3 terminals Ground terminal G10 Ground terminal G20 15 Remove the saddle part mounting cables inside Arm 2 16 Remove the spring plate 17 2 M4 10 Saddle part Wire tie 18 2 M4 8 Spring plate G10 17 2 M4 10 18 2 M4 8 G20 Saddle part Wire tie Spring plate 17 Cut off the two wire tie binding cables 18 Disconnect the Base side cables from Arm 1 Table Top mounting Disconnect from the upper part of Arm 1...

Page 138: ...nnect the air tubes Then disconnect from the smaller connectors in order Do not try to disconnect the cables forcibly Otherwise connectors may be stuck disconnected or connector pins may fall off Cable 21 Disconnect the cables that were disconnected to the lower part of Arm 1 in step 20 to the side of Arm 1 Cable 22 Remove the spring plate mounting bolts on both the Arm 1 side and the Arm 2 side A...

Page 139: ...1 241 X21 22 31 32 33 X41 42 X61 Connector X121 131 X20 30 XB10 2 Cover both ends of the cables with plastic bags The photo shows one end covered with plastic bags The plastic bags prevent grease adhesion to the ends of connectors and air tubes while drawing the cables 3 Refer to step 1 and insert the cables to Arm 1 in the proper direction Cable G10 Cable G20 4 Set the mounting holes of the sprin...

Page 140: ...unting type or Ceiling mounting type 6 1 Mount the spring for cable protection to the spring plate with a wire tie Spring plate Wire tie Spring 6 2 Mount the spring plate to the base 2 M4 15 Spring plate 6 3 Move Arm 1 to the right or left until the arm touches the mechanical stop to make allowance Then band the cables and air tubes with a wire tie If you band the cables and tubes without allowanc...

Page 141: ...t the cables move Spring plate 6 4 Move Arm 1 to the right or left until the arm touches the mechanical stop to make allowance Then band the cables and air tubes with a wire tie If you band the cables and tubes without allowance the cables are pulled and may be disconnected during the robot operation Make sure to make allowance Wire tie 6 5 Remove the plastic bags on the base side applied in step ...

Page 142: ... pull the cables into Arm 2 Cable 10 Mount the spring for cable protection to the spring plate with a wire tie Secure the spring plate to Arm 2 Wire tie Spring plate Spring 2 M4 8 G10 G20 11 Move Arm 2 until the arm touches the mechanical stop to make allowance push the cables toward the spring by approx 20 mm Then band the cables and air tubes with a wire tie If you band the cables and tubes with...

Page 143: ...ound wire tighten it with the terminal of D sub cable 17 Mount the user plate to the Arm 2 cover For details of user plate installation refer to Maintenance 3 6 User Plate 18 Set and secure the Arm 2 cover without the cables being stuck For details refer to Maintenance 3 1 Arm Top Cover 19 Mount the arm caps and side covers for Arm 1 For details refer to Maintenance 3 3 Arm 1 Cover 20 Remove the c...

Page 144: ... Cable 132 G10 G20 Rev 20 4 2 Wiring Diagrams 4 2 1 Signal Cable Cable color Pink Red Violet White Yellow Code P R V W Y Cable color Black Brown Green Blue Orange Code B BR G L O Mounting plate Detail Board Diagram ...

Page 145: ...Maintenance 4 Cable G10 G20 Rev 20 133 4 2 2 Power Cable RC180 Cable color Pink Red Violet White Yellow Code P R V W Y Cable color Black Brown Green Blue Light green Orange Code B BR G L LG O ...

Page 146: ...Maintenance 4 Cable 134 G10 G20 Rev 20 RC700 A RC700DU A Cable color Pink Red Violet White Yellow Code P R V W Y Cable color Black Brown Green Blue Light green Orange Code B BR G L LG O ...

Page 147: ...r B Black R Red BR Brown V Violet G Green W White L Blue Y Yellow The following table shows the types of the use cable Environment Arm length Code Note S C 650 mm R13B020033 850 mm R13B020018 1000 mm R13B020019 P D 650 mm R13B020034 Waterproof connector 850 mm R13B020020 1000 mm R13B020021 ...

Page 148: ...er connection of the connectors may result in improper function of the robot system For details on the connections refer to Maintenance 4 2 Wiring Diagrams When mounting the cover be careful not to allow the cables to interfere with the cover mounting and do not bend these cables forcibly to push them into the cover Unnecessary strain on cables may result in damage to the cables disconnection and ...

Page 149: ... 1 or later is different from other models in its form For the detail refer to Setup Operation 2 6 4 G10 65 For S N 1 or later G10 G20 Table Top mounting M C Cable M C Cable G10 G20 Wall mounting M C Cable M C Cable G10 G20 Ceiling mounting M C Cable M C Cable NOTE ...

Page 150: ...nique number Each connector has a different shape Do not disconect the battery connector XB10 Otherwise the calibration must be executed M C Cable Installation 5 Connect new M C cable connectors to those of the Cable Unit Connect to the connectors of the Cable Unit with the same number 6 Mount the Connector Sub Plate For details refer to Maintenance 3 5 Connector SubPlate 7 Connect the power cable...

Page 151: ... shock and or malfunction of the robot system CAUTION Be careful not to apply excessive shock to the motor shaft when replacing the motors The shock may shorten the life cycle of the motors and encoder and or damage them Never disassemble the motor and encoder A disassembled motor and encoder will cause a positional gap and cannot be used again After parts have been replaced motors reduction gear ...

Page 152: ...nance plate For details refer to Maintenance 3 7 Maintenance Plate 4 Remove the spring plate For the details refer to Maintenance 4 1 Replacing Cable Unit Cable unit Removal Step 7 2 for Table mounting Ceiling mounting 5 Remove the Joint 1 motor unit from the base To do so unscrew the bolts from the Joint 1 motor flange Then pull out the motor straight and downward To unscrew the two bolts on the ...

Page 153: ...of the waveform generator Be sure to install the waveform generator properly Improper installation of the waveform generator will result in improper function of the Manipulator 4 Insert the oil seal and mount the Joint 1 motor unit on the base Be sure to fit the O ring properly The motor cable must face the connector plate side If it is difficult to mount the motor push it while moving Arm 1 slowl...

Page 154: ...Maintenance 15 Maintenance parts list Name Quantity Note Maintenance Parts Reduction Gear Unit 1 R13B010013 Tools Hexagonal wrench width across flats 2 5 mm 1 For M5 set screw width across flats 4 mm 1 For M5 screw width across flats 6 mm 1 For M8 screw Torque wrench M5 1 Tightening torque 10 0 N m 101 9 kgf cm M8 1 Tightening torque 30 0 N cm 305 9 kgf cm Nippers 1 Spatula 1 For applying grease W...

Page 155: ...laterally CAUTION When turning the Manipulator laterally there must be two or more people to work on it so that at least one of them can support the arm while others are removing the bolts Removing the bolts without supporting the arm may result in the arm falling bodily injury and or malfunction of the robot system 4 Use the extracting M5 screws and remove the spacer flexspline and the grip ring ...

Page 156: ... M5 25 Item Bolt type Number of bolts Tightening torque Joint 1 reduction gear unit M5 25 16 10 0 N m 101 9 kgf cm M8 20 8 30 0 N m 305 9 kgf cm 3 Apply LOCTITE 241 on the screws Set the grip ring by aligning it with the tap hole Apply grease SK 1A on the gear side of the flexspline Set the flexspline by aligning it with the tap hole Align the position of the air vent of the spacer and secure the ...

Page 157: ... shock and or malfunction of the robot system CAUTION Be careful not to apply excessive shock to the motor shaft when replacing the motors The shock may shorten the life cycle of the motors and encoder and or damage them Never disassemble the motor and encoder A disassembled motor and encoder will cause a positional gap and cannot be used again After parts have been replaced motors reduction gear ...

Page 158: ...W 1 R13B000611 R13B000623 For S N 1 or later Tools Hexagonal wrench width across flats 2 5 mm 1 For M5 set screw width across flats 3 mm 1 For M4 screw width across flats 4 mm 1 For M5 screw Nippers 1 For cutting wire tie Spatula 1 For grease up Wiping cloth 1 For wiping grease Material Wire tie 3 Grease Grease SK 1A 28 g ...

Page 159: ...weight of an end effector 3 Turn OFF the Controller 4 Remove the arm top cover For details refer to Maintenance 3 1 Arm Top Cover 5 Cut off the wire tie used for binding the motor cables to the Joint 2 motor 6 Disconnect the following connectors Connectors X221 X21 Hold the claw to remove Connector X62 7 This step is for the Radiating Unit 7 1 Remove the mounting bolt of the heat sink Hexagon sock...

Page 160: ...int 2 motor unit upward to remove If the motor cannot be removed easily pull it out while moving Arm 2 slowly by hand 6 M4 15 G10 G20 10 Remove the wave generator from the Joint 2 motor There is a brass bushing in one of the set screw holes Be careful not to lose it 2 M5 8 set screw M5 bushing 11 Remove the motor flange from the Joint 2 motor 4 M5 15 ...

Page 161: ...t a space of 6 5 mm or less between the waveform generator edge and the motor shaft edge 2 M5 8 set screw M5 bushing Put the end faces together CAUTION See the figures above for the orientation of the waveform generator Be sure to install the waveform generator properly Improper installation of the waveform generator will result in improper function of the Manipulator 4 Mount the Joint 2 motor uni...

Page 162: ...1 and X62 8 Re bundle the cables in their original positions with a wire tie removed in the removal procedure step 5 Do not allow unnecessary strain on the cables 9 Mount the arm top cover For details refer to Maintenance 3 1 Arm Top Cover 10 Perform the calibration of Joint 2 For details refer to Maintenance 14 Calibration ...

Page 163: ...o Maintenance 15 Maintenance parts list Name Qty Note Maintenance parts Reduction Gear Unit 1 R13B010014 R13B010028 For G10 65 G10 85 S N 1 or later Hexagonal wrench width across flats 2 5 mm 1 For M5 set screw width across flats 4 mm 1 For M5 screw width across flats 6 mm 1 For M8 screw Torque wrench M5 1 Tightening torque 10 0 N m 102 kgf cm M8 1 Tightening torque 30 0 N m 306 kgf cm Nippers 1 S...

Page 164: ...ressed the respective brakes of the Joints 3 and 4 are released simultaneously Be careful of the shaft falling and rotating while the brake release switch is being pressed because the shaft may be lowered by the weight of an end effector 3 Turn OFF the Controller 4 Execute steps from 1 to 9 in Maintenance 6 1 Replacing Joint 2 Motor and remove the waveform generator from the Joint 2 motor 5 Use th...

Page 165: ...e specified in the table below 16 M5 25 Circular spline G10 G20 Item Bolt type Number of bolts Tightening torque Joint 2 reduction gear unit M5 25 16 10 0 N m 102 kgf cm M8 20 8 30 0 N m 306 kgf cm 3 Apply grease SK 1A on the flexspline teeth Set the flexspline by aligning it with the tap hole Aligning the tap hole and mount the flexspline Align the position of the air vent of the spacer If it is ...

Page 166: ...lectric shock and or malfunction of the robot system CAUTION Be careful not to apply excessive shock to the motor shaft when replacing the motors The shock may shorten the life cycle of the motors and encoder and or damage them Never disassemble the motor and encoder A disassembled motor and encoder will cause a positional gap and cannot be used again After parts have been replaced motors reductio...

Page 167: ...e Move the shaft down to its lower limit before starting the replacement procedure by following the removal steps from 1 to 3 Joint 3 motor Removal 1 Turn ON the Controller 2 Push down the shaft to its lower limit while pressing the brake release switch Be sure to keep enough space and prevent the end effector hitting any peripheral equipment The brake release switch is applied to both Joints 3 an...

Page 168: ...e Battery unit G10 G20 3 point mounting Plate Battery unit G10 G20 8 Loosen the Z belt Loosen four bolts on the Joint 3 motor unit Slide the Joint 3 motor unit to the end of the arm 4 M4 15 Washer Joint 3 motor unit G10 G20 9 Remove the motor from the Joint 3 motor unit 2 M5 20 Joint 3 motor 2 M5 10 G10 G20 10 Remove the brake unit mounting bolts from the Joint 3 motor unit Leave the brake unit mo...

Page 169: ...e plate Be sure to pass the motor through the belt Place the Joint 3 motor to the plate so that the motor cable faces toward the left from the end of Arm 2 2 M5 20 Joint 3 motor 2 M5 10 G10 G20 Cable 3 Place the Z belt around the Z1 pulley and the Z2 pulley so that the gear grooves of the belt are fit into those of the pulleys completely Z belt Z2 pulley Z1 pulley G10 Z belt Z2 pulley Z1 pulley G2...

Page 170: ...se the plate of 3 point mounting mount the plate with pressing it to the motor side G10 series Joint 4 motor side G20 series Joint 3 motor side When mounting the battery unit mounting bolts be sure to keep the connectors connected to the battery unit If connectors of the battery unity are disconnected you need to perform calibration again 4 point mounting 4 M4 10 Plate Battery unit G10 G20 3 point...

Page 171: ...nce parts Z belt G10 width 12 mm 1 R13B030209 G20 width 12 mm 1 R13B030211 Tools Hexagonal wrench width across flats 1 5 mm G10 1 For M3 set screw width across flats 3 mm 1 For M4 screw width across flats 4 mm 1 For M5 screw Nippers 1 For cutting wire tie Force gauge 1 Belt tension 160 N 16 3 kgf Suitable cord Length about 800 mm 1 For belt tension Wiping cloth 1 For wiping grease Material Wire ti...

Page 172: ... the brake unit from Arm 2 2 Remove the Joint 4 motor unit from Arm 2 Pull out the U belt from the U1 pulley to remove it 4 M4 15 Joint 4 motor unit 3 Remove the brake hub Loosen the two set screws and pull out the brake hub 2 M3 4 set screw Brake hub 4 Remove the brake There is a wave washer between the housing and the bearing Be careful not to lose it The gear for Z axis is a backlash less gear ...

Page 173: ...crews 2 M3 4 set screw Brake hub 6 Align the brake disk to the hub and mount the Joint 3 motor to the plate Be sure to pass the motor through the belt Place the Joint 3 motor to the plate so that the motor cable faces toward the left from the end of Arm 2 2 M5 20 Cable 2 M5 10 7 Place the Z belt around the Z1 pulley and the Z2 pulley so that the gear grooves of the belt are fit into those of the p...

Page 174: ... the motor unit can be moved by hand and it will not tilt when pulled If the unit is secured too loose or too tight the belt will not have the proper tension 4 M4 15 Washer Joint 4 motor unit 12 Apply the proper tension to the Z belt and U belt and then secure the Joint 3 motor unit and Joint 4 motor unit To do so pass a suitable cord or string around the motor unit near its mounting plate Then pu...

Page 175: ...connectors of the battery unity are disconnected you need to perform calibration again 4 point mounting 4 M4 10 Plate Battery unit 3 point mounting Plate Battery unit 14 Re bundle the cables in their original positions with a wire tie removed in the removal procedure Do not allow unnecessary strain on the cables 15 Install the arm top cover and the arm bottom cover For details refer to Maintenance...

Page 176: ...lt Removal G20 1 Execute the removal steps from 1 to 10 in Maintenance 7 1 Replacing Joint 3 Motor to remove the Joint 3 motor Do not remove the brake unit from Arm 2 2 Remove the Z belt Remove the bolts securing the spline plate Hold the spline plate and pull out the Z belt from the shaft upwards 3 M5 15 Z belt Spline plate Z belt Installation G20 1 Pass a new Z belt through the shaft from above ...

Page 177: ...t the shaft from moving down due to the weight of the end effector while the power to the Controller is OFF or while the motor is in OFF status MOTOR OFF Note that the brake will not work during the replacement procedure Move the shaft down to its lower limit before the replacement procedure following the removal steps Joint 3 brake Removal 1 Execute the removal steps from 1 to 10 in Maintenance 7...

Page 178: ...ey 2 M3 4 Set screw Brake hub 2 Mount the brake support to the brake 3 M3 8 Brake Brake support 3 Mount back the Joint 3 brake unit to Arm 2 The screws are not secured in this step Brake unit G20 G10 4 Connect the connector Connector X32 5 Execute steps from 2 to 10 in Maintenance 7 1 Replacing Joint 3 ...

Page 179: ...ion of the robot system CAUTION Be careful not to apply excessive shock to the motor shaft when replacing the motors The shock may shorten the life cycle of the motors and encoder and or damage them Never disassemble the motor and encoder A disassembled motor and encoder will cause a positional gap and cannot be used again After parts have been replaced motors reduction gear units brakes timing be...

Page 180: ...3 screw width across flats 3 mm 1 For M4 screw Nipper 1 For cutting wire tie Force gauge G10 1 Belt tension 160 N 16 3 kgf G20 1 Belt tension 200 N 20 3 kgf Scale G20 1 Ring mounting height 16 5 mm Suitable cord Length about 800 mm 1 For belt tension Material Wire tie 1 8 1 1 Replacing the Joint 4 Motor G10 A brake is mounted on the motor of Joints 3 and 4 to prevent the shaft from moving down due...

Page 181: ... Cut off the wire tie used for binding the motor cables to the Joint 4 motor 6 Disconnect the following connectors Connectors X241 X41 Hold the claw to remove Connector X64 7 When you use the plate of 3 poin mounting loosen the plate mounting bolt Be sure to keep the connectors connected to the battery unit If connectors of the battery unity are disconnected you need to perform calibration again W...

Page 182: ...otor unit 3 Place the U belt around the U1 pulley and the U2 pulley so that the gear grooves of the belt are fit into those of the pulleys completely 4 Loosely secure the Joint 4 motor unit to Arm 2 Loosely secure the Joint 4 motor unit to Arm 2 so that the motor unit can be moved by hand and it will not tilt when pulled If the unit is secured too loose or too tight the belt will not have the prop...

Page 183: ... you use the plate of 4 point mounting you do not have to mount the plate 3 point mounting Plate Battery unit 7 Connect the connectors X241 X41 and X64 8 Re bundle the cables in their original positions with a wire tie removed in step 5 Do not allow unnecessary strain on the cables 9 Install the arm top cover and the arm bottom cover For details refer to Maintenance 3 Covers 10 Perform the calibra...

Page 184: ...When the brake release switch is pressed the respective brakes of the Joints 3 and 4 are released simultaneously Be careful of the shaft falling and rotating while the brake release switch is being pressed because the shaft may be lowered by the weight of an end effector 3 Turn OFF the Controller 4 Remove the arm top cover and the arm bottom cover For details refer to Maintenance 3 Covers 5 Cut of...

Page 185: ...m 2 Secure the Joint 4 motor to the reduction gear unit so that the Joint 4 motor cable faces toward the left from the end of Arm 2 2 M4 10 Joint 4 motor Reduction gear unit M3 10 Securing the motor shaft 3 Secure the motor shaft to the reduction gear unit 4 Connect the connectors X241 X41 and X64 6 Re bundle the cables in their original positions with a wire tie removed in the removal procedure D...

Page 186: ... Note Maintenance parts U belt width 15 mm G10 1 R13B030210 width 20 mm G20 1 R13B030212 Tools Hexagonal wrench width across flats 1 5 mm G10 1 For M3 set screw width across flats 3 mm 1 For M4 screw width across flats 4 mm 1 For M5 screw Nippers 1 For cutting wire tie Force gauge 1 Belt tension 130N 160N 200N 13 3kgf 16 3kgf 20 4kgf Suitable cord Length about 800 mm 1 For belt tension ...

Page 187: ...e brake release switch is pressed the respective brakes for Joints 3 and 4 are released simultaneously Be careful of the shaft falling and rotating while the brake release switch is being pressed because the shaft may be lowered by the weight of an end effector 3 Turn OFF the Controller 4 Remove the arm top cover and the arm bottom cover For details refer to Maintenance 3 Covers 5 When you use the...

Page 188: ...earing Be careful not to lose it The gear for Z axis is a backlash less gear Be sure to keep the gear and pinion engage If the gear is out of joint refer to step 7 in Ball Screw Spline Unit Installation of Maintenance 10 2 1 Replacing the Ball Screw Spline Unit G10 to engage the gear 4 M4 12 Brake Wave washer Bearing 10 Remove the Z belt from the Z pulley and remove the U belt Remove the bolts sec...

Page 189: ...can be moved by hand and it will not tilt when pulled If the unit is secured too loose or too tight the belt will not have the proper tension 4 M4 15 Washer Joint 3 motor unit 4 Mount the brake to the Joint 4 intermediate pulley unit When mounting the brake be sure to keep the wave washer from being stuck 4 M4 12 Brake Wave washer Bearing 5 Secure the brake hub with the two set screws 2 M3 4 set s...

Page 190: ...unit 4 M4 15 Washer G10 U belt tension 160 N 16 3 kgf Force gauge Joint 4 motor unit 8 When you use the plate of 4 point mounting mount the plate When you use the plate of 3 point mounting mount the plate with pressing it to the Joint 4 motor When mounting the battery unit be sure to keep the connectors connected to the battery unit If connectors of the battery unity are disconnected you need to p...

Page 191: ...th Joints 3 and 4 When the brake release switch is pressed the respective brakes of the Joints 3 and 4 are released simultaneously Be careful of the shaft falling and rotating while the brake release switch is being pressed because the shaft may be lowered by the weight of an end effector 3 Turn OFF the Controller 4 Remove the arm top cover and the arm bottom cover For details refer to Maintenance...

Page 192: ...t from Arm 2 4 M4 15 Washer Joint 4 motor unit 8 Remove the Z belt from the Z pulley and remove the U belt Remove the bolts securing the spline plate Hold the spline plate and pull out the Z belt from the Z pulley upwards and remove the U belt 3 M5 15 U belt Spline plate ...

Page 193: ... not tilt when pulled If the unit is secured too loose or too tight the belt will not have the proper tension 4 M4 15 Washer Joint 3 motor unit 4 Set the Joint 4 motor unit in Arm 2 Place the Joint 4 motor unit in Arm 2 so that the motor cable faces toward the left from the end of Arm 2 4 M4 15 washer Joint 4 Motor unit 5 Place the U belt around the U1 pulley and the U2 pulley so that the gear gro...

Page 194: ...motor unit How to apply the proper tension to the U belt of G20 There is a bolt on the Z axis plate part to apply tension to the U belt Since it is difficult to apply 200N tension on the U belt only by human power The procedure to apply tension using the bolt is as follows We recommend the Tensometer U series from Gates Unitta for measuring the belt tension Tensometer setting Weight 5 25 g m Width...

Page 195: ...y unit be sure to keep the connectors connected to the battery unit If connectors of the battery unity are disconnected you need to perform calibration again 4 point mounting 4 M4 10 Plate Battery unit 3 point mounting Plate Battery unit 9 Install the arm top cover and the arm bottom cover For details refer to Maintenance 3 Covers 10 Perform the calibration of Joint 3 For details refer to Maintena...

Page 196: ...TOR OFF Note that the brake will not work during the replacement procedure Move the shaft down to its lower limit before the replacement procedure following the removal steps from 1 to 3 Joint 4 brake Removal G10 1 Turn ON the Controller 2 Push down the shaft to its lower limit while pressing the brake release switch Be sure to keep enough space and prevent the end effector hitting any peripheral ...

Page 197: ...rform calibration again When you use the plate of 4 point mounting you do not have to loosen the plate mounting bolt 3 point mounting Plate Battery unit G10 8 Loosen the U belt Loosen bolts on the Joint 4 motor unit Slide the Joint 4 motor unit to the end of the arm 4 M4 15 Washer Joint 4 motor unit 9 Remove the brake hub Loosen the two set screws and pull out the brake hub 2 M3 4 set screw Brake ...

Page 198: ...o the battery unit If connectors of the battery unity are disconnected you need to perform calibration again When you use the plate of 4 point mounting you do not have to mount the plate 3 point mounting Plate Battery unit G10 5 Apply the proper tension to the U belt and then secure the Joint 4 motor unit To do so pass a suitable cord or string around the Joint 4 motor unit near its mounting plate...

Page 199: ...d G20 series are different Name Quantity Note Maintenance parts Reduction Gear Unit G10 1 R13B031601 G20 1 R13B010015 Tools Hexagonal wrench width across flats 2 5 mm G10 1 For M3 screw width across flats 3 mm 1 For M4 screw width across flats 4 mm 1 For M5 screw Nippers 1 For cutting wire tie Force gauge 1 Belt tension 130N 160N 200N 13 3 kgf 16 3 kgf 20 4 kgf ...

Page 200: ...t before the replacement procedure following the removal steps Reduction Gear Unit Removal G10 1 Refer to the removal steps 1 to 13 in Maintenance 10 2 1 Replacing the Ball Screw Spline Unit G10 and remove the U belt M4 10 2 Secure the Z gear Before removing the reduction gear unit secure the Z gear with pressure on the Z gear 3 Remove the reduction gear unit Reduction gear unit Bearing 4 Remove t...

Page 201: ...efore the replacement procedure following the removal steps Joint 4 Reduction gear unit Removal G20 1 Refer to the removal steps 1 to 7 in Maintenance 8 2 2 Replacing the Timing Belt G20 and remove the Joint 4 motor unit from Arm 2 2 M4 10 Joint 4 motor Joint 4 reduction gear unit M3 10 To secure the motor shaft 2 Remove the Joint 4 motor from the reduction gear unit Unscrew the bolt of reduction ...

Page 202: ...t the plate Joint 4 reduction gear unit Plate 4 M5 18 3 Mount the Joint 4 motor to the reduction gear unit Secure the blot of the reduction gear unit securing the Joint 4 motor shaft 2 M4 10 Joint 4 motor Joint 4 reduction gear unit M3 10 To secure the motor shaft 4 Execute the installation steps 4 to 10 in Maintenance 8 2 2 Replacing the Timing Belt G20 ...

Page 203: ...re removing the bellows Name Quantity Note Maintenance parts Bellows 150 mm 1 R13B030701 390 mm R13B030703 Tools Cross point screwdriver 1 For clamp band removal Bellows Removal 1 Remove the end effector 2 Remove the wires and tubes from the end effector 3 Turn ON the controller Stop motor excitation MOTOR OFF 4 Loosen the two clamp bands on each bellows Bellows Clamp band small Clamp band medium ...

Page 204: ...he bellows The bellows has two joints The larger joint must be attached to the cover side The smaller joint must be attached to the end face side of the shaft Be careful not to misplace the clamp bands The clamp band has three sizes small medium and large Attach the mounting part of the bellows until the end touches the cylindrical part of the cover Attach the rubber sheet Be sure to attach the ru...

Page 205: ...ellows move the shaft up down by hand several times and rotate Joint 4 Make sure that the bellows can expand and contract smoothly without any excessive force 6 Turn OFF the Controller and peripheral equipment 7 Attach the end effector 8 Connect the wires and tubes to the end effector ...

Page 206: ...t it directly to a factory power source Before performing any replacement procedure turn OFF the Controller and related equipment and then disconnect the power plug from the power source Performing any replacement procedure with the power ON is extremely hazardous and may result in electric shock and or malfunction of the robot system After parts have been replaced motors reduction gear units brak...

Page 207: ... Joint 3 can be moved in full stroke 3 Move the shaft to its upper limit manually while pressing the brake release switch Brake release switch 4 Turn OFF the Controller 5 Wipe off the old grease from the upper part of the shaft and then apply new grease to it When applying the new grease to the upper part of the shaft directly fill the grooves on it by hand Wipe off excess grease from the shaft 6 ...

Page 208: ...e Joint 3 can be moved in full stroke 3 Move the shaft to its lower limit manually while pressing the brake release switch Brake release switch 4 Clamp band 4 Loosen the clamp band under the bellows and then lift the bellows 5 Move the shaft to its upper limit manually while pressing the brake release switch 6 Shaft 7 Clamp band 6 Wipe off the old grease from the upper part of the shaft and then a...

Page 209: ...0 Move the shaft up and down several times while pressing the brake release switch to smooth out the grease on the shaft Wipe off excess grease from the shaft 11 Secure the bellows To attach the upper bellows move the shaft to its lower limit To attach the lower bellows move the shaft to its upper limit To move the shaft up down press and hold the brake release switch Attach the mounting part of t...

Page 210: ...rs 1 For cutting wire tie Cross point screwdriver 1 Only for Cleanroom model and Protected model Force gauge 1 G10 Belt tension 130N 160N 13 3 kgf 16 3 kgf G20 Belt tension 130N 200N 13 3 kgf 20 4 kgf Suitable cord Length about 1000 mm 1 For belt tension Wiping cloth 1 For wiping grease 10 2 1 Replacing the Ball Screw Spline Unit G10 A brake is mounted on the motor of Joints 3 and 4 to prevent the...

Page 211: ...ve the end effector 5 This step is only for Cleanroom model and Protected model C D with bellows option P Remove the bellows For details refer to Maintenance 9 Bellows 6 Remove the arm top cover and arm bottom cover For details refer to Maintenance 3 Covers 7 Cut off the wire tie banding motor cables to the Joint 3 motor and Joint 4 motor 8 When you use the plate of 4 point mounting remove the pla...

Page 212: ...l out the brake hub 2 M3 4 set screw Brake hub 12 Remove the brake There is a wave washer between the housing and the bearing Be careful not to lose it 4 M4 12 Brake Wave washer Bearing 13 Remove the U belt 3 M5 15 U belt 14 Remove the Joint 4 intermediate pulley Remove the shaft from the bearing and remove the intermediate pulley from the lower side of Arm 2 Intermediate pulley Bearing Shaft 15 R...

Page 213: ...r side of Arm 2 and engage the gear M4 10 Intermediate pulley Bearing Shaft 4 Remove the bolt of the Z gear The gear for Z axis is a backlash less gear consists of two gears The gear and pinion is pressurized Be sure to keep the gear and pinion engage M4 10 Slotted hole Assist gear Main gear Slotted hole Slotted hole Tap If the gear is out of joint 1 Rotate the main gear and the assist gear in the...

Page 214: ... the wave washer from being stuck 4 M4 12 Brake Wave washer Bearing 9 Secure the brake hub with the two set screws 2 M3 4 set screw Brake hub 10 Loosely secure the Joint 3 motor unit to Arm 2 Loosely secure the Joint 3 motor unit to Arm 2 so that the motor unit can be moved by hand and it will not tilt when pulled If the unit is secured too loose or too tight the belt will not have the proper tens...

Page 215: ...cord or string around the motor unit near its mounting plate Then pull the cord using a force gauge or similar tool to apply the specified tension shown in the figure on the right Make sure that the brake cables do not touch the pulley 4 M4 15 Washer G10 Z belt tension 130 N 13 3 kgf Force gauge Joint 3 motor unit 4 M4 15 Washer G10 U belt tension 160 N 16 3 kgf Force gauge Joint 4 motor unit 15 W...

Page 216: ...t For details refer to Maintenance 10 1 Greasing the Ball Screw Spline Unit 19 Install the arm top cover and arm bottom cover For details refer to Maintenance 3 Covers 20 Turn OFF the Controller and peripheral equipment 21 Install the end effector and connect wires and tubes to the end effector 22 This step is only for Cleanroom model and Protected model C D with bellows option P Install the bello...

Page 217: ...ive brakes of the Joints 3 and 4 are released simultaneously Be careful of the shaft falling and rotating while the brake release switch is being pressed because the shaft may be lowered by the weight of an end effector 3 Turn OFF the Controller 4 Detach the wires and tubes from the end effector and remove the end effector 5 This step is only for Cleanroom model and Protected model C D with bellow...

Page 218: ...n the bolts mounting the Joint 4 motor unit on the motor plate Slide the Joint 4 motor unit to the end of the arm 4 M4 15 Washer Joint 4 motor unit 11 Remove the nut mounting screws of the ball screw spline shaft on the upper part of Arm 2 3 M5 15 Washer 12 Remove the nut mounting screws of the ball screw spline shaft on the lower part of Arm 2 4 M5 15 Washer 13 Pull out the ball screw spline unit...

Page 219: ... into those of the pulleys completely Z belt Z2 pulley Z1 pulley 5 Loosely secure the Joint 3 motor unit to Arm 2 Loosely secure the Joint 3 motor unit to Arm 2 so that the motor unit can be moved by hand and it will not tilt when pulled If the unit is secured too loose or too tight the belt will not have the proper tension Joint 3 motor unit 6 Place the U belt around the U1 pulley and the U2 pull...

Page 220: ... it to the motor When you use the plate of 3 point mounting mount the plate with pressing it to the motor When mounting the battery unit be sure to keep the connectors connected to the battery unit If connectors of the battery unity are disconnected you need to perform calibration again 4 point mounting 4 M4 10 Plate Battery unit 3 point mounting Plate Battery unit 10 Re bundle the cables in their...

Page 221: ...d connect wires and tubes to the end effector 16 This step is only for Cleanroom model and Protected model C D with bellows option P Install the bellows For details refer to Maintenance 9 Bellows 17 Perform the calibration of Joints 3 and 4 For details refer to Maintenance 14 Calibration ...

Page 222: ...xplosion or inflammation and may cause serious safety problems Improper Handling Battery Charge Disassembly Incorrect Installation Exposing to Fire Forced Discharge Deformation by Pressure Short circuit Polarity Positive Negative Heating 85 C or more Soldering the terminal of the lithium battery directly When disposing of the battery consult with the professional disposal services or comply with t...

Page 223: ...he following manual Robot Controller RC180 Appendix Alarm The battery may run out if it passes the recommended replacement time If no warnings of voltage reduction occur the calibration for all joints is not necessary You need to perform calibration if the position moves from the originals after replaced the battery Always use the lithium battery and battery board designated by us Refer to Mainten...

Page 224: ...shaft may be lowered by the weight of an end effector 3 Remove the arm top cover For details refer to Maintenance 3 1 Arm Top Cover 4 Connect the connector of the new lithium battery to the battery board User the unused connector of the two connectors X60A X60B on the upper part of the battery board Be sure to connect the connector of the new battery before disconnecting the old battery If the cur...

Page 225: ...r from the battery board 3 Mount the arm top cover For details refer to Maintenance 3 1 Arm Top Cover 4 Turn ON the Controller 5 Check if the Manipulator moves to points poses correctly To do so select 2 points poses or more from the registered points poses and move the Manipulator to the points poses 6 If the Manipulator does not move to the points poses correctly perform the calibration of all j...

Page 226: ...t while pressing the brake release switch Be sure to keep enough space and prevent the end effector hitting any peripheral equipment The brake release switch is applied to both Joints 3 and 4 When the brake release switch is pressed the respective brakes of the Joints 3 and 4 are released simultaneously Be careful of the shaft falling and rotating while the brake release switch is being pressed be...

Page 227: ...onnect the connectors X61 X62 X63 and X64 Battery board X61 X62 X63 X64 3 Refer to the Removal step 4 to mount the cables of connector with wire tie 4 Mount the arm top cover For details refer to Maintenance 3 1 Arm Top Cover 5 Turn ON the Controller 6 Perform the calibration of all joints For details refer to Maintenance 14 Calibration ...

Page 228: ...ower to the robot system disconnect the power plug from the power source Be sure to connect the AC power cable to a power receptacle DO NOT connect it directly to a factory power source Before performing any replacement procedure turn OFF the Controller and related equipment and then disconnect the power plug from the power source Performing any replacement procedure with the power ON is extremely...

Page 229: ...lockwise to remove it 4 Remove the LED from the arm top cover G10 G20 X2 terminal X1 terminal Lens Lens holder Ring LED LED Lamp Installation 1 Connect the X1 and X2 terminals to the LED Each terminal must be connected to its terminal number on the LED 2 Put the arm top cover between the ring and lens holder and then mount the LED on the arm top cover 3 Install the lens to the lens holder 4 Instal...

Page 230: ...urce Before performing any replacement procedure turn OFF the Controller and related equipment and then disconnect the power plug from the power source Performing any replacement procedure with the power ON is extremely hazardous and may result in electric shock and or malfunction of the robot system The radiating unit can be very hot after the robot operation DO NOT touch and wait until it cools ...

Page 231: ...o pull out the plate too from the pipe Radiating Unit Installation 1 Insert the radiating unit to the arm from above 2 Apply the radiating sheet to the plate Make sure the gray color side of radiating sheet faces to the plate To do so put the plate as upper side as possible 3 Press the plate to the Joint 2 motor and secure the plate and motor using the insulation lock ties in two points up down of...

Page 232: ...e that no one is inside the safeguarded area The robot system can be operated in the mode for teaching even when someone is inside the safeguarded area The motion of the Manipulator is always in restricted low speeds and low power status to secure the safety of an operator However operating the robot system while someone is inside the safeguarded area is extremely hazardous and may result in serio...

Page 233: ...to Maintenance 14 3 Accurate Calibration of Joint 2 When calibrating Joint 4 you must calibrate Joint 3 and 4 at the same time You cannot calibrate Joint 4 alone because of the structure of the Manipulator If Err9716 or 5016 Power supply failure of the absolute encoder Replace the battery Check the robot internal wiring occurs apply the procedure of Maintenance 14 4 Calibration Procedure without u...

Page 234: ... iii Select the joint and click the Calibrate button 2 Confirm the warning message and click the Yes button 3 Move the joint to calibrate manually to approximate 0 pulse position as shown in the dialog After moving the joint click the Next button ...

Page 235: ...position of Joint 3 upper limit position in motion range The height of Joint 3 depends on manipulator model Standard model Cleanroom model Protected model with bellows option 0 pulse position of Joint 4 position where the flat surface or screw hole 1 on the shaft faces toward the tip of Arm 2 Flat surface Screw hole 2 Screw hole 1 0 pulse Screw hole 1 and flat surface are located in the center of ...

Page 236: ...er 5 Reboot the Controller This window will disappear when the Controller starts up 6 Select the reference point to use for calibration and click the Next button Select a point from the current points to use for checking the accuracy 7 Click the Jog button to display the Jog Teach dialog ...

Page 237: ...20 Rev 20 225 8 Jog the end effector to approximate reference point in the Jog Teach dialog for rough calibration Then click the OK button Before operating the robot open the Jog Teach tab and execute Motor ON 9 Click the Next button ...

Page 238: ... The manipulator moves to the reference point Click the Execute button Input JUMP P0 z 0 Point selected in step 6 11 Confirm the message and click the Yes button 12 After the manipulator moves to the reference point click the Next button JUMP P0 z 0 ...

Page 239: ... 13 Jog to the accurate reference position Click the Jog button 14 Jog the end effector to approximate reference point in the Jog Teach dialog for rough calibration Then click the OK button Position Joint 2 only and move Joint 3 to around 0 pulse ...

Page 240: ...bration Using Right Left Arm Orientations to accurately calibrate Joint 2 only Go on to the step 19 for the other joints calibration i Move to another point that has different pose from righty to lefty using Jump command Click the Yes button ii Jog to the accurate reference position Click the Jog button ...

Page 241: ...Maintenance 14 Calibration G10 G20 Rev 20 229 iii Jog to the accurate reference position and adjust the position Click the OK button iv Click the Next button ...

Page 242: ...tenance 14 Calibration 230 G10 G20 Rev 20 17 Calibration is complete Click the Finish button 18 Move the manipulator to other points and check if it can move without problems Teach points where appropriate ...

Page 243: ... right figure and attach it on the end of the shaft to make the center of the shaft clear Decide a target point and mark a cross on it so that you can easily verify the center of the shaft after switching the arm pose between right and left Calibration jig at the end of the shaft Example Target point The center of the shaft After removing the end effector and performing the calibration install the...

Page 244: ...ay from right to lefty click the Free All in the Control Panel and change the arm orientation to lefty by hands Then go to the step 6 7 8 The joints are slightly out of position Adjust the gap with the Z in the Jogging group in the Jog Teach Then teach another point data number unused This pose point is now called P2 Specify point number P2 and click the Teach button in Jog Teach 9 Input the new H...

Page 245: ...alibrating Joint 4 you must calibrate Joint 3 and 4 at the same time The reference point a point to identify the position of the manipulator needs to be specified for calibration Follow steps 1 to 6 described below in order to calibrate the origin 1 Basic Pose Confirmation 1 1 After the part replacement perform the calibration using the point data currently registered Confirm the point data number...

Page 246: ...position of Joint 3 upper limit position in motion range The height of Joint 3 depends on manipulator model Standard model Cleanroom model Protected model with bellows option 0 pulse position of Joint 4 position where the flat surface or screw hole 1 on the shaft faces toward the tip of Arm 2 Flat surface Screw hole 2 Screw hole 1 0 pulse Screw hole 1 and flat surface are located in the center of ...

Page 247: ...et Controller button This window will disappear when the Controller starts up 4 Rough Calibration 4 1 Execute the following command from the menu Tools Command Window calpls 0 0 0 0 Manipulator does not move 4 2 Execute one of the following commands according to the joint you want to calibrate from the menu Tools Command Window Joint 1 calib 1 Joint 2 calib 2 Joint 3 calib 3 Joint 4 calib 3 4 5 Ca...

Page 248: ...tely align the joint being calibrated to the specified point using jog commands You must move Joint 3 and 4 to the position when calibrating Joint 4 Select the jog mode Joint from Jog Teach to execute the jog motion 5 7 Execute the calibration Enter and execute one of the following commands in Command Window according to the joint being calibrated Joint 1 Calib 1 Joint 2 Calib 2 Joint 3 Calib 3 Jo...

Page 249: ... or later Reduction Gear Unit Joint 1 R13B010013 5 2 Joint 2 R13B010014 6 2 Joint 2 R13B010028 For G10 65 G10 85 S N 1 or later Joint 4 G10 R13B031601 8 4 1 G20 R13B010015 8 4 2 Solenoid Brake Z axis R13B030503 7 3 U axis R13B030501 G10 only 1 8 3 Timing Belt Joint 3 G10 R13B030209 Z width 12 mm 7 2 1 G20 R13B030211 Z width 12 mm 7 2 2 Joint 4 G10 R13B030210 U1 width 15 mm 8 2 1 G20 R13B030212 U1 ...

Page 250: ...ng unclear please contact our suppliers Product name Manufacturer URL THK AFB LF Grease THK CO LTD http www thk com Harmonic Grease SK 1A Harmonic Drive Systems Inc http www harmonicdrive net Krytox GPL 224 DuPont http www2 dupont com Our_Company en_US worldwide us_country html Reduction Gear Unit A reduction gear unit consists of the following three parts for Joint 1 and Joint 2 When replacing th...

Page 251: ...0218 390 mm R13B010219 Cable Unit S C 650 mm R13B020033 Inner wiring cable 4 850 mm R13B020018 1000 mm R13B020019 P D 650 mm R13B020034 850 mm R13B020020 1000 mm R13B020021 M C Cable S C 3 m For RC180 R12B020425 1 4 3 For RC700 A Straight R12NZ900JX For RC700 A L shaped R12NZ900K1 5 m For RC180 R12B020426 For RC700 A Straight R12NZ900JY For RC700 A L shaped R12NZ900K2 10 m For RC180 R12B020427 For...

Page 252: ...t P R13B031232 Brake Release Switch S C R13Z702640100 3 P D R13B060902 1 1 Common with G6 series 3 Common with E2 series 4 As a rough indication perform the overhaul parts replacement before reaching 20 000 operation hours of the Manipulator The operation hours can be checked in Controller Status Viewer dialog Motor On Hours For details refer to Maintenance 2 2 Overhaul Parts Replacement 5 The bel...

Reviews: