background image

L1210 User's Guide

Summary of Contents for L1210

Page 1: ...L1210 User s Guide ...

Page 2: ......

Page 3: ...ing Capacity 20 Compatible Epson Papers 21 Borderless Paper Type Compatibility 23 Paper or Media Type Settings 24 Printing from a Computer 25 Printing with Windows 25 Selecting Basic Print Settings Windows 26 Print Quality Options Windows 28 Multi Page Printing Options Windows 29 Selecting Double sided Printing Settings Windows 29 Double sided Printing Options Windows 31 Selecting Additional Layou...

Page 4: ... Mac 56 Print Options Mac 57 Selecting Page Setup Settings Mac 57 Selecting Print Layout Options Mac 58 Managing Color Mac 59 Color Matching and Color Options Mac 60 Selecting Printing Preferences Mac 61 Printing Preferences Mac 62 Printing Your Document or Photo Mac 62 Checking Print Status Mac 63 Cancelling Printing Using a Product Button 64 Printing with Epson Photo 64 Refilling Ink 66 Ink Safe...

Page 5: ...dows 92 Checking the Sheet Counter Mac 93 Cleaning and Transporting the Product 95 Cleaning Your Product 95 Transporting Your Product 95 Solving Problems 100 Checking for Software Updates 100 Product Light Status 101 Running a Product Check 103 Solving Setup Problems 105 Product Does Not Turn On or Off 105 Noise After Filling the Ink 105 Software Installation Problems 106 Solving Paper Problems 10...

Page 6: ...ect Colors 125 Uninstall Your Product Software 126 Uninstalling Printing Software Windows 126 Uninstalling Product Software Mac 127 Where to Get Help 128 Technical Specifications 130 Windows System Requirements 130 Mac System Requirements 131 Paper Specifications 131 Printable Area Specifications 133 Ink Specifications 135 Dimension Specifications 135 Electrical Specifications 136 Environmental Sp...

Page 7: ...7 Trademarks 144 Copyright Notice 144 A Note Concerning Responsible Use of Copyrighted Materials 145 Default Delay Times for Power Management for Epson Products 145 Copyright Attribution 145 ...

Page 8: ......

Page 9: ...9 L1210 User s Guide Welcome to the L1210 User s Guide For a printable PDF copy of this guide click here ...

Page 10: ...s Locations The Power Off and Sleep Timers Control Panel Buttons and Lights 1 power button and light 2 stop button 3 ink and paper lights Parent topic Product Basics Product Parts Locations See these sections to identify the parts on your product Product Parts Front Product Parts Inside Product Parts Back Parent topic Product Basics ...

Page 11: ...11 Product Parts Front 1 Rear paper feeder 2 Paper support 3 Edge guides 4 Output tray 5 Control panel 6 Paper stopper Parent topic Product Parts Locations ...

Page 12: ...12 Product Parts Inside 1 Printer cover 2 Ink tank caps 3 Ink tank cover 4 Ink tanks 5 Ink tank unit 6 Front cover 7 Printer cover support 8 Print head Parent topic Product Parts Locations ...

Page 13: ...ficiency Changing the Power Off and Sleep Timer Settings Windows Changing the Power Off and Sleep Timer Settings Mac Parent topic Product Basics Changing the Power Off and Sleep Timer Settings Windows You can use the printer software to change the time period before the printer enters sleep mode or turns off automatically 1 Access the Windows Desktop and right click the icon for your product in th...

Page 14: ...gram windows Parent topic The Power Off and Sleep Timers Changing the Power Off and Sleep Timer Settings Mac You can use the printer software to change the time period before the printer enters sleep mode or turns off automatically 1 In the Apple menu or the Dock select System Preferences Select Print Fax Print Scan or Printers Scanners select your product and select Options Supplies Select Utilit...

Page 15: ...od you want as the Power Off Timer setting 4 Select the time period you want as the Sleep Timer setting 5 Click Apply 6 If you see the confirmation message click Yes and close the Printer Settings window Parent topic The Power Off and Sleep Timers ...

Page 16: ...e Rear Paper Feeder Paper Loading Capacity Double sided Printing Capacity Compatible Epson Papers Borderless Paper Type Compatibility Paper or Media Type Settings Loading Paper in the Rear Paper Feeder You can print documents and photos on a variety of paper types and sizes 1 Pull out the paper support ...

Page 17: ...t tray and open the paper stopper 3 Slide the edge guides out all the way 4 If you are inserting a stack of paper fan the sheets first and tap the stack on a flat surface to even the edges Note Do not fan or curl photo paper ...

Page 18: ...or printable side up and short edge first in the center of the paper support Load up to 10 envelopes in the center of the paper support Load them printable side up and flap edge left Load a sheet of loose leaf or other paper with holes facing as shown ...

Page 19: ...above the arrow mark inside the edge guide If you have trouble loading a stack of envelopes press each envelope flat before loading it or load one envelope at a time Do not load envelopes that are curled folded or too thin or that have plastic windows or exposed adhesive flaps Check the paper package for any additional loading instructions If you use paper with binder holes load only one sheet at ...

Page 20: ...16 340 mm or Oficio 9 8 46 12 4 inches 215 315 mm size 1 sheet Epson Presentation Paper Matte Epson High Quality Ink Jet Paper 80 sheets Epson Premium Presentation Paper Matte Epson Photo Paper Glossy Epson Premium Photo Paper Glossy Epson Ultra Premium Photo Paper Glossy Epson Premium Photo Paper Semi gloss Epson Value Photo Paper Glossy 20 sheets If paper feeds incorrectly or printing is uneven ...

Page 21: ...resentation Paper Matte Double sided Letter 8 5 11 inches 216 279 mm 1 sheet You cannot print double sided on the following paper types Epson High Quality Ink Jet Paper Epson Presentation Paper Matte Epson Photo Paper Glossy Epson Value Photo Paper Glossy Epson Premium Photo Paper Glossy Epson Premium Photo Paper Semi gloss Epson Ultra Premium Photo Paper Glossy Epson Premium Presentation Paper Ma...

Page 22: ...um Photo Paper Glossy 4 6 inches 102 152 mm S041727 100 5 7 inches 127 178 mm S041464 20 8 10 inches 203 254 mm S041465 20 Letter 8 5 11 inches 216 279 mm S041286 ML S041667 20 50 Epson Ultra Premium Photo Paper Glossy 4 6 inches 102 152 mm S042181 S042174 60 100 5 7 inches 127 178 mm S041945 20 8 10 inches 203 254 mm S041946 20 Letter 8 5 11 inches 216 279 mm S042182 S042175 25 50 Epson Premium P...

Page 23: ...r 8 5 11 inches 216 279 mm S400031 50 4 6 inches 102 152 mm S400032 S400033 S400034 20 50 100 Parent topic Loading Paper Borderless Paper Type Compatibility You can print borderless photos on compatible paper types in compatible sizes Borderless Paper Types Epson Premium Photo Paper Glossy Epson Ultra Premium Photo Paper Glossy Epson Photo Paper Glossy Epson Premium Photo Paper Semi gloss Epson Va...

Page 24: ...ium Photo Paper Glossy Ultra Premium Photo Paper Glossy Epson Premium Photo Paper Glossy Premium Photo Paper Glossy Epson Photo Paper Glossy Epson Value Photo Paper Glossy Photo Paper Glossy Epson Premium Photo Paper Semi gloss Premium Photo Paper Semi Gloss Epson Premium Presentation Paper Matte Epson Premium Presentation Paper Matte Double sided Premium Presentation Paper Matte Envelopes Envelop...

Page 25: ...g with Epson Photo Printing with Windows You can print with your product using any Windows application as described in these sections Note If you are using your Epson product with the Windows 10 S operating system you cannot use the software described in this section You also cannot download and install any Epson product software from the Epson website for use with Windows 10 S you must obtain sof...

Page 26: ...hoto or document for printing 2 Select the print command in your application Note You may need to select a print icon on your screen the Print option in the File menu or another command See your application s help utility for details 3 If necessary select your product name as the printer you want to use Note You may also need to select Properties or Preferences to view your print settings ...

Page 27: ...tom paper size 5 If you are printing a borderless photo select Borderless You can click Settings to access additional options for borderless printing Note You must select a compatible borderless paper type and size to print without borders Check the borderless paper compatibility list for details 6 Select the orientation of your document Note If you are printing an envelope select Landscape ...

Page 28: ... arrange their print order select the Copies options 13 To reduce noise during printing when you select Plain Paper Bright White Paper turn on Quiet Mode printing will be slower 14 To preview your job before printing select Print Preview 15 To save your print job as a project that can be modified and combined with other print jobs select Job Arranger Lite Print Quality Options Windows Multi Page P...

Page 29: ... Up 4 Up 6 Up 8 Up 9 Up and 16 Up Prints several pages on one sheet of paper Click the Layout Order button to select page layout and border options 2 1 Poster 2 2 Poster 3 3 Poster 4 4 Poster Prints one image on multiple sheets of paper to create a larger poster Click the Settings button to select image layout and guideline options Parent topic Selecting Basic Print Settings Windows Selecting Doub...

Page 30: ... by printing one side and prompting you to flip the paper over on the long edge to print the other side Manual Short edge binding to print your double sided print job by printing one side and prompting you to flip the paper over on the short edge to print the other side 2 Click the Settings button You see a window like this ...

Page 31: ...ic Print Settings Windows Double sided Printing Options Windows You can select any of the available options on the Binding Settings window to set up your double sided print job Binding Edge Options Select a setting that orients double sided print binding in the desired direction Binding Margin Options Select options that define a wider margin to allow for binding Create Folded Booklet Options Sele...

Page 32: ...on to size your image to fit the paper you loaded Select the size of your document or photo as the Document Size setting and the size of your paper as the Output Paper setting If you want to center your image on the paper select the Center option Select the Zoom to option to reduce or enlarge your document or photo by a specific percentage Select the percentage in the menu 2 Select one of the foll...

Page 33: ...tern and click the Settings button to customize the pattern Watermark adds a visible watermark to your printout Note Click the Add Delete button to create your own watermark and click the Settings button to customize the watermark Header Footer adds information such as the date and time to the top or bottom of your printout Note Click the Settings button to customize the text and location of the h...

Page 34: ...r tones Depending on the selected color mode you can also adjust the midtone density using the Gamma setting Fix Photo Improves the color contrast and sharpness of flawed photos Note Fix Photo uses a sophisticated face recognition technology to optimize photos that include faces For this to work both eyes and the nose must be visible in the subject s face If your photo includes a face with an inte...

Page 35: ...ity Edge Smoothing Smooths jagged edges in low resolution images such as screen captures or images from the Web Fix Red Eye Reduces or removes red eye in photos Print Text in Black Prints colored text in black For Color Text Prints colored text on a background pattern or underlined For Color Graphs and Images Prints colored graphics and images with overlay patterns For Color Text Graphs and Images...

Page 36: ...ions Windows Header Footer Settings Windows You can select any of the Header Footer Settings options to add headers or footers when you print The items are available to print at the top or bottom of your pages in either the left right or center of the page Note These settings are not saved with your document ...

Page 37: ...come from the Windows Control Panel on your computer Parent topic Selecting Additional Layout and Print Options Windows Selecting a Printing Preset Windows For quick access to common groups of print settings you can select a printing preset on the Main or More Options tab Note You can create your own preset by clicking the Add Remove Presets button 1 Click the Main or More Options tab ...

Page 38: ...ur cursor over one of the Printing Presets to view its list of settings 3 Click on a preset to change its settings or delete it or use any of the available options on the screen to control your printing presets 4 To choose a preset for printing select it 5 Click OK ...

Page 39: ... to all the print jobs you send to your product 1 Access the Windows Desktop and right click the icon for your product in the right side of the Windows taskbar or click the up arrow and right click 2 Select Printer Settings 3 Click the Maintenance tab You see the maintenance options 4 Click the Extended Settings button ...

Page 40: ...ended Settings window Enable EPSON Status Monitor 3 Enables product monitoring for ink and paper supplies and other issues Thick Paper and Envelopes Prevents ink from smearing when you print on envelopes or other thick paper Short Grain Paper Prevents ink from smearing when you print on envelopes or other thick paper Separator Page Before each document prints a separator page containing the title ...

Page 41: ... a finer screening pattern Allow Applications to Perform ICM Color Matching Allows applications to perform ICM color matching Always Use the Driver s Paper Source Setting Prints using the paper source setting in the printer driver rather than the setting in your application Barcode mode Reduces bleeding when printing barcodes on plain paper letterhead paper recycled paper preprinted paper envelope...

Page 42: ...indows Windows administrators can lock access to some printer settings to prevent unauthorized changes 1 Do one of the following Windows 10 Click and select Settings Devices Printers scanners Select your product name and select Manage Printer properties Windows 8 x Navigate to the Apps screen and select Control Panel Hardware and Sound Devices and Printers Right click your product and select Print...

Page 43: ...and select Properties 2 Click the Optional Settings tab Note You can prevent access to the Optional Settings tab by changing the user or group permissions in the Security tab 3 Click Driver Settings You see this window 4 Select the checkbox for each setting you want to lock To lock all print settings select All Document Settings 5 Under Advanced Settings select the setting option you want to use f...

Page 44: ...ou select the arrangement size and other settings for the custom anti copy pattern Watermark Various text watermarks Lets you select the text for the watermark or prohibit watermarks Add Delete Lets you add or delete a customized text or image based watermark Settings Lets you select the size position color and other watermark settings Header Footer Off Prohibits headers or footers On Allows heade...

Page 45: ... Allows printing of 16 pages on one sheet of paper Parent topic Locking Printer Settings Windows Selecting Default Print Settings Windows When you change your print settings in a program the changes apply only while you are printing in that program session If you want to change the print settings you use in all your Windows programs you can select new default print settings 1 Access the Windows De...

Page 46: ...ults selected for printing You can still change them as needed for printing in any program session Changing the Language of the Printer Software Screens Parent topic Printing with Windows Related tasks Selecting Basic Print Settings Windows Changing the Language of the Printer Software Screens You can change the language used on the Windows printer software screens ...

Page 47: ...ter Settings You see the printer settings window 3 Click the Maintenance tab You see the maintenance options 4 Select the language you want to use as the Language setting 5 Click OK to close the printer software window The printer software screens appear in the language you selected the next time you access them Parent topic Selecting Default Print Settings Windows ...

Page 48: ...side of the Windows taskbar or click the up arrow and right click 2 Select Software Update Settings You see this window 3 Do one of the following To change how often the software checks for updates select a setting in the Check every menu To disable the automatic update feature select the Never option 4 Click OK to exit Note If you choose to disable the automatic update feature you can check for u...

Page 49: ... topic Printing from a Computer Selecting Print Settings Windows 10 S Select the settings for your print job in your Windows 10 S application 1 Open a photo or document for printing 2 Select the print command in your application Note You may need to select a print icon on your screen the Print option in the File menu or another command See your application s help utility for details 3 If necessary...

Page 50: ... window like this 4 Select the type of paper you loaded as the Media setting Note The setting may not exactly match the name of your paper Check the paper type settings list for details 5 Click the Advanced button ...

Page 51: ... you loaded as the Paper Size setting 7 To print multiple copies select or enter the number as the Copy Count setting 8 To print multiple copies of multi page documents in sets select the Collated checkbox 9 Click OK You return to the printing preferences window ...

Page 52: ...rt printing Parent topic Printing with the Built in Epson Driver Windows 10 S Related references Paper or Media Type Settings Printing on a Mac You can print with your product using any Mac printing program as described in these sections Note If you have an Internet connection it is a good idea to check for updates to your product software on Epson s support website or using Epson Software Updater...

Page 53: ...c Print Settings Mac Select the basic settings for the document or photo you want to print 1 Open a photo or document for printing 2 Select the print command in your application Note You may need to select a print icon on your screen the Print option in the File menu or another command See your application s help utility for details 3 Select your product as the Printer setting 4 If necessary click...

Page 54: ...Note The print window may look different depending on the Mac OS version and the application you are using 5 Select the Copies and Pages settings as necessary Note If you do not see these settings in the print window check for them in your application before printing ...

Page 55: ...rinting They may be accessible by selecting Page Setup from the File menu Note Paper sizes may include additional options such as Borderless 7 Select any application specific settings that appear on the screen such as those shown in the image above for the Preview application 8 Select Print Settings or Printer Features from the pop up menu You see these settings ...

Page 56: ...upports borderless printing 12 Select any of the available print options Print Quality Options Mac Print Options Mac Parent topic Printing on a Mac Related references Paper or Media Type Settings Related tasks Selecting Page Setup Settings Mac Print Quality Options Mac You can select any of the available Print Quality options to fine tune the quality of your print Some settings may be unavailable ...

Page 57: ...ts you flip the printed image horizontally Note If you select the Min option for the Expansion setting you may see white borders on your printed photo Parent topic Selecting Basic Print Settings Mac Selecting Page Setup Settings Mac Depending on your application you may be able to select the paper size and orientation settings from the print window Note If you do not see these settings in the prin...

Page 58: ...ent or photo as shown in the print window Note If you are printing an envelope select the Landscape setting Note You can reduce or enlarge the size of the printed image by selecting Paper Handling from the pop up menu and selecting a scaling option Parent topic Printing on a Mac Related tasks Selecting Basic Print Settings Mac Selecting Print Layout Options Mac You can select a variety of layout o...

Page 59: ...elect a setting from the Two Sided pop up menu To invert or flip the printed image select the Reverse page orientation or Flip horizontally settings Parent topic Printing on a Mac Managing Color Mac You can adjust the Color Matching and Color Options settings to fine tune the colors in your printout or turn off color management in your printer software 1 Select Color Matching from the pop up menu ...

Page 60: ...vanced Settings and select settings for Brightness Contrast Saturation and individual color tones You can also select a color Mode setting for printing photos and graphics and the Fix Red Eye setting to reduce or remove red eye in photos Depending on the selected color mode you can also adjust the midtone density using the Gamma setting Fix Photo Improves the color contrast and sharpness of flawed...

Page 61: ...pply to all the print jobs you send to your product 1 In the Apple menu or the Dock select System Preferences 2 Select Print Fax Print Scan or Printers Scanners select your product and select Options Supplies 3 Select Driver or Options You see a screen like this 4 Select any of the available printing preferences 5 Click OK Printing Preferences Mac Parent topic Printing on a Mac ...

Page 62: ...right speeding up printing but may reduce print quality Remove white borders Removes white margins that may appear when you print borderless photos Warning Notifications Lets you choose whether or not to receive warning notifications from the printer software for various operating conditions Establish bidirectional communication Allows the product to communicate with the computer Do not change the...

Page 63: ...g Print Status Mac Parent topic Printing on a Mac Related tasks Selecting Basic Print Settings Mac Checking Print Status Mac During printing you can view the progress of your print job and control printing 1 Click the printer icon when it appears in the Dock ...

Page 64: ...our Document or Photo Mac Cancelling Printing Using a Product Button If you need to cancel printing press the stop button Parent topic Printing from a Computer Printing with Epson Photo You can print photos CD DVD labels and more using a variety of layouts and templates with Epson Photo Features include image corrections and adjustments and adding text and stamps to photos We recommend printing on...

Page 65: ...dows 10 S operating system you cannot use Epson Photo You also cannot download and install any Epson product software from the Epson website for use with Windows 10 S you must obtain software only from the Windows Store Parent topic Printing from a Computer ...

Page 66: ...cautions Keep ink bottles and the ink tanks out of the reach of children Do not allow children to drink from or handle the ink bottles and bottle caps Do not tilt or shake an ink bottle after opening it otherwise ink may leak Be careful not to touch any ink when you handle the ink tanks ink tank caps and opened ink bottles or ink bottle caps If ink gets on your skin wash it thoroughly with soap an...

Page 67: ...room temperature for at least three hours before using it Use the ink bottle before the date printed on the package After opening an ink bottle Epson recommends using it as soon as possible Store ink bottles in a cool dark place Keep them out of direct sunlight Do not store the ink bottles in high or freezing temperatures Store the ink bottles in the same environment as the product When storing or...

Page 68: ...ve the lower lines on the ink tanks Parent topic Refilling Ink Related references Ink Safety Precautions Related tasks Refilling the Ink Tanks Disabling Special Offers with Windows You can disable special offers messages from Epson using a utility on your Windows computer Note You may see the Epson Special Offers screen every time you print if your computer is connected to the Internet Select Do n...

Page 69: ...eselect the Display Epson Offers checkbox Parent topic Refilling Ink Purchase Epson Ink You can purchase genuine Epson ink and paper from an Epson authorized reseller To find the nearest reseller visit latin epson com or call your nearest Epson sales office ...

Page 70: ...fill the ink tanks if necessary Ink Bottle Part Numbers Parent topic Refilling Ink Ink Bottle Part Numbers Use these part numbers when you order or purchase new ink bottles and use the ink by the date printed on the package Ink color Part number Black T544120 AL Cyan T544220 AL Magenta T544320 AL Yellow T544420 AL Parent topic Purchase Epson Ink Refilling the Ink Tanks Make sure you have new ink b...

Page 71: ... Open the ink tank cover 2 Open the cap for the ink tank you are going to fill Note Make sure the color of the ink tank label matches the ink color you want to fill 3 Check the upper line a in the ink tank ...

Page 72: ...p of the bottle after removing its cap Warning If ink gets on your skin wash it thoroughly with soap and water If ink gets into your eyes flush them immediately with water If ink gets into your mouth spit it out and see a doctor right away Seek medical advice if problems persist Keep the ink bottles out of the reach of children and do not drink the ink ...

Page 73: ... stand the bottle upright to insert it as shown Wait for the ink to fill the tank Do not squeeze the bottle Ink flows into the tank and stops automatically when the ink is filled to the upper line Note Do not force the bottles into position they are keyed for each color ...

Page 74: ...y leak 6 When the ink tank is full remove the ink bottle and securely close the ink tank cap as shown Note If any ink remains in the bottle replace the bottle cap and tighten it Store the bottle upright for later use Do not leave the ink bottle inserted otherwise the bottle may be damaged or ink may leak 7 Repeat the previous steps as necessary for each ink tank you need to fill ...

Page 75: ...75 8 Close the ink tank cover Parent topic Refilling Ink Related concepts Purchase Epson Ink Related references Ink Safety Precautions ...

Page 76: ...uality declines You can check for clogged nozzles before you clean them so you don t clean them unnecessarily Note You may not be able to clean the print head when the ink level in any of the tanks is low You may have to refill the ink tank first If you still see white or dark lines or gaps in your printouts even after cleaning the print head several times you can run a Power Cleaning Print Head N...

Page 77: ...w sheets of plain paper in the product 3 Hold down the stop button and press the power button to turn the product on 4 When the product turns on release both buttons The product prints a nozzle check pattern Note It can take a few seconds for the nozzle check pattern to start printing If it does not start printing after a few seconds make sure there is paper loaded in the product ...

Page 78: ...s in the lines Print head is clean Print head needs cleaning Print head needs Power Cleaning 6 Do one of the following If there are no gaps the print head is clean and you can continue printing If there are gaps or the pattern is faint clean the print head ...

Page 79: ...ing the Product Buttons Checking the Nozzles Using a Computer Utility You can check the print head nozzles using a utility on your Windows or Mac computer 1 Make sure no product lights are indicating errors and that the output tray is extended 2 Load a few sheets of plain paper in the product 3 Do one of the following Windows Access the Windows Desktop and right click the icon for your product in ...

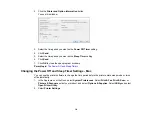
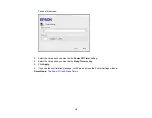
Page 80: ...80 You see a window like this 5 Click Print ...

Page 81: ...see if there are gaps in the lines Print head is clean Print head needs cleaning Print head needs Power Cleaning 7 Do one of the following If there are no gaps click Finish If there are gaps or the pattern is faint clean the print head ...

Page 82: ...ogged nozzles you can clean the print head Note You may not be able to clean the print head when the ink level in any of the tanks is low You may have to refill the ink tank first Cleaning the Print Head Using the Product Buttons Cleaning the Print Head Using a Computer Utility Parent topic Print Head Maintenance Related tasks Refilling the Ink Tanks Cleaning the Print Head Using the Product Butto...

Page 83: ...ad is clean Print head is clean Print head needs cleaning Print head needs Power Cleaning 5 Do one of the following If there are no gaps the print head is clean and you can continue printing If there are gaps or the pattern is faint clean the print head ...

Page 84: ...per in the Rear Paper Feeder Checking the Nozzles Using the Product Buttons Cleaning the Print Head Using a Computer Utility You can clean the print head using a utility on your Windows or Mac computer 1 Make sure no product lights are indicating errors 2 Load a few sheets of plain paper in the product 3 Do one of the following Windows Access the Windows Desktop and right click the icon for your p...

Page 85: ...cleaning cycle and stays on when the cleaning cycle is finished Caution Never turn off the product or open the printer cover during a cleaning cycle or you may not be able to print 6 When the cleaning cycle is finished you can check to see if the nozzles are clean click Print Nozzle Check Pattern and click Print ...

Page 86: ...nt head is clean Print head needs cleaning Print head needs Power Cleaning If there are no gaps click Finish If there are gaps or the pattern is faint click Clean to clean the print head again If almost the entire pattern is missing click Finish and perform a Power Cleaning ...

Page 87: ...fter running a Power Cleaning turn off the product and wait at least 12 hours before running another Power Cleaning Caution Running a Power Cleaning consumes a lot of ink so you should run it only if necessary Make sure each ink tank is at least one third full before running a Power Cleaning or it may damage the product Caution Power Cleaning may cause the ink pads to reach their capacity sooner W...

Page 88: ...f the Windows taskbar or click the up arrow and right click Select Printer Settings and click the Maintenance tab Mac In the Apple menu or the Dock select System Preferences Select Print Fax Print Scan or Printers Scanners select your product and select Options Supplies Select Utility and select Open Printer Utility 4 Select Power Cleaning You see a window like this 5 Follow the on screen instruct...

Page 89: ...printouts become grainy or blurry you notice misalignment of vertical lines or you see dark or light horizontal bands you may need to align the print head Note Banding may also occur if your print head nozzles need cleaning Aligning the Print Head Using a Computer Utility Parent topic Adjusting Print Quality Related concepts Print Head Cleaning Related tasks Loading Paper in the Rear Paper Feeder ...

Page 90: ...ters Scanners select your product and select Options Supplies Select Utility and select Open Printer Utility 3 Select Print Head Alignment 4 Click Next then click Print to print an alignment sheet Note Do not cancel printing while you are printing a head alignment pattern You see a window like this ...

Page 91: ...each set and click Realignment Then print another alignment sheet and check it Note Click Skip where available if you want to skip a particular alignment sheet 6 When you are done click Finish Parent topic Print Head Alignment Related tasks Loading Paper in the Rear Paper Feeder Cleaning the Paper Path If you see ink on the back of a printout you can clean the paper path to remove any excess ink 1...

Page 92: ...t as necessary until the paper comes out clean Parent topic Adjusting Print Quality Related tasks Loading Paper in the Rear Paper Feeder Checking the Number of Sheets Fed You can view an option that displays the number of sheets of paper that have fed through the product Note You can also view the number of sheets of paper fed through the product by printing a nozzle check Checking the Sheet Count...

Page 93: ...on Status Monitor 3 is enabled Parent topic Checking the Number of Sheets Fed Checking the Sheet Counter Mac You can check the number of sheets of paper that have fed through the product by checking the sheet counter 1 In the Apple menu or the Dock select System Preferences Select Print Fax Print Scan or Printers Scanners select your product and select Options Supplies Select Utility and select Op...

Page 94: ...94 You see this window 3 After checking the number of sheets fed into the printer click OK to close the window Parent topic Checking the Number of Sheets Fed ...

Page 95: ...uct or you may damage it Do not place anything on top of the cover or use the cover as a writing surface or it could get permanently scratched Do not use oil or other lubricants inside the product or let water get inside 1 Turn off the product 2 Unplug the power cable 3 Disconnect any connected cables 4 Remove all the paper 5 Clean the outer case with a soft clean cloth that has been dampened with...

Page 96: ...When storing or transporting an ink bottle after removing its seal do not tilt the bottle and do not subject it to impacts or temperature changes Otherwise ink may leak even if the cap on the ink bottle is tightened securely Be sure to keep the ink bottle upright when tightening the cap and take measures to prevent ink from leaking when transporting the ink bottles ...

Page 97: ...nt head is in the far right position the home position If not turn on the product wait for the print head to move to the far right then turn the product off again 3 Unplug the power cable 4 Disconnect any connected cables 5 Remove all the paper 6 Open the ink tank cover and make sure that the ink tank caps are securely closed as shown ...

Page 98: ...98 7 Close the ink tank cover 8 Close the paper support and output tray ...

Page 99: ... closed Pack the product in its box with protective materials If print quality has declined when you print again clean and align the print head Parent topic Cleaning and Transporting the Product Related concepts Print Head Alignment Print Head Cleaning ...

Page 100: ...ate the software by selecting Software Update here Access the Windows Desktop and right clicking the icon for your product in the right side of the Windows taskbar or clicking the up arrow and right clicking On the Maintenance tab in the printer settings window You can also update the software by selecting EPSON Software Updater in the EPSON or EPSON Software program group accessible by the Start ...

Page 101: ...mplete See the Start Here sheet for instructions The paper light is on No paper is loaded or multiple sheets fed at one time Load paper in the product and press the stop button to clear the error The paper light is flashing Paper is jammed in the product Remove the jammed paper and press the stop button to clear the error If the paper light is still flashing turn the product off and then back on a...

Page 102: ... continue printing Borderless printing is not available until the ink pad is replaced All lights are flashing Paper or protective material is stuck inside the product Open the front cover and remove any jammed paper or protective materials Turn the product off and then back on again If the error continues contact Epson for support Note The ink pads in the printer collect distribute and contain the...

Page 103: ...t off 2 Load a few sheets of plain paper in the product 3 Hold down the stop button and press the power button to turn the product on 4 When the product turns on release both buttons The product begins printing a nozzle check pattern Note It can take a few seconds for the nozzle check pattern to start printing If it does not start printing after a few seconds make sure there is paper loaded in the...

Page 104: ...puter cable software or selected settings Check the other solutions in this book or try uninstalling and reinstalling your printer software If the page prints but the nozzle check pattern has gaps clean or align the print head If the page prints but almost the entire nozzle check pattern is missing perform a Power Cleaning If the page does not print the product may have a problem Check the other s...

Page 105: ...ing Setup Problems Noise After Filling the Ink If you hear noises from your product after filling the ink tanks with ink check these explanations The first time you fill the tanks with ink the product must charge its print head Wait until charging finishes before you turn off the product or it may charge improperly and use excess ink the next time you turn it on Your product is finished charging t...

Page 106: ... In Windows make sure your product is selected as the default printer and the correct port is shown in the printer properties If you see any error message or your software does not install correctly in Windows you may not have software installation privileges Contact your system administrator Parent topic Solving Setup Problems Related concepts Uninstall Your Product Software Related references Wi...

Page 107: ...not load more than the recommended number of sheets If paper jams when you print on both sides of the paper try loading fewer sheets Make sure your paper meets the specifications for your product Try cleaning the paper path For best results follow these guidelines Use new smooth high quality paper that is not curled creased old too thin or too thick Load paper in the rear paper feed printable side...

Page 108: ...tly pull out any jammed paper from the rear paper feed slot Note When removing jammed paper avoid tilting the printer placing it vertically or turning it upside down otherwise ink may leak 3 Open the front cover ...

Page 109: ...109 4 Open the printer cover until it clicks 5 Gently remove any jammed paper ...

Page 110: ...ou may damage the product Never touch the buttons on the control panel while your hand is inside the printer If the printer starts operating it could cause an injury Be careful not to touch the protruding parts to avoid injury 6 Close the printer cover ...

Page 111: ... If you have problems with paper ejecting properly try these solutions If paper does not eject fully you may have set the wrong paper size Cancel printing using the product control panel then press the button to eject the paper Remove any paper remaining in the product Select the correct size when you reprint If paper is wrinkled when it ejects it may be damp or too thin Load new paper and be sure...

Page 112: ...int Make sure the printer status is not offline or pending Make sure you are using the Epson printer driver for your product or the available functions are limited Run a product check to see if a test page prints If the test page prints check to see if your product software is installed correctly Make sure your system meets the requirements for your operating system If you are printing a high reso...

Page 113: ... product name again if necessary Windows Vista Click select Control Panel and click Printer under Hardware and Sound Right click your product name select Printing Preferences and select your product name again if necessary 2 Click the Maintenance tab 3 Click the Extended Settings button 4 Select Enable EPSON Status Monitor 3 and click OK 5 Click the Monitoring Preferences button 6 Click the checkb...

Page 114: ...setting Windows Click the Maintenance or Utility tab select Extended Settings or Speed and Progress and select the following settings Always Spool RAW Datatype Page Rendering Mode Print as Bitmap Windows Select Printing preferences click the More Options tab and make sure the Bidirectional printing setting is enabled Mac Select System Preferences select Printers Scanners and select your product Se...

Page 115: ...int Blank Pages Print Incorrect Margins on Printout Border Appears on Borderless Prints Incorrect Characters Print Incorrect Image Size or Position Slanted Printout Parent topic Solving Problems Inverted Image If your printed image is inverted unexpectedly try these solutions Turn off any mirror or inversion settings in your printing application Turn off the Mirror Image Flip horizontally or Rever...

Page 116: ...n the print head if necessary Make sure your product is selected as the printer in your printing program You may need to refill the ink Visually check the ink levels Parent topic Solving Page Layout and Content Problems Related concepts Print Head Nozzle Check Print Head Cleaning Related references Paper or Media Type Settings Related tasks Selecting Basic Print Settings Mac Selecting Basic Print ...

Page 117: ...ke sure you are printing on a compatible borderless paper type and size Windows Make sure you selected the Borderless setting in your printer software Mac Make sure you selected the Borderless checkbox or a paper size with a Borderless option in your printer software Adjust the Expansion setting to adjust the amount of image expansion on the edges of borderless prints Make sure the image size and ...

Page 118: ... name at the top of the driver window Parent topic Solving Page Layout and Content Problems Related tasks Selecting Basic Print Settings Windows Selecting Extended Settings Windows Incorrect Image Size or Position If your printed image is the wrong size or in the wrong position try these solutions Make sure you selected the correct paper size and layout settings in your printing program and printe...

Page 119: ...ity setting in your printer software Turn off any high speed settings in your product software Align the print head Adjust the print quality Make sure the product is not printing while tilted or at an angle Parent topic Solving Page Layout and Content Problems Related tasks Selecting Basic Print Settings Windows Selecting Basic Print Settings Mac Related topics Loading Paper Solving Print Quality ...

Page 120: ...peed setting Adjust the print quality in the product software When horizontal banding appears or the top or bottom of the paper is smeared load paper in the correct direction and slide the edge guides to the edges of the paper You may need to refill the ink Visually check the ink levels If you have not used the product for a long time run the Power Cleaning utility Note Power Cleaning consumes a l...

Page 121: ...ropriate settings In Windows you can also try selecting Short Grain Paper in Extended Settings When manually printing 2 sided make sure the ink is completely dry before loading the paper Remove each sheet from the output tray as it is printed Avoid handling printouts on glossy paper right after printing to allow the ink to set When horizontal banding appears or the top or bottom of the paper is sm...

Page 122: ... if you cannot improve print quality by cleaning the print head Note Your product will not operate properly while tilted at an angle Place it on a flat stable surface that extends beyond the base of the product in all directions Parent topic Solving Print Quality Problems Related concepts Print Head Alignment Print Head Cleaning Print Head Nozzle Check Power Cleaning Related references Paper or Me...

Page 123: ...aning utility Note Power Cleaning consumes a lot of ink so run this utility only if you cannot improve print quality by cleaning the print head If you cannot solve the problem using head cleaning you can print immediately from a Windows computer with a mixture of color inks to create composite black Select the Use a Mixture of Color Inks to Create Black setting from Extended Settings on the printe...

Page 124: ... not result in a high quality printout If you enlarged the image size in an image editing program you need to increase the image resolution setting to retain a high image quality Increase the image resolution by the same amount you increase the image size For example if the image resolution is 300 dpi dots per inch and you will double the image size for printing change the resolution setting to 60...

Page 125: ...er Cleaning utility Then run a nozzle check to see if print quality has improved After you print the colors in your printout need time to set as the ink dries During this time the colors may look different than you expect To speed up drying time do not stack your printouts on top of each other Your printed colors can never exactly match your on screen colors However you can use a color management ...

Page 126: ...ent topic Solving Problems Uninstalling Printing Software Windows You can uninstall and then re install your printer software to solve certain problems 1 Turn off the product 2 Disconnect any interface cables 3 Do one of the following Windows 10 Click and select Settings Apps Apps features Select the program you want to uninstall and select Uninstall Windows 8 x Navigate to the Apps screen and sel...

Page 127: ...installer utility from the Epson support website to uninstall your product software as described here Note If you find that re installing your product software does not solve a problem contact Epson 1 To download the Uninstaller utility visit latin epson com support and select your product 2 Click Downloads 3 Select your operating system click Utilities locate the Uninstaller utility and click Dow...

Page 128: ...k to a Support Representative Before you call Epson for support please have the following information ready Product name Product serial number located on a label on the product Proof of purchase such as a store receipt and date of purchase Computer configuration Description of the problem Then call Country Telephone Argentina 54 11 5167 0300 0800 288 37766 Bolivia 800 100 116 Brazil State capitals...

Page 129: ...00040 5210067 Venezuela 58 212 240 1111 Contact your local phone company to call this toll free number from a mobile phone If your country does not appear in the list contact the sales office in the nearest country Toll or long distance charges may apply Purchase Supplies and Accessories You can purchase genuine Epson ink and paper from an Epson authorized reseller To find the nearest reseller vis...

Page 130: ...dows System Requirements To use your product and its software your computer should use one of these Microsoft operating systems Windows 10 Windows 8 x Windows 7 Windows Vista Windows Server 2019 Windows Server 2016 Windows Server 2012 R2 Windows Server 2012 Windows Server 2008 R2 Windows Server 2008 Windows Server 2003 R2 Windows Server 2003 SP2 or later Note For the latest product software availa...

Page 131: ... latest product software available for your operating system visit the Epson support site at latin epson com support select your product and select Downloads Parent topic Technical Specifications Paper Specifications Note Since the quality of any particular brand or type of paper may be changed by the manufacturer at any time Epson cannot guarantee the quality of any non Epson brand or type of pap...

Page 132: ... 7 1 inches 102 181 mm Half Letter 5 5 8 5 inches 140 216 mm Paper types Plain paper Note Your product also supports compatible papers distributed by Epson See the link at the end of this topic for a list of compatible Epson papers Weight Plain paper 17 lb 64 g m2 to 24 lb 90 g m2 Envelopes Size No 10 4 1 9 5 inches 105 241 mm Paper types Plain paper Weight 20 lb 75 g m2 to 27 lb 100 g m2 Note Eve...

Page 133: ...Note When printing borderless quality may decline in the expanded printable area Single sheets borders 1 Top bottom left right margins 0 12 inch 3 mm minimum 2 Reduced print quality area top 1 61 inches 41 mm minimum 3 Reduced print quality area bottom 1 46 inches 37 mm minimum ...

Page 134: ...nt quality area bottom 1 57 inches 40 mm minimum Envelopes 1 Right left margins 0 12 inch 3 mm minimum 2 Top bottom margins 0 12 inch 3 mm minimum 3 Reduced print quality area right 0 71 inch 18 mm minimum 4 Reduced print quality area left 1 61 inches 41 mm minimum Parent topic Technical Specifications ...

Page 135: ... Do not load paper before refilling the ink tanks Check the ink level in your product frequently and refill the ink tanks if necessary Color Cyan Magenta Yellow Black Ink life Opened package use as soon as possible Unopened package do not use if the date on the package has expired Temperature Storage 4 to 104 F 20 to 40 C 1 month at 104 F 40 C Ink freezes at 5 F 15 C Ink thaws and is usable after ...

Page 136: ...onsumption Printing Approximately 12 W ISO IEC24712 Sleep mode Approximately 0 4 W Power off mode Approximately 0 2 W Parent topic Technical Specifications Environmental Specifications Temperature Operating 50 to 95 F 10 to 35 C Storage 4 to 104 F 20 to 40 C 1 month at 104 F 40 C Humidity without condensation Operating 20 to 80 RH Storage 5 to 85 RH Parent topic Technical Specifications Interface ...

Page 137: ...137 Note Epson cannot guarantee the operation of externally connected devices Parent topic Technical Specifications ...

Page 138: ... Place the printer near a wall outlet where the plug can be easily unplugged Avoid plugging the printer into an outlet on the same circuit as a photo copier or air control system that regularly switches on and off or on an outlet controlled by a wall switch or timer Do not let the power cord become damaged or frayed If you use an extension cord with the printer make sure the total ampere rating of...

Page 139: ...cifically explained in your documentation do not attempt to service the printer yourself Unplug the printer and refer servicing to qualified service personnel under the following conditions if the power cord or plug is damaged if liquid has entered the product if the product has been dropped or the case damaged if the product does not operate normally or exhibits a distinct change in performance A...

Page 140: ...ion reception which can be determined by turning the equipment off and on the user is encouraged to try to correct the interference by one or more of the following measures Reorient or relocate the receiving antenna Increase the separation between the equipment and receiver Connect the equipment into an outlet on a circuit different from that to which the receiver is connected Consult the dealer o...

Page 141: ...ures then in effect for consumer related disputes but excluding any rules that permit joinder or class actions in arbitration for more detail on procedure see Section 1 6 below You and Epson understand and agree that a the Federal Arbitration Act 9 U S C 1 et seq governs the interpretation and enforcement of this Section 1 b this Agreement memorializes a transaction in interstate commerce and c th...

Page 142: ...ability enforceability or formation of this Agreement including any claim that all or any part of this Agreement is void or voidable Notwithstanding this broad delegation of authority to the arbitrator a court may determine the limited question of whether a claim or cause of action is for an IP Claim which is excluded from the definition of Disputes in Section 1 1 above The arbitrator shall be emp...

Page 143: ...reement Your right to attorney s fees and expenses under Section 1 6d above does not limit your rights to attorney s fees and expenses under applicable law notwithstanding the foregoing the arbitrator may not award duplicative awards of attorney s fees and expenses 1 7 Opt out You may elect to opt out exclude yourself from the final binding individual arbitration procedure and waiver of class and ...

Page 144: ... those marks Parent topic Notices Copyright Notice All rights reserved No part of this publication may be reproduced stored in a retrieval system or transmitted in any form or by any means electronic mechanical photocopying recording or otherwise without the prior written permission of Seiko Epson Corporation The information contained herein is designed only for use with this Epson product Epson i...

Page 145: ...pectful of the copyright laws when using any Epson product While some countries laws permit limited copying or reuse of copyrighted material in certain circumstances those circumstances may not be as broad as some people assume Contact your legal advisor for any questions regarding copyright law Parent topic Copyright Notice Default Delay Times for Power Management for Epson Products This product ...

Reviews: