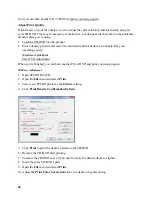
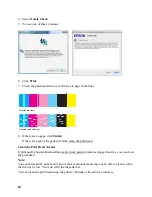
background image

60

4. Select 

Nozzle Check

.

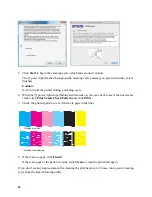
5. You see one of these windows:

6. Click 

Print

.

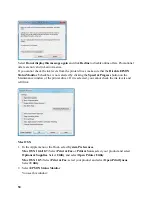
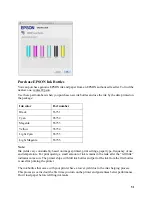
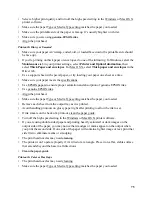
7. Check the printed pattern to see if there are gaps in the lines.

8. If there are no gaps, click 

Finish

.

If there are gaps or the pattern is faint, clean the print head.

Clean the Print Head Nozzles

If print quality has declined and the nozzle check pattern indicates clogged nozzles, you can clean 
the print head.

Note:

You cannot clean the print head if an ink tank is expended, and may not be able to clean it when 
the ink level is low. You must refill the ink tank first.

You can clean the print head using the printer’s buttons or the printer’s software.

Nozzles are clean

Nozzles need cleaning

Summary of Contents for L800

Page 1: ...EPSON Ink Bottles 51 Precautions on Refilling Ink 52 Refill Ink Tanks 52 Adjust Print Quality 58 Clean the Print Head 58 Align the Print Head 63 Clean the Paper Guide 64 Solve Problems 65 Check for Software Updates 65 Problem solving Tools 65 Problems and Solutions 68 Re install Software 77 Get More Help 78 Clean and Transport Your Product 80 Cleaning 80 Transportation 80 Use Your Product on a Net...

Page 2: ...2 Home Welcome to the L800 User s Guide ...

Page 3: ...duct Parts Use these illustrations to identify the parts on your product Paper support Output tray extensions Edge guide Sheet feeder Output tray Printer cover Front cover Ink tank unit USB port Power inlet ...

Page 4: ...int head to its home position When the ink light is off press and hold for at least 3 seconds to clean the print head Press to load or eject paper Press to resume printing after a paper out error or multiple page feed error Press to cancel printing during a print job Transportation lock Print head Ink tanks Control panel Ink tubes ...

Page 5: ...k level of one or more ink tanks may have reached the lower line Flashes when the ink level of one or more ink tanks may be low You may continue printing until the ink level reaches the lower line On when the printer is out of paper or the CD DVD tray is not loaded corretly Flashes when paper or the CD DVD tray is jammed or when the output tray is in an incorrect position ...

Page 6: ... Load Envelopes General Paper Information Load Paper for Documents or Photos You can print documents and photos on a variety of paper types and sizes 1 Open the paper support then pull up the extension 2 Open the front cover then extend the output tray 3 Squeeze the tab on the edge guide and slide it to the left ...

Page 7: ...ght side of the sheet feeder and place it behind the tabs on the edge guides 5 Slide the edge guide against the paper but not too tightly If you are inserting a stack of paper fan the sheets first and tap the stack on a flat surface to even the edges Smaller paper Letter or A4 size ...

Page 8: ...er top edge first Do not load paper above the arrow marks on the edge guide Check the paper package for any additional loading instructions Leave enough space in front of the printer for the paper to be fully ejected Load Envelopes You can print on plain paper envelopes in 4 1 8 9 1 2 inch 10 105 241 mm size 1 Open the paper support then pull up the extension ...

Page 9: ...9 2 Open the front cover then extend the output tray 3 Squeeze the tab on the edge guide and slide it to the left ...

Page 10: ...t the envelopes but not too tightly Tip Do not use envelopes that are curled or folded and avoid using envelopes that are too thin because they may curl during printing Before printing from your computer select Envelope as the paper type Envelope 10 as the paper size and Landscape as the orientation If you are printing on envelopes of a different size create a custom size in Windows or Mac OS X Ge...

Page 11: ...er Glossy EPSON Premium Photo Paper Semi gloss EPSON Ultra Premium Photo Paper Glossy EPSON Premium Presentation Paper Matte 20 sheets EPSON Premium Presentation Paper Matte Double sided EPSON Photo Quality Self adhesive Sheets EPSON Iron on Cool Peel Transfer paper 1 sheet Paper type Size Part number Sheet count EPSON Bright White Paper Letter 8 5 11 inches 216 279 mm S041586 500 EPSON Photo Pape...

Page 12: ...emium Photo Paper Semi gloss 4 6 inches 102 152 mm S041982 40 Letter 8 5 11 inches 216 279 mm S041331 20 EPSON Presentation Paper Matte Letter 8 5 11 inches 216 279 mm S041062 100 EPSON Premium Presentation Paper Matte 8 10 inches 203 254 mm S041467 50 Letter 8 5 11 inches 216 279 mm S041257 S042180 50 100 EPSON Premium Presentation Paper Matte Double sided Letter 8 5 11 inches 216 279 mm S041568 ...

Page 13: ...mium Photo Paper Semi gloss 4 6 inches 102 152 mm Letter 8 5 11 inches 216 279 mm EPSON Premium Presentation Paper Matte Letter 8 5 11 inches 216 279 mm For this paper media Select this paper Type or Media Type setting Plain paper EPSON Bright White Paper Plain Paper Bright White Paper EPSON Ultra Premium Photo Paper Glossy Ultra Premium Photo Paper Glossy EPSON Premium Photo Paper Glossy Premium ...

Page 14: ...14 Envelopes Envelope For this paper media Select this paper Type or Media Type setting ...

Page 15: ...uctions Tip It s a good idea to check for updates to your printer software see Check for Printer Updates for instructions Also be sure to load paper in the sheet feeder Windows Printing You can print using any Windows printing program Follow the steps in these sections Print From a Program Select Basic Options Change Print Layout Select Advanced Options Print Your Document or Photo Check Printing ...

Page 16: ...t EPSON L800 Series 3 Click Properties or Preferences Note If you don t see these buttons click Setup Printer or Options then click Properties or Preferences on the next screen Your printer settings window opens ...

Page 17: ...Default Print Settings Select Basic Options There are two ways to select basic printing options Select a printing preset to quickly select settings for common paper types sizes and print qualities Select individual settings on the Main tab Select a Printing Preset For quick access to the most common settings click the Shortcuts tab Point to one of the Printing Presets to view a list of the setting...

Page 18: ...e Advanced tab select your settings and then click on the Save Settings button To delete a preset you created click Add Remove on the Shortcuts tab select the preset and click Delete Select Basic Settings on the Main Tab Click the Main tab at the top of the printer settings window to select your basic print options ...

Page 19: ...he print quality you want 3 Select the paper type setting that matches the paper you loaded 4 Select the paper size setting for the paper you loaded A User Defined option is also available so you can create a custom size 5 If you re printing borderless photos select Borderless For documents or photos with borders select Borders Note For borderless photos make sure you loaded a compatible borderles...

Page 20: ...Choose Portrait or Landscape orientation for your document or photo Choose Landscape for printing envelopes You can also Select different print layout settings Select advanced printing options See a summary of your settings click Show Settings Return to the default settings click Reset Defaults Access the Epson support website click Online Support website is available in Spanish and Portuguese Whe...

Page 21: ...t the amount of image expansion when printing borderless photos select Auto Expand as the Enlargement Method then adjust the Borderless Expansion slider to Min Mid or Max If you select Retain Size the image is printed at its actual size without scaling Note You may see white borders on your printed photo if you use the Min setting To add a watermark message to your printed document or photo select...

Page 22: ...ect Borderless For documents or photos with borders select Borders Note For borderless photos make sure you loaded a compatible borderless paper size and type 5 Choose Portrait or Landscape orientation for your document or photo Choose Landscape for printing envelopes 6 Select any of the Print Options you want for your document or photo 7 Select Color Management options for finer control of the co...

Page 23: ...ngs click OK to save them and return to the Print window Click OK or Print to start printing During printing you can check printing status Check Printing Status During printing you see this window showing the progress of your print job It allows you to control printing and check ink levels To cancel printing click Stop To see print jobs lined up for printing click Print Queue ...

Page 24: ...gs to use in all your Windows programs you can change the default print settings 1 Right click the printer icon in the taskbar 2 Select Printer Settings You see the printer settings window 3 Select the print settings you want to use as defaults in all your Windows programs You can still change the default settings from within a program as needed Change the Language In Windows you can choose Englis...

Page 25: ...ou can print using any Mac OS X printing program Follow the steps in these sections to print from your Mac Open Your File for Printing Select Basic Print Options Select Page Setup Options Change Print Layout Manage color Print Your Document or Photo Check Printing Status General Printing Preferences See also Windows Printing Open Your File for Printing You can open a file for printing by either ...

Page 26: ...inter setting 3 If necessary click the Show Details button or the button next to the Printer setting to expand the print window 4 Select the page setup options Choose the Paper Size and Orientation settings Note If you don t see these settings here check for them in your application before printing For example you may be able to select them by opening the File menu and selecting Page Setup 5 Selec...

Page 27: ... the screen 7 Select the Media Type setting that matches the paper you loaded 8 Select a Print Quality for your document or photo Available settings depend on the selected Media Type setting You can also Select page setup options ...

Page 28: ...e able to select them by opening the File menu and selecting Page Setup 1 Select the Paper Size setting for the paper you loaded A custom option is also available so you can create a custom paper size 2 Choose a portrait or landscape Orientation option for your document or photo Choose landscape left for envelopes You can also Select basic print options Select different print layout settings Manag...

Page 29: ...e ready to print Manage color You can adjust the Color Matching and Color Options settings to fine tune the colors in your printout or turn off color management in your printer software 1 Select Color Matching in the pop up menu 2 Select from the following options if necessary EPSON Color Controls lets you manage color using controls in your printer software or turn off color management ColorSync ...

Page 30: ...on technology to optimize photos that include faces For this to work both eyes and the nose must be visible in the subject s face If your photo includes a face with an intentional color cast such as a statue you may want to turn off Fix Photo to retain the special color effects Off No Color Adjustment turns off color management in your printer software so you can manage color using only your appli...

Page 31: ...Levels Note You can also cancel printing by pressing the printer s paper button 3 When you re finished close the window to exit the program If you see an error during printing see Solve Problems for solutions General Printing Preferences You can select various printing preferences that will apply to all print jobs 1 In the Apple menu or the Dock select System Preferences 2 Select Print Fax or Prin...

Page 32: ... that pages without text or images are not printed Quiet Mode for quieter printing when Plain Paper Bright White Paper is selected as the Media Type High Speed Printing for faster printing print quality is reduced Warning Notifications lets you choose whether or not to receive warning notifications from the printer software when ink is low 6 Click OK when done ...

Page 33: ... may cause errors when you burn the data Always use the small CD DVD adapter when you print on 8 cm discs and make sure the disc and adapter lie flat on the tray otherwise the printer may be damaged Print only on circular CDs DVDs Store the CD DVD tray in a flat place A warped or damaged CD DVD tray may stop the printer from operating normally Before you insert the disc make sure that no dust or d...

Page 34: ...the ink If the tray is ejected or not fed correctly when you start a CD DVD print job make sure that you inserted the tray properly If the tray is ejected when you start a CD DVD print job the printer is not ready Wait until you see a message on your screen asking you to insert the tray Then reinsert the tray and press the paper button Do not turn the printer off with a CD or DVD loaded in it Alwa...

Page 35: ...eding and ejecting Letter or A4 size paper Load plain paper and press the paper button to feed and eject paper several times 1 First burn files music or video onto your CD DVD before printing on it to prevent errors 2 Before you insert a disc make sure the printer is turned on Otherwise the disc may not be positioned correctly 3 Open the front cover 4 Lift the output tray up with both hands then p...

Page 36: ...es or substances are on the CD DVD tray as these may damage the CD DVD s data side Be sure to use the CD DVD tray provided with this printer If you use another CD DVD tray there may be a gap in the print position and printing may not be performed properly 7 Gently insert the CD DVD tray along the base of the output tray until the arrows on the CD DVD tray and the output tray are aligned Make sure ...

Page 37: ...he instructions in these sections to print on a CD DVD using EPSON Print CD Design a CD DVD Print a CD DVD Adjust Print Position Adjust Print Quality See also Load a CD DVD Design a CD DVD You can use EPSON Print CD to design your CD DVD by importing photos adding text and creating special effects Follow the instructions in the section for your operating system Windows Mac OS X Windows 1 Double cl...

Page 38: ...ted and click OK Select the image you want to use and click OK to use the image as is To adjust the image select the options on the right side of the window 4 Click OK to close the Select Background window 5 To make additional adjustments click the Background button again Click the Image Adjustment button and tab ...

Page 39: ...lect the font size and other text effects by accessing them through the Text Settings Text Color and other tabs Note For more details on EPSON Print CD options click Help 8 Click OK to close the Text Settings window 9 When you re finished open the File menu select Save and save your design file Once your design is saved you can load the CD DVD and print your design on it ...

Page 40: ...40 Mac OS X 1 Select Applications EPSON Software Print CD 2 To select an image to use in the background click the background icon Click Select Background ...

Page 41: ...xt Settings box Select the font size and other text effects in the options below or on the Distort Text tab Note For more details on EPSON Print CD options click Help 5 When you re finished open the File menu select Save and save your design file Once your design is saved you can load the CD DVD and print your design on it Print a CD DVD After designing your CD DVD and loading the disc you re read...

Page 42: ...D DVD from the printer If you need to adjust the print position or print quality see Adjust Print Position Adjust Print Quality Adjust Print Position If your printed design is not positioned on your disc correctly you can adjust the print position using an extra CD DVD ...

Page 43: ...N Print CD 2 Open the File menu and select Print 3 Select your EPSON printer as the Printer setting if necessary 4 Click Print Position Confirmation Pattern 5 Click Print 6 Remove the disc after printing 7 Using a metric ruler measure the distance from the hole to the cross marks labeled Top and Right Note Be sure to measure from the edge of the hole and not the edge of the printable area 8 Open t...

Page 44: ...d the distance for Right in the Width Right box 10 Click OK Now you can burn another CD or DVD and print your design again Mac OS X Adjustment 1 Open EPSON Print CD 2 Open the File menu and select Print 3 Make sure your EPSON printer is selected 4 Click Print Position Check Pattern ...

Page 45: ...g a metric ruler measure the distance from the hole to the cross marks labeled Top and Right 8 Click Position Adjustment 9 Click Value Entry then select the distance for Top into the Top Space box and the distance for Right in the Right Space box 10 Click OK ...

Page 46: ... your operating system Windows Adjustment Mac OS X Adjustment When you re finished you can burn another CD or DVD and print your design again Windows Adjustment 1 Open EPSON Print CD 2 Open the File menu and select Print 3 Select your EPSON printer as the Printer setting 4 Click Print Density Confirmation Pattern 5 Click Print to print the density pattern on the CD DVD 6 Remove the CD DVD after pr...

Page 47: ... menu and select Print 3 Make sure your EPSON printer is selected 4 Click Print Density Check Pattern 5 Click Print 6 Remove the disc after printing and examine it to see if you need to make the density darker or lighter 7 Load the same disc again 8 Select a darker or lighter setting in the Color Correction box 9 Click Second Time or Third Time to print additional patterns using different settings...

Page 48: ...ON Status Monitor screen and follow the on screen instructions or follow the steps in Refill ink tanks You must refill the tank to be able to print You cannot print when any ink tank is expended even if the other ink tanks are not expended Note For best printing results use up the ink by the date printed on the ink bottle Follow the instructions in these sections to check and refill the ink tanks ...

Page 49: ...b You can check the approximate ink levels from this window Click the Check Ink Levels button on the progress meter screen to display the approximate ink levels as shown below You may also see this screen every time you print if your computer is connected to the Internet ...

Page 50: ...peed Progress button on the Maintenance window of the printer driver If it is selected you cannot check the ink levels and refill ink Mac OS X 1 In the Apple menu or the Dock select System Preferences Mac OS X 10 6 10 7 Select Print Fax or Print Scan select your product and select Options Supplies Select Utility and select Open Printer Utility Mac OS X 10 5 Select Print Fax select your product and...

Page 51: ...ture For print quality a small amount of ink remains in the tank after the refill ink indicator comes on The printer ships with full ink bottles and part of the ink from the first bottles is used for priming the printer The ink bottles that came with your printer have a lower yield due to the ink charging process This process is carried out the first time you turn on the printer and guarantees bet...

Page 52: ...ready to use them Continue using the printer until the ink level reaches the lower line so that the ink tank can be refilled with the entire contents of a new ink bottle This printer uses IDs that are indicated on each ink bottle to fill or refill ink IDs are only valid one time Some ink is consumed from all ink tanks during the print head cleaning Store the ink bottles in the same environment as ...

Page 53: ...tles out the reach of children and don t drink the ink Caution For best printing results use up the ink bottle before the date printed on the package Note The illustrations show how to refill the black ink However the instructions are the same for all of the inks Use gloves and place a sheet of paper under the ink tank when refilling ink If ink spills wipe off the ink immediately to prevent accide...

Page 54: ...move the ink tank cap Note Be careful not to spill any ink Make sure that the color of the ink tank matches the ink color that you want to refill 4 Snap off the tip of the bottle cap remove the cap of the ink bottle remove the seal from the bottle and then install the cap 1 2 1 2 ...

Page 55: ... ink bottle cap 5 Refill the ink tank with the correct colored ink up to the upper line on the ink tank Note If any ink remains in the ink bottle after filling the ink tank up to the upper line install the cap securely and store the ink bottle upright for later use 6 Install the cap onto the ink tank securely and then close the ink tank unit cover ...

Page 56: ...inter or ink will not be delivered and you may experience print quality problems When transporting the printer set the transportation lock to the transport position or ink may leak 8 Confirm the ID that is indicated on the ink bottle and then follow the on screen instructions to enter the ID and complete the refilling procedure 2 1 1 2 ...

Page 57: ...57 ...

Page 58: ... cannot clean the print head if an ink tank is expended and may not be able to clean it when the ink level is low You must refill the tank first Follow the instructions in these sections to check your print head nozzles and clean them Check the Print Head Nozzles Clean the Print Head Nozzles Check the Print Head Nozzles You can print a nozzle check pattern to check for clogged nozzles using the pr...

Page 59: ...ay is in the paper position 2 Load a few sheets of plain paper in the sheet feeder 3 Do one of the following Windows Right click the printer icon in the taskbar Mac OS X 10 6 10 7 In the Apple menu or the Dock select System Preferences Select Print Fax or Print Scan select your product and select Options Supplies Select Utility and select Open Printer Utility Mac OS X 10 5 In the Apple menu or the...

Page 60: ...t head Clean the Print Head Nozzles If print quality has declined and the nozzle check pattern indicates clogged nozzles you can clean the print head Note You cannot clean the print head if an ink tank is expended and may not be able to clean it when the ink level is low You must refill the ink tank first You can clean the print head using the printer s buttons or the printer s software Nozzles ar...

Page 61: ...the print head up to 3 times If print quality has still not improved contact Epson From the Computer 1 Make sure that no lights are indicating errors that the CD DVD tray is not inserted in the printer and that the output tray is in the paper position 2 Load a few sheets of plain paper in the sheet feeder 3 Do one of the following Windows Right click the printer icon in the taskbar Mac OS X 10 6 1...

Page 62: ... and remains on you can check to see if the nozzles are clean click Print Nozzle Check Pattern and click Print 7 Check the printed pattern to see if there are gaps in the lines 8 If there are no gaps click Finish If there are gaps or the pattern is faint click Clean to clean the print head again If you don t see any improvement after cleaning the print head up to 3 times run a power cleaning cycle...

Page 63: ...are indicating errors that the CD DVD tray is not inserted in the printer and that the output tray is in the paper position 2 Load a few sheets of plain paper in the sheet feeder 3 Do one of the following Windows Right click the printer icon in the taskbar Mac OS X 10 6 10 7 In the Apple menu or the Dock select System Preferences Select Print Fax or Print Scan select your product and select Option...

Page 64: ...e that no lights are indicating errors that the CD DVD tray is not inserted in the printer and that the output tray is in the paper position 2 Load a few sheets of plain paper in the sheet feeder 3 Right click the paper button on the printer s control panel to feed and eject the paper 4 Repeat as necessary until the paper comes out clean Caution Do not apply grease to the metal parts under the pri...

Page 65: ...ws you can manually update the software by selecting Driver Update on the Maintenance tab in the printer settings window You can also click or Start select All Programs or Programs select EPSON select EPSON L800 Series and click Driver Update Problem solving Tools You can often diagnose problems with your printer by checking the status of lights on the control panel If the lights do not help you s...

Page 66: ...than one sheet of paper at a time Make sure you set the output tray to the paper position Then load paper in the sheet feeder and press the paper button to resume printing Paper jam Paper has jammed in the printer Clear the paper jam CD DVD tray jam When printing on a CD or DVD the CD DVD tray is not ejected Pull out the CD DVD tray and press the paper button Ink level reaches the lower line Ink l...

Page 67: ... of a new ink bottle Cover open The printer cover is open Close the printer cover Output tray error The output tray is not in the correct position Before turning on the printer make sure the output tray is set to the paper lower position When printing on a CD or DVD set the output tray to the CD DVD position When printing on paper set the output tray to the paper position Flashing alternately Main...

Page 68: ...cable software or settings Check for additional solutions or re install your software If the pattern on the page has gaps clean or align the print head If the page does not print the printer may have a problem Check for additional solutions If they don t work contact Epson Problems and Solutions Check these sections for solutions to problems you may have using the product Setup Problems Miscellane...

Page 69: ... virus protection software and install the software again Make sure the EPSON L800 is selected as the default printer and that the correct port is shown in the printer properties If you see an error message or your software doesn t install correctly you may not have software installation privileges Contact your System Administrator Make sure the USB Controller is working properly in Device Manager...

Page 70: ...paper that is too thick for the printer Do not load paper with holes punched in it Paper Jams If paper jams follow these steps to clear it 1 Cancel the print job if necessary 2 Gently pull the jammed paper from the output tray or sheet feeder 3 If paper is stuck inside open the printer cover then remove all of the paper inside the printer including any torn pieces Close the printer cover If paper ...

Page 71: ... you loaded Printing Problems Nothing Prints Even Though the Printer Is Turned On Printing Noise Occurs Even Though Nothing Prints Noise Occurs When Printer Sits for a While No Printer Icon Appears in Windows Taskbar Slow Printing Nothing Prints Even Though the Printer Is Turned On Make sure the USB cable is connected securely at both ends and meets the requirements If you are connecting the print...

Page 72: ... Noise Occurs When Printer Sits for a While The printer is performing routine maintenance No Printer Icon Appears in Windows Taskbar Try restarting your computer If you still don t see the icon follow these steps 1 Do one of the following Windows 7 Click and select Devices and Printers Windows Vista Click select Control Panel and click Printer under Hardware and Sound Windows XP Click Start and se...

Page 73: ... If the printer is connected to a USB hub disconnect unused USB devices Page Layout and Content Problems Blank Pages Print Too Many Copies Print Incorrect Margins White Border on Borderless Photo Incorrect Characters Print Incorrect Image Size or Position Image Is Inverted Like a Mirror Image Turn off the mirror setting in your application program Turn off the Mirror Image setting in the printer d...

Page 74: ...correct Characters Print Make sure the USB cable is securely connected and meets the requirements Then try printing again Make sure your printer is selected as the active printer in your printing program If you re using a switch box or USB hub with your printer connect the printer directly to your computer Turn the printer off and then on again Incorrect Image Size or Position Make sure the paper ...

Page 75: ...ion and absorption of genuine EPSON inks Use genuine EPSON inks Align the print head Make sure the paper Type or Media Type setting matches the paper you loaded Remove each sheet from the output tray as it is printed Avoid handling printouts on glossy paper right after printing to allow the ink to set If ink smears on the back of a printout clean the paper guide Turn off the high speed setting in ...

Page 76: ...Mac OS X printer software is not set to print in black or grayscale The print head nozzles may need cleaning If you have not used the printer in a long time run a power cleaning Try turning off Fix Photo in the Windows or Mac OS X printer software Try changing the Gamma setting in your Windows or Mac OS X printer software Your printed colors can never exactly match your on screen colors However yo...

Page 77: ... is not ready Wait until you see a message on your screen asking you to insert the tray Then reinsert the tray and press the paper button Re install Software If you have a problem that requires you to re install your software follow the instructions in one of these sections Windows Mac OS X Windows 1 Turn off the printer 2 Disconnect the USB cable from the printer 3 Click or Start and select All P...

Page 78: ...ct software see the Start Here sheet for instructions Note If you uninstall the printer driver and your product name remains in the Print Fax or Print Scan window select your product name and click the remove icon to remove it Get More Help If you need additional help with your printer or its software contact Epson Epson provides these technical support services Internet Support Visit Epson s supp...

Page 79: ...er To find the nearest one call your nearest Epson sales office as described above Bolivia 800 100 116 Chile 56 2 484 3400 Colombia 57 1 523 5000 Costa Rica 800 377 6627 Dominican Republic 1 888 760 0068 Ecuador 1 800 000 044 El Salvador 800 6570 Guatemala 1 800 835 0358 Honduras 800 0122 Code 8320 Mexico Mexico City Other Cities 52 55 1323 2052 01 800 087 1080 Nicaragua 00 1 800 226 0368 Panama 0...

Page 80: ...lean the outer case with a soft cloth dampened with mild detergent Transportation If you need to ship your printer or transport it a long distance prepare it for transportation as follows Caution When storing or transporting the printer avoid tilting it placing it vertically or turning it upside down otherwise ink may leak When storing or transporting an ink bottle after removing its seal do not t...

Page 81: ... original box or one of a similar size using protective material to keep it from moving inside the box Keep the printer level during transportation After you move it set the transportation lock to the printing position If print quality has declined when you print again in a new location clean and align the print head Note Be sure to remove the tape inside the printer and any protective materials b...

Page 82: ... Up Shared Printer 1 Do one of the following Windows 7 Click then click Devices and Printers Windows Vista Click click Control Panel and click Printer under Hardware and Sound Windows XP Click Start click Control Panel and click Printers and Other Hardware or Printers and Faxes 2 Do one of the following Windows 7 Right click the EPSON L800 Series icon click Printers properties click the Sharing ta...

Page 83: ...er Windows XP Double click the Add Printer icon The Add Printer Wizard opens Click Next 3 Do one of the following Windows 7 and Windows Vista Click Add a network wireless or Bluetooth printer then click Next Windows XP Select A network printer or a printer attached to another computer then click Next 4 Follow the on screen instructions to complete access to the shared printer You may need to inser...

Page 84: ...the Printer Sharing checkbox 6 Close System Preferences Now you can access the shared printer from other computers on the network Just select the printer from the Format For menu in the Page Setup window or Printer menu in the Print menu Then select the rest of your settings and print your document or photo ...

Page 85: ...or automatic timers Keep the entire computer system away from potential sources of electromagnetic interference such as loudspeakers or the base units of cordless telephones Do not use a damaged or frayed power cord The power supply cords should be placed to avoid abrasions cuts fraying crimping and kinking Do not place objects on top of the power supply cords and do not allow the power supply cor...

Page 86: ...per to be fully ejected Avoid places subject to rapid changes in temperature and humidity Also keep the printer away from direct sunlight strong light or heat sources Do not place or store the printer outdoors near excessive dirt or dust water heat sources or in locations subject to shocks vibrations high temperature or humidity Do not use with wet hands Place the printer near a wall outlet where ...

Page 87: ...ise ink may leak even if the cap on the ink bottle is tightened securely Be sure to keep the ink bottle upright when tightening the cap and take measures to prevent ink from leaking when you transport the bottle Computer System Requirements To use the printer and its software your computer system should meet or exceed the requirements in these sections Windows Requirements Mac OS X Requirements No...

Page 88: ...al size paper Load one sheet at a time Envelopes 10 envelopes Paper Use paper under normal conditions Temperature 59 to 77 F 15 to 25 C Humidity 40 to 60 RH Note Since the quality of any particular brand or type of paper may be changed by the manufacturer at any time Epson cannot guarantee the quality of any non EPSON brand or type of paper Always test a sample of paper stock before purchasing lar...

Page 89: ...ght 17 lb 64 g m2 to 24 lb 90 g m2 Envelopes Size No 10 4 1 9 5 inches 105 241 mm Paper type Plain bond paper Weight 20 lb 75 g m2 to 24 lb 90 g m2 Printable Area Note When printing borderless quality may decline in the expanded printable area Single sheets Top 0 12 inch 3 mm minimum Left 0 12 inch 3 mm minimum Right 0 12 inch 3 mm minimum Top Left Right Bottom Borderless printing Sheets with bord...

Page 90: ...Right 0 78 inch 20 mm minimum CD DVD A Inner margin 0 7 inch 18 mm maximum B Outer margin 4 7 inch 120 mm maximum A Inner margin 0 7 inch 18 mm maximum B Outer margin 3 2 inch 80 mm maximum Note Avoid printing in the clear plastic areas of discs to prevent staining the disc with ink Top Left Right Bottom 12 cm CD DVD 8 cm CD DVD ...

Page 91: ... may vary based images printed print settings paper type frequency of use and temperature To ensure you receive premium print quality and to help protect your print head a variable amount of ink remains in the ink tank after the refill ink screen comes on The yields quoted do not include this reserve Although the ink bottles may contain recycled materials this does not affect the product s functio...

Page 92: ...V 220 V Model 198 to 264 V Rated frequency range 50 to 60 Hz Input frequency range 49 5 to 60 5 Hz Rated current 120 V Model 0 6 A 220 V Model 0 3 A Power consumption 120 V Model Printing Approx 13 0 W ISO IEC24712 Ready mode Approx 3 3 W Sleep mode Approx 1 0 W Power off mode Approx 0 2 W 220 V Model Printing Approx 13 0 W ISO IEC24712 Ready mode Approx 3 3 W Sleep mode Approx 1 2 W Power off mod...

Page 93: ...iko Epson Corporation s operating and maintenance instructions Seiko Epson Corporation shall not be liable for any damages or problems arising from the use of any options or any consumable products other than those designated as Original EPSON Products or EPSON Approved Products by Seiko Epson Corporation Seiko Epson Corporation shall not be held liable for any damage resulting from electromagneti...

Page 94: ...ko Epson Corporation General Notice Other product names used herein are for identification purposes only and may be trademarks of their respective owners Epson disclaims any and all rights in those marks This information is subject to change without notice 2012 Epson America Inc 7 12 CPD 35589R1 ...

Page 95: ...95 ...

Reviews: