background image

Product Description

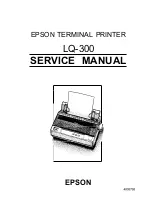
 Service Manual

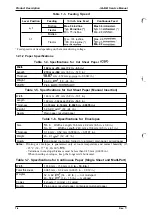
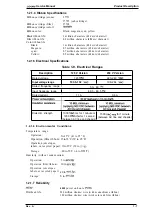
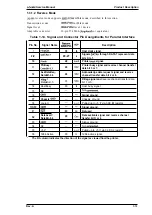
Table 1-3. Feeding 

Speed

Lever Position

Feeding

 inch Line Feed

Continuous Feed

Friction

Max. 94 ins/line

Max 3.6 

o, 1

Tractor

 80 ins/line (*)

 3.3 

 (*)

Min. 75 ins/line

Min. 2.8 

Friction

I

I

2-5

Max. 106 

redline

Max. 2.8 

Tractor

 104 ins/line (*)

 2.5 


Min. 2.2 

 Feed speed is varies depending on the motor driving voltage.

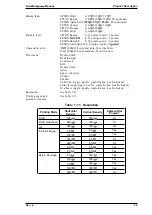
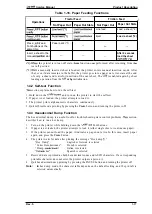
1.2.1.2 Paper Specifications

Table 

1-4. Specifications for Cut Sheet Paper 

Width

182 mm -216 mm (7.2 in. -8.5 in.)

Length

210 mm -364  mm (8.3 in. -14.3 in.)

Thickness

10.07 

mm -0.12 mm 

 in. -0.0047 in.)

I

Weight

64-90 

 (18 -24 lb.)

Plain 


Table 1-5. Specifications  for Cut Sheet Paper (Manual Insertion)

Width

148 mm -257 mm (5.8 in. -10.1 in.)

Length

182 mm -364  mm (7.2 in. -14.3  in.)

Thickness

0.065  mm -0.14 mm (0.0025 in. -0.0055 in.)

Weight

52.3-90 

 (14 -24 lb.)

Quality

 Plain paper, recycled paper

Table 1-6. Specifications  for Envelopes

Size

 6

Width x Length: 166 mm x 92 mm (6.5 in. x 3.6 in.)

No. 10

Width x Length: 240 mm x 104 mm (9.5 in. x 4.1 in.)

Thickness

0.16 mm - 0.52 mm (0.0063 in. - 0.0197 in.)

Weight

45- 91 

 (12 -24 lb.)

Quality

Bond paper (not curled, folded, or crumpled), plain paper, airmail paper

Notes: . 

Printing of envelopes is guaranteed only at room temperature and normal humidity (15

- 25° C (59 - 77° F) ,20- 60% 

● 

Variations in envelope thickness must be less than 0.25 mm (0.0098 in.).

. When inserting envelopes, keep the longer side horizontal.

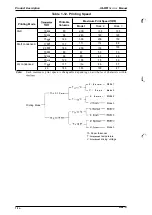
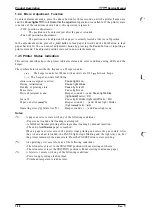
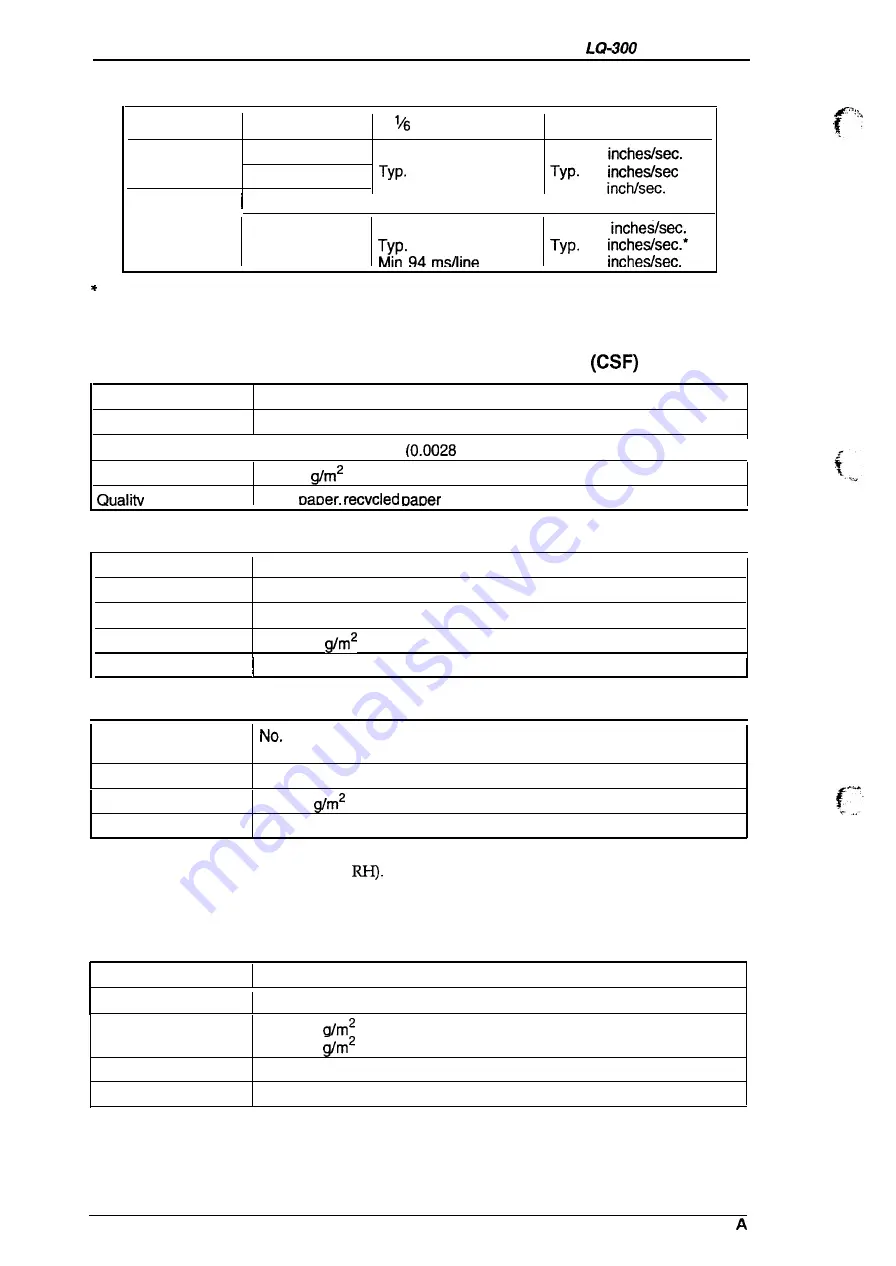
Table 1-7. Specifications for Continuous Paper (Single Sheet and Multi-Part)

Width

101.6 mm - 

254 

mm 

(4.0 

in. - 10.0 in.)

Total thickness

0.065 mm - 0.32 mm 

(0.0025 

in. - 0.012 in.)

Weights

52.3- 82 

 (14 - 22 lb.) — not multi-part

40- 58.2 

 (12 - 15 lb.) — multi-part

Copies

4 sheets (1 or 3 copies)

Quality

Plain paper, recycled paper, carbonless multi-part paper

1-4

Rev. 

Summary of Contents for LQ-300 - Impact Printer

Page 1: ...EPSON TERMINAL PRINTER LQ 300 SERVICE MANUAL EPSON ...

Page 2: ...this manual However should any errors be detected SEIKO EPSON would greatly appreciate being informed of them The above notwithstanding SEIKO EPSON can assume no responsibility for any errors in this manual or the consequence thereof Epson is registered trademark of Seiko Epson Corporation General Notice Other product names used herein are foridentication purposes only and maybe trademarks of thei...

Page 3: ... MANUAL DO NOT CONNECT THE UNITTOA POWER SOURCE UNTIL INSTRUCTED TO DO SO WHEN THE POWER SUPPLY CABLE MUST BE CONNECTED USE EXTREME CAUTION IN WORKING ON POWER SUPPLY AND OTHER ELECTRONIC COMPONENTS WARNING REPAIRS ON EPSON PRODUCT SHOULD BE PERFORMED ONLY BY AN EPSON CERTIFIED REPAIR TECHNICIAN MAKE CERTAIN THAT THE SOURCE VOLTAGE IS THE SAME AS THE RATED VOLT AGE LISTED ON THE SERIAL NUMBER RATI...

Page 4: ... of the printer CHAPTER 2 OPERATING PRINCIPLES Describes the theory of printer operation CHAPTER 3 DISASSEMBLY AND ASSEMBLY Includes a step by step guide for product disassembly and assembly CHAPTER 4 ADJUSTMENTS Includes a step by step guide for adjustment CHAPTER 5 TROUBLESHOOTING Provides Epson approved techniques for adjustment CHAPTER 6 MAINTENANCE Describes preventive maintenance techniques ...

Page 5: ...REVISION SHEET Revision Issue Date Revision Page Rev A September 28 1994 1st issue f v 1 ...

Page 6: ...TABLE OF CONTENTS CHAPTER 1 CHAPTER 2 CHAPTER 3 CHAPTER 4 CHAPTER 5 CHAPTER 6 APPENDIX PRODUCT DESCRIPTION OPERATING PRINCIPLES DISASSEMBLY AND ASSEMBLY ADJUSTMENTS TROUBLESHOOTING MAINTENANCE vi ...

Page 7: ...rse Mode I 13 1 3 2 Serial Interface 1 14 1 3 3 Interface Selection 1 15 1 3 4 Preventing the Host from Data TransferTimeout 1 15 1 4 OPERATING INSTRUCTIONS 1 16 1 4 1 Control Panel Operation 1 4 2 Self test Function 1 4 3 Hexadecimal Dump Function 1 4 4 Micro Adjustment Function 1 4 5 PrinterStatus Indication 1 4 6 Selected Font 1 4 7 Printer Initialization 1 4 7 1 Power on Initialization 1 4 7 2...

Page 8: ...ble Table Table Table Table Table Table Table Table Table Table Table 6 Specifications forEnvelopes 1 4 7 Specifications for Continuous Paper Single Sheet and Multi Part 1 4 8 Specifications for Continuous Paper with a Label 1 5 9 Electrical Ranges 1 7 lO CharacterTables 1 8 11 Resolution 1 9 12 Printing Speed 1 10 13 Signal and Connector Pin Assignments forthe Parallel Interface 1 12 14 Signal an...

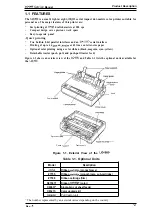
Page 9: ... printing using a color ribbon black magenta cyan yellow Detachable tractor push pull and push pull tractor feed Figure 1 1 shows an exterior view of the LQ 300 and Table 1 1 lists the optional units available for the LQ 300 pe Q Power lease r s Sprocket Knob l e v e r Center support Tractor unit Figure 1 1 Exterior View of the LQ 300 Table 1 1 Optional Units Model Description 77 53 Ribbon oartrid...

Page 10: ... impact dot matrix 12 x 2 staggered 0 20 mm 0 0079 inches L Printing direction o m o 3f 5 E 7 I 6 E 9 i 8 In 4 1 0 m 1 1 II 1 3 m a HEAD CENTER x 15 I 1 6 o 17 a 1 9 ij 7 21 i 22 22 I f5 L 2 4 Figure 1 2 Pin Configuration Bidirectional with logic seeking for text and unidirectional for graphics Bidirectional printing of graphics can be selected with a printer setdng or software command r T p 1 2 R...

Page 11: ...0 87 inch 22 mm from the top edge of the sheet On the last page the accuracy of paper feeding is not guaranteed after the paper comes off the tractor pins During printing oflabels never perform reverse feeding Do not eject the labels from the rear Pull tractor feed Set the release lever to the tractor position Install the tractor unit in the top in the pull tractor position Do not perform reverse ...

Page 12: ...m 7 2 in 14 3 in Thickness 0 065 mm 0 14 mm 0 0025 in 0 0055 in Weight 52 3 90 g m2 14 24 lb Quality I Plain paper recycled paper Table 1 6 Specifications for Envelopes Size No 6 Width x Length 166 mm x 92 mm 6 5 in x 3 6 in No 10 Width x Length 240 mm x 104 mm 9 5 in x 4 1 in Thickness 0 16 mm 0 52 mm 0 0063 in 0 0197 in Weight 45 91 g m2 12 24 lb Quality Bond paper not curled folded or crumpled ...

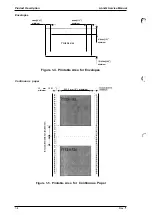
Page 13: ...6 mm 0 19 mm 0 0063 in 0 0075 in Weight 68 g m2 17 lb Quality Plain paper Notes Use only continuous type labels and use them only with the tractor Examples of labels Avery Continuous Form Labels Avery Mini Line Labels Printing of envelopes is guaranteed only at room temperature and normal humidity 15 25 C 59 77 F 20 6 Mo RI 1 2 1 3 Printable Area Cut sheets 3mm 0 12 minimum D 3mm 0 12 G minimum b ...

Page 14: ... 4 Printable Area for T13 5mm 0 53 minimum Envelopes Continuous paper 13 mm 10 51 m minimum 203 2 mm 8 maximum 4 0 0 06 0 0 0 0 0 0 0 0 0 0 0 0 o 0 0 0 0 0 0 0 0 0 Q r 0 0 0 0 0 0 0 0 0 0 0 4 0 0 0 0 0 0 0 0 0 0 0 0 0 0 0 0 0 0 0 0 0 0 0 0 6 0 0 0 0 0 0 0 0 0 0 0 0 0 0 0 0 0 0 Figure 1 5 Printable Area for Continuous Paper 1 6 Rev A ...

Page 15: ...0 VAC Input voltage range 103 5 132 VAC 198 264 VAC Rated frequency range I 50 60 t fz Input frequency range 49 5 60 5 Hz I 1 Rated current I 1 1 A I 0 6 A Dielectric strength 1000 VAC ms for 1 minute or 1200 VAC rms for 1 second 1500 VAC rms for 1 minute between AC line and chassis between AC line and chassis 1 2 1 6 Environmental Conditions Temperature range Operation 5to35 C 41 to 95 F Operatio...

Page 16: ...ions ESC P2 IBM X24E emulation EPSON remote 8KB Download memory 10KB Character sets 14 international character sets and one legal character set Character tables Table 1 10 Character Tables Character Table Standard Model NLSP Model ITALIC o 0 PC437 US Standard Europe o 0 PC850 Multilingual o 0 PC860 Portuguese o x PC861 Icelandic o x PC863 Canadian French o x PC865 Norwegian o x BRASCII Iolxl Abico...

Page 17: ...ertical dots Double width Double height Condensed Bold Double strike Italics Super subscript Outline Shadow Underline single double single broken double broken Strike through single double single broken double broken OverScore single double single broken double broken Resolution See Table 1 11 Printing speed and See Table 1 12 printable columns Table 1 11 Resolution Printing Mode Horizontal Vertic...

Page 18: ...6 20 cpi 160 200 133 100 10 cpi 80 67 50 33 12 cpi 96 80 60 40 15 cpi 120 100 75 50 LQ condensed 17 cpi 137 114 86 57 20 160 133 100 67 Vote Each maximum print speed is changeable depending on attributes of characters within cV N o r m a l Mode 1 T 12 C V D o w n Mode 3 J Th c 0 19 m m _ V N o r m a l Mode 2 T 12 C V Down Mode 3 Printing Mode Th 01 mm T212 T 12 C V Down Mode 3 Th Paper thickness T...

Page 19: ...mphenol or equivalent Data transmission timing See Figure 1 6 Note Transition time rise time and fall time of every input signal must be less than 0 2 ps BUSY ACKNLG DATA S T R O B E Figure 1 6 Data Transmission Timing The BUSY signal is active HIGH under the following conditions During data reception See Figure 1 6 When the innt buffer is full When the INIT input signal is active During a printer...

Page 20: ...ccept more data The pulse width is approximately 12 U S 11 BUSY 29 out HIGH indicates the printer cannot acoept more data 12 E 28 out HIGH indicates paper out This signal is effective only when the ERROR signal is LOW 13 SLCT 28 out Always HIGH output Pulled up to 5 V through 3 3K Q resistor 14 AFXT 30 In Not used 15 34 NC Not connected 16 GND Signal ground 17 Chassis GND Chassis ground 18 LOGIC H...

Page 21: ...l and reverse channel transfer DataBit 3 7 data bit 3 or 7 12 AckDataReq 28 out Acknowledge data request signal and reverse DataBit 2 6 channel transfer data bit 2 or 6 13 Xflag I 28 out X flag signal and reverse channel transfer data DataBit l 5 bit 1 or5 14 HostBusy 30 In Host busy signal 15 NC Not oonnected 16 GND Signal ground 17 Chassis GND Chassis ground 18 Logic H out Pulled up to 5 V via 3...

Page 22: ...k Odd even or no parity bit selectable Connectoc EIA standard 25 pin D SUB female comector Table 1 15 Signal and Connector Pin Assignments for Serial Interface Pin No Signal Name I o Description 1 Chassis GND Chassis ground 2 TXD out Transmit serial data 3 RXD In Receive serial data 4 RTS out Request to send Always SPACE level when the printer is powered on Pulled up to 12V via 4 7K Q wsistor 7 Si...

Page 23: ...he same Interface state and interface selection When the parallel interface is not selected the interface is in the BUSY state When the serial interface is not selected the interface sends X OFF and sets the DTR signal MARK When the printer is initialized or returned to the idle state the parallel interface is in a READY state the serial interface sends X ON and sets the DTR signal SPACE Notice th...

Page 24: ...p mode Default setting mode Micro adjustment mode Paper park mode Switches printer status between printing and no printing if there is print data in the input buffer When the printer is out of paper the light flashes and the beeper sounds three times S c one of the available fonts When you hold down this button while you turn on the printer you enter the printer setting mode When you press this bu...

Page 25: ...pts to load it 3 The printer prints alphanumeric characters continuously 5 Quit self test mode printing bypressingthe Pause button and turning the printer off 1 4 3 Hexadecimal Dump Function The hexadecimal dump is a useful tool for troubleshooting data control problems This section describes how to run a hex dump 1 2 3 4 5 6 Turn on the printer while holding down the LF FF and Font buttons If pap...

Page 26: ...itialize signal is active During initialization Standby or printing state Pause state Micro adjustment mode Tear off Paper out error state l Operating error fatal error 3 Pause light is on Pause light blinks Pause light is off Pause light is on Beeper sounds and Pause light blinks light on off ratio 1 1 Pause light blinks light on off ratio 1 6 Beeper sounds and Pause light blinks light on off rat...

Page 27: ...er powered on When the power on initialization is performed The printer mechanism is initialized The hardware initialization is performed 1 4 7 2 Hardware Initialization Hardware initialization is performed by Turning on the printer The falling edge of a negative pulse ora low signal on theparallel interface INITline When hardware initialization is performed Print data in the input buffer is clear...

Page 28: ...ter initialization 1 To enter the default setting mode turn on the printer while holding down the Font button The printer prints out the firmware version Ifpaperisnot loaded insert a sheet of paper 2 The printer automatically loads paper and prints a table of languages to choose from English French German Italian and Spanish The Font lights indicate the currently selected language as shown in the ...

Page 29: ...s the Font button to move the through the settings in the submenu The printer beeps twice each time you press the Font button while in a submenu When the lights match your desired setting press the Pause button to make your selection The printer saves the new setting and returns to the menu shown above Repeat steps 5 through 8 for each additional setting you want to change or skip to step 10 to ex...

Page 30: ...rection Font 1 Light Font 2 Light Pause Light Setting OFF OFF OFF Uni D ON ON ON Bi D Table 1 24 Software Font 1 Light Font 2 Light Pause Light Setting OFF OFF OFF ESC P2 ON ON ON IBM X24E Table 1 25 Interface Font 1 Light Font 2 Light Pause Light Setting OFF OFF OFF Auto selection 10 ms wait ON OFF OFF Auto selection 30 ms wait OFF ON OFF Parallel ON ON OFF Serial Table 1 26 Bit Rate Font 1 Light...

Page 31: ...ion Table 1 27 Parity Bit Font 1 Light Font 2 Light Pause Light Setting I OFF OFF OFF None ON OFF OFF I OFF ON OFF Even 1 Table 1 28 Data Length Font 1 Light Font 2 Light Pause Light Setting OFF OFF OFF 7 bits I ON ON ON 8 bits J Rev A 1 23 ...

Page 32: ...or Driver I 6 STA475A Printhead Driver boll n 0 00 SLA7022M CR Motor Driver _ UPC78M05AHF Regulator IC 2 M51955B Reset IC Color Option Figure 1 8 C143 MAIN Board Component Layout 1 5 2 C130 PSB PSE Board The power supply boards are the same as those for the LX 300 The boards have two ratings for input AC voltages 120 VAC C130 PSB and 230 VAC C130 PSE Both boards consist of a transformer switching ...

Page 33: ...r RF motor PE sensor sensor PG sensor release lever sensor etc Figure 1 10 Printer Mechanism 1 5 4 Housing Assembly This consists of printer cover assembly edge guide assembly upper housing lower housing assembly etc Edge Guide Assembly Printer Cover Assembly per Housing Assembly r Housing Assembly Figure 1 11 Housing Assembly Rev A 1 25 ...

Page 34: ...c f ...

Page 35: ...r Supply Overview 2 10 2 2 2 Power Supply Circuit Operation 2 11 2 3 CONTROL CIRCUIT 2 12 2 3 1 Control CircuitODeration overvie w 2 12 2 3 2 2 3 3 2 3 4 2 3 5 2 3 6 2 3 7 2 3 8 2 3 9 2 3 10 Interface Circuit 2 17 2 3 11 EEPROM Control Circuit 2 18 2 3 12 CS Motor Circuit 2 18 2 3 13 Color Ribbon SensorCircuit 2 19 2 3 14 Platen GapSensorCircuit 2 19 Power On Reset Circuit 2 13 Power OffSensorCirc...

Page 36: ...End Sensor Circuit 2 14 Figure 2 17 Release Lever Position Sensor Circuit Diagram 2 14 Figure 2 18 Carriage Motor Driver Circuit Diagram 2 15 s 1 Figure 2 19 Paper Feed Motor Driver Circuit Diagram 2 16 Figure 2 20 Printhead Driver Circuit Diagram 2 17 Figure 2 21 Parallel Interface Block Diagram 2 17 Figure 2 22 Serial Interface Block Diagram 2 18 Figure 2 23 EEPROM Control Circuit Diagram 2 18 F...

Page 37: ...e iron core to become magnetized The magnetic force draws the actuating plate toward the core and the dot wire which is connected to the core rushes toward the platen When the dot wire impacts the platen pressing against the ribbon and paper it prints a dot When the driving voltage stops energizing the coil the magnetic force from the iron core vanishes The actuating plate returns to its original ...

Page 38: ...he carriage home position The HP sensor informs the CPU of the carriage home position The sensor is ON when the carriage is pushed to the right or left The striker on the carriage actives the sensor to indicate the carriage home position which toggles the sensor to OFF Table 2 1 CR Motor Assembly Specifications I Category I Requirement I Type 4 phase 96 pole HB type stepping motor Drive Voltaae 31...

Page 39: ...per into the printer Cut sheets use the top entrance and continuous paper uses rear insertion 2 1 3 2 Paper Advance Mechanism This section describes how the friction and tractor advance mechanisms feed paper through the printer The paper advance mechanism consists of the PF motor platen driven roller assembly driven roller cover tractor assembly knob PF gear train etc The PF motor can drive the pl...

Page 40: ... transmitted to the push tractor gear through the PF motor pinion gear the paper advance reduction gear and the tractor transmission gear When the PF motor pinion gear turns in the direction of the black arrows the tractor gear rotates in the direction of the black arrow and thus feeds the paper into the printer The paper is advanced by the platen which is also driven by the PF motor through the g...

Page 41: ...ctor is installed at the paper exit instead of paper entrance the tractor functions as a Pull tractor instead of a push tractor pulling the paper out of the printer mechanism tractor advance mechanism Figure 2 5 sho ws the pull Continuous Paper hk Tractor ear PI 3 PF Motor d 0 Platen Gear Pinion Gear Figure 2 5 Pull Tractor Paper Advance Mechanism Rev A 2 5 ...

Page 42: ...the rear paper entrance t b Figure 2 6 Push Pull Tractor Paper Advance Mechanism Disengage Lever The disengage lever switches whether or not the printer transmits the torque of the PF motor to the tractor transmission gear See Figures 2 5 and 2 6 The paper path is different from friction feed and tractor feed The PF driven roller is not in the tractor feed paper path so continuous paper is not adv...

Page 43: ... a planetary gear is used in the gear linkage Table 2 3 Ribbon Advance Gear Linkage I 1 Direction of Carriage Movement Gear Linkage Left to right Belt driven pulley Gear 1 Gear 2 indicated by the black arrow Ribbon driving gear Right to light Belt driven pulley Gear 1 Gear 3 irtdioated by the white arrow Gear 4 Ribbon driving gear The ribbon brake spring attached to the exit of the cartridge case ...

Page 44: ... cartridge is loaded it is possible to print in up to seven colors One of the four colors on the ribbon is selected by the color ribbon cartxidge motion which inserts a portion of the plastic posts into the slots in the printer mechanism as a fulcrum Figure 2 9 illustrates the color shift mechanism The mechanism shifts the ribbon cartridge by converting the gear rotation to liner motion up and dow...

Page 45: ...between the platen and the printhead can be adjusted to allow the printer to use paper of different weights or thicknesses When the gap adjust lever is moved forward or badcward the CR guide shaft rotates This rotation moves the carriage either toward or away from the platen and changes the platen gap lhe correct platen gap is 0 45 0 02 mm with the gap adjust lever set to position O Gap Adjust Lev...

Page 46: ...e ratings for these boards Table 2 6 Power Supply Board Board Input Voltage Fuse F1 Rating C130 PSB 100 5 132 VAC 2 5A 1125 V 250 V C130 PSE 198 264 VAC 1 25 A 1250 V 2 2 1 Power Supply Overview The power supply board has two power outputs for use in the various control circuits and drive mechanisms Table 2 7 lists the circuitry and the units that are driven by the two DC output supply voltages Ta...

Page 47: ...utputs a stabilized supply The 9 VDC output is stabilized to 5 VDC using the regulator on the C130 MAIN board assembly There are several circuits to protect the supply arcuits and avoid danger The 9 VDC line contains a voltage overload protection circuit The 9 V voltage overload protection circuit ZD53 Q82 and PC1 cuts the supply if the voltage reaches or exceeds 11 VDC It stops switching arcuit o...

Page 48: ...essing control Extends the input data held in the buffer to create image data Loads this image data to the image buffer in RAM Transfers the image data to the Printhead drive circuit Also controls various parts of the printer mechanism such as PF motor control and color select motor control Controls the functions below Input Output Control Memory Management Bit Manipulation Interface Control Expan...

Page 49: ...hemselves 67 XRST i A VL 4b GATE ARRAY 3 IC2 IC6 2 IN Vcc 3 4 GND OUT 6 16 RESET CPU L ICI z Fgiure 2 13 Power On Reset Circuit Diagram 2 3 3 Power Off Sensor Circuit When the power supply is turned off and the VP 35V immediately goes down to 25 V typical the reset IC IC7 outputs the system RFSETsignal LOW The CPUreceives this LOW Ievelsignal from the reset IC and resets itself 5 VP 4 Power Off t ...

Page 50: ... switch for sensing the paper end The CPU receives a signal from the connector switch and reco es a paper end The connector switch is closed ON when there is no paper on the platen and is open OFF when paper is present CPU ICI E P52JAN2 5 v t PE Sensor 63 Figure 2 16 Paper End Sensor Circuit 2 3 6 Release Lever Position Sensor Circuit This printer has a connector switch to detect the type of paper...

Page 51: ... carriage motor The amount of the cument is set by the gate array IC2 Signals are sent to the ODO 0D2 on the CPU ODENO 1 and OPHO 1 on the CPU control the stepping motor Table 2 9 Carriage Motor Drive Modes Driver Mode Excitation Type Drive Frequency Type Standard Print Character 3 x speed 2 2 phase 2400 PPS Draft Mode 2 X speed 2 2 phase 1600 PPS Draft Copy Mode 3 2 X speed 2 2 phase 1200 pps Bit...

Page 52: ...otor Drive Transistors Q2 37 PF W Q3 PF_A 139 Q4 PF 140 Q5 P FA 5V A4 k wTpFcOM 1J VL Vx Figure 2 19 Paper Feed Motor Driver Circuit Diagram 2 3 9 Printhead Driver Circuit Figure 2 20 shows the printhead driver circuit block diagram Print data already expanded into image data is split by the CPU and transferred to the latch circuit in the gate array in the system Port AN6 pin 66 of IC1 samples the...

Page 53: ...allel l F Gate Array IC2 127 134 DINO 7 39 XSTROB 13 XB SY 4 12 4 XPE 14 4 XERR 4 15 XSLCT 4 L XSLIN Fim ue 2 22 shows Figure 2 21 Parallel Interface Block Diagram the serial interface circuit block diagram The serial interface conforms to E 232D RXD is data received by the serial 1 0 of th CPU block from the host computer via driver receiver IC4 Data is transmitted to an input buffer in IC1l from...

Page 54: ...m 2 3 12 CS Motor Circuit Figure 2 24 shows a block diagram of the CS motor circuit in the optional color upgrade kit The CS motor is a permanent magnet PM stepping motor driven with 2 2 phase exatation in proportion to the desired rotational speed This motor can be rotated in either direction and stopped at any position Four phase signals are directly output from the system IC and pass through a ...

Page 55: ... Color Ribbon 2 3 14 Platen Gap Sensor Circuit Color Upgrade Kit I Sensor Circuit Diagram This printer has a connector switch to sense the PG Platen Gap adjust lever position The CPU receives a signal from the PG sensor and recognizes the PG adjust lever position The comector switch is open OFF when the printer is in copy mode PG adjust lever position 2 6 and is close ON when the printer is in nor...

Page 56: ...ng the PSB PSE Board Assembly 3 8 Removing the Printer Mechanism 3 9 3 2 4 1 Removing the PF Motor 3 10 3 2 4 2 Removing the CR Motor 3 11 3 2 4 3 Removing the Platen 3 12 3 2 4 4 Removing the PE Sensor 3 13 3 2 4 5 Removing the HP Sensor 3 14 3 2 4 6 Removing the Release Lever Position Sensor 3 14 3 2 4 7 Removing the Carriage Assembly 3 15 3 2 4 8 Removing the Ribbon Drive Gear Assembly 3 16 3 2...

Page 57: ...e PSB PSE Board Assembly 3 8 Removing the Printer Mechanism 3 9 3 2 4 1 Removing the PF Motor 3 10 3 2 4 2 Removing the CR Motor 3 11 3 2 4 3 Removing the Platen 3 12 3 2 4 4 Removing the PE Sensor 3 13 3 2 4 5 Removing the HP Sensor 3 14 3 2 4 6 Removing the Release Lever Position Sensor 3 14 3 2 4 7 Removing the Carriage Assembly 3 15 3 2 4 8 Removing the Ribbon Drive Gear Assembly 3 16 3 2 4 9 ...

Page 58: ...sives see Chapter 6 Adjust the pn nter only in the manner described in this manual 3 1 2 Tools Tables 3 1 and 3 2 list the tools recommended for disassembling assembling or adjusting the printer Use only tools that meet these specifications Note Note Table 3 1 Recommended Tools Tool Part No Round nose pliers 6740400100 Nippers B7405OO1OO Tweezers 6741000100 Soldering iron B7402OO1OO E ring holder ...

Page 59: ...ked Not neoessary at the correct temperature not overheating Paper path Is the oe of paper in the printer Checked Not neoessary feeding smoothly Is the tractor feeding the paper Checkedn Not neoessary correctly Is the paper path clear of all Checked Not neoessary obstructions Is the platen free of damage Checked Not neoessaty Ribbon Is the ribbon mask free of distortion Checkedn Not necessary mask...

Page 60: ...ashers Table 3 4 Screw Abbreviations Abbreviation Part Name CP Cross recessed pan head screw CPB Cross recessed pan head B tight screw CBB Cross recessed bind head B tight screw CBS Cross recessed bind head S tight screw CBC Cross recessed bind head C Lamitite screw CB 0 Cross recessed bind head with outside toothed lock washer CFP Cross recessed flat head P tight screw Rev A 3 3 ...

Page 61: ...IN and PSB PSE board assemblies Removing the printer mechanism Removing the interface board assembly Disassembling the driven roller assembly Disassembling the color upgrade kit Refer to the diagrams in the appendix to see how components fit together I START 1 I I Unplug the power cable and the interface cable from h prfntart I Removing the Driven RollerAawmbly 3 2 2 1 Rem wing the Upper Housing A...

Page 62: ...assembly edge guide assembly ribbon cartridge tractor assembly platen knob and color upgrade kit 2 Remove the CPB M3 x 14 screw attaching the printhead to the carnage assembly 3 Remove the printhead 4 Remove the head cables FFCS from the printhead Printhead FC Fgiure 3 2 Removing the Printhead Rev A 3 5 ...

Page 63: ...ssembly 3 Lift off the upper housing assembly Upper Housing Assembly Housing Assembly Figure 3 3 Removing the Upper Housing Assembly 3 2 2 1 Removing the Eject Roller Assembly 1 Remove the upper housing assembly see Section 3 221 2 Lift the eject roller assembly up and atan angle from theupperhousing assembly Note User care when removing the eject ro erassemb y or the 500 g spring may pop out N Up...

Page 64: ...e flat cables FFCS and 7 connectors from the MAIN and PSB PSE board assemblies Remove 4 CBB M3 x 8 screws attaching the shield plate to the MAIN and PSB PSE board assemblies the CBB M3 x 8 screw attaching the CS board and the CB 0 M4 x 8 screw attaching the ground wire of the power cable Disengage the shield plate and W and PSB PSE board assemblies from the grounding plate CBB M3X8 MA M4x8 round W...

Page 65: ...move he CB USCA C M3 x 10 screw and 2 CB USCA C M3 x 8 screws 3 Remove the PSB PSEboard assembly When replacing the MAIN board assembly bend the LED lead wires parallel to the MAIN board assembly see Figure 3 7 The shield plate is easily bent be carefil when tightening the screws that attach it to the MAW and PSBIPSE board assemblies CBUSCA C M3X1O CBUSCA C M3X8 CBUSCA C M3X8 A CBC M3X8 FFc shield...

Page 66: ...ve the upper housing assembly see Section 3 2 2 Remove the connectors and FFCS from the MAIN board assembly Remove the 3 lower housing shafts 1018296 Remove the other lower housing shaft 1015457 Note that this shaft is different from the three described in the previous step Remove the printer mechanism Lower Housing Shaft 1015457 Lower Housing Shaft 101 8296 n Lower Housing Assembly Figure 3 8 Rem...

Page 67: ...3 2 4 2 Remove the platen grounding spring thatsecures theplatenshaft see Section 3 2 4 3 3 Remove the CBB M3 x8 screw attaching the PFmotorto the nghtframe 4 Release the clip holding the PF motor assembly from the right frame 5 Remove the PF motor from the right frame PF Motor Figure 3 9 Removing the PF Motor 3 1o Rev A ...

Page 68: ...sion spring from the hook on the CR motor and the hook on the base frame 3 Remove the timing belt from the pulley drive 4 Remove the E ring pulley washer belt pulley flange and pulley drive from the CR motor 5 Rotate the CR motor counterclockwise and remove it Timing Belt Extension Spring Right Frame Figure 3 10 Removing the CR Motor Rev A 3 11 ...

Page 69: ...emove the platen gmundingspring that secures the platen shaft 3 Remove the 25 mm gear from the right frame 4 Disengage the teeth of the 211 mm bushings and rotate them 5 Rotate the platen and move it firI lrnm Busing Platen i mmGear I piaten Grounding Am Spring 25mrn Gear Right Frame Figure 3 11 Removing the Platen 3 12 Rev A ...

Page 70: ...per Wide from the clips on the right and left frame 4 Remove the upper paper guide from the right and left frame J pD ve e ier uide 14 2g Compression a q 1 1 Spring L i Friction Shaft Left Frame Ct 0 1 PE Sensor I k gcompression Frame Figure 3 12 Removing the PE Sensor 5 Release the 2 clips securing the PE sensor and remove it PE Sensor mess Upper Paper Guide Figure 3 13 Wiring of the PE Harness R...

Page 71: ... with a pair of tweezers Base Figure 3 14 Removing the HP Sensor 3 2 4 6 Removing the Release Lever Position Sensor 1 Remove the PFmotor assembly see Section 3 2 4 1 2 Release the 2 clips that attach the release lever position sensor to the frame of the PF motor assembly 3 Remove the release lever position sensor from the frame of the PFmotor assembly Frame of the Release Lever PF Motor Position S...

Page 72: ...t attaches the head cable sheet to the base frame Slide the cable to the left and remove it 4 Remove the printhead FFC from the base frame 5 Remove the CR shaft grounding plate from the left side of the printer mechanism 6 Rotate both sides of the parallelism adjustment bushing and remove them from the left and right frame 7 Remove the CR guide shaft assembly and the carriage assembly CR S 9 Paral...

Page 73: ...hook on the base frame see Section 3 2 4 2 5 Remove the timing belt from the driven pulley Make sure not to put the timing belt between the RD cover and the leftj ame RD Ratchet RDCover o 2 3m 17mjn f3eH p Q No e pulley Washer e G Belt Pulley Flange Ribbon Planetary 4 Pulley Driven Gear Shafi 5 1 16 2mm Combination Gear 5 WL Driven Shaft Pulley Plane Washer d 1 zmm Gear Spring Washer mmGear 5116 2...

Page 74: ...ove the printer mechanism see Section 3 2 4 2 Release the 2 clips attaching the PG sensor and remove it The clips can be accessed through 2 holes in the left frame to release the clips push each with a pair of tweezers PG Left Frame Sensor Figure 3 18 Removing the PG Sensor Rev A 3 17 ...

Page 75: ... theshieldplate 3 Remove the CBB M3 x 8 screw and the CBB M3 x 10 screw attaching the bottom cover to the lower housing assembly 4 Remove the 2 CBB M3 x 8 SCreWS attaching the interface board assembly to the lower housing assembly 5 Remove the bottom cover and the interface board assembly l F Board Assembly Grounding Plate Lower Housing Assembly Figure 3 19 Removing the Interface Board Assembly 3 ...

Page 76: ... 1 Remove the printer cover 2 Remove the CFP M2 6 x 8 screw attaching the driven roller assembly 3 Remove the driven roller assembly CFP M2 6X8 Driven Roller 1 73g Spring Ta A h Driven Roller Holder I Kf w ven o ercover pfinter er Figure 3 20 Removing the Driven Roller Assembly Rev A 3 19 ...

Page 77: ... 3 2 7 1 2 Remove the E ring3 from the CS frame shaft 3 Remove the CS cam 3 2 7 3 Removing the Color Sensor Assembly 1 Remove the ribbon motor assembly andthe CSboardassembly see Section 3 2 7 1 2 Remove the 4rnm E ringfrom thecartridge holder shaft 3 Remove the color cartridge holder from the ribbon motor assembly 4 Release the clip that attaches the color cartridge holder to tie color sensor ass...

Page 78: ...1 Platen Gap Adjustment 4 1 4 2 DEFAULTS MACHINE INFORMATION BIDIRECTIONAL ADJUSTMENT SEITINGS AND 4 2 4 2 1 Default Settings 4 2 4 2 2 Bidirectional Adjustment A A List of Figures Figure 4 1 The Flowchart of the Platen Gap Adjustment 4 1 Figure 4 2 The Bidirectional Pattern Print 4 4 ...

Page 79: ...he printhead Remove the ribbon mask with a pair of tweezers Install the printhead Adjust the platen gap using the flowchart below The correct platen gap is 0 455 mm 0 015 mm When measuring the gap take care to let the gauge fall between the platen and the printhead by gravity only To inmease the platen gap turn the parallelism adjustment bushing toward the platen using a screwdriver To reduce the ...

Page 80: ...splay LQ 300 Adjustment Program 1 EAI EAI Latin A EIS EIB EUL ESP EHK 2 EDG EFS 3 EDG NLSP 4 El l 5 END Do nut input unspecified destination Please input each destination No 1 4 andEnter Key Do not input unspecific destination data 8 Press 1 4 then go to adjustment program of each destination 9 The following message appears on the display LQ 300 Adjustment Program 1 Bi DAdjustment 2 Defaults Machi...

Page 81: ...ctory defaults programmed into this printer Press Y then Enter to confirm these settings and return to the initial menu Exit the program by pressing 3 then Enter The following message appears on the display r Any setting value specified within this program is not stored in the EEPROM until you turn the printer OFF Turn the printer OFF now Turn the printer off to store the defaults shown above into...

Page 82: ... the LQ 300Adjustment Program into the PC s diskette drive 6 Load the LQ 300 Adjustment Program BKMENU BAS 7 When you run the program the following message appeam on the display LQ 300 Adjustment Program 1 EAI EAI Latin A EIS EIB EUL ESP EHK 2 EDG EFS 3 EDG NLSP 4 El r 5 END Do nut input unspecified destination Please input each destination No 1 4 and Enter Key 8 Press 1 4 then go to adjustment pr...

Page 83: ...erns find the row in which the vertical lines in the H are best aligned then enter the value assigned to that row The printer lets you check your print pattern selection for confirmation following steps 9 and 10 by printing one row of the pattern you selected After the printer prints check patterns for confirmation the following message appears on the display ET If Bi D is correct press Y and the ...

Page 84: ...cedures 5 1 Printhead ConnectorPin Alignment 5 2 Flowchart Symbols 5 4 Flowchart 1 5 5 Flowchart 2 5 6 Flowchatt 3 5 7 Flowchart 4 5 8 Flowchart 5 s g Flowchart 6 5 10 List of Tables Table 5 l PrintheadCoil Resistance 5 1 Table 5 2 MotorDriverTest Points 5 2 Table 5 3 MotorCoil ResistanceTest Points 5 3 Table 5 4 SensorTest Points 5 3 Table 5 5 Error State Indication 5 3 Table 5 6 Symptomsand Prob...

Page 85: ... Corrected Figure 5 1 Troubleshooting Procedures Note f the power supply board assembly is faulty it must be replaced as a whole unit No field repair should be performed on it except for the replacement of tise F1 The following tables provide troubleshooting information Table 5 1 Printhead Coil Resistance Part Specifications I Printhead I Coil resistance 54 7 Q 3 9 Q at 25 C 77 F I Rev A 5 1 ...

Page 86: ...Pin Alignment Table 5 2 Motor Driver Test Points I T sis r I Test Method Set Meter to Diodes Check wfth Power Off I Meter Reading PF Motor Driver Q2 Q3 Q4 Q5 Cheek from base to ooliector and from base to The reading should be emitter neither open nor shorted Reverse leads and test again from base to collector or Emitter and base are marked on the main board base to emitter assembly 5 2 Rev A ...

Page 87: ...ad on pin 1 and the other lead on pin 2 Toggle the sensor by inserting and removing a sheet of paper Place one lead on pin 1 and the other lead on pin 2 Change the paper release lever position Place one lead on pin 1 and the other lead on pin 2 Change the paper release lever position Place one lead on pin 1 and the other lead on pin 2 Toggle sensor position Method Reading Meter should toggle betwe...

Page 88: ...ves away from home position at power on operation The carriage returns to home position correctly but the 5 6 printer then fails to enter the READY mode Printing is faulty during No printing at all self test but carriage Faulty printing some of the dot are not printing 5 7 oDeration is normal Abnormal paper feed The printer prints but paper feeds incorrectly 5 8 Abnormal control panel operation Da...

Page 89: ...e the VP 35 VDC at pins 1 and NO 2 of CN2 on PSB PSE Board Assembly L does the new fuse also Replace the PSB PSE Board Assembly Measure the VL 9 VDC at pins 4 and 5 of CN2 on the PSB PSE Board Assembly NO e Verify each motor s coil resistance If any motor is shorted NO be sure to check the driver f the driver is bad replace along with the motor Replace the MAIN Board Assembly Figure 5 4 Flowchart ...

Page 90: ...ly Reinsert connectors and the Printer Mechanism correctly YES 4 NO YES See the troubleshooting items under Printer Mecnanism Section 5 4 YES 4 NO Check the HP sensor YES YES motor and drivers with fault corrected7 the same time Is the au tcorrected YES T Replace the MAIN ND Board Assembly ND Figure 5 5 Flowchart 2 5 6 Rev A ...

Page 91: ...n and turn on the printer to start printing the self test Are connectors CN2 CN1 O from the MAIN Board Reinsert them correctly T YES Verify FFCS are properly inserted and have contlnuky If they are tance If any pins are shorted be I sure to replace the drivers along I with the r rinthead t w I I v I T YES I Check all motor resistances v N and the drivers for all motors If anything is bad or shorte...

Page 92: ...e Check the resistance of See the troubleshooting the PF motor and check items for the printer the PF motor drivers If mechanism Section 5 4 anything is bad replace I NO Is the Is the YES fault corrected fault corrected J YES NO N Replace the MAIN N Board Assembly 91 Is the NO fault corrected YES Figure 5 7 Flowchart 4 5 8 Rev A ...

Page 93: ...ion T START A button Whi s click Replace the upper YES 4 NO Check the switches using a multimeter If bad replace the upper housing assemb Iv YES IReplace the MAIN Board I Refer to the other fault corrected troubleshooting items I YES 9 N Figure 5 8 Flowchart 5 Rev A 5 9 ...

Page 94: ...T Print the self test Refer to the other troubleshooting items YES Check the default settings eNo F YES NO 4 fault corrected I Replace the MAIN I I YES T v ND NO Increase the the setting of the paper thickness lever YES ND I Adjust the platen gap Section 4 1 1 T7 ND Figure 5 9 Flowchart 6 5 10 Rev A ...

Page 95: ...oms likely causes and checkpoints Checkpoints refer to proper waveforms resistance values and other values to be checked when evaluating the operation of any potentially faulty component Check these values and take the appropriate a tion Note This section is required on y for semicers who repair to the component eve Table 5 7 Repairing Problems in the Main Board Assembly Rev A 5 11 ...

Page 96: ...Troubleshooting LQ 3OO Service Manual Table 5 7 Repairing Problems in the Main Board Assembly Continued 5 12 Rev A ...

Page 97: ... or worn Replace the does not rotates but pulleys are pulleys belt pulleys operate when the oarriage defeotive turned on does not move The timing belt Ch k that the timing belt is after the Reinsert the carriage has is defective inserted correctly into the timing been manually bottom of the carriage belt centered prior Check for a broken timing belt Replace the to power on timing belt The carriage...

Page 98: ...not the paper path fed uniformly The PF motor Check that no foreign Remove any is not driving substance is iodged between foreign the gear the gears and that the gears substances correctly are not broken or worn Replaoe the PF motor reduction gears Replace the paper pickup gears The PF motor Measure the coil resistance for Replace the is defective the PF motor The approximate PF motor and value sh...

Page 99: ...tenance Table of Contents 6 1 PREVENTIVE MAINTENANCE 6 1 6 2 APPLYING LUBRICATION 6 1 List of Figures Figure 6 1 LQ 300 Lubrication Points 6 2 Table 6 1 Lubrication Table 6 2 Lubrication List of Tables 6 1 Points 6 1 ...

Page 100: ...6 1 provides details about these lubricants Before applying a lubricant be sure that the surface to be lubricated is clean Do not apply too much lubricant as this may damage nearby parts Table 6 1 Lubrication Type Name Quantity Availability Part No G 26 Grease 40 gm EPSON B702600001 G 20 40 gm EPSON B702ml Oil o 2 40 co EPSON B703700001 Table 6 2 Lubrication Points Ref No Lubrication Points Lubric...

Page 101: ...Maintenance LQ 300 Service Manual Figure 6 1 LQ 300 Lubrication Points 6 2 Rev A ...

Page 102: ...gure A 8 LQ 300 Exploded Diagram 2 A 12 Figure A 9 Color Upgrade Kit Exploded Diagram A 13 Figure A 10 LQ 300 Case Outline Drawing A 17 List of Tables Table A 1 Connector Summary A 2 Table A 2 Connector Pin Assignments CN2 A 2 Table A 3 Connector Pin Assignments CN3 A 2 Table A 4 Connector Pin Assignments CN4 A 2 Table A 5 Connector Pin Assignments CN5 A 3 Table A 6 Connector Pin Assignments CN6 A...

Page 103: ...ed Table A 1 SUrnmariZeS the functions and sizes of the connectors Printer Mechanism PG Sensor I Release Lever Position Sensor HP Sensor CR Motor Assembly I I t I d ram CN1O m HOST MAIN BOARD ASSEMBLY COMPUTER E55 olor upgrade Kitl i cs Mo orA emb y I llColor R i b b o n S e n s o r J Figure A 1 Cable Connections ...

Page 104: ...r optional 10 CS motor optional Color ribbon sensor optional 10 Table A 2 Connector Pin Assignments CN2 i I I I 1 Pin I l O Signal Name Function 1 0 CR A CR motor phase A 2 0 CR B CR motor phase B 3 CRCOM CR motor common 4 0 CR A CR motor phase A 5 0 CR B CR motor phase B Table A 3 Connector Pin Assignments CN3 Pin I o Signal Name Function 1 0 PF A PF motor phase A 2 0 PF B PF motor phase B 3 PFCO...

Page 105: ...d data 6 Table A 6 Connector Pin Assignments CN6 l o o 0 0 0 0 0 o 0 0 0 0 0 i I Signai Name Function HD 5 Head data 5 HD 1 HD 5 HD 3 HD 21 HD 17 HDCOM HDCOM HDCOM HD 24 HD 9 HD 12 HD 8 HD 20 HD 4 TEMP2 Head data 1 Head data 5 Head data 3 Head data 21 Head data 17 Common VP Common VP Common VP Head data 24 Head data 9 Head data 12 Head data 8 Head data 20 Head data 4 Head temperature TEMP1 I Head ...

Page 106: ...N1O Pin I o Signal Name Function 1 I Gap Adj Platen gap sensor signal 2 GND Signal ground Table A 1 1 Connector Pin Assignments CN11 CN12 CN13 Pin I o Signal Name Function 1 35 35 VDC 2 CS HOLD 5 VDC 3 5 VDC 5 VDC 4 0 CS A CS motor phase A 5 0 CS A CS motor phase A 6 0 CS B CS motor phase B 7 0 CS B CS motor phase B 8 GP Signal ground 9 I C c s w Color ribbon sensor signal 10 GAD Signal ground A 4...

Page 107: ...LQ 300 Service Manual Appendik N z v G o i i N 1 m w H w iiiim i I L rA m 1 1 I I I 0 0 Figure A 3 C130 PSB Circuit Diagram Rev A A 7 ...

Page 108: ...Appendix LQ 300 Service Manual I I I J a 1 e 1 1 l il G I Figure A 4 C130 PSE Circuit Diagram A 8 Rev A ...

Page 109: ...LWOO Sewice Manual Appandix A 3 COMPONENT LAYOUTS lml mlm b gl 2 m 1 0 4 4 l Y L UC n Figure A 5 C143 MAIN Component Layout Rev A A 9 ...

Page 110: ... Figure A 6 C130 PSB PSE Component Layout ...

Page 111: ...Lq 3OO Service Manual Appendix A 4 EXPLODED DIAGRAMS Figure A 7 LQ 300 Exploded Diagram 1 Rev A A 1 1 ...

Page 112: ...Appendix LC MMS vbeMantd Q ix iyii t v Figure A 8 LQ 300 Exploded Diagram 2 A 12 Rev A ...

Page 113: ...L WOO Service Manual Appendix U3 o b o r I I 4 o u o b f Figure A 9 Color Upgrade Kit Exploded Diagram Rev A A 13 ...

Page 114: ...10 M3 x 10 126 C B B Screw CBB SCfeW 127 C B USCA C CBUSCA C M4x 12 M4x 12 M3 X 8 M8 x8 128 Jack Socket Jack sooket 129 C F P Ttie Screw CFP TII Sorew M2 6 x8 M2 6 x8 131 C B USCA C CBUSCA C 132 Guide Stacker Staoker guide M3 X 10 M3x 10 133 Staoker Stacker m Board Assy MAIN MAIN boatd assembfy 50 Board Assy uF I F board assembly 300 B Kdsy PSB PSE board assembty 130 Wire Harness Wire harness 410 ...

Page 115: ... Head Rear Rear head cable 543 Sheet Cable Head Head cable sheet 544 Ribbon Mask Ribbon mask 545 Hamess HP HP harness 546 Hamess PE PE harness 547 Cable Head Front Front head oable 548 Hamess PG PG harness 549 Heat insulator Heat insulator 550 Sheet Frame Base Base frame sheet 551 Lever Disengage Disengage iever 552 Bushing Parallel Parallelism 553 Shaft Friction Friction shaft Adjust adjustment b...

Page 116: ...Bushing EJ Roller EJ bu hing M3X5 700 Frame Assy CS Csframeassembly 701 Lever Assy C c s v e r 702 Hoider CaMdge Color cartddge 703 Detector Assy Color Cdorsensor Color holder 704 Board Assy cs CS board assembly 705 Harness Assy cs Cshameas assernbty 706 Cover CS CS awer 707 Cam CS CS cam 708 Motor Assy Ri on Ribbon motor 709 Retaining Ring 3 mm Type E Type E 3 retaining ring 710 Retaining Ring 4 ...

Page 117: ...LWOO Service Manual Appendix A 5 CASE OUTLINE DRAWING E E w w m l q 275mm A 132mm 1 v 1 L Figure A 10 LQ 300 Case Outline Drawing Rev A A 17 ...

Page 118: ...08290 Cerdanyola del Vanes 20099 Sesto S Giovanni Ml Italy Barcelona Spain Phone 02 262331 Phone 582 15 00 Fax 02 2440750 Fax 582 15 55 EPSON AUSTRALIA PTV LTD EPSON SINGAPORE PTE LTD 1 70 Gibbes Street No 1 Raffles Place 26 00 Chatswood 2067 NSW Australia OUB Centre Singapore 0104 Phone 02 415 9000 Phone 5330477 Fax 02 417 0077 Fax 5338119 EPSON HONG KONG LTD EPSON ELECTRONICS TRADING LTD 20 F Ha...

Page 119: ... f ...

Reviews: