2
Printing on Continuous Paper
2-19
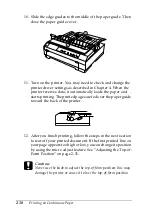
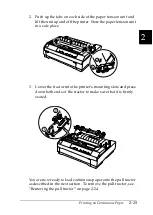
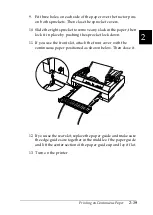
9. Fit three holes on each side of the paper over the tractor pins
on both sprockets. Then close the sprocket covers.
10. Slide the right sprocket to remove any slack in the paper, then
lock it in place by pushing the sprocket lock down.
11. If you use the front slot, attach the front cover with the
continuous paper positioned as shown below. Then close it.
12. If you use the rear slot, replace the paper guide and make sure
the edge guides are together in the middle of the paper guide
and lift the center section of the paper guide up and lay it flat.
13. Turn on the printer.
Summary of Contents for LQ-570e
Page 1: ...24 Pin Dot Matrix Printer User s Guide 4011804 XXX 00 ...
Page 24: ...14 Getting to Know Your Printer ...
Page 36: ...1 12 Setting Up the Printer 2 Close the paper guide cover ...
Page 44: ...1 20 Setting Up the Printer ...
Page 94: ...3 14 Printing on Single Sheets ...
Page 136: ...5 12 Changing Printer Settings From the Printer s Control Panel ...
Page 140: ...6 4 Using EPSON Status Monitor 3 ...
Page 194: ...B 4 Cleaning and Transporting the Printer ...
Page 216: ...C 22 Specifications PC 861 Icelandic BRASCII Abicomp ISO Latin 1 ...
Page 217: ...C Specifications C 23 Roman 8 PC 858 ...
Page 218: ...C 24 Specifications ISO 8859 15 PC 437 Greek PC 853 Turkish PC 855 Cyrillic ...
Page 219: ...C Specifications C 25 PC 852 Eastern Europe PC 857 Turkish PC 866 Russian PC864 Arabic ...
Page 220: ...C 26 Specifications PC 869 Greek MAZOWIA Poland Code MJK CSFR ISO 8859 7 ...
Page 222: ...C 28 Specifications PC 771 Lithuanian ISO 8859 2 PC 866 LAT Latvian PC 866 UKR Ukranian ...
Page 223: ...C Specifications C 29 PC APTEC Arabic PC 708 Arabic PC 720 Arabic PC AR 864 Arabic ...
Page 226: ...C 32 Specifications ...
Page 242: ...6 Glossary Top of form position The letters ABC above are printed at the top of form position ...
Page 246: ...IN 4 ...
Page 248: ...24 Pin Dot Matrix Printer Printed in Japan 99 XX XX User s Guide ...


