LQ-670 Service Manual
Rev. A
1-18
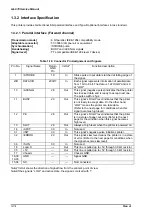
1.3.2 Interface Specification
This printer provides bi-directional 8-bit parallel interface and Type-B optional interface slot as standard.
1.3.2.1 Parallel interface (Forward channel)
[Transmission mode]
: 8 bit parallel, IEEE-1284 compatibility mode
[Adaptable connector]
: 57-30360 (Amphenol) or equivalent
[Synchronization]
: /STROBE pulse
[Handshaking]
: BUSY and /ACKNLG signals
[Signal level]
: TTL compatible (IEEE-1284 level 1 device)
Pin No.
Signal Name
Return
GND
Pin
In/Out *
Function description
1
/STROBE
19
In
Stroke pulse. Input data is latched at falling edge of
the signal.
2
∼
9
DATA1
∼
8
20
∼
27
In
Each signal represents information of parallel data
from 1 bit to 8 bit. The data is 1 at “HIGH” and is 0
at “LOW”.
10
/ACKNLG
28
Out
This signal (negative pulse) indicates that the printer
has received data and is ready to accept next one.
The pulse width is 5
µ
s.
11
BUSY
29
Out
This signal’s “HIGH” level indicates that the printer
is not ready to accept data. On the other hand,
“LOW” means the printer can take data.
(Refer to the next page for conditions when this
signal becomes high level)
12
PE
28
Out
This signal’s “HIGH” level indicates that the printer
is in a state of paper-out error.(Refer to the next
page for the condition when this signal becomes
high level.)
13
SLCT
28
Out
Always at high level when the printer is powered on.
14
/AFXT
30
In
Not used.
31
/INIT
30
In
This signal’s negative pulse initializes printer.
32
/ERROR
29
Out
This signal’s low level means the printer is in a state
of error. (Refer to the next page for conditions when
the signal becomes low level)
36
/SLIN
30
In
Not used.
18
Logic H
----
Out
This line is pulled up to +5V through 3.9 k
Ω
resistor.
35
+5V
---
Out
This line is pulled up to +5V through 1.0 k
Ω
resistor.
17
Chassis
---
---
Chassis GND.
16,33
19-30
GND
---
---
Signal GND.
15,34
NC
---
---
Not connected.
Note)
*In/Out shows the direction of signal flow from the printer's point of view.
Note)
If the signal is “LOW” and active state, the signal is marked with “/”.
Table 1-19. Connector Pin Assignment and Signals
Summary of Contents for LQ 670 - B/W Dot-matrix Printer
Page 1: ...EPSON IMPACT DOT MATRIX PRINTER EPSON LQ 670 SERVICE MANUAL SEIKO EPSON CORPORATION 4007875 ...
Page 5: ...v REVISION SHEET Revision Issued Data Contents Rev A May 28 1997 First issue ...
Page 114: ...Chapter 6 Maintenance 6 1 Preventive Maintenance 6 1 ...
Page 116: ...LQ 670 Service Manual Rev A 6 2 Figure 6 1 Lubrication Points ...
Page 122: ...LQ 670 Service Manual Rev A A 5 A 2 Circuit Diagram Figure A 2 C214Main Board Circuit Diagram ...
Page 123: ...Appendix Rev A A 6 Heat Sink Q1 D51 Figure A 3 C214PSB Board Circuit Diagram ...
Page 124: ...LQ 670 Service Manual Rev A A 7 Heat Sink Q1 D51 Figure A 4 C214PSE Board Circuit Diagram ...
Page 125: ...Appendix Rev A A 8 A 3 Component Layout Figure A 5 C214 Main Board Component Layout ...
Page 127: ...Appendix Rev A A 10 A 4 Exploded Diagram Figure A 8 Exploded Diagram ...
Page 128: ...LQ 670 Service Manual Rev A A 11 Figure A 9 Exploded Diagram ...
Page 129: ...Appendix Rev A A 12 Figure A 10 Exploded Diagram ...
Page 135: ...EPSON SEIKO EPSON CORPORATION ...


