background image

2.

Select 

Settings

 on the home screen.

3.

Select 

General Settings

 > 

Network Settings

 > 

Network Status

.

4.

Select 

Print Status Sheet

.

5.

Check the message, and then print the network status sheet.

6.

Close the screen.

The screen automatically closes after a specific length of time.

Replacing or Adding New Wireless Routers

If the SSID changes due to the replacement of a wireless router, or a wireless router is added and a new network
environment is established, re-set the Wi-Fi settings.

Related Information

&

“Changing the Connection Method to a Computer” on page 46

Changing the Connection Method to a Computer

Using the installer and re-set up in a different connection method.

Setting up from the website

Access the following website, and then enter the product name. Go to 

Setup

, and then start setting up.

http://epson.sn

Setting up using the software disc (only for the models that come with a software disc and users with Windows
computers with disc drives.)

Insert the software disc into the computer, and then follow the on-screen instructions.

Selecting Change the Connection Methods

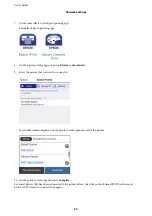
Follow the on-screen instructions until the following screen is displayed.

User's Guide

Network Settings

46

Summary of Contents for M3180

Page 1: ...User s Guide NPD6006 04 EN ...

Page 2: ...ting to Devices other than iOS and Android using Wi Fi Direct 29 Making Wi Fi Settings from the Printer 33 Making Wi Fi Settings by Entering the SSID and Password 33 Making Wi Fi Settings by Push Button Setup WPS 34 Making Wi Fi Settings by PIN Code Setup WPS 35 Making Wi Fi Direct Simple AP Connection Settings 36 Making Advanced Network Settings 37 Checking the Network Connection Status 38 Networ...

Page 3: ...s 94 Printing Several Pages on One Sheet 95 Printing and Stacking in Page Order Reverse Order Printing 95 Printing a Reduced or Enlarged Document 96 Printing One Image on Multiple Sheets for Enlargement Creating a Poster 96 Printing with a Header and Footer 102 Printing a Watermark 103 Printing Multiple Files Together 103 Adjusting the Print Tone 104 Printing to Emphasize Thin Lines 105 Printing t...

Page 4: ...the Printer Preventing the Print Head from Drying 164 Check if Nozzles are Clogged Nozzle Check 164 Check if Nozzles are Clogged Nozzle Check Control Panel 164 Check if Nozzles are Clogged Nozzle Check Windows 165 Check if Nozzles are Clogged Nozzle Check Mac OS 166 Cleaning the Print Head Head Cleaning 167 Cleaning the Print Head Control Panel 167 Cleaning the Print Head Windows 167 Cleaning the ...

Page 5: ...Checking the Printer Status from the Computer Mac OS 204 When You Cannot Make Network Settings 205 Cannot Connect from Devices Even Though Network Settings are No Problems 205 Checking the SSID Connected to the Printer 207 Checking the SSID for the Computer 207 Ethernet Connection Becomes Unstable 208 Cannot Print from an iPhone or iPad 209 Printout Problems 209 Printout is Scuffed or Color is Mis...

Page 6: ...der s Fax Number Not Displayed on Received Faxes or the Number Is Wrong 226 Other Problems 226 Operation Sounds Are Loud 226 The Date and Time Are Incorrect 226 Application Is Blocked by a Firewall for Windows Only 226 A Message Prompting You to Reset the Ink Level is Displayed 226 Ink Spilled 227 Appendix Technical Specifications 228 Printer Specifications 228 Scanner Specifications 229 Interface...

Page 7: ... You can obtain the latest versions of the above manuals with the following methods Paper manual Visit the Epson Europe support website at http www epson eu Support or the Epson worldwide support website at http support epson net Digital manual Start EPSON Software Updater on your computer EPSON Software Updater checks for available updates of Epson software applications and the digital manuals an...

Page 8: ...turn to the previous page perform the following operation on your keyboard Windows Hold down Alt and then press Mac OS Hold down the command key and then press Printing only the pages you need You can extract and print only the pages you need Click Print in the File menu and then specify the pages you want to print in Pages in Pages to Print To specify a series of pages enter a hyphen between the ...

Page 9: ...creen vary depending on the model and settings You can read the QR code using dedicated app Operating System References Windows In this manual terms such as Windows 10 Windows 8 1 Windows 8 Windows 7 Windows Vista Windows XP Windows Server 2016 Windows Server 2012 R2 Windows Server 2012 Windows Server 2008 R2 Windows Server 2008 Windows Server 2003 R2 and Windows Server 2003 refer to the following...

Page 10: ...operating system Microsoft Windows Server 2003 R2 operating system Microsoft Windows Server 2003 operating system Mac OS In this manual Mac OS is used to refer to macOS High Sierra macOS Sierra OS X El Capitan OS X Yosemite OS X Mavericks OS X Mountain Lion Mac OS X v10 7 x and Mac OS X v10 6 8 User s Guide About This Manual 10 ...

Page 11: ...d Do not place or store the printer outdoors near excessive dirt or dust water heat sources or in locations subject to shocks vibrations high temperature or humidity Take care not to spill liquid on the printer and not to handle the printer with wet hands Keep the printer at least 22 cm away from cardiac pacemakers Radio waves from this printer may adversely affect the operation of cardiac pacemak...

Page 12: ...ed the cord s ampere rating Also make sure that the total ampere rating of all devices plugged into the wall outlet does not exceed the wall outlet s ampere rating If you plan to use the printer in Germany the building installation must be protected by a 10 or 16 amp circuit breaker to provide adequate short circuit protection and over current protection for the printer When connecting the printer...

Page 13: ...atic doors or fire alarms and could lead to accidents due to malfunction When using this printer near automatically controlled devices follow all posted warnings and directions on these devices Advisories and Warnings for Using the Touchscreen The LCD screen may contain a few small bright or dark spots and because of its features it may have an uneven brightness These are normal and do not indicat...

Page 14: ...originals D ADF edge guide Feeds originals straight into the printer Slide to the edges of the originals E ADF document support Supports originals F ADF output tray Holds originals ejected from the ADF A Control panel Indicates the printer s status and allows you to make print settings B Ink tank cover Open to refill the ink tank C Ink tank Contains the ink tank User s Guide Printer Basics 14 ...

Page 15: ...r glass Place the originals C Print head Ink is ejected from the print head nozzles underneath D Edge guide Feeds the paper straight into the printer Slide to the edges of the paper E Paper cassette Loads paper F Output switch lever Raise to output paper to the output tray Lower to output paper facing up to the front of the printer G Printer cover Open when removing jammed paper User s Guide Print...

Page 16: ...with a computer D LINE port Connects a phone line E EXT port Connects external phone devices F AC inlet Connects the power cord G Rear paper feed slot Loads paper H Rear cover Remove when removing jammed paper I Maintenance box cover Open when replacing the maintenance box Related Information Control Panel on page 16 Control Panel User s Guide Printer Basics 16 ...

Page 17: ...g menu This action bar is displayed on the home screen only B Displays each menu C Switch tabs D Indicates the setting items Tap each item to set or change the settings The grayed out items are not available Tap the item to check why they are unavailable E Execute the current settings Available functions vary depending on each menu This action bar is displayed on the basic settings tab only Icons ...

Page 18: ... Device Sound Settings screen You can set Mute and Quiet Mode You can also access the Sound menu from this screen This is the shortcut for the following menu Settings General Settings Basic Settings Sound Indicates whether or not Quiet Mode is set for the printer When this feature is enabled the noise made by printer operations is reduced but print speed may slow down However noises may not be red...

Page 19: ...he icons Flick Scroll the screen swiftly Slide Hold and move the items around Basic Operations Tap anywhere on the setting item to switch it on and off Tap the input field to enter the value name and so on User s Guide Printer Basics 19 ...

Page 20: ...ype You can enter alphanumerics and symbols E Switches the character type You can enter alphanumerics and special characters such as umlauts and accents F Enters frequently used email domain addresses or URLs by simply selecting the item G Enters a space H Enters character I Deletes a character to the left Viewing Animations You can view animations of operating instructions such as loading paper o...

Page 21: ...tes the total number of steps and the current step number In the example above it shows step 3 from 4 steps B Returns to the previous step C Indicates your progress through the current step The animation repeats when the progress bar reaches the end D Moves to next step User s Guide Printer Basics 21 ...

Page 22: ... an Ethernet cable Related Information Making Advanced Network Settings on page 37 Wi Fi Connection Connect the printer and the computer or smart device to the wireless router This is the typical connection method for home or office networks where computers are connected by Wi Fi through the wireless router User s Guide Network Settings 22 ...

Page 23: ...onnection in Wi Fi Direct Simple AP connection when the printer is connected by Wi Fi the Wi Fi is temporarily disconnected Related Information Making Wi Fi Direct Simple AP Connection Settings on page 36 Connecting to a Computer We recommend using the installer to connect the printer to a computer You can run the installer using one of the following methods Setting up from the website Access the ...

Page 24: ...Note If you want to connect a computer and a smart device to the printer at the same time we recommend setting up from the computer first by using the installer Connecting to an iPhone iPad or iPod touch using Wi Fi Direct This method allows you to connect the printer directly to an iPhone iPad or iPod touch without a wireless router The following conditions are required to use this function If yo...

Page 25: ...se settings for the printer and the smart device that you want to connect to once Unless you disable Wi Fi Direct or restore the network settings to their defaults you do not need to make these settings again 1 Tap on the home screen 2 Tap Wi Fi Direct 3 Tap Start Setup 4 Tap iOS The QR code is displayed on the printer s control panel User s Guide Network Settings 25 ...

Page 26: ...not connect using an app for scanning QR codes If you cannot connect scroll the screen on the printer s control panel and then select Other OS Devices See the related information link below for details on connecting 6 Tap the notification displayed on the screen of the iPhone iPad or iPod touch 7 Tap Join 8 On the printer s control panel select Next 9 On the iPhone iPad or iPod touch start Epson p...

Page 27: ... screen to connect them again Related Information Connecting to Devices other than iOS and Android using Wi Fi Direct on page 29 Printing from Smart Devices on page 116 Connecting to Android Devices using Wi Fi Direct This method allows you to connect the printer directly to your Android device without a wireless router The following conditions are required to use this function Android 4 4 or late...

Page 28: ... restore the network settings to their defaults you do not need to make these settings again 1 Tap on the home screen 2 Tap Wi Fi Direct 3 Tap Start Setup 4 Tap Android 5 On the smart device start Epson iPrint 6 On the Epson iPrint screen tap Printer is not selected 7 Select the printer that you want to connect to User s Guide Network Settings 28 ...

Page 29: ... connected to the printer before select the network name SSID on the smart device s Wi Fi screen to connect them again Related Information Connecting to Devices other than iOS and Android using Wi Fi Direct on page 29 Printing from Smart Devices on page 116 Connecting to Devices other than iOS and Android using Wi Fi Direct This method allows you to connect the printer directly to smart devices wi...

Page 30: ...4 Tap Other OS Devices The Network Name SSID and Password for Wi Fi Direct for the printer are displayed User s Guide Network Settings 30 ...

Page 31: ...5 On the smart device s Wi Fi screen select the SSID shown on the printer s control panel and then enter the password 6 On the printer s control panel select Next User s Guide Network Settings 31 ...

Page 32: ...e printer that you want to connect to See the information displayed on the printer s control panel to select the printer 10 On the printer s control panel select Complete For smart devices that have been connected to the printer before select the network name SSID on the smart device s Wi Fi screen to connect them again User s Guide Network Settings 32 ...

Page 33: ...tings by Push Button Setup WPS on page 34 Making Wi Fi Settings by PIN Code Setup WPS on page 35 Making Wi Fi Direct Simple AP Connection Settings on page 36 Making Advanced Network Settings on page 37 Making Wi Fi Settings by Entering the SSID and Password You can set up a Wi Fi network by entering the information necessary to connect to a wireless router from the printer s control panel To set u...

Page 34: ...bel the password may be written Network Key Wireless Password and so on If you are using the wireless router with its default settings use the password written on the label 7 When you have finished tap OK 8 Check the settings and then tap Start Setup 9 Tap OK to finish Note If you fail to connect load A4 size plain paper and then select Print Check Report to print a connection report 10 Close the ...

Page 35: ...the printer 7 Close the screen The screen automatically closes after a specific length of time Note If connection fails restart the wireless router move it closer to the printer and try again If it still does not work print a network connection report and check the solution 8 Close the Network Connection Settings screen Related Information Checking the Network Connection Status on page 38 When You...

Page 36: ...gth of time Note If connection fails restart the wireless router move it closer to the printer and try again If it still does not work print a connection report and check the solution 8 Close the Network Connection Settings screen Related Information Checking the Network Connection Status on page 38 When You Cannot Make Network Settings on page 205 Making Wi Fi Direct Simple AP Connection Settings...

Page 37: ...ame TCP IP setup proxy server and so on Check your network environment before making changes 1 Select Settings on the home screen 2 Select General Settings Network Settings Advanced 3 Select the menu item for settings and then select or specify the setting values Related Information Setting Items for Advanced Network Settings on page 37 Setting Items for Advanced Network Settings Select the menu i...

Page 38: ...rver address directly Proxy Server Do Not Use Select when you are using the printer in a home network environment Use Select when you are using a proxy server in your network environment and you want to set it to the printer Enter the proxy server address and port number IPv6 Address Enable Select this when using an IPv6 address Disable Select this when using an IPv4 address Link Speed Duplex Sele...

Page 39: ...tus 3 To check the information select the menus that you want to check Wired LAN Wi Fi Status Displays the network information device name connection signal strength and so on for Ethernet or Wi Fi connections Wi Fi Direct Status Displays whether Wi Fi Direct is enabled or disabled and the SSID password and so on for Wi Fi Direct connections Print Status Sheet Prints a network status sheet The inf...

Page 40: ...network connection report and then follow the printed solutions 6 Tap Close Related Information Messages and Solutions on the Network Connection Report on page 40 Messages and Solutions on the Network Connection Report Check the messages and error codes on the network connection report and then follow the solutions a Error code b Messages on the Network Environment User s Guide Network Settings 40...

Page 41: ... Network Status part on the network connection report If an wireless router has multiple SSIDs select the SSID that is displayed When the SSID is using a non compliant frequency the printer does not display them If you are using push button setup to establish a network connection make sure your wireless router supports WPS You cannot use push button setup if your wireless router does not support W...

Page 42: ... PSK TKIP AES WPA TKIP AES WPA2 TKIP AES WPA PSK is also known as WPA Personal WPA2 PSK is also known as WPA2 Personal E 6 Solutions Check if MAC address filtering is disabled If it is enabled register the printer s MAC address so that it is not filtered See the documentation provided with the wireless router for details You can check the printer s MAC address from the Network Status part on the n...

Page 43: ...s by downloading and running the installer from the following website http epson sn Setup Related Information Connecting to a Computer on page 23 E 10 Solutions Check the following Other devices on the network are turned on Network addresses IP address subnet mask and default gateway are correct if you have set the printer s Obtain IP Address to Manual Reset the network address if they are incorre...

Page 44: ...e correct if you are entering them manually The network addresses for other devices subnet mask and default gateway are the same The IP address does not conflict with other devices If still does not connect your printer and network devices after confirming the above try the following Turn off the wireless router Wait for about 10 seconds and then turn it on Make network settings again using the in...

Page 45: ...nvironment needs to be improved Turn the wireless router off and then turn it on If the connection does not improve see the documentation for the wireless router After moving the printer closer to the wireless router and removing any obstacles between them turn off the wireless router Wait for about 10 seconds and then turn it on If it still does not connect see the documentation supplied with the...

Page 46: ...rmation Changing the Connection Method to a Computer on page 46 Changing the Connection Method to a Computer Using the installer and re set up in a different connection method Setting up from the website Access the following website and then enter the product name Go to Setup and then start setting up http epson sn Setting up using the software disc only for the models that come with a software di...

Page 47: ...elect Settings on the home screen 2 Select General Settings Network Settings Wired LAN Setup 3 Tap Start Setup 4 Check the message and then close the screen The screen automatically closes after a specific length of time 5 Connect the printer to a router using an Ethernet cable Changing the Wi Fi Direct Simple AP Settings When Wi Fi Direct simple AP connection is enabled you can change the setting...

Page 48: ...AP settings of the printer When disabling it all devices connected to the printer in Wi Fi Direct Simple AP connection are disconnected Restoring Wi Fi Direct simple AP settings Restore all Wi Fi Direct simple AP settings to their defaults The Wi Fi Direct simple AP connection information of the smart device saved to the printer is deleted Note You can also set up from the Network tab Wi Fi Direct...

Page 49: ...rmation is displayed 3 Tap Change Settings 4 Select Disable Wi Fi Direct 5 Tap the Disable the settings 6 When a completion message is displayed close the screen The screen automatically closes after a specific length of time 7 Close the Network Connection Settings screen Restoring the Network Settings from the Control Panel You can restore all network settings to their defaults 1 Select Settings ...

Page 50: ...rmal print quality settings are available Although some printer drivers allow you to select a better print quality the printouts are printed using Standard or Normal Paper suitable for printing documents Media Name Size Loading Capacity Sheets 2 Sided Printing Paper Cassette Rear Paper Feed Slot Epson Bright White Ink Jet Paper A4 200 1 Paper suitable for printing documents and photos Media Name S...

Page 51: ...86 to 215 9 1200 1 User Defined mm 2 182x257 to 215 9 297 1 1 1 Paper on which information such as the sender s name or corporation name are pre printed in the header There must be a margin of 3 mm or more at the top of the paper 2 sided printing is not available for letterhead paper 2 Only printing from computer is available Thick papers Media Name Size Loading Capacity Sheets 2 Sided Printing Pa...

Page 52: ...fan or curl photo paper Doing so may damage the printable side If the paper is curled flatten it or curl it slightly in the opposite direction before loading Printing on curled paper may cause paper jams and smears on the printout Do not use paper that is wavy torn cut folded damp too thick too thin or paper that has stickers stuck to it Using these types of paper causes paper jams and smears on t...

Page 53: ...er Cassette 1 Open the paper cassette cover until it clicks 2 Check that the printer is not operating and then slide out the paper cassette cImportant The paper cassette cannot be removed User s Guide Preparing the Printer 53 ...

Page 54: ...ith the printable side facing down load paper until it touches the back of the paper cassette cImportant Do not load more than the maximum number of sheets specified for the paper 8 5 x 13 in Load paper using the line User s Guide Preparing the Printer 54 ...

Page 55: ...ype settings screen by selecting Settings General Settings Printer Settings Paper Source Settings Paper Setting For letterhead paper select Letterhead as the paper type For letterhead paper if you print on paper that is smaller than the setting in the printer driver the printer may print beyond the edges of the paper which can lead to ink smears on your printouts and excess ink building up inside ...

Page 56: ...r Related Information Paper Handling Precautions on page 52 Available Paper and Capacities on page 50 List of Paper Type on page 59 Loading Envelopes and Precautions on page 58 Loading Paper in the Rear Paper Feed Slot 1 Slide out the edge guides 2 Load a single sheet of paper at the center of the rear paper feed slot with the printable side facing up User s Guide Preparing the Printer 56 ...

Page 57: ... bottom Adjust the print position of your file to avoid printing over the holes 3 Slide the edge guides to the edges of the paper 4 When you load thick paper or business card size paper lower the output switch lever to output the paper to the front of the printer User s Guide Preparing the Printer 57 ...

Page 58: ...ect paper size setting 2 sided printing is not available for letterhead paper Also the print speed may be slower Related Information Paper Handling Precautions on page 52 Available Paper and Capacities on page 50 Loading Envelopes and Precautions on page 58 Loading Envelopes and Precautions Load envelopes in the center of the rear paper feed slot short edge first with the flap facing down and slid...

Page 59: ...To obtain optimum printing results select the paper type that suits the paper Media Name Media Type Control Panel Printer Driver Epson Bright White Ink Jet Paper Plain paper Plain paper Epson Matte Paper Heavyweight Epson Double Sided Matte Paper Matte Epson Matte Epson Photo Quality Ink Jet Paper Photo Quality IJ Epson Photo Quality Ink Jet Outputting Paper Printed paper is ejected to the output ...

Page 60: ...ns for media that can be placed in the ADF it may not feed from the ADF or the scan quality may decline depending on the paper properties or quality cImportant Do not feed photographs or valuable original artwork into the ADF Misfeeding may wrinkle or damage the original Scan these documents on the scanner glass instead To prevent paper jams avoid placing the following originals in the ADF For the...

Page 61: ... of the originals 2 Open the ADF input tray 3 Pinch and slide out the ADF edge guide 4 Place the originals face up and short edge first in the ADF and then slide the ADF edge guide to the edge of the originals User s Guide Preparing the Printer 61 ...

Page 62: ...Select Landscape on the control panel as described below Copy Advanced Settings Original Orientation Landscape Place the originals on the ADF in the direction of the arrow Portrait originals Select Portrait on the control panel as described below Copy Advanced Settings Original Orientation Portrait Place the originals on the ADF in the direction of the arrow Placing Originals on the Scanner Glass ...

Page 63: ... Note If there is any trash or dirt on the scanner glass the scanning range may expand to include it so the image of the original may be displaced or reduced 3 Place the original face down and slide it to the corner mark Note A range of 1 5 mm from the corner of the scanner glass is not scanned When originals are placed in the ADF and on the scanner glass priority is given to the originals in the ...

Page 64: ...diting Contacts 1 Select Fax on the home screen 2 Select Contacts 3 Do one of the following To register a new contact select Add Entry and then select Add Contact To edit a contact select on the target contact and then select Edit To delete a contact select on the target contact and then select Delete and then select Yes You do not have to perform following procedures 4 Make the necessary settings...

Page 65: ...have to perform following procedures 4 Enter or edit the Group Name and the Index Word and then select Contact s Added to the Group Required 5 Select the contacts that you want to register in the group and then tap Close Note You can register up to 99 contacts To deselect a contact tap it again 6 Tap OK Related Information Entering Characters on page 20 Register Contacts on a Computer Using Web Co...

Page 66: ...g 0 9 and space Fax Speed Select a communication speed for a destination Registering Destinations as a Group 1 Access Web Config 2 Select Advanced Settings from the list at the top right of the window 3 Select Contacts 4 Select the number that you want to register and then click Edit 5 Enter a Name and Index Word 6 Select a group from Type 7 Click Select for Contact s for Group The available desti...

Page 67: ...ing to turn the printer off automatically when it is not used for a specified period of time You can adjust the time before power management is applied Any increase will affect the product s energy efficiency Please consider the environment before making any change Power Off Settings Your product may have this feature or the Power Off Timer feature depending on the location of purchase Power Off I...

Page 68: ...racters on page 20 Printer Settings Select the menus on the control panel as described below Settings General Settings Printer Settings Paper Source Settings Paper Setting Select the paper size and paper type you loaded in the paper source You can make Favorite Paper Settings in paper size and paper type A4 Letter Auto Switching Select On to feed paper from the paper source set as A4 size when the...

Page 69: ...ing This prevents printing beyond the edges of the paper when the paper size setting is incorrect but this may lower the print speed Skip Blank Page Skips blank pages in the print data automatically PDL Print Configuration Select the PDL Print Configuration options you want to use for PCL printing Common Settings Paper Size Select the default paper size for PCL printing Paper Type Select the defau...

Page 70: ...ont number settings Symbol Set Select the default symbol set If the font that you selected in the font source and the font number setting is not available in the new symbol set setting the font source and the font number settings are automatically replaced with the default value IBM US Form Set the number of lines for the selected paper size and orientation This also causes a line spacing VMI chan...

Page 71: ...ting and scanning that is not sent over a network connection is restricted USB I F Timeout Setting Specify the length of time in seconds that must elapse before ending USB communication with a computer after the printer receives a print job from a PCL printer driver If the job ending is not clearly defined from a PCL printer driver it can cause endless USB communication When this occurs the printe...

Page 72: ...page 36 Printing a Network Connection Report on page 39 Checking the Network Connection Status on page 38 Changing the Network Connection to Ethernet from the Control Panel on page 47 Making Advanced Network Settings on page 37 Web Service Settings Select the menus on the control panel as described below Settings General Settings Web Service Settings Epson Connect Services Displays whether the pri...

Page 73: ... Options for Fax Settings on page 87 Menu Options for Maintenance Select the menus on the control panel as described below Settings Maintenance Print Head Nozzle Check Select this feature to check if the print head nozzles are clogged The printer prints a nozzle check pattern Print Head Cleaning Select this feature to clean clogged nozzles in the print head Power Cleaning Select this feature to re...

Page 74: ...ning on page 167 Power Cleaning the Print Head Power Cleaning on page 168 Aligning the Print Head on page 170 Refilling the Ink Tank on page 159 Cleaning the Paper Path for Ink Smears on page 170 Menu Options for Print Status Sheet Select the menus on the control panel as described below Settings Print Status Sheet Configuration Status Sheet Print information sheets showing the current printer sta...

Page 75: ...efault settings of the following menus Copy Scan to Computer Scan to Cloud Fax Menu Options for Clear Internal Memory Data Select the menus on the control panel as described below Settings Clear Internal Memory Data When you give the printer to someone else or dispose of it make sure you delete the printer s internal memory such as PDL Fonts Macros and Working Areas Menu Options for Restore Defaul...

Page 76: ...management is applied Any increase will affect the product s energy efficiency Please consider the environment before making any change Depending on the location of purchase the printer may have a feature that turns it off automatically if it is not connected to the network for 30 minutes Saving Power Control Panel 1 Select Settings on the home screen 2 Select General Settings Basic Settings 3 Do ...

Page 77: ...idually for Printer s Fax Features on page 82 Menu Options for Fax Settings on page 87 Network Settings on page 22 Managing Contacts on page 64 Menu Options for User Settings on page 75 Report Settings Menu on page 89 Connecting to a Phone Line Compatible Telephone Lines You can use the printer over standard analogue telephone lines PSTN Public Switched Telephone Network and PBX Private Branch Exc...

Page 78: ... of the printer only when connecting your telephone to the printer Do not remove the cap if you are not connecting your telephone In areas where lightning strikes occur frequently we recommend that you use a surge protector Connecting to a Standard Phone Line PSTN or PBX Connect a phone cable from the telephone wall jack or PBX port to the LINE port on the back of the printer Connecting to DSL or ...

Page 79: ...ne to the printer Note If your phone device has a fax function disable the fax function before connecting See the manuals that came with the phone device for details If you connect an answering machine make sure the printer s Rings to Answer setting is set higher than the number of rings your answering machine is set to answer a call 1 Remove the cap from the EXT port on the back of the printer Us...

Page 80: ...ter do not work correctly 3 Select Fax on the home screen 4 Pick up the handset The connection is established when x Send is enabled as the following screen Related Information Making the Printer Ready to Send and Receive Faxes Using Fax Setting Wizard on page 81 Making Settings to Use an Answering Machine on page 84 Making Settings to Receive Faxes Operating Only a Connected Phone Remote Receive ...

Page 81: ...1 Make sure the printer is connected to the phone line Note Because an automatic fax connection check runs at the end of the wizard the printer must be connected to the phone line before starting the wizard 2 Select Settings on the home screen on the printer s control panel 3 Select General Settings Fax Settings Fax Setting Wizard 4 Check the message on the screen displayed and then selectProceed ...

Page 82: ...d when the screen prompts you to print the check result select Print A report of the check result that shows the connection status is printed Note If there are any errors reported follow the instructions on the report to solve them If the Select Line Type screen is displayed select the line type When you are connecting the printer to a PBX phone system or terminal adapter select PBX When you are c...

Page 83: ...Select Fax on the printer s home screen select Send Receive Receive and then tap x Next hang up the handset If the ringing is for a voice call You can answer the phone as normal Receiving Faxes Using only a Connected Telephone When Remote Receive is set you can receive faxes by simply entering the Start Code When the telephone rings pick up the handset When you hear a fax tone baud dial the two di...

Page 84: ...for the answering machine Otherwise the answering machine cannot receive voice calls to record voice messages For details on setting up the answering machine see the manual supplied with the answering machine Related Information Making Settings to Use an Answering Machine on page 84 Usage of Manual Mode on page 83 Making Settings When You Connect an External Phone Device Making Settings to Use an ...

Page 85: ... for Blocking Junk Faxes You can block junk faxes 1 Select Settings on the home screen on the printer s control panel 2 Select General Settings Fax Settings Basic Settings Rejection Fax 3 Set the condition to block junk faxes Select Rejection Fax and then enable the following options Rejection Number List Rejects faxes that are in the Rejection Number List Fax Header Blank Rejects faxes that have ...

Page 86: ...ed in the Inbox Reject incoming faxes The printer does not answer incoming fax calls 7 You can set a password for the inbox Select Inbox Password Settings and then set the password Note You cannot set a password when Options when memory is full is set to Receive and print faxes Related Information Fax Output Settings Menu on page 88 Making Settings to Send and Receive Faxes on a Computer To send a...

Page 87: ...en unsaved to the computer the feature does not work 1 Select Settings on the home screen on the printer s control panel 2 Select General Settings Fax Settings Receive Settings 3 Select Fax Output Settings Save to Computer No Related Information Fax Output Settings Menu on page 88 Menu Options for Fax Settings Selecting Settings Fax Settings from the printer s control panel displays this menu Chec...

Page 88: ...always be possible depending on the received data If this is turned off large documents are printed at their original size on multiple sheets or a blank second page may be ejected Split Page Settings Prints received faxes with the page split when the size of the received documents is larger than the size of the paper loaded in the printer Auto Rotation Rotates faxes received as landscape orientate...

Page 89: ...s even before the restart time Time to Stop Stops printing documents Time to Restart Restarts printing documents automatically Quiet Mode Reduces the noise the printer makes when printing faxes however print speed may be reduced Report Settings Menu You can find the menu on the printer s control panel below Settings General Settings Fax Settings Report Settings Item Description Fax Log Auto Print ...

Page 90: ... the code to in Contacts Header Enter your sender name and fax number These appear as a header on outgoing faxes Your Phone Number You can enter up to 20 characters using 0 9 or space Fax Header You can register up to 21 sender names as necessary You can enter up to 40 characters for each sender name Receive Mode Select the receive mode For details see the related Information below DRD If you have...

Page 91: ...Selecting Enter Twice requires the operator to enter the fax number again when the number was manually entered Selecting Off enables manual entry of the recipient s fax numbers Confirm Address List Selecting On displays a recipient confirmation screen before starting the transmission Backup Data Auto Clear Selecting On automatically erases the backups when sending or receiving a document completes...

Page 92: ...art button and select Control Panel Printers in Hardware and Sound Right click on your printer and select Printing preferences Windows XP Windows Server 2003 R2 Windows Server 2003 Click the start button and select Control Panel Printers and Other Hardware Printers and Faxes Right click on your printer and select Printing preferences Accessing the printer driver from the printer icon on the task b...

Page 93: ...Right clicking an item displays Help When you select Print Preview you can see a preview of your document before printing 6 Click OK to close the printer driver window 7 Click Print Note When you select Print Preview a preview window is displayed To change the settings click Cancel and then repeat the procedure from step 2 Related Information Available Paper and Capacities on page 50 Loading Paper...

Page 94: ...ies on page 50 Print Settings 1 On the printer driver s Main tab select an option from 2 Sided Printing 2 Click Settings make the appropriate settings and then click OK Make settings for Print Density if necessary Note To print a folded booklet select Booklet When setting Print Density you can adjust print density according to the document type Printing may be slow depending on the combination of ...

Page 95: ...ng Related Information Printing Basics on page 92 Main Tab on page 107 Printing and Stacking in Page Order Reverse Order Printing You can print from the last page so that documents are stacked in page order for outputting paper to the front of the printer Print Settings On the printer driver s Main tab select Reverse Order Related Information Printing Basics on page 92 User s Guide Printing 95 ...

Page 96: ...you want to print on from the Output Paper setting Select Reduce Enlarge Document and then select Fit to Page or Zoom to When you select Zoom to enter a percentage Select Center to print the images in the center of the page Related Information Printing Basics on page 92 More Options Tab on page 107 Printing One Image on Multiple Sheets for Enlargement Creating a Poster This feature allows you to p...

Page 97: ... select the cutting guide options Related Information Printing Basics on page 92 Main Tab on page 107 Making Posters Using Overlapping Alignment Marks Here is an example of how to make a poster when 2x2 Poster is selected and Overlapping Alignment Marks is selected in Print Cutting Guides The actual guides are printed in monochrome but for this explanation they are shown as blue and red lines User...

Page 98: ... of Sheet 1 along the vertical blue line through the center of the top and bottom cross marks 2 Place the edge of Sheet 1 on top of Sheet 2 and align the cross marks then temporarily tape the two sheets together from the back User s Guide Printing 98 ...

Page 99: ...along the vertical red line through the alignment markers this time the line to the left of the cross marks 4 Tape the sheets together from the back 5 Repeat steps 1 to 4 to tape Sheet 3 and Sheet 4 together User s Guide Printing 99 ...

Page 100: ... horizontal blue line through the center of the left and right side cross marks 7 Place the edge of Sheet 1 and Sheet 2 on top of Sheet 3 and Sheet 4 and align the cross marks and then temporarily tape them together from the back User s Guide Printing 100 ...

Page 101: ...8 Cut the taped sheets in two along the horizontal red line through the alignment markers this time the line above the cross marks 9 Tape the sheets together from the back User s Guide Printing 101 ...

Page 102: ...oter You can print information such as a user name and printing date in headers or footers Print Settings On the printer driver s More Options tab click Watermark Features and then select Header Footer Click Settings and then select the items you want to print User s Guide Printing 102 ...

Page 103: ...ting Not selected Tone Correction Automatic Note You can also add your own watermark or anti copy pattern Print Settings On the printer driver s More Options tab click Watermark Features and then select Anti Copy Pattern or Watermark Click Settings to change details such as the size density or position of the pattern or the mark Related Information Printing Basics on page 92 More Options Tab on pa...

Page 104: ...n of the saved files is ecl To open a Print Project click Job Arranger Lite on the printer driver s Maintenance tab to open the Job Arranger Lite window Next select Open from the File menu to select the file Related Information Printing Basics on page 92 Main Tab on page 107 Adjusting the Print Tone You can adjust the tone used in the print job These adjustments are not applied to the original dat...

Page 105: ...rmation Printing Basics on page 92 More Options Tab on page 107 Printing to Enhance Light Text and Lines You can enhance light letters and lines to make them more visible or to sharpen images Print Settings On the printer driver s More Options tab click Image Options in the Tone Correction setting Select Enhance Light Text and Lines Related Information Printing Basics on page 92 More Options Tab o...

Page 106: ...ion Printing Basics on page 92 Maintenance Tab on page 108 Canceling Printing You can cancel a print job from the computer However you cannot cancel a print job from the computer once it has been completely sent to the printer In this case cancel the print job by using the printer s control panel Canceling On your computer right click on your printer in Devices and Printers Printer or in Printers ...

Page 107: ...e and the binding margins When printing multi page documents you can select to print starting from either the front or the back side of the page Print Density Select the document type to adjust the print density If the appropriate print density is selected you can prevent images from bleeding through to the reverse side Select User Defined to adjust the print density manually Multi Page Allows you...

Page 108: ... perform manual tone correction Click Advanced for further settings Image Options Enables print quality options such as Emphasize Text You can also thicken thin lines to make them visible on the printouts Watermark Features Allows you to make settings for anti copy pattern or watermarks Additional Settings Rotate 180 Rotates pages 180 degrees before printing This feature is helpful when printing o...

Page 109: ...s waiting to be printed You can check pause or resume print jobs Printer and Option Information Displays the number of sheets of paper fed into the printer or the ADF Language Changes the language used on the printer driver window To apply the settings close the printer driver and then open it again Software Update Starts EPSON Software Updater to check for the latest version of applications on th...

Page 110: ...rs or Print Scan Print Fax remove the printer and then add the printer again See the following to add a printer http epson sn 5 Change the settings as necessary See the menu options for the printer driver for details 6 Click Print Related Information Available Paper and Capacities on page 50 Loading Paper in the Paper Cassette on page 53 List of Paper Type on page 59 Menu Options for Print Setting...

Page 111: ...Printing Settings from the pop up menu Select the method of 2 sided printing and then make the Document Type settings Note Printing speed may be reduced depending on the document type When printing photos with dense data select Text Graphics or Text Photos in the Document Type setting If the printouts are smeared or ink bleeds through to the other side of the paper adjust the Print Density and Inc...

Page 112: ...page order and Border Related Information Printing Basics on page 109 Menu Options for Layout on page 114 Printing and Stacking in Page Order Reverse Order Printing You can print from the last page so that documents are stacked in page order for outputting paper to the front of the printer Print Settings Select Paper Handling from the pop up menu Select Reverse as the Page Order setting User s Gui...

Page 113: ...ting at a specific percentage do one of the following Select Print from the File menu of the application Select Printer enter a percentage in Scale and then click Print Select Page Setup from the File menu of the application Select your printer in Format For enter a percentage in Scale and then click OK Note Select the paper size you set in the application as the Paper Size setting Related Informa...

Page 114: ...ees before printing Select this item when printing on paper such as envelopes that are loaded in fixed direction in the printer Flip horizontally Inverts an image to print as it would appear in a mirror Menu Options for Color Matching ColorSync Select the method for color adjustment These options adjusts colors between the printer and the computer display to minimize the difference in color EPSON ...

Page 115: ...Two sided Printing Prints on both sides of the paper Making Operation Settings for the Mac OS Printer Driver Accessing the Operation Settings Window of the Mac OS Printer Driver Select System Preferences from the menu Printers Scanners or Print Scan Print Fax and then select the printer Click Options Supplies Options or Driver Operation Settings for Mac OS Printer Driver Skip Blank Page Avoids pri...

Page 116: ...e Epson Connect service If you start Epson iPrint when the printer is not connected to the network a message is displayed instructing you to connect to the printer Follow the instructions to complete the connection See the URL below for the operating conditions http epson sn Related Information Printing Using a Network Service on page 189 Installing Epson iPrint You can install Epson iPrint on you...

Page 117: ...gs such as paper size and paper type G Displays the paper size When this is displayed as a button tap it to display the paper settings currently set on the printer H Displays photos and documents you selected I Starts printing Note To print from the document menu using iPhone iPad and iPod touch running iOS start Epson iPrint after transferring the document you want to print using the file sharing...

Page 118: ...n Loading Paper in the Paper Cassette on page 53 Connecting to a Smart Device on page 24 Using AirPrint AirPrint enables instant wireless printing from iPhone iPad and iPod touch with the latest version of iOS and Mac with the latest version of OS X or macOS Note If you disabled paper configuration messages on your product control panel you cannot use AirPrint See the link below to enable the mess...

Page 119: ...nformation Loading Paper in the Paper Cassette on page 53 Printer Settings on page 68 Canceling the Ongoing Job Tap y on the printer s control panel to cancel the print job in progress User s Guide Printing 119 ...

Page 120: ...ngs you require is not available is displayed Select the icon to check the details and then change the settings 4 Enter the number of copies 5 Tap x Related Information Placing Originals on page 60 Basic Menu Options for Copying on page 121 Advanced Menu Options for Copying on page 121 Copying on 2 Sides You can copy multiple originals on both sides of the paper 1 Select Copy on the home screen 2 ...

Page 121: ... Sided Select 2 sided layout 1 1 Sided Copies one side of an original onto a single side of paper 1 2 Sided Copies two single sided originals onto both sides of a single sheet of paper Select the orientation of your original and the binding position of the paper Density Increase the level of density when the copying results are faint Decrease the level of density when ink smears ID Card Copy Scans...

Page 122: ...ins around the original the white margins from the corner mark of the scanner glass are detected as the scan area but the margins at the opposite side may be cropped Original Size Select the size of your original When copying non standard size originals select the size closest to your original Multi Page Single Page Copies a single sided original onto a single sheet 2 up Copies two single sided or...

Page 123: ...nal Orientation Select the orientation of your original Remove Shadow Removes shadows that appear around copies when copying thick paper or that appear in the center of copies when copying a booklet Remove Punch Holes Removes the binding holes when copying Clear All Settings Resets the copy settings to their defaults User s Guide Copying 123 ...

Page 124: ...ge 128 Scanning Using WSD on page 130 Scanning to a Computer Event Manager Note Before scanning install Epson Scan 2 and Epson Event Manager on your computer 1 Place the originals 2 Select Scan on the home screen 3 Select Computer 4 Select to select the computer to which you want to save the scanned images Note When the printer is connected to a network you can select the computer to which you wan...

Page 125: ...t 6 Tap x Related Information Placing Originals on page 60 Making Custom Settings in Epson Event Manager You can set the scan settings for Follow custom setting in Epson Event Manager See the Epson Event Manager help for details 1 Start Epson Event Manager 2 Make sure that your scanner is selected as the Scanner on the Button Settings tab on the main screen User s Guide Scanning 125 ...

Page 126: ...3 Click Make Job Settings User s Guide Scanning 126 ...

Page 127: ... such as the resolution or the color for saving the scanned image Target Folder Select the save folder for the scanned image Filename Prefix Start Number Change the settings for the file name you want to save File Format Select the save format Launch Action Select the action when scanning Test Settings Starts test scanning using current settings 5 Click OK to return to the main screen User s Guide...

Page 128: ... portal website for details https www epsonconnect com http www epsonconnect eu Europe only 1 Make sure that you have made settings using Epson Connect 2 Place the originals 3 Select Scan on the home screen 4 Select Cloud 5 Select on the top of the screen and then select a destination 6 Set items on Scan tab such as the save format 7 Select Advanced Settings tab and then check settings and change ...

Page 129: ...anning select Auto Cropping To scan at the maximum area of the scanner glass select Max Area Original Orientation Select the orientation of the original Original Type Select the type of your original Density Select the contrast of the scanned image Remove Shadow Remove the shadows of the original that appear in the scanned image Surround Remove the shadows at the edge of the original Center Remove...

Page 130: ...D 4 Select a computer 5 Tap x 6 Follow the on screen instructions on your computer Setting Up a WSD Port This section explains how to set up a WSD port for Windows 7 Windows Vista Note For Windows 10 Windows 8 1 Windows 8 the WSD port is set up automatically The following is necessary to set up a WSD port The printer and the computer are connected to the network The printer driver is installed on ...

Page 131: ...he network screen You can check the printer s name set on the network from the printer s control panel or by printing a network status sheet 4 Click Your device is ready to use 5 Check the message and then click Close 6 Open the Devices and Printers screen Windows 7 Click start Control Panel Hardware and Sound or Hardware Devices and Printers User s Guide Scanning 131 ...

Page 132: ...n scan using the scanner driver Epson Scan 2 You can scan originals using detailed settings that are suitable for text documents See the Epson Scan 2 help for an explanation of each setting item 1 Place the original Note If you want to scan multiple originals place them in the ADF 2 Start Epson Scan 2 3 Make the following settings on the Main Settings tab Document Source Select the source where th...

Page 133: ...Background Remove the background of the originals Text Enhancement You can make blurred letters in the original clear and sharp Auto Area Segmentation You can make letters clear and images smooth when performing black and white scanning for a document that contains images Color Enhance You can enhance the color specified for the scanned image and then save it in grayscale or black and white Thresh...

Page 134: ... Confirm the save file name displayed You can change settings for the file name by selecting Settings from the list Folder Select the save folder for the scanned image from the list You can select another folder or create a new folder by selecting Select from the list 6 Click Scan Related Information Placing Originals on page 60 Application for Scanning Documents and Images Epson Scan 2 on page 18...

Page 135: ...network as your printer You can save the scanned data on a smart device or to Cloud services send it by email or print it Installing Epson iPrint You can install Epson iPrint on your smart device from the following URL or QR code http ipr to c Scanning Using Epson iPrint Start Epson iPrint from your smart device and select the item you want to use from the home screen User s Guide Scanning 135 ...

Page 136: ...ou have selected the printer you do not need to select it again from the next time D Displays the scanning screen E Displays the screen where you can make scan settings such as resolution F Displays scanned images G Starts scanning H Displays the screen where you can save scanned data to a smart device or Cloud services I Displays the screen where you can send scanned data by email J Displays the ...

Page 137: ...omatically Using the Control Panel on page 137 Sending Faxes Automatically Using the Control Panel You can send faxes by entering fax numbers for recipients on the control panel Note When sending a fax in monochrome you can preview the scanned image on the LCD screen before sending 1 Place the originals You can send up to 100 pages in one transmission however depending on the remaining amount of m...

Page 138: ...nd the sending method as necessary 5 Send the fax To send without checking the scanned document image Tap x To scan check the scanned document image and then send when sending a fax in monochrome only Select Preview on the fax top screen To send the fax as is select Start Sending Otherwise select Cancel and then go to step 3 Moves the screen in the direction of the arrows Reduces or enlarges Moves...

Page 139: ...nd sending simultaneously While sending the fax you cannot use the other features 6 When sending is complete remove the originals Related Information Placing Originals on page 60 Fax Settings on page 146 Various Ways of Sending Faxes Related Information Sending Many Pages of a Monochrome Document Direct Send on page 139 Sending Faxes at a Specified Time Send Fax Later on page 140 Sending Different...

Page 140: ...tings You can also make settings such as the resolution and the sending method as necessary 7 Send the fax Note You cannot send another fax until the fax has been sent at the specified time If you want to send another one you need to cancel the scheduled fax by selecting Fax on the home screen and then deleting it Related Information Placing Originals on page 60 Sending Faxes Automatically Using t...

Page 141: ... Originals on page 60 Sending Faxes Automatically Using the Control Panel on page 137 Fax Settings on page 146 Receiving Faxes on the Printer If the printer is connected to the phone line and basic settings have been completed using the Fax Setting Wizard you can receive faxes There are two ways of receiving faxes Receiving an incoming fax Receiving a fax by making a call Polling Receive Received ...

Page 142: ...ord voice messages When you pick up the handset within the number of rings set in Rings to Answer If the ringing is for a fax You can receive the fax using the same steps as for Manual Select Fax on the home screen and then select Send Receive Receive Next select x and then hang up the handset If the ringing is for a voice call You can answer the phone as normal When the ringing stops and the prin...

Page 143: ...eiving Faxes by Polling Polling Receive You can receive a fax stored on another fax machine by dialing the fax number Use this feature to receive a document from a fax information service However if the fax information service has an audio guidance feature that you need to follow to receive a document you cannot use this feature Note To receive a document from a fax information service that uses a...

Page 144: ...he Inbox You can set to save received faxes in the printer s inbox Up to 100 documents can be saved If you use this feature received documents are not automatically printed You can view them on the printer s LCD screen and print only when needed Note Saving 100 documents may not be possible depending on the usage conditions such as the file size of saved documents and using of multiple fax saving ...

Page 145: ... follow the on screen instructions cImportant If the printer runs out of memory receiving and sending faxes is disabled Delete documents that you have already read or printed Related Information Menu Options for Fax Settings on page 87 Using Other Faxing Features Printing Fax Report Manually 1 Select Fax on the home screen 2 Tap More 3 Select Fax Report 4 Select the report you want to print and th...

Page 146: ...r of the original document and removes or lightens the color Depending on the darkness and vividness of the color it may not be removed or lightened Sharpness Enhances or defocuses the outline of the image enhances the sharpness and defocuses the sharpness ADF Continuous Scan Sending faxes by placing originals one by one or by placing originals by size you can send them as one document at their or...

Page 147: ...a transmission report after you send the fax Print on Error prints a report only when an error occurs Related Information Sending Many Pages of a Monochrome Document Direct Send on page 139 Sending Faxes at a Specified Time Send Fax Later on page 140 Sending Different Size Documents Using ADF ADF Continuous Scan on page 140 More Selecting in Fax on the home screen displays the More menu Transmissi...

Page 148: ... tapping this icon When there are received faxes that have not been read the number of unread documents is displayed on the Sending a Fax from a Computer You can send faxes from the computer by using the FAX Utility and PC FAX driver Note To install the FAX Utility use the EPSON Software Updater See Related Information below for details For Windows users you can install using the software disc sup...

Page 149: ...nformation is displayed Enter the necessary information and then click OK FAX Utility uses Nickname to manage fax jobs internally Other information is automatically added to the cover sheet Recipient Settings screen of FAX Utility is displayed 6 Specify a recipient and click Next Selecting a recipient name fax number and so on from PC FAX Phone Book If the recipient is saved in the phone book do t...

Page 150: ...f you want to change the order of the items on the cover sheet You can select the cover sheet size in Paper Size You can also select a cover sheet at a different size to the document being transmitted CClick Font if you want to change the font or font size used for the text on the cover sheet D Click Sender Settings if you want to change the sender information E Click Detailed Preview if you want ...

Page 151: ...e PC FAX driver s help 6 Select the Recipient Settings menu and then specify the recipient Specifying a recipient name fax number and so on directly Click the Add item enter the necessary information and then click The recipient is added to the Recipient List displayed in the upper part of the window If you have selected Enter fax number twice in the PC FAX driver settings you need to enter the sa...

Page 152: ...d with your printer Windows users Only cImportant To receive faxes on a computer the Receive Mode on the printer s control panel must be set to Auto If your organization has a printer administrator contact your administrator for information on the printer setting status See Related Information below to make settings The computer set to receive faxes should always be on Received documents are saved...

Page 153: ...lso change the settings on the printer See Related Information below to change settings Related Information Making Save to Computer Setting not to Receive Faxes on page 87 Application for Configuring Fax Operations and Sending Faxes FAX Utility on page 183 Checking for New Faxes Windows By setting up a computer to save faxes received by the printer you can check the processing status of received f...

Page 154: ...axes opens Check the date and the sender in the file name and then open the PDF file Note Received faxes are automatically renamed using the following naming format YYYYMMDDHHMMSS_xxxxxxxxxx_nnnnn Year Month Day Hour Minute Second_sender s number Checking for New Faxes Mac OS You can check for new faxes using one of the following methods This is available only on computers set to Save save faxes o...

Page 155: ...es are automatically renamed using the following naming format YYYYMMDDHHMMSS_xxxxxxxxxx_nnnnn Year Month Day Hour Minute Second_sender s number Information sent from the sender is displayed as the sender s number This number may not be displayed depending on the sender User s Guide Faxing 155 ...

Page 156: ...nance box Checking the Status of the Remaining Ink and the Maintenance Box Windows 1 Access the printer driver window 2 Click EPSON Status Monitor 3 on the Maintenance tab Note If EPSON Status Monitor 3 is disabled click Extended Settings on the Maintenance tab and then select Enable EPSON Status Monitor 3 Related Information Accessing the Printer Driver on page 92 Checking the Status of the Remai...

Page 157: ... location For the correct codes in your area contact Epson support Although the ink bottles may contain recycled materials this does not affect printer function or performance Specifications and appearance of the ink bottle are subject to change without prior notice for improvement For Europe Product BK Black ET M3180 111 M3180 110 1 110S 2 1 High capacity 2 Standard capacity Note For users in Eur...

Page 158: ...e handled carefully Ink may splatter when the ink tank is being filled or refilled with ink If ink gets on your clothes or belongings it may not come off Use ink bottles with the correct part code for this printer Do not shake too vigorously or squeeze the ink bottles For optimum print results do not maintain low ink levels for extended periods of time To obtain optimum printing results refill the...

Page 159: ...s 1 Select Maintenance on the home screen 2 Select Reset Ink Level 3 Open the ink tank cover A message is displayed on the printer s control panel prompting you to refill the ink tank to the upper line 4 Open the ink tank cap User s Guide Refilling Ink and Replacing Maintenance Boxes 159 ...

Page 160: ...removing the cap otherwise you may be smeared with ink 6 Align the tip of the bottle with the filling port and then stand the bottle slowly to insert it into the filling port cImportant Do not allow the top of the ink bottle to hit against any objects after removing its cap otherwise ink may spill User s Guide Refilling Ink and Replacing Maintenance Boxes 160 ...

Page 161: ...tle normally without squeezing The ink flow stops automatically when the ink is filled to the upper line cImportant Do not leave the ink bottle inserted otherwise the bottle may be damaged or ink may leak 8 Tighten the cap of the ink bottle Note If any ink remains in the ink bottle tighten the cap and store the bottle upright for later use User s Guide Refilling Ink and Replacing Maintenance Boxes...

Page 162: ...ng at its best fill ink tank up to the upper line and reset the ink level immediately Related Information Ink Bottle Codes on page 157 Ink Bottle Handling Precautions on page 158 Ink Spilled on page 227 Maintenance Box Code The maintenance box can be purchased and replaced by the user Epson recommends the use of a genuine Epson maintenance box The following is the code for the genuine Epson mainte...

Page 163: ... box out of direct sunlight Do not store the maintenance box in high or freezing temperatures Replacing a Maintenance Box In some print cycles a very small amount of surplus ink may be collected in the maintenance box To prevent ink leakage from the maintenance box the printer is designed to stop printing when the absorbing capacity of the maintenance box has reached its limit Whether and how ofte...

Page 164: ...ozzles ink outlets to clog In these cases turn the printer on and off again as soon as possible to cap the print head Check if Nozzles are Clogged Nozzle Check If the nozzles are clogged the printouts become faint or visible banding appears When print quality has declined first use the nozzle check feature to check if the nozzles are clogged Check if Nozzles are Clogged Nozzle Check Control Panel ...

Page 165: ...logged Nozzle Check Windows 1 Load A4 size plain paper in the paper cassette 2 Access the printer driver window 3 Click Nozzle Check on the Maintenance tab 4 Follow the on screen instructions to print the nozzle check pattern 5 Examine the printed pattern and then perform one of the following options depending on the print results A All lines are printed No further steps are needed B or close to B...

Page 166: ...zle check pattern 6 Examine the printed pattern and then perform one of the following options depending on the print results A All lines are printed No further steps are needed B or close to B Clean the print head When some nozzles are clogged perform head cleaning For details see the related information below C or close to C Power Clean the print head When most lines are broken or most segments a...

Page 167: ... head from drying out do not unplug the printer while the power is on Cleaning the Print Head Control Panel 1 Select Maintenance on the home screen 2 Select Print Head Cleaning 3 Follow the on screen instructions After the print head cleaning is finished run Nozzle Check and then check if the print head nozzles have been un clogged For details on how to run the nozzle check see the related informa...

Page 168: ...ut print quality still did not improve Before running this feature use the nozzle check feature to check if the nozzles are clogged read the following instructions and then power clean the print head cImportant Make sure that there is enough ink in the ink tank Visually check the ink tank is at least a third full Low ink levels during Power Cleaning could damage the product cImportant An interval ...

Page 169: ...ower Cleaning the Print Head Power Cleaning on page 168 Check if Nozzles are Clogged Nozzle Check on page 164 Running Power Cleaning Windows 1 Access the printer driver window 2 Click Power Cleaning on the Maintenance tab 3 Follow the on screen instructions Note If you cannot run this feature solve the problems that are displayed on the printer s control panel Next follow this procedure from step ...

Page 170: ...tenance on the home screen 2 Select Print Head Alignment 3 Select the adjustment menu you want to adjust to improve the printouts according to the status of the print results Vertical lines look misaligned or the printouts look blurry Select Vertical Alignment Horizontal banding occurs at regular intervals Select Horizontal Alignment 4 Follow the on screen instructions Related Information Loading ...

Page 171: ...not smeared with ink Related Information Loading Paper in the Paper Cassette on page 53 Cleaning the Paper Path for Paper Feeding Problems When paper is not fed from paper cassette correctly clean the roller inside 1 Turn off the printer by pressing the P button 2 Unplug the power cord and then disconnect the power cord 3 Make sure that the ink tank cap is securely closed cImportant If the ink tan...

Page 172: ...ttom Caution Be careful not to trap your hand or fingers when standing the printer Otherwise you may be injured cImportant Do not leave the printer standing for a long time 7 Dampen a soft cloth with water wring it out thoroughly and then wipe the roller while rotating it with the cloth User s Guide Maintaining the Printer 172 ...

Page 173: ...inals do not feed in the ADF correctly clean the ADF cImportant Never use alcohol or thinner to clean the printer These chemicals can damage the printer 1 Open the ADF cover 2 Use a soft moist cloth to clean the roller and the interior of the ADF cImportant Using a dry cloth may damage the surface of the roller Use the ADF after the roller has dried User s Guide Maintaining the Printer 173 ...

Page 174: ...ined with grease or some other hard to remove material use a small amount of glass cleaner and a soft cloth to remove it Wipe off all remaining liquid Do not press the glass surface too hard Be careful not to scratch or damage the surface of the glass A damaged glass surface can decrease the scan quality User s Guide Maintaining the Printer 174 ...

Page 175: ...illustration Cleaning the Scanner Glass When the copies or scanned images are smeared clean the scanner glass Caution Be careful not to trap your hand or fingers when opening or closing the document cover Otherwise you may be injured cImportant Never use alcohol or thinner to clean the printer These chemicals can damage the printer User s Guide Maintaining the Printer 175 ...

Page 176: ...rface of the glass A damaged glass surface can decrease the scan quality Cleaning the Translucent Film When the printout is not improved after aligning the print head or cleaning the paper path the translucent film inside the printer may be smeared Items required Cotton swabs several Water with a few drops of detergent 2 to 3 drops of detergent in 1 4 cup of tap water Light for checking smears cIm...

Page 177: ...e are smears such as finger marks or grease on the translucent film A go to the next step A Translucent film B Rail cImportant Be careful not to touch the rail B Otherwise you may not be able to print Do not wipe off the grease on the rail because this is necessary for operations User s Guide Maintaining the Printer 177 ...

Page 178: ...uently replace the cotton swab with a new one 6 Repeat steps 4 and 5 until the film is not smeared 7 Visually check that the film is not smeared Checking the Total Number of Pages Fed Through the Printer You can check the total number of pages fed through the printer Checking the Total Number of Pages Fed Through the Printer Control Panel The information is printed together with the nozzle check p...

Page 179: ...rmation on the Maintenance tab Related Information Accessing the Printer Driver on page 92 Checking the Total Number of Pages Fed Through the Printer Mac OS 1 Select System Preferences from the menu Printers Scanners or Print Scan Print Fax and then select the printer 2 Click Options Supplies Utility Open Printer Utility 3 Click Printer and Option Information User s Guide Maintaining the Printer 1...

Page 180: ...ows XP SP3 or later Microsoft Edge Internet Explorer 8 or later Firefox Chrome Mac OS X v10 6 8 or later Safari Firefox Chrome iOS Safari Android 2 3 or later Default browser Chrome OS Default browser Use the latest version Running Web Config on a Web Browser 1 Check the printer s IP address Select the network icon on the printer s home screen and then select the active connection method to confir...

Page 181: ...dows Server 2008 R2 Click the start button and select Control Panel View devices and printers in Hardware and Sound Windows Vista Windows Server 2008 Click the start button and select Control Panel Printers in Hardware and Sound 2 Right click on your printer and select Properties 3 Select the Web Service tab and click the URL Running Web Config on Mac OS 1 Select System Preferences from the menu P...

Page 182: ...age 132 Installing the Latest Applications on page 186 Adding the Network Scanner Before using Epson Scan 2 you need to add the network scanner 1 Start the software and then click Add on the Scanner Settings screen Note If Add is grayed out click Enable Editing If the main screen of Epson Scan 2 is displayed it has already been connected to the scanner If you want to connect to another network sel...

Page 183: ...ation Installing the Latest Applications on page 186 Application for Configuring Fax Operations and Sending Faxes FAX Utility FAX Utility is an application that allows you to configure various settings for sending faxes from a computer You can create or edit the contacts list to be used when sending a fax configure to save received faxes in PDF format on the computer and so on See the application ...

Page 184: ...int or Print Setup from the File menu Select your printer FAX and then click Preferences or Properties Accessing from Mac OS In the application select Print from the File menu Select your printer FAX as the Printer setting and then select Fax Settings or Recipient Settings from the pop up menu Related Information Sending a Fax from a Computer on page 148 Application for Configuring Fax Operations ...

Page 185: ...1 Windows 8 Enter the application name in the search charm and then select the displayed icon Windows 7 Windows Vista Windows XP Click the start button and then select All Programs or Programs Epson Software EPSON Software Updater Note You can also start EPSON Software Updater by clicking the printer icon on the task bar on the desktop and then selecting Software Update Starting on Mac OS Select G...

Page 186: ...Net Config Installing the Latest Applications Note When reinstalling an application you need to uninstall it first 1 Make sure the printer and the computer are available for communication and the printer is connected to the Internet 2 Start EPSON Software Updater The screenshot is an example on Windows 3 For Windows select your printer and then click to check for the latest available applications ...

Page 187: ...ssage is displayed on the LCD screen informing you that a firmware update is available follow the on screen instructions to start the update cImportant Do not turn off or unplug the printer until the update is complete otherwise the printer may malfunction If the firmware update is not completed or is unsuccessful the printer does not start up normally and Recovery Mode is displayed on the LCD scr...

Page 188: ...er driver if there is any print jobs Delete or wait to be printed the jobs before uninstalling 6 Uninstall the applications Windows 10 Windows 8 1 Windows 8 Windows 7 Windows Vista Windows Server 2016 Windows Server 2012 R2 Windows Server 2012 Windows Server 2008 R2 Windows Server 2008 Click Uninstall Change or Uninstall Windows XP Windows Server 2003 R2 Windows Server 2003 Click Change Remove or ...

Page 189: ...service you need to register the user and the printer in Epson Connect The features available on the Internet are as follows Email Print When you send an email with attachments such as documents or images to an email address assigned to the printer you can print that email and the attachments from remote locations such as your home or office printer Epson iPrint This Application is for iOS and And...

Page 190: ...splayed set the Dial Tone Detection settings to disabled However disabling this feature may drop the first digit of a fax number and send the fax to the wrong number The combination of the IP address and the subnet mask is invalid See your documentation for more details Enter the correct IP address or default gateway Contact the person who setup the network for assistance To use cloud services upd...

Page 191: ...tatus Monitor 3 Related Information Accessing the Printer Driver on page 92 Checking the Printer Status Mac OS 1 Select System Preferences from the menu Printers Scanners or Print Scan Print Fax and then select the printer 2 Click Options Supplies Utility Open Printer Utility 3 Click EPSON Status Monitor You can check the printer status ink levels and error status Checking the Software Status You ...

Page 192: ...turning it upside down otherwise ink may leak Removing Jammed Paper from the Front Cover Caution Never touch the buttons on the control panel while your hand is inside the printer If the printer starts operating it could cause an injury Be careful not to touch the protruding parts to avoid injury 1 Open the front cover 2 Lower the output switch lever User s Guide Solving Problems 192 ...

Page 193: ...er Removing Jammed Paper from the Rear Paper Feed Slot Remove the jammed paper Removing Jammed Paper from Inside the Printer Caution Never touch the buttons on the control panel while your hand is inside the printer If the printer starts operating it could cause an injury Be careful not to touch the protruding parts to avoid injury User s Guide Solving Problems 193 ...

Page 194: ...it to the top 2 Remove the jammed paper cImportant Do not touch the white flat cable translucent film and ink tubes inside the printer Doing so may cause a malfunction If you touch the translucent film make sure you clean it User s Guide Solving Problems 194 ...

Page 195: ...3 Close the printer cover until it clicks Removing Jammed Paper from Rear Cover 1 Remove the rear cover 2 Remove the jammed paper User s Guide Solving Problems 195 ...

Page 196: ...3 Remove jammed paper from the rear cover 4 Insert the rear cover in the printer Removing Jammed Paper from the ADF 1 Open the ADF cover 2 Remove the jammed paper User s Guide Solving Problems 196 ...

Page 197: ...3 Raise the ADF input tray cImportant Make sure that you open the ADF cover before raising the ADF input tray Otherwise the ADF may be damaged 4 Remove the jammed paper User s Guide Solving Problems 197 ...

Page 198: ...a flat surface and operate in the recommended environmental conditions Use paper supported by this printer Follow the paper handling precautions Do not load more than the maximum number of sheets specified for the paper Make sure the paper size and paper type settings match the actual paper size and paper type loaded in the printer Clean the roller inside the printer User s Guide Solving Problems ...

Page 199: ... edges of the paper Related Information Loading Paper in the Paper Cassette on page 53 Ejected Paper Falls from the Output Tray If ejected paper falls from the output tray slide out the stopper to prevent the paper from falling Paper is Ejected During Printing When you load letterhead paper paper on which information such as the sender s name or corporation name are pre printed in the header selec...

Page 200: ...n the P button for a little longer Power Does Not Turn Off Hold down the P button for a little longer If you still cannot turn off the printer unplug the power cord To prevent the print head from drying out turn the printer back on and turn it off by pressing the P button Power Turns Off Automatically Select Settings General Settings Basic Settings Power Off Settings and then disable the Power Off...

Page 201: ...thod to a computer See the related information link below for details Related Information Changing the Connection Method to a Computer on page 46 Checking the Connection Network When you have changed your wireless router or provider try making network settings for the printer again Connect the computer or smart device to the same SSID as the printer Turn off the devices you want to connect to the ...

Page 202: ...ormation link below for details If you are printing a large data size image the computer may run out of memory Print the image at a lower resolution or a smaller size Related Information Checking for Genuine Epson Printer Drivers on page 202 Installing the Latest Applications on page 186 Checking for Genuine Epson Printer Drivers You can check if a genuine Epson printer driver is installed on your...

Page 203: ...m Preferences from the menu Printers Scanners or Print Scan Print Fax and then select the printer Click Options Supplies and if the Options tab and Utility tab are displayed on the window a genuine Epson printer driver is installed on your computer Related Information Installing the Latest Applications on page 186 User s Guide Solving Problems 203 ...

Page 204: ... devices and printers Printers Printers and Faxes see the following to select the icon Example USB connection EPSON XXXX Series Network connection EPSON XXXX Series network If you install the printer driver multiple times copies of printer driver may be created If copies such as EPSON XXXX Series copy 1 are created right click the copied driver icon and then click Remove Device Make sure the print...

Page 205: ...then follow the printed solutions Related Information Printing a Network Connection Report on page 39 Messages and Solutions on the Network Connection Report on page 40 Cannot Connect from Devices Even Though Network Settings are No Problems If you cannot connect from the computer or smart device to the printer even though the network connection report does not show any problems see the following ...

Page 206: ...or smart device to a 5 GHz SSID you cannot connect to the printer because the printer only supports communication over 2 4 GHz Connect the computer or smart device to the same SSID as the printer Most wireless routers have a privacy separator feature that blocks communication between connected devices If you cannot communicate between the printer and the computer or smart device even if they are c...

Page 207: ... SSID Connected to the Printer Select Settings General Settings Network Settings Network Status You can check the SSID for Wi Fi and Wi Fi Direct from each menu Checking the SSID for the Computer Windows Click in the task tray on the desktop Check the name of the connected SSID from the list displayed User s Guide Solving Problems 207 ...

Page 208: ... the steps below to disable IEEE802 3az for the printer and then connect 1 Remove the Ethernet cable connected to the computer and the printer 2 When IEEE802 3az for the computer is enabled disable it See the documentation provided with the computer for details 3 Connect the computer and the printer with an Ethernet cable directly 4 On the printer print a network connection report 5 Check the prin...

Page 209: ...mart Device on page 24 Application for Configuring Printer Operations Web Config on page 180 Printout Problems Printout is Scuffed or Color is Missing If you have not used the printer for a long time the print head nozzles may be clogged and ink drops may not be discharged Perform a nozzle check and then clean the print head if any of the print head nozzles are clogged If you printed when the ink ...

Page 210: ...f Nozzles are Clogged Nozzle Check on page 164 Colored Banding Appears at Intervals of Approximately 3 3 cm Select the appropriate paper type setting for the type of paper loaded in the printer Align the print head using the Horizontal Alignment feature When printing on plain paper print using a higher quality setting Related Information List of Paper Type on page 59 Aligning the Print Head on pag...

Page 211: ...f any of the print head nozzles are clogged Align the print head Checking the paper Use paper supported by this printer Do not print on paper that is damp damaged or too old If the paper is curled or the envelope is puffed up flatten it Do not stack the paper immediately after printing Dry the printouts completely before filing or displaying them When drying the printouts avoid direct sun light do...

Page 212: ...the ink bottle before the date printed on the package Try to use genuine Epson ink bottles This product is designed to adjust colors based on the use of genuine Epson ink bottles The use of non genuine ink bottles may cause print quality to decline Related Information Check if Nozzles are Clogged Nozzle Check on page 164 Aligning the Print Head on page 170 Available Paper and Capacities on page 50...

Page 213: ...photo paper you need to clean the paper path Related Information Cleaning the Paper Path for Ink Smears on page 170 The Position Size or Margins of the Printout Are Incorrect Load paper in the correct direction and slide the edge guides against the edges of the paper When placing the originals on the scanner glass align the corner of the original with the corner indicated by a symbol on the frame ...

Page 214: ...ion Windows Clear Mirror Image on the printer driver s More Options tab Mac OS Clear Mirror Image from the print dialog s Print Settings menu Mosaic Like Patterns in the Prints When printing images or photos print using high resolution data Images on websites are often low resolution although they look good enough on the display and so print quality may decline Uneven Colors Smears Dots or Straigh...

Page 215: ...d the problem try uninstalling and then reinstalling the printer driver Related Information Uninstalling Applications on page 187 Installing the Latest Applications on page 186 Other Printing Problems Printing Is Too Slow Close any unnecessary applications Lower the quality setting High quality printing slows down the printing speed Enable the bidirectional or high speed setting When this setting ...

Page 216: ...ing in AirPrint Setup Select System Preferences from the menu Printers Scanners or Print Scan Print Fax remove the printer and then add the printer again Cannot Start Scanning If you are scanning with the ADF check that the document cover and ADF cover are closed Connect the USB cable securely to the printer and the computer If you are using a USB hub try to connect the printer directly to the com...

Page 217: ...ect Control Panel Printers and Other Hardware Scanner and Cameras and then check if the printer is displayed Related Information Uninstalling Applications on page 187 Installing the Latest Applications on page 186 Scanned Image Problems Uneven Colors Dirt Spots and so on Appear when Scanning from the Scanner Glass Clean the scanner glass Remove any trash or dirt that adheres to the original Do not...

Page 218: ...n Text Enhancement When scanning from the scanner glass place black paper or a desk pad over the original Related Information Scanning Using Epson Scan 2 on page 132 Placing Originals on page 60 Text is Blurred In Epson Scan 2 select the Advanced Settings tab and then Image Option Text Enhancement In Epson Scan 2 when Image Type on the Main Settings tab is set to Black White adjust the Threshold o...

Page 219: ... set correctly on the Text tab Check that the original is placed straight Use an original with clear text Text recognition may decline for the following types of originals Originals that have been copied a number of times Originals received by fax at low resolutions Originals on which the letter spacing or line spacing is too small Originals with ruled lines or underlining over the text Originals ...

Page 220: ...tility 2 Select the Other tab 3 Click Reset Note If initialization does not solve the problem uninstall and re install Epson Scan 2 Related Information Uninstalling Applications on page 187 Installing the Latest Applications on page 186 Other Scanning Problems Scanning Is Too Slow Lower the resolution Scanning Stops when Scanning to PDF Multi TIFF When scanning using Epson Scan 2 you can continuou...

Page 221: ...ble the ECM setting on the control panel Color faxes cannot be sent when ECM is off To send or receive faxes using the computer make sure that the printer is connected using a USB cable or a network and that the PC FAX Driver have been installed on the computer The PC FAX Driver is installed together with FAX Utility In Windows make sure the printer fax is displayed in Devices and Printers Printer...

Page 222: ...the recipient if the fax number is correct and the recipient s fax machine is ready to receive a fax Related Information Basic Settings Menu on page 89 Cannot Send or Receive Faxes on page 221 Cannot Send Faxes to a Specific Recipient Check the following if you cannot send faxes to a specific recipient due to an error If the recipient machine does not pick up your call within 50 seconds after the ...

Page 223: ...ed when Fax Header Blank in Rejection Fax is enabled Check if the sender s fax number is registered in the contacts list Faxes sent from numbers that have not been registered to this list are blocked when Unregistered Contacts in Rejection Fax is enabled Related Information Basic Settings Menu on page 89 Cannot Send or Receive Faxes on page 221 Memory Full Error Occurs on page 223 Memory Full Erro...

Page 224: ...ize When sending a fax using the scanner glass place the original correctly aligning its corner with the origin mark Select your original size on the control panel Clean the scanner glass and the document cover If there is dust or stains on the glass the scanning area may extend to include the dust or stains resulting in the wrong scanning position or small images Related Information Fax Settings ...

Page 225: ...in Delete Print Data After Split and then adjust Threshold Increasing the threshold increases the amount deleted a higher threshold gives you a higher possibility of printing on one page Related Information Print Settings Menu on page 88 Other Faxing Problems Cannot Make Calls on the Connected Telephone Connect the telephone to the EXT port on the printer and pick up the receiver If you cannot hea...

Page 226: ... to open the Configuration window Next set the Quiet Mode on the Scan tab The Date and Time Are Incorrect Set the date and the time correctly on the control panel After a power failure caused by a lightning strike or if the power is left off for a long time the clock may show the wrong time Related Information Basic Settings Menu on page 89 Application Is Blocked by a Firewall for Windows Only Add...

Page 227: ...s clean cloth or cotton swab If ink spills on the desk or floor wipe it off immediately When ink is dried it will be difficult to remove the smear To prevent the smear from spreading blot the ink with a dry cloth and then wipe it with a moist cloth If ink gets on your hands wash them with water and soap User s Guide Solving Problems 227 ...

Page 228: ...eed in the printer or the print quality may decline depending on the paper properties or quality Printable Area Printable Area for Single Sheets Print quality may decline in the shaded areas due to the printer s mechanism A 3 0 mm 0 12 in B 3 0 mm 0 12 in C 46 0 mm 1 81 in D 44 0 mm 1 73 in Printable Area for Envelopes Print quality may decline in the shaded areas due to the printer s mechanism A ...

Page 229: ...per pixel per color internal 24 bits per pixel external 8 bits per pixel per color external Grayscale 16 bits per pixel internal 8 bits per pixel external Black and white 16 bits per pixel internal 1 bits per pixel external Light Source LED Interface Specifications For Computer Hi Speed USB Fax Specifications Fax Type Walk up black and white and color fax capability ITU T Super Group 3 1 Supported...

Page 230: ... Telephone set connection 1 Black and White only for receiving faxes 2 The specifications may differ by country or region Network Function List Network Functions and IPv4 IPv6 Functions Supported Remarks Network Printing EpsonNet Print Windows IPv4 Standard TCP IP Windows IPv4 IPv6 WSD Printing Windows IPv4 IPv6 Windows Vista or later Bonjour Printing Mac OS IPv4 IPv6 IPP Printing Windows Mac OS I...

Page 231: ...curities 4 WEP 64 128bit WPA2 PSK AES 5 1 IEEE802 11n is only available for the HT20 2 Not supported for IEEE 802 11b 3 Simple AP mode is compatible with a Wi Fi connection infrastructure or an Ethernet connection 4 Wi Fi Direct supports WPA2 PSK AES only 5 Complies with WPA2 standards with support for WPA WPA2 Personal Ethernet Specifications Standards IEEE802 3i 10BASE T 1 IEEE802 3u 100BASE TX ...

Page 232: ...nting Width 375 mm 14 8 in Depth 347 mm 13 7 in Height 346 mm 13 6 in Weight Approx 7 3 kg 16 1 lb Without the ink and the power cord Electrical Specifications Model 100 to 240 V Model 220 to 240 V Model Rated Frequency Range 50 to 60 Hz 50 to 60 Hz Rated Current 0 5 to 0 2 A 0 3 A Power Consumption with USB Con nection Standalone copying Approx 12 0 W ISO IEC24712 Ready mode Approx 5 7 W Sleep mo...

Page 233: ...ure 15 C 5 F Ink thaws and is usable after approximately 2 hours at 25 C 77 F You can store for one month at 40 C 104 F System Requirements Windows 10 32 bit 64 bit Windows 8 1 32 bit 64 bit Windows 8 32 bit 64 bit Windows 7 32 bit 64 bit Windows Vista 32 bit 64 bit Windows XP SP3 or later 32 bit Windows XP Professional x64 Edition SP2 or later Windows Server 2016 Windows Server 2012 R2 Windows Se...

Page 234: ...dium Bold Italic Antique Olive 3 Garamond Antiqua Halbfett Kursiv Kursiv Halbfett Garamond 3 Mauritius Marigold 3 Algiers Medium Extra Bold Albertus 3 NimbusSansNo2 Medium Bold Italic Bold Italic Arial 3 Nimbus Roman No9 Medium Bold Italic Bold Italic Times New 3 Nimbus Sans Medium Bold Oblique Bold Oblique Helvetica 3 Nimbus Sans Narrow Medium Bold Oblique Bold Oblique Helvetica Narrow 3 Palladio...

Page 235: ... or color of the paper OCR A OCR B Code39 and EAN UPC fonts may not be readable Print a sample and make sure the fonts can be read before printing large quantities List of Symbol Sets Your printer can access a variety of symbol sets Many of these symbol sets differ only in the international characters specific to each language When you are considering which font to use you should also consider whi...

Page 236: ...E Italian 0I ECM94 1 0N Swedis2 0S ANSI ASCII 0U UK 1E French2 1F German 1G Legal 1U 8859 2 ISO 2N Spanish 2S ISO 8859 4 Latin 4 4N Roman 9 4U PsMath 5M 8859 9 ISO 5N WiTurkish 5T MsPublishin 6J VeMath 6M 8859 10ISO 6N DeskTop 7J Math 8 8M Roman 8 8U WiE Europe 9E Pc1004 9J 8859 15ISO 9N PcTk437 9T Windows 9U User s Guide Appendix 236 ...

Page 237: ...12U VeInternati 13J PcEur858 13U VeUS 14J PiFont 15U PcE Europe 17U Unicode 3 0 18N WiBALT 19L WiAnsi 19U PcBlt775 26U Pc866Cyr 3R Greek8 8G WinGrk 9G WinCyr 9R Pc851Grk 10G ISOCyr 10N Pc8Grk 12G ISOGrk 12N Pc866Ukr 14R Hebrew7 0H 8859 8 ISO 7H Hebrew8 8H Pc862Heb 15H PC 862 Hebrew 15Q Arabic8 8V HPWARA 9V User s Guide Appendix 237 ...

Page 238: ...ilure to satisfy the protection requirements resulting from a non recommended modification of the product Operation is subject to the following two conditions 1 this device may not cause harmful interference and 2 this device must accept any interference received including interference that may cause undesired operation of the device To prevent radio interference to the licensed service this devic...

Page 239: ...Epson cannot accept responsibility for any failure to satisfy the protection requirements resulting from a non recommended modification of the products Standards and Approvals for New Zealand Model General Warning The grant of a Telepermit for any item of terminal equipment indicates only that Telecom has accepted that the item complies with minimum conditions for connection to its network It indi...

Page 240: ...securities stock certificates negotiable notes checks etc monthly passes concession tickets etc Passports driver s licenses warrants of fitness road passes food stamps tickets etc Note Copying these items may also be prohibited by law Responsible use of copyrighted materials Printers can be misused by improperly copying copyrighted materials Unless acting on the advice of a knowledgeable attorney ...

Page 241: ...transporting an ink bottle do not tilt the bottle and do not subject it to impacts or temperature changes Otherwise ink may leak even if the cap on the ink bottle is tightened securely Be sure to keep the ink bottle upright when tightening the cap and take precautions to prevent ink from leaking when transporting the bottle for example putting the bottle in a bag Do not put opened ink bottles in t...

Page 242: ...o the home position causing the ink to dry and printing may become impossible 3 Disconnect all cables such as the power cord and USB cable 4 Remove all of the paper from the printer 5 Make sure there are no originals on the printer 6 Open the printer cover Secure the print head to the case with tape 7 Make sure to close the ink tank cap securely User s Guide Appendix 242 ...

Page 243: ...e sure you remove the tape securing the print head If print quality has declined the next time you print clean and align the print head Related Information Part Names and Functions on page 14 Check if Nozzles are Clogged Nozzle Check on page 164 Aligning the Print Head on page 170 Copyright No part of this publication may be reproduced stored in a retrieval system or transmitted in any form or by ...

Page 244: ... trademarks of Seiko Epson Corporation Copyright 2001 Seiko Epson Corporation All rights reserved Epson Scan 2 software is based in part on the work of the Independent JPEG Group libtiff Copyright 1988 1997 Sam Leffler Copyright 1991 1997 Silicon Graphics Inc Permission to use copy modify distribute and sell this software and its documentation for any purpose is hereby granted without fee provided...

Page 245: ...Corp registered in the U S Patent and Trademark Office and may be registered in certain other jurisdictions in the name of Linotype Corp or its licensee Linotype GmbH PCL is a trademark of Hewlett Packard Company Arcfour This code illustrates a sample implementation of the Arcfour algorithm Copyright April 29 1997 Kalle Kaukonen All Rights Reserved Redistribution and use in source and binary forms...

Page 246: ...d your product Epson support will be able to help you much more quickly if you give them the following information Product serial number The serial number label is usually on the back of the product Product model Product software version Click About Version Info or a similar button in the product software Brand and model of your computer Your computer operating system name and version Names and ve...

Page 247: ...ion of Product Epson recommends retaining product packaging for future transportation Securing the ink tank with tape and keeping the product upright is also recommended Help for Users in New Zealand Epson New Zealand wishes to provide you with a high level of customer service In addition to your product documentation we provide the following sources for obtaining information Internet URL http www...

Page 248: ...requently Asked Questions FAQs Latest versions of Epson product drivers Technical Support Hotline You can also contact our technical staff at the following telephone and fax numbers Phone 852 2827 8911 Fax 852 2827 4383 Help for Users in India Contacts for information support and services are World Wide Web http www epson co in Information on product specifications drivers for download and product...

Reviews: